Applicable Products
- HDP for Business
- HDP for Business Agent 1.0.0.1697 and later
- Windows 10 (64-bit, version 1607 or later), Windows 11
- Windows Server 2016 / 2019 / 2022 / 2025
Purpose
This tutorial shows you how to install HDP for Business Agent on a Windows computer, connect it to your Management Server with a Join Key, and confirm that the assigned backup policy is running.
Prerequisites
- HDP for Business is installed and initialized on a QNAP NAS that acts as the Management Server.
- A Backup Server and a protection policy are ready, so that you can bind them to a Join Key.
- The Windows computer runs a supported 64-bit operating system. ARM-based devices such as ARM64 Windows are not supported.
- The computer has internet access during the first installation. The installer automatically installs the .NET 10.0 runtime components that the agent requires. If the computer has no internet access, install these components manually first. See Note: Installing on a Computer Without Internet Access.
- NetBak PC Agent is not installed on the computer. The two products cannot coexist, and the installer asks you to remove the other product before it continues.
Procedure
Step 1: Create a Join Key on the Management Server
The Join Key defines which Backup Server and which policy the computer is bound to. The agent applies them automatically once it connects.
- In HDP for Business, go to Physical Device and click Add.
- Click Download Agent to download the installer, and copy the file to the Windows computer.
- Click Manage Join Key > Create.
- Select the Backup Server and the Policy to bind, then click Create.
- In the Join Key table, click Copy. The key is 64 alphanumeric characters long.
Step 2: Install the agent on the Windows computer
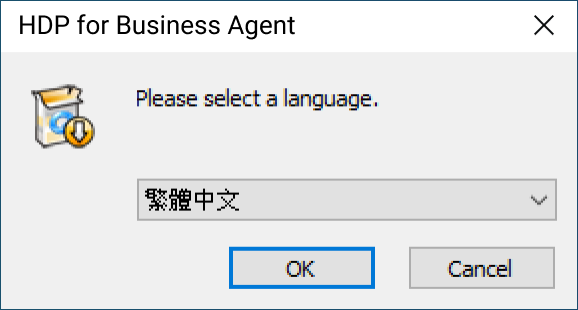
- Run the installer on the Windows computer.
- Select the installation language. Your system language is selected by default.
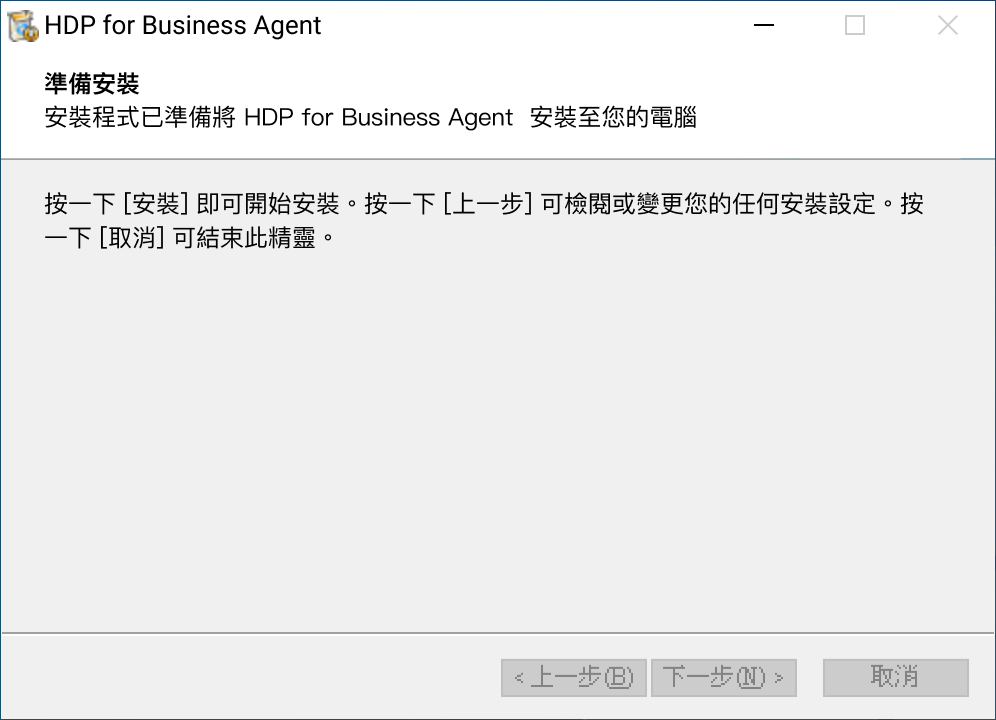
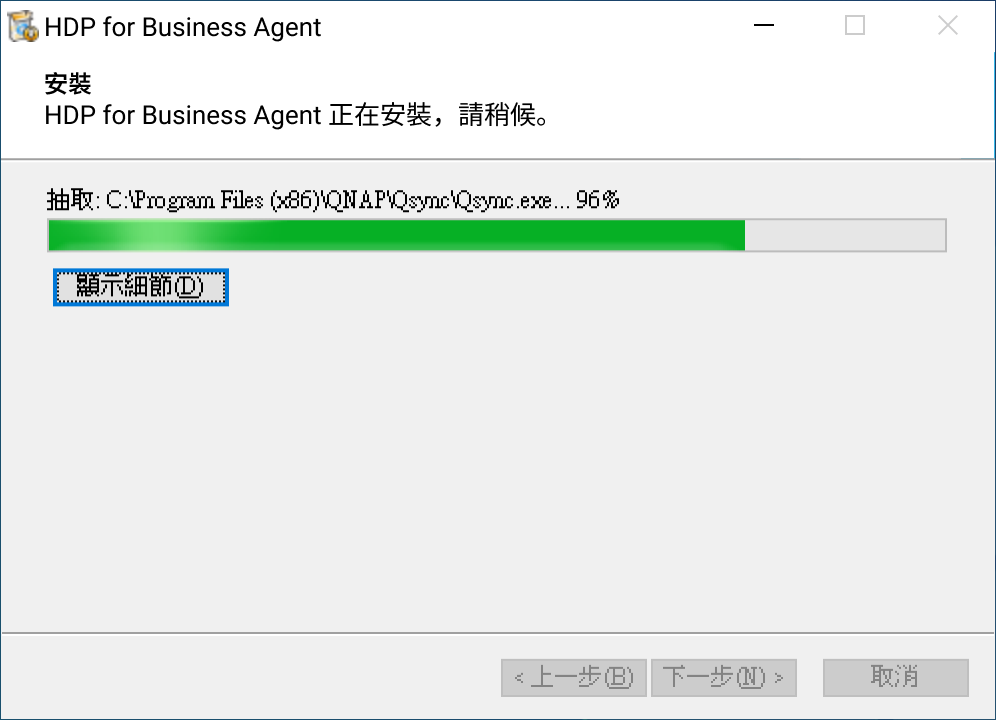
- Confirm that you want to install HDP for Business Agent, and wait for the files to be extracted to
C:\Program Files\QNAP. - When the installation finishes, keep the option to run the application selected, and close the installer.
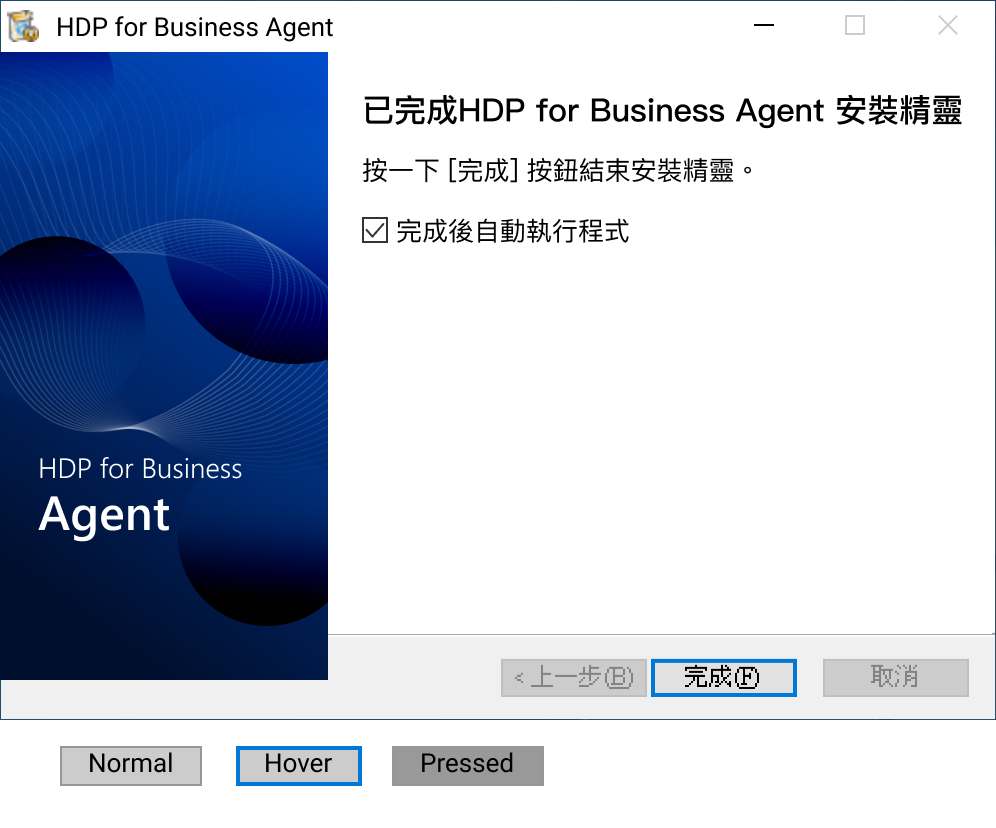
You can only upgrade an existing installation. Reinstalling the same version and downgrading to an earlier version are not supported.
Step 3: Connect to the Management Server
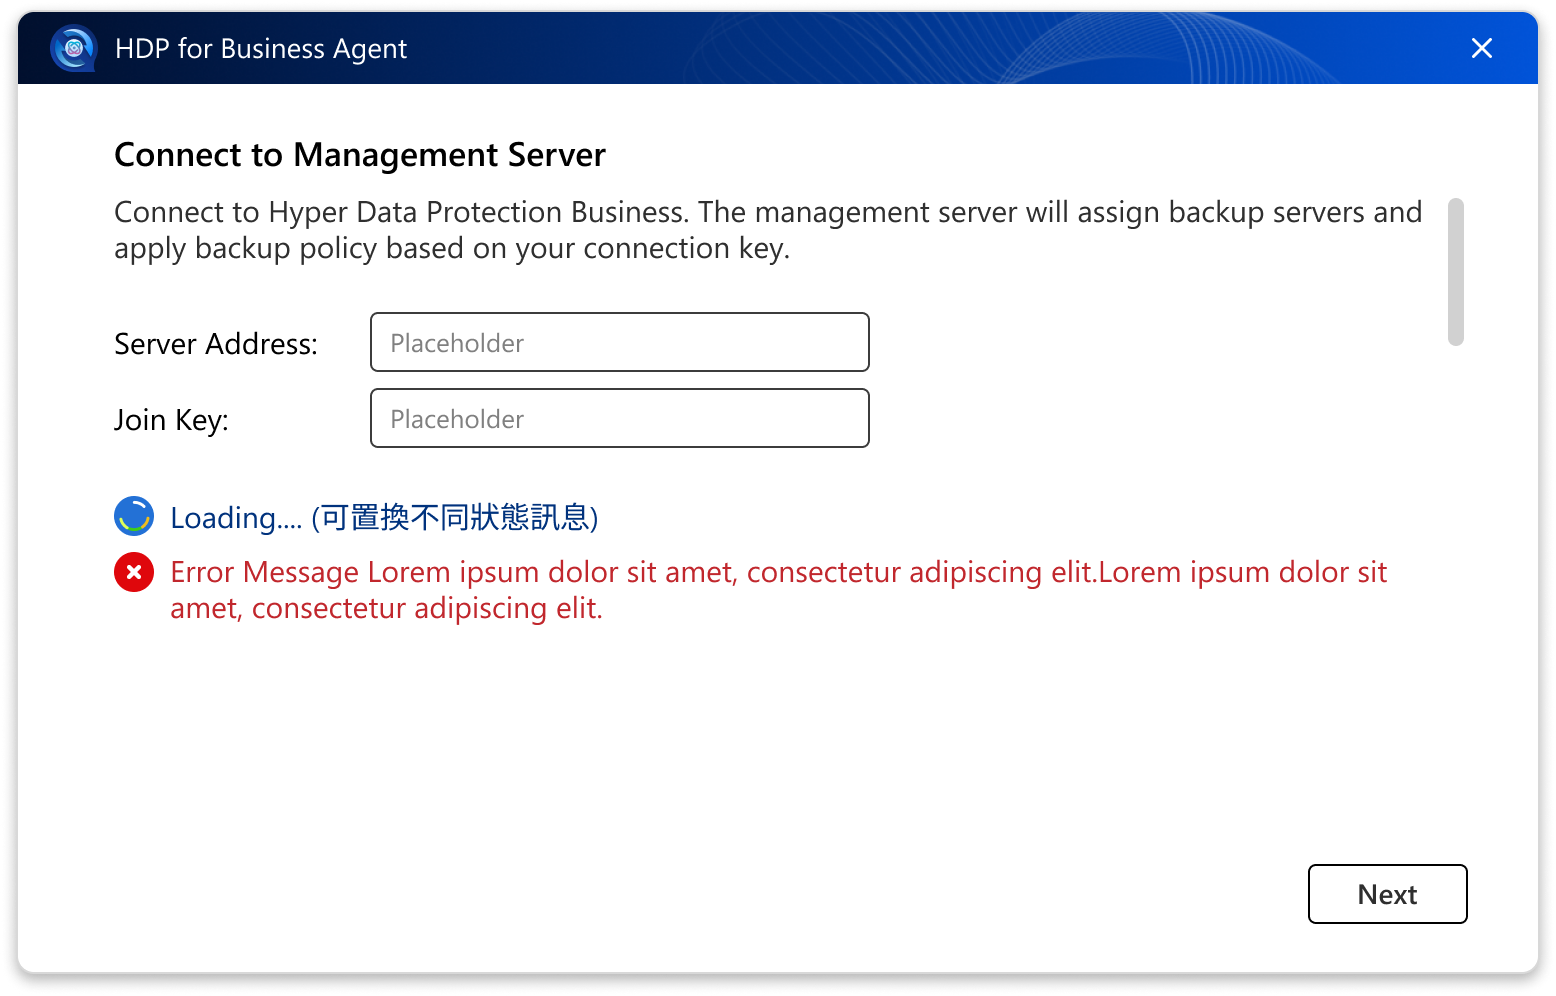
The agent opens the Connect to Management Server screen on its first run.
- In Server Address, enter the host name or IP address of the Management Server, with an optional port number, for example
nas-01, 10.77.216.185, or 10.77.216.185:11443. Do not include http:// or https://. - In Join Key, paste the key you copied in Step 1.
- Click Next.
- If a certificate confirmation window appears, click Continue.
Connecting over HTTPS
If you do not specify a port number, the agent tries HTTPS on port 443 first, and then HTTP on port 8080. QNAP NAS devices use a configurable HTTPS port that is often not 443, so to make sure the connection is encrypted, enter the HTTPS port of your NAS explicitly. To find the port, go to Control Panel > System > General Settings > Secure Connection (HTTPS).
Because most NAS devices use a self-signed certificate, the agent shows a certificate confirmation window when it connects over HTTPS. This is expected. Click Continue to proceed. Your choice also applies to the Backup Server that the agent connects to afterwards.
If you enter a Join Key that belongs to a Backup Server instead of a Management Server, the agent asks you to connect to the Management Server instead.
Step 4: Review the assigned policy
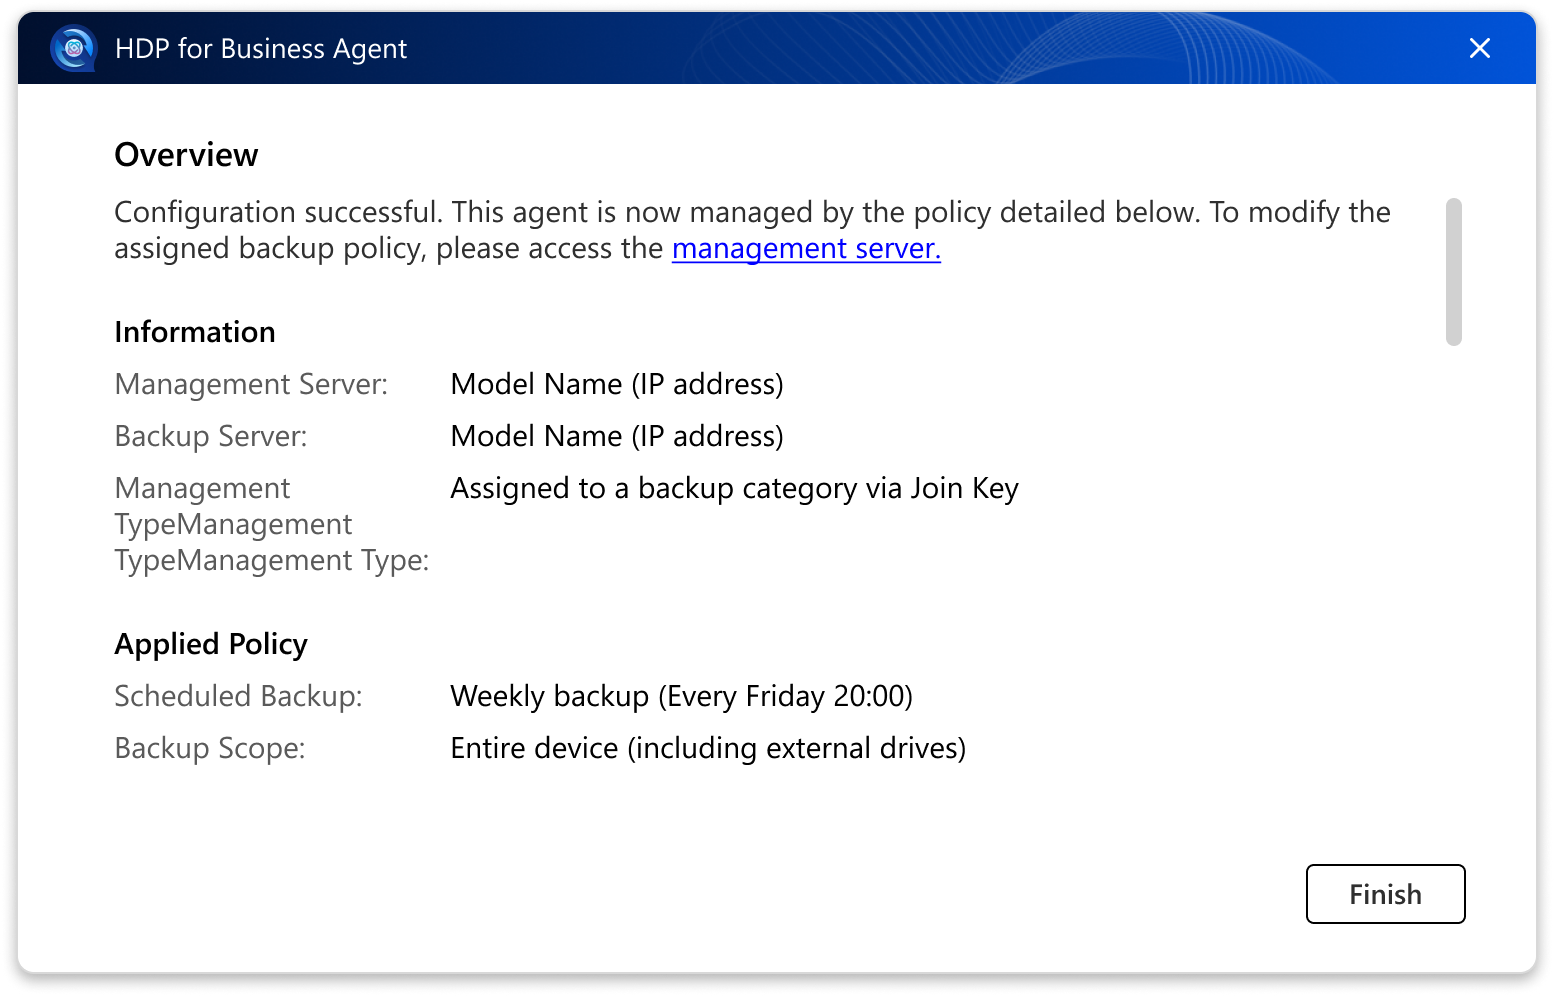
After the connection succeeds, the Overview page shows what the computer is now protected by:
- The Management Server and the Backup Server, each with its name and IP address.
- The applied policy, its backup schedule, and its backup scope.
Click Finish to close the wizard.
Step 5: Check the backup status from the system tray
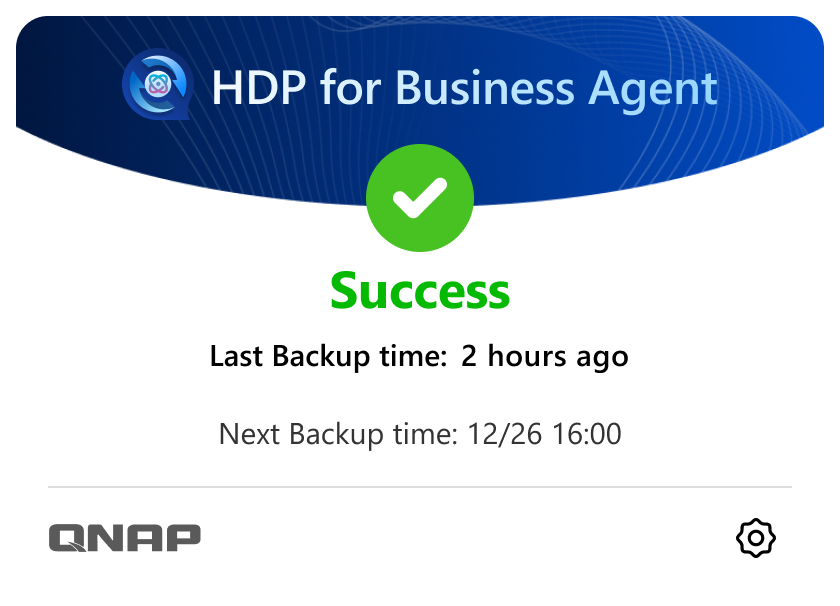
After setup, the agent adds an icon to the Windows system tray and starts automatically when the computer boots. Click the icon to open the status panel.
| Status | What the panel shows |
|---|
| Not started yet | No backup has run yet. The next backup time is shown. |
| Running | A backup is in progress, with a progress bar. The panel shows Finalizing after the data transfer completes. |
| Success | The backup completed. The last and next backup times are shown. |
| Warning | The backup completed with warnings. |
| Error | The backup failed. Open the Logs page for details. |
| Queued | The backup is waiting to run. |
| Stopped | The backup was stopped. The last backup time is shown. |
| Disabled | The backup job is disabled. Enable it again on the Management Server. |
| Network Reconnecting | The network connection was lost. The agent reconnects automatically. |
Note: Installing on a Computer Without Internet Access
HDP for Business Agent runs on the .NET 10.0 runtime. The installer downloads the required components from Microsoft during installation. If the computer has no internet access, install the following components manually before you run the agent installer.
- ASP.NET Core Runtime 10.0
- .NET Runtime 10.0
- .NET Desktop Runtime 10.0
- On a computer with internet access, download the three x64 installers for Windows from the Microsoft .NET 10.0 download page.
- Copy the installers to the offline computer and install all three components.
- Run the HDP for Business Agent installer. When the installer asks whether the .NET runtime components are already installed, click OK to continue.
Install all three components. The agent service requires ASP.NET Core Runtime and .NET Runtime, and the agent user interface requires .NET Desktop Runtime. If .NET Desktop Runtime is missing, the installation still finishes, but the agent prompts you to update .NET when it starts.
Result
The Windows computer is now a protected workload in HDP for Business. To confirm this:
- The computer appears on the Physical Device page of the Management Server, bound to the Backup Server and the policy of the Join Key.
- The system tray panel shows the next backup time, and shows Success after the first backup completes.
- The backup appears in Activities on the Management Server.
What's Next
対象製品
- HDP for Business
- HDP for Business Agent 1.0.0.1697 and later
- Windows 10 (64-bit, version 1607 or later), Windows 11
- Windows Server 2016 / 2019 / 2022 / 2025
目的
このチュートリアルでは、Windows コンピュータに HDP for Business Agent をインストールし、Join Key を使用して管理サーバーに接続し、割り当てられたバックアップポリシーが実行されていることを確認する方法を示します。
前提条件
- HDP for Business が管理サーバーとして機能する QNAP NAS にインストールされ、初期化されています。
- バックアップサーバーと保護ポリシーが準備されており、Join Key にバインドできるようになっています。
- Windows コンピュータはサポートされている 64 ビットオペレーティングシステムを実行しています。ARM64 Windows などの ARM ベースのデバイスはサポートされていません。
- コンピュータは初回インストール時にインターネットアクセスが必要です。インストーラーはエージェントに必要な.NET 10.0 ランタイムコンポーネントを自動的にインストールします。コンピュータがインターネットに接続されていない場合は、これらのコンポーネントを手動で先にインストールしてください。注意: インターネット接続のないコンピューターへのインストールを参照してください。
- コンピュータに NetBak PC Agent がインストールされていません。2 つの製品は共存できず、インストーラーは続行する前に他の製品を削除するよう求めます。
手順
ステップ 1: 管理サーバーで Join Key を作成する
Join Key は、コンピュータがどのバックアップサーバーとどのポリシーにバインドされるかを定義します。エージェントは接続すると自動的にそれらを適用します。
- HDP for Business で、物理デバイスに移動し、追加をクリックします。
- インストーラーをダウンロードするにはエージェントをダウンロードをクリックし、ファイルを Windows コンピュータにコピーします。
- Join Key を管理 > 作成をクリックします。
- バインドするバックアップサーバーとポリシーを選択し、作成をクリックします。
- Join Key テーブルでコピーをクリックします。キーは 64 文字の英数字です。
ステップ 2: Windows コンピュータにエージェントをインストールする
- Windows コンピュータでインストーラーを実行します。
- インストール言語を選択します。システム言語がデフォルトで選択されています。
- HDP for Business Agent をインストールすることを確認し、ファイルが
C:\Program Files\QNAPに展開されるのを待ちます。 - インストールが完了したら、アプリケーションを実行するオプションを選択したままにして、インストーラーを閉じます。
既存のインストールのみアップグレードできます。同じバージョンの再インストールや以前のバージョンへのダウングレードはサポートされていません。
ステップ 3: 管理サーバーに接続する
エージェントは初回実行時に管理サーバーに接続画面を開きます。
- サーバーアドレスに、管理サーバーのホスト名または IP アドレスを入力し、必要に応じてポート番号を追加します。例:
nas-01、10.77.216.185、または10.77.216.185:11443。http://やhttps://は含めないでください。 - 参加キーに、ステップ 1 でコピーしたキーを貼り付けます。
- 次へをクリックします。
- 証明書確認ウィンドウが表示された場合は、続行をクリックします。
HTTPS での接続
ポート番号を指定しない場合、エージェントはまずポート 443 で HTTPS を試し、その後ポート 8080 で HTTP を試みます。QNAP NAS デバイスは、しばしば 443 以外の設定可能な HTTPS ポートを使用するため、接続が暗号化されていることを確認するには、NAS の HTTPS ポートを明示的に入力してください。ポートを確認するには、コントロールパネル > システム > 一般設定 > セキュア接続 (HTTPS)に移動します。
ほとんどの NAS デバイスは自己署名証明書を使用しているため、エージェントが HTTPS で接続するときに証明書確認ウィンドウが表示されます。これは予想される動作です。続行をクリックして進めます。この選択は、その後エージェントが接続するバックアップサーバーにも適用されます。
参加キーが管理サーバーではなくバックアップサーバーに属している場合、エージェントは管理サーバーに接続するよう求めます。
ステップ 4: 割り当てられたポリシーを確認する
接続が成功すると、概要ページにコンピュータが現在保護されている内容が表示されます:
- 管理サーバーとバックアップサーバー、それぞれの名前と IP アドレス。
- 適用されたポリシー、そのバックアップスケジュールとバックアップ範囲。
ウィザードを閉じるには完了をクリックします。
ステップ 5: システムトレイからバックアップステータスを確認する
セットアップ後、エージェントは Windows のシステムトレイにアイコンを追加し、コンピュータの起動時に自動的に開始します。アイコンをクリックしてステータスパネルを開きます。
| ステータス | パネルに表示される内容 |
|---|
| まだ開始されていません | まだバックアップは実行されていません。次のバックアップ時間が表示されます。 |
| 実行中 | バックアップが進行中で、進行状況バーが表示されます。データ転送が完了すると、パネルには「最終処理中」と表示されます。 |
| 成功 | バックアップが完了しました。最後と次のバックアップ時間が表示されます。 |
| 警告 | バックアップは警告付きで完了しました。 |
| エラー | バックアップに失敗しました。詳細はログページを開いてください。 |
| 待機中 | バックアップは実行待ちです。 |
| 停止 | バックアップが停止しました。最終バックアップ時間が表示されます。 |
| 無効 | バックアップジョブは無効です。管理サーバーで再度有効にしてください。 |
| ネットワーク再接続中 | ネットワーク接続が失われました。エージェントは自動的に再接続します。 |
注意: インターネット接続のないコンピューターへのインストール
HDP for Business Agent は .NET 10.0 ランタイムで動作します。インストーラーはインストール中に必要なコンポーネントを Microsoft からダウンロードします。コンピューターがインターネットに接続されていない場合は、エージェントインストーラーを実行する前に以下のコンポーネントを手動でインストールしてください。
- ASP.NET Core ランタイム 10.0
- .NET ランタイム 10.0
- .NET デスクトップランタイム 10.0
- インターネットに接続されたコンピューターで、Microsoft .NET 10.0 ダウンロードページから Windows 用の 3 つの x64 インストーラーをダウンロードします。
- インストーラーをオフラインのコンピューターにコピーし、3 つのコンポーネントすべてをインストールします。
- HDP for Business Agent インストーラーを実行します。インストーラーが .NET ランタイムコンポーネントがすでにインストールされているかどうかを尋ねたら、OKをクリックして続行します。
3 つのコンポーネントすべてをインストールします。エージェントサービスには ASP.NET Core ランタイムと .NET ランタイムが必要で、エージェントユーザーインターフェースには .NET デスクトップランタイムが必要です。.NET デスクトップランタイムがない場合でもインストールは完了しますが、エージェント起動時に .NET の更新を促されます。
結果
Windows コンピューターは現在、HDP for Business の保護されたワークロードです。これを確認するには:
- コンピューターは管理サーバーの物理デバイスページに表示され、バックアップサーバーとジョインキーのポリシーにバインドされています。
- システムトレイパネルには次のバックアップ時間が表示され、最初のバックアップが完了すると成功と表示されます。
- バックアップは管理サーバーのアクティビティに表示されます。
次のステップ


