Appliable Products
- NAS running with QTS or QuTS system
Overview
There are many reasons to permanently erase data from your NAS drives — decommissioning hardware, repurposing drives, meeting compliance requirements, or ensuring sensitive data cannot be recovered. QNAP QTS and QuTS hero include a built-in Secure Erase function that handles this using certified overwrite methods.
Why isn't deleting files or reformatting a drive enough?
Deleting files or reformatting a volume only removes the filesystem index — the actual data sectors remain on the disk and can be recovered with widely available tools in minutes. Anyone with physical access to the drive could retrieve your files, documents, credentials, and any other data that was ever stored on it.
Secure Erase overwrites the raw storage media with one or more passes of data patterns, making the original content physically unreadable even with forensic software.
When should I use Secure Erase?
Common situations where Secure Erase is appropriate:
- Decommissioning hardware — retiring a NAS or drive from service and handing it off
- Repurposing drives — reusing a drive for a different purpose or different owner
- Compliance requirements — GDPR, HIPAA, and other regulations require verifiable data destruction when retiring storage that held personal or protected data
- Security policy — organizational policies may require certified erasure before any storage device leaves IT control
- Drive RMA — before returning a defective drive to the manufacturer under warranty
Solution
⚠️ Back up all data before proceeding. Secure Erase is irreversible. Verify your backup is complete and accessible on another device before starting.
Step 1 — Back up your data
Copy everything you need to keep to an external drive, network share, or cloud storage. Confirm the backup is complete and all files open correctly before continuing.
Step 2 — Remove drives from any storage pool
Open Storage & Snapshots → Storage → Storage/Snapshots. Select your storage pool, click Manage → Remove, and confirm. Repeat for all pools. The drives will now show Used Type: Free in the Disks view.
Step 3 — Select the drive and open Secure Erase
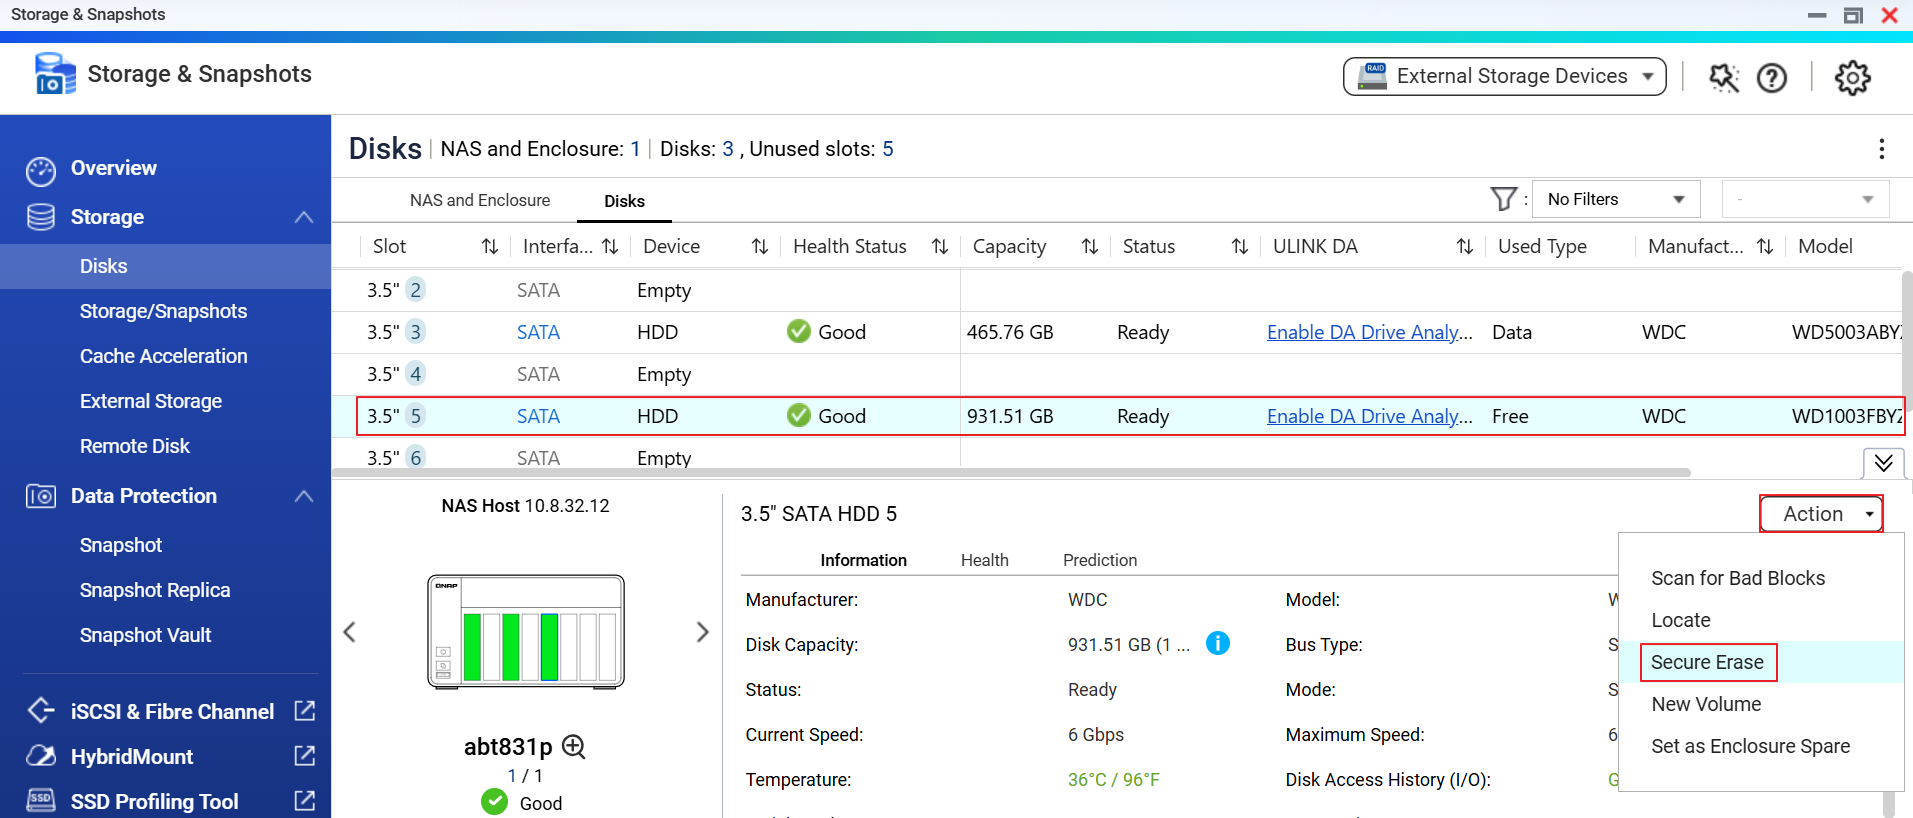
Go to Storage & Snapshots → Storage → Disks. Click a drive to select it — its details appear in the lower pane. Click Action → Secure Erase from the dropdown menu at the top right of the detail panel.
Step 4 — Wizard Step 1/3: Confirm the drive selection
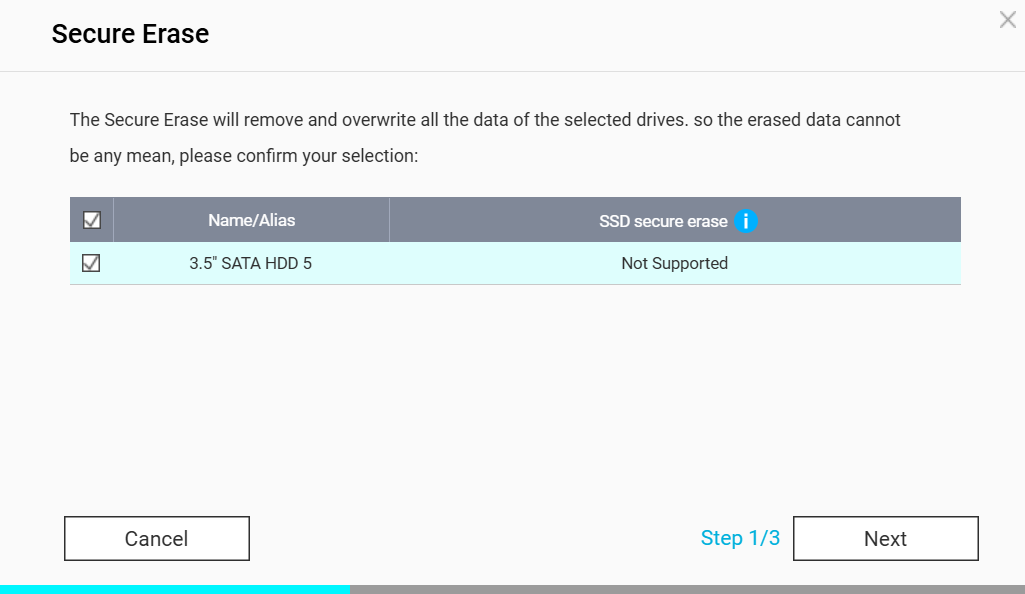
The wizard lists the selected drive(s) and shows whether native SSD secure erase is supported for each. Verify the correct drive is checked, then click Next.
Step 5 — Wizard Step 2/3: Select an erase mode
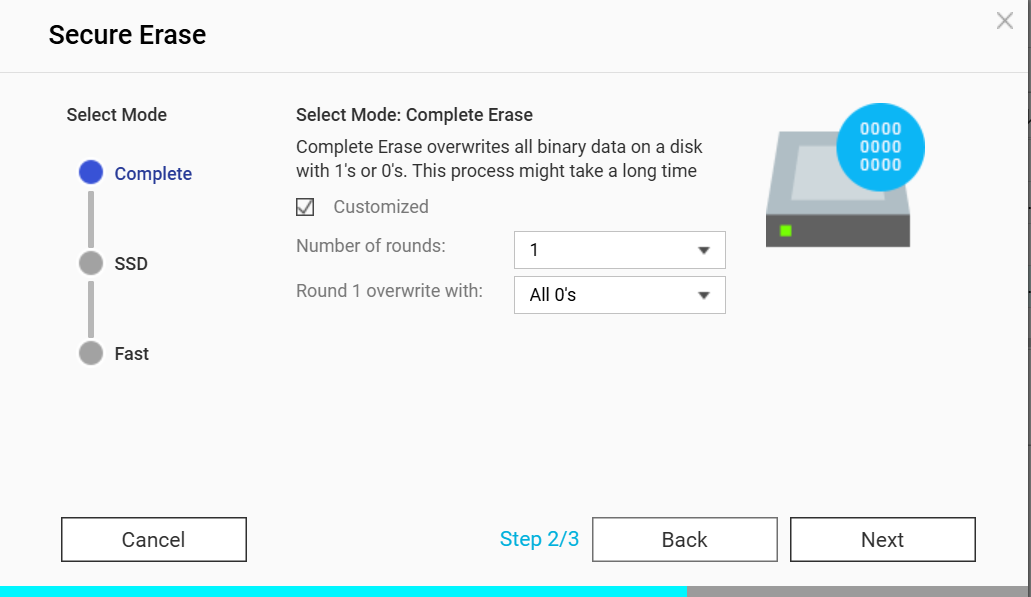
Choose from Complete, SSD, or Fast. For most HDDs, select Complete. You can enable Customized to adjust the number of overwrite rounds and the data pattern per round. Click Next when done.
Step 6 — Wizard Step 3/3: Confirm with admin password and apply
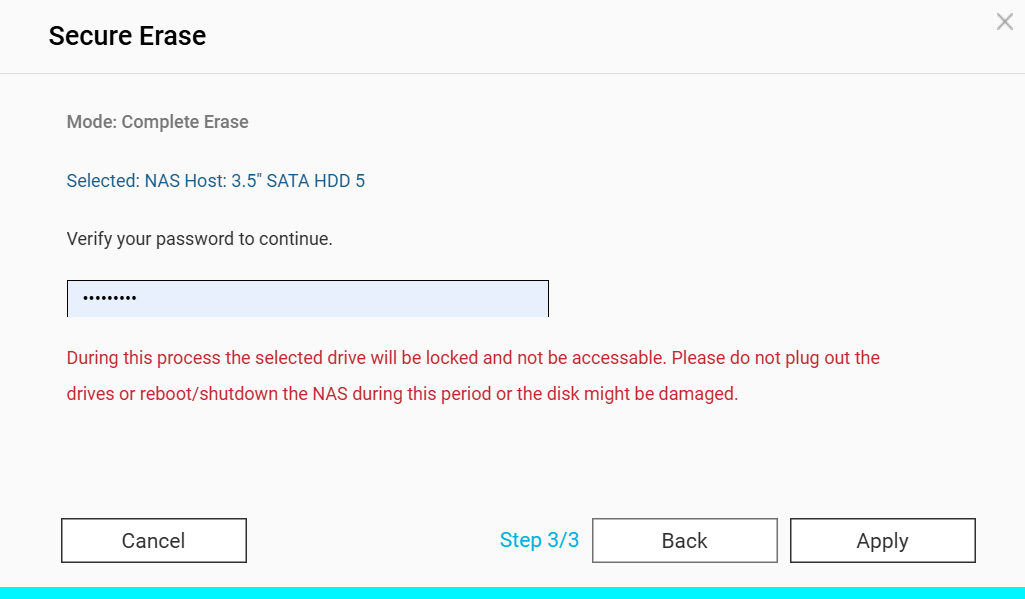
Review the summary (mode and selected drive). Enter your NAS administrator password, then click Apply. The drive will be locked immediately and the erase process begins.
⚠️ Do not unplug the drives or reboot/shutdown the NAS during this period or the disk might be damaged.
Step 7 — Monitor progress until completion
Progress is tracked per drive in the Disks view. Wait for each drive to report Erase completed. You can close the browser — the erase continues running on the NAS. Repeat steps 3–6 for any remaining drives.
Further Reading
What are the three erase modes?
Complete — Overwrites all binary data with 1's or 0's. Supports a customizable number of rounds (1–N) with selectable overwrite patterns per round (All 0's, All 1's, Random). This is the most flexible option and can emulate recognized standards by configuring multiple rounds. Takes longest but gives the highest assurance for HDDs.
SSD — Uses the drive's native ATA Secure Erase or NVMe Format command (where supported), letting the drive's own firmware erase all cells including those hidden from OS-level writes by wear leveling. The recommended mode for SSDs. Typically completes in minutes.
Fast — A quick single-pass erase. Suitable for low-risk scenarios where speed is a priority and the threat model does not include sophisticated data recovery attempts.
適用製品
- QTS または QuTS システムを実行している NAS
概要
NAS ドライブからデータを完全に消去する理由は多くあります。ハードウェアの廃棄、ドライブの再利用、コンプライアンス要件の遵守、または機密データが復元されないようにするためです。QNAP QTS と QuTS hero には、認定された上書き方法を使用してこれを処理する組み込みのSecure Erase機能があります。
ファイルの削除やドライブの再フォーマットだけでは不十分な理由は?
ファイルの削除やボリュームの再フォーマットはファイルシステムのインデックスを削除するだけで、実際のデータセクターはディスク上に残り、広く利用可能なツールで数分で復元できます。ドライブに物理的にアクセスできる人は、保存されていたファイル、ドキュメント、認証情報、その他のデータを取得できる可能性があります。
Secure Erase は、生のストレージメディアにデータパターンを 1 回以上上書きし、法医学ソフトウェアを使用しても元の内容を物理的に読み取れないようにします。
Secure Erase を使用すべき時はいつですか?
Secure Erase が適切な一般的な状況:
- ハードウェアの廃棄 — NAS やドライブをサービスから引退させて引き渡すとき
- ドライブの再利用 — ドライブを別の目的や所有者のために再利用する場合
- コンプライアンス要件 — GDPR、HIPAA、その他の規制は、個人データや保護されたデータを保持していたストレージを廃棄する際に検証可能なデータ破壊を要求します
- セキュリティポリシー — 組織のポリシーにより、IT 管理下を離れる前に認定された消去が必要な場合があります
- ドライブ RMA — 保証の下で不良ドライブをメーカーに返送する前に
ソリューション
⚠️ 進行する前にすべてのデータをバックアップしてください。 Secure Erase は不可逆です。開始する前に、バックアップが完全であり、別のデバイスでアクセス可能であることを確認してください。
ステップ 1 — データをバックアップする
必要なものをすべて外部ドライブ、ネットワーク共有、またはクラウドストレージにコピーします。バックアップが完全であり、すべてのファイルが正しく開くことを確認してから続行してください。
ステップ 2 — すべてのストレージプールからドライブを取り外す
ストレージ&スナップショット → ストレージ → ストレージ / スナップショットを開きます。ストレージプールを選択し、管理 → 削除をクリックして確認します。すべてのプールに対して繰り返します。これで、ディスクビューに使用タイプ: フリーと表示されます。
ステップ 3 — ドライブを選択してセキュア消去を開く
ストレージ&スナップショット → ストレージ → ディスクに移動します。ドライブをクリックして選択すると、その詳細が下部ペインに表示されます。詳細パネルの右上にあるドロップダウンメニューからアクション → セキュア消去をクリックします。
ステップ 4 — ウィザード ステップ 1/3: ドライブ選択の確認
ウィザードは選択されたドライブを一覧表示し、各ドライブに対してネイティブ SSD セキュア消去がサポートされているかどうかを示します。正しいドライブが選択されていることを確認し、次へをクリックします。
ステップ 5 — ウィザード ステップ 2/3: 消去モードの選択
完全、SSD、または高速から選択します。ほとんどの HDD には完全を選択します。カスタマイズを有効にして、上書き回数やラウンドごとのデータパターンを調整できます。完了したら次へをクリックします。
ステップ 6 — ウィザード ステップ 3/3: admin パスワードで確認して適用
概要(モードと選択されたドライブ)を確認します。NAS の管理者パスワードを入力し、適用をクリックします。ドライブは即座にロックされ、消去プロセスが始まります。
⚠️ この期間中にドライブを抜いたり、NAS を再起動 / シャットダウンしないでください。ディスクが損傷する可能性があります。
ステップ 7 — 完了まで進捗を監視
進捗はディスクビューでドライブごとに追跡されます。各ドライブが消去完了を報告するのを待ちます。ブラウザを閉じても消去は NAS 上で続行されます。残りのドライブに対してステップ 3–6 を繰り返します。
さらに読む
3 つの消去モードとは何ですか?
完全 — すべてのバイナリデータを 1 または 0 で上書きします。ラウンドごとに選択可能な上書きパターン(すべて 0、すべて 1、ランダム)でカスタマイズ可能なラウンド数(1–N)をサポートします。これは最も柔軟なオプションで、複数のラウンドを設定することで認識された標準をエミュレートできます。時間がかかりますが、HDD に対して最高の保証を提供します。
SSD — ドライブのネイティブ ATA セキュア消去または NVMe フォーマットコマンド(サポートされている場合)を使用し、OS レベルの書き込みからウェアレベリングによって隠されたセルを含むすべてのセルをドライブ自身が消去します。SSD に推奨されるモードです。通常、数分で完了します。
高速 — 迅速な単一パスの消去です。スピードが優先され、洗練されたデータ復旧試行を含まない低リスクのシナリオに適しています。


