Applicable Products
Scenario 1: Regular User Forgot Password → Ask the Administrator to Reset It
Note
Regular users cannot reset their own passwords. You must contact the NAS administrator, who can update your password from the Control Panel without affecting any other account settings. You can log in with the new password once the reset is complete.
NAS administrator Change sthe Password for a Local User Account
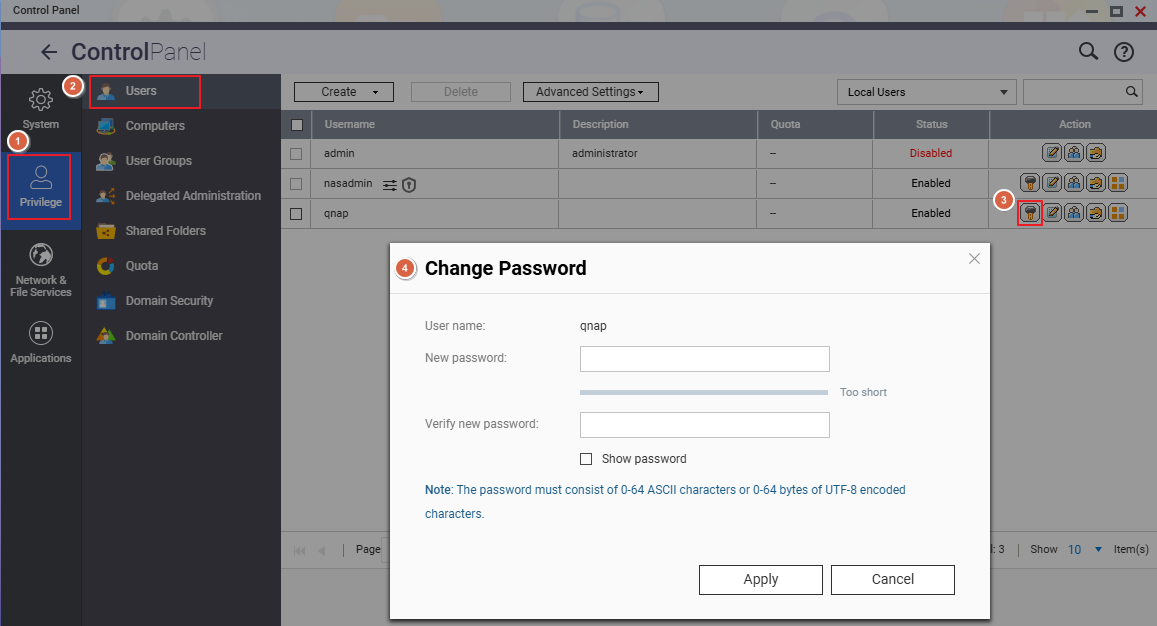
- Log in to QTS or QuTS hero as an administrator.
- Go to Control Panel > Privilege > Users.
- Locate the account that needs a password change.
- In the Action column, click Change Password.
- In the Change Password dialog:
- Enter the new password.
- Re-enter the password in the Verify New Password field.
- Click Apply to save the changes.
Important
Only an administrator can perform this action. The new password must meet the system's complexity requirements.
Scenario 2: Administrator Forgot the NAS Admin Password
Reset the Admin Password via the Reset Button
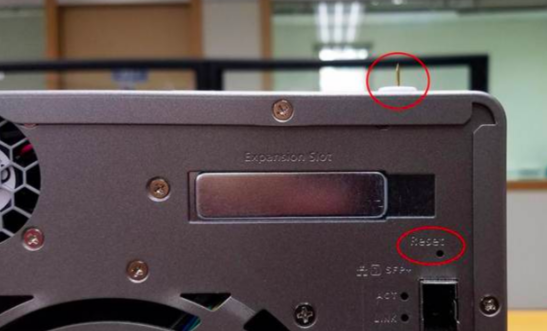
When to use: You have physical access to the back panel of the NAS.
Insert a straightened paperclip or pin into the reset hole on the back of the NAS and press:
| Press Duration |
Beep Indicator |
Reset Effect |
| Short press (3 seconds) |
1 beep |
✅ All user data and shared folders preserved
• Admin password reset to default
• Security level reset to "Low" (allow all connections)
• Service binding and system ports restored to default
• Network (TCP/IP) settings: Switched to DHCP, disables Jumbo Frame and VLANs,Port Trunking set to Active Backup (on dual LAN models) |
| Long press (10 seconds) |
1 beep at 3 sec + 1 beep at 10 sec (2 beeps total) |
✅ User data on disks preserved
• All shared folder configurations are deleted. To restore, see here
• All system settings restored to default |
Warning
A 10-second long press deletes all shared folder configurations. To restore them, use the Backup/Restore function afterward.
After Reset — Log In with the Default Password
After completing a reset, log in using the default admin password. The default password depends on your firmware version:
| Firmware Version |
Default Admin Account |
Default Password |
| QTS/QuTS hero 5.2.0 and later |
admin |
The device's Cloud Key printed on the label (typically an 8-character alphanumeric string) |
| QTS/QuTS hero 4.4.2 – 5.1.x |
admin |
MAC address of the first network adapter (Adapter 1), colons removed, all uppercase |
| QTS/QuTS hero 4.4.1 and earlier |
admin |
admin |
Example (MAC address)
MAC address 00:08:9B:AA:BB:CC → password is 00089BAABBCC
Example (Cloud Key)
Cloud Key printed as Q1234-5678 → password is Q12345678 (uppercase letters, special characters removed)
Where to Find Your Cloud Key and MAC Address
Finding the Cloud Key
| Method |
Steps |
| ① Device label / Quick Installation Guide |
Check the sticker on the back or bottom of the NAS chassis for a field labeled "Cloud Key", or refer to the included Quick Installation Guide (QIG). |
| ② Qfinder Pro (when unable to log in to NAS) |
1. Power off the NAS
2. Remove all hard drives, M.2 SSDs, and QM2 PCIe expansion cards
3. Power on the NAS
4. Open Qfinder Pro, select the device in the list
5. Click Details → the Cloud Key is shown in the Device Details window |
| ③ Qfinder Pro (when able to log in normally) |
1. Open Qfinder Pro and select the device
2. Click Details, then enter your NAS credentials when prompted
3. The Cloud Key is shown in the Device Details window |
| ④ myQNAPcloud website |
1. Go to myQNAPcloud and log in with your QNAP ID
2. Go to Device Management and click your device
3. Click Device Details → the Cloud Key is shown in the details tab |
Note
If none of the above methods work, contact QNAP Customer Support for assistance.
Finding the MAC Address
| Method |
Steps |
| ① Device label |
The sticker on the NAS chassis lists the model name, serial number, and MAC address (format: XX:XX:XX:XX:XX:XX). |
| ② Qfinder Pro |
Open Qfinder Pro, locate your NAS in the list — the MAC Address field is shown directly in the device information. |
Note
When used as the default password, remove the colons from the MAC address and convert all letters to uppercase.
Example: 00:08:9B:AA:BB:CC → password is 00089BAABBCC
Related Articles
対象製品
シナリオ 1: 一般ユーザーがパスワードを忘れた場合 → 管理者にリセットを依頼
注意
一般ユーザーは自分でパスワードをリセットできません。NAS の管理者に連絡する必要があります。コントロールパネルからパスワードを更新しても、他のアカウント設定には影響しません。リセットが完了したら、新しいパスワードでログインできます。
NAS 管理者がローカルユーザーアカウントのパスワードを変更
- 管理者として QTS または QuTS hero にログインします。
- コントロールパネル > 権限 > ユーザーに移動します。
- パスワード変更が必要なアカウントを探します。
- アクション列で、パスワード変更をクリックします。
- パスワード変更ダイアログで:
- 新しいパスワードを入力します。
- 新しいパスワードの確認フィールドにパスワードを再入力します。
- 適用をクリックして変更を保存します。
重要
この操作は管理者のみが実行できます。新しいパスワードはシステムの複雑性要件を満たす必要があります。
シナリオ 2: 管理者が NAS admin のパスワードを忘れた場合
リセットボタンで admin のパスワードをリセット
使用するタイミング: NAS の背面パネルに物理的にアクセスできる場合。
まっすぐにしたペーパークリップやピンを NAS の背面にあるリセットホールに挿入し、押します:
| 押す時間 |
ビープ音の指示 |
リセットの効果 |
| 短押し(3 秒) |
1 回のビープ音 |
✅ すべてのユーザーデータと共有フォルダーが保持されます
• admin パスワードがデフォルトにリセットされます
• セキュリティレベルが「低」にリセットされ、すべての接続が許可されます
• サービスバインディングとシステムポートがデフォルトに復元されます
• ネットワーク(TCP/IP)設定:DHCP に切り替え、ジャンボフレームと VLAN を無効化し、ポートトランキングがアクティブバックアップに設定されます(デュアル LAN モデルの場合) |
| 長押し(10 秒) |
3 秒で 1 回のビープ音 + 10 秒で 1 回のビープ音(合計 2 回のビープ音) |
✅ ディスク上のユーザーデータが保持されます
• すべての共有フォルダー設定が削除されます。復元するには、こちら
を参照してください• すべてのシステム設定がデフォルトに復元されます |
警告
10 秒間の長押しはすべての共有フォルダー設定を削除します。復元するには、その後バックアップ / 復元機能を使用してください。
リセット後 — デフォルトパスワードでログイン
リセット完了後、デフォルトのadminパスワードを使用してログインします。デフォルトのパスワードは、ファームウェアバージョンによって異なります:
| ファームウェアバージョン |
デフォルトの admin アカウント |
デフォルトパスワード |
| QTS/QuTS hero 5.2.0 以降 |
admin |
デバイスのラベルに印刷されたCloud Key(通常は 8 文字の英数字) |
| QTS/QuTS hero 4.4.2 – 5.1.x |
admin |
最初のネットワークアダプター(アダプター 1)のMAC アドレス、コロンを除去し、すべて大文字 |
| QTS/QuTS hero 4.4.1 以前 |
admin |
admin |
例(MAC アドレス)
MAC アドレス00:08:9B:AA:BB:CC → パスワードは00089BAABBCC
例(Cloud Key)
Cloud Key がQ1234-5678として印刷される → パスワードはQ12345678(大文字、特殊文字を除去)
あなたの Cloud Key と MAC アドレスの見つけ方
Cloud Key の見つけ方
| 方法 |
手順 |
| ① デバイスラベル / クイックインストールガイド |
NAS シャーシの背面または底面のステッカーを確認し、「Cloud Key」とラベル付けされたフィールドを探すか、同梱のクイックインストールガイド(QIG)を参照してください。 |
| ② Qfinder Pro(NAS にログインできない場合) |
1. NAS の電源を切る
2. すべてのハードドライブ、M.2 SSD、および QM2 PCIe 拡張カードを取り外す
3. NAS の電源を入れる
4. Qfinder Proを開き、リスト内のデバイスを選択
5. 詳細をクリック → デバイス詳細ウィンドウに Cloud Key が表示されます |
| ③ Qfinder Pro(通常ログインできる場合) |
1. Qfinder Proを開き、デバイスを選択
2. 詳細をクリックし、プロンプトが表示されたら NAS の認証情報を入力
3. デバイス詳細ウィンドウに Cloud Key が表示されます |
| ④ myQNAPcloud ウェブサイト |
1. myQNAPcloudにアクセスし、QNAP ID でログインします
2. デバイス管理に移動し、デバイスをクリックします
3. デバイス詳細をクリックすると、詳細タブに Cloud Key が表示されます |
注意
上記の方法がどれも機能しない場合は、QNAP カスタマーサポートに連絡してサポートを受けてください。
MAC アドレスの確認方法
| 方法 |
手順 |
| ① デバイスラベル |
NAS シャーシのステッカーには、モデル名、シリアル番号、MAC アドレス(形式: XX:XX:XX:XX:XX:XX)が記載されています。 |
| ② Qfinder Pro |
Qfinder Pro を開き、リストで NAS を見つけます — デバイス情報にMAC アドレスフィールドが直接表示されます。 |
注意
デフォルトのパスワードとして使用する場合、MAC アドレスからコロンを取り除き、すべての文字を大文字に変換します。
例: 00:08:9B:AA:BB:CC → パスワードは00089BAABBCC
関連記事


