Applicable Products
- HDP for Business
- QuTS hero 6.0.2 and later
Purpose
This tutorial takes you from an empty QNAP NAS to a working backup environment: install HDP for Business, build a site, bring virtual machines and computers under protection, create a protection policy, copy backups off site, and restore and verify them. Each section stands on its own, so you can jump to the task you need.
Prerequisites
- A QNAP NAS running QuTS hero 6.0.2 or later. A mid-to-high-end model is recommended for the Management Server.
- An available storage space with enough free space.
- HDP for PC/VM 2.4.1.871 or later installed on the same NAS.
- Virtualization Station 4.2.0.257 or later, if you plan to use Instant Restore or Backup Verification.
- An administrator account on the NAS.
1. Install HDP for Business
- Sign in to the NAS as an administrator and open App Center.
- Search for HDP for Business and click Install.
- Click Open. The welcome page appears.
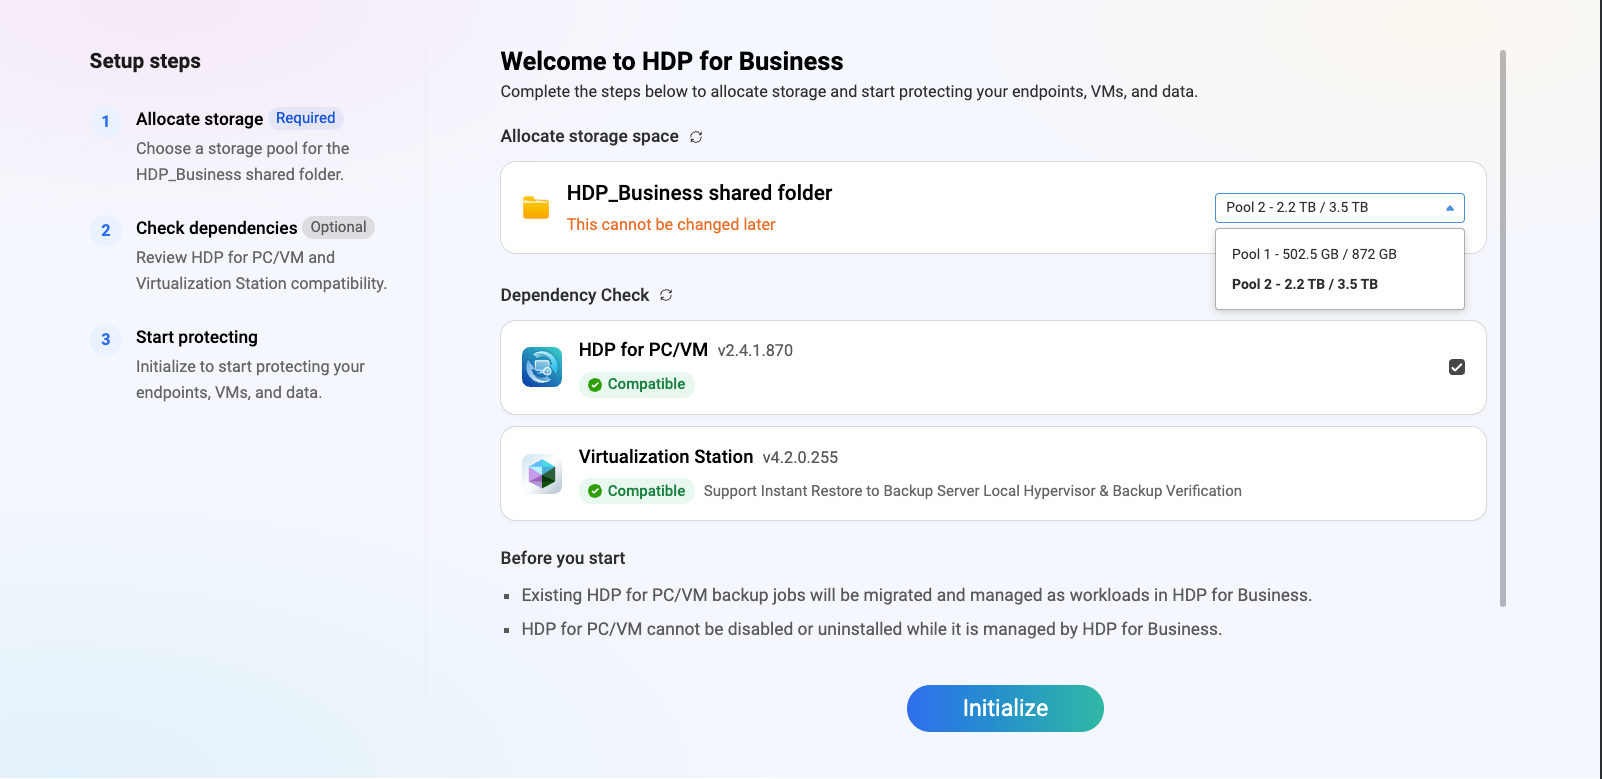
- Click Set up HDP for Business. The setup steps page opens, where you allocate storage and check dependencies before initializing.
Dependency check
| Status | What it means | What to do |
|---|
| Green check mark | Installed and compatible. | Nothing. The item is selected by default. |
| Yellow warning, grayed out | Installed, but the version is too old. | Upgrade to the version stated on the page. |
| Gray | Not installed. | Install it from App Center. |
Virtualization Station is handled differently: the page only reports whether it is installed and whether the version is sufficient. If it is missing, the options related to Instant Restore are grayed out. You can install it from the guided flow on this page.
Select a storage space
The system creates a shared folder named HDP_Business in the storage space you select. The storage space cannot be changed after initialization, so choose carefully. A storage space is grayed out when it has exceeded its alert threshold or when it is encrypted. If no storage space can be selected, free up space in Storage Manager, and then click Refresh.
HDP for Business never deletes this folder. It remains on the storage space even after you uninstall the app, so your backup data is preserved. To use a different storage space later, delete the HDP_Business folder in Storage Manager first.
Run the initialization
Click Initialize. HDP for Business takes over the existing HDP for PC/VM automatically, without interrupting running backups. Unfinished backups continue after the takeover. When the process completes, the NAS is a Management Server.
2. Build a Site
A site is one Management Server, up to four Backup Servers, and optionally one standby Management Server.
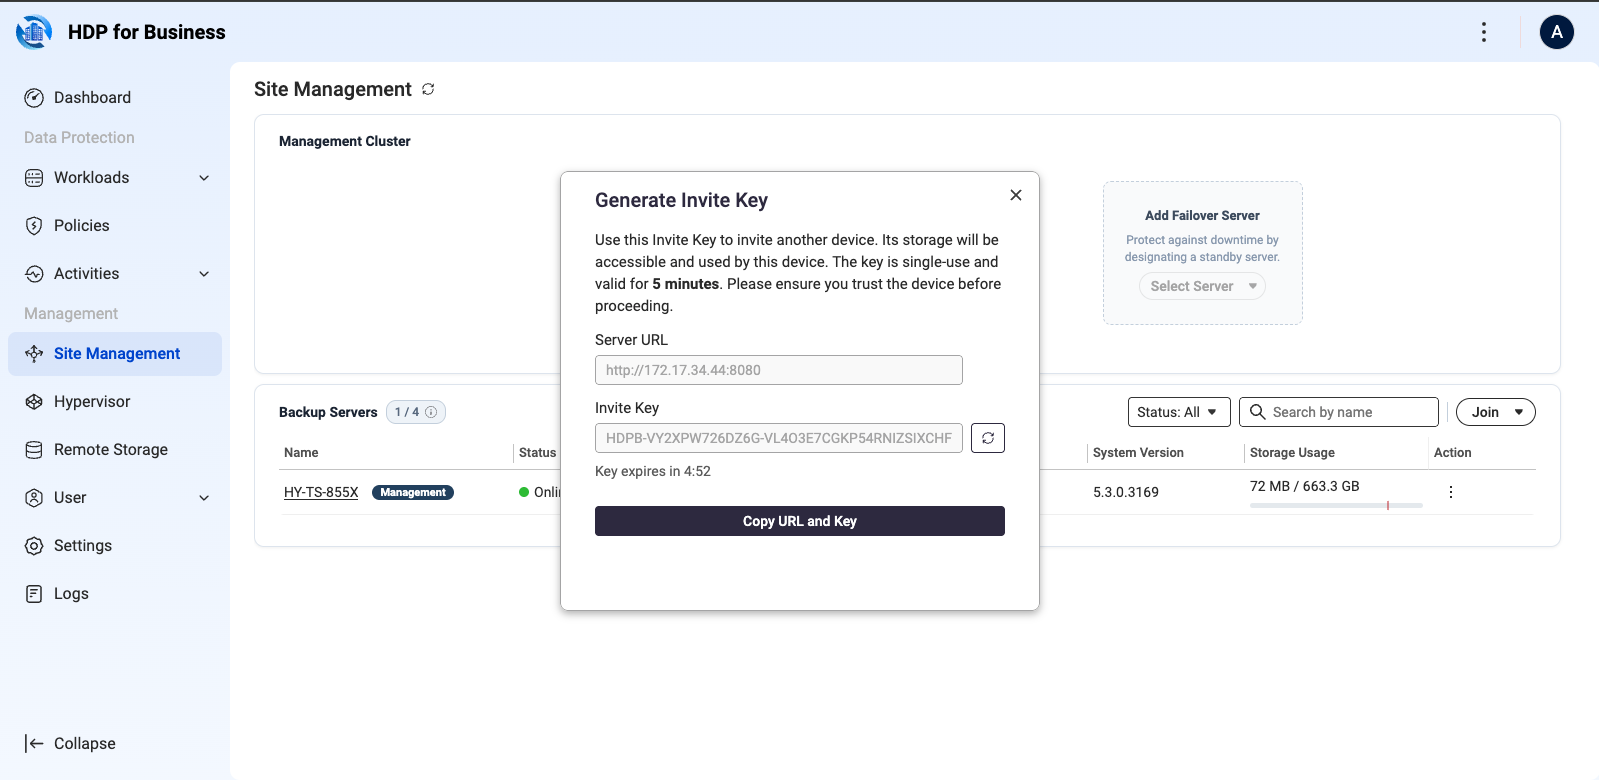
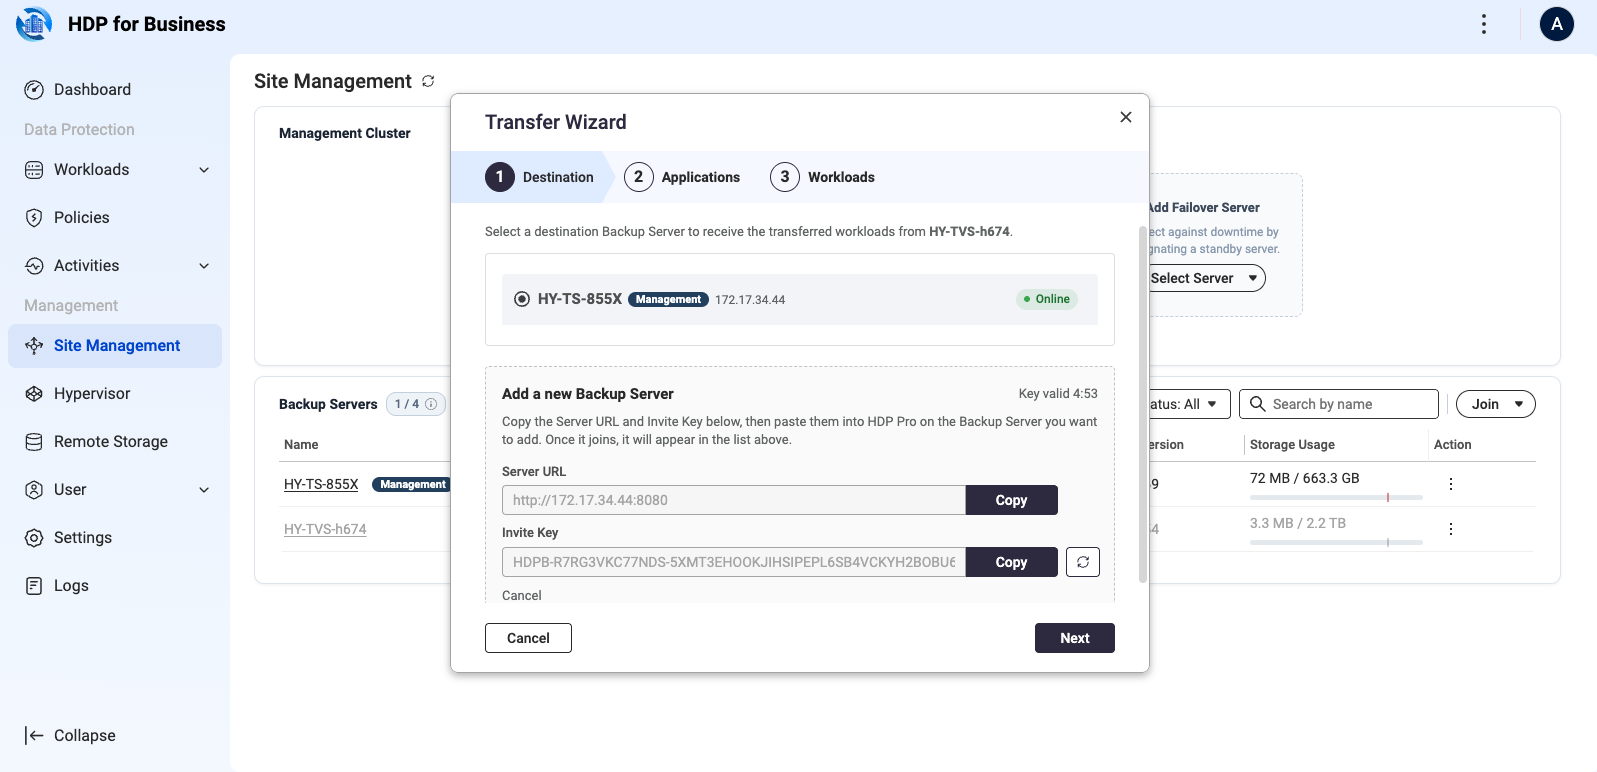
- On the Management Server, go to Site Management and click Join > Generate Invite Key.
- Copy the Server URL and the Invite Key, and send them to the administrator of the Backup Server. The key can be used once and expires after five minutes; click Regenerate if it expires.
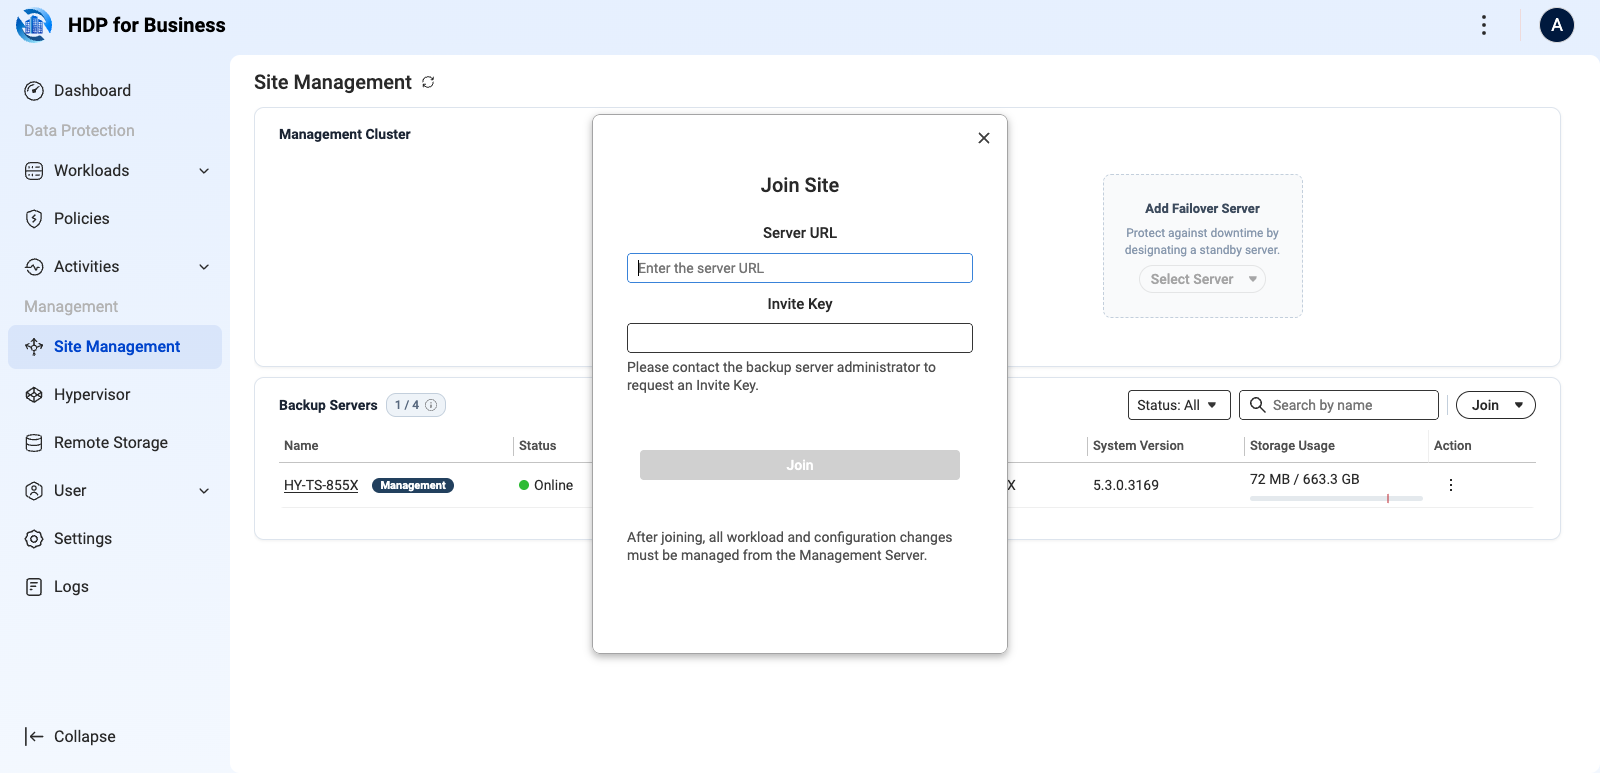
- On the Backup Server, go to Site Management and click Join > Join Site.
- Enter the Management Server URL and the Join Key, then click Join. The page shows This server is managed.
On the Management Server, the device moves through Connecting, Syncing, and Online.
Standby Management Server and switch over
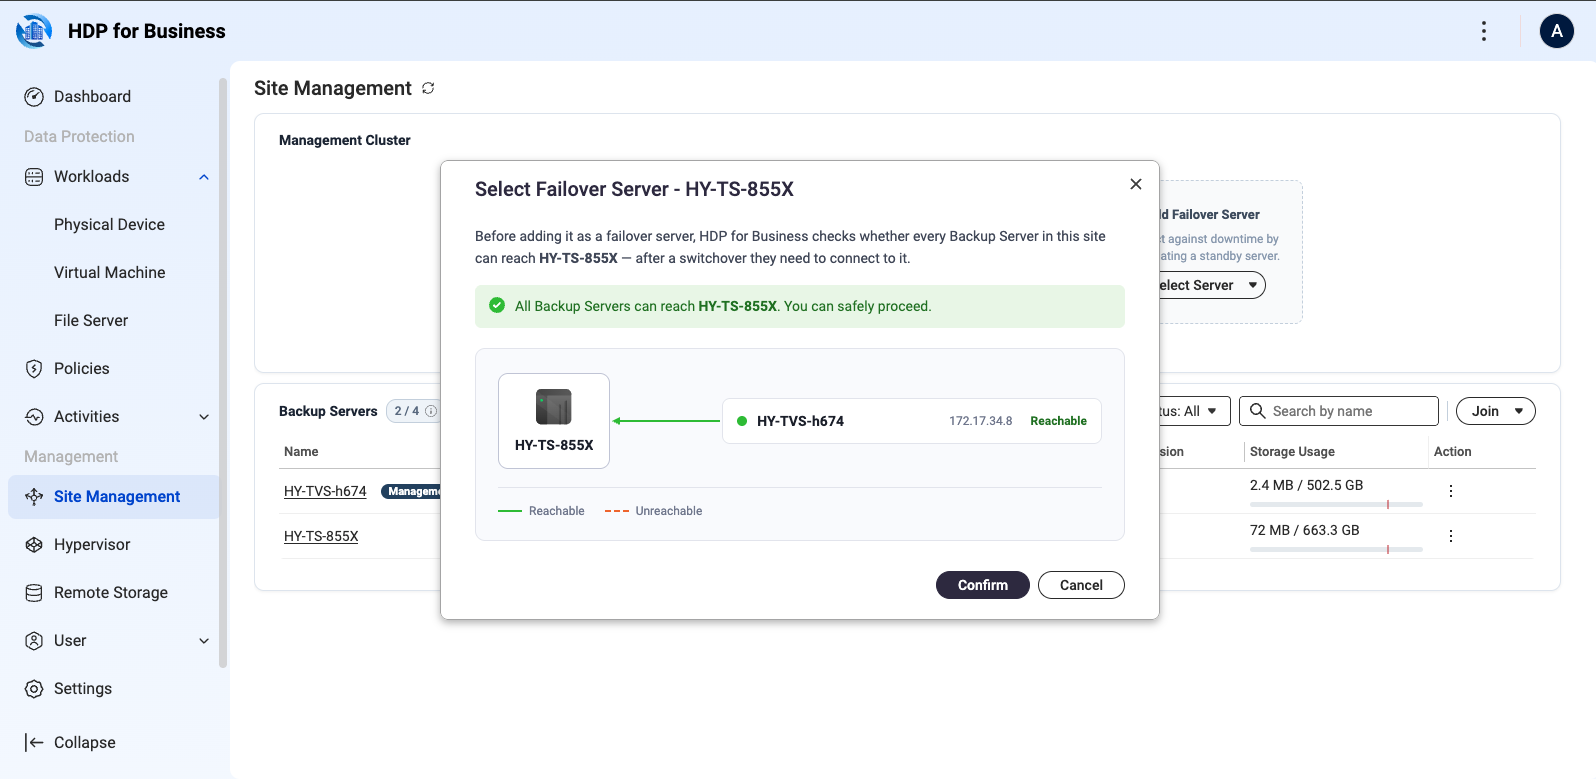
In the Add Failover Server area, select a Backup Server to act as the standby. The system checks whether every Backup Server can reach it, because they connect to it after a switchover. You can still add it when some servers report Unreachable, but those servers may be unmanageable after a switchover.
To hand management control to the standby, use Manage > Switch Over on the Management Server, or the Switch Over area on the standby's own page. Scheduled tasks pause during the process and resume automatically.
Transfer workloads to another Backup Server
To retire or release a Backup Server, click the three-dot action menu in its row on the Site Management page and select Transfer. The workload settings move in bulk to the destination Backup Server, which takes over the backup operations.
3. Add What You Want to Protect
Virtual machines
Virtual machine backup connects to the hypervisor to read the inventory. No agent is installed inside the virtual machines.
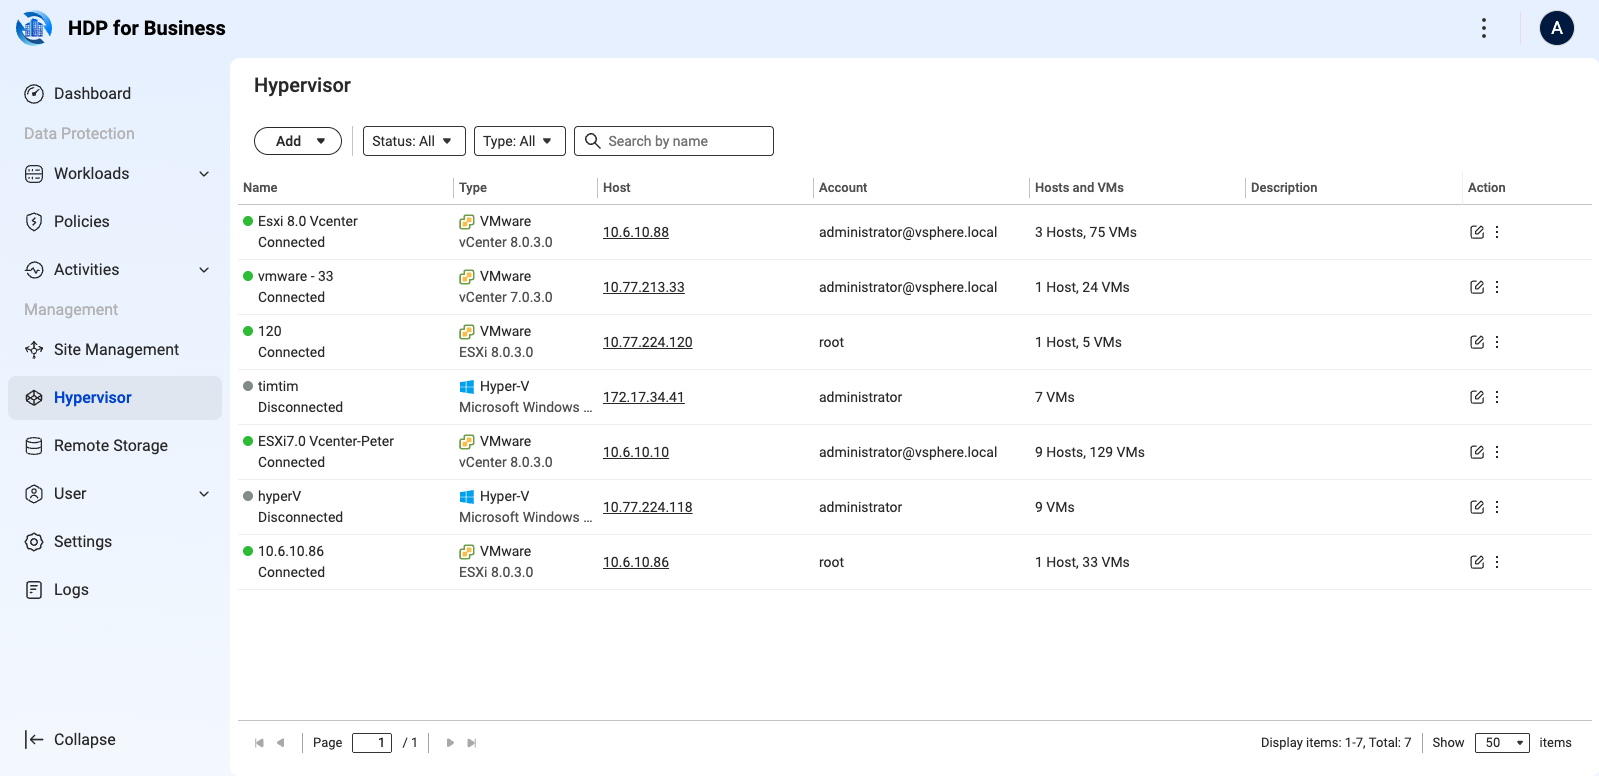
- Go to the Hypervisor page and click Add, then select the platform.
- Enter the name, host IP address, server port, user name, and password, then click Add.
| Platform | Default port | Notes |
|---|
| VMware | 443 | Standalone ESXi and vCenter are both supported. Connecting the vCenter that manages your hosts is recommended. |
| Hyper-V | 5985 | — |
| Proxmox VE | 22 | Versions 8.x and 9.x. Adding any node brings in the entire cluster. |
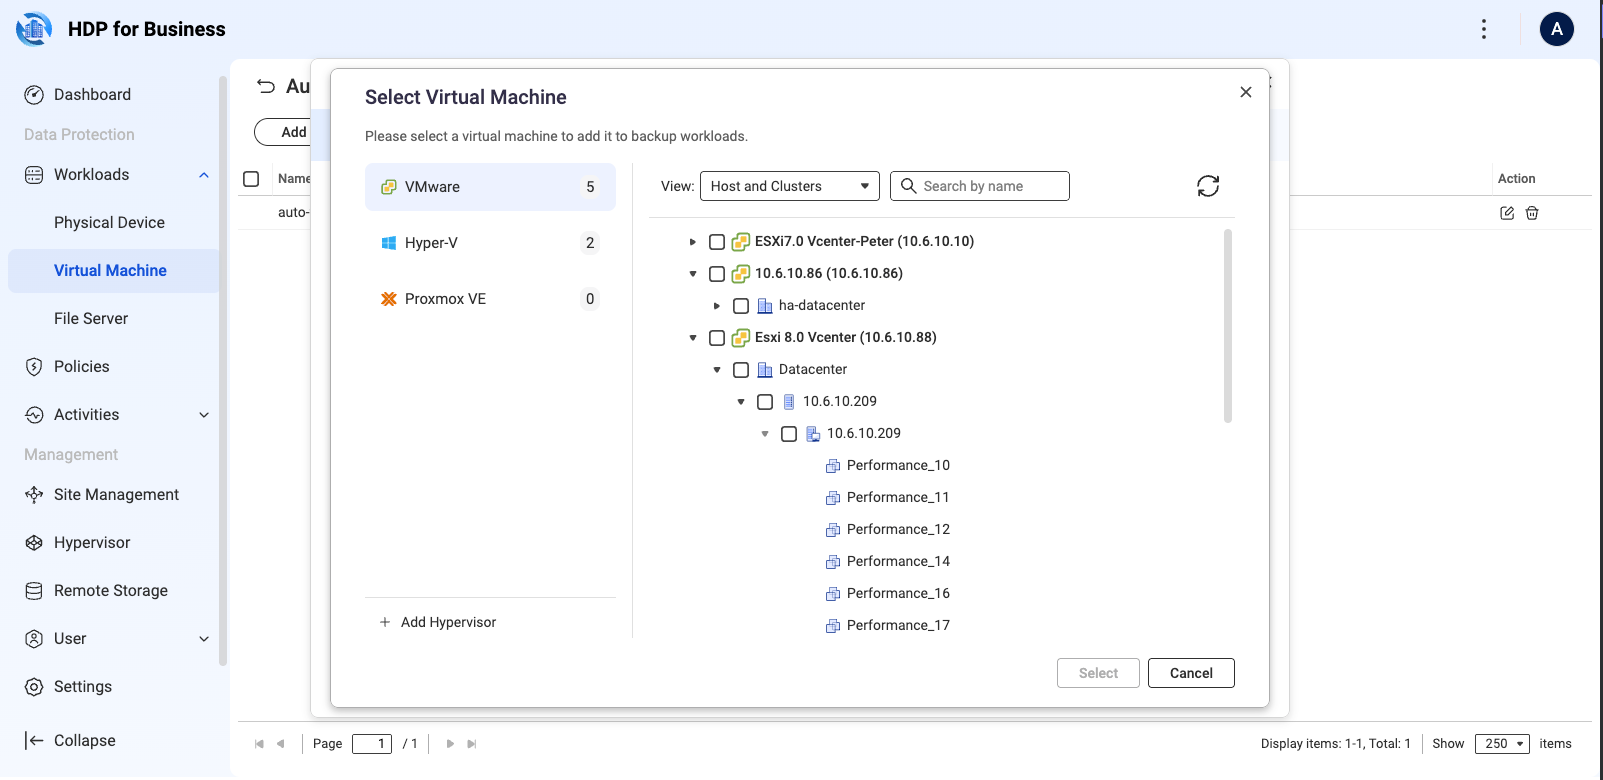
Connecting a hypervisor only retrieves the inventory. Add the virtual machines as workloads on the Workloads > Virtual Machine page, in one of two ways.
- Select specific virtual machines: click Add, select the source platform on the left, expand the datacenter or host in the Host and Clusters view on the right, select the virtual machines, and click Select.
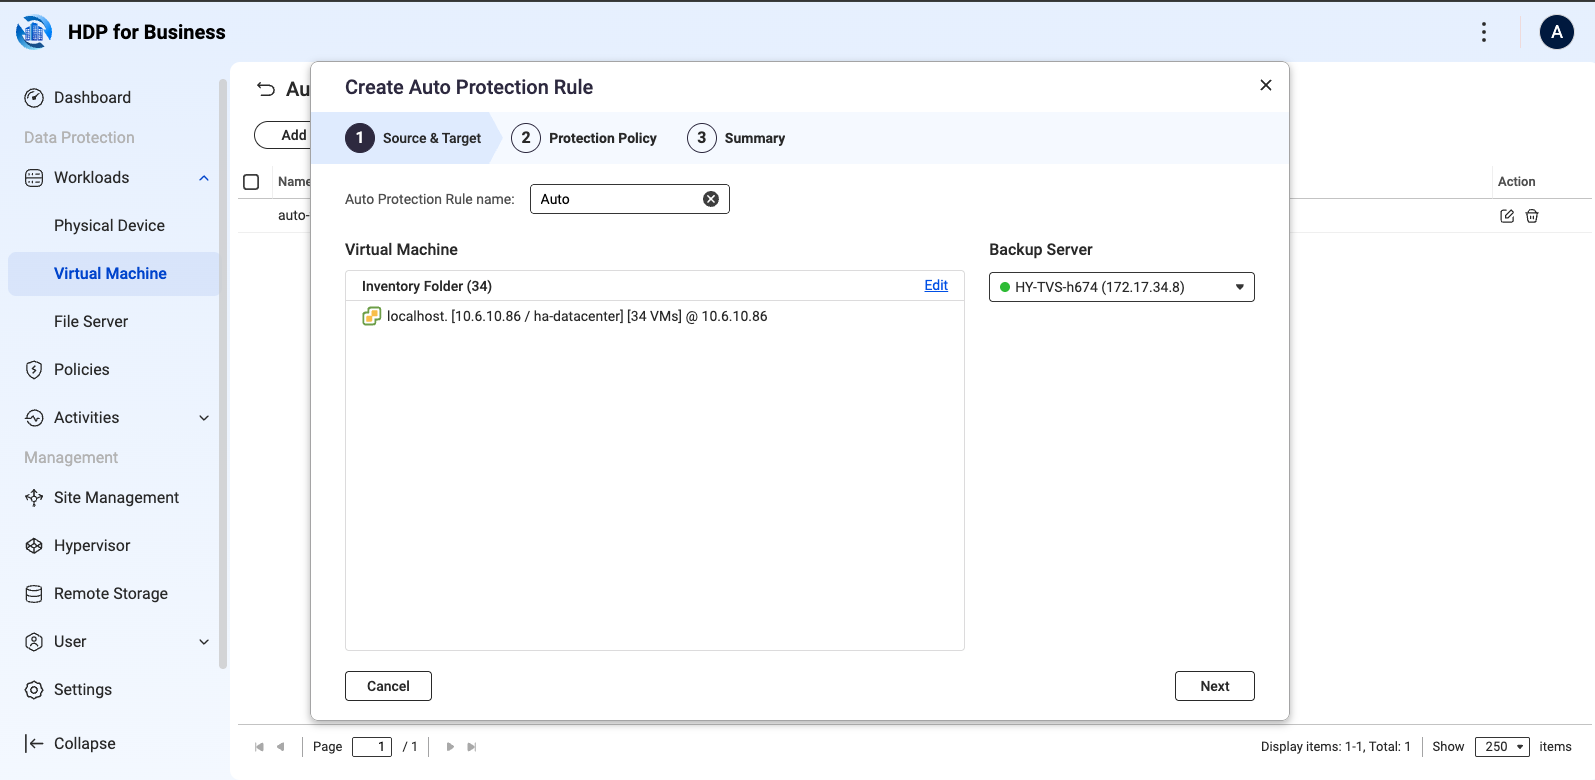
- Create an auto protection rule: click Auto Protection Rule > Create, then set the rule name, the source inventory folder, the target Backup Server, and the protection policy. Virtual machines added to that folder later are protected automatically.
Windows computers
Physical computers are protected by HDP for Business Agent. On the Physical Device page, click Add, download the installer, and create a Join Key that binds a Backup Server and a policy. Install the agent on the computer and connect it with that key. For the full procedure, see the HDP for Business Agent tutorial.
File servers
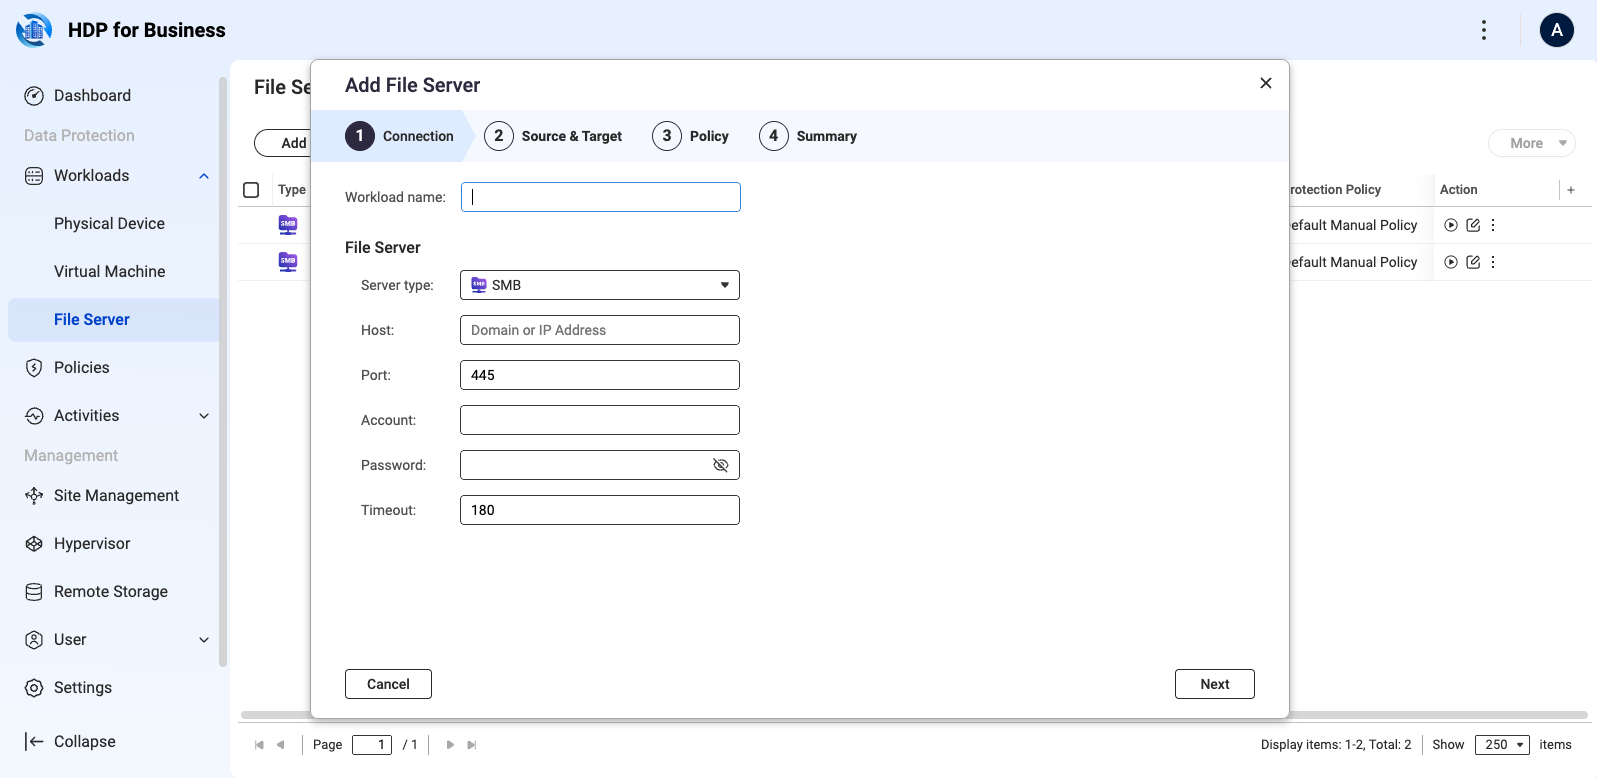
A file server is added over SMB on the Workloads > File Server page. Click Add and complete the wizard: connection settings including host, port (445 by default), account, password, and timeout; the source paths and the target Backup Server; the protection policy; and the summary.
4. Create a Protection Policy
Two policies are built in and cannot be deleted: Default Policy, which runs daily at 09:00, and Default Manual Policy, which runs only when you start it. Both keep 30 versions. To create your own:
- Go to Protection Policy and click Create > Machine Policy.
- General: enter a unique name and select the policy type. A standard protection policy manages versions by the retention rule; an immutable protection policy prevents backups from being modified or deleted within the retention period and can only be set in days. The type cannot be changed after creation.
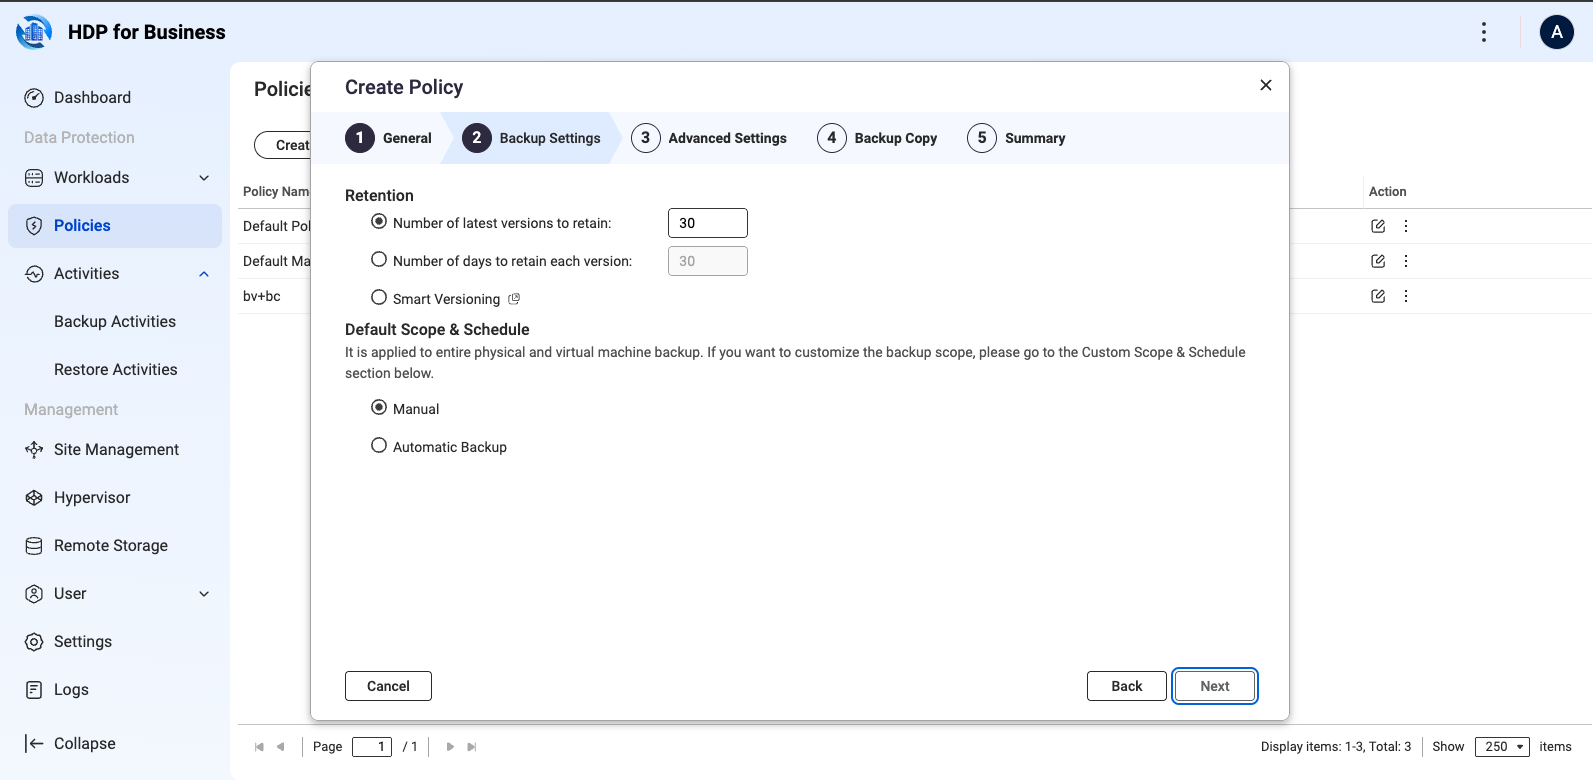
- Backup Settings: set the retention rule — a number of versions (30 by default), a number of days (30 by default), or Smart Versioning — and the schedule, which can be manual or automatic with a minimum interval of five minutes.
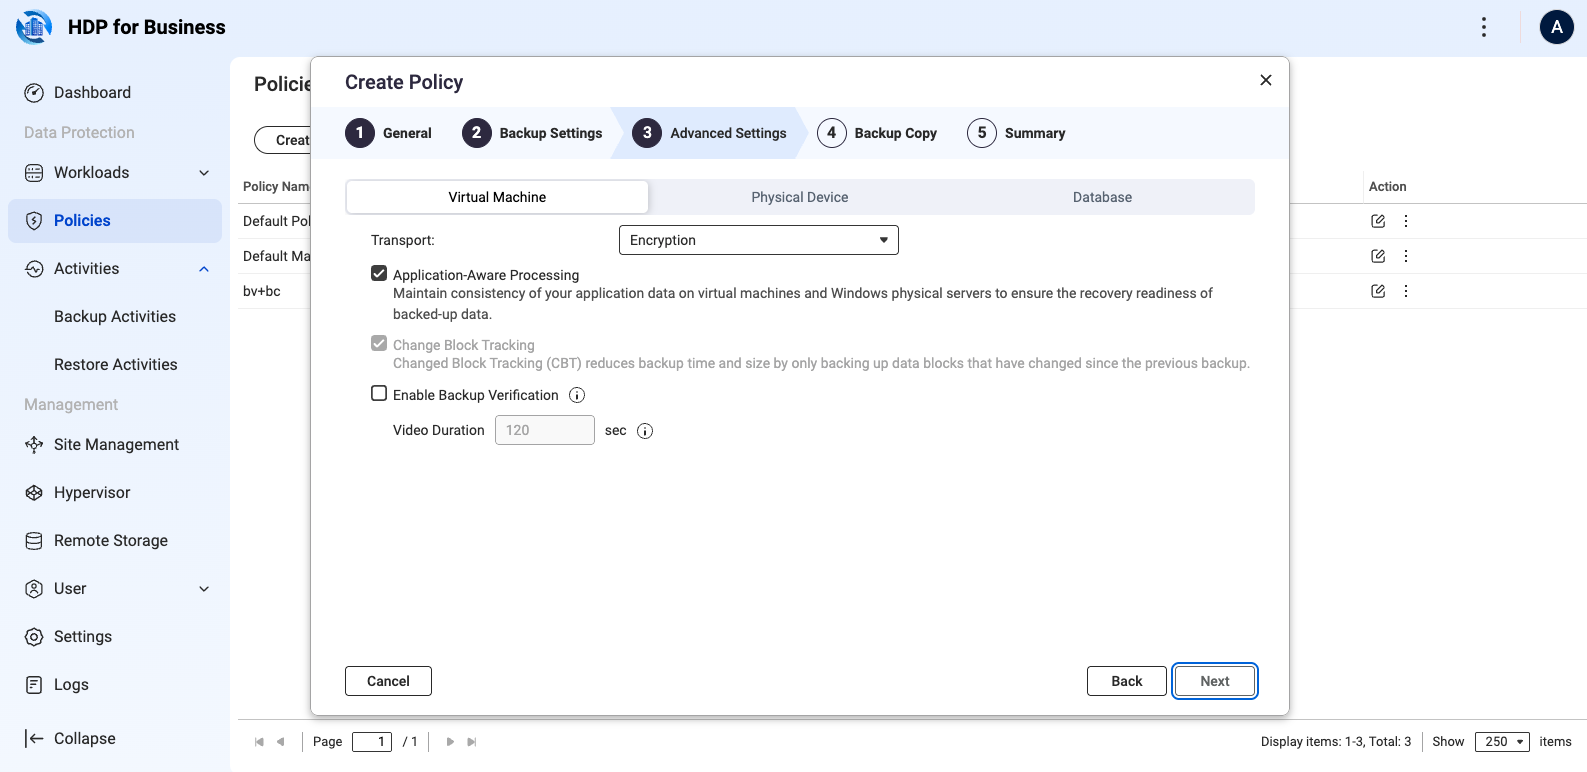
- Advanced Settings: configure the Virtual Machine, Physical Device, and Database tabs as needed. This is also where you select Enable Backup Verification.
- Backup Copy: optionally copy each backup to remote storage. Set up the remote storage first, as described in section 6.
- Summary: review and click Create.
5. Run and Monitor Backups
- On a schedule: the policy runs at the time you set.
- Manually: on the workload page, click the Backup icon in that row, or select several workloads and click More > Backup.
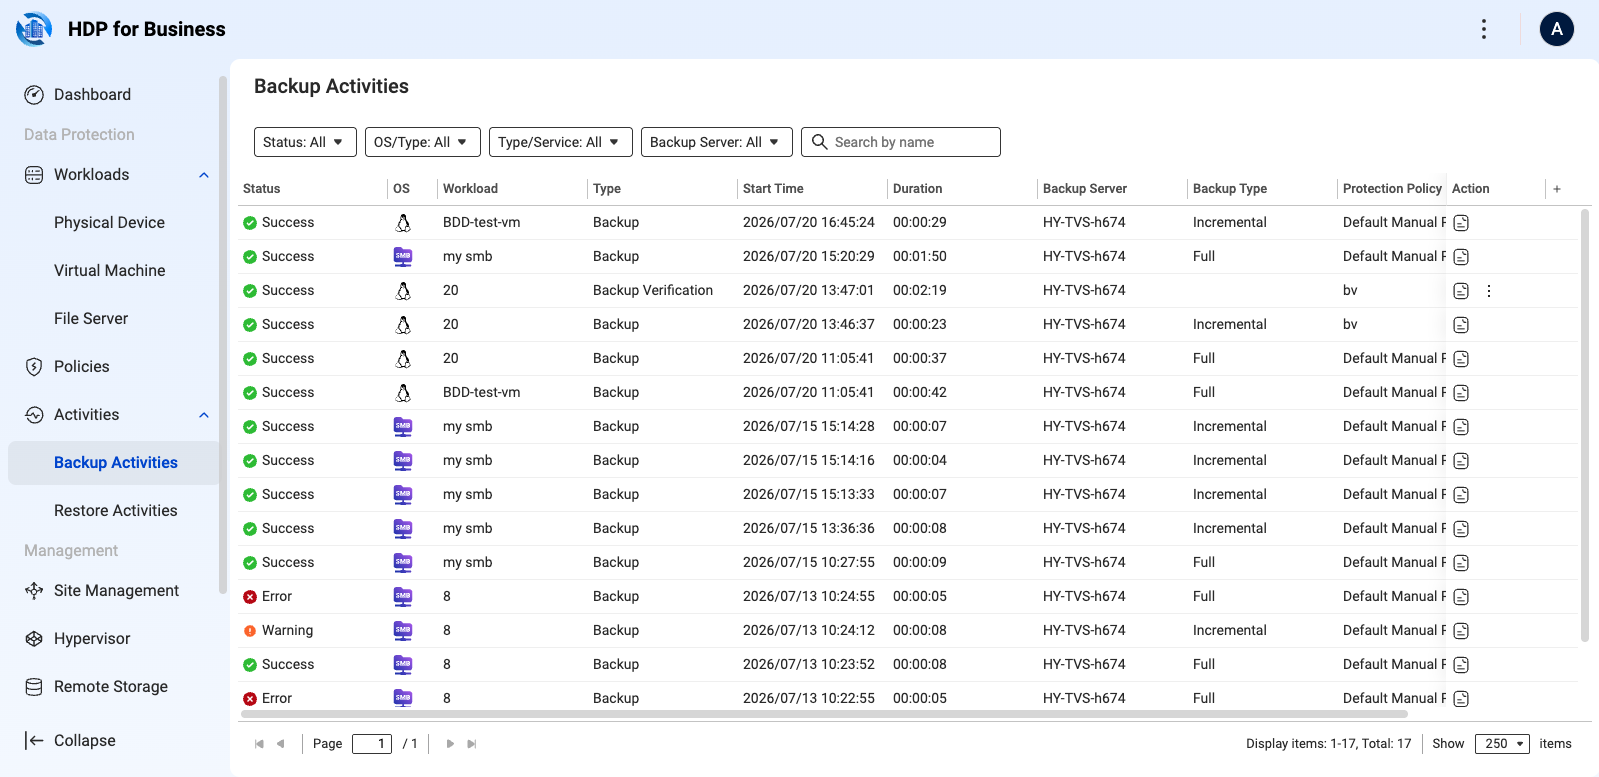
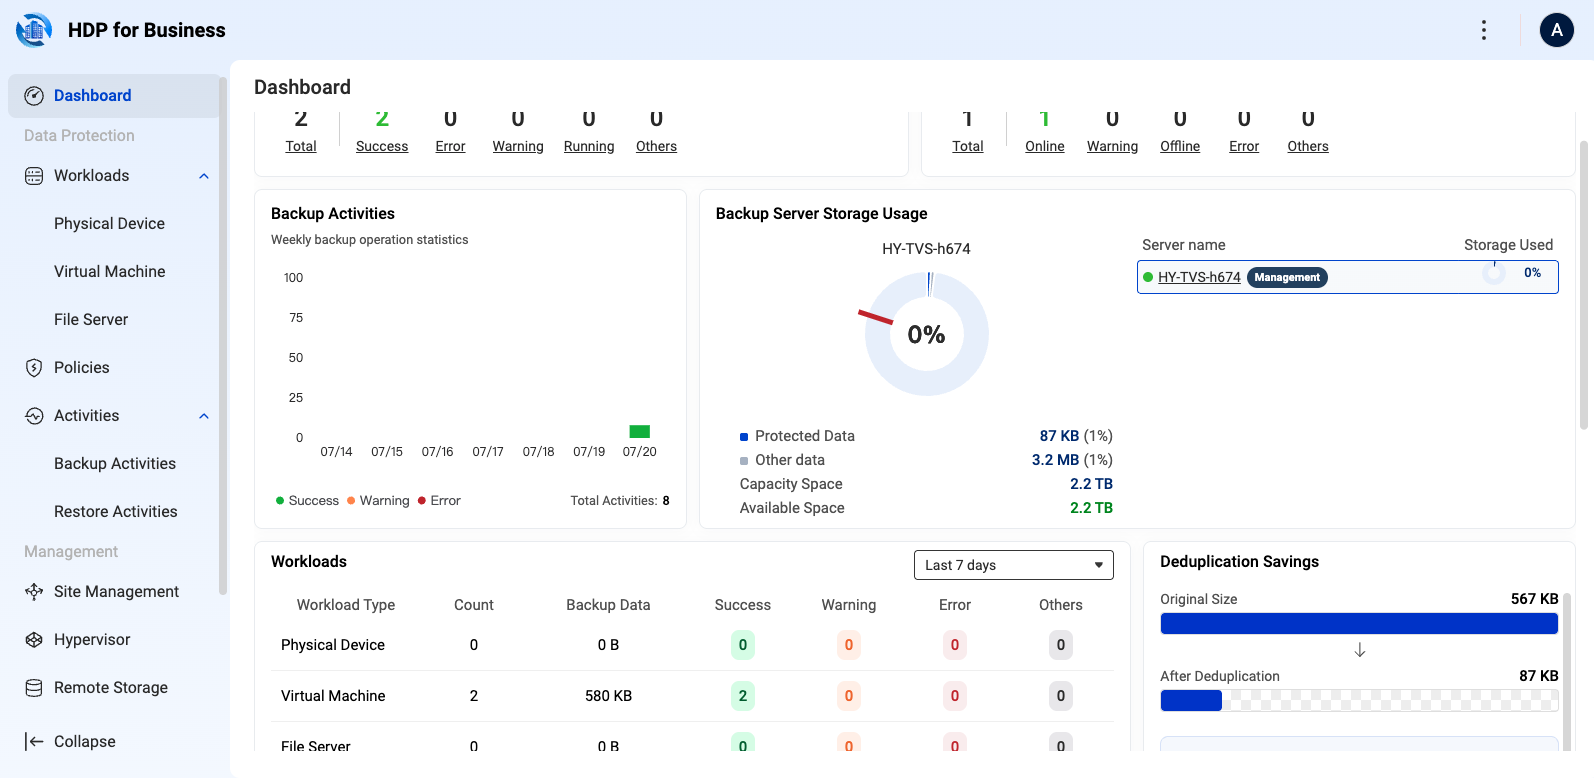
Check progress and history on the Activities page, and the health of the whole environment on the Dashboard, where every figure can be clicked to drill down.
6. Copy Backups to Remote Storage
A backup copy keeps a second copy of your backups in remote object storage, so the data survives the loss of the Backup Server. Supported types are QuObjects, myQNAPcloud Object, Amazon S3, Wasabi, and S3 Compatible.
- Go to Remote Storage, click Add, and select the storage type.
- Connection: enter the access key and secret key, add the endpoint if the type requires one, and verify the connection.
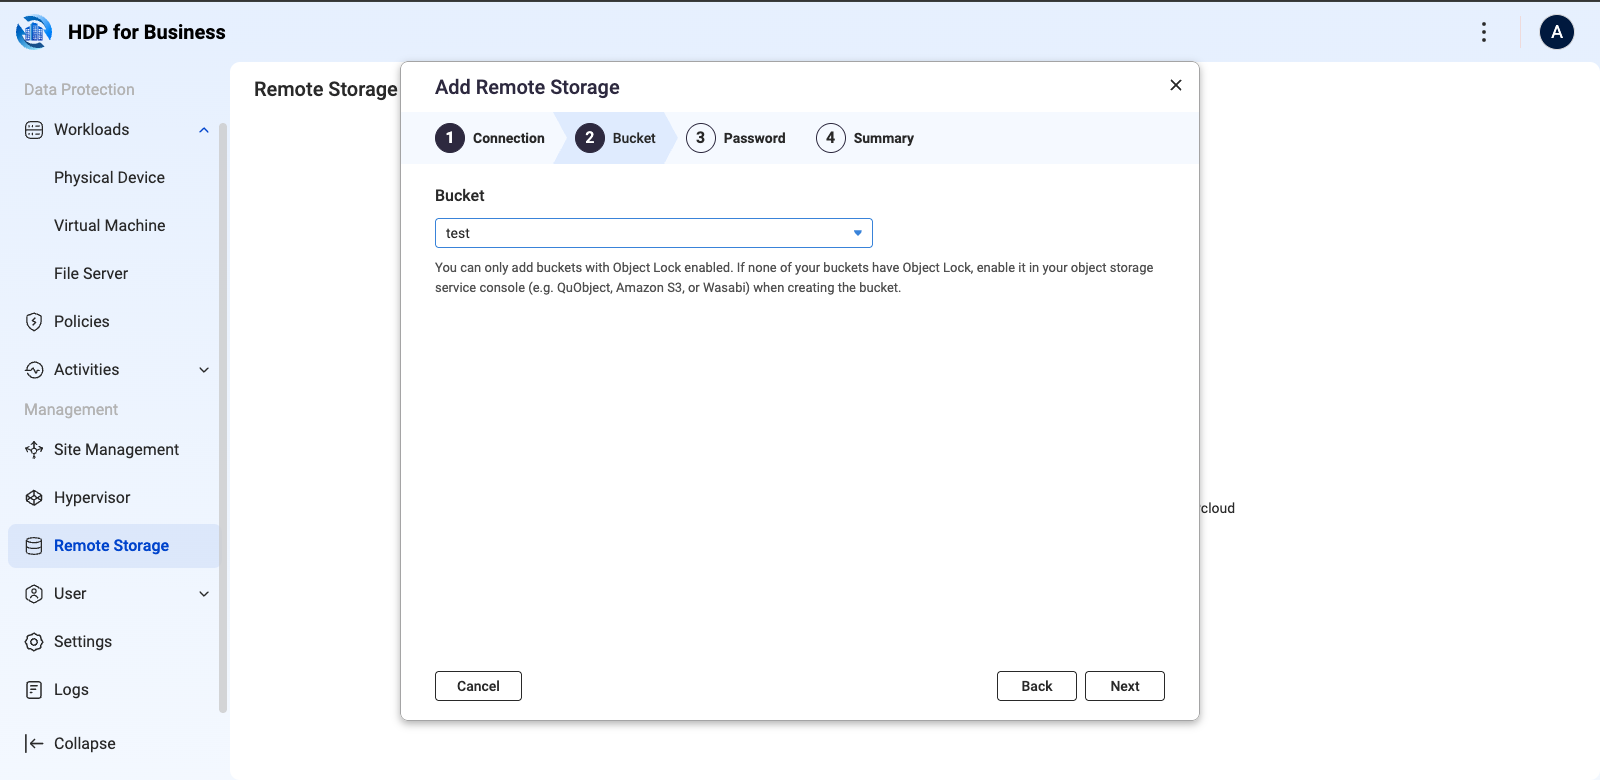
- Bucket: select a bucket. Only buckets with Object Lock enabled can be selected, so that backups cannot be modified or deleted.
- Password: optionally enable password protection for end-to-end encryption, using 8 to 64 characters with uppercase letters, lowercase letters, numbers, and special characters.
- Summary: review and click Create.
Keep the password safe. If it is lost, the backups in that bucket can never be decrypted or recovered, and the password cannot be changed.
Then open the protection policy, select Enable backup copy on the Backup Copy step, and set the target, the retention, and the schedule.
Recover backups from a bucket
When the versions on a Backup Server are lost, or a new Backup Server takes over an existing bucket, click Import Workloads in that storage's row, select the workloads, and click Import. The result is grouped into Relinked, Updated, and Skipped. A workload imported to a machine other than the original is always Unmanaged: you can restore from it, but you cannot assign a policy to it.
7. Restore
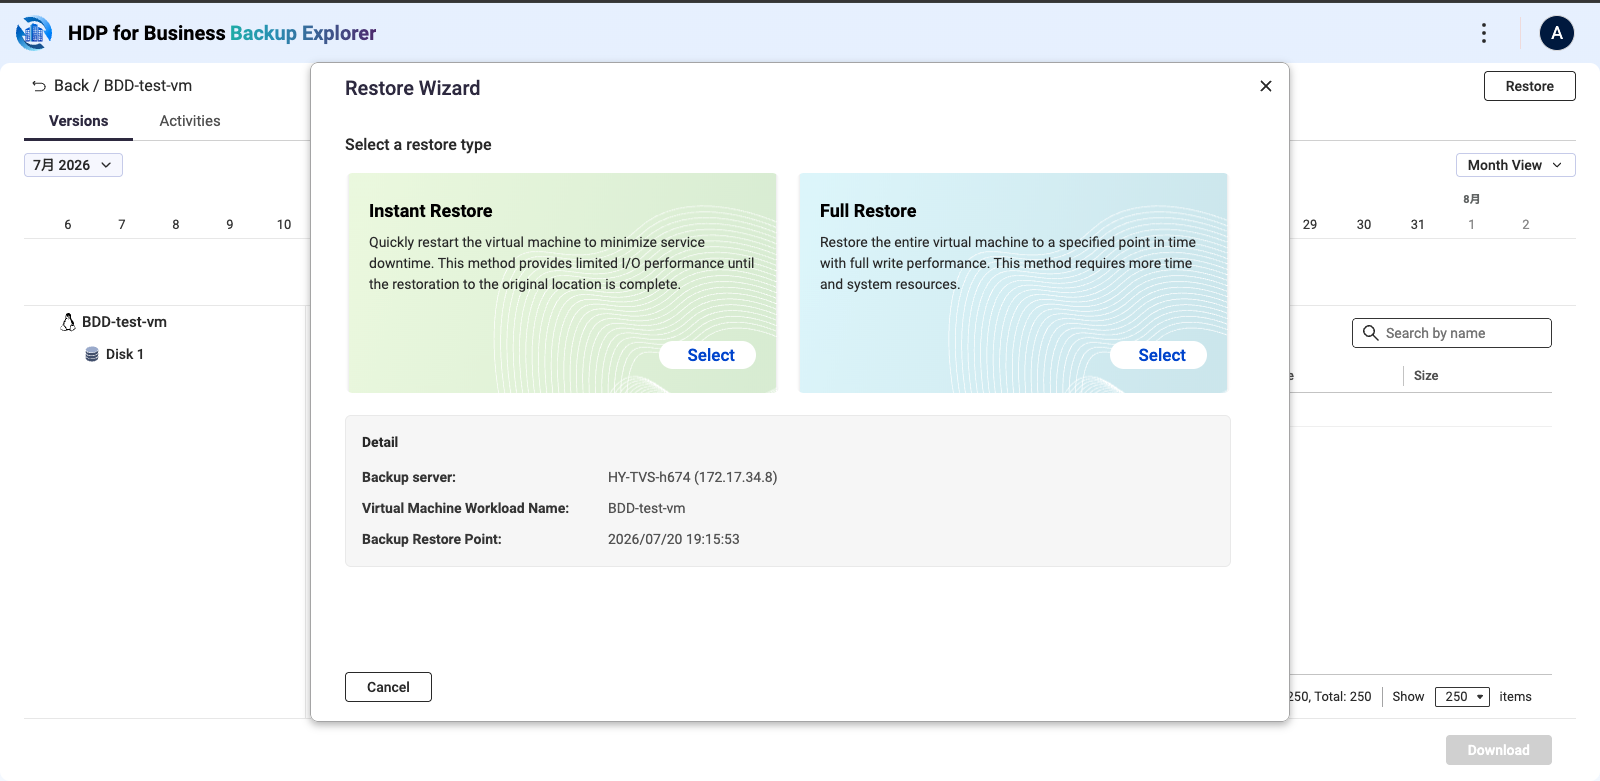
Open Backup Explorer, select a backup version, and click Restore. Then select the restore type.
| Type | When to use it |
|---|
| Instant Restore | Boots the backup directly on the Backup Server within minutes. I/O performance is limited because it runs from read-only backup files. |
| Full Restore | Restores the machine to a hypervisor with full performance, for formal disaster recovery. A backup can only be restored to the same type of hypervisor. Physical computers require bare-metal restore boot media. |
Instant Restore
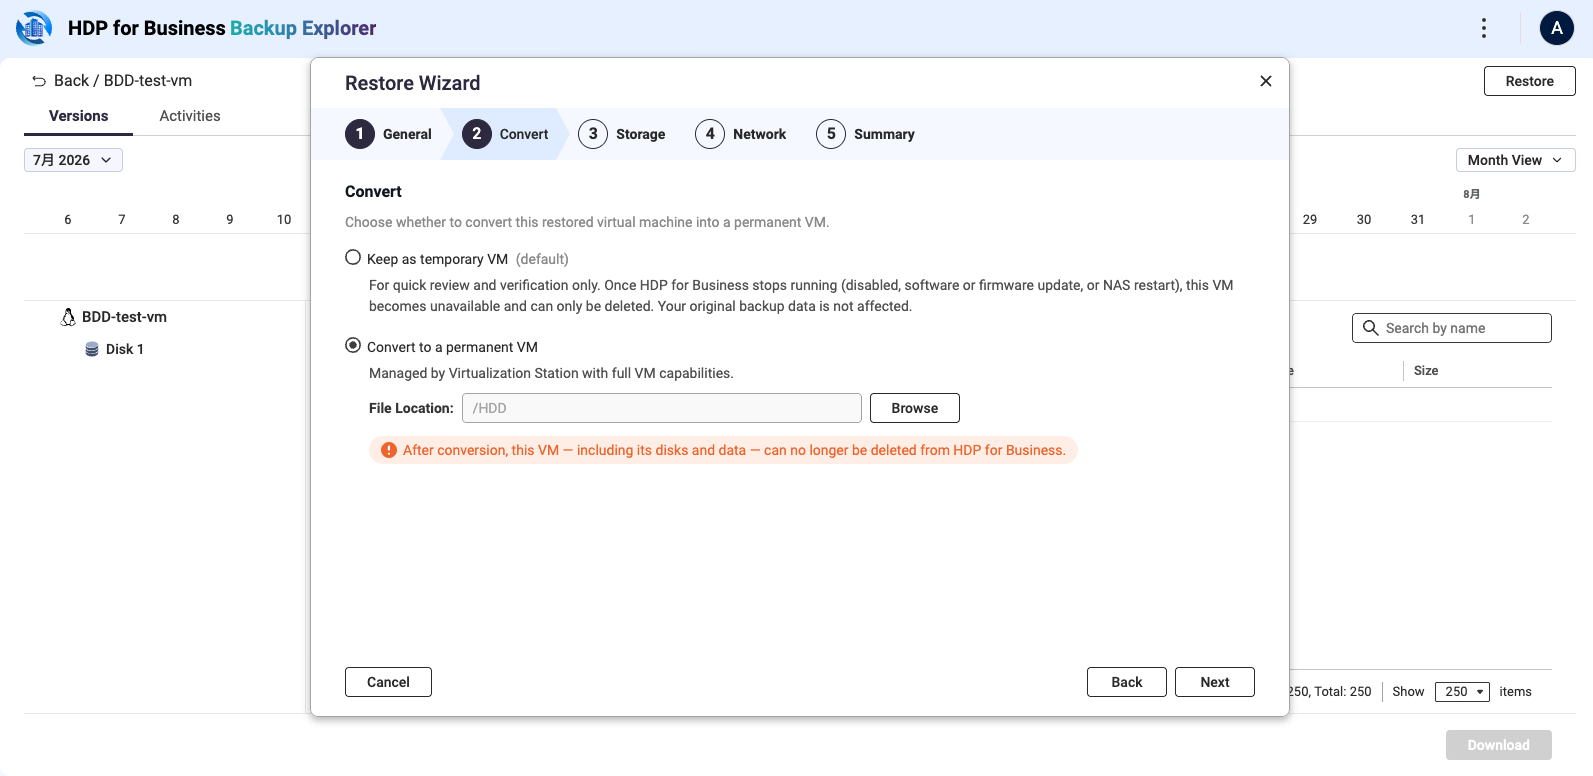
Virtualization Station must be installed and initialized on the Backup Server, with at least 2 GB of available memory. The wizard has five steps: General, Convert, Storage, Network, and Summary.
On the Convert step, decide what happens to the restored machine:
| Option | What it means |
|---|
| Keep as temporary virtual machine (default) | For review and verification. The machine stops working when HDP for Business stops running, for example when it is disabled, updated, or the NAS restarts. The backup data is not affected. |
| Convert to a permanent virtual machine | Handed over to Virtualization Station with full capabilities. Requires a File Location. After the conversion, the virtual machine and its data can no longer be deleted from HDP for Business. |
Free space required for a conversion: the target storage briefly holds two copies of the disks during the conversion, so make sure the File Location has free space of at least twice the disk size of the virtual machine. The intermediate copy is removed automatically when the conversion finishes.
If you kept the machine as temporary, you can convert it later: on the Activities tab of Backup Explorer, click Convert in that task's row. Tasks already marked Converted no longer offer the action.
8. Verify That Backups Can Boot
With backup verification enabled, HDP for Business starts a temporary virtual machine from each completed backup and records the boot as a video. Virtualization Station must be installed and initialized on the Backup Server, with at least 4 GB of available memory.
- In the protection policy, on the Advanced Settings step, select Enable Backup Verification on the Virtual Machine or Physical Device tab.
- Set the Video Duration in seconds. The default is 120 and the range is 30 to 600. Allow enough time for the machine to boot fully.
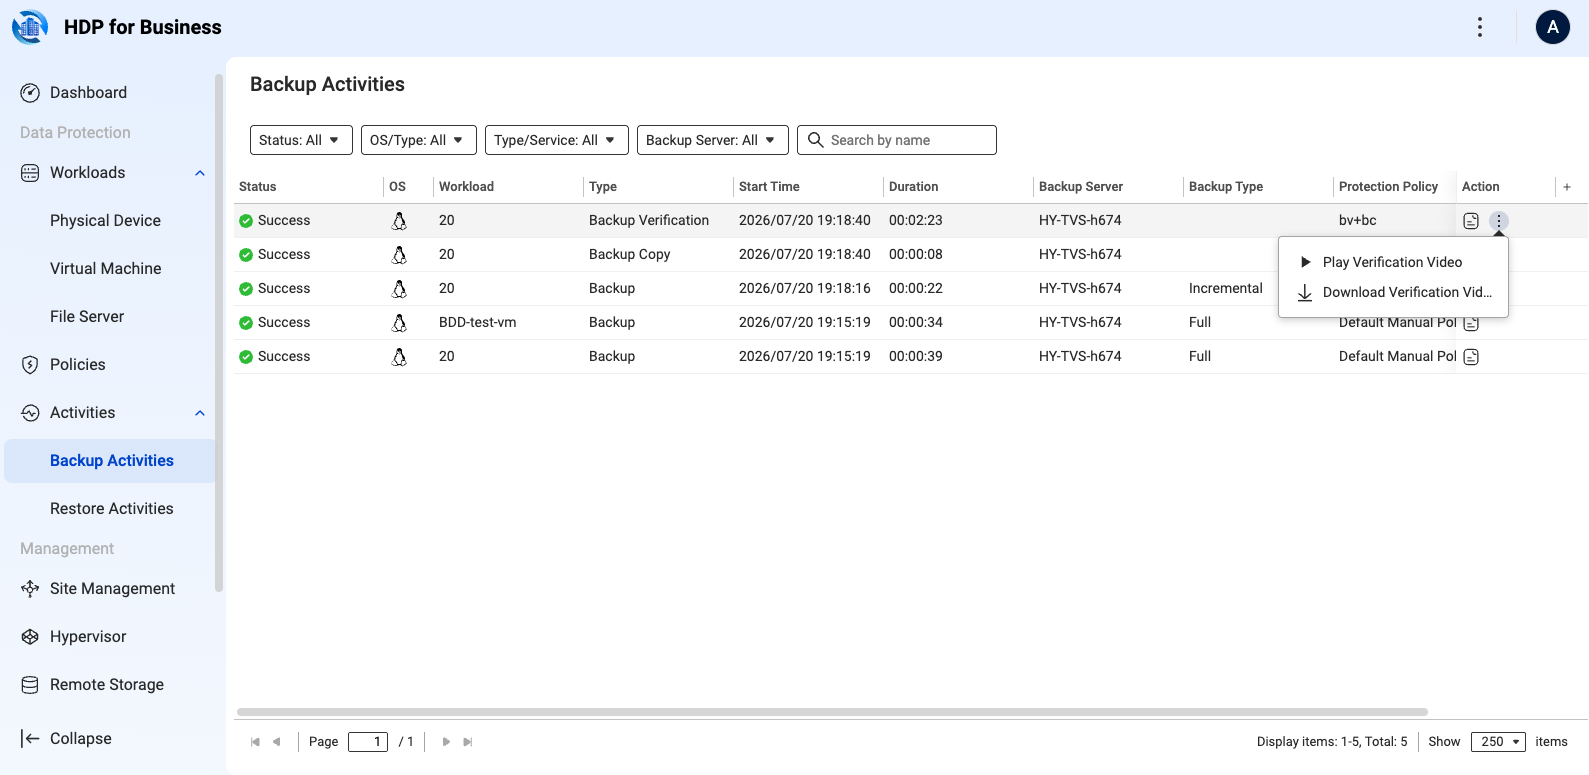
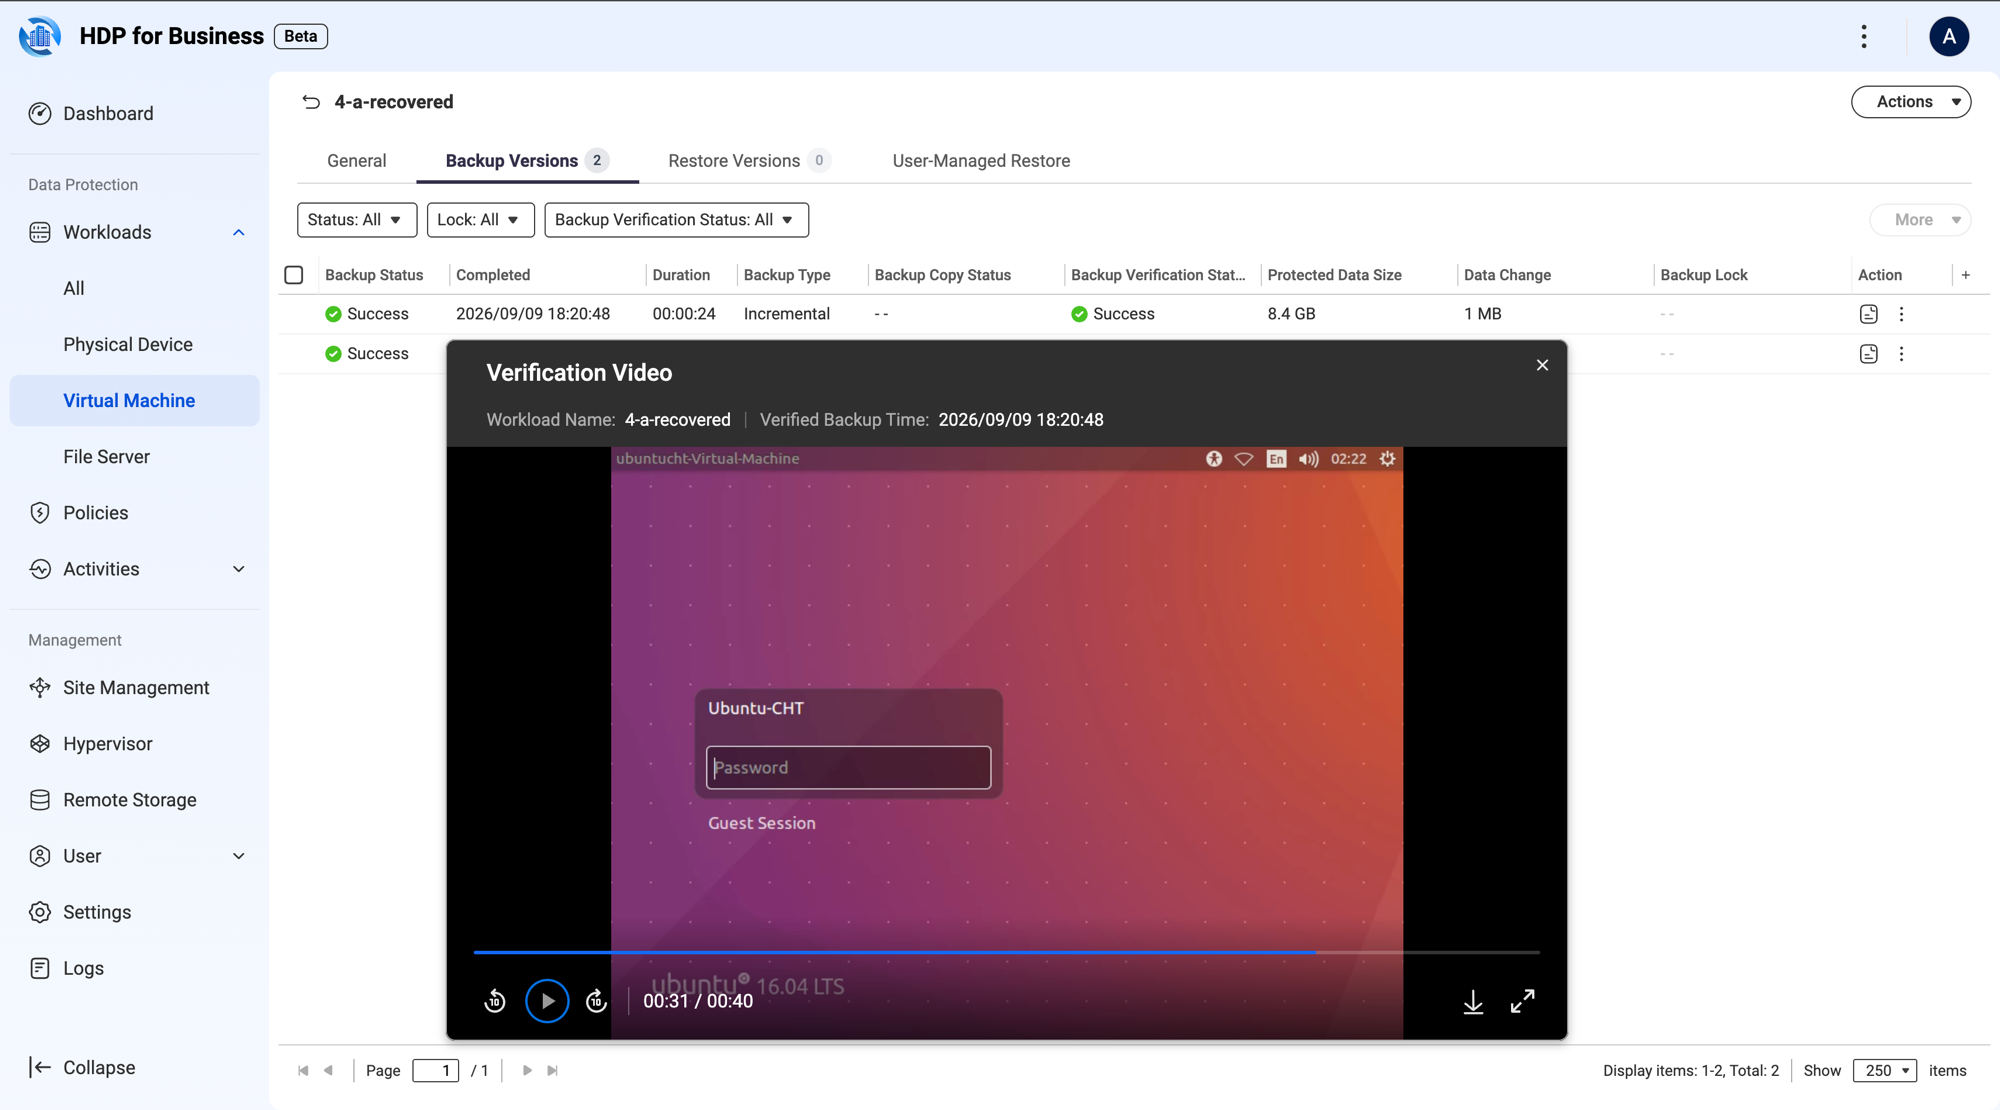
- To watch the result, open the workload and go to its Backup Versions tab. The Backup Verification Status column shows the outcome of each version, and you can narrow the list with the Backup Verification Status filter. Open the action menu of a version and select Play Verification Video or Download Verification Video. The same actions are available from Backup Activities.
Backup Activities lists the verification as a task of the type Backup Verification, with the same two actions in its action menu. The dialog shows the workload name and the verified backup time above the player, and the video can be downloaded or opened full screen from the player controls. A video exists only when the verification succeeds.
9. Isolate a Backup Server with AirGap+
AirGap+ creates physical isolation for critical assets by shutting the Backup Server down on a schedule. A device that is powered off cannot be reached over the network, which puts the backups stored on it out of reach of ransomware, insider access, and unauthorized connections.
- Go to Site Management and click the name of the Backup Server to open its detail page.
- Open the Airgap+ tab.
- The weekly grid covers every hour of every day, from 12 AM to 11 PM. Select the hours during which the server is protected. Selected hours are marked Deny all collections, and unselected hours remain No settings applied.
- Click Apply. The button is enabled only after you change the grid.
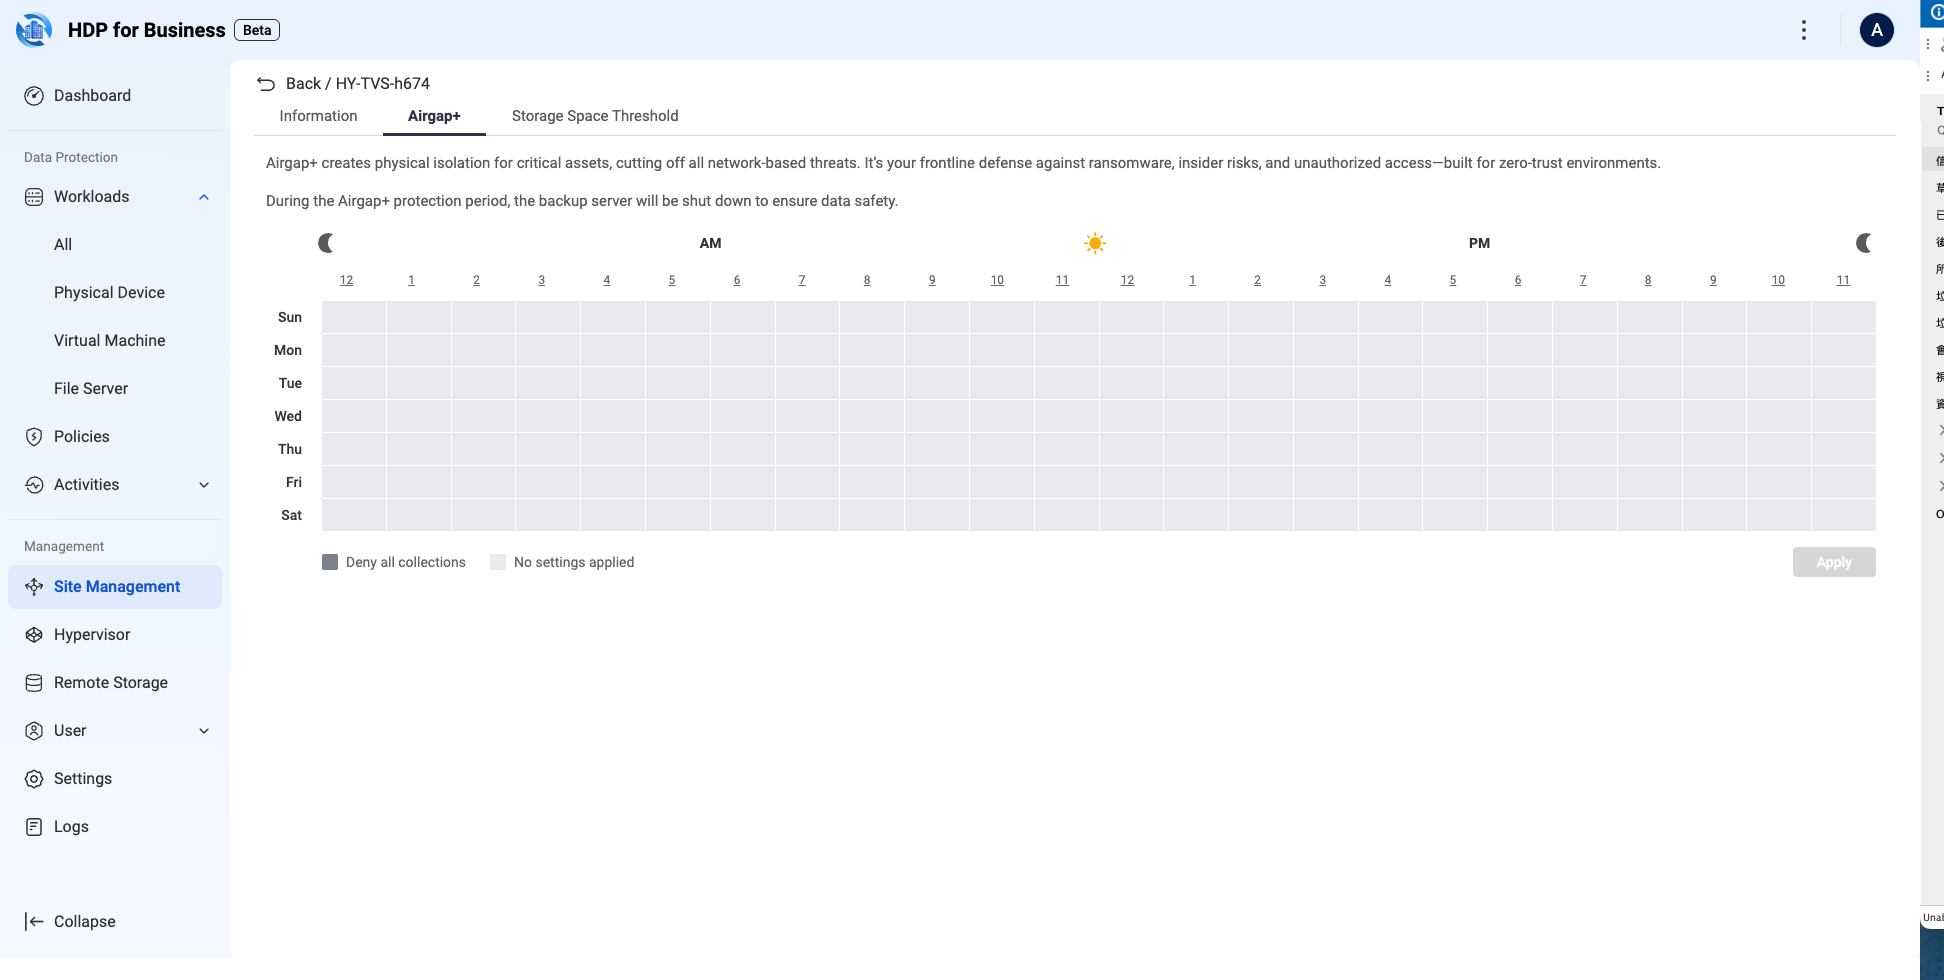
During the protection period the Backup Server is shut down, no backup collection runs on it, and it appears as Offline in Site Management. Logs of that device cannot be queried while it is offline, because log queries are forwarded to the device in real time. The Logs page on the Management Server records the applied schedule and the next power-off time.
What's Next
対象製品
- HDP for Business
- QuTS hero 6.0.2 and later
目的
このチュートリアルでは、空の QNAP NAS から稼働中のバックアップ環境を構築する方法を説明します。HDP for Business をインストールし、サイトを構築し、仮想マシンとコンピュータを保護下に置き、保護ポリシーを作成し、バックアップをオフサイトにコピーし、復元と検証を行います。各セクションは独立しているため、必要なタスクに直接移動できます。
前提条件
- QuTS hero 6.0.2 以降を実行している QNAP NAS。管理サーバーには中〜高性能モデルを推奨します。
- 十分な空き容量のあるストレージスペース。
- 同じ NAS にインストールされた HDP for PC/VM 2.4.1.871 以降。
- インスタントリストアまたはバックアップ検証を使用する場合は、Virtualization Station 4.2.0.257 以降。
- NAS 上の管理者アカウント。
1. HDP for Business をインストール
- NAS に管理者としてサインインし、App Centerを開きます。
- HDP for Businessを検索し、インストールをクリックします。
- 開くをクリックします。ウェルカムページが表示されます。
- HDP for Business のセットアップをクリックします。セットアップステップページが開き、ストレージを割り当て、初期化前に依存関係を確認します。
依存関係の確認
| ステータス | 意味 | 対処方法 |
|---|
| 緑のチェックマーク | インストール済みで互換性があります。 | 何もしません。アイテムはデフォルトで選択されています。 |
| 黄色の警告、グレーアウト | インストールされていますが、バージョンが古すぎます。 | ページに記載されているバージョンにアップグレードしてください。 |
| グレー | インストールされていません。 | App Center からインストールしてください。 |
Virtualization Station は異なる方法で処理されます: ページはインストールされているかどうかと、バージョンが十分かどうかのみを報告します。欠落している場合、Instant Restore に関連するオプションはグレーアウトされます。このページのガイド付きフローからインストールできます。
ストレージスペースを選択
システムは、選択したストレージスペースにHDP_Businessという名前の共有フォルダーを作成します。ストレージスペースは初期化後に変更できないため、慎重に選択してください。ストレージスペースがアラートのしきい値を超えた場合や暗号化されている場合はグレー表示されます。選択可能なストレージスペースがない場合は、ストレージマネージャーでスペースを解放し、更新をクリックしてください。
HDP for Business はこのフォルダーを削除しません。アプリをアンインストールした後もストレージスペースに残り、バックアップデータが保持されます。後で別のストレージスペースを使用するには、まずストレージマネージャーでHDP_Businessフォルダーを削除してください。
初期化を実行
初期化をクリックします。HDP for Business は、実行中のバックアップを中断することなく、既存の HDP for PC/VM を自動的に引き継ぎます。引き継ぎ後、未完了のバックアップは続行されます。プロセスが完了すると、NAS は管理サーバーになります。
2. サイトを構築
サイトは 1 つの管理サーバー、最大 4 つのバックアップサーバー、オプションで 1 つの待機管理サーバーで構成されます。
- 管理サーバーで、サイト管理に移動し、参加 > 招待キーを生成をクリックします。
- サーバー URLと招待キーをコピーし、バックアップサーバーの管理者に送信します。キーは一度だけ使用でき、5 分後に期限切れになります。期限切れの場合は再生成をクリックしてください。
- バックアップサーバーで、サイト管理に移動し、参加 > サイトに参加をクリックします。
- 管理サーバー URL と参加キーを入力し、参加をクリックします。ページにはこのサーバーは管理されていますと表示されます。
管理サーバーでは、デバイスが接続中、同期中、オンラインを経て移動します。
スタンバイ管理サーバーとスイッチオーバー
追加フェイルオーバーサーバーエリアで、スタンバイとして機能するバックアップサーバーを選択します。システムは、スイッチオーバー後に接続するため、すべてのバックアップサーバーが到達可能かどうかを確認します。一部のサーバーが到達不能と報告しても追加できますが、スイッチオーバー後にそれらのサーバーは管理できない可能性があります。
スタンバイに管理制御を引き継ぐには、管理サーバーで管理 > スイッチオーバーを使用するか、スタンバイ自身のページのスイッチオーバーエリアを使用します。プロセス中はスケジュールされたタスクが一時停止し、自動的に再開します。
ワークロードを別のバックアップサーバーに転送
バックアップサーバーを退役またはリリースするには、サイト管理ページのその行の三点アクションメニューをクリックし、転送を選択します。ワークロード設定は一括して宛先のバックアップサーバーに移動し、バックアップ操作を引き継ぎます。
3. 保護したいものを追加
仮想マシン
仮想マシンのバックアップはハイパーバイザーに接続してインベントリを読み取ります。仮想マシン内にエージェントはインストールされません。
- ハイパーバイザーページに移動し、追加をクリックしてプラットフォームを選択します。
- 名前、ホスト IP アドレス、サーバーポート、ユーザー名、パスワードを入力し、追加をクリックします。
| プラットフォーム | デフォルトポート | 注意事項 |
|---|
| VMware | 443 | スタンドアロン ESXi と vCenter の両方がサポートされています。ホストを管理する vCenter への接続が推奨されます。 |
| Hyper-V | 5985 | — |
| Proxmox VE | 22 | バージョン 8.x および 9.x。ノードを追加すると、クラスター全体が取り込まれます。 |
ハイパーバイザーを接続すると、インベントリのみが取得されます。仮想マシンをWorkloads > Virtual Machineページでワークロードとして追加するには、2 つの方法があります。
- 特定の仮想マシンを選択: Addをクリックし、左側でソースプラットフォームを選択し、右側のHost and クラスタービューでデータセンターまたはホストを展開し、仮想マシンを選択してSelectをクリックします。
- 自動保護ルールを作成: Auto Protection Rule > Createをクリックし、ルール名、ソースインベントリフォルダー、ターゲットバックアップサーバー、保護ポリシーを設定します。そのフォルダーに後で追加された仮想マシンは自動的に保護されます。
Windows コンピュータ
物理コンピュータは HDP for Business Agent によって保護されます。Physical DeviceページでAddをクリックし、インストーラーをダウンロードし、バックアップサーバーとポリシーを結びつけるジョインキーを作成します。エージェントをコンピュータにインストールし、そのキーで接続します。完全な手順については、HDP for Business Agent のチュートリアルを参照してください。
ファイルサーバー
ファイルサーバーはWorkloads > File Serverページで SMB を介して追加されます。Addをクリックし、ウィザードを完了します: ホスト、ポート(デフォルトは 445)、アカウント、パスワード、タイムアウトを含む接続設定、ソースパスとターゲットバックアップサーバー、保護ポリシー、サマリー。
4. 保護ポリシーを作成する
2 つのポリシーが組み込まれており、削除できません: デフォルトポリシーは毎日 09:00 に実行され、デフォルト手動ポリシーは開始したときのみ実行されます。どちらも 30 バージョンを保持します。独自のポリシーを作成するには:
- 保護ポリシーに移動し、作成 > マシンポリシーをクリックします。
- 一般: 一意の名前を入力し、ポリシータイプを選択します。標準保護ポリシーは保持ルールによってバージョンを管理し、不変保護ポリシーは保持期間中にバックアップが変更または削除されるのを防ぎ、日数でのみ設定できます。作成後にタイプを変更することはできません。
- バックアップ設定: 保持ルールを設定します — バージョン数(デフォルトは 30)、日数(デフォルトは 30)、またはスマートバージョン管理 — およびスケジュールを設定します。スケジュールは手動または最小間隔 5 分の自動にできます。
- 詳細設定: 必要に応じて仮想マシン、物理デバイス、データベースタブを構成します。ここでバックアップ検証を有効にするを選択します。
- バックアップコピー: 必要に応じて各バックアップをリモートストレージにコピーします。リモートストレージを最初にセットアップしてください。詳細はセクション 6 を参照してください。
- 概要: 確認して作成をクリックします。
5. バックアップの実行と監視
- スケジュール: ポリシーは設定した時間に実行されます。
- 手動: ワークロードページで、その行のバックアップアイコンをクリックするか、複数のワークロードを選択してその他 > バックアップをクリックします。
アクティビティページで進捗と履歴を確認し、ダッシュボードで環境全体の健全性を確認します。各数値をクリックして詳細を確認できます。
6. バックアップをリモートストレージにコピー
バックアップコピーは、リモートオブジェクトストレージにバックアップの第 2 コピーを保持するため、バックアップサーバーの損失に備えます。サポートされているタイプは QuObjects、myQNAPcloud Object、Amazon S3、Wasabi、S3 互換です。
- リモートストレージに移動し、追加をクリックして、ストレージタイプを選択します。
- 接続: アクセスキーとシークレットキーを入力し、タイプが必要とする場合はエンドポイントを追加し、接続を確認します。
- バケット: バケットを選択します。バックアップは変更や削除ができないように、オブジェクトロックが有効なバケットのみ選択できます。
- パスワード: オプションでエンドツーエンド暗号化のためのパスワード保護を有効にします。大文字、小文字、数字、特殊文字を含む 8〜64 文字を使用します。
- 概要: 確認して作成をクリックします。
パスワードを安全に保管してください。紛失した場合、そのバケット内のバックアップは復号化や復元が不可能になり、パスワードを変更することもできません。
次に保護ポリシーを開き、バックアップコピーのステップでバックアップコピーを有効にするを選択し、ターゲット、保持期間、スケジュールを設定します。
バケットからバックアップを復元
バックアップサーバー上のバージョンが失われた場合や、新しいバックアップサーバーが既存のバケットを引き継ぐ場合、そのストレージの行でワークロードをインポートをクリックし、ワークロードを選択してインポートをクリックします。結果は再リンク、更新、スキップに分類されます。元のマシン以外にインポートされたワークロードは常に管理外となります:復元は可能ですが、ポリシーを割り当てることはできません。
7. 復元
バックアップ エクスプローラーを開き、バックアップバージョンを選択して復元をクリックします。その後、復元タイプを選択します。
| タイプ | 使用するタイミング |
|---|
| インスタントリストア | バックアップサーバー上で数分以内にバックアップを直接起動します。読み取り専用のバックアップファイルから実行されるため、I/ O パフォーマンスは制限されます。 |
| フルリストア | 正式な災害復旧のために、マシンをフルパフォーマンスでハイパーバイザーに復元します。バックアップは同じタイプのハイパーバイザーにのみ復元可能です。物理コンピューターにはベアメタルリストアブートメディアが必要です。 |
インスタントリストア
Virtualization Station はバックアップサーバーにインストールされ、初期化されている必要があります。少なくとも 2GB の利用可能なメモリが必要です。ウィザードは 5 つのステップで構成されています:一般、変換、ストレージ、ネットワーク、サマリー。
変換ステップで、復元されたマシンに何が起こるかを決定します:
| オプション | その意味 |
|---|
| 一時的な仮想マシンとして保持(デフォルト) | レビューと検証のため。例えば、HDP for Business が無効化、更新、または NAS が再起動されたときに停止します。バックアップデータには影響しません。 |
| 永続的な仮想マシンに変換 | 完全な機能を備えた Virtualization Station に引き渡されます。ファイルの場所が必要です。変換後、仮想マシンとそのデータは HDP for Business から削除できなくなります。 |
変換に必要な空き容量:変換中、ターゲットストレージは一時的にディスクの 2 つのコピーを保持するため、ファイルの場所に仮想マシンのディスクサイズの少なくとも 2 倍の空き容量があることを確認してください。変換が完了すると中間コピーは自動的に削除されます。
マシンを一時的に保持していた場合、後で変換できます: バックアップ エクスプローラーのアクティビティタブで、そのタスクの行にある変換をクリックします。すでに変換済みとマークされたタスクはこの操作を提供しません。
8. バックアップが起動できることを確認
バックアップ検証が有効になっていると、HDP for Business は完了した各バックアップから一時的な仮想マシンを起動し、起動をビデオとして記録します。バックアップサーバーには Virtualization Station がインストールされ、初期化されている必要があり、少なくとも 4GB の利用可能なメモリが必要です。
- 保護ポリシーの詳細設定ステップで、仮想マシンまたは物理デバイスタブでバックアップ検証を有効にするを選択します。
- ビデオの長さを秒単位で設定します。デフォルトは 120 で、範囲は 30 から 600 です。マシンが完全に起動するのに十分な時間を確保してください。
- 結果を確認するには、ワークロードを開き、そのバックアップバージョンタブに移動します。バックアップ検証ステータス列には各バージョンの結果が表示され、バックアップ検証ステータスフィルターでリストを絞り込むことができます。バージョンのアクションメニューを開き、検証ビデオを再生または検証ビデオをダウンロードを選択します。同じ操作はバックアップアクティビティからも利用可能です。
バックアップアクティビティは、バックアップ検証タイプのタスクとして検証をリストし、そのアクションメニューには同じ 2 つのアクションがあります。ダイアログには、プレーヤーの上にワークロード名と検証されたバックアップ時間が表示され、ビデオはプレーヤーコントロールからダウンロードまたは全画面で開くことができます。ビデオは検証が成功した場合にのみ存在します。
9. AirGap+ でバックアップサーバーを隔離する
AirGap+ は、バックアップサーバーをスケジュールに従ってシャットダウンすることで、重要な資産に物理的な隔離を作り出します。電源がオフになっているデバイスはネットワーク経由でアクセスできないため、そこに保存されているバックアップはランサムウェア、内部アクセス、無許可の接続から保護されます。
- サイト管理に移動し、バックアップサーバーの名前をクリックして詳細ページを開きます。
- Airgap+タブを開きます。
- 週ごとのグリッドは、毎日午前 12 時から午後 11 時までのすべての時間をカバーしています。サーバーが保護される時間を選択します。選択された時間はすべてのコレクションを拒否としてマークされ、選択されていない時間は設定が適用されていませんのままです。
- 適用をクリックします。グリッドを変更した後にのみボタンが有効になります。
保護期間中、バックアップサーバーはシャットダウンされ、バックアップコレクションは実行されず、サイト管理ではオフラインとして表示されます。そのデバイスのログはオフライン中にクエリできません。なぜなら、ログクエリはリアルタイムでデバイスに転送されるからです。管理サーバーのログページには、適用されたスケジュールと次の電源オフ時間が記録されます。
次のステップ


