Applicable Products
- HDP for Business
- QuTS hero 6.0.2 and later
Purpose
This tutorial takes you from an empty QNAP NAS to a working backup environment: install HDP for Business, build a site, bring virtual machines and computers under protection, create a protection policy, copy backups off site, and restore and verify them. Each section stands on its own, so you can jump to the task you need.
Prerequisites
- A QNAP NAS running QuTS hero 6.0.2 or later. A mid-to-high-end model is recommended for the Management Server.
- An available storage space with enough free space.
- HDP for PC/VM 2.4.1.871 or later installed on the same NAS.
- Virtualization Station 4.2.0.257 or later, if you plan to use Instant Restore or Backup Verification.
- An administrator account on the NAS.
1. Install HDP for Business
- Sign in to the NAS as an administrator and open App Center.
- Search for HDP for Business and click Install.
- Click Open. The welcome page appears.
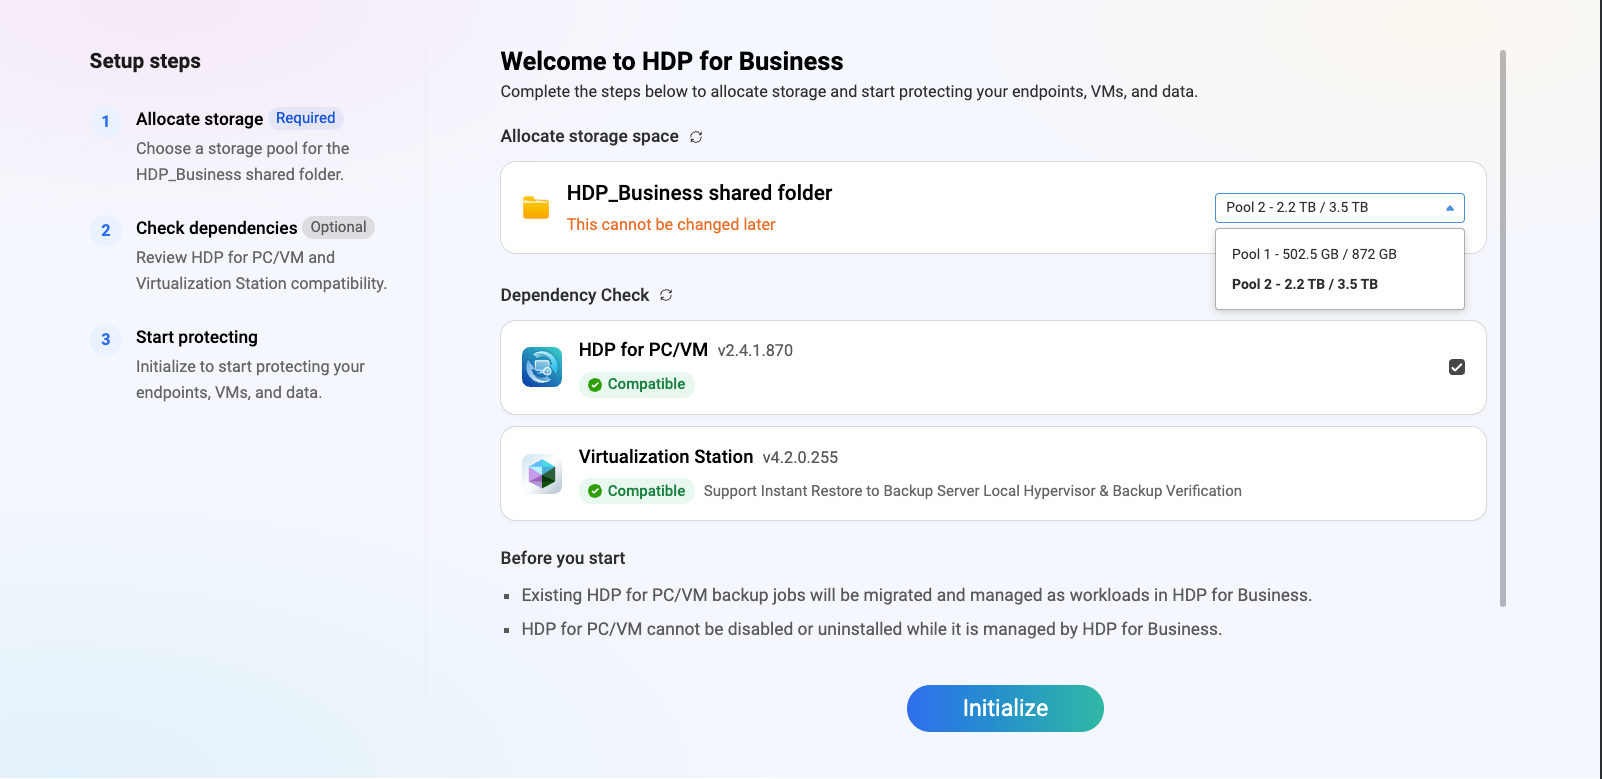
- Click Set up HDP for Business. The setup steps page opens, where you allocate storage and check dependencies before initializing.
Dependency check
| Status | What it means | What to do |
|---|
| Green check mark | Installed and compatible. | Nothing. The item is selected by default. |
| Yellow warning, grayed out | Installed, but the version is too old. | Upgrade to the version stated on the page. |
| Gray | Not installed. | Install it from App Center. |
Virtualization Station is handled differently: the page only reports whether it is installed and whether the version is sufficient. If it is missing, the options related to Instant Restore are grayed out. You can install it from the guided flow on this page.
Select a storage space
The system creates a shared folder named HDP_Business in the storage space you select. The storage space cannot be changed after initialization, so choose carefully. A storage space is grayed out when it has exceeded its alert threshold or when it is encrypted. If no storage space can be selected, free up space in Storage Manager, and then click Refresh.
HDP for Business never deletes this folder. It remains on the storage space even after you uninstall the app, so your backup data is preserved. To use a different storage space later, delete the HDP_Business folder in Storage Manager first.
Run the initialization
Click Initialize. HDP for Business takes over the existing HDP for PC/VM automatically, without interrupting running backups. Unfinished backups continue after the takeover. When the process completes, the NAS is a Management Server.
2. Build a Site
A site is one Management Server, up to four Backup Servers, and optionally one standby Management Server.
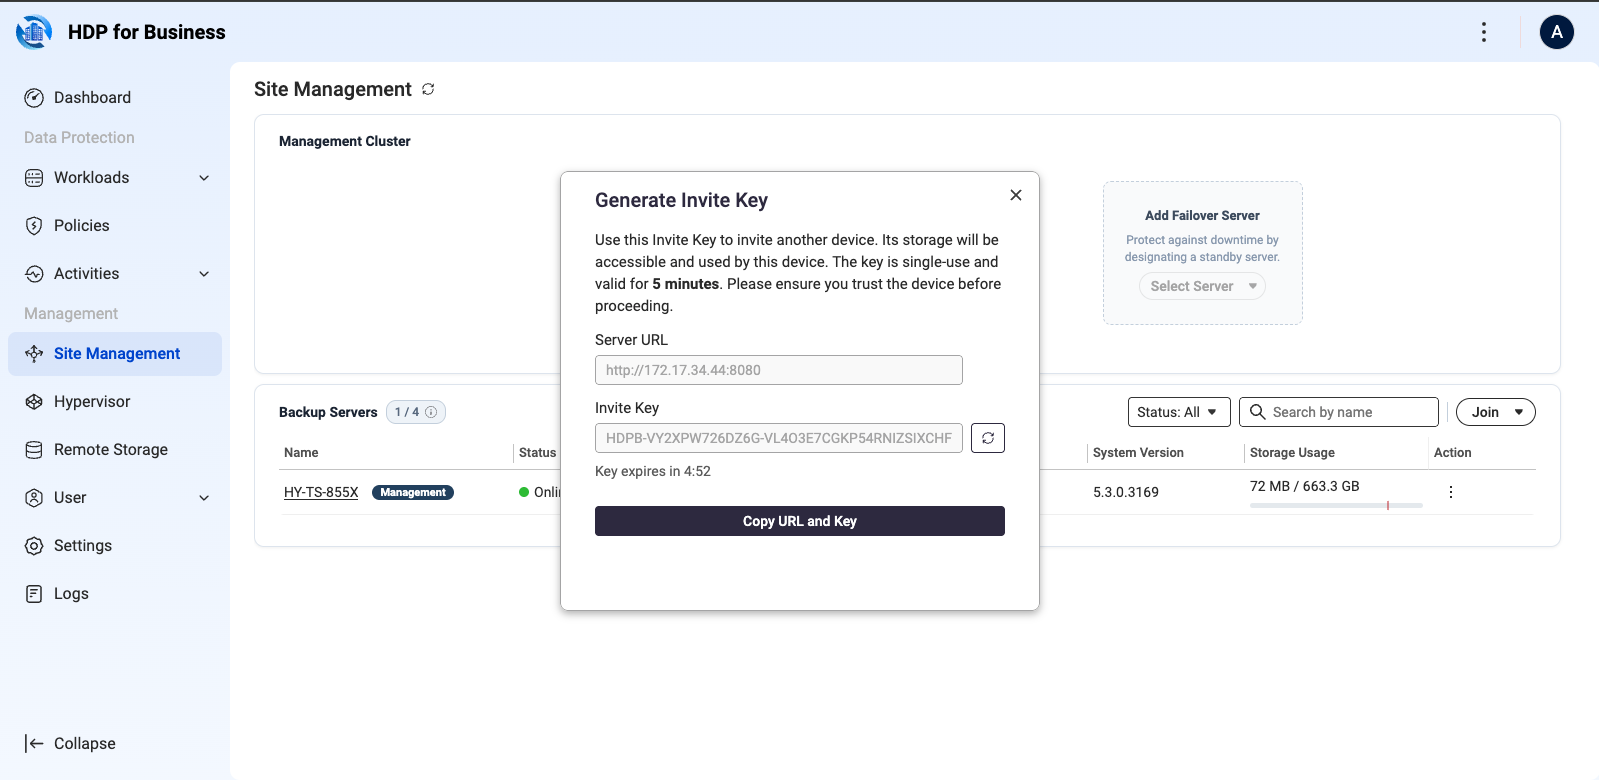
- On the Management Server, go to Site Management and click Join > Generate Invite Key.
- Copy the Server URL and the Invite Key, and send them to the administrator of the Backup Server. The key can be used once and expires after five minutes; click Regenerate if it expires.
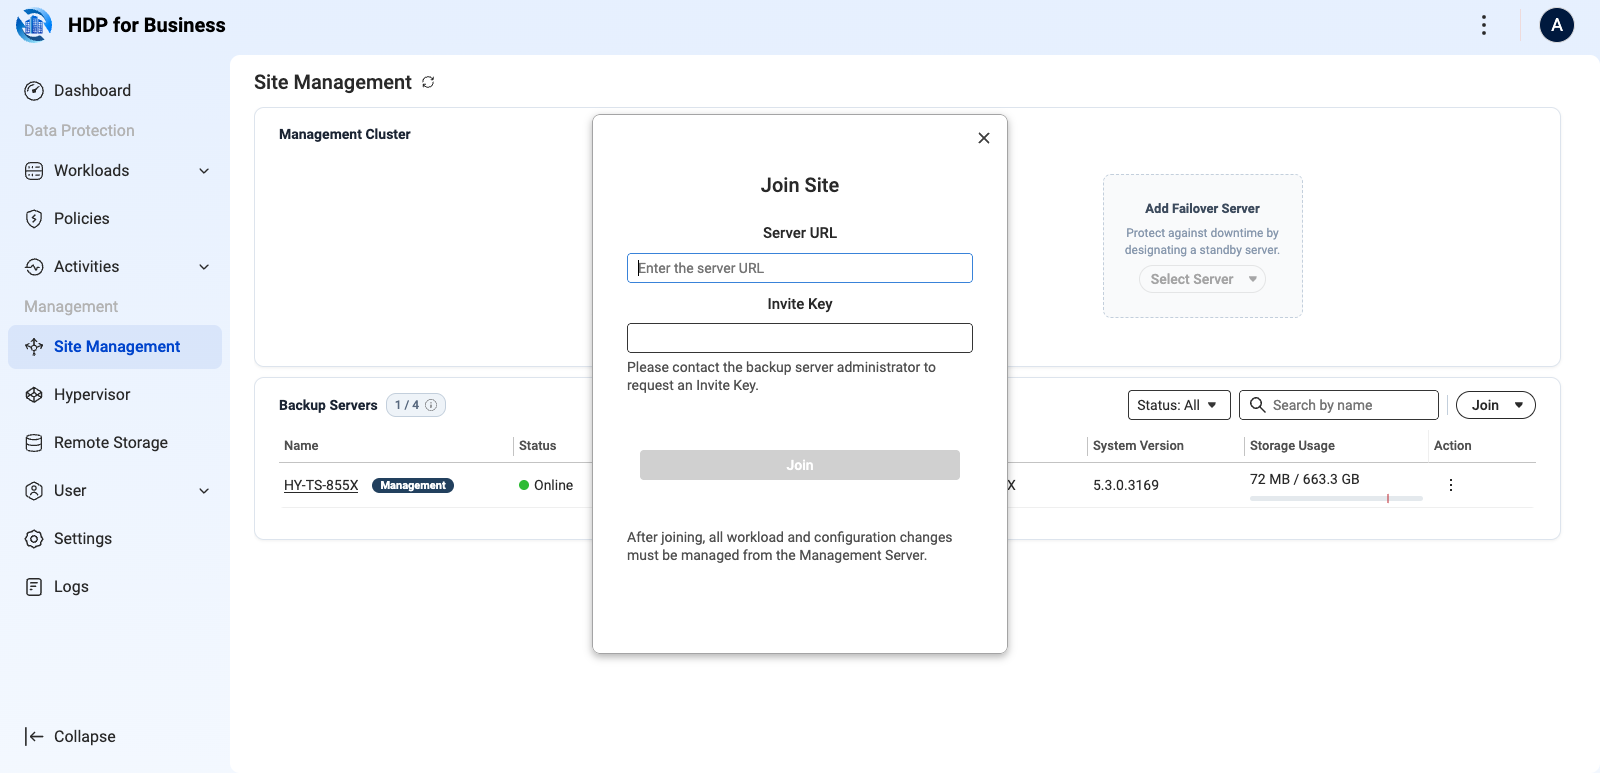
- On the Backup Server, go to Site Management and click Join > Join Site.
- Enter the Management Server URL and the Join Key, then click Join. The page shows This server is managed.
On the Management Server, the device moves through Connecting, Syncing, and Online.
Standby Management Server and switch over
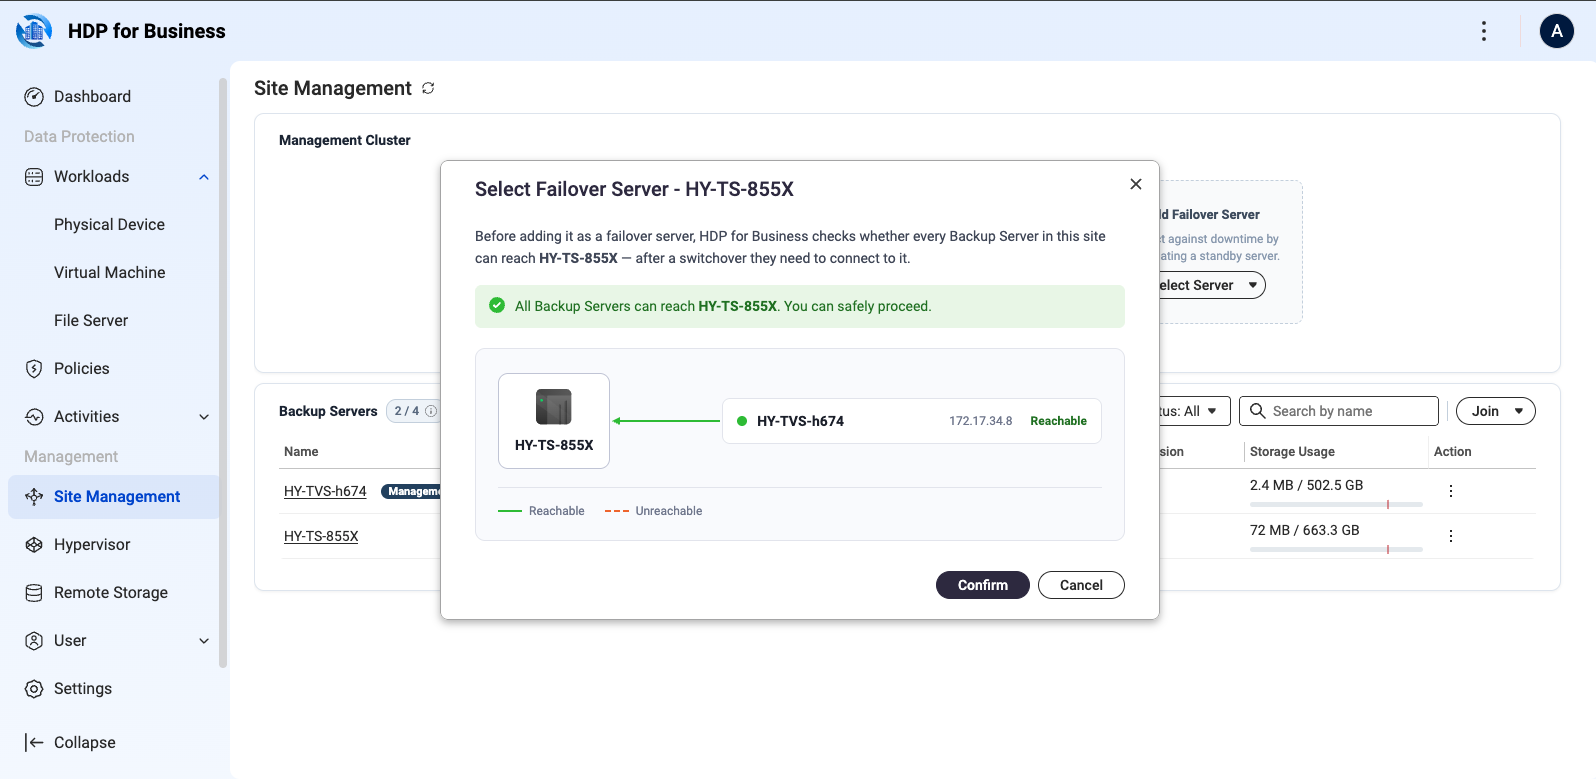
In the Add Failover Server area, select a Backup Server to act as the standby. The system checks whether every Backup Server can reach it, because they connect to it after a switchover. You can still add it when some servers report Unreachable, but those servers may be unmanageable after a switchover.
To hand management control to the standby, use Manage > Switch Over on the Management Server, or the Switch Over area on the standby's own page. Scheduled tasks pause during the process and resume automatically.
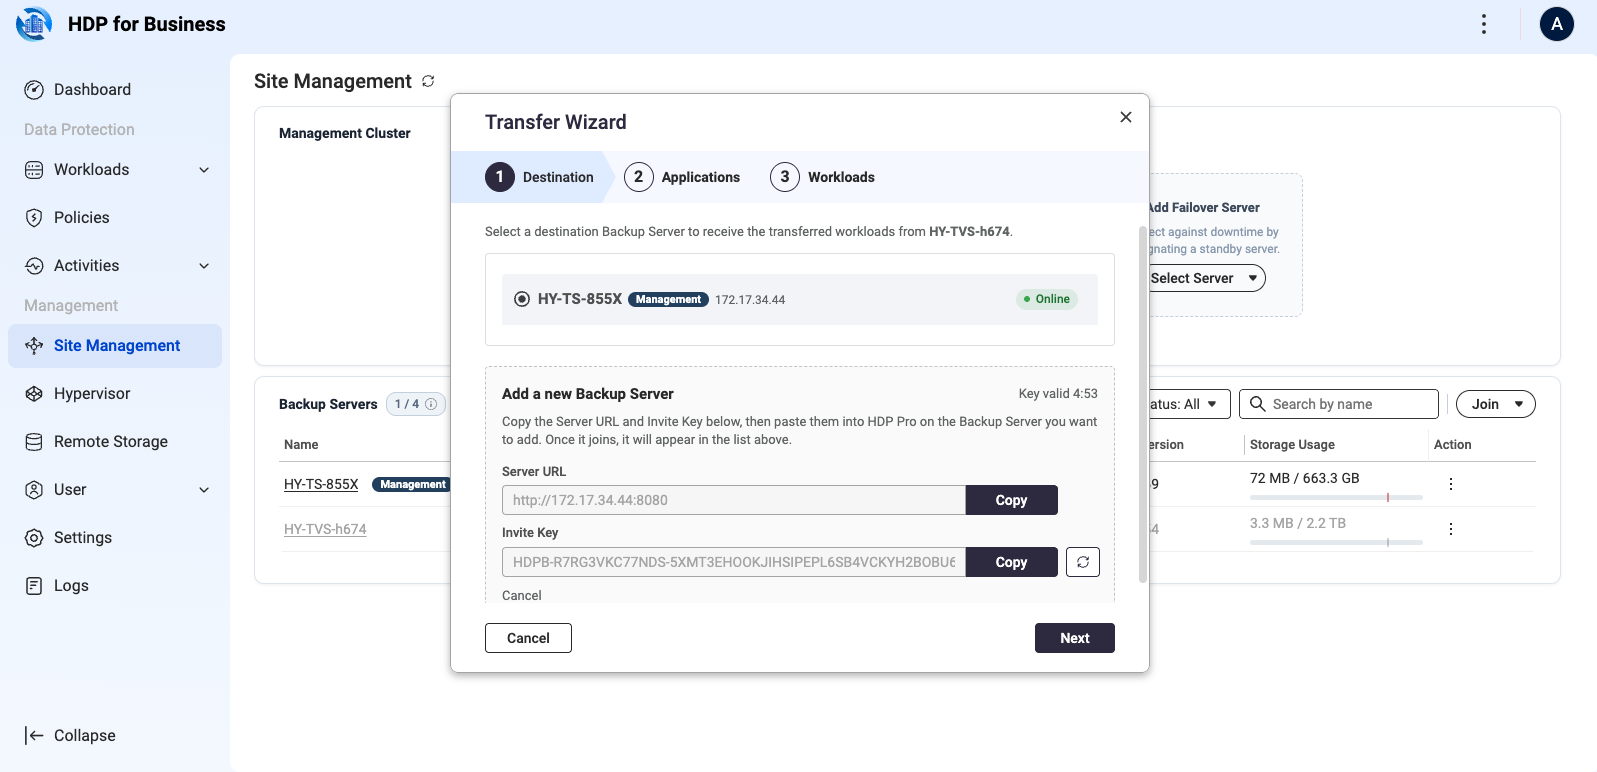
Transfer workloads to another Backup Server
To retire or release a Backup Server, click the three-dot action menu in its row on the Site Management page and select Transfer. The workload settings move in bulk to the destination Backup Server, which takes over the backup operations.
3. Add What You Want to Protect
Virtual machines
Virtual machine backup connects to the hypervisor to read the inventory. No agent is installed inside the virtual machines.
- Go to the Hypervisor page and click Add, then select the platform.
- Enter the name, host IP address, server port, user name, and password, then click Add.
| Platform | Default port | Notes |
|---|
| VMware | 443 | Standalone ESXi and vCenter are both supported. Connecting the vCenter that manages your hosts is recommended. |
| Hyper-V | 5985 | — |
| Proxmox VE | 22 | Versions 8.x and 9.x. Adding any node brings in the entire cluster. |
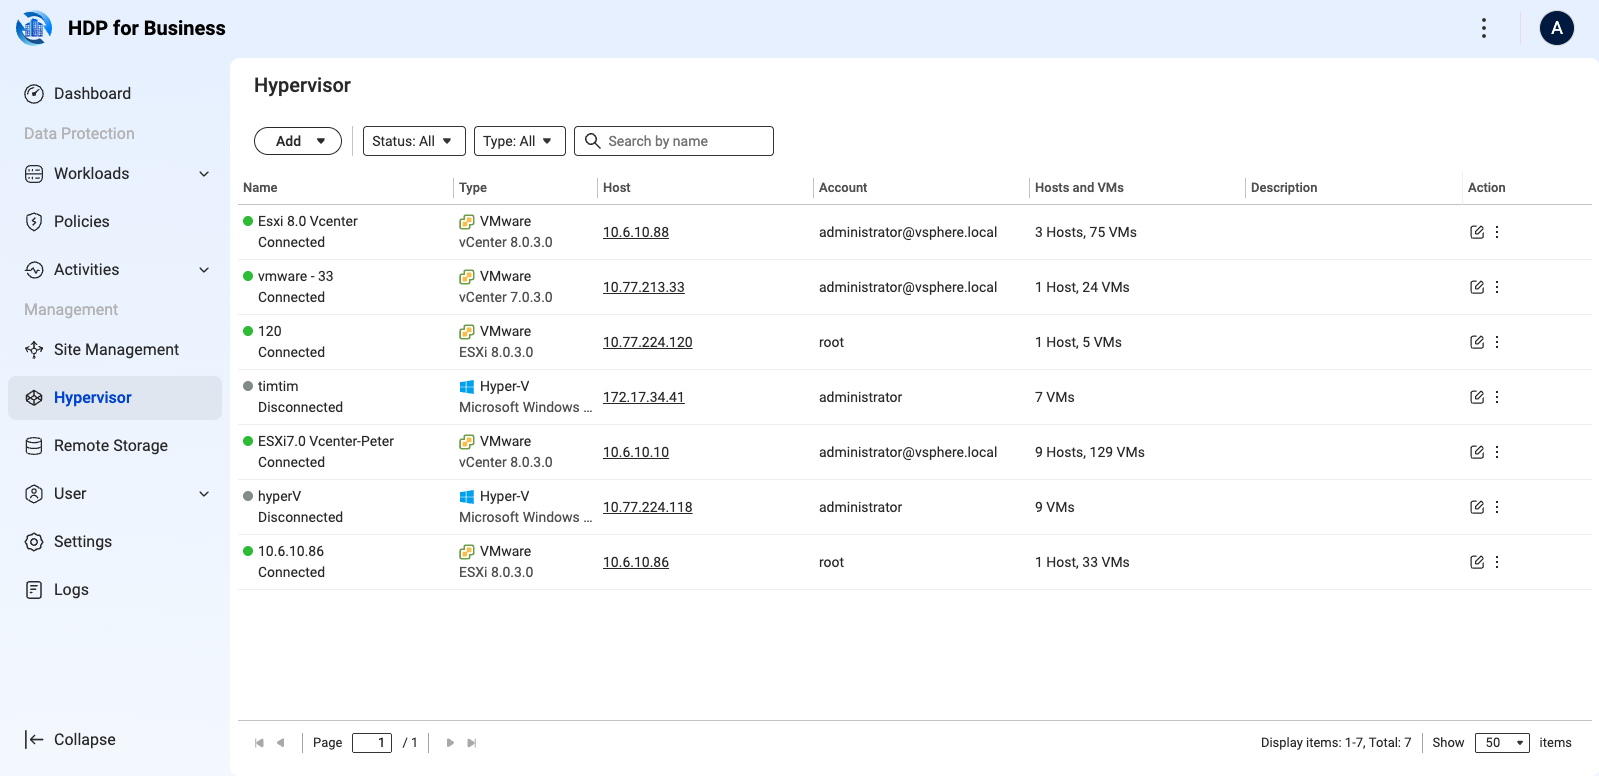
Connecting a hypervisor only retrieves the inventory. Add the virtual machines as workloads on the Workloads > Virtual Machine page, in one of two ways.
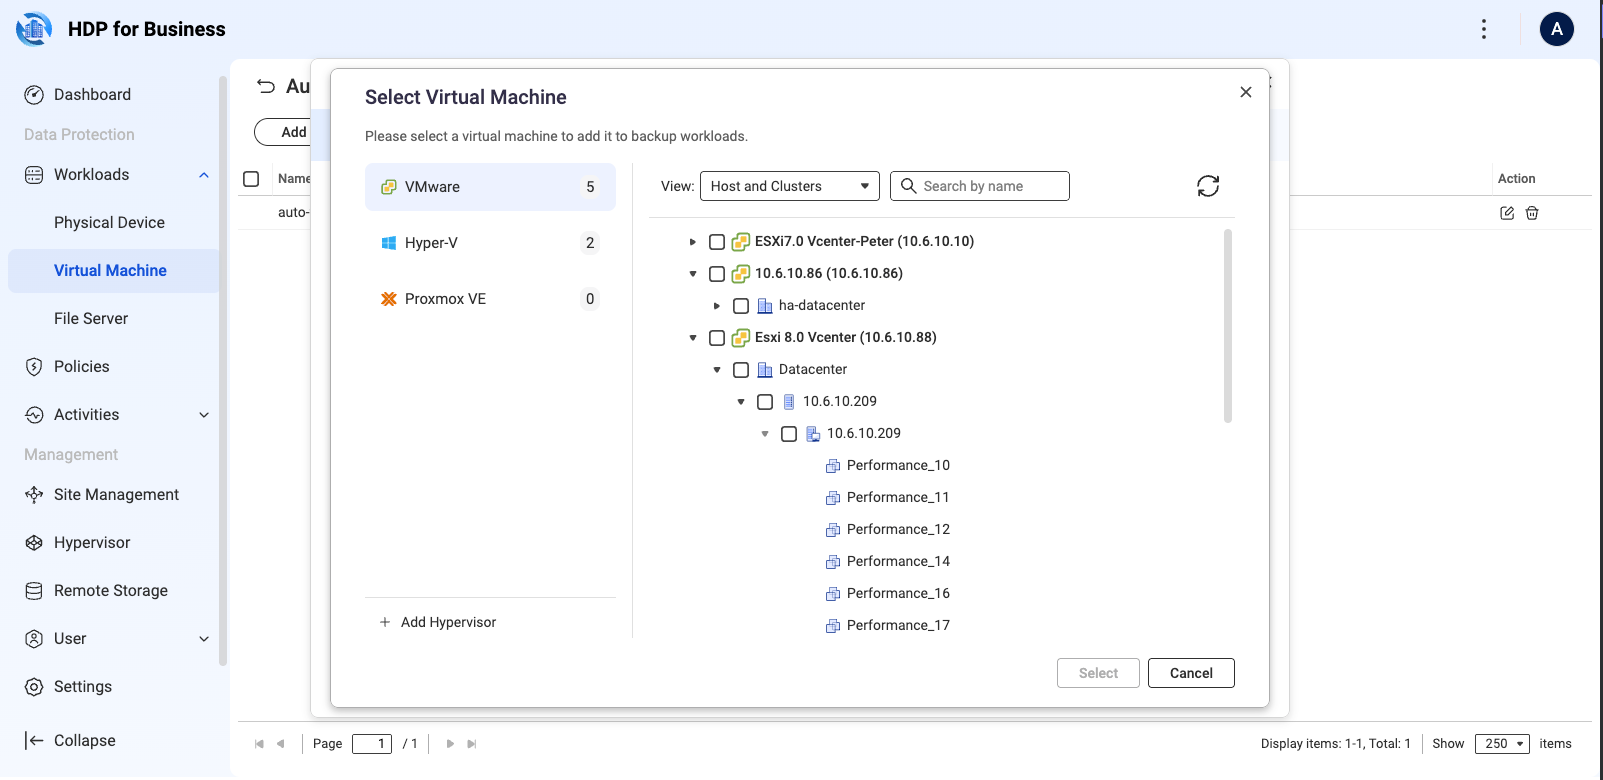
- Select specific virtual machines: click Add, select the source platform on the left, expand the datacenter or host in the Host and Clusters view on the right, select the virtual machines, and click Select.
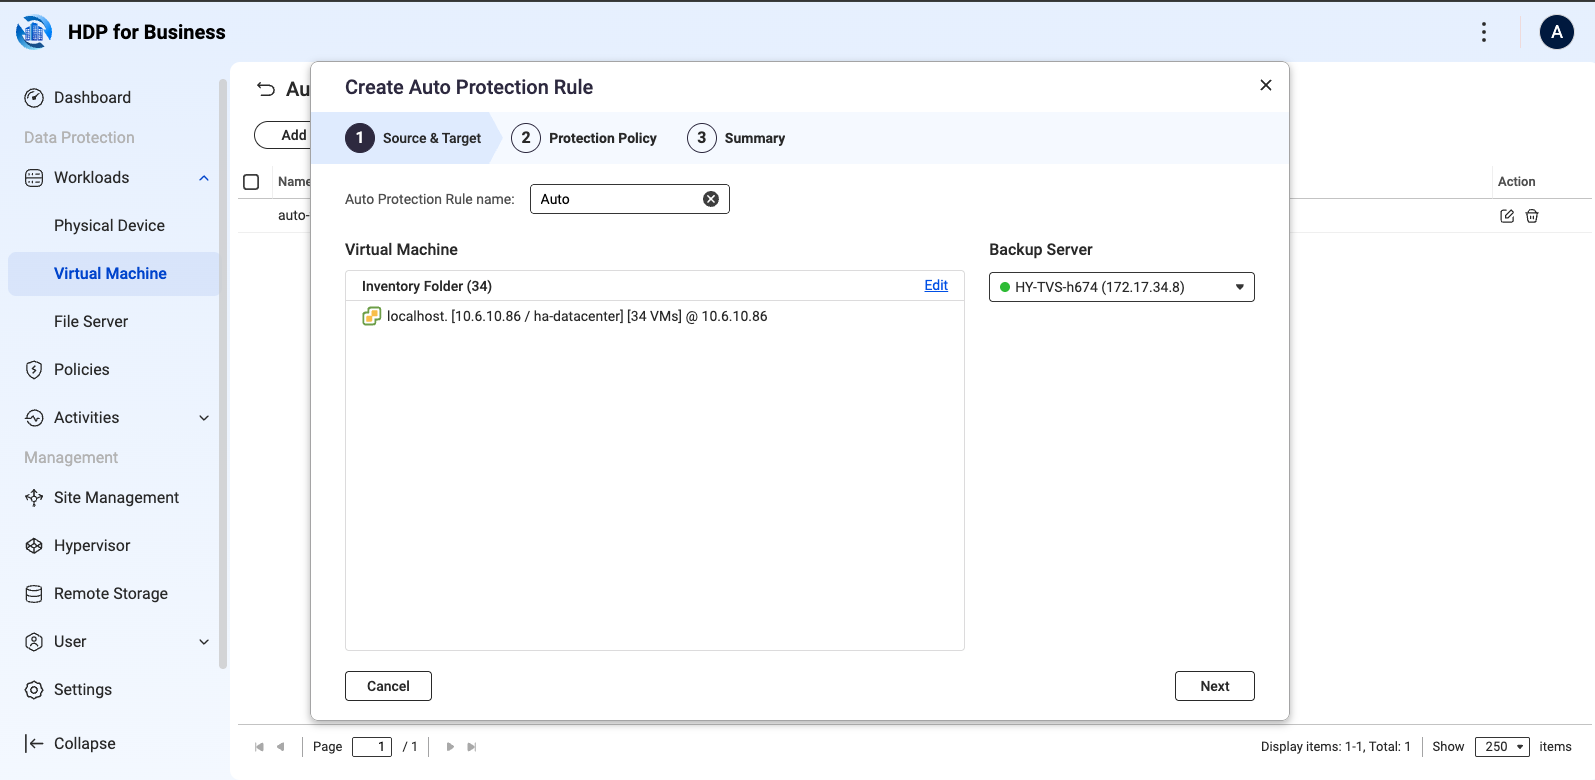
- Create an auto protection rule: click Auto Protection Rule > Create, then set the rule name, the source inventory folder, the target Backup Server, and the protection policy. Virtual machines added to that folder later are protected automatically.
Windows computers
Physical computers are protected by HDP for Business Agent. On the Physical Device page, click Add, download the installer, and create a Join Key that binds a Backup Server and a policy. Install the agent on the computer and connect it with that key. For the full procedure, see the HDP for Business Agent tutorial.
File servers
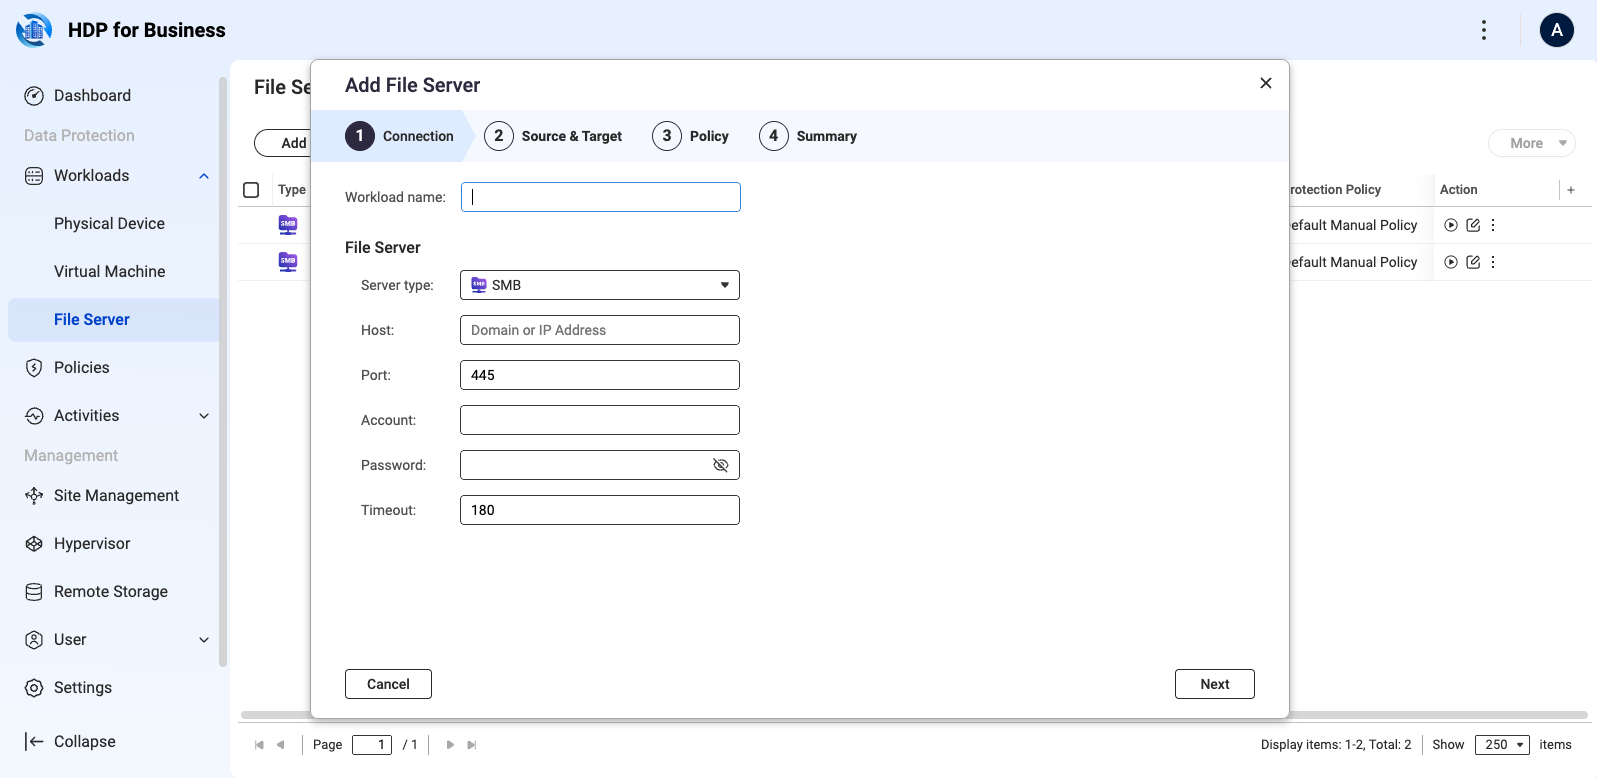
A file server is added over SMB on the Workloads > File Server page. Click Add and complete the wizard: connection settings including host, port (445 by default), account, password, and timeout; the source paths and the target Backup Server; the protection policy; and the summary.
4. Create a Protection Policy
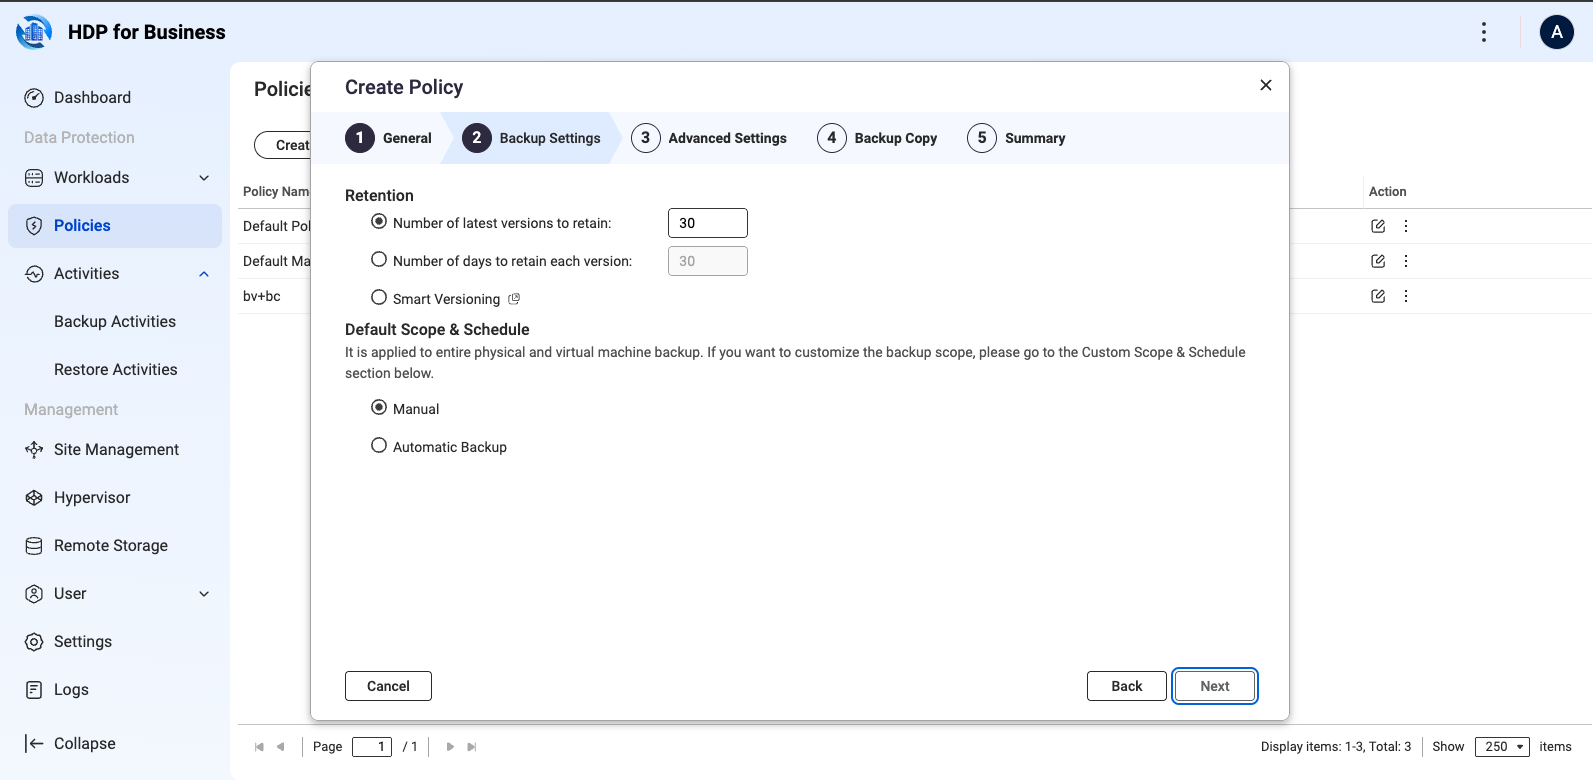
Two policies are built in and cannot be deleted: Default Policy, which runs daily at 09:00, and Default Manual Policy, which runs only when you start it. Both keep 30 versions. To create your own:
- Go to Protection Policy and click Create > Machine Policy.
- General: enter a unique name and select the policy type. A standard protection policy manages versions by the retention rule; an immutable protection policy prevents backups from being modified or deleted within the retention period and can only be set in days. The type cannot be changed after creation.
- Backup Settings: set the retention rule — a number of versions (30 by default), a number of days (30 by default), or Smart Versioning — and the schedule, which can be manual or automatic with a minimum interval of five minutes.
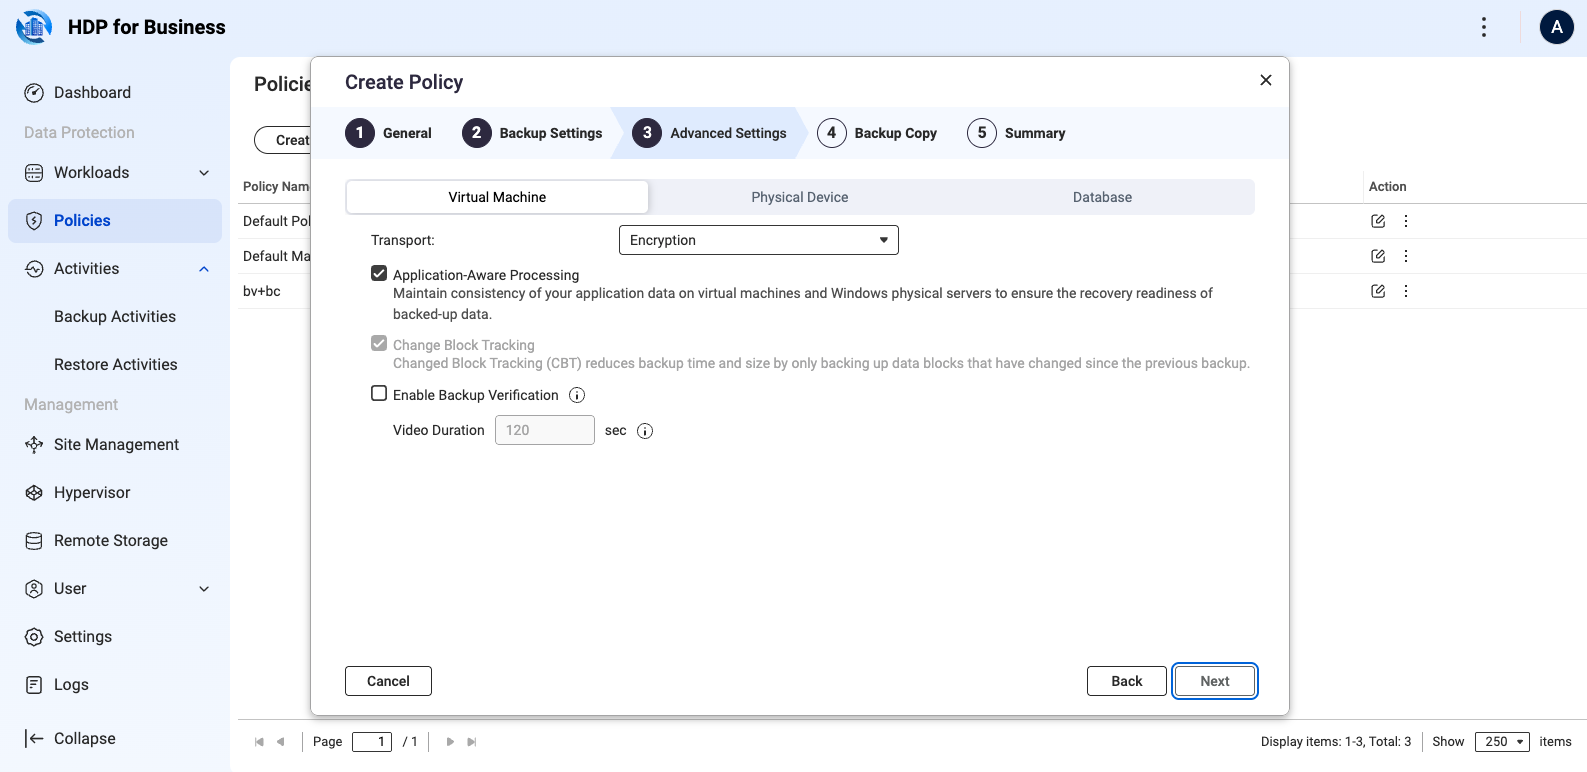
- Advanced Settings: configure the Virtual Machine, Physical Device, and Database tabs as needed. This is also where you select Enable Backup Verification.
- Backup Copy: optionally copy each backup to remote storage. Set up the remote storage first, as described in section 6.
- Summary: review and click Create.
5. Run and Monitor Backups
- On a schedule: the policy runs at the time you set.
- Manually: on the workload page, click the Backup icon in that row, or select several workloads and click More > Backup.
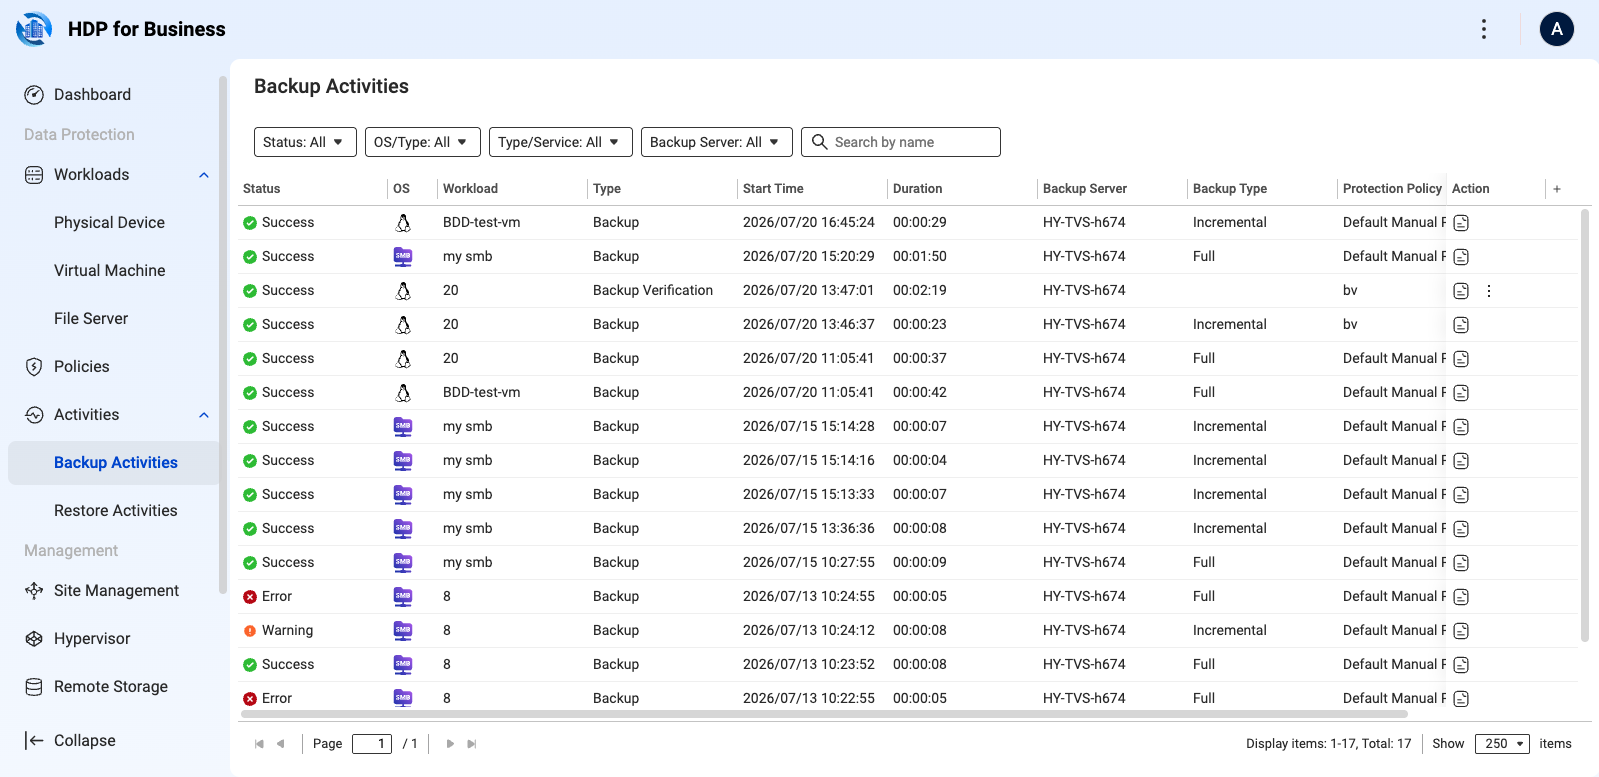
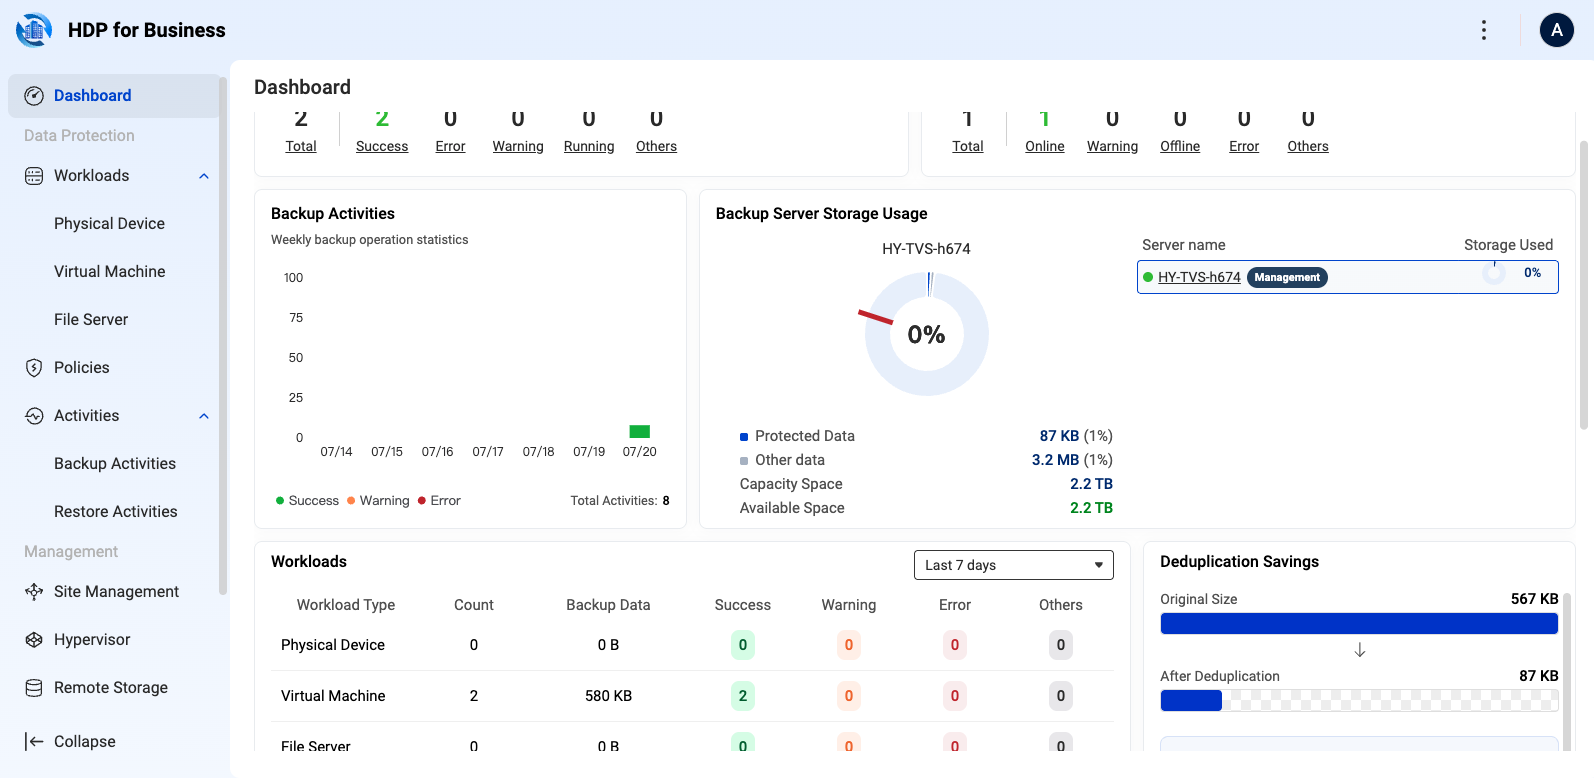
Check progress and history on the Activities page, and the health of the whole environment on the Dashboard, where every figure can be clicked to drill down.
6. Copy Backups to Remote Storage
A backup copy keeps a second copy of your backups in remote object storage, so the data survives the loss of the Backup Server. Supported types are QuObjects, myQNAPcloud Object, Amazon S3, Wasabi, and S3 Compatible.
- Go to Remote Storage, click Add, and select the storage type.
- Connection: enter the access key and secret key, add the endpoint if the type requires one, and verify the connection.
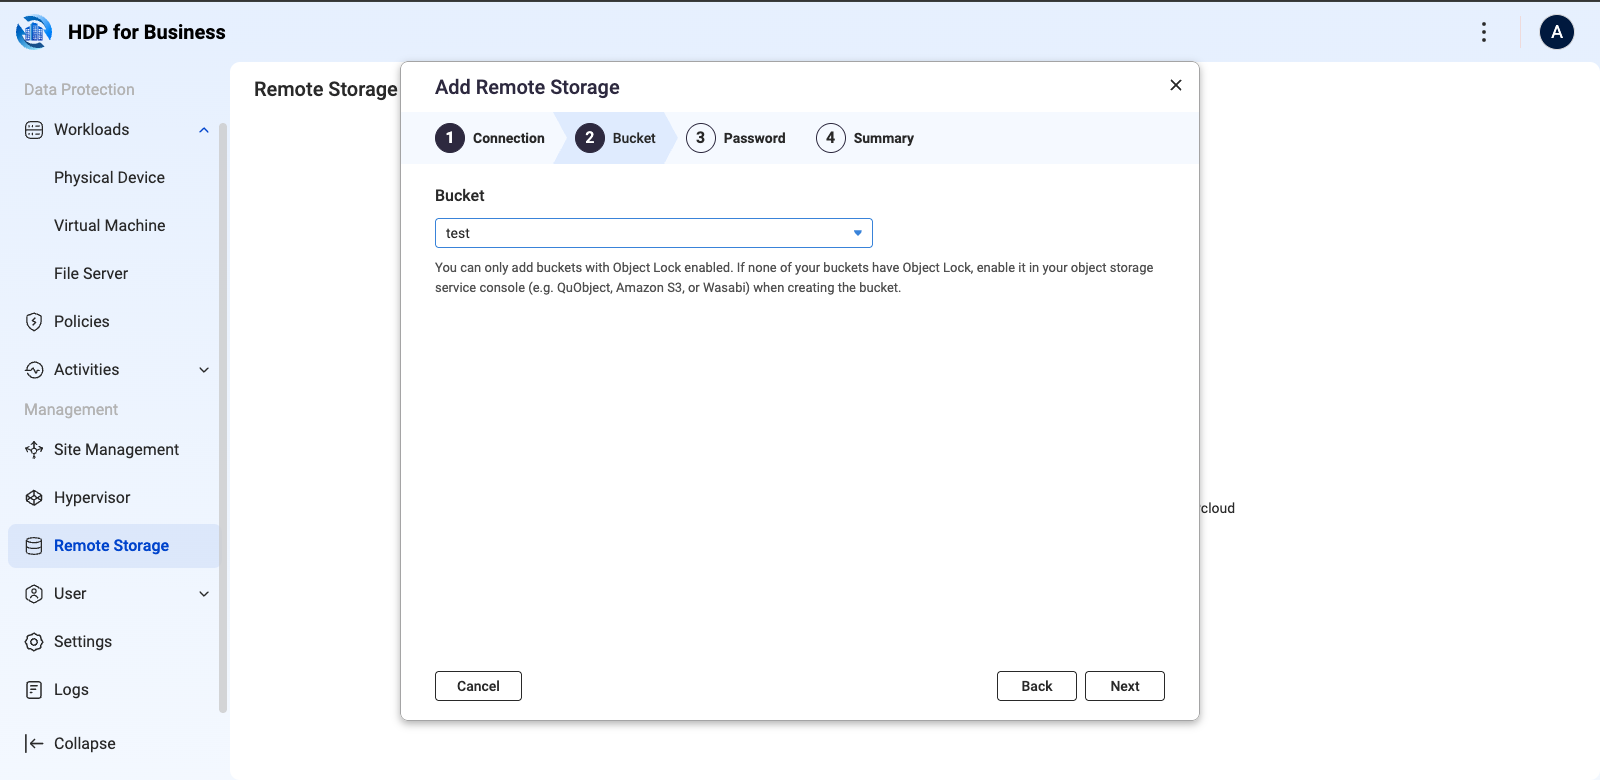
- Bucket: select a bucket. Only buckets with Object Lock enabled can be selected, so that backups cannot be modified or deleted.
- Password: optionally enable password protection for end-to-end encryption, using 8 to 64 characters with uppercase letters, lowercase letters, numbers, and special characters.
- Summary: review and click Create.
Keep the password safe. If it is lost, the backups in that bucket can never be decrypted or recovered, and the password cannot be changed.
Then open the protection policy, select Enable backup copy on the Backup Copy step, and set the target, the retention, and the schedule.
Recover backups from a bucket
When the versions on a Backup Server are lost, or a new Backup Server takes over an existing bucket, click Import Workloads in that storage's row, select the workloads, and click Import. The result is grouped into Relinked, Updated, and Skipped. A workload imported to a machine other than the original is always Unmanaged: you can restore from it, but you cannot assign a policy to it.
7. Restore
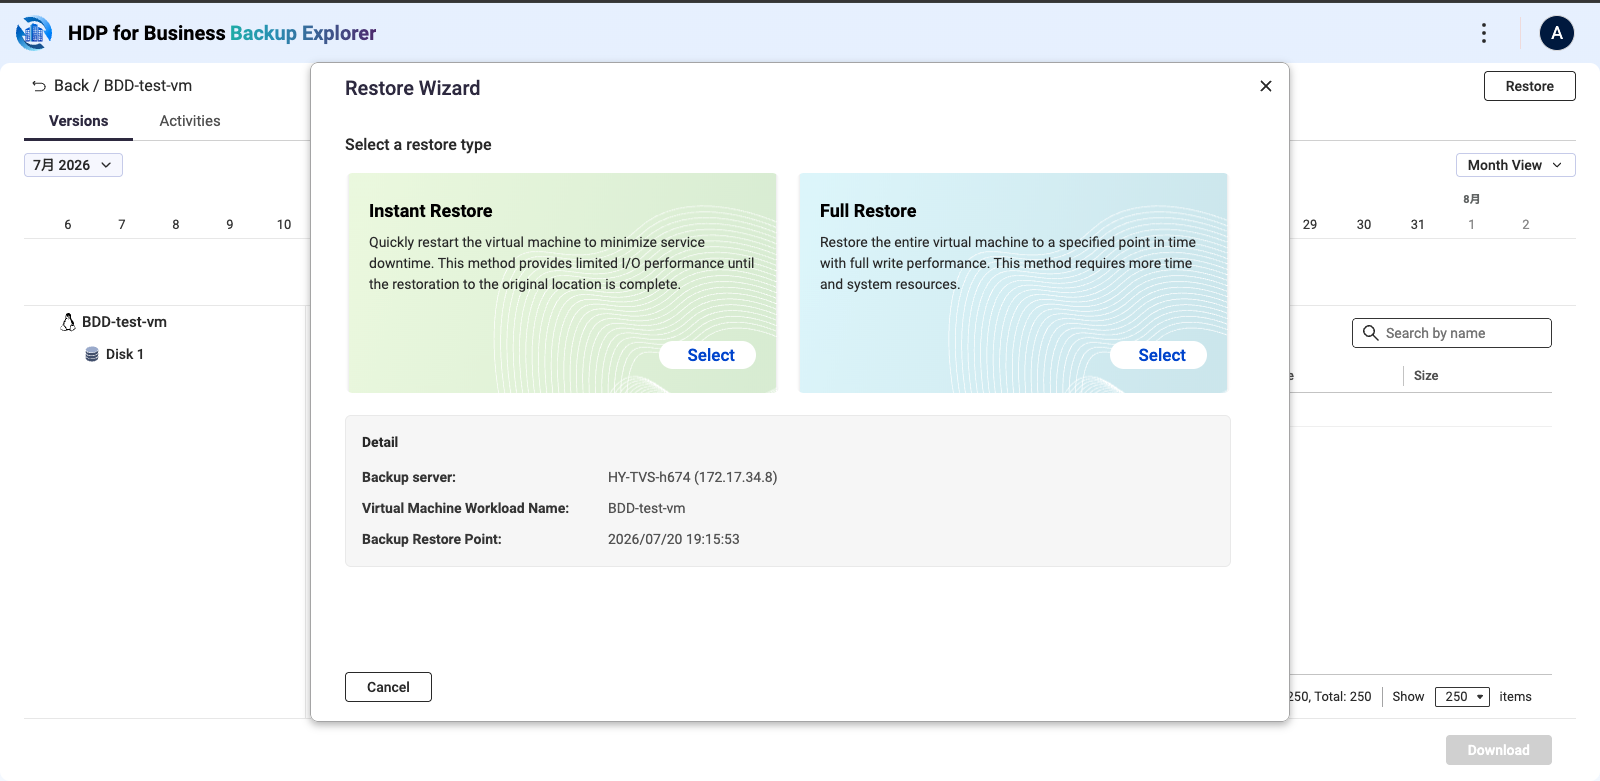
Open Backup Explorer, select a backup version, and click Restore. Then select the restore type.
| Type | When to use it |
|---|
| Instant Restore | Boots the backup directly on the Backup Server within minutes. I/O performance is limited because it runs from read-only backup files. |
| Full Restore | Restores the machine to a hypervisor with full performance, for formal disaster recovery. A backup can only be restored to the same type of hypervisor. Physical computers require bare-metal restore boot media. |
Instant Restore
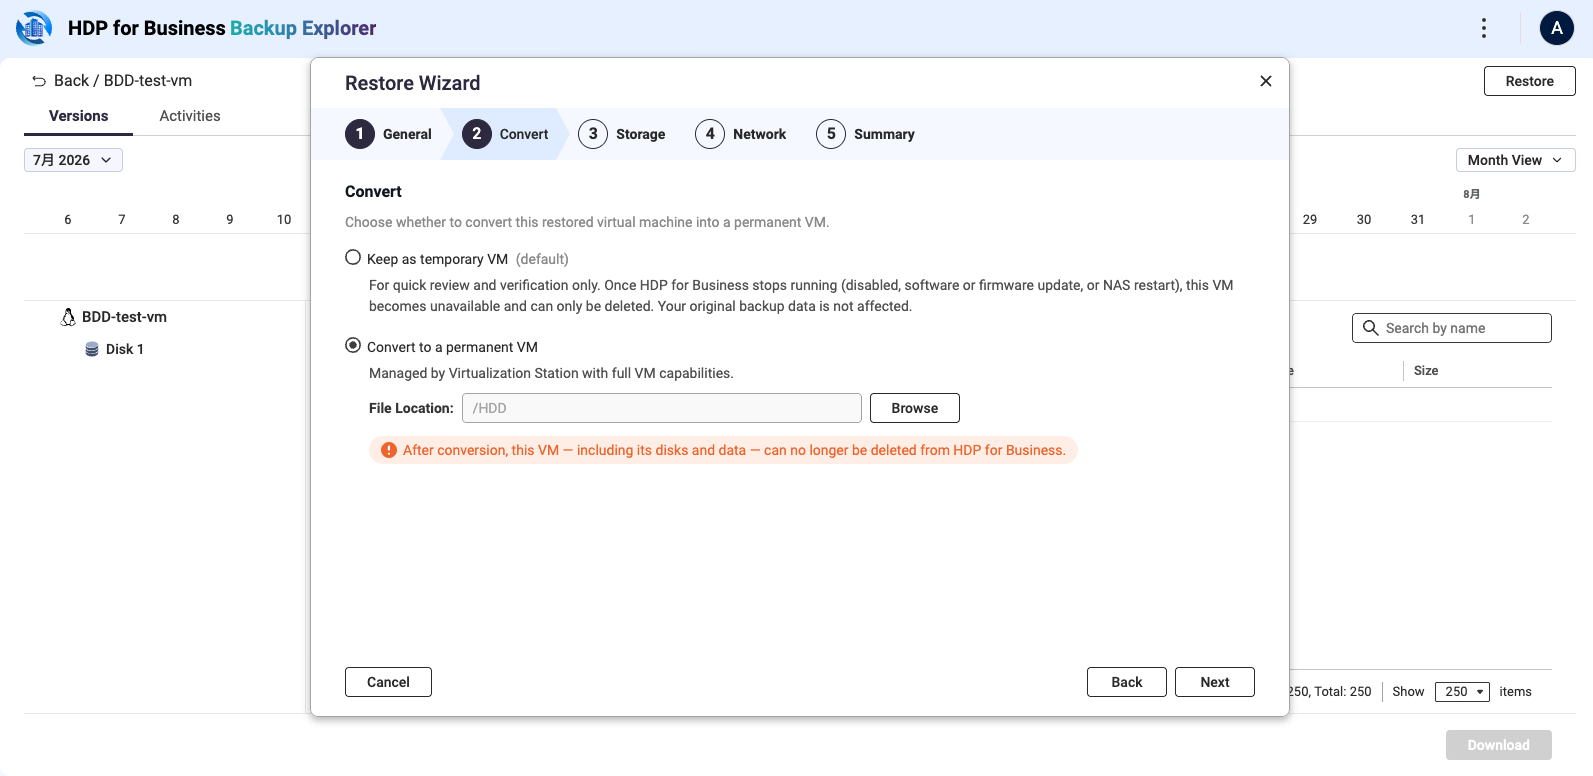
Virtualization Station must be installed and initialized on the Backup Server, with at least 2 GB of available memory. The wizard has five steps: General, Convert, Storage, Network, and Summary.
On the Convert step, decide what happens to the restored machine:
| Option | What it means |
|---|
| Keep as temporary virtual machine (default) | For review and verification. The machine stops working when HDP for Business stops running, for example when it is disabled, updated, or the NAS restarts. The backup data is not affected. |
| Convert to a permanent virtual machine | Handed over to Virtualization Station with full capabilities. Requires a File Location. After the conversion, the virtual machine and its data can no longer be deleted from HDP for Business. |
Free space required for a conversion: the target storage briefly holds two copies of the disks during the conversion, so make sure the File Location has free space of at least twice the disk size of the virtual machine. The intermediate copy is removed automatically when the conversion finishes.
If you kept the machine as temporary, you can convert it later: on the Activities tab of Backup Explorer, click Convert in that task's row. Tasks already marked Converted no longer offer the action.
8. Verify That Backups Can Boot
With backup verification enabled, HDP for Business starts a temporary virtual machine from each completed backup and records the boot as a video. Virtualization Station must be installed and initialized on the Backup Server, with at least 4 GB of available memory.
- In the protection policy, on the Advanced Settings step, select Enable Backup Verification on the Virtual Machine or Physical Device tab.
- Set the Video Duration in seconds. The default is 120 and the range is 30 to 600. Allow enough time for the machine to boot fully.
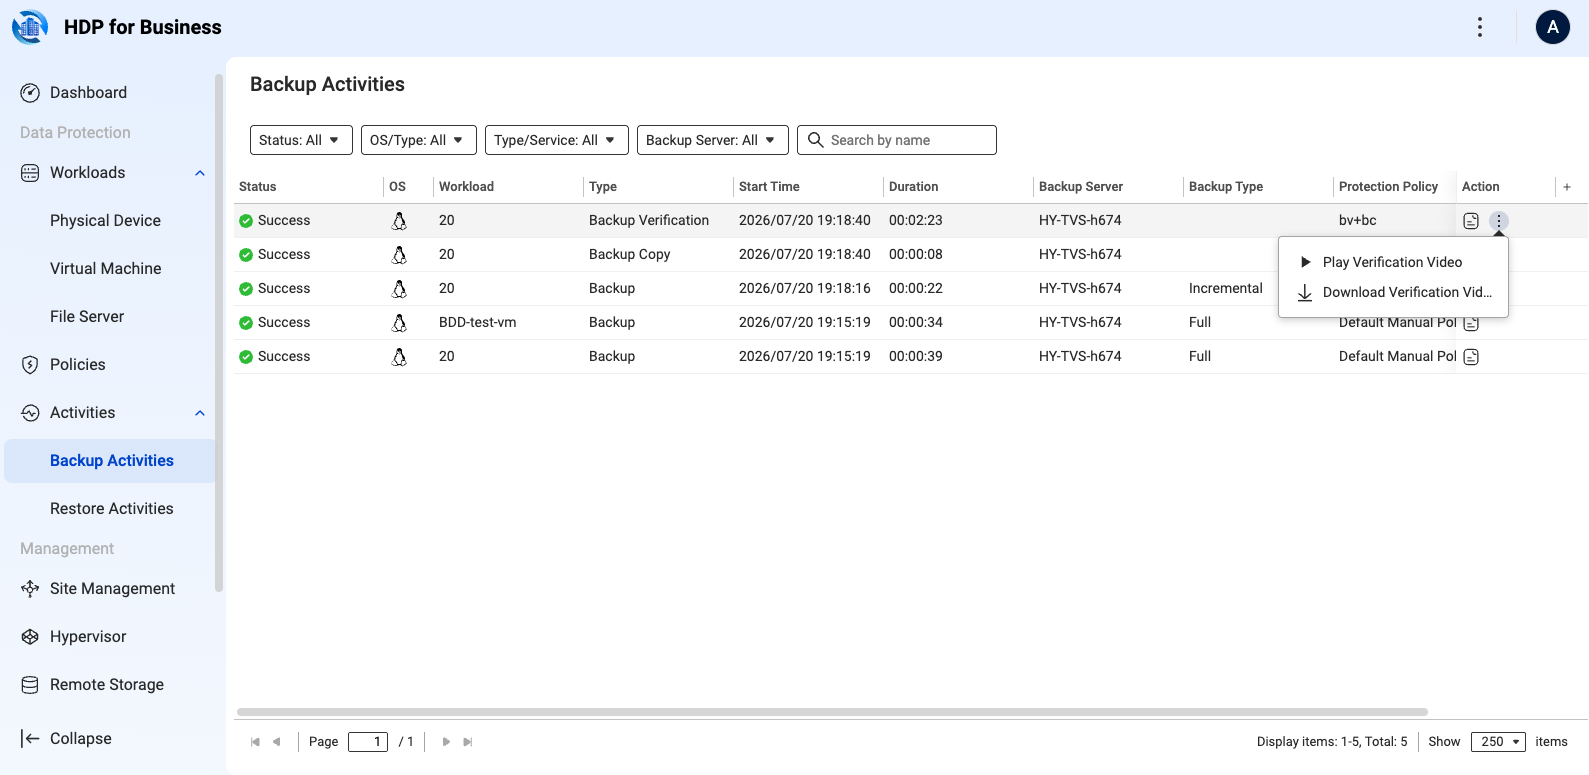
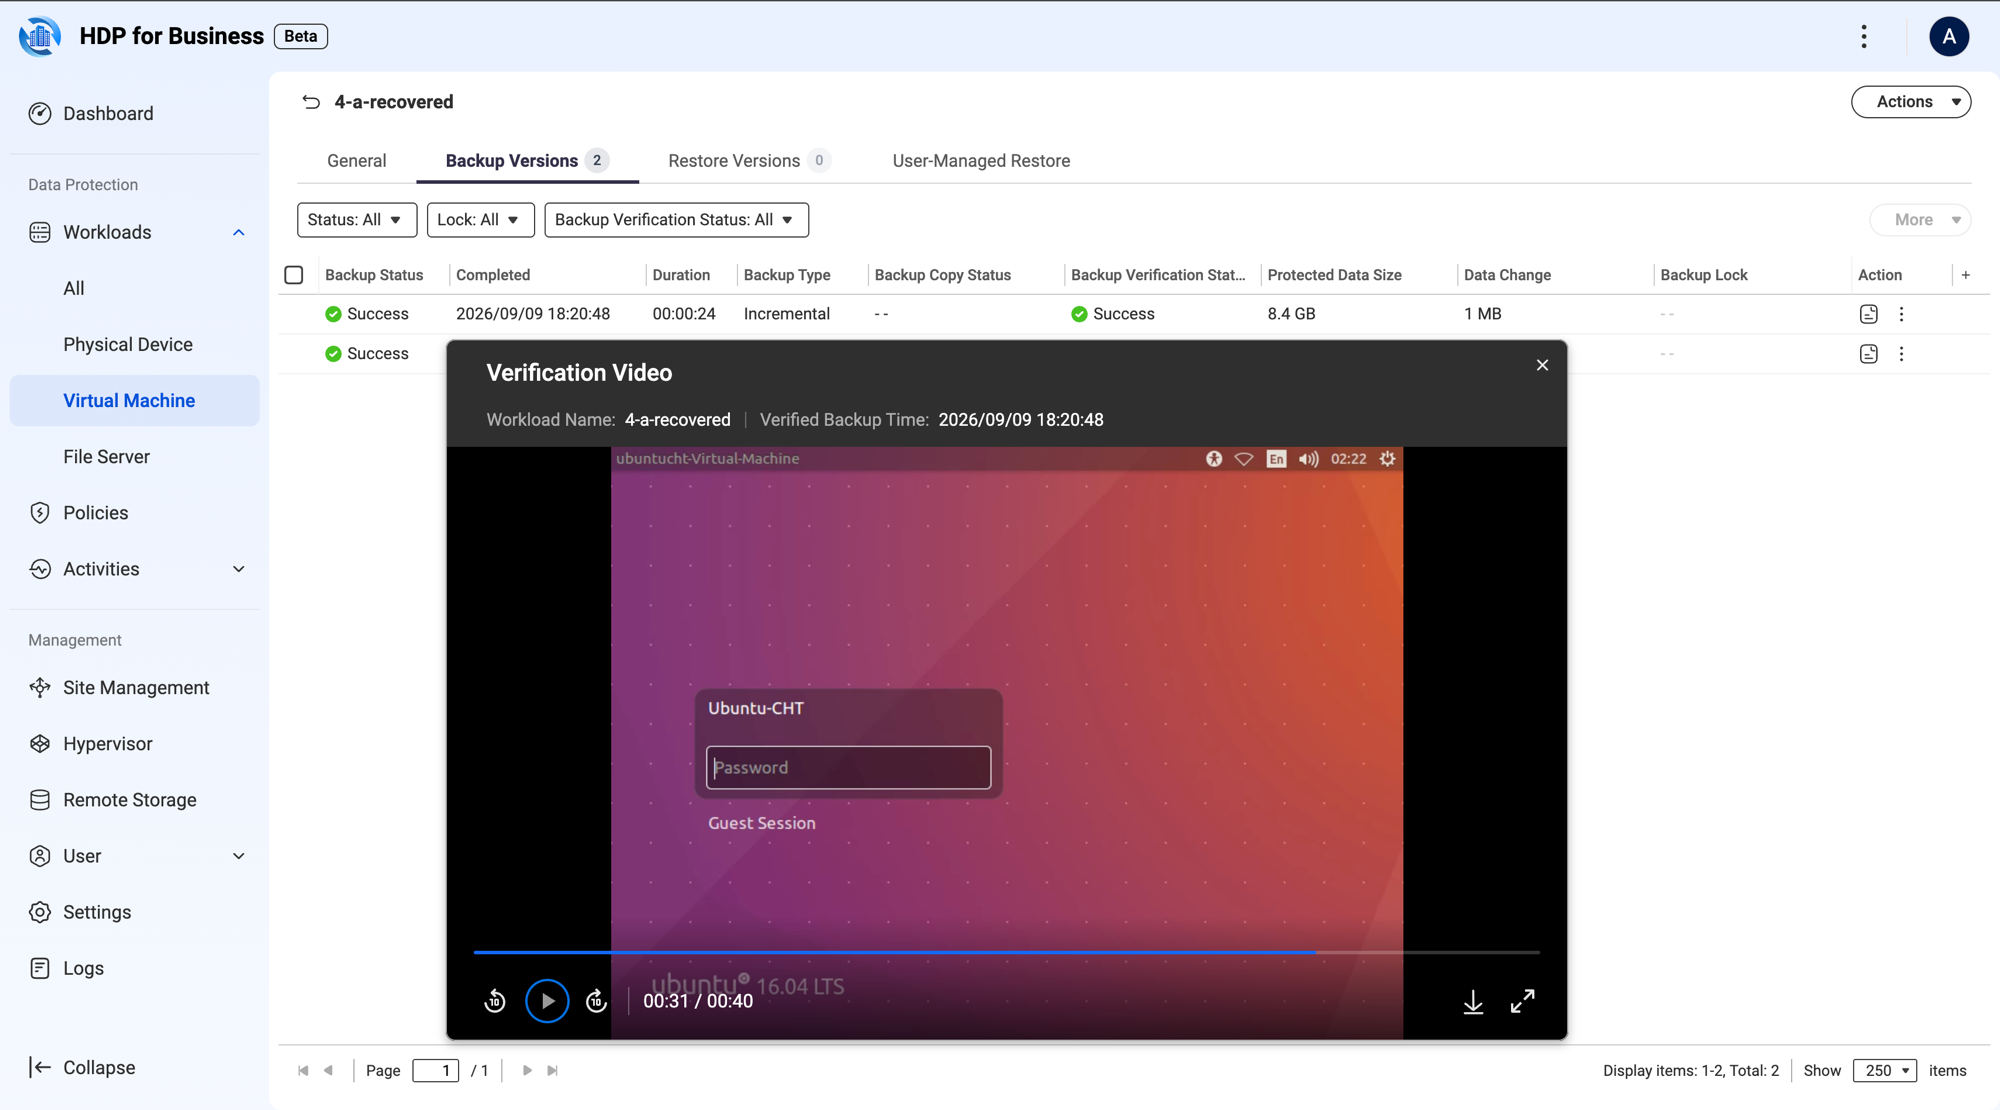
- To watch the result, open the workload and go to its Backup Versions tab. The Backup Verification Status column shows the outcome of each version, and you can narrow the list with the Backup Verification Status filter. Open the action menu of a version and select Play Verification Video or Download Verification Video. The same actions are available from Backup Activities.
Backup Activities lists the verification as a task of the type Backup Verification, with the same two actions in its action menu. The dialog shows the workload name and the verified backup time above the player, and the video can be downloaded or opened full screen from the player controls. A video exists only when the verification succeeds.
9. Isolate a Backup Server with AirGap+
AirGap+ creates physical isolation for critical assets by shutting the Backup Server down on a schedule. A device that is powered off cannot be reached over the network, which puts the backups stored on it out of reach of ransomware, insider access, and unauthorized connections.
- Go to Site Management and click the name of the Backup Server to open its detail page.
- Open the Airgap+ tab.
- The weekly grid covers every hour of every day, from 12 AM to 11 PM. Select the hours during which the server is protected. Selected hours are marked Deny all collections, and unselected hours remain No settings applied.
- Click Apply. The button is enabled only after you change the grid.
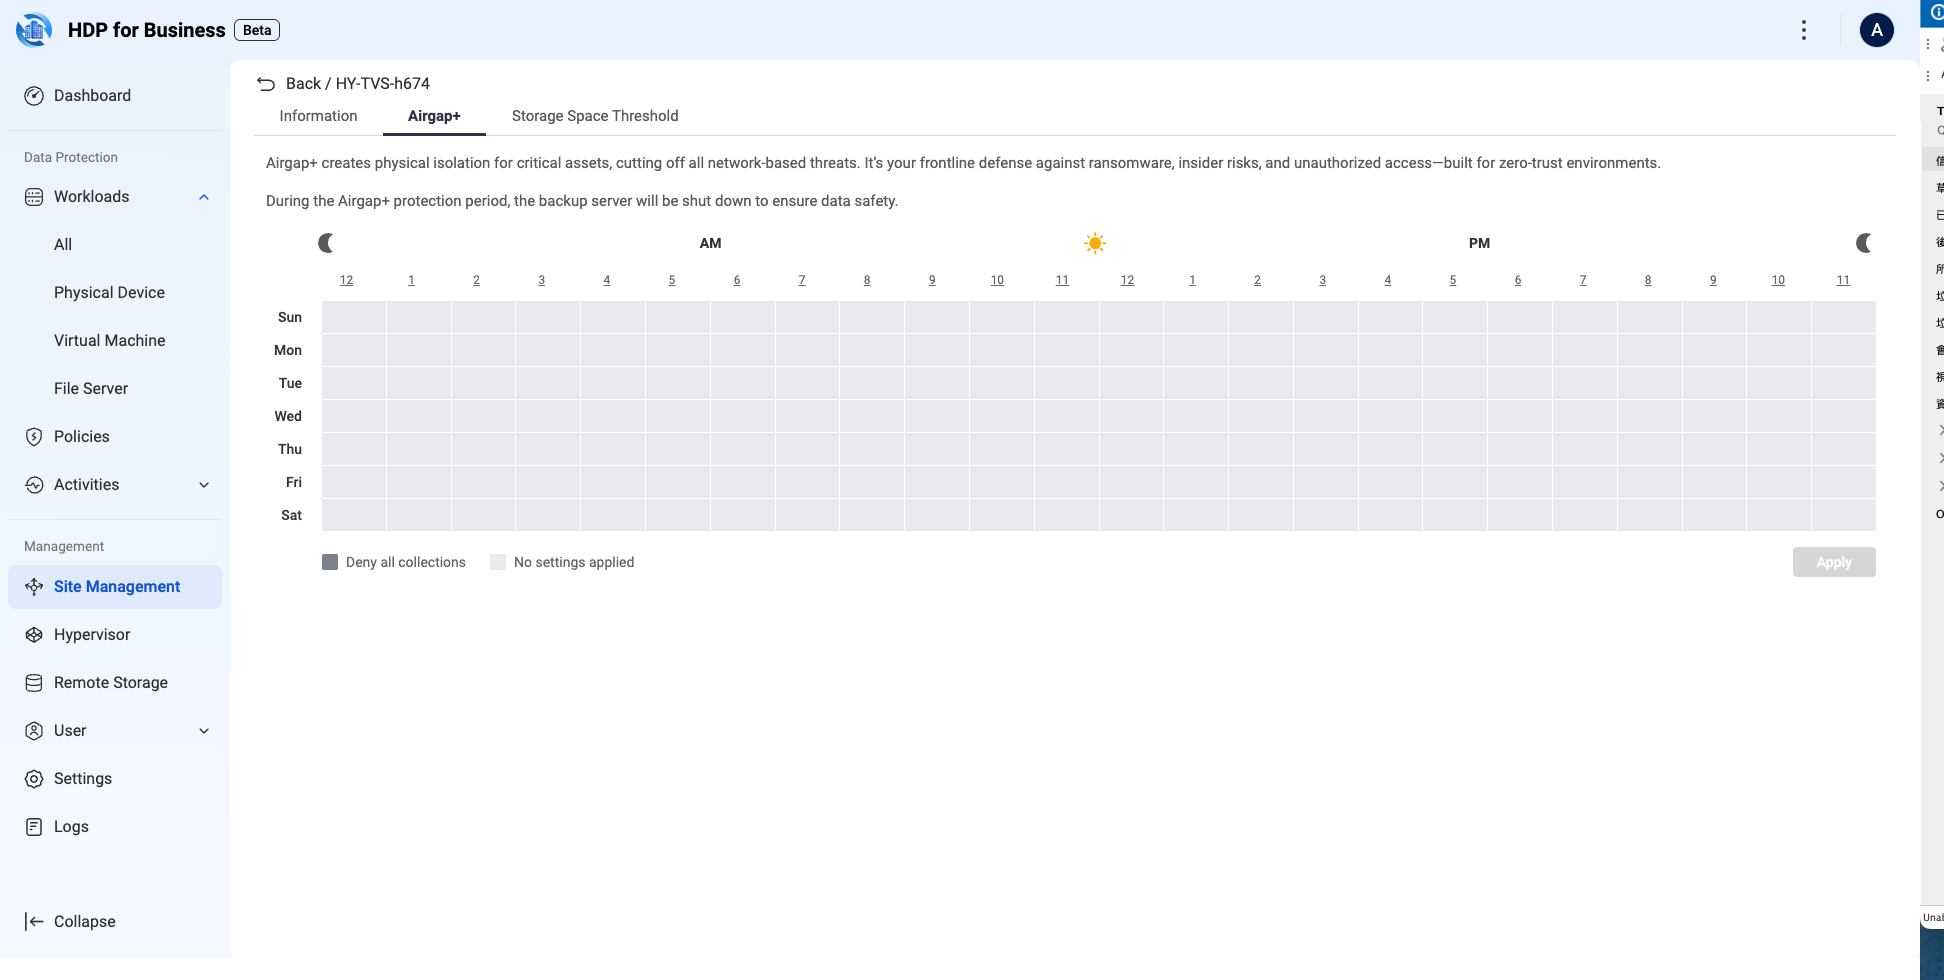
During the protection period the Backup Server is shut down, no backup collection runs on it, and it appears as Offline in Site Management. Logs of that device cannot be queried while it is offline, because log queries are forwarded to the device in real time. The Logs page on the Management Server records the applied schedule and the next power-off time.
What's Next
適用產品
- HDP for Business
- QuTS hero 6.0.2 and later
目的
本教學將帶您從空的 QNAP NAS 建立一個可運作的備份環境:安裝 HDP for Business、建立站點、保護虛擬機器和電腦、建立保護策略、將備份複製到異地,並進行還原和驗證。每個部分都是獨立的,因此您可以直接跳到所需的任務。
先決條件
- 執行 QuTS hero 6.0.2 或更新版本的 QNAP NAS。建議使用中高階型號作為管理伺服器。
- 可用的儲存空間空間,並有足夠的可用空間。
- 在同一 NAS 上安裝 HDP for PC/VM 2.4.1.871 或更新版本。
- 如果您計劃使用即時還原或備份驗證,則需要 Virtualization Station 4.2.0.257 或更新版本。
- NAS 上的系統管理員帳戶。
1. 安裝 HDP for Business
- 以系統管理員身份登入 NAS,並開啟App Center。
- 搜尋HDP for Business並按一下安裝。
- 按一下開啟。歡迎頁面隨即顯示。
- 按一下設定 HDP for Business。設定步驟頁面開啟,您可以在初始化之前分配儲存空間並檢查相依性。
相依性檢查
| 狀態 | 含意 | 應採取的行動 |
|---|
| 綠色勾號 | 已安裝且相容。 | 無需操作。此專案預設已選取。 |
| 黃色警告,灰色顯示 | 已安裝,但版本過舊。 | 升級至頁面上所述的版本。 |
| 灰色 | 未安裝。 | 從 App Center 安裝。 |
Virtualization Station 的處理方式不同:頁面僅報告是否已安裝及版本是否足夠。如果缺少,與 Instant Restore 相關的選項將顯示為灰色。您可以從此頁面的引導流程中安裝。
選擇一個儲存空間空間
系統會在您選擇的儲存空間空間中建立一個名為HDP_Business的共享資料夾。初始化後,儲存空間空間無法更改,因此請謹慎選擇。當儲存空間空間超過警示門檻或被加密時,會顯示為灰色。如果無法選擇儲存空間空間,請在儲存空間管理器中釋放空間,然後點擊刷新。
HDP for Business 永遠不會刪除此資料夾。即使您卸載應用程式,它仍然保留在儲存空間空間中,因此您的備份資料得以保存。若要稍後使用不同的儲存空間空間,請先在儲存空間管理器中刪除HDP_Business資料夾。
執行初始化
點擊初始化。HDP for Business 自動接管現有的 HDP for PC/VM,不會中斷正在進行的備份。接管後未完成的備份會繼續進行。當過程完成後,NAS 成為管理伺服器。
2. 建立站點
一個站點包含一個管理伺服器,最多四個備份伺服器,並可選擇一個備用管理伺服器。
- 在管理伺服器上,前往站點管理,然後點擊加入 > 生成邀請密鑰。
- 複製伺服器 URL和邀請密鑰,並將它們發送給備份伺服器的系統管理員。密鑰可使用一次,並在五分鐘後過期;如果過期,請點擊重新生成。
- 在備份伺服器上,前往站點管理,然後點擊加入 > 加入站點。
- 輸入管理伺服器 URL 和加入密鑰,然後點擊加入。頁面顯示此伺服器已被管理。
在管理伺服器上,設備會經過連接中、同步中和在線。
備援管理伺服器並切換
在新增容錯移轉伺服器區域,選擇一個備份伺服器作為備援。系統會檢查每個備份伺服器是否能夠連接到它,因為在切換後它們會連接到它。即使有些伺服器報告無法連接,您仍然可以新增,但那些伺服器在切換後可能無法管理。
要將管理控制權交給備援,請在管理伺服器上使用管理 > 切換,或在備援自己的頁面上的切換區域。過程中排程任務會暫停,並自動恢復。
將工作負載轉移到另一個備份伺服器
要退役或釋放備份伺服器,請在站點管理頁面中其行的三點動作選單中選擇轉移。工作負載設定會批量移動到目的地備份伺服器,該伺服器接管備份操作。
3. 新增您想保護的專案
虛擬機器
虛擬機器備份連線到虛擬機器管理程式以讀取清單。虛擬機器內部未安裝代理程式。
- 前往虛擬機管理程式頁面並點擊新增,然後選擇平台。
- 輸入名稱、主機 IP 位址、伺服器埠、使用者名稱和密碼,然後點擊新增。
| 平臺 | 預設埠 | 備註 |
|---|
| VMware | 443 | 支援獨立 ESXi 和 vCenter。建議連線管理主機的 vCenter。 |
| Hyper-V | 5985 | — |
| Proxmox VE | 22 | 版本 8.x 和 9.x。添加任何節點會引入整個叢集。 |
連接虛擬機管理程式僅檢索清單。在Workloads > Virtual Machine頁面上將虛擬機器作為工作負載添加,有兩種方式。
- 選擇特定虛擬機器:點擊Add,在左側選擇來源平台,在右側的Host and 叢集視圖中展開資料中心或主機,選擇虛擬機器,然後點擊Select。
- 創建自動保護規則:點擊Auto Protection Rule > Create,然後設置規則名稱、來源清單資料夾、目標備份伺服器和保護策略。稍後添加到該資料夾的虛擬機器會自動受到保護。
Windows 電腦
實體電腦由 HDP for Business Agent 保護。在Physical Device頁面上,點擊Add,下載安裝程式,並創建一個將備份伺服器和策略綁定的加入密鑰。在電腦上安裝代理並使用該密鑰連接。完整程序請參見 HDP for Business Agent 教程。
檔案伺服器
檔案伺服器通過 SMB 添加到Workloads > File Server頁面。點擊Add並完成向導:連接設置包括主機、端口(默認為 445)、帳戶、密碼和超時;來源路徑和目標備份伺服器;保護策略;以及摘要。
4. 建立保護政策
有兩個內建政策且無法刪除:預設政策,每天 09:00 執行,以及預設手動政策,僅在您啟動時執行。兩者皆保留 30 個版本。要建立自己的政策:
- 前往保護政策並點擊建立 > 機器政策。
- 一般:輸入唯一名稱並選擇政策類型。標準保護政策依據保留規則管理版本;不可變保護政策防止備份在保留期間被修改或刪除,且只能以天數設定。建立後無法更改類型。
- 備份設定:設定保留規則——版本數量(預設為 30)、天數(預設為 30)或智慧型版本控制——以及排程,可以是手動或自動,最小間隔為五分鐘。
- 進階設定:根據需要配置虛擬機器、實體裝置和資料庫標籤。這也是選擇啟用備份驗證的地方。
- 備份副本:可選擇將每個備份複製到遠端儲存空間。首先設定遠端儲存空間,如第 6 節所述。
- 摘要:檢閱並按一下建立。
5. 執行並監控備份
- 按排程:策略會在您設定的時間執行。
- 手動:在工作負載頁面中,按一下該列中的備份圖示,或選擇多個工作負載並按一下更多 > 備份。
在活動頁面檢查進度和歷史記錄,並在儀表板上檢查整個環境的健康狀況,每個數字都可以點擊以深入查看。
6. 將備份複製到遠端儲存空間
備份副本會將您的備份的第二份副本保存在遠端物件儲存空間中,因此即使備份伺服器遺失,資料仍然可以保存。支援的類型有 QuObjects、myQNAPcloud Object、Amazon S3、Wasabi 和 S3 相容。
- 前往遠端儲存空間,按一下新增,並選擇儲存空間類型。
- 連接:輸入存取金鑰和秘密金鑰,如果類型需要,則添加端點並驗證連接。
- 貯體:選擇一個貯體。只有啟用了物件鎖定的貯體才能被選擇,以確保備份不能被修改或刪除。
- 密碼:可選擇啟用密碼保護以進行端到端加密,使用 8 到 64 個字元,包括大寫字母、小寫字母、數字和特殊字元。
- 摘要:檢閱並按一下建立。
請妥善保管密碼。如果遺失,該儲存桶中的備份將無法解密或復原,且密碼無法更改。
然後開啟保護政策,在備份複製步驟中選擇啟用備份複製,並設定目標、保留期限和排程。
從儲存桶復原備份
當備份伺服器上的版本遺失或新的備份伺服器接管現有儲存桶時,點擊匯入工作負載於該儲存空間的行中,選擇工作負載,然後點擊匯入。結果分為重新連結、更新和跳過。匯入到非原始機器的工作負載始終為未管理:您可以從中復原,但無法為其分配政策。
7. 還原
開啟備份總管,選擇備份版本,然後點擊還原。接著選擇還原類型。
| 型別 | 使用時機 |
|---|
| 立即還原 | 在備份伺服器上於數分鐘內直接啟動備份。因為從唯讀備份檔案運行,I/ O 效能有限。 |
| 完整還原 | 將機器還原至具有完整效能的虛擬機器管理程式,用於正式災難復原。備份只能還原至相同型別的虛擬機器管理程式。實體電腦需要裸機還原啟動媒體。 |
立即還原
Virtualization Station 必須安裝並初始化於備份伺服器上,至少需要 2 GB 的可用記憶體。向導有五個步驟:一般、轉換、儲存空間、網路和摘要。
在轉換步驟中,決定還原機器的處理方式:
| 選項 | 含義 |
|---|
| 保留為臨時虛擬機器(預設) | 用於審查和驗證。當 HDP for Business 停止運行時,例如禁用、更新或 NAS 重新啟動時,機器將停止工作。備份資料不受影響。 |
| 轉換為永久虛擬機器 | 交由 Virtualization Station 完全掌控。需要檔案位置。轉換後,虛擬機器及其資料將無法從 HDP for Business 中刪除。 |
轉換所需的空間:目標儲存空間在轉換過程中暫時保留兩份磁碟副本,因此請確保檔案位置至少有兩倍於虛擬機器磁碟大小的空間。轉換完成後,中間副本會自動移除。
如果您將機器保留為臨時狀態,您可以稍後進行轉換:在活動標籤的備份總管中,點擊該任務行中的轉換。已標記為已轉換的任務不再提供此操作。
8. 驗證備份是否可以啟動
啟用備份驗證後,HDP for Business 會從每個完成的備份啟動臨時虛擬機器並將啟動過程錄製為影片。必須在備份伺服器上安裝並初始化 Virtualization Station,且至少有 4 GB 的可用記憶體。
- 在保護政策中,於進階設定步驟中,選擇虛擬機器或實體裝置標籤上的啟用備份驗證。
- 設定影片時長(以秒為單位)。預設值為 120,範圍為 30 到 600。請確保有足夠的時間讓機器完全啟動。
- 要查看結果,請打開工作負載並進入其備份版本標籤。備份驗證狀態欄顯示每個版本的結果,您可以使用備份驗證狀態篩選器縮小列表。打開版本的操作選單並選擇播放驗證影片或下載驗證影片。備份活動中也提供相同的操作。
備份活動將驗證列為備份驗證型別的任務,其操作選單中有相同的兩個動作。對話方塊顯示工作負載名稱和已驗證的備份時間在播放器上方,並且可以從播放器控制中下載或全螢幕開啟影片。只有在驗證成功時才會存在影片。
9. 使用 AirGap+ 隔離備份伺服器
AirGap+ 透過按計劃關閉備份伺服器來為關鍵資產創造物理隔離。關閉電源的裝置無法透過網路訪問,這使得儲存在其上的備份不受勒索軟體、內部訪問和未授權連線的影響。
- 前往站點管理,點擊備份伺服器的名稱以開啟其詳細頁面。
- 打開Airgap+索引標籤。
- 每週網格涵蓋每天的每個小時,從凌晨 12 點到晚上 11 點。選擇伺服器受保護的時段。選定的時段標記為拒絕所有集合,未選定的時段則保持未應用設定。
- 點擊套用。只有在您更改網格後,按鈕才會啟用。
在保護期間,備份伺服器被關閉,沒有備份集合在其上運行,並且在站點管理中顯示為離線。該設備的日誌無法在離線時查詢,因為日誌查詢會實時轉發到設備。管理伺服器上的日誌頁面記錄了應用的計劃和下一次關機時間。
下一步


