Applicable Products
QTS, QuTS hero
Container Station
Scenario
You want to run large language models (LLMs) locally on your QNAP NAS for private AI chat, code assistance, or document analysis without sending data to the cloud. Ollama is the most popular and beginner-friendly inference engine for this purpose. This tutorial explains how to deploy Ollama on the QNAP NAS using Container Station.
System Requirements
| Requirement | Detail |
|---|
| QNAP App | Container Station 3.x or later |
| NAS Architecture | x86_64 (Intel or AMD CPU)
(Only a few ARM-based models are supported.) |
| Memory | - At least 8 GB (for 3B models)
- At least 16 GB (for 7B models)
|
| Storage Space | - At least 20 GB of extra free storage space in addition to the model file size.
- Use an SSD volume if possible.
|
| GPU (Optional) | Compatible NVIDIA GPUs (see the compatibility list)
GPU should be set to Container Station Mode in the Control Panel. |
Warning
OOM (Out of Memory) Risk
Ollama will attempt to load the entire model into memory by default. If your NAS has only 8–16 GB of RAM, loading a 14B or larger model may exhaust system memory, causing NAS services to become unresponsive or the system to restart.
Data Loss Risk
If you do not mount a persistent volume for /root/.ollama, all downloaded models and configuration will be lost when the container is removed or recreated. Always follow the volume mounting instructions in this tutorial.
Best Practice
- Check the model size against your available RAM in advance.
- Set memory limits to cap container memory usage.
- Start with small models (1B or 3B) and assess system stability before attempting larger models.
Procedure
Method 1: CPU-Only Deployment (No GPU Required)
Create storage folders.
Open File Station and create the following folder to store Ollama model data:
/share/Container/ollama
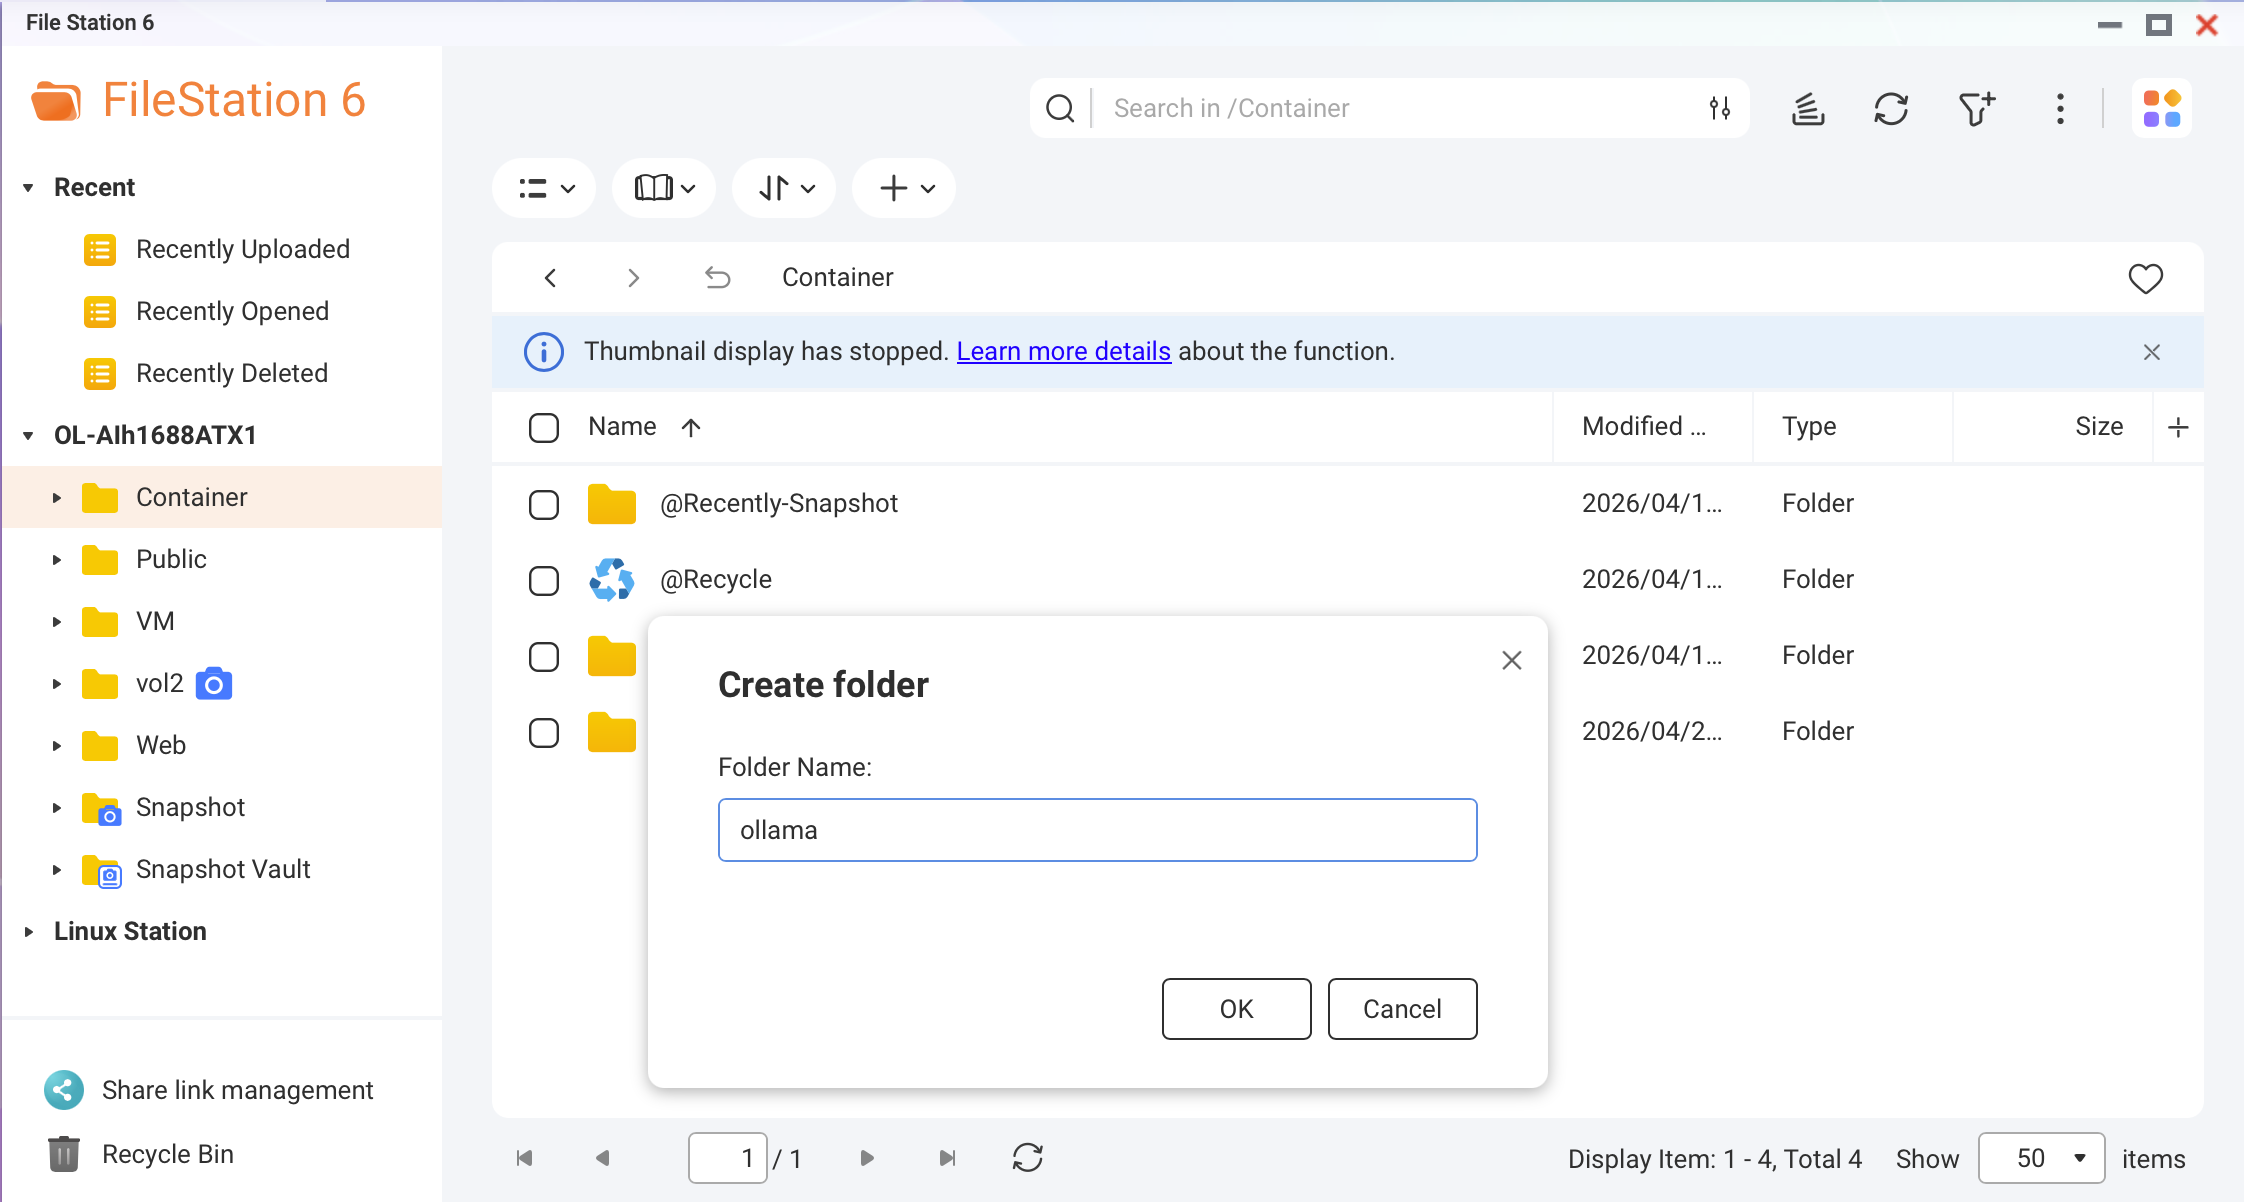 Screenshot: File Station — creating the Ollama folder under /share/Container/
Best Practice
If your NAS has an NVMe SSD cache or SSD volume, create this folder on the SSD. Model loading speed improves by up to 10 times compared to HDDs.
Create a Docker Compose file.
In Container Station, go to Applications > Create. Name the application ollama and paste the following YAML:
version: "3.8"

services:
  ollama:
    image: ollama/ollama:latest
    container_name: ollama
    restart: unless-stopped
    ports:
      - "11434:11434"
    volumes:
      - /share/Container/ollama:/root/.ollama
    environment:
      - OLLAMA_HOST=0.0.0.0
      - OLLAMA_KEEP_ALIVE=10m
    networks:
      - ai-network

networks:
  ai-network:
    name: ai-network
    driver: bridge
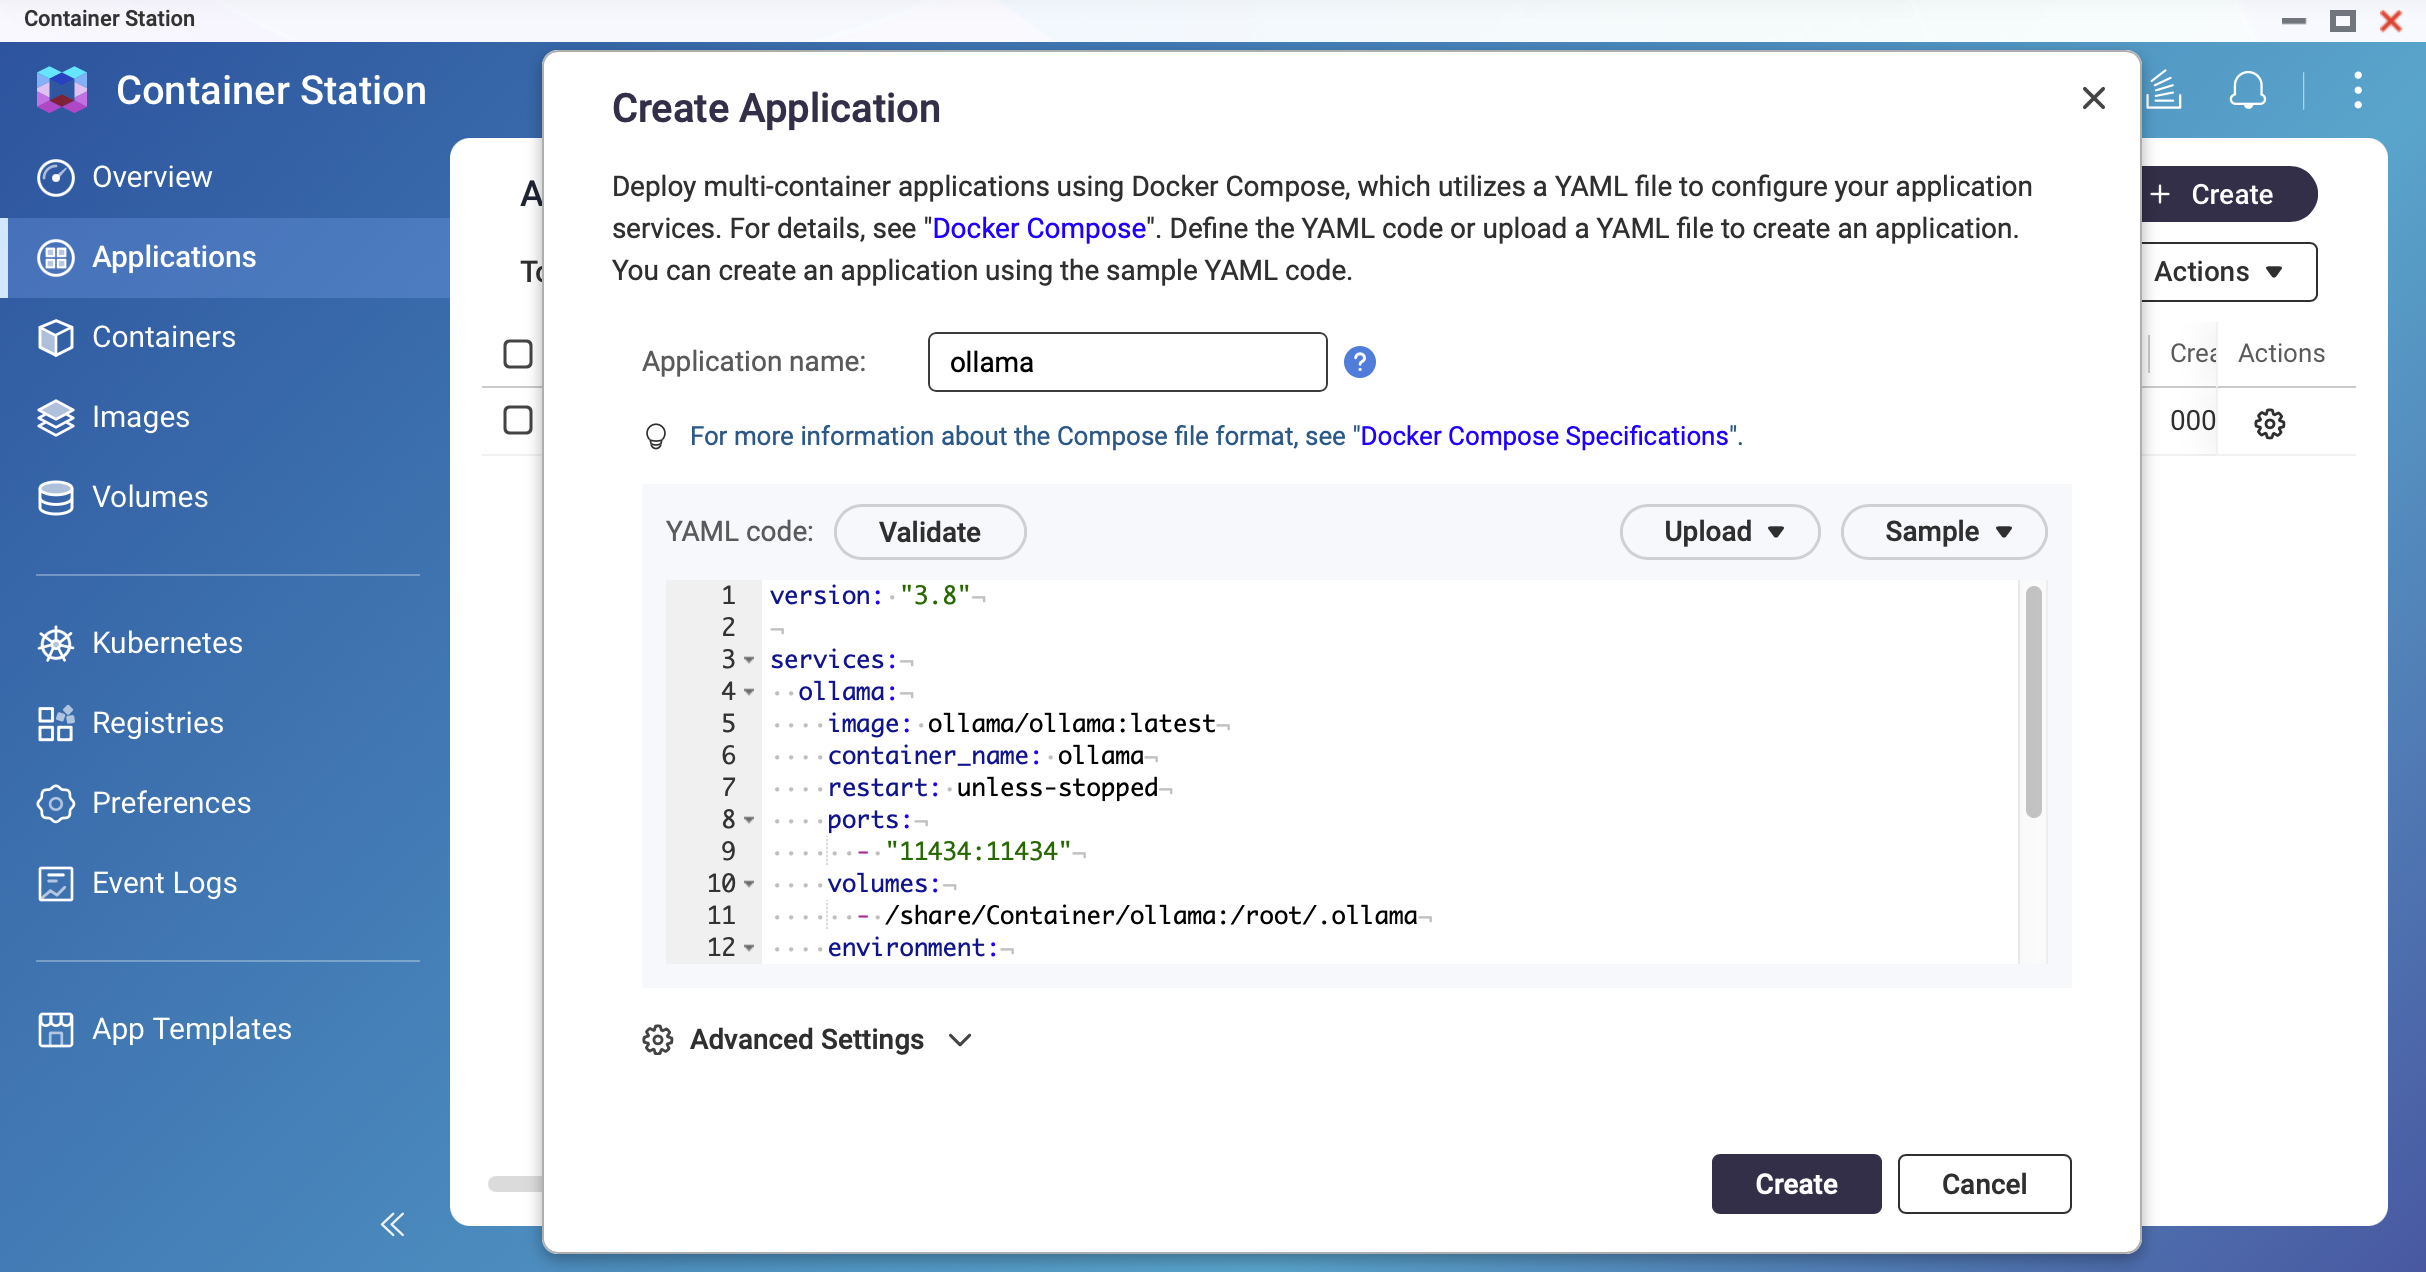 Screenshot: Container Station — Application creation screen with YAML editor
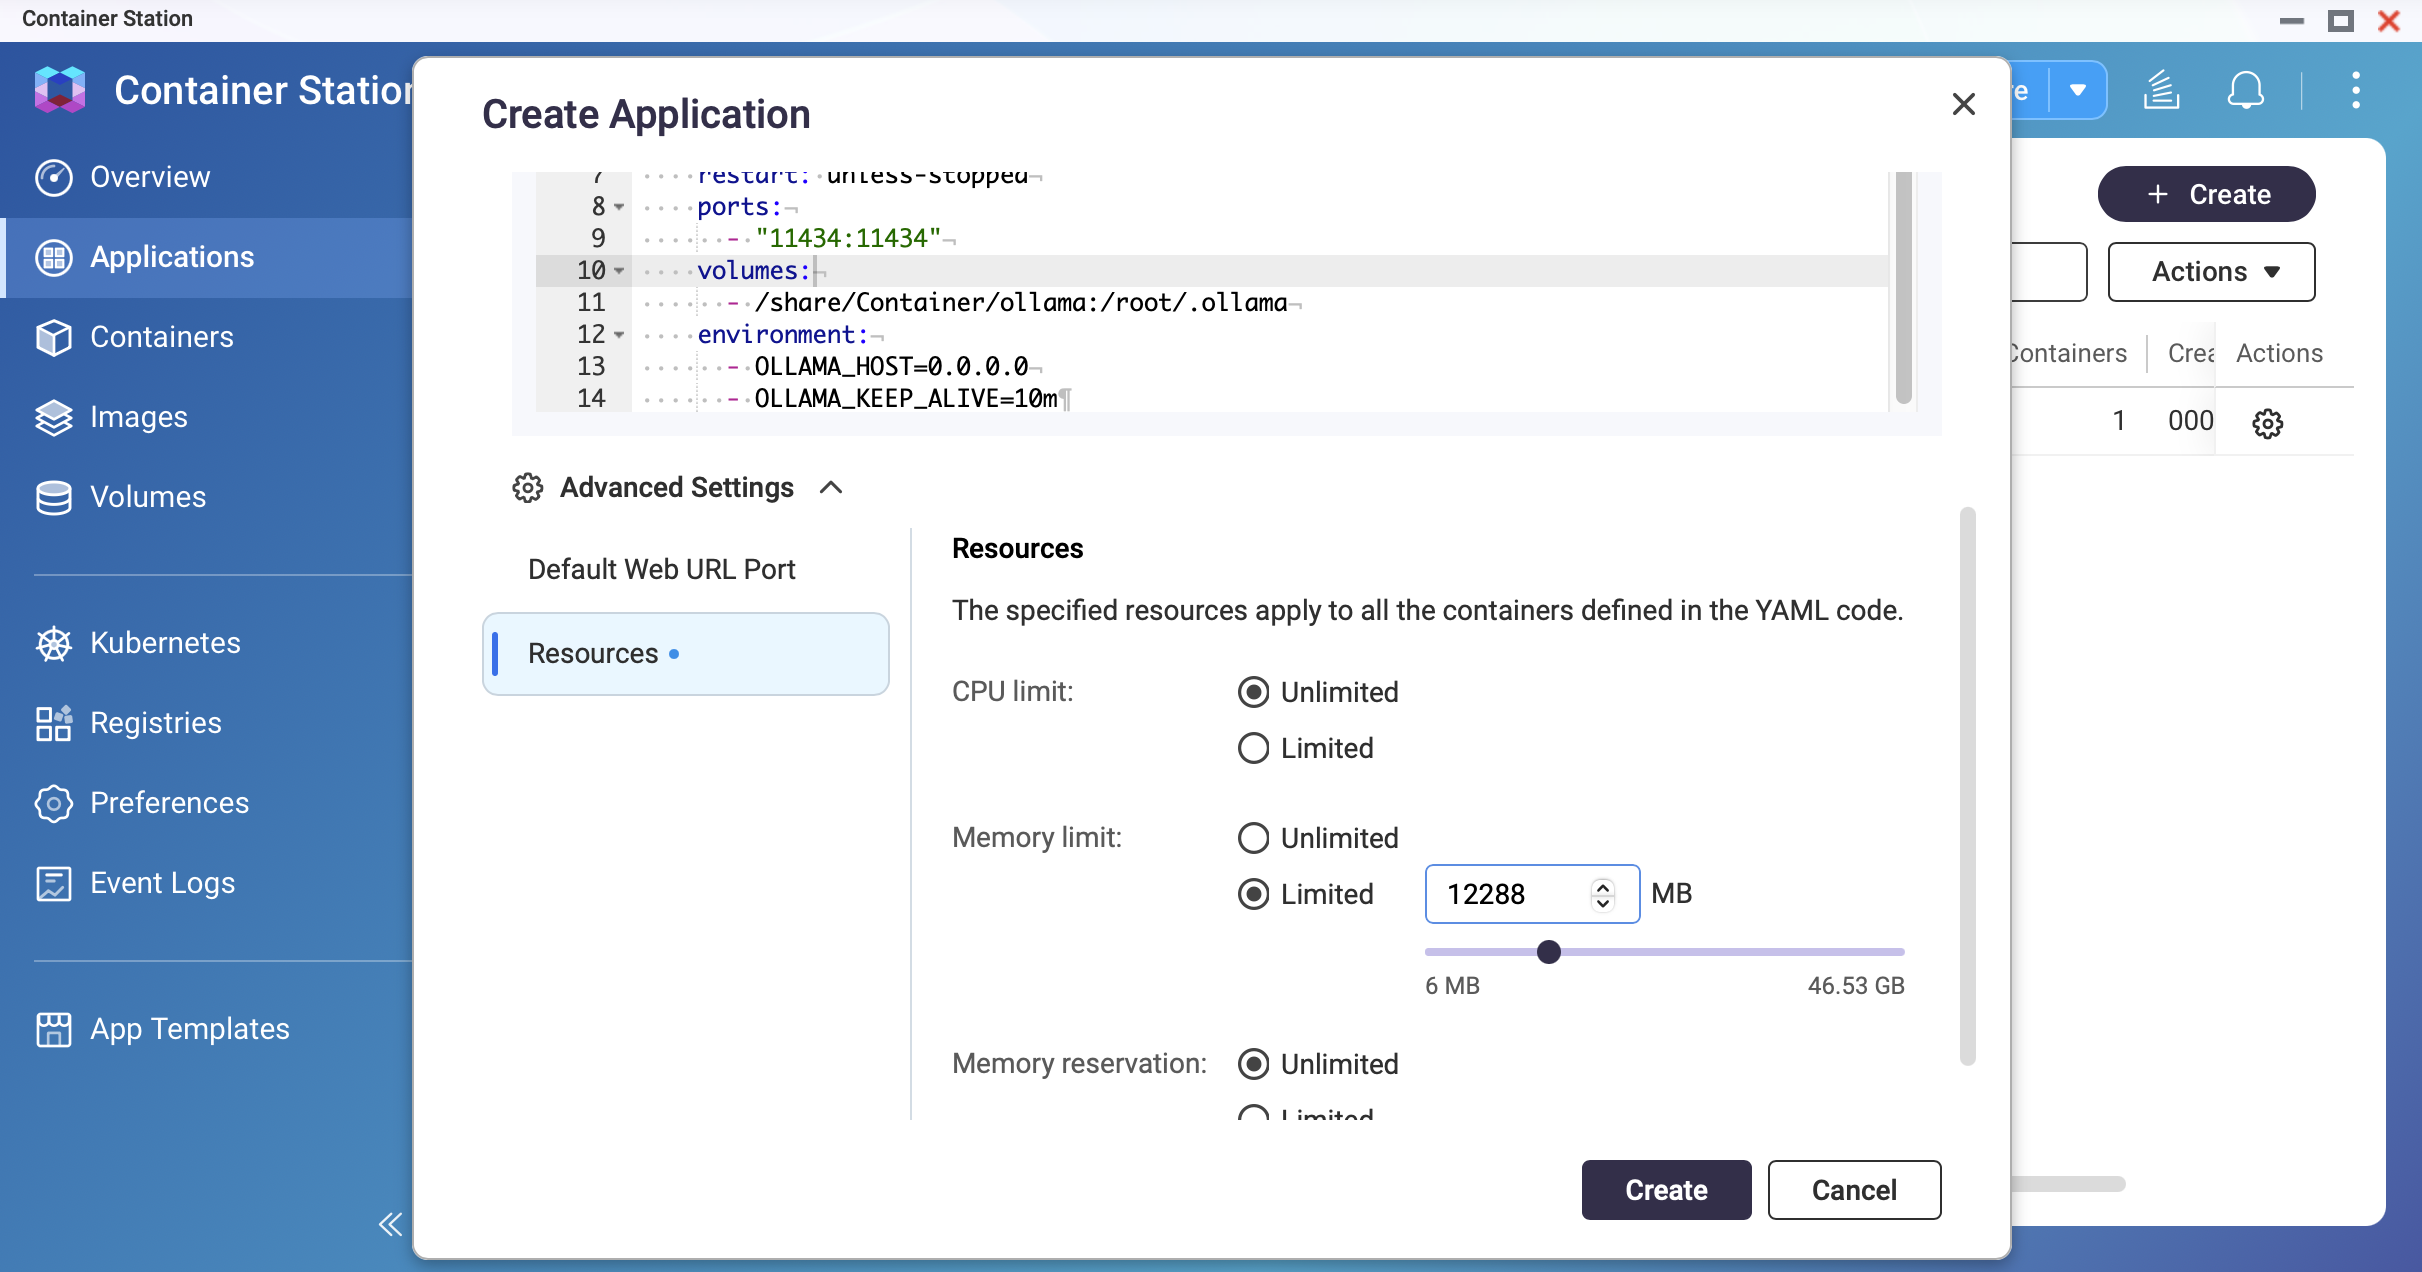 Screenshot: Container Station — Set the memory limit
Deploy the container.
Click Create. Container Station will pull the Ollama image and start the container. Wait until the status shows Running.
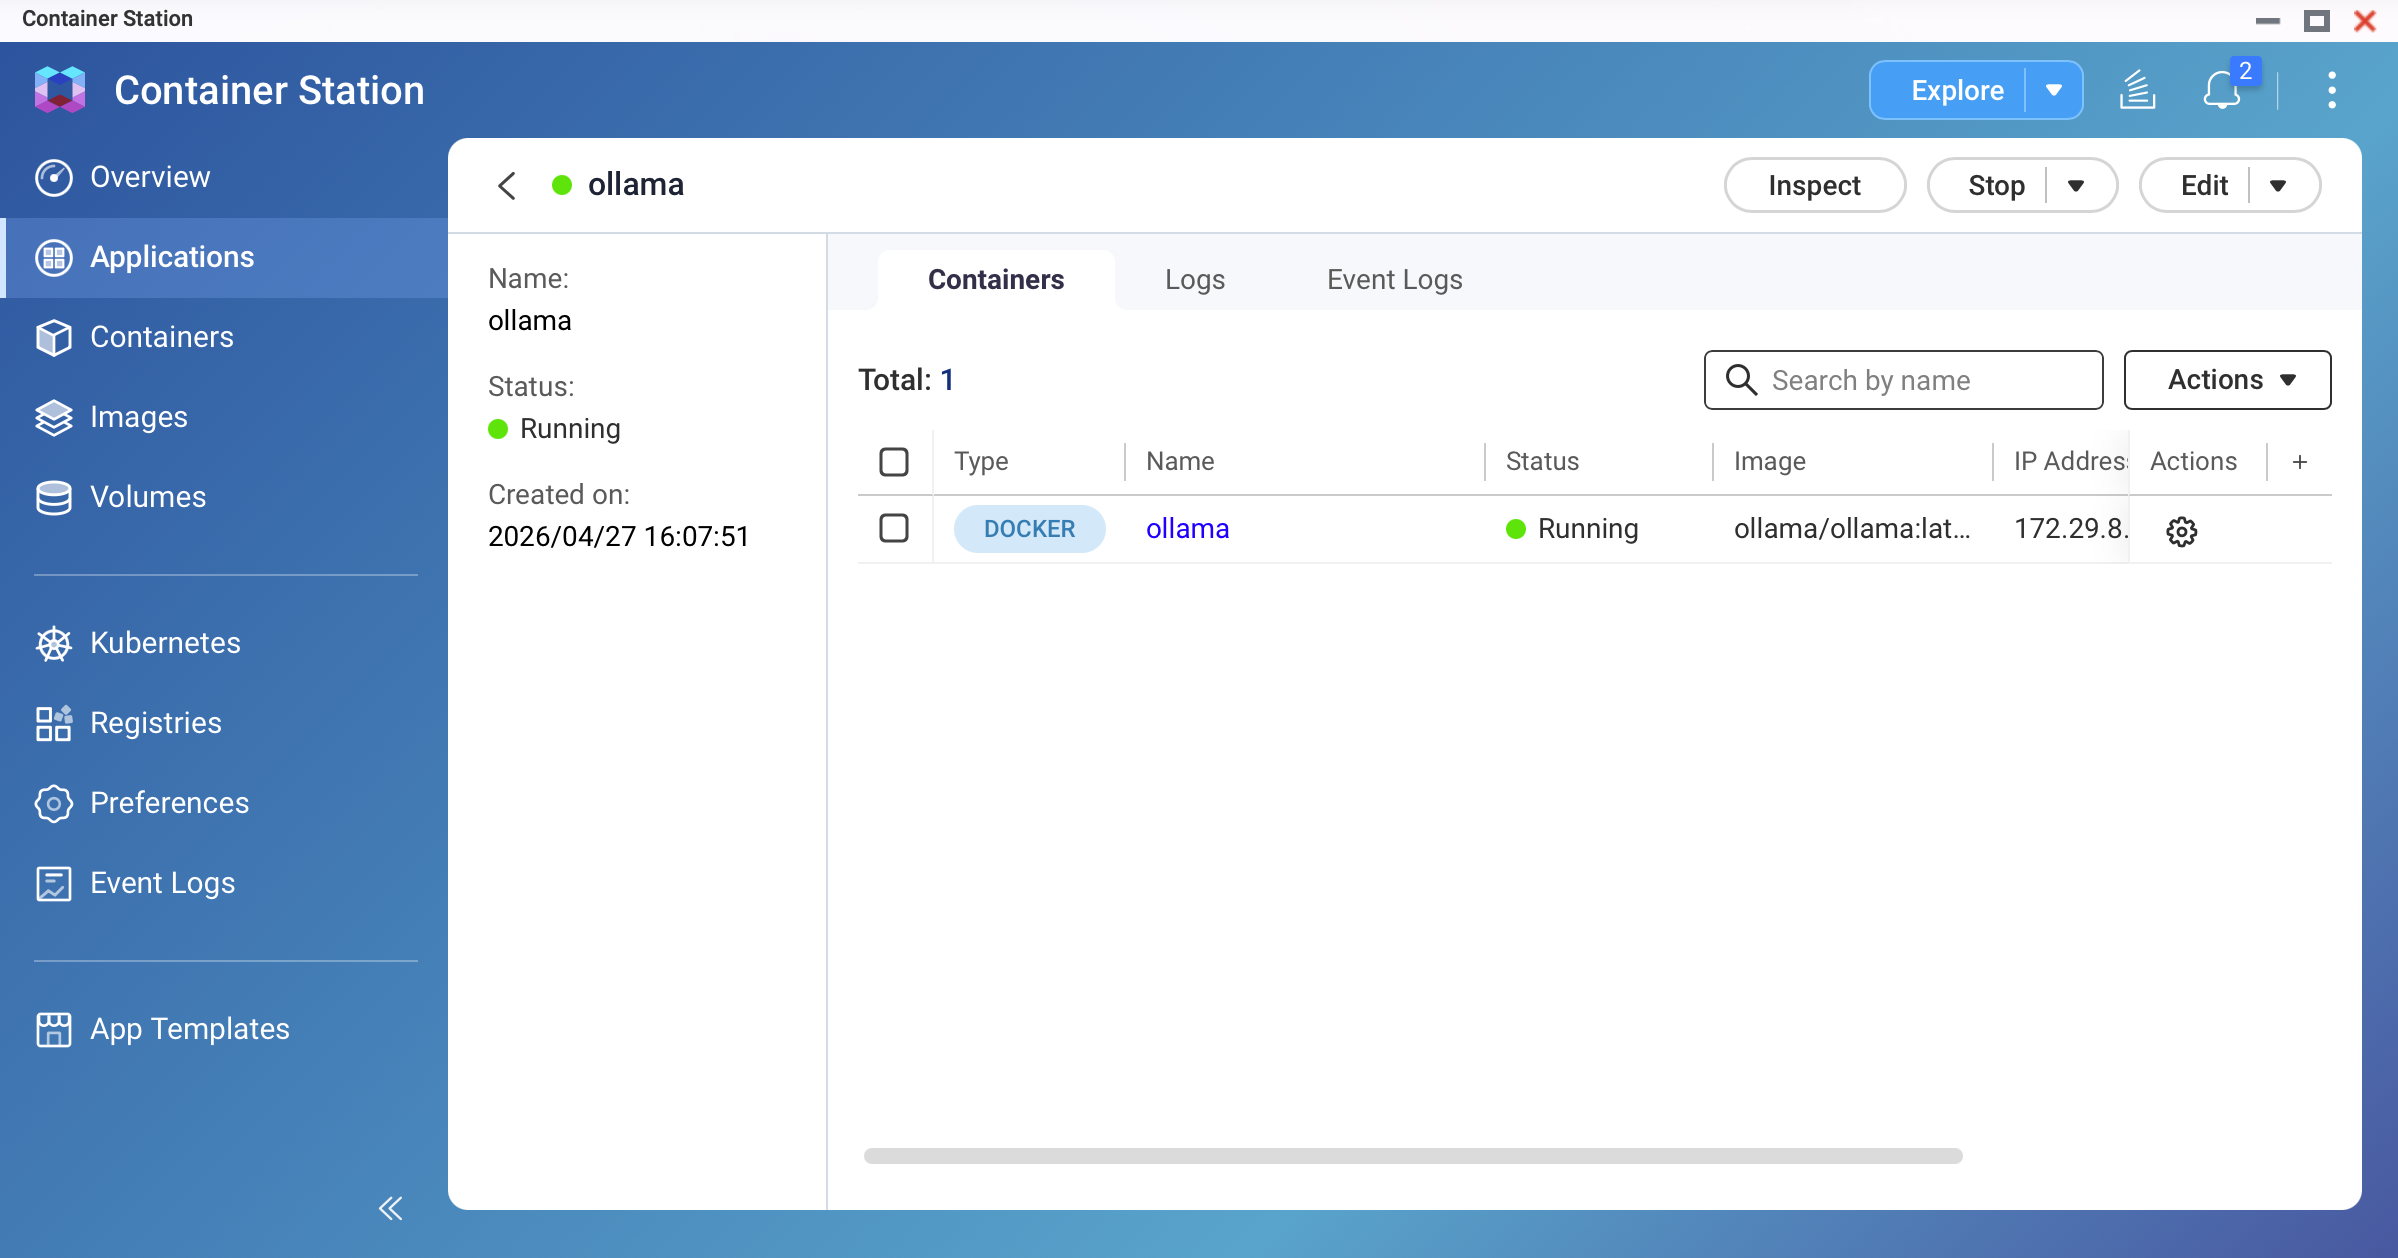 Screenshot: Container Station — ollama container showing "Running" status
Pull your first model.
Open the container's Terminal (or SSH into your NAS and exec you Docker) and run:
# For a lightweight 3B model (recommended for first test):
ollama pull llama3.2:3b

# For a standard 9B model (requires 16 GB+ RAM):
ollama pull qwen3.5:9b
The download may take several minutes depending on your internet speed. A 9B Q4_K_M model is approximately 4–7 GB.
Note
- Verify you have sufficient disk space before pulling. Use
ollama list to check existing models and their sizes. - For ARM-based NAS models, we recommend starting with the <1B model to monitor memory usage.
Test the model.
In the container terminal, run:
ollama run qwen3.5:9b
Type a prompt and confirm that you receive a response. Type /bye to exit.
Method 2: NVIDIA GPU-Accelerated Deployment
Note
Additional prerequisites for GPU Mode:
- NVIDIA GPU installed and detected by QTS/QuTS hero
- GPU set to Container Station Mode in the Control Panel
- NVIDIA GPU Driver and NvKernelDriver installed from App Center
Use the GPU-enabled Docker Compose configuration.
Replace the YAML from Method 1 with the following:
version: "3.8"

services:
  ollama:
    image: ollama/ollama:latest
    container_name: ollama
    restart: unless-stopped
    ports:
      - "11434:11434"
    volumes:
      - /share/Container/ollama:/root/.ollama
    environment:
      - OLLAMA_HOST=0.0.0.0
      - OLLAMA_KEEP_ALIVE=10m
      - NVIDIA_VISIBLE_DEVICES=all
    deploy:
      resources:
        reservations:
          devices:
            - driver: nvidia
              count: all
              capabilities: [gpu]
    networks:
      - ai-network

networks:
  ai-network:
    name: ai-network
    driver: bridge
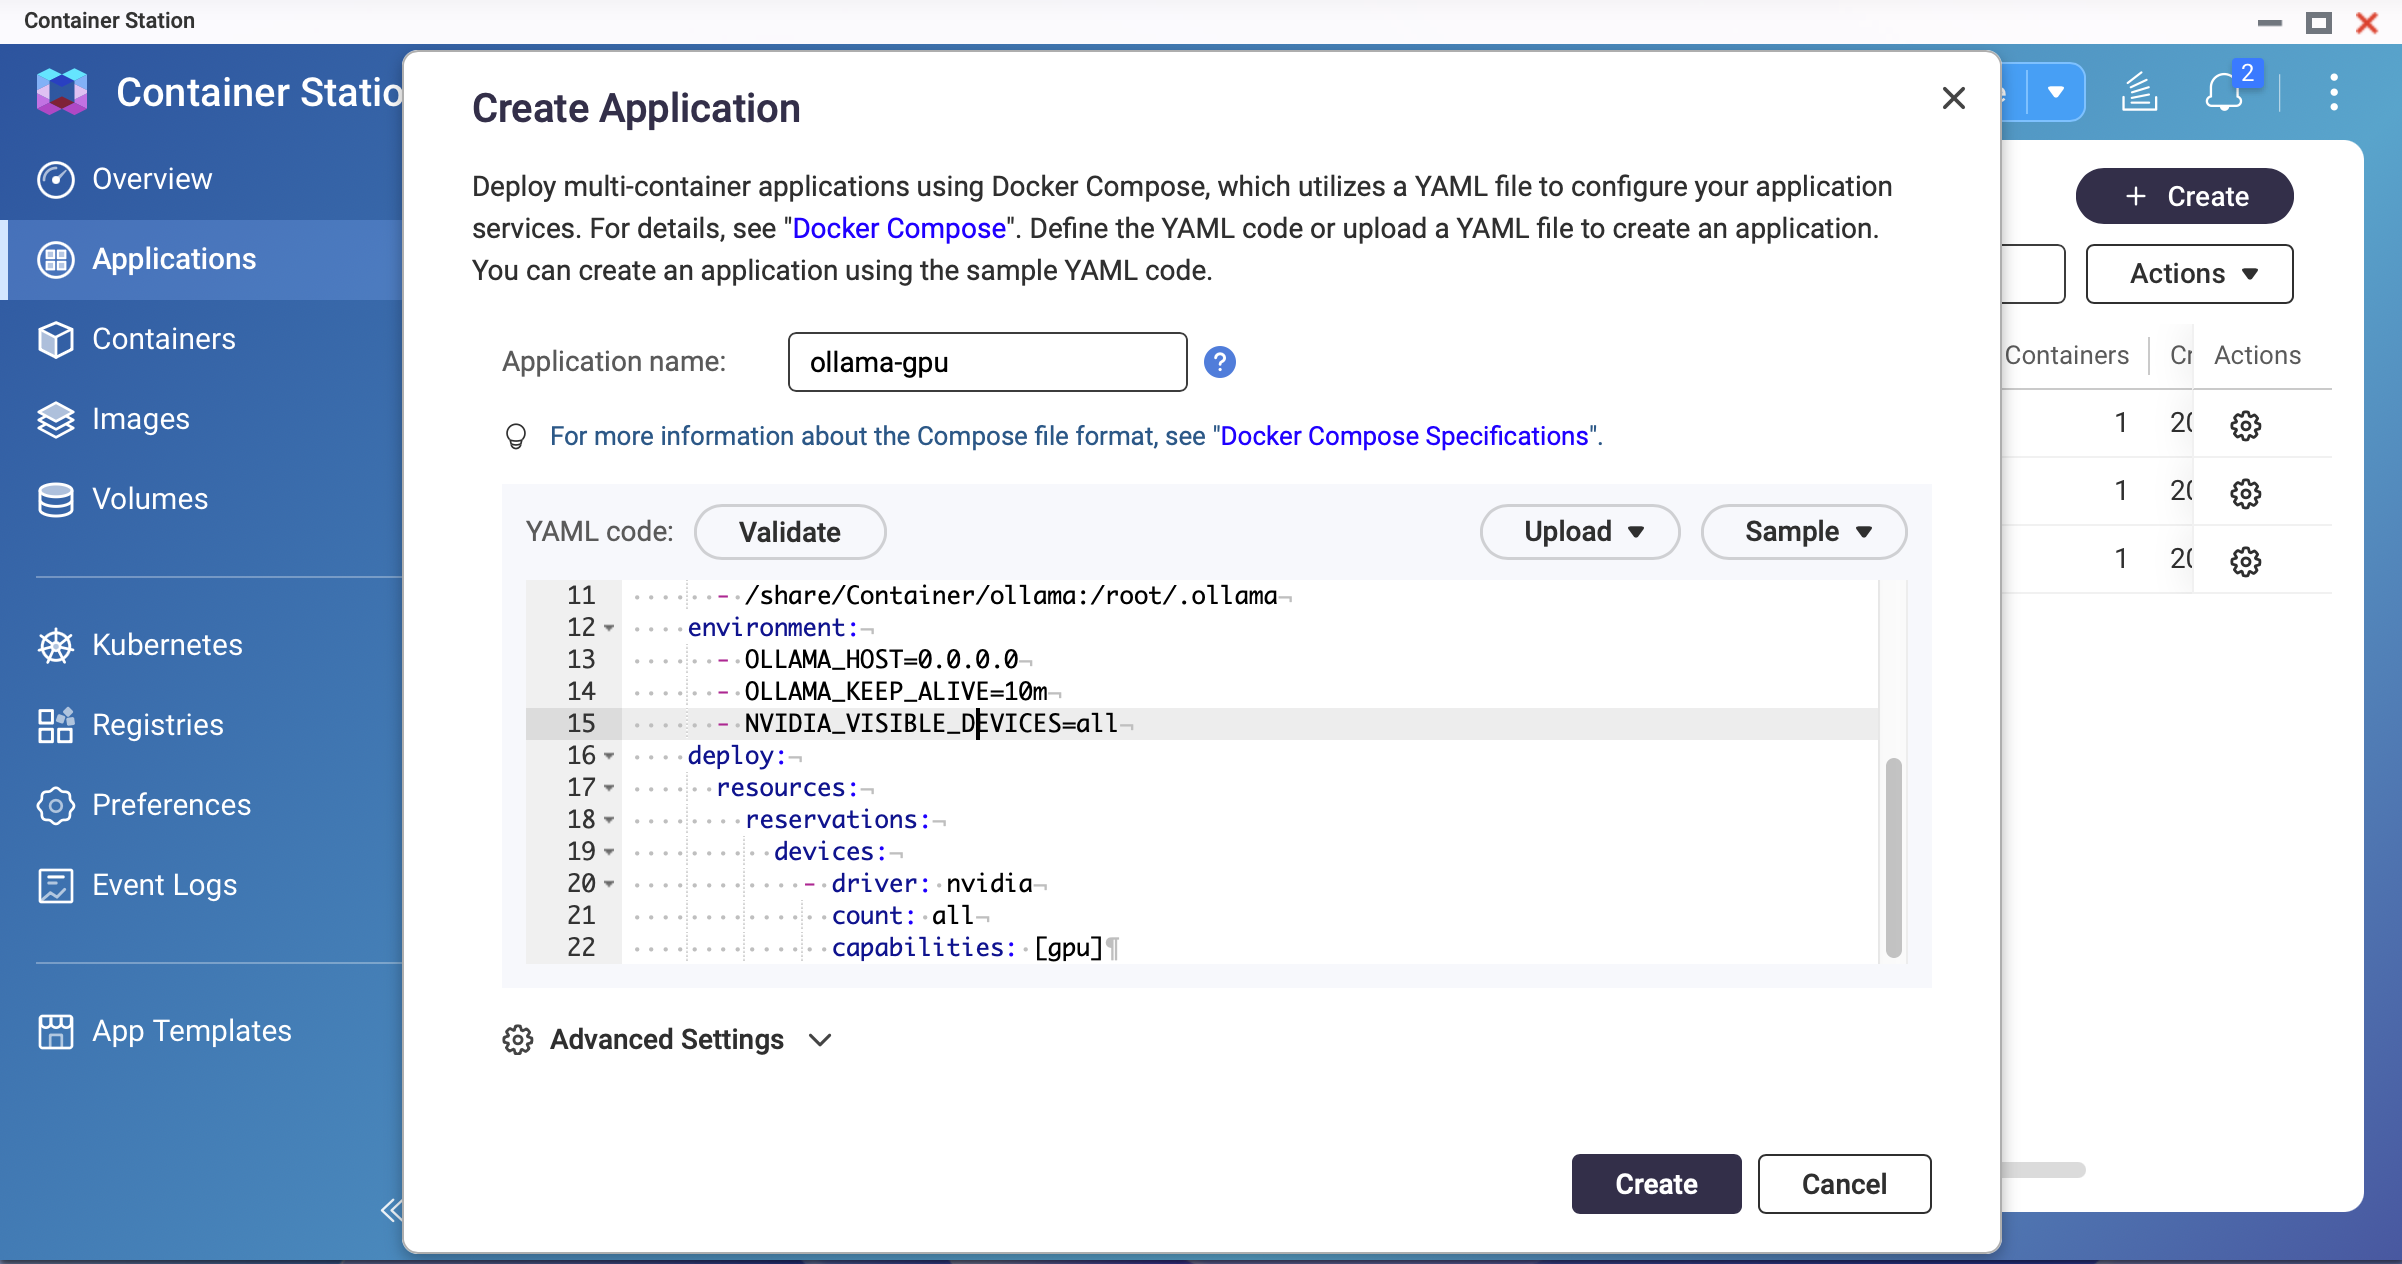 Screenshot: Container Station — GPU-enabled Docker Compose YAML
Note
QNAP's bundled NVIDIA drivers may be older than the latest release. If the container fails to start with GPU enabled, check the driver version with nvidia-smi on the host and ensure it is compatible with the Ollama image version
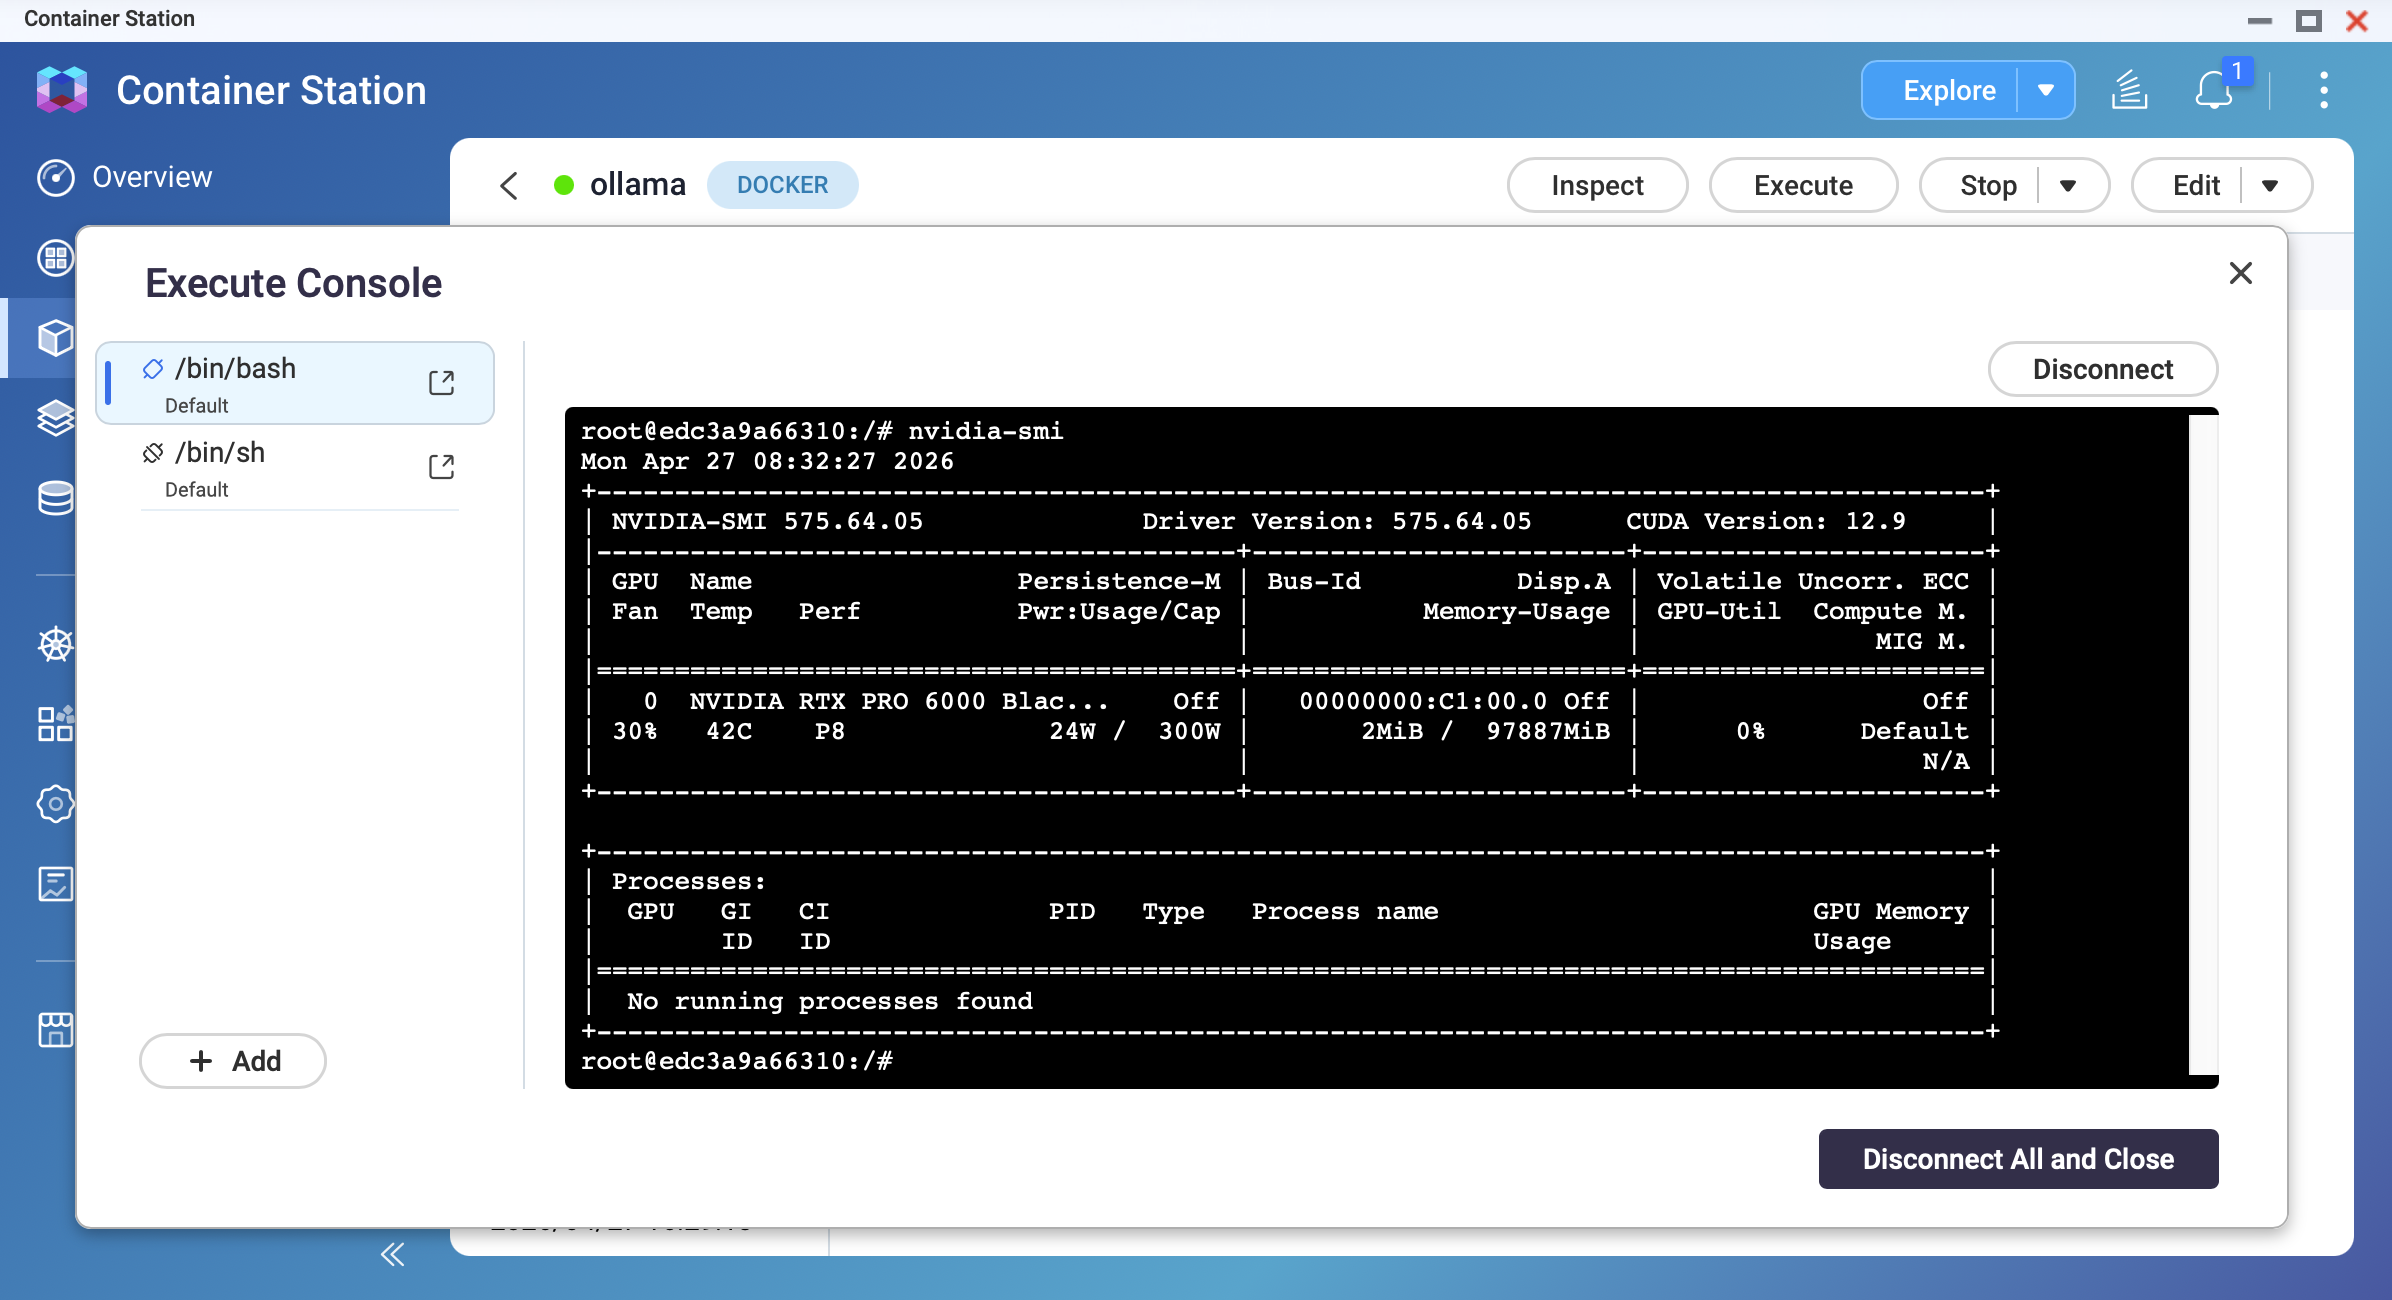
Deploy and verify GPU access.
After the container starts, open its terminal and run:
nvidia-smi
You should see your GPU model, driver version, and memory information.
Pull a model and confirm GPU acceleration.
ollama pull qwen3.5:9b
ollama run qwen3.5:9b
While the model is generating a response, open another terminal and run nvidia-smi. You should observe GPU memory usage and GPU utilization increasing.
Result
After completing this tutorial, you will have:
- Ollama running on your QNAP NAS at
http://<NAS-IP>:11434 - Model data persisted in
/share/Container/ollama (survives container rebuilds) - A working LLM accessible via the Ollama API
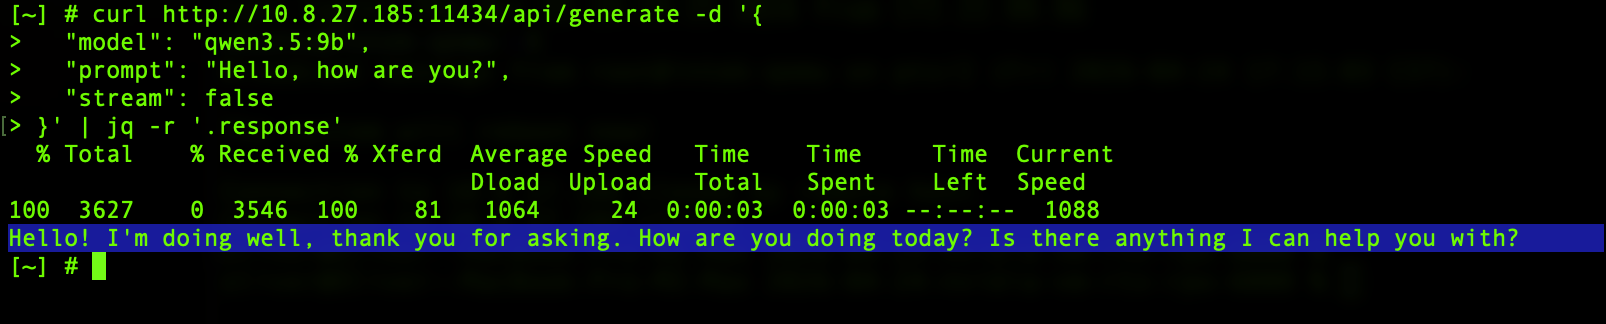
You can test the API from any device on your local network:
curl http://<NAS-IP>:11434/api/generate -d '{
  "model": "qwen3.5:9b",
  "prompt": "Hello, how are you?",
  "stream": false
}'
Important
The OLLAMA_HOST=0.0.0.0 setting exposes the Ollama API on all network interfaces. Do not expose port 11434 to the internet. Use firewall rules or QNAP's network settings to restrict access to your local network only.
Troubleshooting
Container exits immediately after starting
This may be caused by insufficient RAM or GPU driver mismatch. Check container logs in Container Station. Reduce memory limitations or disable GPU mode.
Model pull fails midway
This may result from insufficient disk space or network timeout. Try to free up storage space. Re-run ollama pull; the system resumes from where it stopped.
Response speed is very slow (1–3 tokens per second)
The model may be running on CPU instead of GPU, or the model is too large for your RAM. Verify your GPU access with nvidia-smi inside the container. Try to use a smaller model.
The NAS becomes unresponsive during inference
This can be an "out of memory" issue: the model is consuming all the system memory. We recommend restarting the NAS. Set a memory usage limit in the application. Or use a smaller model.
"Cannot connect to Ollama" message from Open WebUI
This may be caused by a wrong API URL or Docker network isolation. You can use http://ollama:11434 if you are on the same Docker network.
対象製品
QTS、QuTS hero
Container Station
シナリオ
データをクラウドに送信せずに、QNAP NAS 上でプライベート AI チャット、コード支援、ドキュメント分析のために大規模言語モデル(LLM)をローカルで実行したい場合、Ollama はこの目的に最も人気があり初心者に優しい推論エンジンです。このチュートリアルでは、Container Station を使用して QNAP NAS に Ollama をデプロイする方法を説明します。
システム要件
| 要件 | 詳細 |
|---|
| QNAP アプリ | Container Station 3.x 以降 |
| NAS アーキテクチャ | x86_64(Intel または AMD CPU)
(ARM ベースのモデルは一部のみ対応) |
| メモリ | - 少なくとも 8 GB(3B モデルの場合)
- 少なくとも 16 GB(7B モデルの場合)
|
| ストレージスペース | - モデルファイルサイズに加えて、少なくとも 20 GB の余分なストレージスペースが必要です。
- 可能であれば SSD ボリュームを使用してください。
|
| GPU(オプション) | 互換性のある NVIDIA GPU(互換性リストを参照)
GPU はコントロールパネルで Container Station モードに設定する必要があります。 |
警告
OOM(メモリ不足)リスク
Ollama はデフォルトでモデル全体をメモリにロードしようとします。NAS の RAM が 8〜16 GB の場合、14B 以上のモデルをロードするとシステムメモリが枯渇し、NAS サービスが応答しなくなったり、システムが再起動する可能性があります。
データ損失リスク
永続ボリュームを/root/.ollamaにマウントしない場合、コンテナが削除または再作成されると、ダウンロードされたモデルと設定がすべて失われます。このチュートリアルのボリュームマウント手順に必ず従ってください。
ベストプラクティス
- 事前にモデルサイズを使用可能な RAM と照らし合わせて確認してください。
- コンテナのメモリ使用量を制限するためにメモリ制限を設定します。
- 小さなモデル(1B または 3B)から始め、システムの安定性を評価してから大きなモデルに挑戦してください。
手順
方法 1: CPU のみのデプロイメント(GPU 不要)
ストレージフォルダを作成します。
File Stationを開き、Ollama モデルデータを保存するための次のフォルダを作成します:
/share/Container/ollama
スクリーンショット: File Station — /share/Container/ に Ollama フォルダを作成
ベストプラクティス
NAS に NVMe SSD キャッシュまたは SSD ボリュームがある場合、このフォルダを SSD に作成してください。モデルの読み込み速度が HDD と比べて最大 10 倍向上します。
Docker Compose ファイルを作成します。
Container Station でアプリケーション > 作成に移動します。アプリケーションに名前を付けollama、以下の YAML を貼り付けます:
version: "3.8"

services:
  ollama:
    image: ollama/ollama:latest
    container_name: ollama
    restart: unless-stopped
    ports:
      - "11434:11434"
    volumes:
      - /share/Container/ollama:/root/.ollama
    environment:
      - OLLAMA_HOST=0.0.0.0
      - OLLAMA_KEEP_ALIVE=10m
    networks:
      - ai-network

networks:
  ai-network:
    name: ai-network
    driver: bridge
スクリーンショット: Container Station — YAML エディター付きアプリケーション作成画面
スクリーンショット: Container Station — メモリ制限を設定
コンテナをデプロイします。
作成をクリックします。Container Station は Ollama イメージを取得し、コンテナを開始します。ステータスが実行中と表示されるまで待ちます。
スクリーンショット: Container Station — ollama コンテナが「実行中」ステータスを表示
最初のモデルを取得します。
コンテナのターミナルを開く(または NAS に SSH で接続して Docker を実行)し、次を実行します:
# 軽量な 3B モデル(初回テストに推奨):
ollama pull llama3.2:3b

# 標準的な 9B モデル(16GB 以上の RAM が必要):
ollama pull qwen3.5:9b
ダウンロードはインターネット速度によって数分かかる場合があります。9B Q4_K_M モデルは約 4〜7GB です。
注意
- 取得する前に十分なディスクスペースがあることを確認してください。
ollama listを使用して既存のモデルとそのサイズを確認します。 - ARM ベースの NAS モデルの場合、メモリ使用量を監視するために <1B モデルから始めることをお勧めします。
モデルをテストします。
コンテナターミナルで次を実行します:
ollama run qwen3.5:9b
プロンプトを入力し、応答が受け取れることを確認します。終了するには/byeを入力します。
方法 2: NVIDIA GPU 高速化展開
注意
GPU モードの追加前提条件:
- NVIDIA GPU が QTS/QuTS hero によってインストールされ、検出されていること
- GPU がコントロールパネルで Container Station モードに設定されていること
- NVIDIA GPU ドライバーと NvKernelDriver が App Center からインストールされていること
GPU 対応の Docker Compose 設定を使用する。
方法 1 の YAML を以下に置き換える:
version: "3.8"

services:
  ollama:
    image: ollama/ollama:latest
    container_name: ollama
    restart: unless-stopped
    ports:
      - "11434:11434"
    volumes:
      - /share/Container/ollama:/root/.ollama
    environment:
      - OLLAMA_HOST=0.0.0.0
      - OLLAMA_KEEP_ALIVE=10m
      - NVIDIA_VISIBLE_DEVICES=all
    deploy:
      resources:
        reservations:
          devices:
            - driver: nvidia
              count: all
              capabilities: [gpu]
    networks:
      - ai-network

networks:
  ai-network:
    name: ai-network
    driver: bridge
スクリーンショット: Container Station — GPU 対応 Docker Compose YAML
注意
QNAP のバンドルされた NVIDIA ドライバーは最新リリースより古い場合があります。GPU が有効な状態でコンテナが起動しない場合、ホスト上でnvidia-smiを使用してドライバーのバージョンを確認し、Ollama イメージバージョンと互換性があることを確認してください。
GPU アクセスを展開して確認する。
コンテナが起動したら、そのターミナルを開いて次を実行します:
nvidia-smi
GPU モデル、ドライバーのバージョン、メモリ情報が表示されるはずです。
モデルをプルして GPU アクセラレーションを確認する。
ollama pull qwen3.5:9b
ollama run qwen3.5:9b
モデルが応答を生成している間に、別のターミナルを開いてnvidia-smiを実行します。GPU メモリ使用量と GPU 利用率が増加していることを観察する必要があります。
効果
このチュートリアルを完了すると、次のことができます:
- QNAP NAS で
http://<NAS-IP>:11434で Ollama を実行 /share/Container/ollamaにモデルデータを保存(コンテナ再構築後も保持)- Ollama API を介してアクセス可能な動作する LLM
ローカルネットワーク上の任意のデバイスから API をテストできます:
curl http://<nas-ip>:11434/api/generate -d '{"model":"qwen3.5:9b","prompt":" こんにちは、元気ですか?","stream": false}'
重要
OLLAMA_HOST=0.0.0.0設定は Ollama API をすべてのネットワークインターフェースに公開します。ポート 11434 をインターネットに公開しないでください。アクセスをローカルネットワークのみに制限するためにファイアウォールルールまたは QNAP のネットワーク設定を使用してください。
トラブルシューティング
コンテナが開始直後に終了する
これは RAM 不足や GPU ドライバの不一致が原因かもしれません。Container Station でコンテナログを確認してください。メモリ制限を減らすか、GPU モードを無効にしてください。
モデルのプルが途中で失敗する
これはディスクスペース不足やネットワークタイムアウトが原因かもしれません。ストレージスペースを解放してください。ollama pullを再実行すると、システムは停止したところから再開します。
応答速度が非常に遅い(1〜3 トークン / 秒)
モデルが CPU で実行されているか、RAM に対してモデルが大きすぎる可能性があります。コンテナ内でnvidia-smiを使用して GPU アクセスを確認してください。より小さなモデルを使用してみてください。
推論中に NAS が応答しなくなる
これは「メモリ不足」問題である可能性があります。モデルがシステムメモリをすべて消費しています。NAS を再起動することをお勧めします。アプリケーションでメモリ使用量の制限を設定してください。または、より小さなモデルを使用してください。
Open WebUI からの「Ollama に接続できません」メッセージ
これは API URL の誤りや Docker ネットワークの隔離が原因かもしれません。同じ Docker ネットワークにいる場合はhttp://ollama:11434を使用できます。


