


NAS Recovery Guide for TS-855eU and TS-x88ATX series
Applicable Products
- TS-855eU, TS-855eU-RP
- TVS-AIh1688ATX
Overview
This FAQ explains how to manually recover your NAS if it fails to start up. This FAQ only applies to the NAS models listed above.
NAS Recovery Requirements
To recover the NAS, you will need the following:
- An empty USB drive of at least 8 GB capacity
- A Windows PC
Recovering The NAS
You can recover your NAS by first creating a USB boot drive to restore basic NAS functionality and then updating the firmware with Qfinder Pro. If any part of the recovery process fails, see Further Troubleshooting below. To recover your NAS, perform the following steps:
Create a USB boot drive
- Download Rufus.
- Download the NAS system images below corresponding to the NAS model:
- Open Rufus.
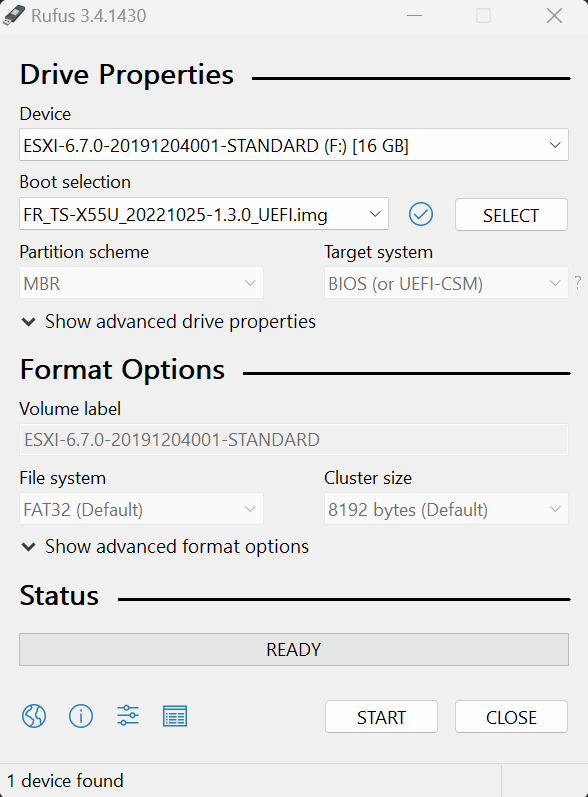
- Under Device Properties > Boot Selection, click Select.
- Select the downloaded NAS system image for TS-885eU / TS-885eu-RP.
- Click Open.
- Click Start.
Rufus formats the USB drive and installs the NAS system image onto the USB drive.WarningFormatting a USB flash drive will erase all its existing data. If you have data on the USB flash drive you want to preserve, copy the data to your PC first, then after formatting the USB flash drive, copy the data back.
Use the USB boot drive to recover the NAS
- Power off the NAS.
- Remove all drive trays.
- Connect the USB boot drive to a rear USB port of the NAS.

- Power on the NAS.
The NAS starts recovering the firmware with the USB boot drive. It will take around 10 minutes to complete the recovery process. Once it is done, the NAS pows off automatically. If the NAS does not power off after 15 minutes, the recovery process has failed. You can try it again or you may contact QNAP technical support. - After the NAS firmware process is finished, remove the USB boot drive from the NAS.
- Power on the NAS.
Qfinder Pro can now find your NAS.
Install the latest firmware version on your NAS with Qfinder Pro
- Download and install Qfinder Pro.
- Open Qfinder Pro.
- Locate your NAS in the device list.TipFor details on using Qfinder Pro, see Qfinder Pro Help.
- Right click on your NAS.
- Select Update Firmware.
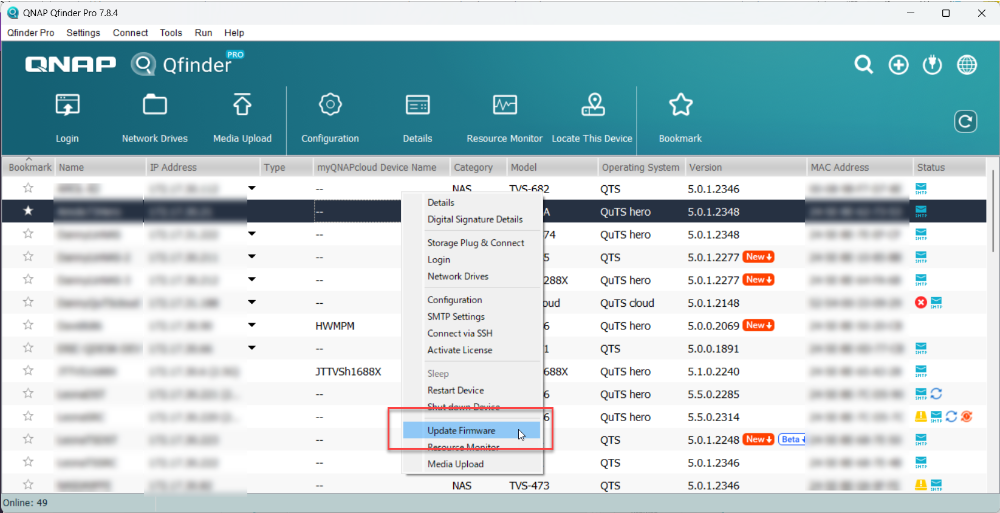 The Update Firmware window opens.
 - Select Automatically update the firmware to the latest version.
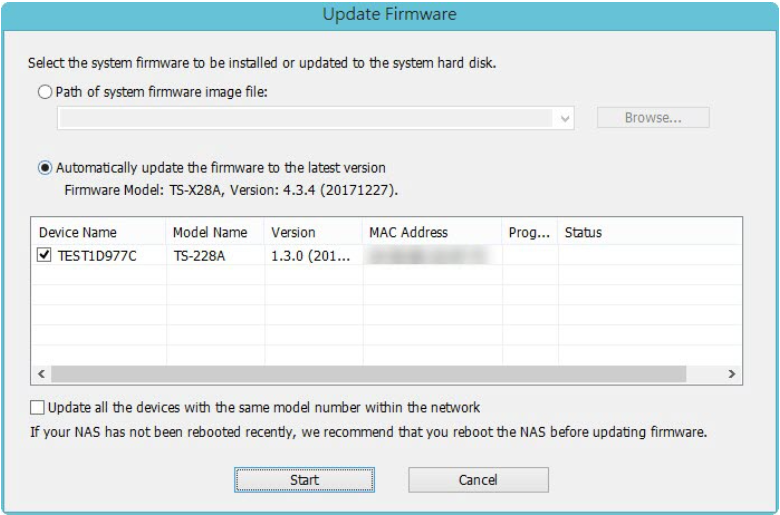
- Click Start.
The NAS firmware will be updated to the latest version.
Install hard drives
- After the firmware is updated, perform the following steps to install hard drives:
- Attach the hard drives to the drive trays.
- Insert the drive trays into the NAS.
For details on installing hard drives, see the NAS User Guide available for download from Download Center. - If the hard drives are not new, the firmware must be updated again while the hard drives are installed. For details, see Updating the NAS Firmware Using Qfinder Pro in How to search and manage a QNAP NAS using Qfinder Pro.
- If the hard drives are new, you can continue to initialize the NAS. For initializing QTS or QuTS hero on your NAS, see the following:
Further Troubleshooting
- If the steps of this guide could not be successfully completed:
Your NAS needs to be physically serviced by a qualified hardware technician. - If you were able to install the latest firmware version on your NAS with Qfinder Pro but after installing the hard drives, the NAS will not boot up:
The hard drives are faulty and need to be replaced. A NAS will fail to start up if the hard drives are faulty.
Further Reading
What to do if Firmware update is stuck?
Why won't my NAS boot after a firmware update?
What can I do if I can not access my NAS after firmware update?
What do I do if there was a power failure or network disconnection during a firmware update?
需要進一步協助,歡迎前往官方社群發文,與其他用戶及 QNAP 專家交流。 前往 QNAP 官方社群


