Applicable Products
- QuTS hero
- HBS 3 Hybrid Backup Sync 26 (or later)
- Storage Manager
Introduction
WORM (Write Once, Read Many) is a data protection solution that ensures data integrity by preventing files from being modified or deleted. Once data is written, it cannot be changed or removed within the configured retention period, protecting your data against ransomware attacks and unauthorized modifications.
In QuTS hero, you can enable WORM on a shared folder. You can then use HBS to back up files to the WORM shared folder, ensuring the backup data will be immutable, thereby preventing any accidental or malicious modifications.
This tutorial provides a step-by-step guide on how to set up a WORM shared folder and then create a backup job in HBS to back up files to the WORM shared folder.
Note
HBS currently only supports backing up to WORM shared folders. Syncing to WORM shared folders is not supported.
Instructions
Because WORM cannot be enabled, disabled, or modified on an existing shared folder, you must create a new shared folder and enable WORM during creation. After the WORM shared folder is created, you can create a backup job in HBS using the WORM shared folder as destination, and then monitor the job status after it runs for the first time. If you run out of space on the WORM shared folder, you can expand the folder capacity as needed.
A. Create a WORM shared folder.
Note
Only the required settings and WORM settings are covered in the following steps.
For details on other shared folder settings, see "Creating a shared folder" in the
QuTS hero User Guide.
- Log in to your NAS as an administrator.
- Open Control Panel.
- Go to System > Shared Folders > Shared Folder.
- Click Create > Shared Folder.
The Create Shared Folder Wizard opens.
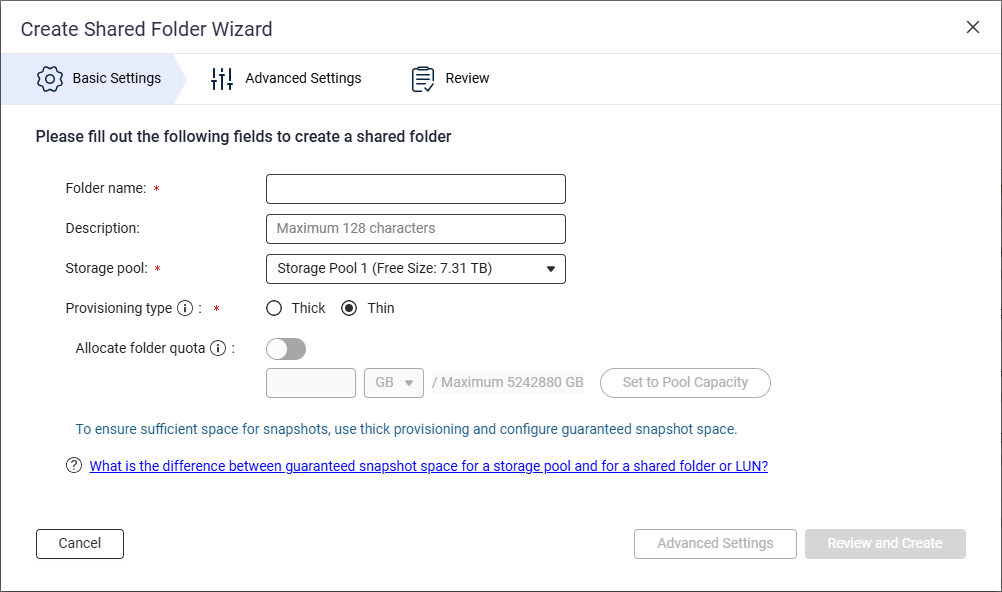
- Next to Folder name, specify the shared folder name.
- Next to Storage pool, select the storage pool in which to create the shared folder.
- Next to Provisioning type, select a provisioning type.
- Click Advanced Settings.
- Configure WORM.
- Next to Security Settings, click
 .
.
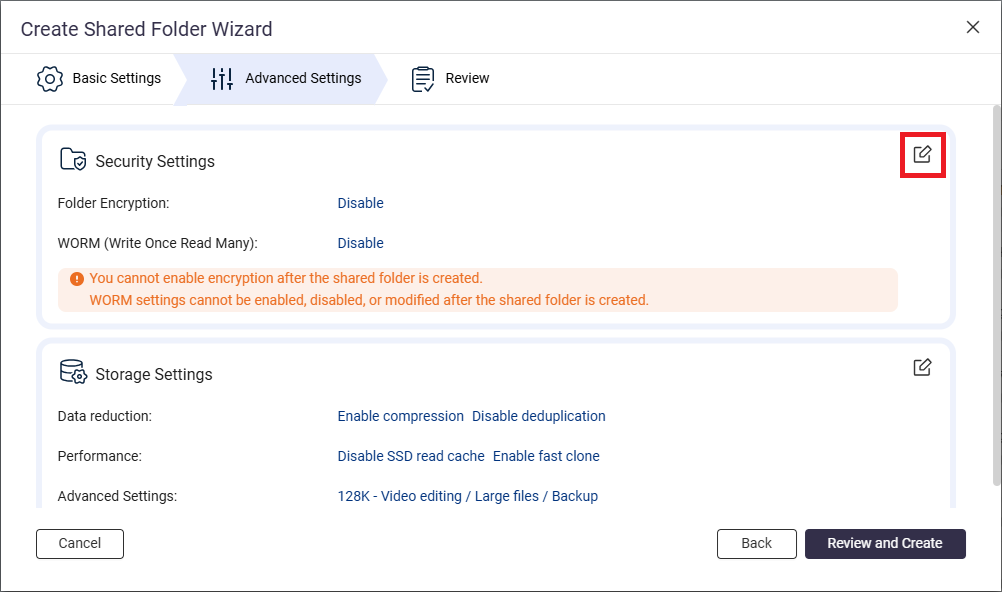
- Go to the WORM (Write Once Read Many) section.
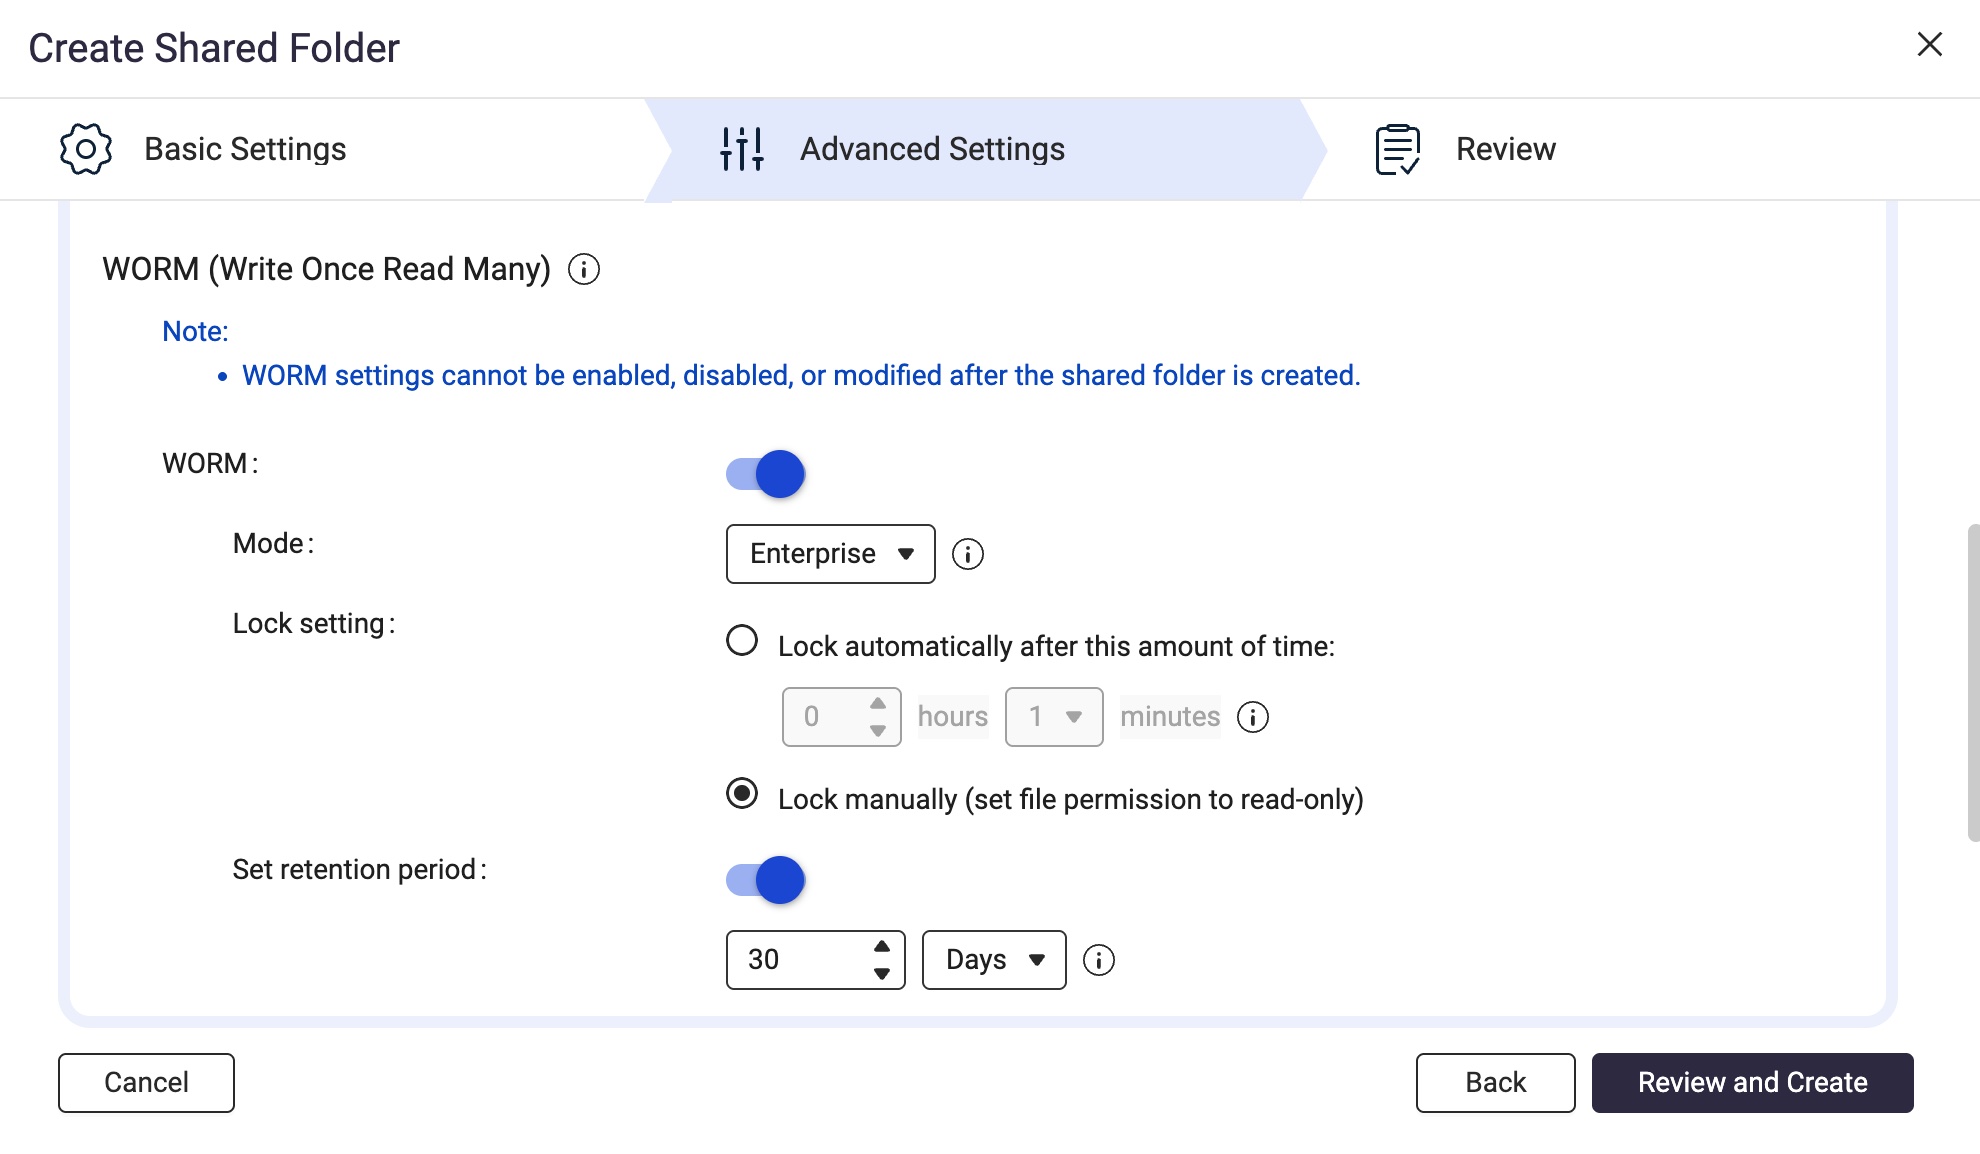
- Next to WORM, click
 .
. - Next to Mode, select one of the following WORM modes:
- Enterprise: Users can delete the shared folder.
- Compliance: Users cannot delete the shared folder. An administrator must delete the parent storage pool in order to delete the shared folder.
- Next to Lock setting, select Lock manually (set file permission to read-only).
This option requires a user with the appropriate privileges to manually set the file permission to read-only in order to lock the file.
Note
To use a WORM shared folder as a destination in HBS, you must select the Lock manually option.
- Enable the retention period.
The retention period limits how long WORM applies to each file and folder in the shared folder. Files and folders can be deleted after the specified retention period.
Note
To use a WORM shared folder as a destination in HBS, you must enable the retention period on the shared folder.
- Next to Set retention period, click .
- Specify the number of days, months, or years.
- Click Review and Create.
- Review the settings, and then click Create.
The system creates the WORM shared folder.
B. Create a backup job in HBS with the WORM shared folder as destination.
For illustration purposes, we'll create a local backup job where the source and destination folders are on the same NAS device.
Note
Only the required settings are covered in the following steps.
For details on other job settings, see
Creating a backup job.
- Open HBS 3 Hybrid Backup Sync.
- Go to Backup & Restore.
- Click Create, and then click New backup Job.
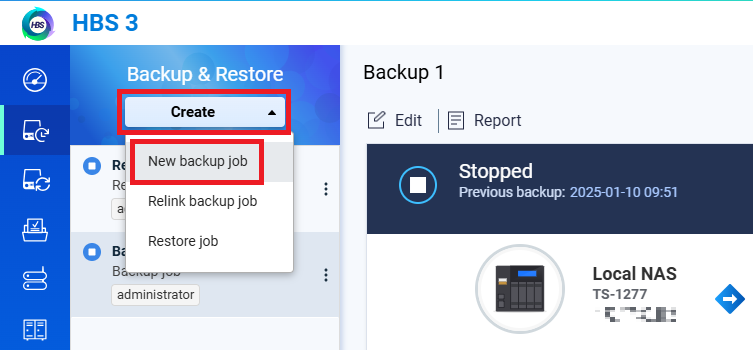 The Create a Backup Job wizard opens.
 - Select the source folder, and then click Next.
- Select Local NAS for the destination NAS, and then click Select.
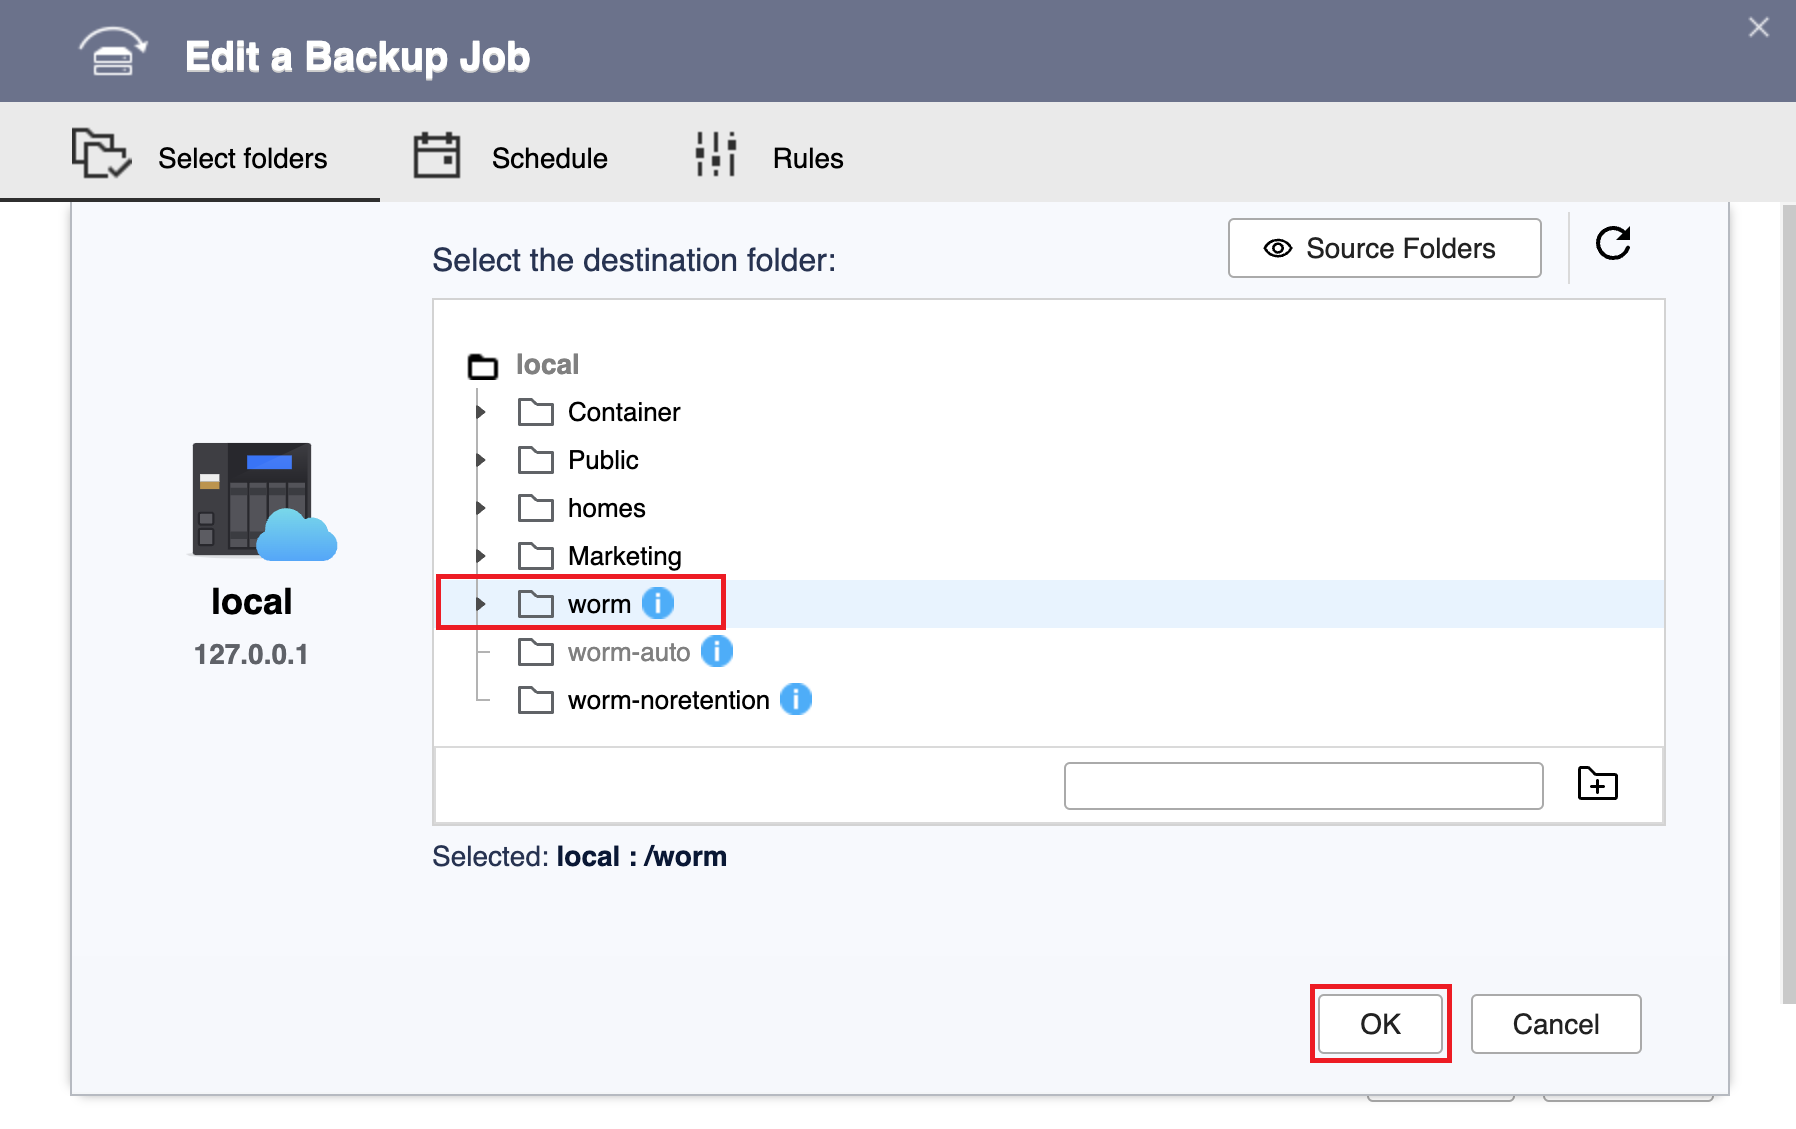
- Select the WORM shared folder you created as the destination folder, and then click OK.
Note
To select a WORM shared folder for the destination folder, the folder's WORM lock setting must be set to Lock manually and the retention period must be enabled.
For details, see earlier instructions in this tutorial.
- Click Next.
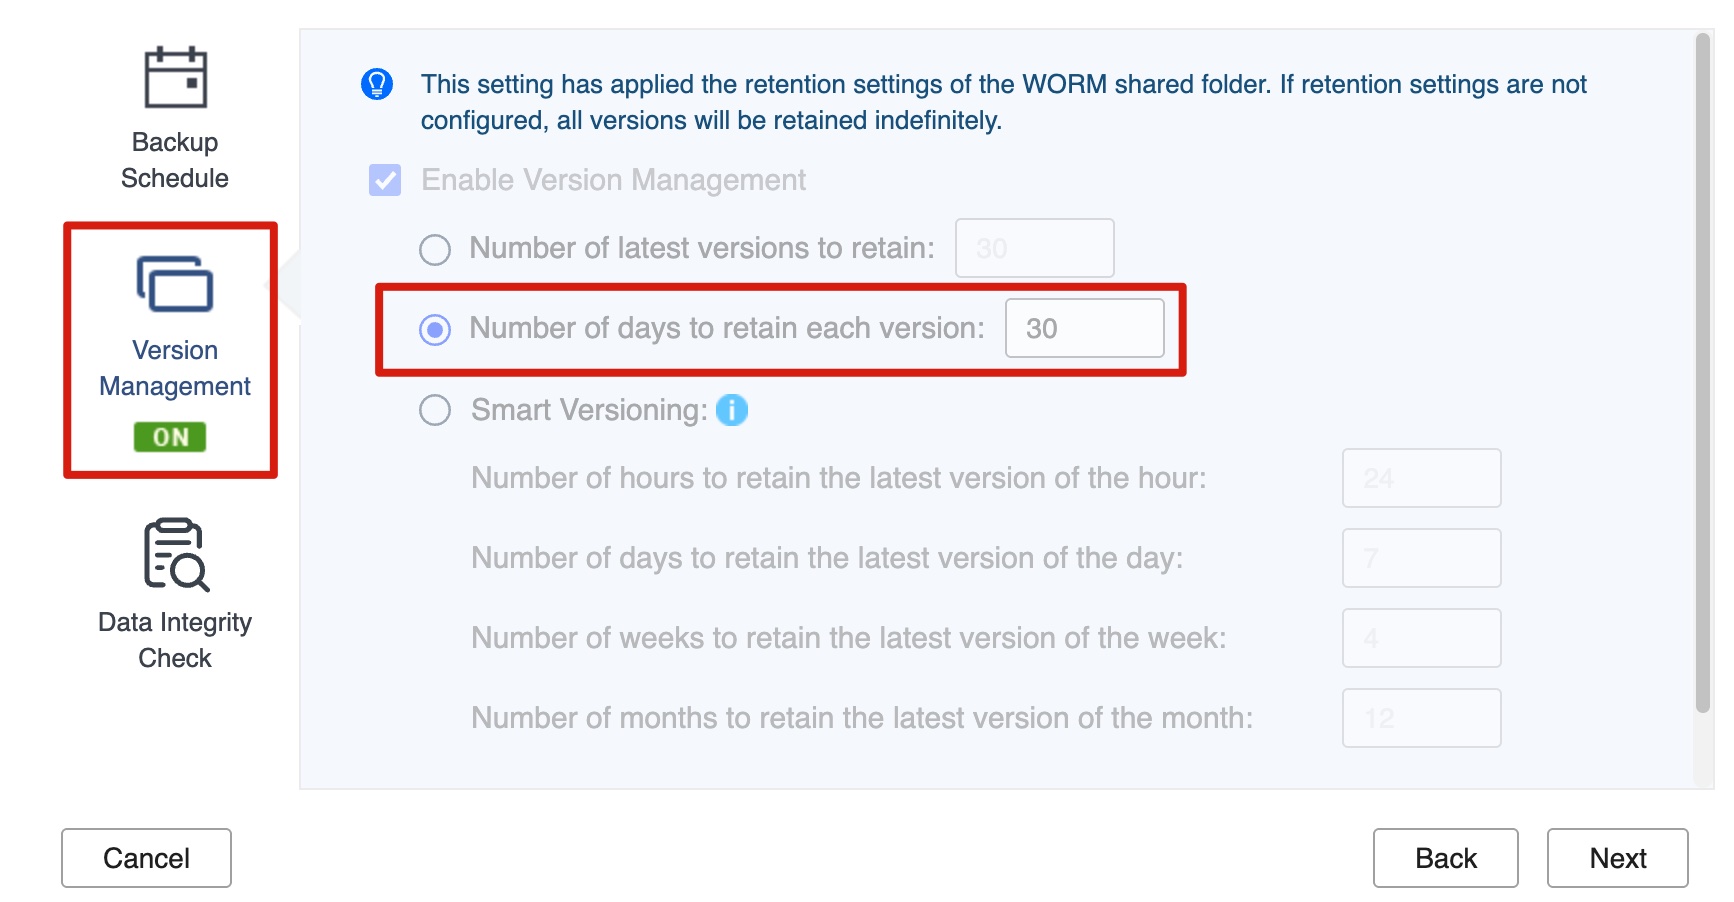
- Confirm that version management has been configured automatically to match the WORM retention period.
Note
- HBS automatically enables and configures the version management setting to match the retention period of the destination WORM shared folder.
- You cannot change this setting.
- This keeps backup versions retained for exactly as long as the WORM files remain immutable, so versions are neither purged early nor kept longer than necessary.
- Click Version Management. The panel shows the following read-only state:
- Enable Version Management is already selected (greyed out; it cannot be cleared).
- Number of days to retain each version is set automatically to match the WORM shared folder's retention period (greyed out; it cannot be modified).
- Click Next.
- Optional: Configure job rules.
- Click Next.
- Review the summary, and then click Create.
HBS creates the backup job.
C. Run and monitor the backup job in HBS.
- Manually run the backup job.
Note
You can skip this step if you configured the job to run immediately after creation or if you want the job to run according to the schedule you configured.
- Go to HBS > Backup & Restore.
- Select the backup job you created.
- Click Back Up Now.
- After the job runs for the first time, check the job report to ensure the job ran smoothly.
- Go to HBS > Backup & Restore.
- Select the backup job.
- Click Report.
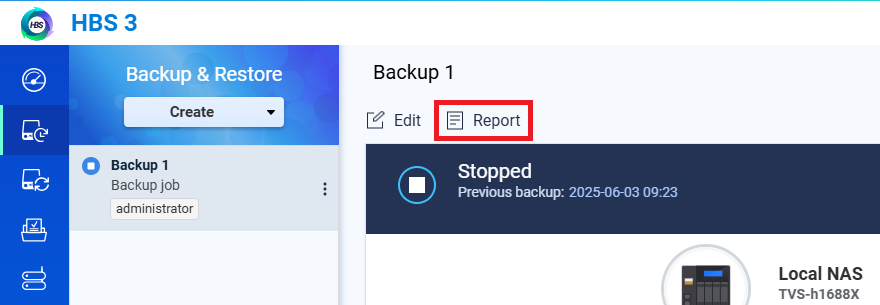 The Report window opens.
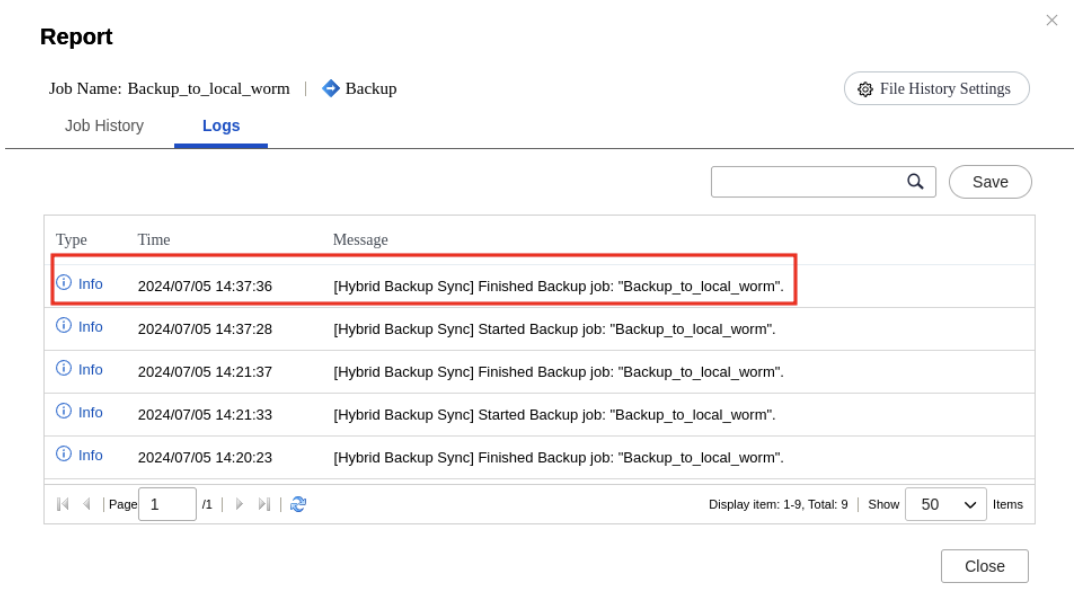
 - Go to the Logs tab.
- Check for a message that mentions the job name and includes the words "Finished Backup job".
For example:
D. Expand the WORM shared folder if you run out of space.
If your backup job fails due to the destination shared folder running out of space, and the folder's parent storage pool still has free space, you can increase the capacity of the shared folder.
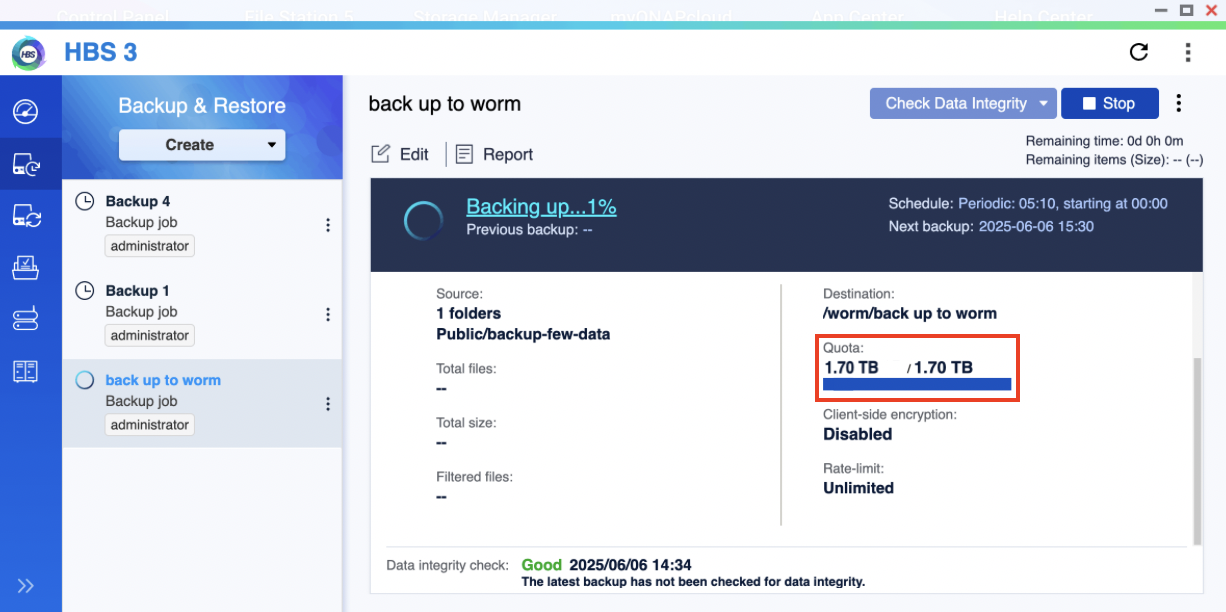
You can see that the destination shared folder is full by checking the Quota field of your job in HBS > Backup & Restore:
Note
The used quota shown here in HBS may not reflect the actual used capacity of the shared folder in its parent storage pool. The actual used capacity in the storage pool subtracts the amount reduced by data reduction. You can check the data reduction by going to
Storage Manager > Storage Space, identifying the shared folder, and then clicking
 > Manage
 under
Action.
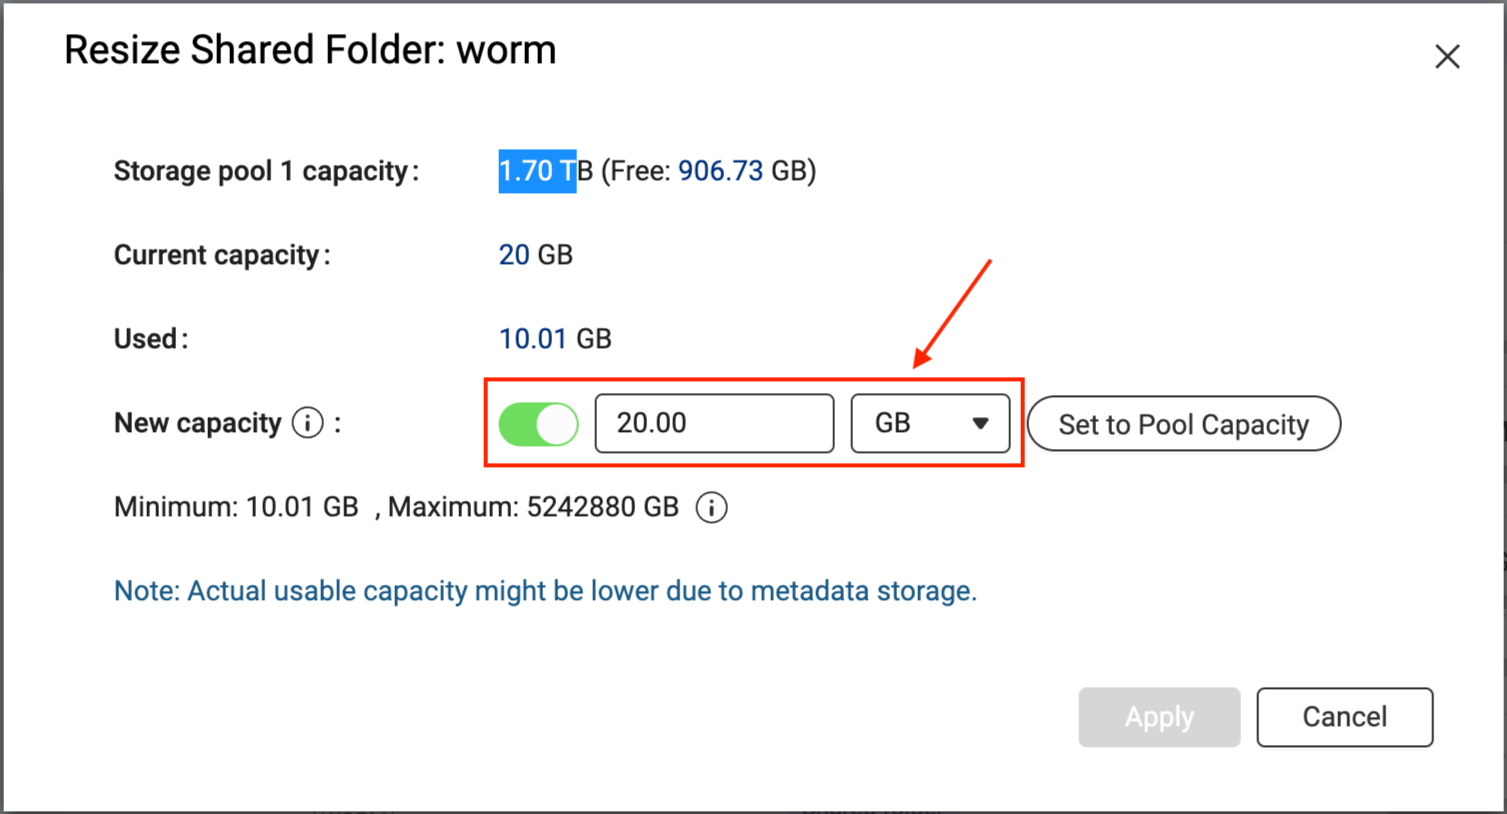
To expand your WORM shared folder, follow these instructions:
- Go to Storage Manager > Storage Space.
- Locate the shared folder.
- Under Action, click > Resize Shared Folder.
The Resize Shared Folder window opens. - Next to New capacity, specify a greater size for the shared folder.
- Click Apply.
The system expands the shared folder. This process may take a while.
After the shared folder has been expanded, you can go to HBS and run the backup job again.
Further Reading and Resources
ผลิตภัณฑ์ที่รองรับ
- QuTS hero
- HBS 3 Hybrid Backup Sync 26 (or later)
- Storage Manager
บทนำ
WORM (Write Once, Read Many) เป็นโซลูชันการป้องกันข้อมูลที่รับประกันความสมบูรณ์ของข้อมูลโดยป้องกันไม่ให้ไฟล์ถูกแก้ไขหรือลบ เมื่อข้อมูลถูกเขียนแล้ว จะไม่สามารถเปลี่ยนแปลงหรือลบออกได้ภายในระยะเวลาการเก็บรักษาที่กำหนด ปกป้องข้อมูลของคุณจากการโจมตีของแรนซัมแวร์และการแก้ไขโดยไม่ได้รับอนุญาต
ใน QuTS hero คุณสามารถเปิดใช้งาน WORM บนโฟลเดอร์ที่แชร์ได้ จากนั้นคุณสามารถใช้ HBS เพื่อสำรองไฟล์ไปยังโฟลเดอร์ที่แชร์ WORM เพื่อให้แน่ใจว่าข้อมูลสำรองจะไม่สามารถเปลี่ยนแปลงได้ ป้องกันการแก้ไขโดยบังเอิญหรือโดยเจตนา
บทแนะนำนี้ให้คำแนะนำทีละขั้นตอนเกี่ยวกับวิธีการตั้งค่าโฟลเดอร์ที่แชร์ WORM และจากนั้นสร้างงานสำรองใน HBS เพื่อสำรองไฟล์ไปยังโฟลเดอร์ที่แชร์ WORM
หมายเหตุ
ปัจจุบัน HBS รองรับเฉพาะการสำรองข้อมูลไปยังโฟลเดอร์ที่แชร์ WORM เท่านั้น การซิงค์ไปยังโฟลเดอร์ที่แชร์ WORM ยังไม่รองรับ
คำแนะนำ
เนื่องจากไม่สามารถเปิดใช้งาน ปิดใช้งาน หรือแก้ไข WORM บนโฟลเดอร์ที่แชร์ที่มีอยู่ได้ คุณต้องสร้างโฟลเดอร์ที่แชร์ใหม่และเปิดใช้งาน WORM ระหว่างการสร้าง หลังจากสร้างโฟลเดอร์ที่แชร์ WORM แล้ว คุณสามารถสร้างงานสำรองใน HBS โดยใช้โฟลเดอร์ที่แชร์ WORM เป็นปลายทาง และจากนั้นตรวจสอบสถานะงานหลังจากที่รันครั้งแรก หากพื้นที่ในโฟลเดอร์ที่แชร์ WORM หมด คุณสามารถขยายความจุของโฟลเดอร์ได้ตามต้องการ
A. สร้างโฟลเดอร์ที่แชร์ WORM
หมายเหตุ
มีเพียงการตั้งค่าที่จำเป็นและการตั้งค่า WORM เท่านั้นที่ครอบคลุมในขั้นตอนต่อไปนี้
สำหรับรายละเอียดเกี่ยวกับการตั้งค่าโฟลเดอร์ที่แชร์อื่น ๆ ดูที่ "การสร้างโฟลเดอร์ที่แชร์" ใน
คู่มือผู้ใช้ QuTS hero- เข้าสู่ระบบ NAS ของคุณในฐานะ ผู้ดูแลระบบ
- เปิด แผงควบคุม
- ไปที่ System > Shared Folders > Shared Folder
- คลิก Create > Shared Folder.
ตัวช่วยสร้าง Create Shared Folder Wizard จะเปิดขึ้น
- ถัดจาก Folder name ระบุชื่อโฟลเดอร์ที่แชร์
- ถัดจาก ที่เก็บข้อมูล pool เลือก ที่เก็บข้อมูล pool ที่จะสร้างโฟลเดอร์ที่แชร์
- ถัดจาก ประเภทการจัดสรร ให้เลือกประเภทการจัดสรร
- คลิก การตั้งค่าขั้นสูง
- กำหนดค่า WORM
- ถัดจาก การตั้งค่าความปลอดภัย ให้คลิก .
- ไปที่ส่วน WORM (Write Once Read Many).
- ถัดจาก WORM ให้คลิก
- ถัดจาก โหมด ให้เลือกหนึ่งในโหมด WORM ต่อไปนี้:
- องค์กร: ผู้ใช้สามารถลบโฟลเดอร์ที่แชร์ได้
- การปฏิบัติตามข้อกำหนด: ผู้ใช้ไม่สามารถลบโฟลเดอร์ที่แชร์ได้ ต้องให้ ผู้ดูแลระบบ ลบพูล ที่เก็บข้อมูล หลักเพื่อที่จะลบโฟลเดอร์ที่แชร์
- ถัดจาก การตั้งค่าล็อค ให้เลือก ล็อคด้วยตนเอง (ตั้งค่าการอนุญาตไฟล์เป็นอ่านอย่างเดียว).
ตัวเลือกนี้ต้องการผู้ใช้ที่มีสิทธิ์ที่เหมาะสมในการตั้งค่าการอนุญาตไฟล์เป็นอ่านอย่างเดียวด้วยตนเองเพื่อที่จะล็อคไฟล์
หมายเหตุ
ในการใช้โฟลเดอร์ที่แชร์ WORM เป็นปลายทางใน HBS คุณต้องเลือกตัวเลือก ล็อคด้วยตนเอง
- เปิดใช้งานระยะเวลาการเก็บรักษา
ระยะเวลาการเก็บรักษาจะจำกัดระยะเวลาที่ WORM ใช้กับแต่ละไฟล์และโฟลเดอร์ในโฟลเดอร์ที่แชร์ ไฟล์และโฟลเดอร์สามารถถูกลบได้หลังจากระยะเวลาการเก็บรักษาที่กำหนด
หมายเหตุ
ในการใช้โฟลเดอร์ที่แชร์ WORM เป็นปลายทางใน HBS คุณต้องเปิดใช้งานระยะเวลาการเก็บรักษาในโฟลเดอร์ที่แชร์
- ถัดจาก ตั้งค่าระยะเวลาการเก็บรักษา คลิก .
- ระบุจำนวนวัน เดือน หรือปี
- คลิก ตรวจสอบและสร้าง
- ตรวจสอบการตั้งค่า แล้วคลิก สร้าง
ระบบจะสร้างโฟลเดอร์ที่แชร์ WORM
B. สร้างงานสำรองข้อมูลใน HBS โดยใช้โฟลเดอร์ที่แชร์ WORM เป็นปลายทาง
เพื่อวัตถุประสงค์ในการอธิบาย เราจะสร้างงานสำรองข้อมูลในเครื่องที่โฟลเดอร์ต้นทางและปลายทางอยู่บนอุปกรณ์ NAS เดียวกัน
หมายเหตุ
มีเพียงการตั้งค่าที่จำเป็นเท่านั้นที่ครอบคลุมในขั้นตอนต่อไปนี้
สำหรับรายละเอียดเกี่ยวกับการตั้งค่างานอื่น ๆ ดูที่
การสร้างงานสำรองข้อมูล- เปิด HBS 3 Hybrid Backup Sync
- ไปที่ สำรองข้อมูลและกู้คืน
- คลิก สร้าง แล้วคลิก งานสำรองข้อมูลใหม่.
วิซาร์ด สร้างงานสำรองข้อมูล จะเปิดขึ้น. - เลือกโฟลเดอร์ต้นทาง แล้วคลิก ถัดไป.
- เลือก NAS ภายในเครื่อง สำหรับ NAS ปลายทาง แล้วคลิก เลือก.
- เลือกโฟลเดอร์แชร์ WORM ที่คุณสร้างไว้เป็นโฟลเดอร์ปลายทาง แล้วคลิก ตกลง.
หมายเหตุ
ในการเลือกโฟลเดอร์แชร์ WORM เป็นโฟลเดอร์ปลายทาง การตั้งค่าล็อค WORM ของโฟลเดอร์ต้องตั้งค่าเป็น ล็อคด้วยตนเอง และต้องเปิดใช้งานระยะเวลาการเก็บรักษา.
สำหรับรายละเอียด ดูคำแนะนำก่อนหน้านี้ในบทเรียนนี้.
- คลิก ถัดไป.
- ยืนยันว่าการจัดการเวอร์ชันได้รับการกำหนดค่าอัตโนมัติเพื่อให้ตรงกับระยะเวลาการเก็บรักษา WORM.
หมายเหตุ
- HBS เปิดใช้งานและกำหนดค่าการจัดการเวอร์ชันอัตโนมัติเพื่อให้ตรงกับระยะเวลาการเก็บรักษาของโฟลเดอร์ที่ใช้ร่วมกัน WORM ปลายทาง.
- คุณไม่สามารถเปลี่ยนการตั้งค่านี้ได้.
- สิ่งนี้ทำให้เวอร์ชันสำรองถูกเก็บรักษาไว้นานเท่าที่ไฟล์ WORM ยังคงไม่เปลี่ยนแปลง ดังนั้นเวอร์ชันจะไม่ถูกลบก่อนเวลาอันควรหรือเก็บไว้นานเกินความจำเป็น.
- คลิก การจัดการเวอร์ชัน. แผงจะแสดงสถานะที่อ่านได้อย่างเดียวดังนี้:
- เปิดใช้งานการจัดการเวอร์ชัน ได้ถูกเลือกไว้แล้ว (เป็นสีเทา; ไม่สามารถล้างได้).
- จำนวนวันที่จะเก็บรักษาแต่ละเวอร์ชัน ถูกตั้งค่าอัตโนมัติเพื่อให้ตรงกับระยะเวลาการเก็บรักษาของโฟลเดอร์ที่ใช้ร่วมกัน WORM (เป็นสีเทา; ไม่สามารถแก้ไขได้).
- คลิก ถัดไป.
- ตัวเลือก: กำหนดกฎของงาน.
- คลิก ถัดไป.
- ตรวจสอบสรุปแล้วคลิก สร้าง.
HBS สร้างงานสำรองข้อมูล.
C. รันและตรวจสอบงานสำรองข้อมูลใน HBS.
- เรียกใช้งานสำรองข้อมูลด้วยตนเอง
หมายเหตุ
คุณสามารถข้ามขั้นตอนนี้ได้หากคุณตั้งค่าให้การทำงานเริ่มต้นทันทีหลังจากสร้าง หรือหากคุณต้องการให้การทำงานเริ่มตามกำหนดเวลาที่คุณตั้งค่าไว้
- ไปที่ HBS > Backup & Restore.
- เลือกงานสำรองข้อมูลที่คุณสร้าง
- คลิก สำรองข้อมูลทันที.
- หลังจากที่งานทำงานครั้งแรก ให้ตรวจสอบรายงานงานเพื่อให้แน่ใจว่างานทำงานได้อย่างราบรื่น
- ไปที่ HBS > Backup & Restore.
- เลือกงานสำรองข้อมูล
- คลิก รายงาน.
หน้าต่าง รายงาน จะเปิดขึ้น - ไปที่แท็บ บันทึก
- ตรวจสอบข้อความที่กล่าวถึงชื่องานและมีคำว่า "งานสำรองข้อมูลเสร็จสิ้น"
ตัวอย่างเช่น:
D. ขยายโฟลเดอร์ที่ใช้ร่วมกัน WORM หากพื้นที่หมด
หากงานสำรองข้อมูลของคุณล้มเหลวเนื่องจากโฟลเดอร์ที่ใช้ร่วมกันปลายทางมีพื้นที่ไม่เพียงพอ และ ที่เก็บข้อมูล pool ของโฟลเดอร์หลักยังมีพื้นที่ว่างอยู่ คุณสามารถเพิ่มความจุของโฟลเดอร์ที่ใช้ร่วมกันได้
คุณสามารถเห็นว่าโฟลเดอร์ที่ใช้ร่วมกันปลายทางเต็มได้โดยตรวจสอบฟิลด์ โควต้า ของงานของคุณใน HBS > Backup & Restore:
หมายเหตุ
โควต้าที่ใช้แสดงที่นี่ใน HBS อาจไม่สะท้อนความจุที่ใช้จริงของโฟลเดอร์ที่ใช้ร่วมกันใน ที่เก็บข้อมูล pool หลัก ความจุที่ใช้จริงใน ที่เก็บข้อมูล pool จะหักลบจำนวนที่ลดลงโดยการลดข้อมูล คุณสามารถตรวจสอบการลดข้อมูลได้โดยไปที่
ที่เก็บข้อมูล Manager > ที่เก็บข้อมูล Space ระบุโฟลเดอร์ที่ใช้ร่วมกัน แล้วคลิก
> จัดการ ภายใต้
การกระทำเพื่อขยายโฟลเดอร์ที่แชร์แบบ WORM ของคุณ ให้ทำตามคำแนะนำเหล่านี้:
- ไปที่ ที่เก็บข้อมูล Manager > ที่เก็บข้อมูล Space.
- ค้นหาโฟลเดอร์ที่แชร์
- ภายใต้ Action คลิก > Resize Shared Folder.
หน้าต่าง Resize Shared Folder จะเปิดขึ้น - ถัดจาก New capacity ให้ระบุขนาดที่ใหญ่ขึ้นสำหรับโฟลเดอร์ที่แชร์
- คลิก Apply.
ระบบจะขยายโฟลเดอร์ที่แชร์ กระบวนการนี้อาจใช้เวลาสักครู่
หลังจากที่โฟลเดอร์ที่แชร์ถูกขยายแล้ว คุณสามารถไปที่ HBS และรันงานสำรองข้อมูลอีกครั้ง
การอ่านเพิ่มเติมและแหล่งข้อมูล


