Applicable Products
- QuTS hero
- HBS 3 Hybrid Backup Sync 26 (or later)
- Storage Manager
Introduction
WORM (Write Once, Read Many) is a data protection solution that ensures data integrity by preventing files from being modified or deleted. Once data is written, it cannot be changed or removed within the configured retention period, protecting your data against ransomware attacks and unauthorized modifications.
In QuTS hero, you can enable WORM on a shared folder. You can then use HBS to back up files to the WORM shared folder, ensuring the backup data will be immutable, thereby preventing any accidental or malicious modifications.
This tutorial provides a step-by-step guide on how to set up a WORM shared folder and then create a backup job in HBS to back up files to the WORM shared folder.
Note
HBS currently only supports backing up to WORM shared folders. Syncing to WORM shared folders is not supported.
Instructions
Because WORM cannot be enabled, disabled, or modified on an existing shared folder, you must create a new shared folder and enable WORM during creation. After the WORM shared folder is created, you can create a backup job in HBS using the WORM shared folder as destination, and then monitor the job status after it runs for the first time. If you run out of space on the WORM shared folder, you can expand the folder capacity as needed.
A. Create a WORM shared folder.
Note
Only the required settings and WORM settings are covered in the following steps.
For details on other shared folder settings, see "Creating a shared folder" in the
QuTS hero User Guide.
- Log in to your NAS as an administrator.
- Open Control Panel.
- Go to System > Shared Folders > Shared Folder.
- Click Create > Shared Folder.
The Create Shared Folder Wizard opens.
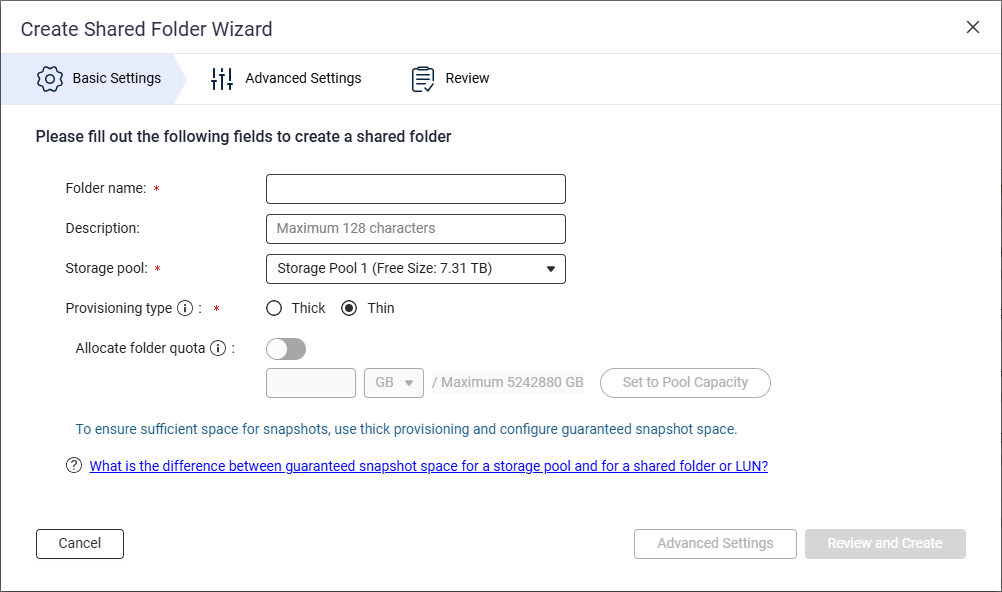
- Next to Folder name, specify the shared folder name.
- Next to Storage pool, select the storage pool in which to create the shared folder.
- Next to Provisioning type, select a provisioning type.
- Click Advanced Settings.
- Configure WORM.
- Next to Security Settings, click
 .
.
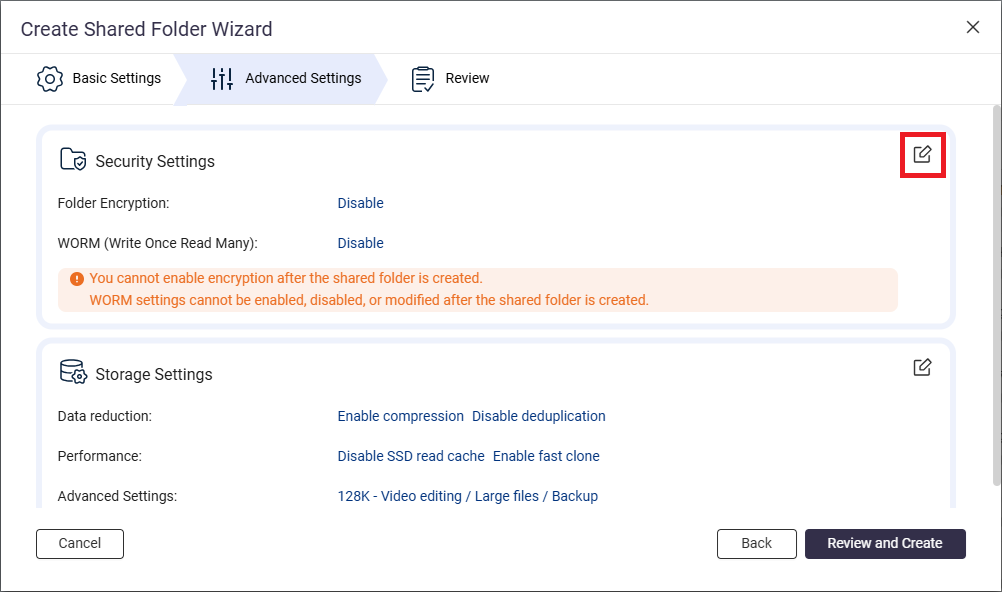
- Go to the WORM (Write Once Read Many) section.
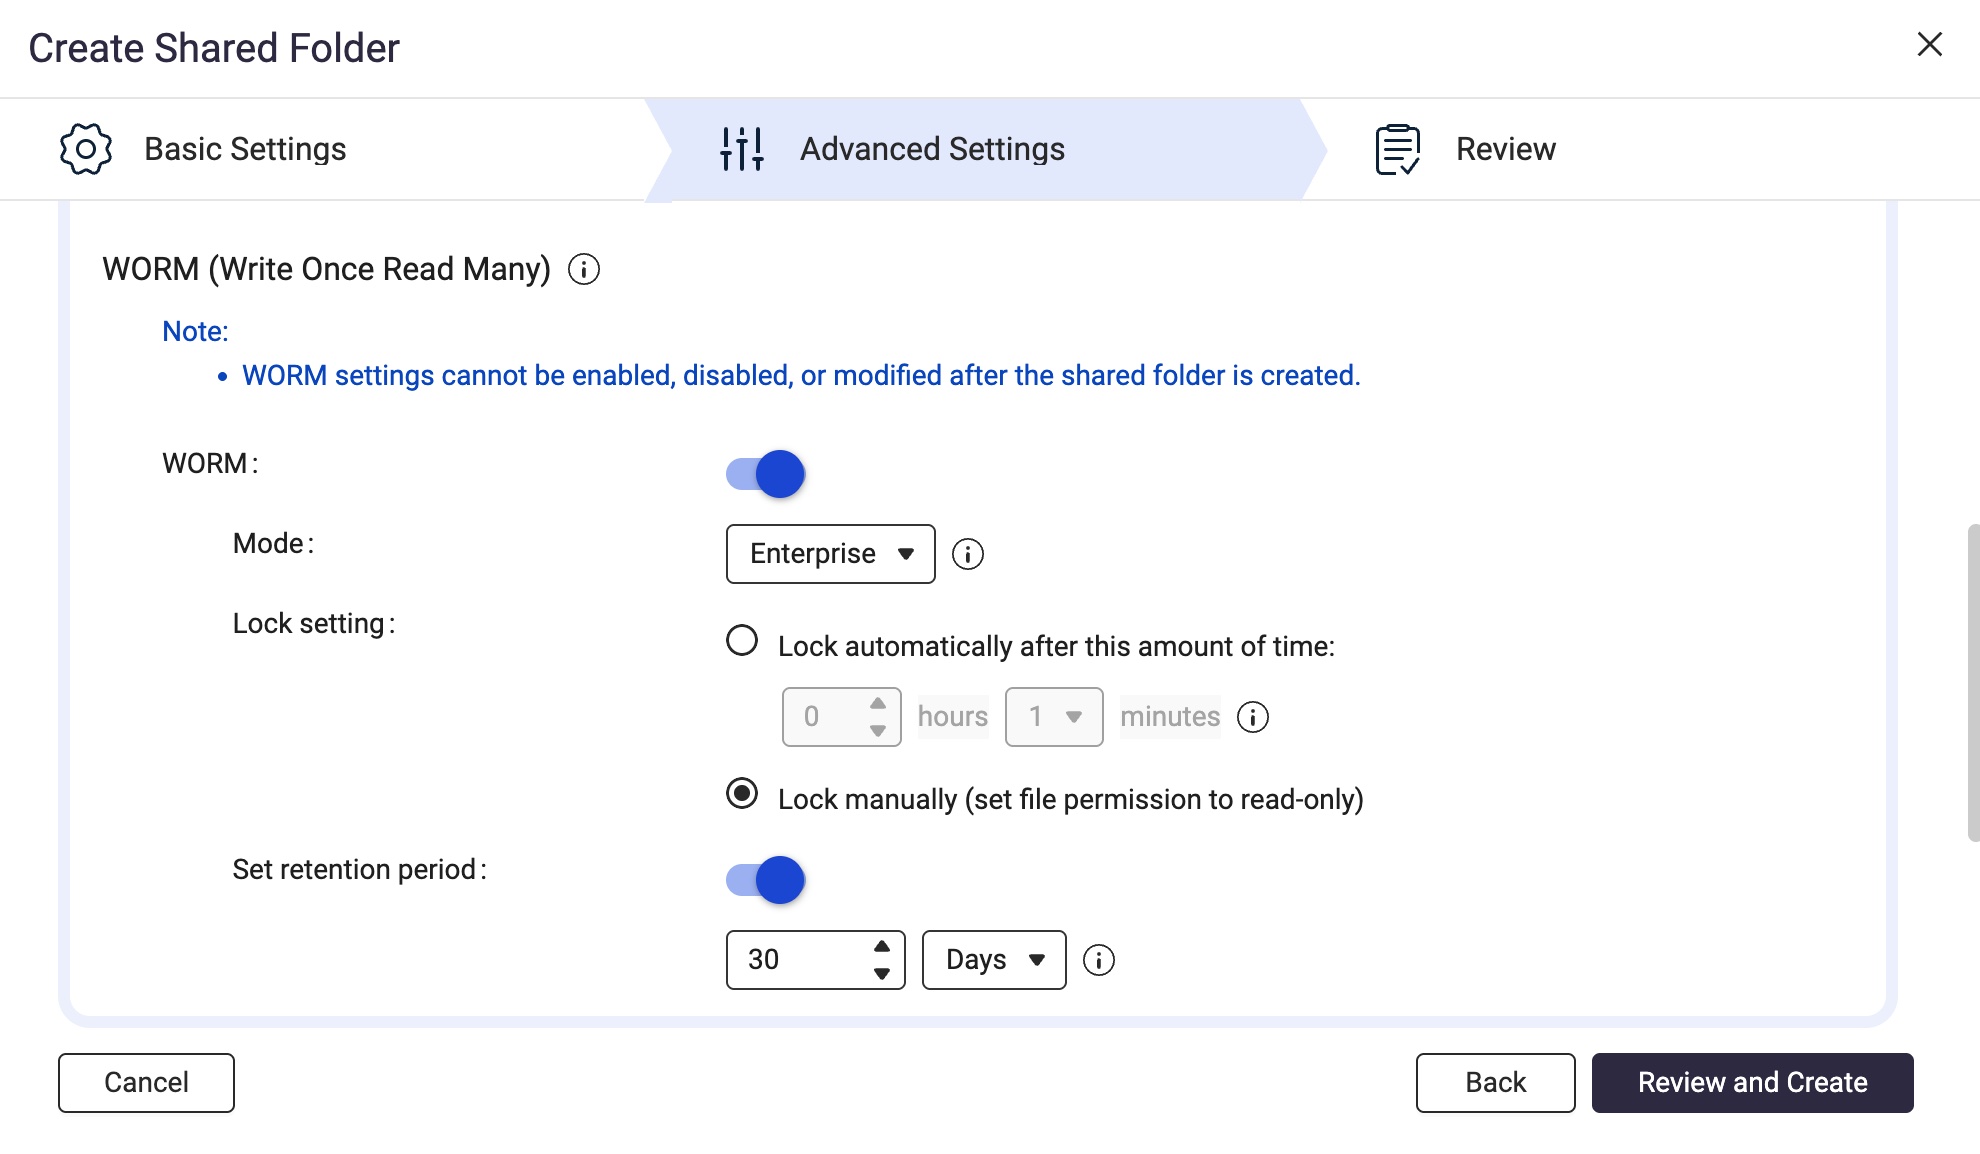
- Next to WORM, click
 .
. - Next to Mode, select one of the following WORM modes:
- Enterprise: Users can delete the shared folder.
- Compliance: Users cannot delete the shared folder. An administrator must delete the parent storage pool in order to delete the shared folder.
- Next to Lock setting, select Lock manually (set file permission to read-only).
This option requires a user with the appropriate privileges to manually set the file permission to read-only in order to lock the file.
Note
To use a WORM shared folder as a destination in HBS, you must select the Lock manually option.
- Enable the retention period.
The retention period limits how long WORM applies to each file and folder in the shared folder. Files and folders can be deleted after the specified retention period.
Note
To use a WORM shared folder as a destination in HBS, you must enable the retention period on the shared folder.
- Next to Set retention period, click .
- Specify the number of days, months, or years.
- Click Review and Create.
- Review the settings, and then click Create.
The system creates the WORM shared folder.
B. Create a backup job in HBS with the WORM shared folder as destination.
For illustration purposes, we'll create a local backup job where the source and destination folders are on the same NAS device.
Note
Only the required settings are covered in the following steps.
For details on other job settings, see
Creating a backup job.
- Open HBS 3 Hybrid Backup Sync.
- Go to Backup & Restore.
- Click Create, and then click New backup Job.
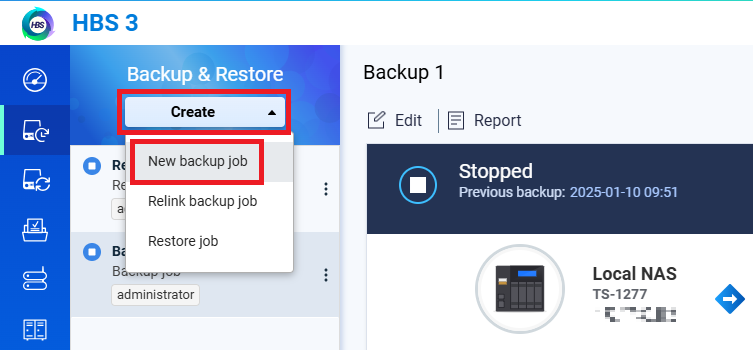 The Create a Backup Job wizard opens.
 - Select the source folder, and then click Next.
- Select Local NAS for the destination NAS, and then click Select.
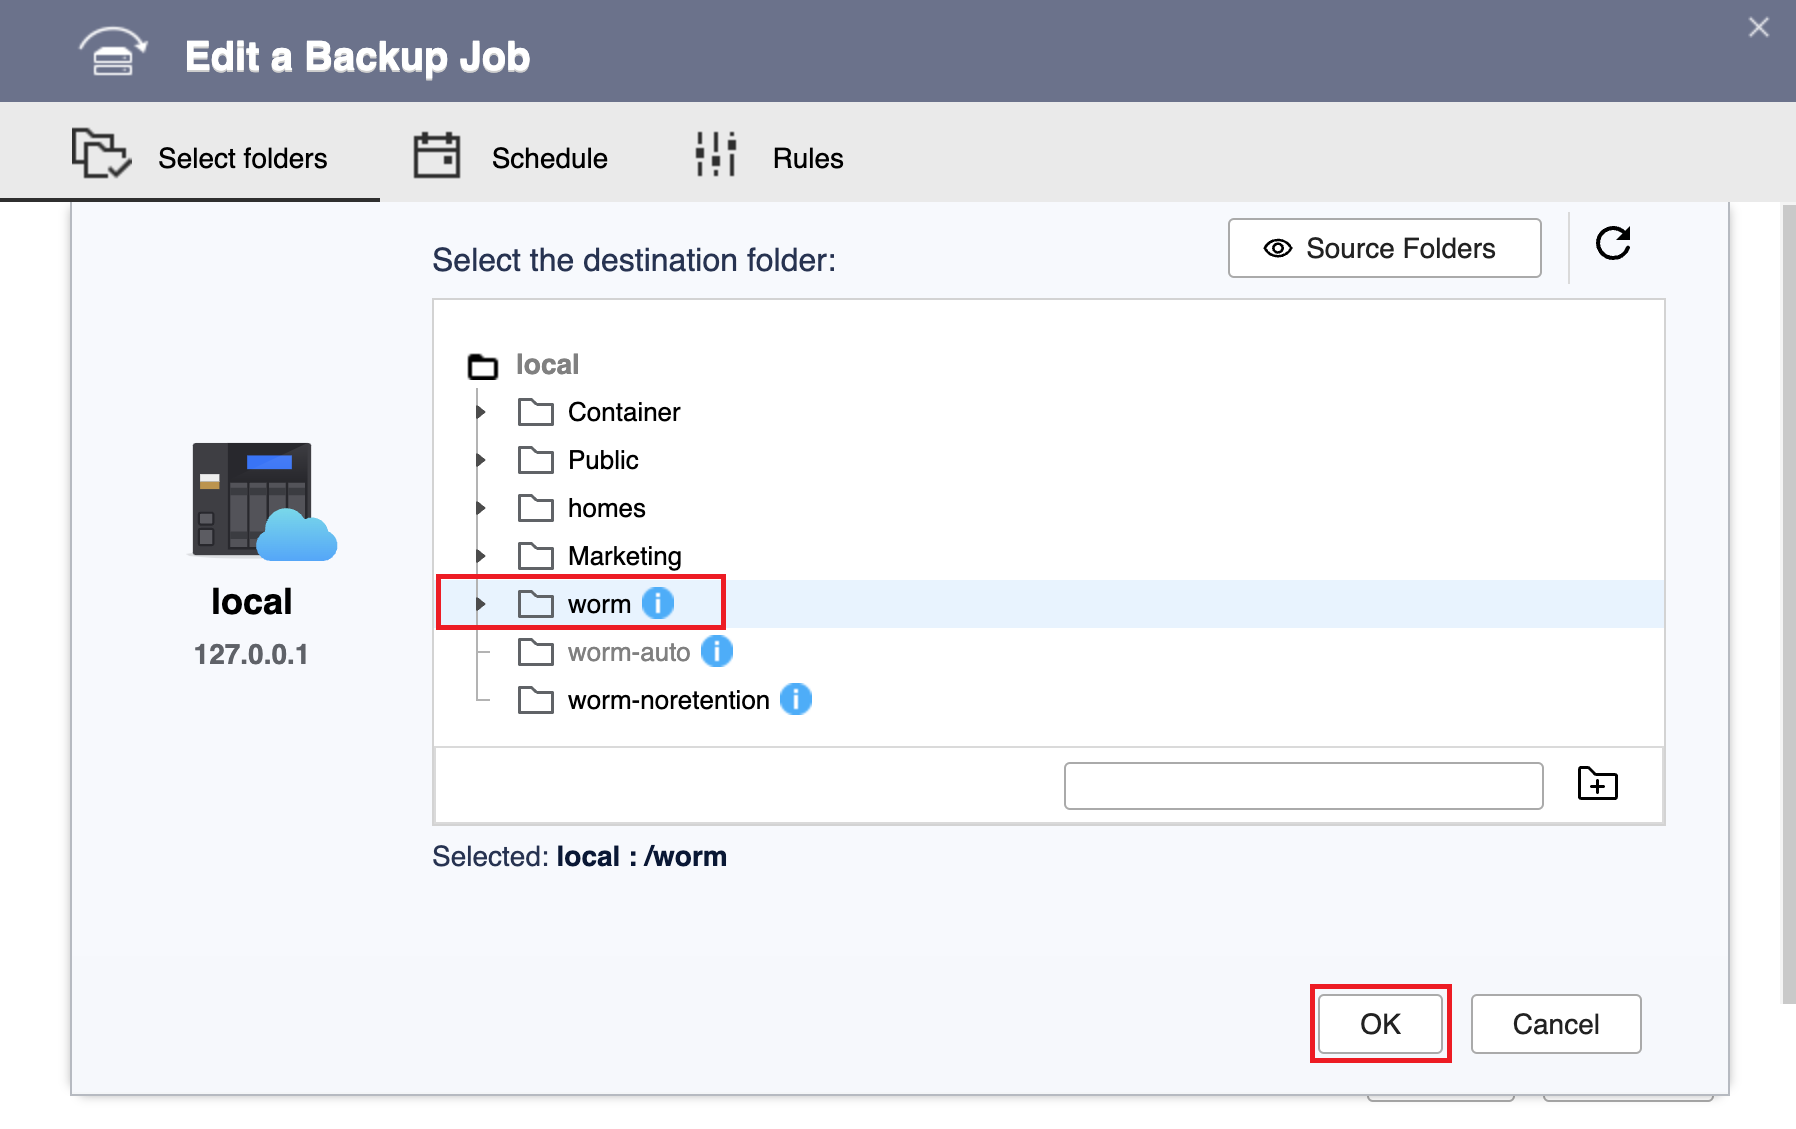
- Select the WORM shared folder you created as the destination folder, and then click OK.
Note
To select a WORM shared folder for the destination folder, the folder's WORM lock setting must be set to Lock manually and the retention period must be enabled.
For details, see earlier instructions in this tutorial.
- Click Next.
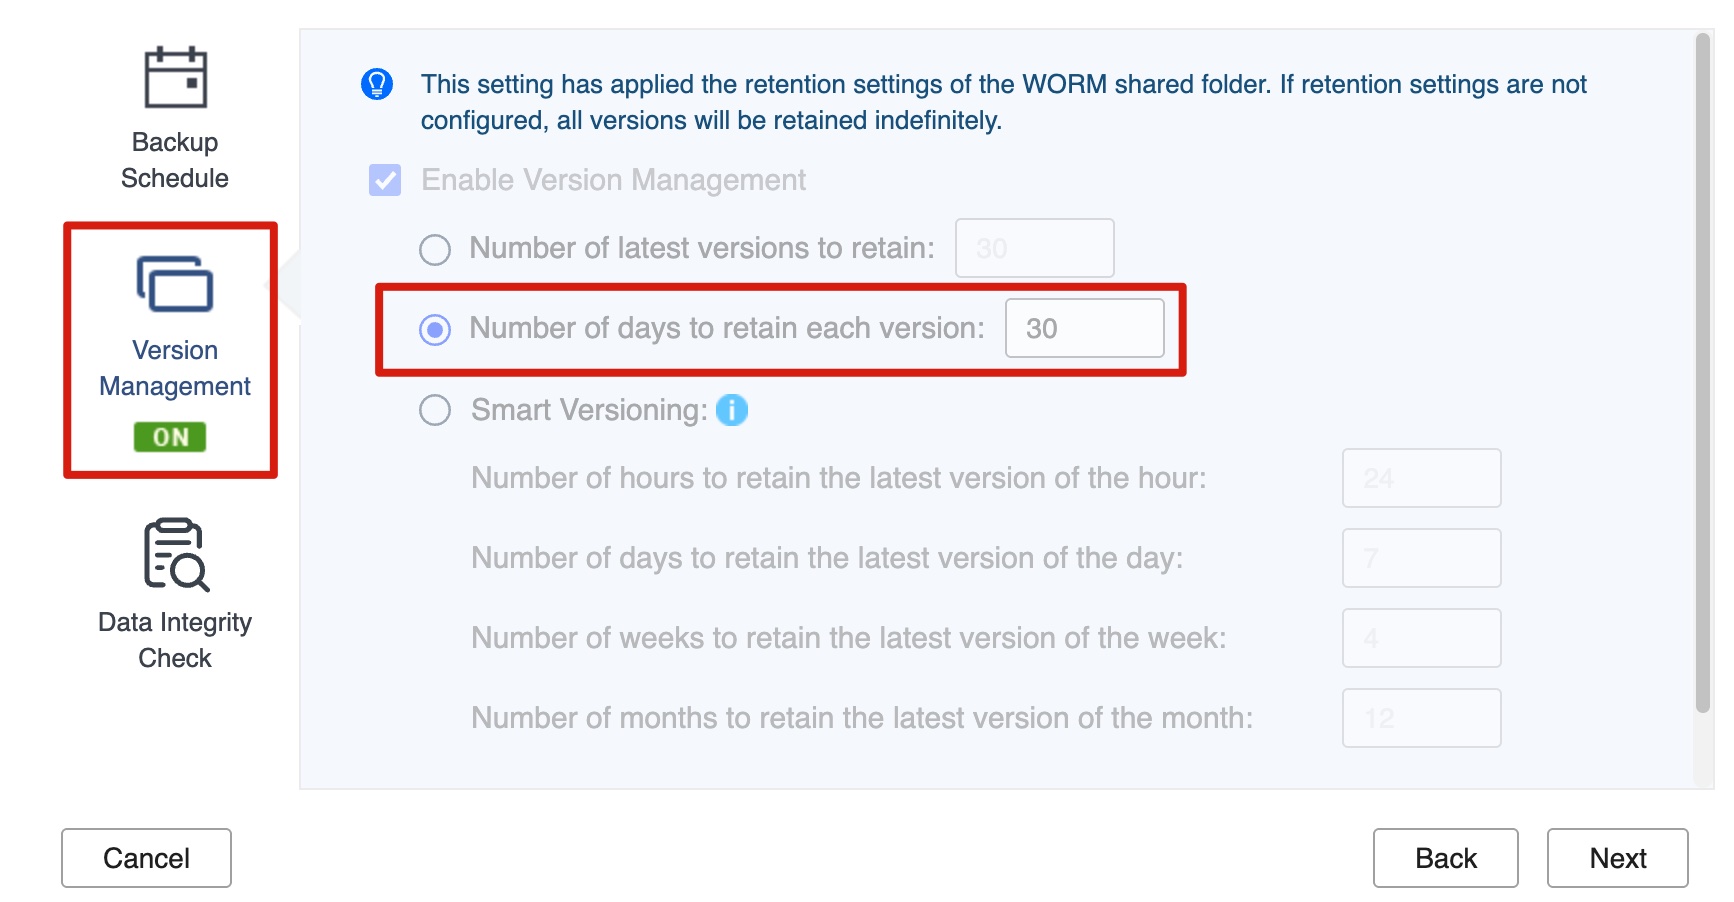
- Confirm that version management has been configured automatically to match the WORM retention period.
Note
- HBS automatically enables and configures the version management setting to match the retention period of the destination WORM shared folder.
- You cannot change this setting.
- This keeps backup versions retained for exactly as long as the WORM files remain immutable, so versions are neither purged early nor kept longer than necessary.
- Click Version Management. The panel shows the following read-only state:
- Enable Version Management is already selected (greyed out; it cannot be cleared).
- Number of days to retain each version is set automatically to match the WORM shared folder's retention period (greyed out; it cannot be modified).
- Click Next.
- Optional: Configure job rules.
- Click Next.
- Review the summary, and then click Create.
HBS creates the backup job.
C. Run and monitor the backup job in HBS.
- Manually run the backup job.
Note
You can skip this step if you configured the job to run immediately after creation or if you want the job to run according to the schedule you configured.
- Go to HBS > Backup & Restore.
- Select the backup job you created.
- Click Back Up Now.
- After the job runs for the first time, check the job report to ensure the job ran smoothly.
- Go to HBS > Backup & Restore.
- Select the backup job.
- Click Report.
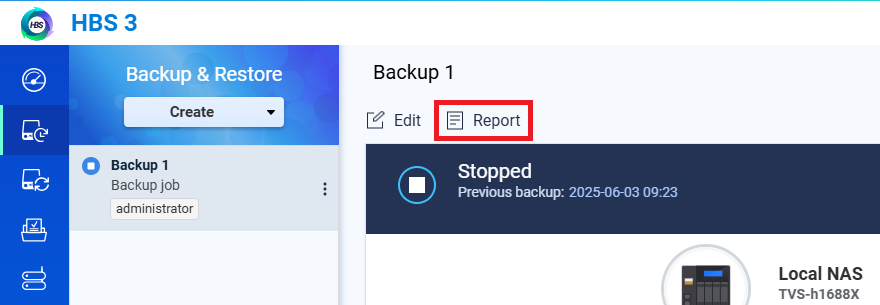 The Report window opens.
 - Go to the Logs tab.
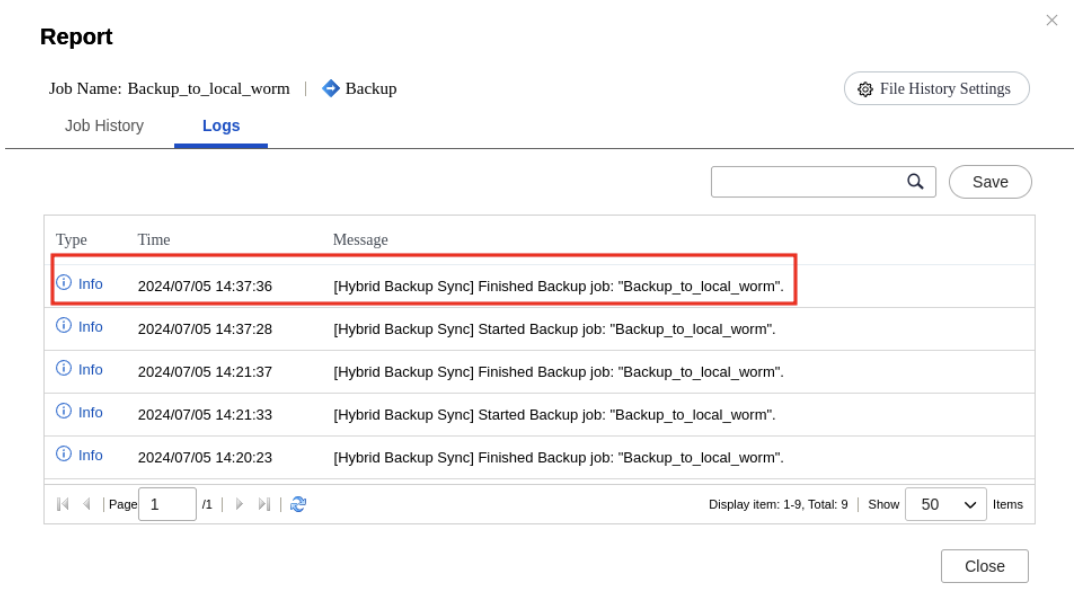
- Check for a message that mentions the job name and includes the words "Finished Backup job".
For example:
D. Expand the WORM shared folder if you run out of space.
If your backup job fails due to the destination shared folder running out of space, and the folder's parent storage pool still has free space, you can increase the capacity of the shared folder.
You can see that the destination shared folder is full by checking the Quota field of your job in HBS > Backup & Restore:
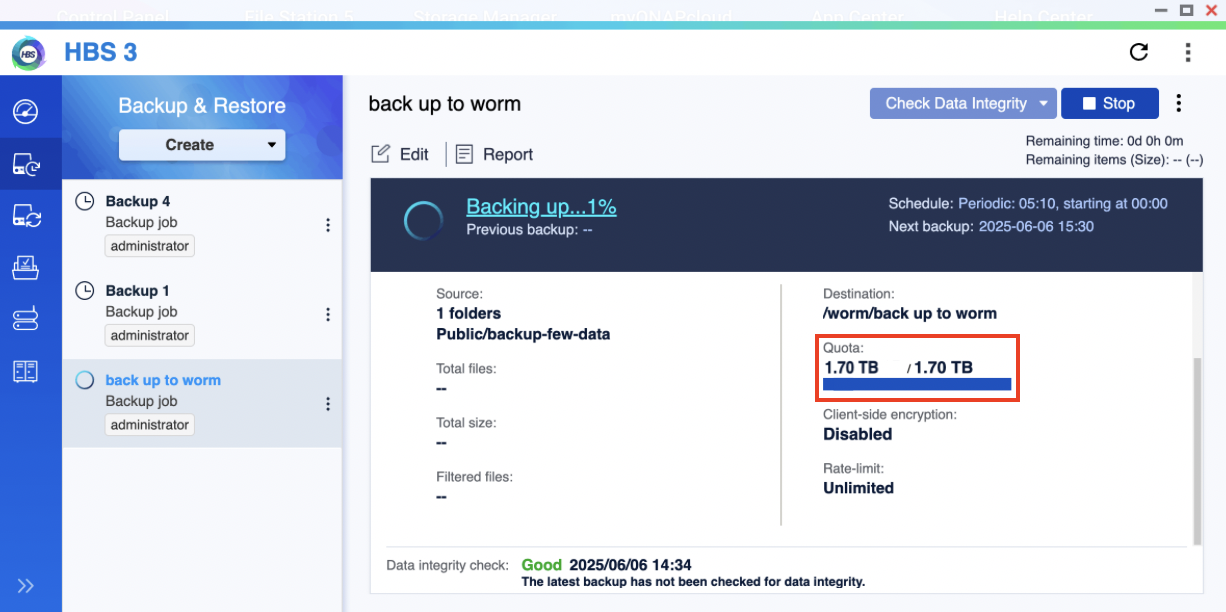
Note
The used quota shown here in HBS may not reflect the actual used capacity of the shared folder in its parent storage pool. The actual used capacity in the storage pool subtracts the amount reduced by data reduction. You can check the data reduction by going to
Storage Manager > Storage Space, identifying the shared folder, and then clicking
 > Manage
 under
Action.
To expand your WORM shared folder, follow these instructions:
- Go to Storage Manager > Storage Space.
- Locate the shared folder.
- Under Action, click > Resize Shared Folder.
The Resize Shared Folder window opens. - Next to New capacity, specify a greater size for the shared folder.
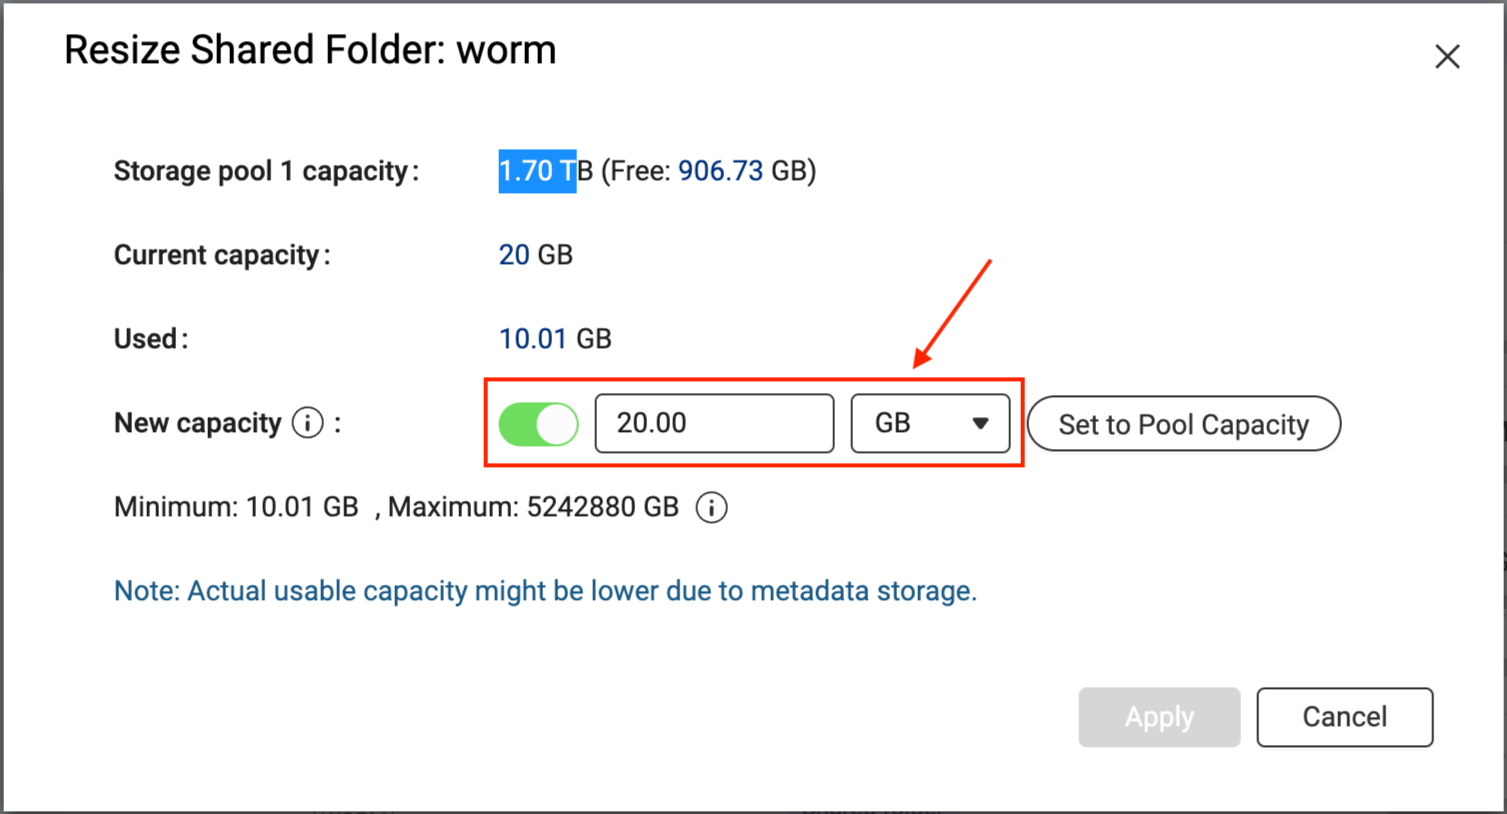
- Click Apply.
The system expands the shared folder. This process may take a while.
After the shared folder has been expanded, you can go to HBS and run the backup job again.
Further Reading and Resources
적용되는 제품
- QuTS hero
- HBS 3 Hybrid Backup Sync 26 (or later)
- Storage Manager
소개
WORM(Write Once, Read Many)은 파일이 수정되거나 삭제되지 않도록 하여 데이터 무결성을 보장하는 데이터 보호 솔루션입니다. 데이터가 기록되면 설정된 보존 기간 동안 변경되거나 제거될 수 없으며, 랜섬웨어 공격 및 무단 수정으로부터 데이터를 보호합니다.
QuTS hero에서 공유 폴더에 WORM을 활성화할 수 있습니다. 그런 다음 HBS를 사용하여 WORM 공유 폴더에 파일을 백업하여 백업 데이터가 불변하도록 하여 실수 또는 악의적인 수정으로부터 보호할 수 있습니다.
이 튜토리얼은 WORM 공유 폴더를 설정하고 HBS에서 백업 작업을 생성하여 WORM 공유 폴더에 파일을 백업하는 단계별 가이드를 제공합니다.
참고
HBS는 현재 WORM 공유 폴더로의 백업만 지원합니다. WORM 공유 폴더로의 동기화는 지원되지 않습니다.
지침
기존 공유 폴더에서는 WORM을 활성화, 비활성화 또는 수정할 수 없으므로 새 공유 폴더를 생성하고 생성 시 WORM을 활성화해야 합니다. WORM 공유 폴더가 생성된 후에는 WORM 공유 폴더를 대상으로 하여 HBS에서 백업 작업을 생성하고 처음 실행된 후 작업 상태를 모니터링할 수 있습니다. WORM 공유 폴더의 공간이 부족하면 필요에 따라 폴더 용량을 확장할 수 있습니다.
A. WORM 공유 폴더를 생성합니다.
참고
다음 단계에서는 필수 설정 및 WORM 설정만 다룹니다.
다른 공유 폴더 설정에 대한 자세한 내용은
QuTS hero 사용자 가이드의 "공유 폴더 만들기"를 참조하십시오.
- 관리자로 NAS에 로그인합니다.
- 제어판을 엽니다.
- 시스템 > 공유 폴더 > 공유 폴더로 이동합니다.
- 생성 > 공유 폴더를 클릭합니다.
공유 폴더 만들기 마법사가 열립니다.
- 폴더 이름옆에 공유 폴더 이름을 지정합니다.
- 스토리지풀옆에 공유 폴더를 생성할스토리지풀을 선택합니다.
- Provisioning type옆에 있는 프로비저닝 유형을 선택합니다.
- Advanced Settings을 클릭합니다.
- WORM을 구성합니다.
- Security Settings옆에 있는을 클릭합니다.
- WORM (Write Once Read Many)섹션으로 이동합니다.
- WORM옆에 있는을 클릭합니다.
- 모드옆에서 다음 WORM 모드 중 하나를 선택합니다:
- 엔터프라이즈: 사용자가 공유 폴더를 삭제할 수 있습니다.
- 컴플라이언스: 사용자가 공유 폴더를 삭제할 수 없습니다. 공유 폴더를 삭제하려면관리자가 상위스토리지풀을 삭제해야 합니다.
- 잠금 설정옆에서수동으로 잠금(파일 권한을 읽기 전용으로 설정)을 선택합니다.
이 옵션은 적절한 권한을 가진 사용자가 파일을 잠그기 위해 파일 권한을 수동으로 읽기 전용으로 설정해야 합니다.
참고
HBS에서 WORM 공유 폴더를 대상으로 사용하려면수동으로 잠금옵션을 선택해야 합니다.
- 보존 기간을 활성화합니다.
보존 기간은 공유 폴더의 각 파일과 폴더에 WORM이 적용되는 기간을 제한합니다. 지정된 보존 기간 후에 파일과 폴더를 삭제할 수 있습니다.
참고
HBS에서 WORM 공유 폴더를 대상으로 사용하려면 공유 폴더에서 보존 기간을 활성화해야 합니다.
- 옆에서보존 기간 설정을 클릭합니다.
- 일, 월, 또는 년 수를 지정합니다.
- 검토 및 생성을 클릭합니다.
- 설정을 검토한 후생성을 클릭합니다.
시스템이 WORM 공유 폴더를 생성합니다.
HBS에서 WORM 공유 폴더를 대상으로 백업 작업을 생성합니다.
설명을 위해 소스와 대상 폴더가 동일한 NAS 장치에 있는 로컬 백업 작업을 생성합니다.
참고
다음 단계에서는 필수 설정만 다룹니다.
다른 작업 설정에 대한 자세한 내용은
백업 작업 만들기을 참조하십시오.
- HBS 3 Hybrid Backup Sync을 엽니다.
- 백업 및 복원으로 이동합니다.
- Create를 클릭한 다음New backup Job을 클릭합니다.
Create a Backup Job마법사가 열립니다. - 소스 폴더를 선택한 다음Next를 클릭합니다.
- 대상 NAS로Local NAS를 선택한 다음Select를 클릭합니다.
- 대상 폴더로 생성한 WORM 공유 폴더를 선택한 다음OK를 클릭합니다.
참고
대상 폴더로 WORM 공유 폴더를 선택하려면 폴더의 WORM 잠금 설정이Lock manually로 설정되어야 하며 보존 기간이 활성화되어야 합니다.
자세한 내용은 이 튜토리얼의 이전 지침을 참조하세요.
- Next을 클릭합니다.
- 버전 관리가 WORM 보존 기간에 맞춰 자동으로 구성되었는지 확인합니다.
참고
- HBS는 자동으로 버전 관리 설정을 활성화하고 구성하여 대상 WORM 공유 폴더의 보존 기간에 맞춥니다.
- 이 설정은 변경할 수 없습니다.
- 이는 백업 버전이 WORM 파일이 변경 불가능한 상태로 유지되는 기간 동안 정확히 보존되도록 하여, 버전이 조기에 삭제되거나 필요 이상으로 오래 유지되지 않도록 합니다.
- 버전 관리를 클릭합니다.Version Management. 패널은 다음과 같은 읽기 전용 상태를 보여줍니다:
- 버전 관리 활성화가 이미 선택되어 있습니다(회색 처리됨; 해제할 수 없음).
- 각 버전을 보존할 일수는 WORM 공유 폴더의 보존 기간에 맞춰 자동으로 설정됩니다(회색 처리됨; 수정할 수 없음).
- Next을 클릭합니다.
- 선택 사항:작업 규칙을 구성합니다.
- Next을 클릭합니다.
- 요약을 검토한 다음, Create를 클릭합니다.
HBS가 백업 작업을 만듭니다.
C. HBS에서 백업 작업을 실행하고 모니터링합니다.
- 백업 작업을 수동으로 실행합니다.
참고
작업을 생성 직후 실행하도록 구성했거나 설정한 일정에 따라 작업이 실행되기를 원하는 경우 이 단계를 건너뛸 수 있습니다.
- HBS > 백업 및 복원으로 이동합니다..
- 생성한 백업 작업을 선택합니다.
- 클릭합니다지금 백업.
- 작업이 처음 실행된 후, 작업 보고서를 확인하여 작업이 원활하게 실행되었는지 확인합니다.
- HBS > 백업 및 복원으로 이동합니다..
- 백업 작업을 선택합니다.
- 클릭합니다보고서.
보고서창이 열립니다. - 로그탭으로 이동합니다.
- 작업 이름을 언급하고 "백업 작업 완료"라는 단어를 포함하는 메시지를 확인합니다.
예를 들어:
D. 공간이 부족한 경우 WORM 공유 폴더를 확장합니다.
대상 공유 폴더의 공간 부족으로 인해 백업 작업이 실패하고 폴더의 상위스토리지풀에 여유 공간이 있는 경우 공유 폴더의 용량을 늘릴 수 있습니다.
할당량필드를 확인하여 대상 공유 폴더가 가득 찬 것을 확인할 수 있습니다. HBS > 백업 및 복원:
참고
여기 HBS에 표시된 사용된 할당량은 상위스토리지풀의 공유 폴더의 실제 사용 용량을 반영하지 않을 수 있습니다. 스토리지풀의 실제 사용 용량은 데이터 감소로 줄어든 양을 뺀 것입니다. 데이터 감소를 확인하려면
스토리지관리자 > 스토리지공간으로 이동하여 공유 폴더를 식별한 다음
> 관리를 클릭합니다
작업아래에서.
WORM 공유 폴더를 확장하려면 다음 지침을 따르십시오:
- 스토리지관리자 > 스토리지공간으로 이동합니다.
- 공유 폴더를 찾습니다.
- 작업아래에서 > 공유 폴더 크기 조정을 클릭합니다.
공유 폴더 크기 조정창이 열립니다. - 새 용량옆에 공유 폴더의 더 큰 크기를 지정합니다.
- 적용을 클릭합니다.
시스템이 공유 폴더를 확장합니다. 이 과정은 시간이 걸릴 수 있습니다.
공유 폴더가 확장된 후 HBS로 이동하여 백업 작업을 다시 실행할 수 있습니다.
추가 읽기 및 리소스


