Applicable Products
- QNAP NAS
- QNAP Expansion Enclosure (if applicable)
Overview
If an HDD or SSD in a QNAP NAS suddenly becomes undetected, shows as disconnected, or the system reports messages such as Disk I/O Error, Disk Plugged Out, or RAID Degraded, follow this FAQ to perform initial troubleshooting.
A disk drop does not necessarily mean that the HDD/SSD itself has
failed. The issue may also be related to the disk tray, disk bay, backplane, SATA/SAS/NVMe connection, controller/HBA, expansion enclosure, power, or drive compatibility/firmware.
Important: If the RAID is already degraded and another RAID member
disk is also showing an abnormal status, or if multiple disks in the
same RAID group are experiencing issues, stop disk swapping, RAID
rebuilding, and high-I/O disk tests. Protect your data first and
contact QNAP Support.
Quick Troubleshooting Reference
| Observation |
Possible Cause / Investigation Direction |
| The same disk has the issue in different bays |
Disk |
| The manufacturer's diagnostic tool also reports an error |
Disk |
| SMART / Bad Block Test reports an error |
Disk |
| Different disks have the same issue in the same bay |
Tray / Bay / Backplane |
| The issue no longer occurs after replacing the tray |
Disk Tray |
| The disk reappears after a disk drop and SMART is normal |
Tray / Connection / I/O Path |
| Disks in different bays experience disk drops over time |
Do not assume individual HDD failures; investigate the Tray / Shared Hardware Path |
| Multiple disks drop at the same time |
Backplane / Controller / Power / Expansion Path |
| Multiple disks in an expansion enclosure disappear at the same time |
Expansion Enclosure / Connection / Power / Shared Path |
| A disk drop occurs together with a system crash or other system error |
Contact QNAP Support for further System / Kernel / Hardware analysis |
The table above provides initial troubleshooting directions only and should not be used by itself to make a final determination of the failed
component.
Solution
1. Check the RAID and data status
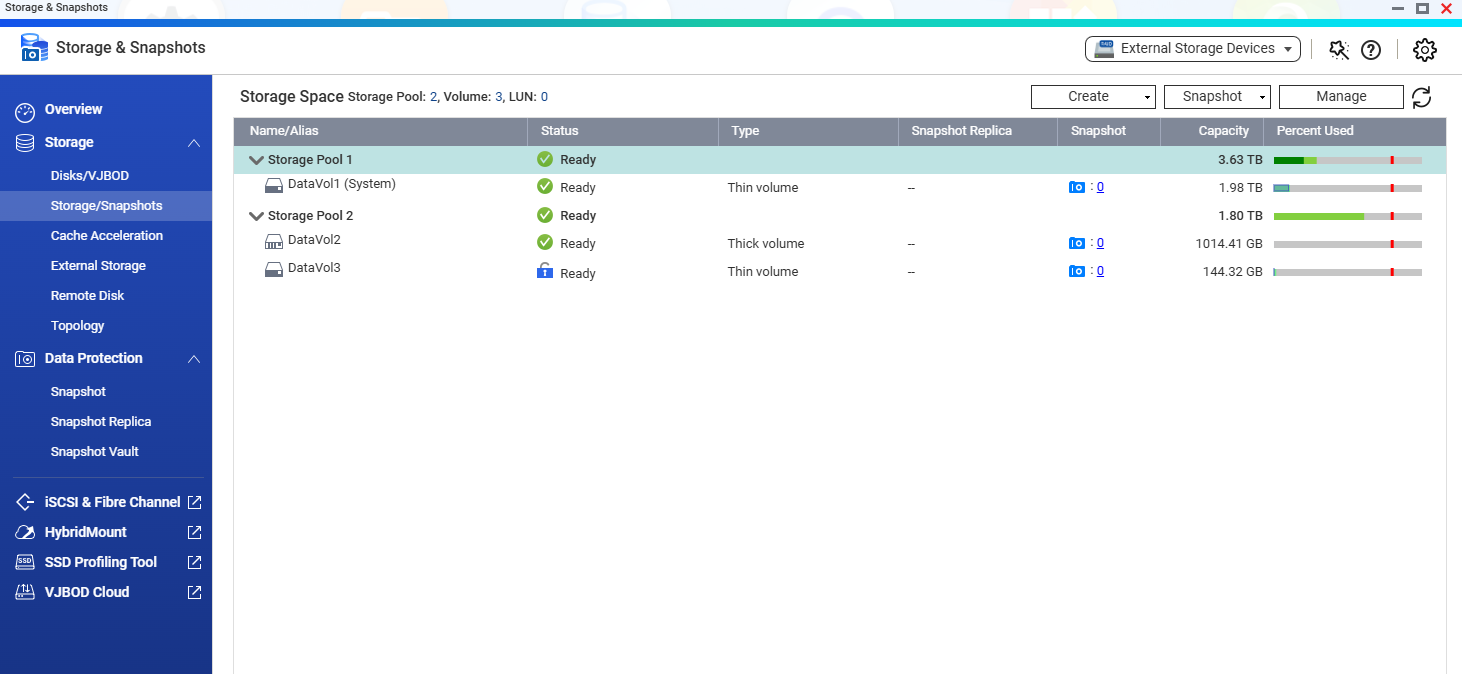
Open Storage & Snapshots and check the status of the storage pool, RAID group, other member disks, and data accessibility.
If two or more disks in the same RAID group are abnormal, the storage pool is inactive, or the data is inaccessible, stop further testing.
2. Record the issue information
Before rebooting the NAS or removing the disk, record:
- NAS model
- QTS/QuTS hero firmware version and build
- RAID type and storage pool / RAID group
- Affected disk bay / slot
- Disk model, capacity, firmware, and serial number
- Exact date and time when the disk drop occurred
- Whether the disk recovered automatically
- Whether any other disks experienced the same issue at the same or a similar time
- What task the NAS was performing when the issue occurred
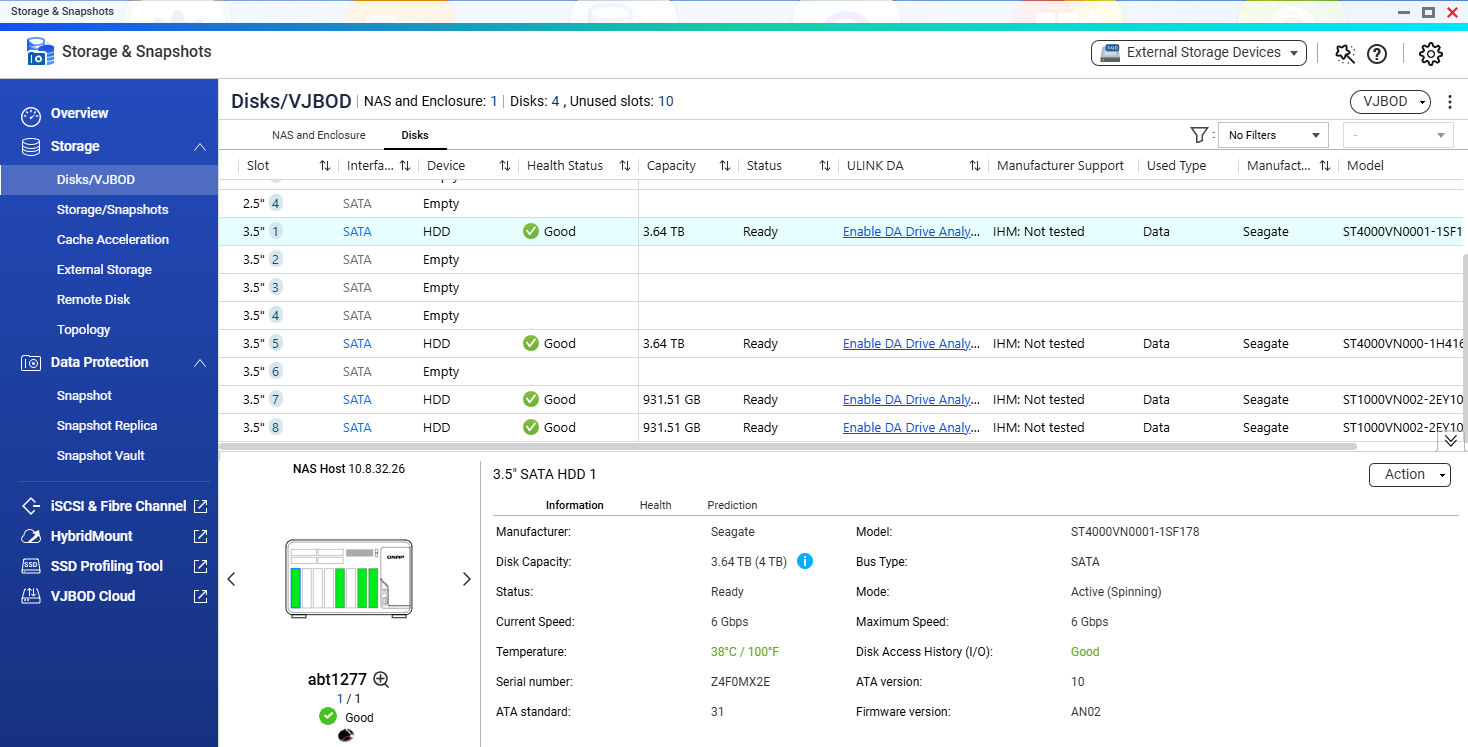
Take screenshots of Storage & Snapshots > Disks/VJBOD and the RAID/storage pool status.
3. Check disk compatibility
Verify that the HDD/SSD is listed on the QNAP Compatibility List and record the disk firmware version. Do not update the drive firmware solely as a troubleshooting step for a disk drop.
4. Check the event log and disk health
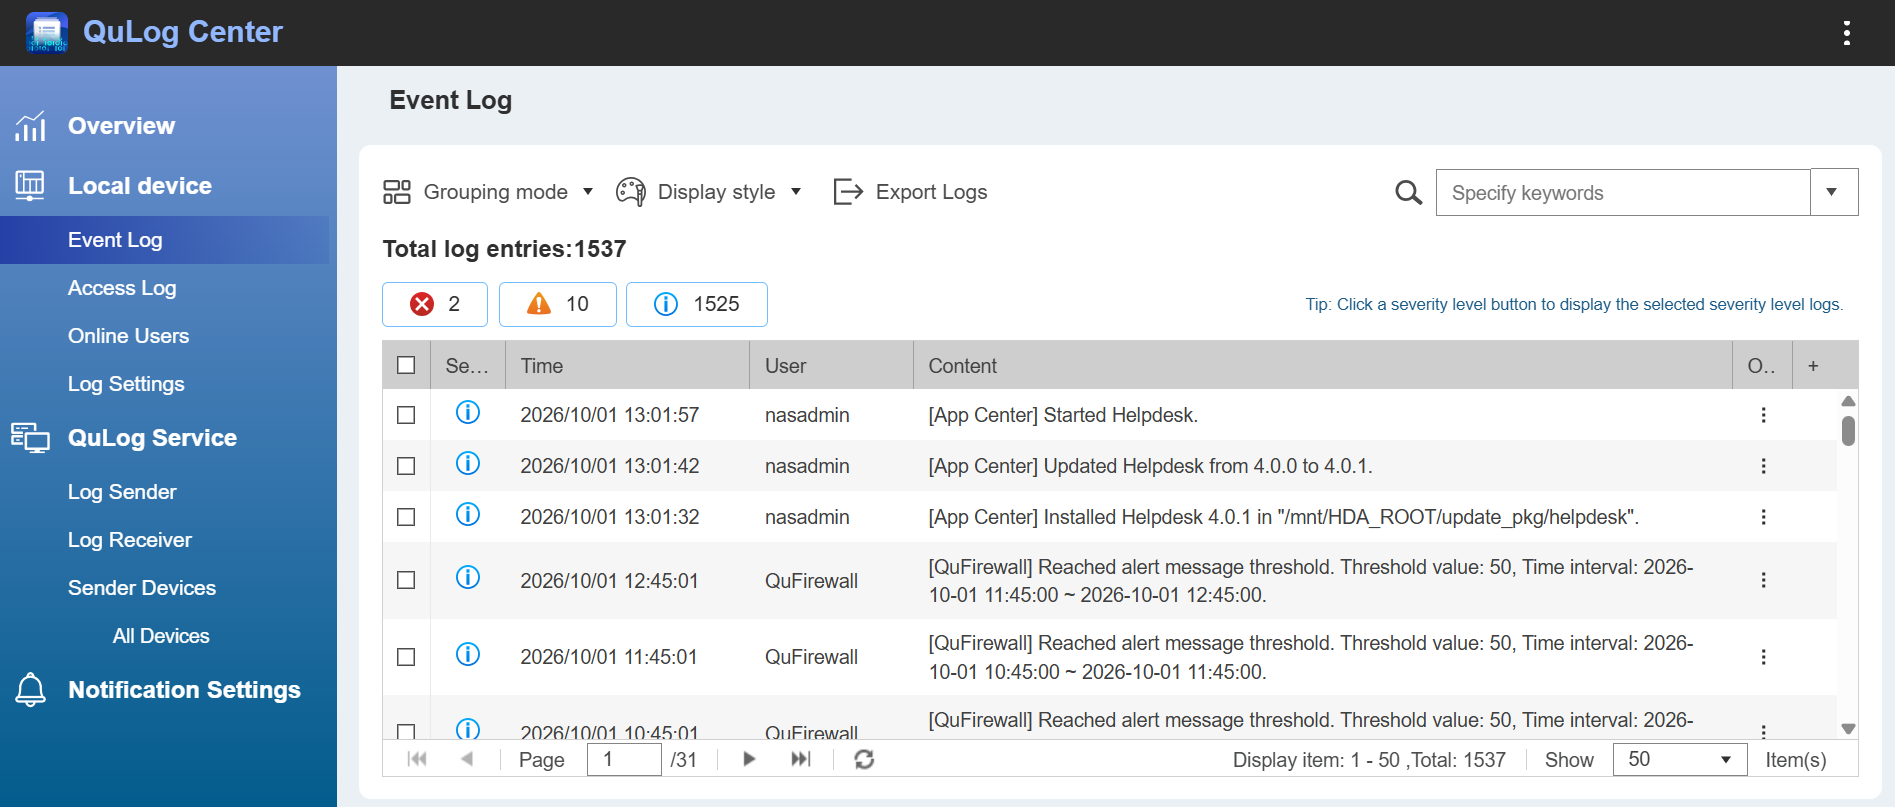
In QuLog Center > System Event Log, check for events around the time of the issue, such as Disk disconnected, Disk I/O error, RAID degraded, SMART warning, or Expansion enclosure disconnected.
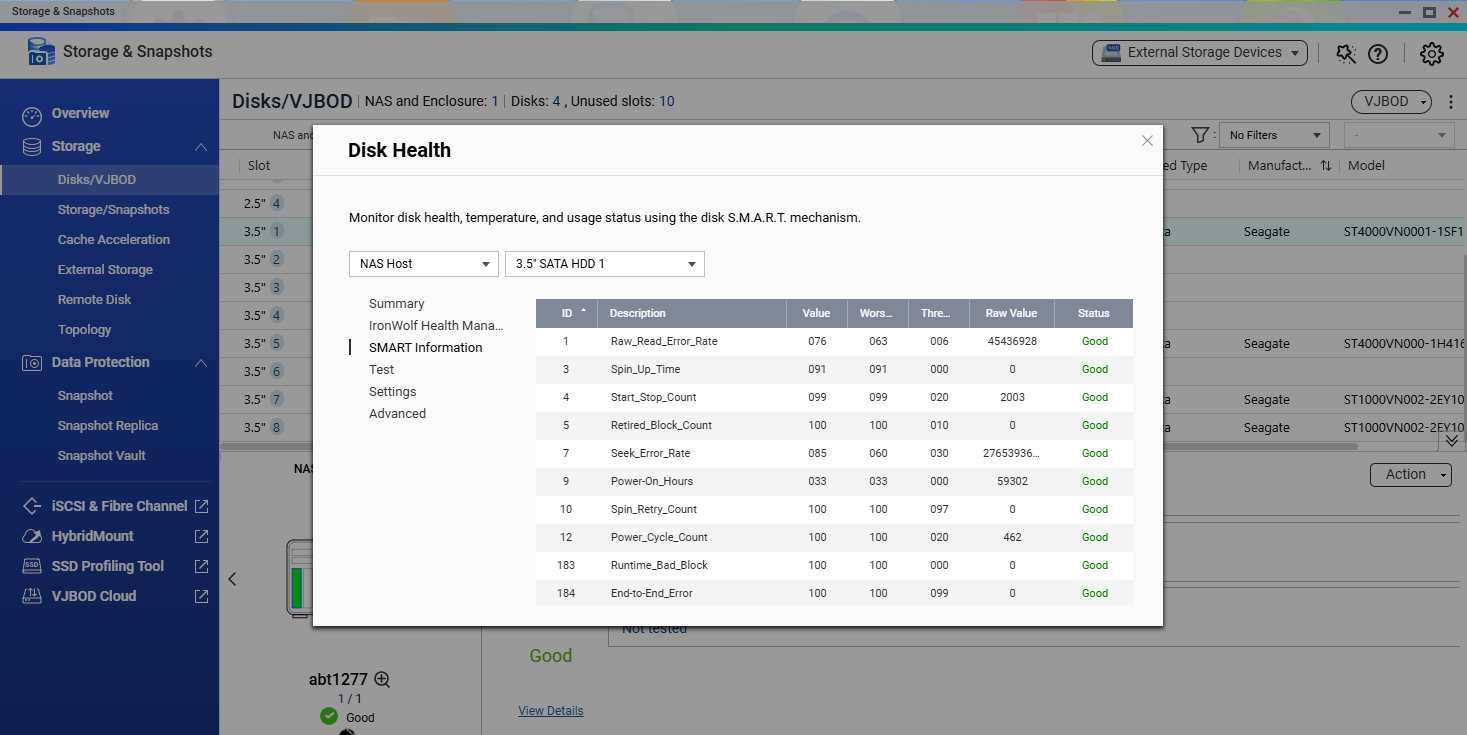
In Storage & Snapshots > Disks/VJBOD, check the disk health, SMART information, temperature, and Reallocated/Pending/Uncorrectable Sector values.
5. Collect diagnostic logs before further troubleshooting
If the NAS GUI is still accessible, go to:
Helpdesk > Diagnostic Tool > Download Logs
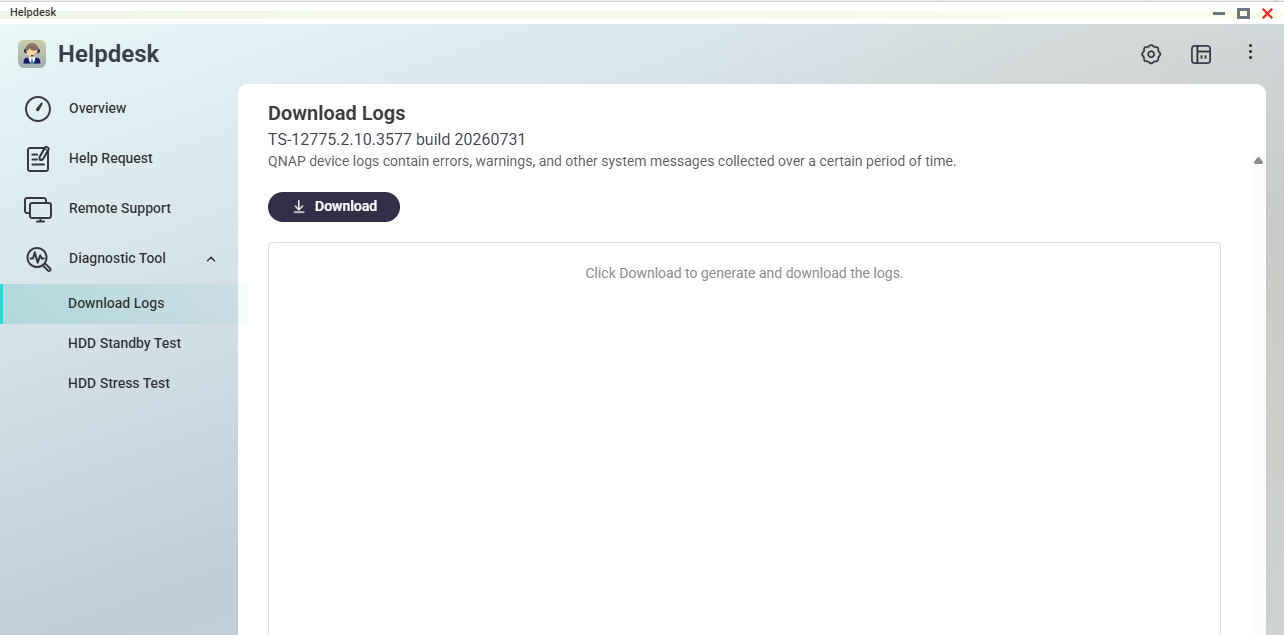
Download the diagnostic log ZIP file before considering a reboot. An accurate incident timestamp can help QNAP Support correlate the issue with kernel and storage-related messages.
6. Run disk tests only when the RAID and data are safe
If the RAID is stable, no other member disk is abnormal, and important data has been backed up, consider running:
- Complete SMART Test
- Scan for bad blocks
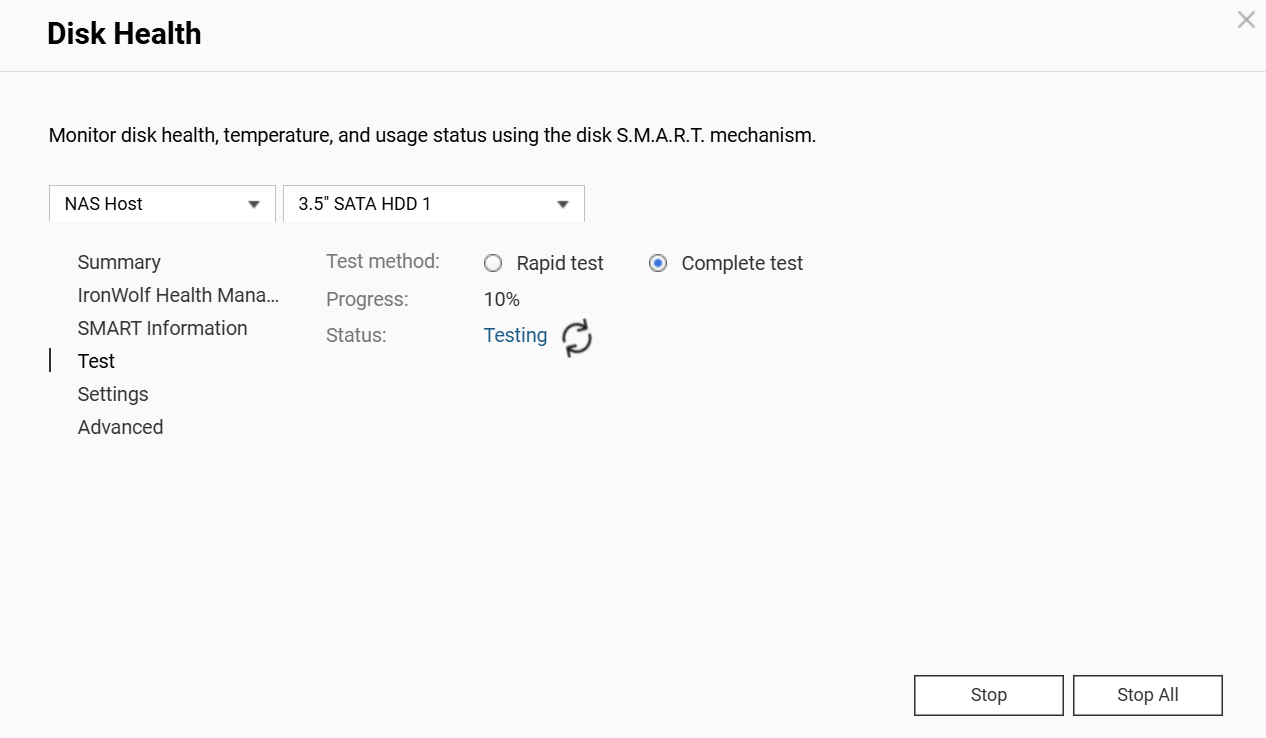
If the RAID is degraded or another member disk is abnormal, do not run long-duration disk tests.
7. Perform a disk/bay isolation test if necessary
If the disk can be safely removed:
- Move the suspected disk to another known-good bay and check whether the problem follows the disk.
- If necessary, connect the disk to a PC or use an appropriate SATA-to-USB adapter, and test it with the disk manufacturer's diagnostic tool.
If the problem follows the disk → Investigate the disk first.
If different disks have the same problem in the same bay → Investigate the disk tray, bay, backplane, or I/O path.
Do not randomly swap RAID member disks. Before moving a disk, record
its serial number, original bay/slot, and RAID group. If you are
unsure whether the disk can be safely moved, stop and contact QNAP
Support.
What NOT to Do
- Do not reboot immediately before collecting diagnostic logs.
- Do not repeatedly remove and reinsert the same disk.
- Do not randomly swap RAID member disks.
- Do not force a RAID rebuild when another member disk is already abnormal.
- Do not run long-duration disk tests on a degraded RAID when doing so could put the data at risk.
- Do not assume that the HDD/SSD has failed before confirming the cause.
- Do not change multiple variables, such as the disk, tray, and firmware, at the same time.
When should I stop troubleshooting?
Stop further testing and contact QNAP Support if multiple disks in the RAID are abnormal, the storage pool is inactive, data is inaccessible, multiple disks experience disk drops or I/O errors at the same time, the RAID rebuild repeatedly fails, a disk repeatedly disconnects and reconnects, the NAS crashes or restarts unexpectedly, or important data does not have a verified backup.
What should I provide when contacting QNAP Support?
- NAS model / firmware version and build
- RAID type / RAID group status
- Disk bay, model, firmware, and serial number
- Exact timestamp of the disk drop
- Whether the disk recovered automatically and whether other disks
experienced the issue at the same time
- Storage & Snapshots screenshots
- SMART / Disk Health results
- Complete SMART / Bad Block Scan results (if performed)
- System Event Log
- Diagnostic Log ZIP file
- Disk/Bay Cross Test and manufacturer diagnostic test results (if performed)
Further Reading
対象製品
- QNAP NAS
- QNAP Expansion Enclosure (if applicable)
概要
QNAP NAS の HDD または SSD が突然認識されなくなったり、切断されたと表示されたり、Disk I/O Error、Disk Plugged Out、RAID Degraded などのメッセージが報告された場合は、この FAQ に従って初期トラブルシューティングを行ってください。
ディスクのドロップは必ずしも HDD/SSD 自体が
故障したことを意味するわけではありません。問題はディスクトレイ、ディスクベイ、バックプレーン、SATA/SAS/NVMe 接続、コントローラー /HBA、拡張エンクロージャー、電源、またはドライブの互換性 / ファームウェアに関連している可能性もあります。
重要: RAID がすでに劣化していて、別の RAID メンバー
ディスクも異常な状態を示している場合、または同じ RAID グループ内の複数のディスクが問題を抱えている場合は、ディスクの交換、RAID
再構築、高 I/O ディスクテストを停止してください。まずデータを保護し、QNAP サポートに連絡してください。
クイックトラブルシューティングリファレンス
| 観察 |
可能性のある原因 / 調査の方向性 |
| 同じディスクが異なるベイで問題を抱えている |
ディスク |
| メーカーの診断ツールもエラーを報告する |
ディスク |
| SMART / 不良ブロックテストがエラーを報告する |
ディスク |
| 異なるディスクが同じベイで同じ問題を抱えている |
トレイ / ベイ / バックプレーン |
| トレイを交換した後、問題が発生しなくなる |
ディスクトレイ |
| ディスクドロップ後にディスクが再表示され、SMART が正常である |
トレイ / 接続 / I/O パス |
| 異なるベイのディスクが時間とともにディスクドロップを経験する |
個々の HDD の故障を仮定せず、トレイ / 共有ハードウェアパスを調査してください |
| 複数のディスクが同時にドロップします |
バックプレーン / コントローラー / 電源 / 拡張パス |
| 拡張エンクロージャー内の複数のディスクが同時に消失します |
拡張エンクロージャー / 接続 / 電源 / 共有パス |
| ディスクドロップがシステムクラッシュや他のシステムエラーと同時に発生します |
システム / カーネル / ハードウェアのさらなる分析については QNAP サポートにお問い合わせください |
上記の表は初期トラブルシューティングの方向性を提供するものであり、失敗した
コンポーネントの最終的な判断をするために単独で使用してはなりません。
ソリューション
1. RAID とデータの状態を確認します
ストレージ&スナップショットを開き、ストレージプール、RAID グループ、他のメンバーディスク、およびデータのアクセス可能性の状態を確認します。
同じ RAID グループ内で 2 つ以上のディスクが異常である場合、ストレージプールが非アクティブであるか、データがアクセス不能である場合は、さらなるテストを中止します。
2. 問題情報を記録します
NAS を再起動する前やディスクを取り外す前に、以下を記録します:
- NAS モデル
- QTS/QuTS hero ファームウェアバージョンとビルド
- RAID タイプとストレージプール / RAID グループ
- 影響を受けたディスクベイ / スロット
- ディスクモデル、容量、ファームウェア、シリアル番号
- ディスクドロップが発生した正確な日時
- ディスクが自動的に復旧したかどうか
- 他のディスクが同じ問題を同時または類似の時間に経験したかどうか
- 問題が発生したときに NAS が実行していたタスク
ストレージ&スナップショット > ディスク /VJBODと RAID/ ストレージプールのステータスのスクリーンショットを撮ります。
3. ディスクの互換性を確認
HDD/SSD がQNAP 互換性一覧にリストされていることを確認し、ディスクのファームウェアバージョンを記録します。ディスクドロップのトラブルシューティングのためだけにドライブのファームウェアを更新しないでください。
4. イベントログとディスクの健康状態を確認
QuLog Center > システムイベントログで、問題発生時のイベントを確認します。例えば、ディスク切断、ディスク I / O エラー、RAID 劣化、SMART 警告、拡張エンクロージャー切断など。
ストレージ&スナップショット > ディスク /VJBODで、ディスクの健康状態、SMART 情報、温度、再割り当て / 保留 / 修正不可能なセクターの値を確認します。
5. さらなるトラブルシューティングの前に診断ログを収集
NAS の GUI にアクセスできる場合は、次に進みます:
ヘルプデスク > 診断ツール > ログをダウンロード
再起動を検討する前に診断ログの ZIP ファイルをダウンロードしてください。正確なインシデントのタイムスタンプは、QNAP サポートがカーネルやストレージ関連のメッセージと問題を関連付けるのに役立ちます。
6. RAID とデータが安全な場合のみディスクテストを実行
RAID が安定しており、他のメンバーディスクに異常がなく、重要なデータがバックアップされている場合は、次を検討してください:
- 完全な SMART テスト
- 不良ブロックのスキャン
RAID が劣化している場合や他のメンバーディスクに異常がある場合は、長時間のディスクテストを実行しないでください。
7. 必要に応じてディスク / ベイの隔離テストを実施
ディスクを安全に取り外せる場合:
- 疑わしいディスクを別の正常なベイに移動し、問題がディスクに追随するか確認します。
- 必要に応じて、ディスクを PC に接続するか、適切な SATA-to-USB アダプターを使用して、ディスクメーカーの診断ツールでテストします。
問題がディスクに追随する場合 → まずディスクを調査します。
同じベイで異なるディスクが同じ問題を抱えている場合 → ディスクトレイ、ベイ、バックプレーン、または I/O パスを調査します。
RAID メンバーディスクをランダムに交換しないでください。ディスクを移動する前に、
そのシリアル番号、元のベイ / スロット、および RAID グループを記録します。ディスクを安全に移動できるか不明な場合は、停止して QNAP
サポートに連絡してください。
やってはいけないこと
- 診断ログを収集する前にすぐに再起動しないでください。
- 同じディスクを繰り返し取り外したり再挿入したりしないでください。
- RAID メンバーディスクをランダムに交換しないでください。
- 他のメンバーディスクがすでに異常な場合に RAID の再構築を強制しないでください。
- データが危険にさらされる可能性がある場合、劣化した RAID で長時間のディスクテストを実行しないでください。
- 原因を確認する前に、HDD/SSD が故障していると決めつけないでください。
- ディスク、トレイ、ファームウェアなどの複数の変数を同時に変更しないでください。
トラブルシューティングをいつ停止すべきですか?
RAID 内の複数のディスクが異常である場合、ストレージプールが非アクティブである場合、データにアクセスできない場合、複数のディスクが同時にディスクドロップや I / O エラーを経験する場合、RAID の再構築が繰り返し失敗する場合、ディスクが繰り返し切断および再接続される場合、NAS がクラッシュまたは予期せず再起動する場合、重要なデータに確認済みのバックアップがない場合は、さらなるテストを停止し、QNAP サポートに連絡してください。
QNAP サポートに連絡する際に何を提供すべきですか?
- NAS モデル / ファームウェアのバージョンとビルド
- RAID タイプ / RAID グループの状態
- ディスクベイ、モデル、ファームウェア、シリアル番号
- ディスクドロップの正確なタイムスタンプ
- ディスクが自動的に回復したかどうか、他のディスクが
同時に問題を経験したかどうか
- ストレージ&スナップショットのスクリーンショット
- SMART / ディスクヘルスの結果
- SMART / 不良ブロックスキャンの完全な結果(実施した場合)
- システムイベントログ
- 診断ログ ZIP ファイル
- ディスク / ベイクロステストおよびメーカー診断テストの結果(実施した場合)
さらに読む


