Applicable Products
Overview
This tutorial guides you through the process of backing up hypervisors in HDP for PC/VM to a remote QNAP NAS using HBS 3. The process requires 4 steps:
A. Adding a Hypervisor to the Inventory (HDP for PC/VM)
B. Creating a Repository (HDP for PC/VM)
C. Backing Up a Hypervisor to a Repository (HDP for PC/VM)
D. Backing Up or Syncing a Repository to a Remote NAS (HBS 3)
Important
When creating backup jobs in HDP for PC/VM (step C) and in HBS 3 (step D), ensure the two job schedules do not overlap.
Requirements
The following must be installed on both the local and remote NAS devices:
- HDP for PC/VM 1.3.0.0813 or later
- HBS 3 version 17.2.0726 or later
A. Adding a Hypervisor to the Inventory
- Open HDP for PC/VM.
- Go to Inventory > Virtual Machine.
- Click Add to choose the type of hypervisor to backup (VMware or Hyper-V).
- The Add/Edit Inventory window opens.
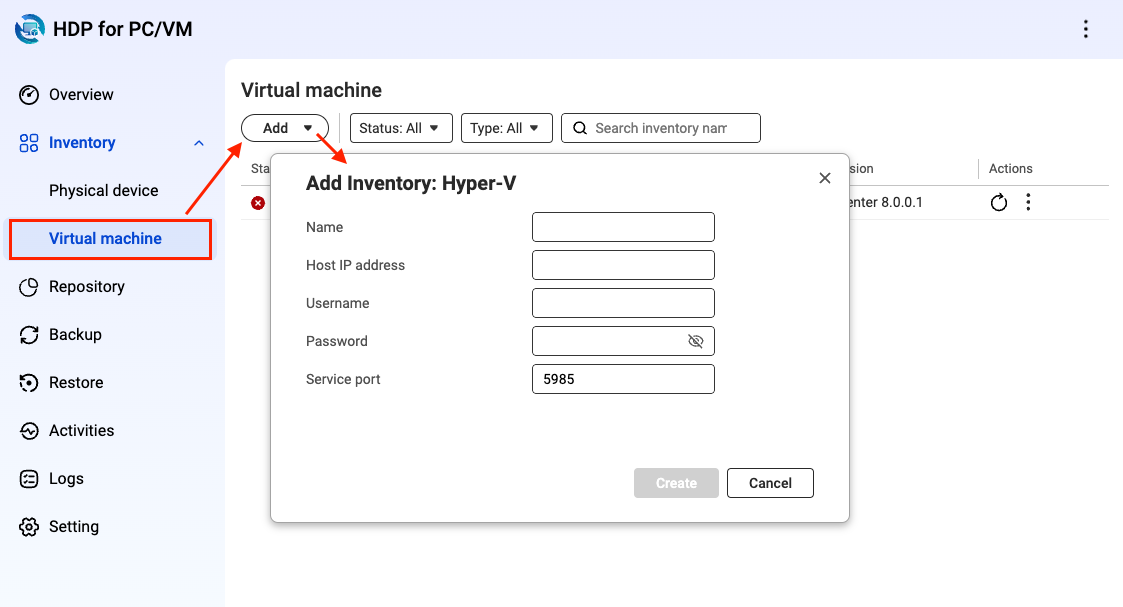
- Enter the details for the hypervisor.
- Enter the name.
- Enter the host IP address.
- Enter the username for the hypervisor account.
- Enter the password for the hypervisor account.
- Enter the service port.
- Click Create.
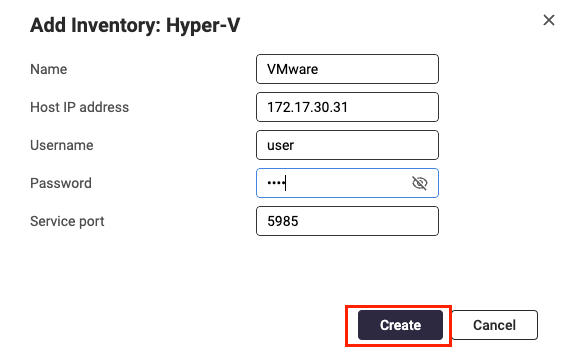
- Check that the hypervisor has been added to the list.
B. Creating a Repository
A repository is required to store the hypervisor data.
- Open HDP for PC/VM.
- Click Repository.
- Click Create.
The Create Repository window opens.
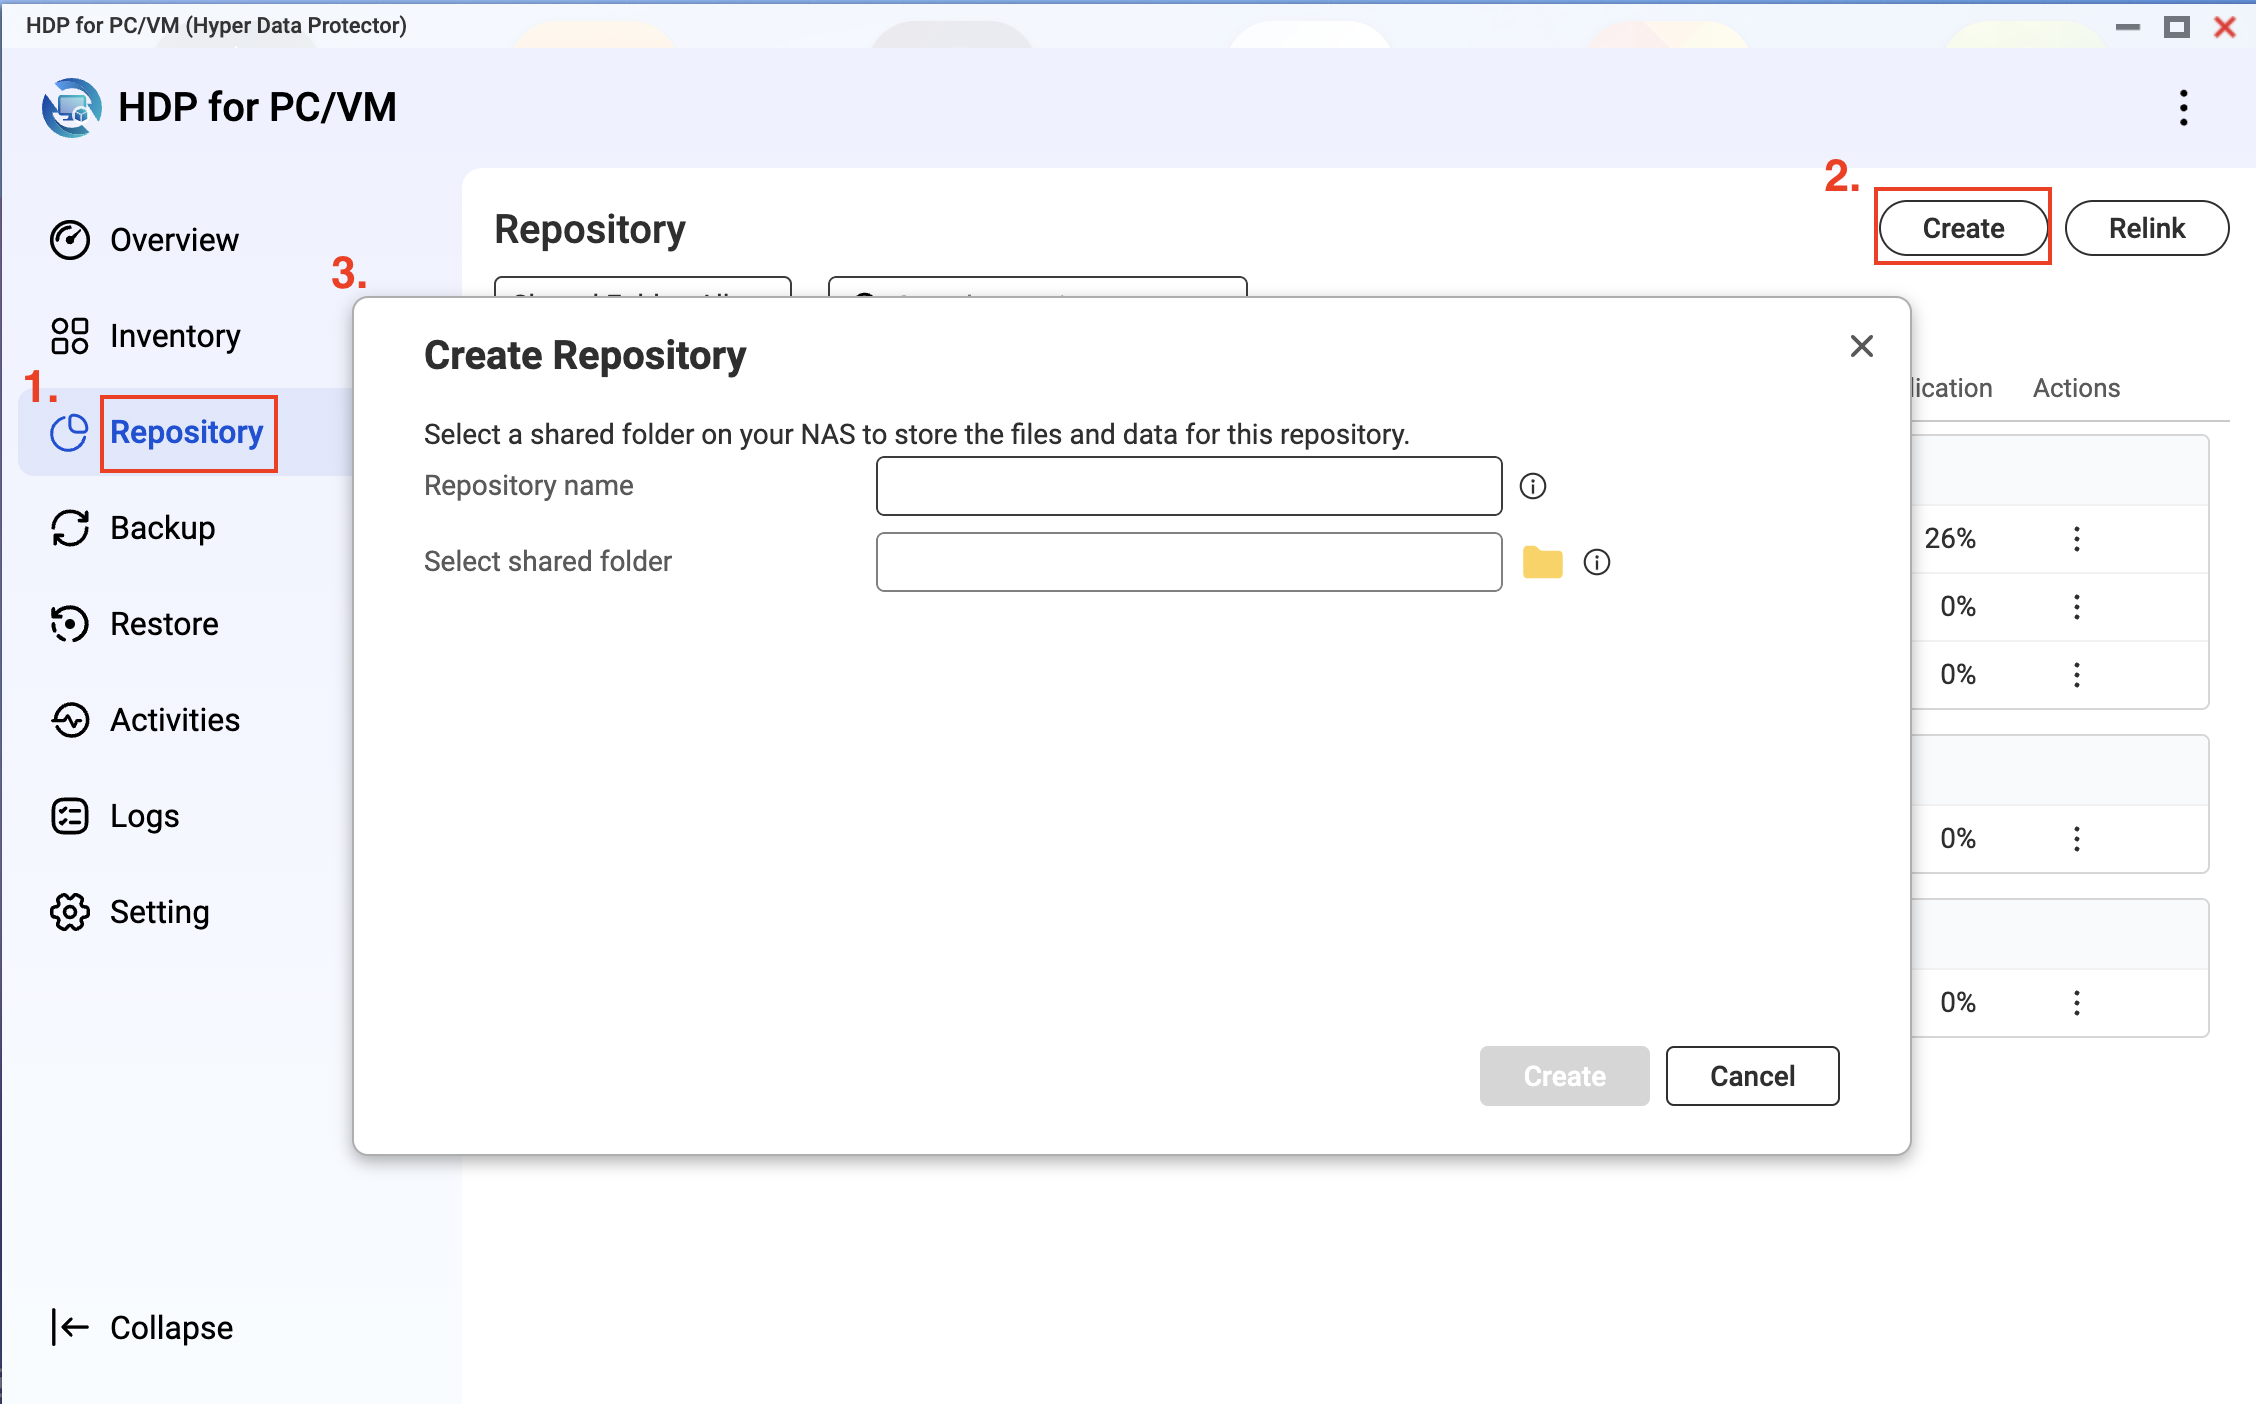
- Enter a repository name.
- Select one or more shared folders to store your backup data.
- Click Create.
C. Backing Up a VMware/Hyper-V Hypervisor to a Repository
To back up a hypervisor to a repository, you need to create a backup job in HDP for PC/VM.
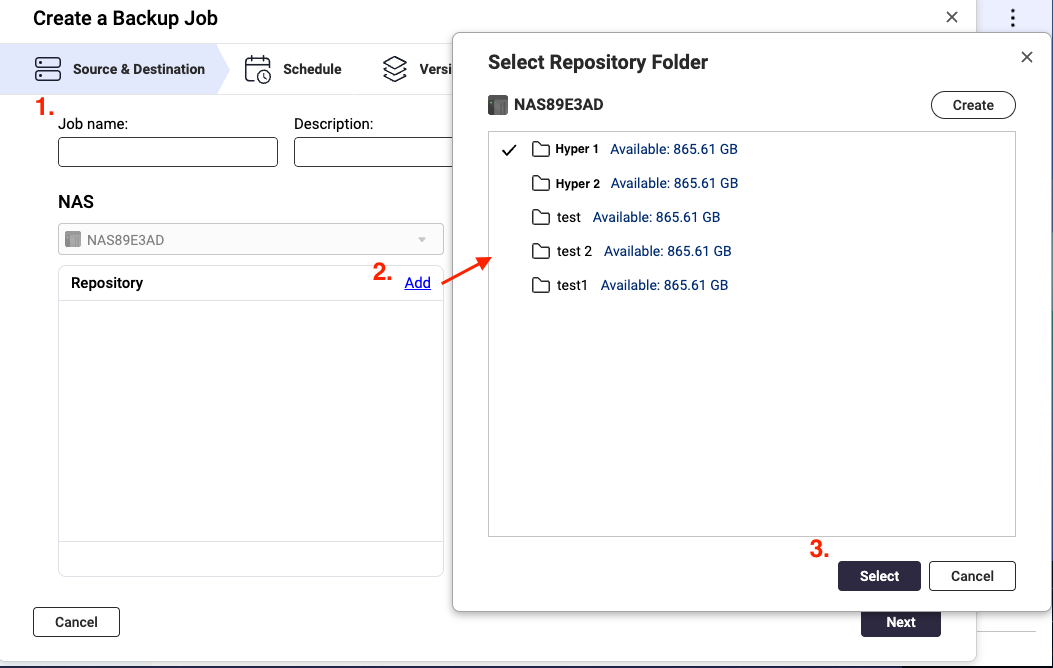
- In HDP for PC/VM, click Backup > Create Job.
The Create a Backup Job window opens. - Enter a job name.
- Optional: Enter a description.
- In the Repository section, click Add.
The Select Repository Folder window opens. - Select or create a folder to store backup data.
- Click Select.
- Under Inventory, select an existing inventory or add a new inventory.
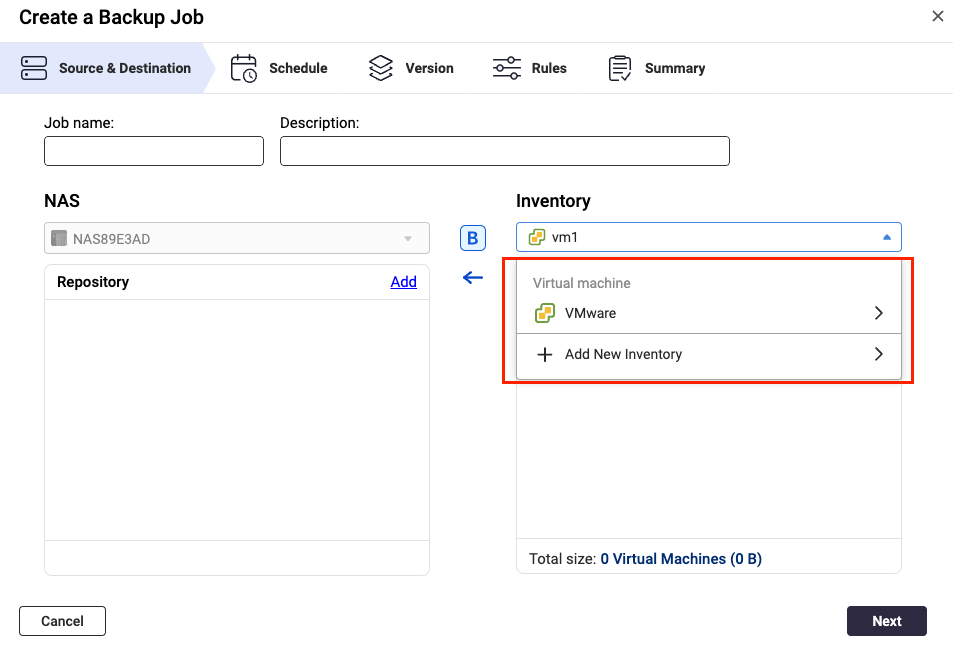
- Click Add.
The Select Source window opens.- Select a view.
- Select the virtual machines or disks to include.
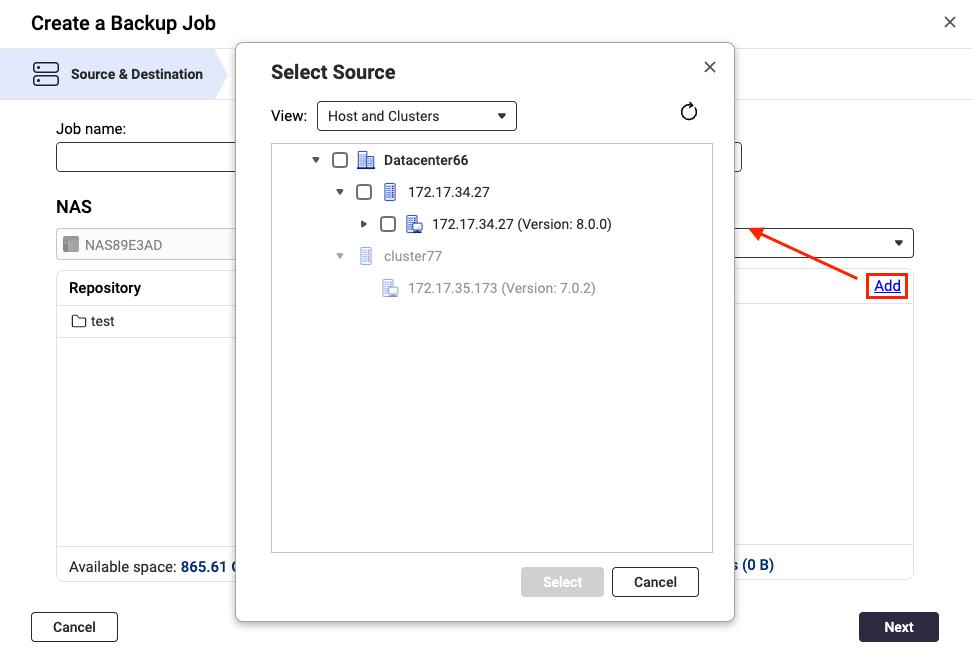
- Click Select.
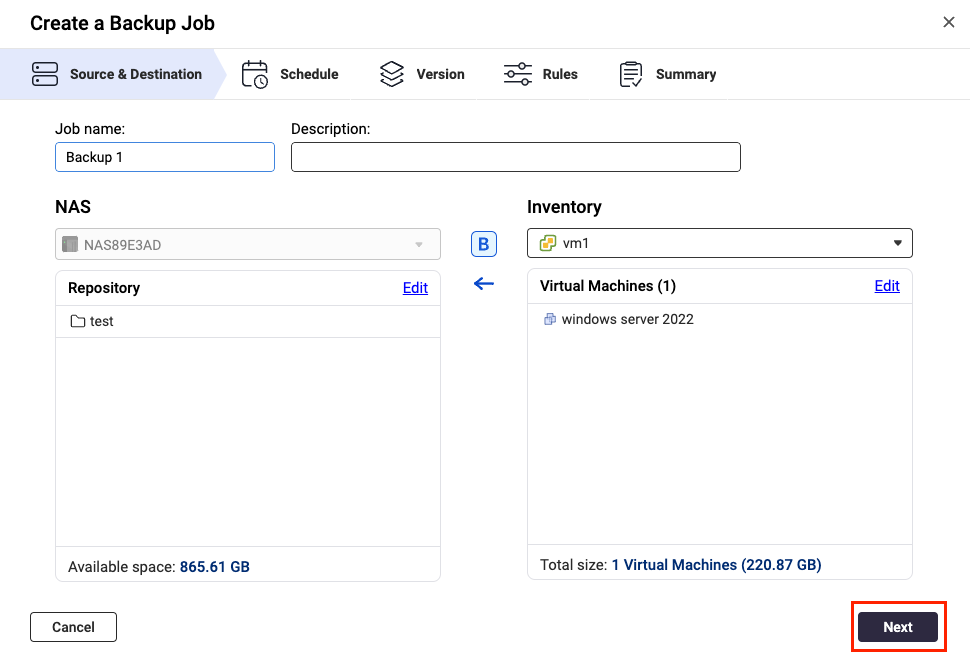
The Select Source window closes. - Review the total number of selected virtual machines and their total size.
- Click Next.
- Configure the backup schedule, then click Next.
- Configure the retention policy, then click Next.
- Configure the rules, then click Next.
Tip
- Transfer encryption and compression: Enhances transfer security and optimizes file size for faster transmission.
- Enable VMware CBT for all VMs: Changed Block Tracking (CBT) is an incremental backup technology for VMware VMs. CBT only backs up blocks that have changed, rather than backing up every block of every VM in the infrastructure.
- Enable application-aware processing: Application awareness is based on Microsoft VSS and prevents data loss or application failures if the backup files include application data or system state information.
- Review the summary page, then click Finish.
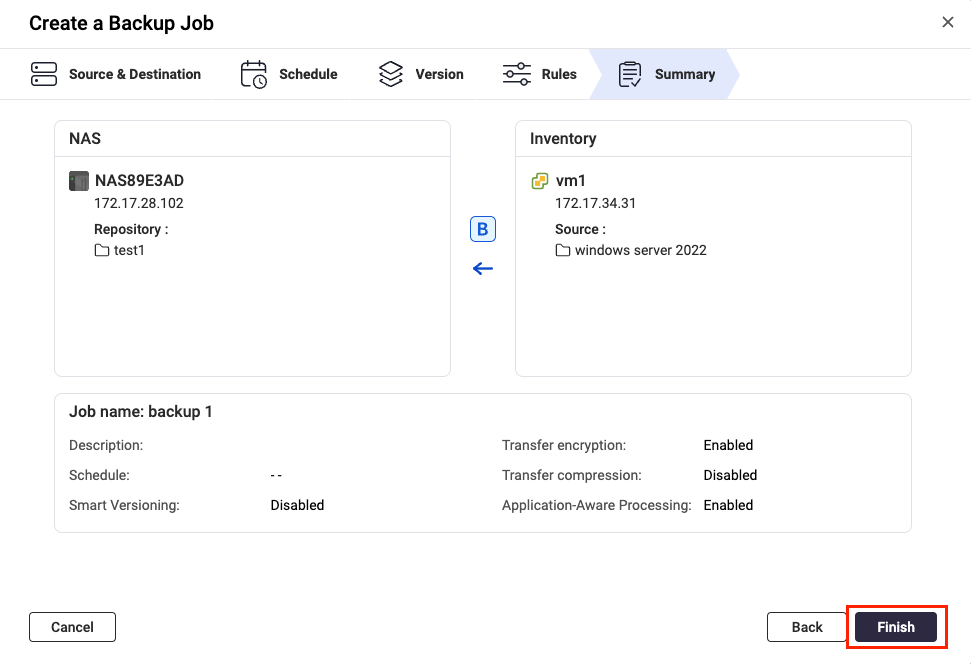 HDP for PC/VM executes the backup job according to the configured schedule.
D. Backing Up or Syncing a Repository to a Remote NAS
Note
The steps to create a backup job and to create a sync job are nearly identical. Below we demonstrate the steps needed to create a sync job.
- Configure the RTRR server on the remote NAS.
Important
This step is required to allow the local and remote NAS devices to connect via HBS 3.
- Open HBS 3 on the remote NAS.
- Go to Services > RTRR Server and enable the RTRR server.
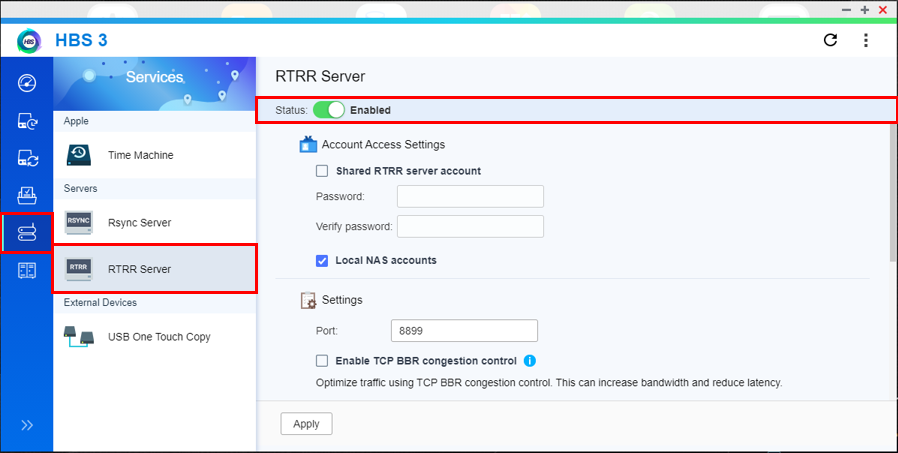
- Configure the account access settings.
- Shared RTRR server account: This option allows incoming connections to log in with a shared account.
- Local NAS accounts: This option allows incoming connections to log in with a local account of the remote NAS.
Note
Remember which option you choose. You will need this information later when you set up the backup job on your source NAS.
- Configure the server settings.
- Port: Specifies the port number used to access the remote NAS.
Note
Remember the port number. You will need this information later when you set up the backup job on your local NAS.
- Use TCP BBR congestion control: This option optimizes transmissions speeds allowing for higher bandwidth and lower latency.
Important
To ensure data integrity, we recommend enabling this setting.
- Integrate with QuWAN: Allows QuWAN to manage and optimize network traffic for jobs using this service.
Important
To ensure data integrity, we recommend disabling this setting.
- Upload limit: Sets the upload rate limit.
- Download limit: Sets the download rate limit.
- Click Apply.
- Open HBS 3 on the local NAS.
- Go to Sync > Create > One-way Sync Job.
Tip
To create a backup job, go to Backup > Create > New backup job.
The Create a Sync Job wizard appears. - Select Remote NAS.
- Click Add new account.
The Create a Storage Space window opens.
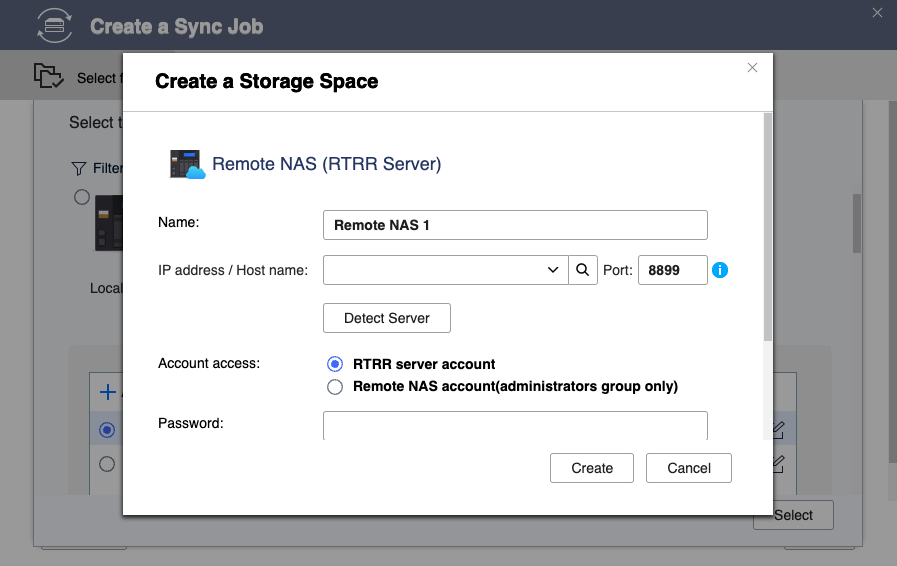
- Configure the storage space settings.
- Name: The name used to identify the storage space.
- IP address / Host name: The IP address or hostname used to access the storage space.
- Port: The port number used to access the storage space.
This value must be between 1 to 65535. - Account access: The account used to access the storage space.
Use the same settings you configured for the RTRR server on the remote NAS. - Username: The username used to access the storage space.
This field is only available if Remote NAS account is selected for account access. - Password: The password used to access the storage space.
- Use SSL connection: Requires SSL connection when accessing the remote NAS.
- Click Create.
- Select the newly added destination NAS.
- Click Select.
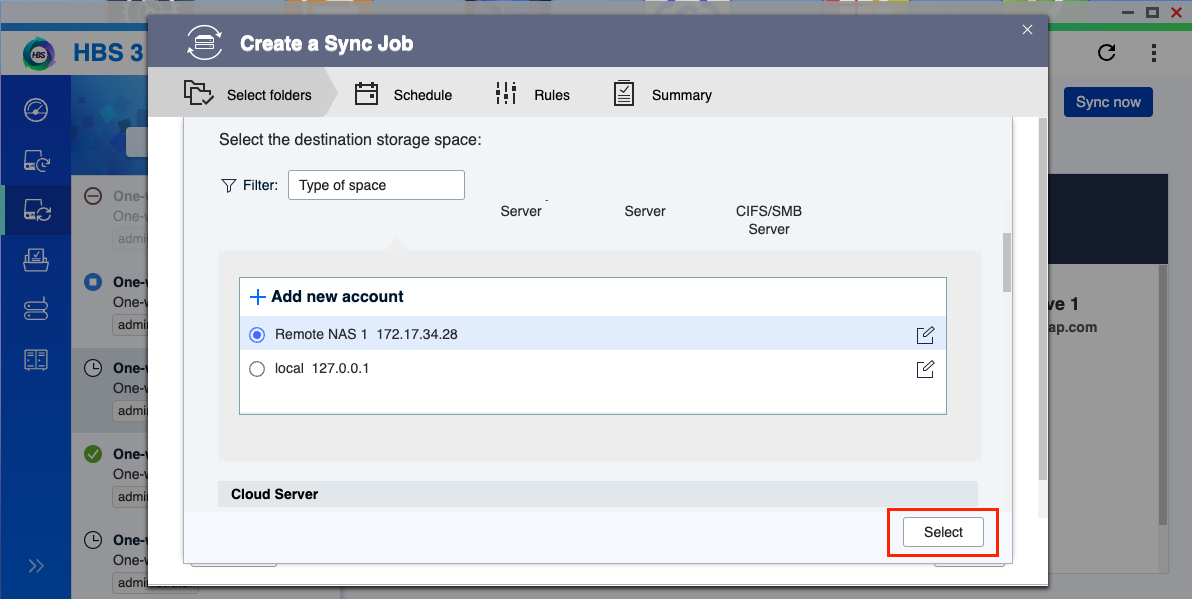
- Enter a name for the sync job.
- Select the previously backed up HDP for PC/VM repository.
Important
The selected folder must be located in a shared folder or in an "HDP" folder in the shared folder.
- Select the destination folder on the remote NAS.
Important
Ensure the folder is not a destination for another one-way sync job. File corruption may occur if the same folder is used as a destination for two or more one-way sync jobs.
- Click Next.
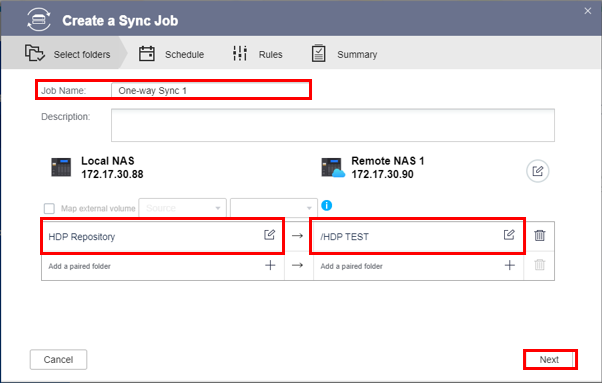
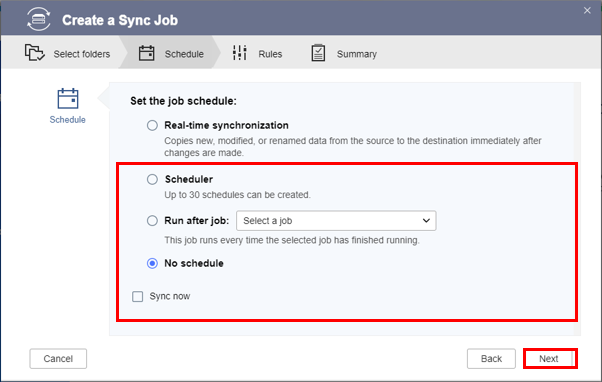
- Configure the job schedule, then click Next.
Important
Do not select Real-time synchronization. This option may cause data corruption in your backup.
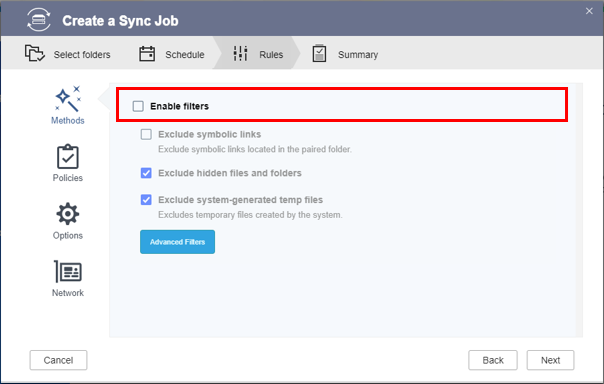
- Deselect Enable filters.
- Configure the job policies.
Important
To avoid data corruption, please configure the following settings as recommended:
- Use rate limits: Disable
- Use TCP BBR congestion control: Enable
- Integrate with QuWAN: Disable
- Remove additional files in destination folder: Enable
- Replicate ACL and extended attributes: Enable
- Do not take a snapshot: Disable
- Optional: Configure the Options and Network settings.
- Click Next.
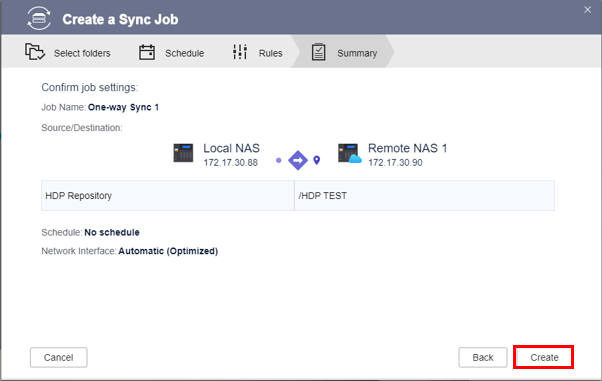
- Review the summary, then click Create.
- Click Sync now.
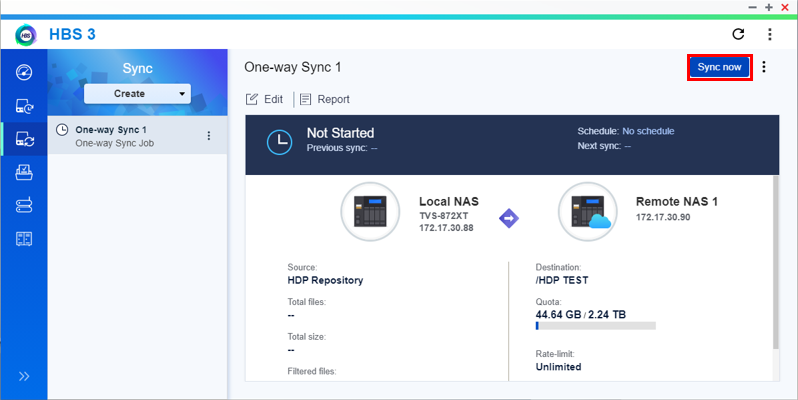
HBS 3 starts syncing your repository to the destination NAS.
Further Reading
Hybrid Backup Sync Web Help
対象製品
概要
このチュートリアルでは、HDP for PC/VM でハイパーバイザーをリモートの QNAP NAS に HBS 3 を使用してバックアップする手順を説明します。このプロセスは 4 つのステップで構成されています:
A. インベントリにハイパーバイザーを追加 (HDP for PC/VM)
B. リポジトリを作成 (HDP for PC/VM)
C. ハイパーバイザーをリポジトリにバックアップ (HDP for PC/VM)
D. リポジトリをリモート NAS にバックアップまたは同期 (HBS 3)
重要
HDP for PC/VM(ステップ C)および HBS 3(ステップ D)でバックアップジョブを作成する際、2 つのジョブスケジュールが重ならないようにしてください。
要件
以下のものがローカルおよびリモートの NAS デバイスにインストールされている必要があります:
- HDP for PC/VM 1.3.0.0813 以降
- HBS 3 バージョン 17.2.0726 以降
A. インベントリにハイパーバイザーを追加する
- HDP for PC/VM を開きます。
- インベントリ > 仮想マシンに移動します。
- 追加 をクリックして、バックアップするハイパーバイザーの種類を選択します(VMwareまたはHyper-V)。
- インベントリの追加 / 編集ウィンドウが開きます。
- ハイパーバイザーの詳細を入力します。
- 名前を入力します。
- ホストの IP アドレスを入力します。
- ハイパーバイザーアカウントのユーザー名を入力します。
- ハイパーバイザーアカウントのパスワードを入力します。
- サービスポートを入力します。
- 作成をクリックします。
- ハイパーバイザーがリストに追加されたことを確認します。
B. リポジトリの作成
ハイパーバイザーデータを保存するためにリポジトリが必要です。
- HDP for PC/VM を開きます。
- リポジトリをクリックします。
- 作成をクリックします。
リポジトリの作成ウィンドウが開きます。
- リポジトリ名を入力します。
- バックアップデータを保存する共有フォルダーを 1 つ以上選択します。
- 作成をクリックします。
C. VMware/Hyper-V ハイパーバイザーをリポジトリにバックアップする
ハイパーバイザーをリポジトリにバックアップするには、HDP for PC/VM でバックアップジョブを作成する必要があります。
- HDP for PC/VM で、バックアップ > ジョブの作成をクリックします。
バックアップジョブの作成ウィンドウが開きます。 - ジョブ名を入力します。
- オプション: 説明を入力します。
- リポジトリセクションで、追加をクリックします。
リポジトリフォルダーの選択ウィンドウが開きます。 - バックアップデータを保存するフォルダーを選択または作成します。
- 選択をクリックします。
- インベントリの下で、既存のインベントリを選択するか、新しいインベントリを追加します。
- 追加をクリックします。
ソースを選択 ウィンドウが開きます。- ビューを選択します。
- 含める仮想マシンまたはディスクを選択します。
- 選択をクリックします。
ソースを選択ウィンドウが閉じます。 - 選択した仮想マシンの総数とその合計サイズを確認します。
- 次へをクリックします。
- バックアップスケジュールを設定し、次へをクリックします。
- 保持ポリシーを設定し、次へをクリックします。
- ルールを設定したら、次へをクリックします。
ヒント
- 転送の暗号化と圧縮:転送のセキュリティを強化し、ファイルサイズを最適化して高速な送信を実現します。
- すべての VM に対して VMware CBT を有効にする:変更ブロック追跡(CBT)は、VMware VM の増分バックアップ技術です。CBT は、インフラ内のすべての VM のすべてのブロックをバックアップするのではなく、変更されたブロックのみをバックアップします。
- アプリケーション対応処理を有効にする: アプリケーション対応は Microsoft VSS に基づいており、バックアップファイルにアプリケーションデータやシステム状態情報が含まれている場合、データ損失やアプリケーション障害を防ぎます。
- サマリーページを確認し、完了をクリックします。
HDP for PC/VM は、設定されたスケジュールに従ってバックアップジョブを実行します。
D. リポジトリをリモート NAS にバックアップまたは同期する
注意
バックアップジョブを作成する手順と同期ジョブを作成する手順はほぼ同じです。以下に同期ジョブを作成するための手順を示します。
- リモート NAS で RTRR サーバーを設定します。
重要
このステップは、ローカルおよびリモート NAS デバイスが HBS 3 を介して接続するために必要です。
- リモート NAS で HBS 3 を開きます。
- サービス > RTRR サーバーに移動し、RTRR サーバーを有効にします。
- アカウントアクセス設定を構成します。
- 共有 RTRR サーバーアカウント: このオプションは、共有アカウントでのログインを許可します。
- ローカル NAS アカウント: このオプションは、リモート NAS のローカルアカウントでのログインを許可します。
注意
選択したオプションを覚えておいてください。後でソース NAS でバックアップジョブを設定する際に必要になります。
- サーバー設定を構成します。
- ポート: リモート NAS にアクセスするために使用するポート番号を指定します。
注意
ポート番号を覚えておいてください。後でローカル NAS でバックアップジョブを設定する際に必要になります。
- TCP BBR 輻輳制御を使用: このオプションは、より高い帯域幅と低遅延を可能にするために送信速度を最適化します。
重要
データの整合性を確保するために、この設定を有効にすることをお勧めします。
- QuWAN と統合: このサービスを使用するジョブのネットワークトラフィックを管理および最適化するために QuWAN を許可します。
重要
データの整合性を確保するために、この設定を無効にすることをお勧めします。
- アップロード制限: アップロード速度制限を設定します。
- ダウンロード制限: ダウンロード速度制限を設定します。
- 適用をクリックします。
- ローカル NAS で HBS 3 を開きます。
- 同期 > 作成 > 一方向同期ジョブに移動します。
ヒント
バックアップジョブを作成するには、バックアップ > 作成 > 新しいバックアップジョブに移動します。
同期ジョブの作成ウィザードが表示されます。 - リモート NASを選択します。
- 新しいアカウントを追加をクリックします。
ストレージスペースを作成ウィンドウが開きます。
- ストレージスペースの設定を構成します。
- 名前: ストレージスペースを識別するために使用される名前。
- IP アドレス / ホスト名: ストレージスペースにアクセスするために使用される IP アドレスまたはホスト名。
- ポート: ストレージスペースにアクセスするためのポート番号です。
この値は 1 から 65535 の間でなければなりません。 - アカウントアクセス: ストレージスペースにアクセスするためのアカウントです。
リモート NAS の RTRR サーバーで設定したものと同じ設定を使用してください。 - ユーザー名: ストレージスペースにアクセスするためのユーザー名です。
このフィールドは、アカウントアクセスにリモート NAS アカウントが選択されている場合にのみ利用可能です。 - パスワード: ストレージスペースにアクセスするためのパスワードです。
- SSL 接続を使用:リモート NAS にアクセスする際に SSL 接続を要求します。
- 作成をクリックします。
- 新しく追加された宛先 NAS を選択します。
- 選択をクリックします。
- 同期ジョブの名前を入力します。
- 以前にバックアップした HDP for PC/VM リポジトリを選択します。
重要
選択したフォルダは、共有フォルダ内または共有フォルダ内の「HDP」フォルダに配置されている必要があります。
- リモート NAS の宛先フォルダを選択します。
重要
フォルダが他の一方向同期ジョブの宛先になっていないことを確認してください。同じフォルダが 2 つ以上の一方向同期ジョブの宛先として使用されると、ファイルが破損する可能性があります。
- 次へをクリックします。
- ジョブスケジュールを設定し、次へをクリックします。
重要
リアルタイム同期を選択しないでください。このオプションはバックアップのデータ破損を引き起こす可能性があります。
- フィルターを有効にする
の選択を解除します。 - ジョブポリシーを設定します。
重要
データの破損を避けるため、以下の設定を推奨通りに構成してください:
- レート制限を使用:無効
- TCP BBR 輻輳制御を使用:有効
- QuWAN と統合:無効
- 宛先フォルダーの追加ファイルを削除:有効
- ACL と拡張属性を複製:有効
- スナップショットを取らない:無効
- オプション: オプションとネットワークの設定を構成します。
- 次へをクリックします。
- 概要を確認し、作成をクリックします。
- 今すぐ同期をクリックします。
HBS 3 がリポジトリを宛先の NAS に同期し始めます。
さらに読む
Hybrid Backup Sync Web ヘルプ


