How can I migrate my DaVinci Resolve Studio database to a newer version of QTS?
This tutorial explains the process of migrating your DaVinci Resolve Studio database to a PostgreSQL container to a newer QTS version. In a previous tutorial, we explained how to host a multi-user collaborative environment on your NAS. That tutorial recommended using a QTS application because DaVinci Resolve Studio only supports an older version of PostgreSQL (v9.5.4). Unfortunately, newer QTS versions no longer support the PostgreSQL app and the app has been removed from the QTS App Center. To keep QTS and DaVinci Resolve Studio integrated, we now recommend using a container to host your DaVinci database.
Please review our tutorial on how to host a multi-user collaborative environment for DaVinci Resolve 15 Studio before starting this guide.
Creating a PostgreSQL Container
The first task is to create a PostgreSQL 9.5.4 container where you can migrate your existing database.
Installing Container Station
- Log in to QTS.
- Open App Center.
- Search for Container Station.
- Click Install.
App Center installs Container Station.

Installing the PostgreSQL container
- Go to Container Station > Create.
- Locate the search bar.
- Enter postgresql.
- Go to the Docker Hub tab.

- Locate the official postgres image.

- Click Install.
The Select Install Version window opens.

- Select version 9.5.4.
- Click Next.
The Create Container window opens. - Configure the PostgreSQL container settings.
- Click Advanced Settings.

- Configure port forwarding.
- Go to Network > Port Forwarding.
- Click Add.
- Set the Host port to 5433.
- Set the Container port to 5432.
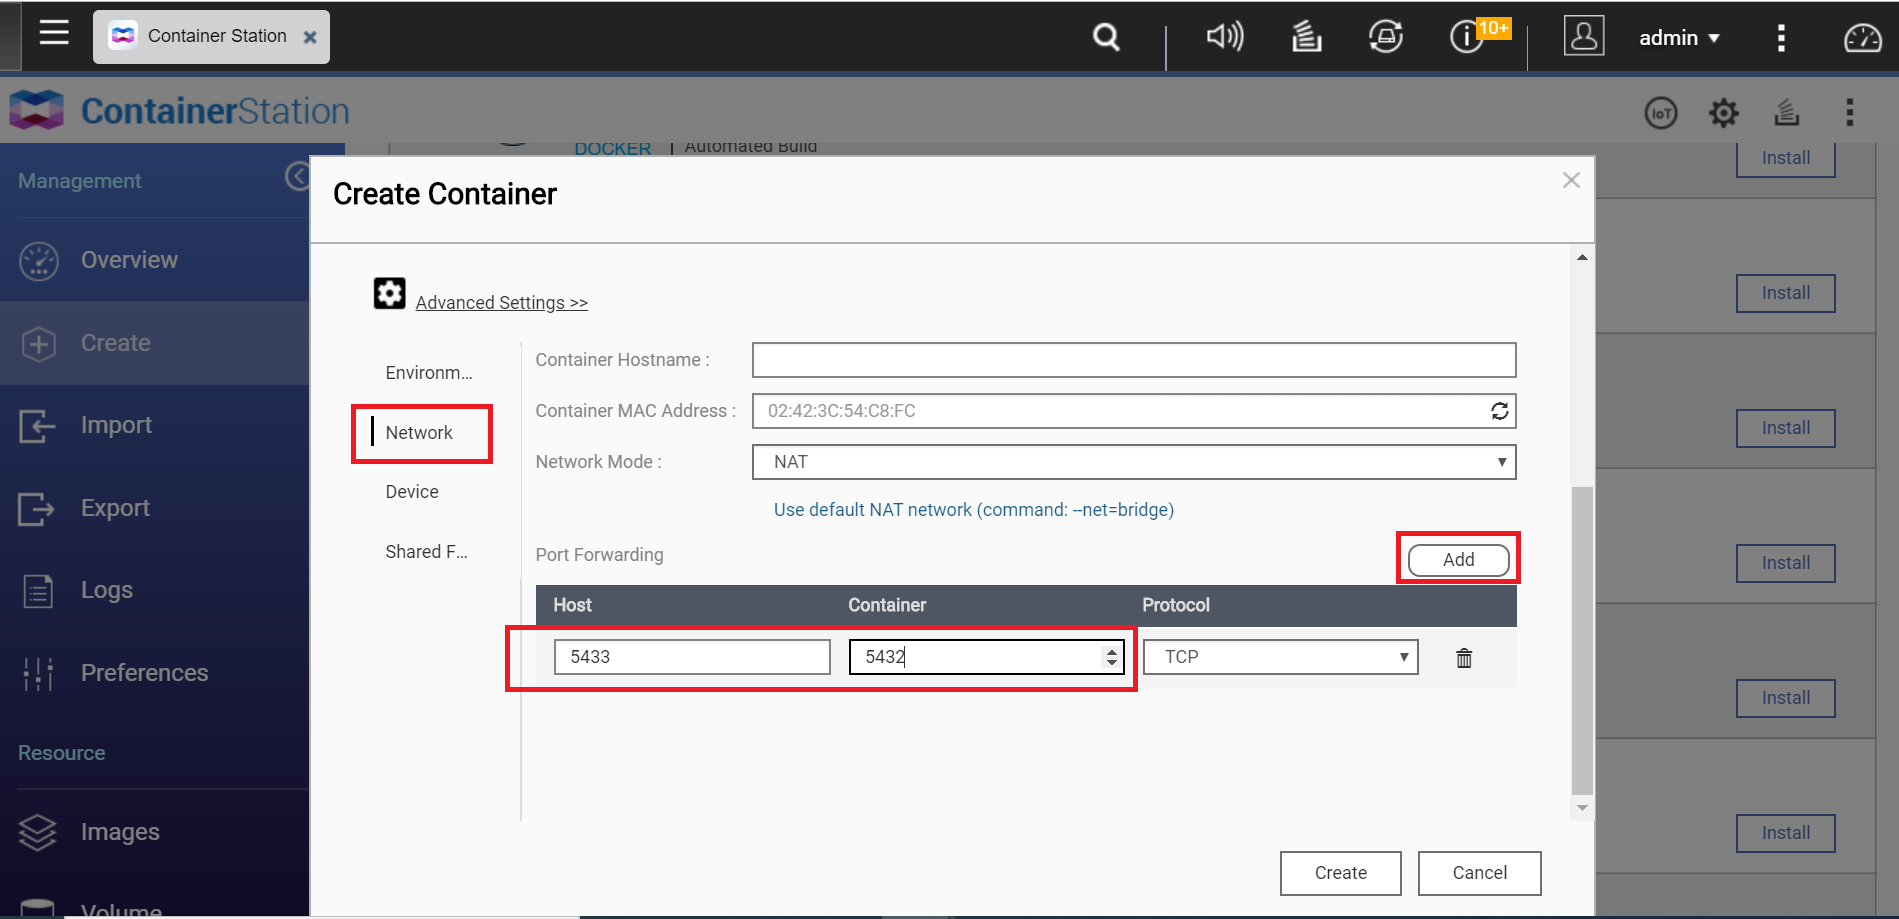
Tip
This action maps the host port with the port in the container virtual environment. By default, PostgreSQL connects over port 5432. Because this port is currently occupied by the QTS PostgreSQL app, we will forward host port 5433 to the container on virtual port 5432. - Optional: Configure shared folders.
Tip
The PostgreSQL container can only initialize inside folders that are completely empty. When creating a Shared Folder with File Station, subfolders such as @Recycle are automatically added. This means that you must create another, empty, folder inside the Shared Folder to use as a storage location for the database.- Go to Shared Folders > Volume from host.
- Click Add.
- Set Volume from host.
- Identify an empty folder.
- Enter the path to the folder.
- Set Mount Point.
- Enter /var/lib/postgresql/data
- Select Read.
- Select Write.
- Click Create.

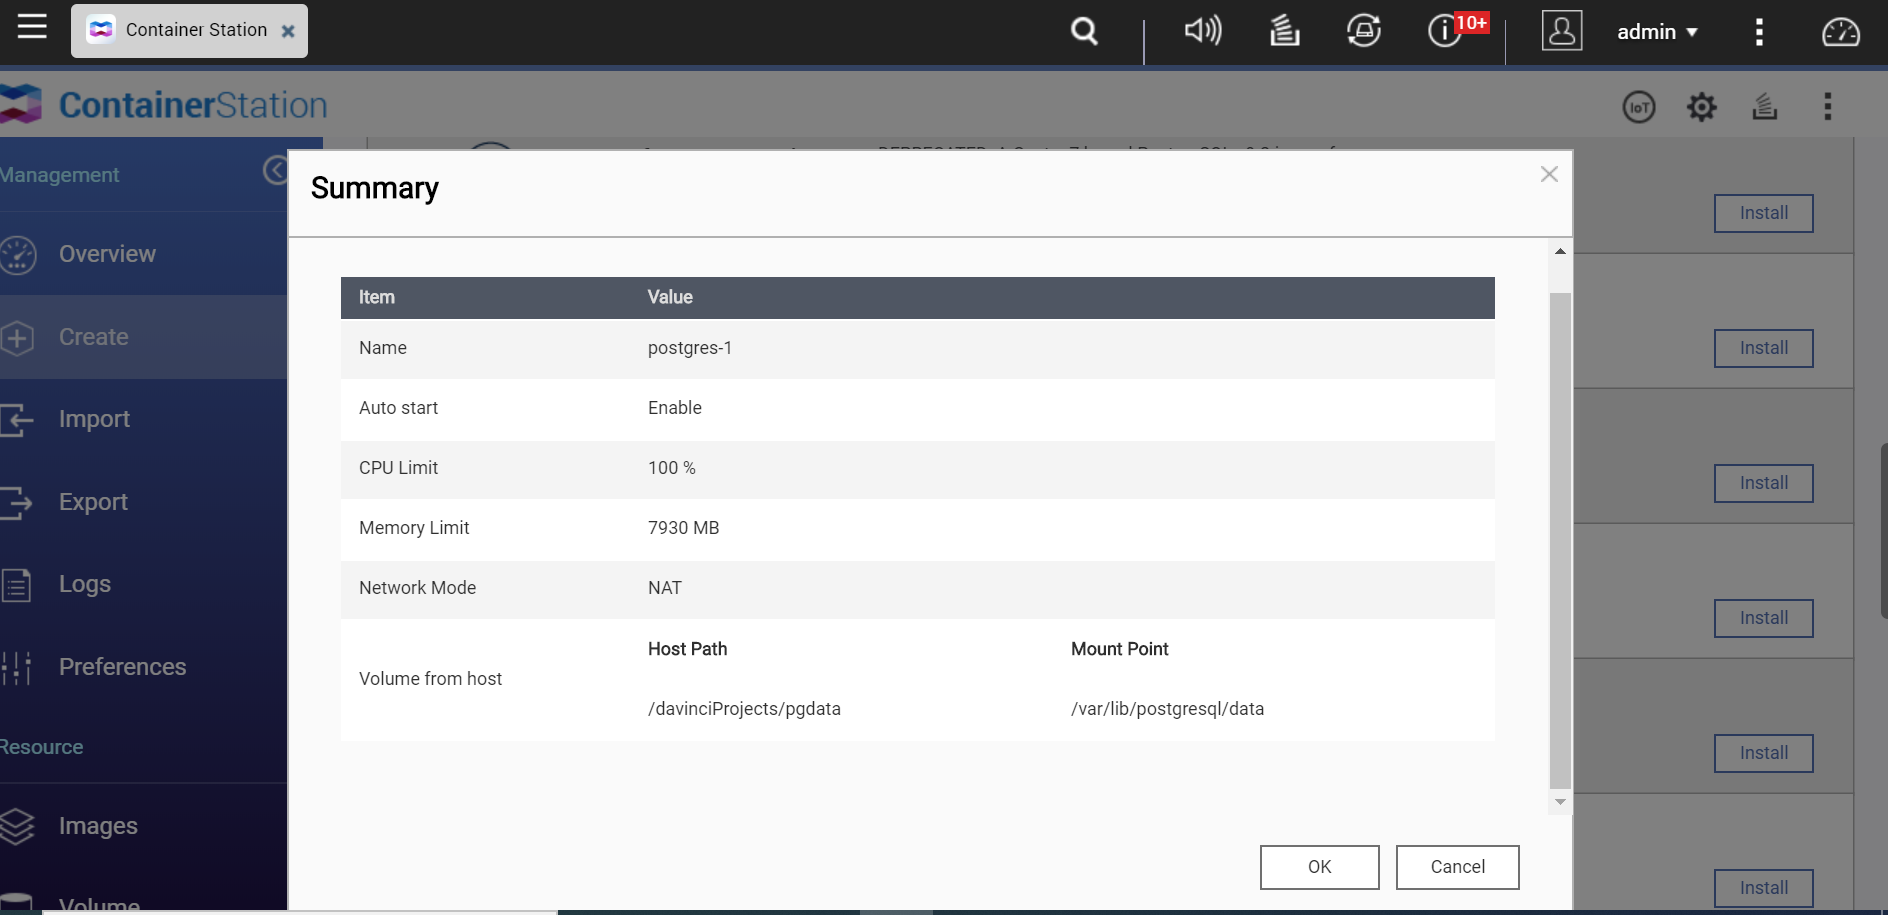
- Review the container settings.
- Click OK.
Container Station creates the container.

The PostgreSQL container is now running. You can check the status or further configure the container from the Overview page.
Migrating the DaVinci Resolve database
Now that the PostgreSQL container is running, the next task is to migrate the database into the container.
Check Application Status
- Open App Center.
- Locate the PostgreSQL 9.3.13.3 app.
- Verify the bar under the icon is blue.

Enabling SSH access
- Go to Control Panel > Network & File Services > Telnet / SSH.

- Select Allow SSH connection.
- Set the port to 22.
- Click Apply.

Connecting to the NAS over SSH
- Open the terminal (Windows cmd or Mac Terminal).
- Enter ssh admin@<YOUR NAS IP ADDRESS>
- Enter your QNAP NAS admin password.
The terminal connects to the NAS. - Locate the pg_dumpall folder.
- Enter find / -name “pg_dumpall”
Tip
This command will locate the path for the PostgreSQL app pg_dumpall and psql commands. For our environment, the path is /share/CACHEDEV1_DATA/.qpkg/PostgreSQL/bin/pg_dumpall
- Change directories to the parent folder from the previous step.
- Enter cd <PATH TO PARENT FOLDER>
Tip
This command changes the working directory to the path you specify. In our example the pg_dumpall folder was located at: /share/CACHEDEV1_DATA/.qpkg/PostgreSQL/bin/pg_dumpall
To change directories to the parent folder we’d need to enter:
cd /share/CACHEDEV1_DATA/.qpkg/PostgreSQL/bin/
- Enter find / -name “pg_dumpall”
- Dump the database and restore in the container.
- Enter the following command as one line.
./pg_dumpall -p 5432 -U postgres |./psql -h localhost -U postgres -p 5433
The PostgreSQL app backs up the database to the container.
Tip
The pg_dumpall and psql commands are used for database backup and restoration. This command backs up the database from the PostgreSQL app (port 5432) and restores it to the container (port 5433). The postgres command is used because of how the DaVinci Resolve Studio database was configured in the previous tutorial.

- Enter the following command as one line.
- Close the terminal.
Stopping the PostgreSQL app
This task allows us to free up port 5432 for use with the PostgreSQL container.
- Log in to QTS.
- Open App Center
- Search for PostgreSQL.
- Click the arrow below the icon.

- Click Stop.
QTS stops the PostgreSQL app.
Updating the container host port
Now that port 5432 is available, we need to update the container host port so that the DaVinci Resolve database can connect. After completing this task, the container will operate identically to the PostgreSQL app
- Go to Container Station > Containers.
- Locate the PostgreSQL container name
- Click the container name.
The Details page opens.

- Click Settings.

The Container Settings window opens. - Click Advanced Settings.
- Go to Network.
- Set the Host port to 5432.
- Select Please restart the container to apply these settings.
- Click Apply.

Container Station restarts the container.
Updating the QTS Firmware
Now that the database has been migrated to the container, we can safely update QTS.
- Go to Control Panel > System > Firmware Update.
- Click Check for Update.
The Update QTS window opens. - Follow the update instructions.
QTS updates and restarts.

Check Container Operation
This task is optional, but will help ensure that everything is running smoothly. If the container is running, you can connect to the DaVinci Resolve Studio database.
- Log in to QTS.
- Go to Container Station > Overview.
- Identify the PostgreSQL container.
- Verify the container is running.


