Why am I receiving “Unable to obtain the latest app update information online’” notifications?
Applicable Products
App Center
Overview
If your QNAP device cannot connect to QNAP servers to download app updates, then the system will send you notifications "Unable to obtain the latest app update information online". To stop receiving these notifications, you can perform one or more of the solutions below. If you are unable to resolve this issue, you can contact QNAP support.
Solutions
Disable notifications for app updates
If your QNAP device is located on an isolated network, then the system will give you warning notifications because it cannot connect to outside QNAP servers. To stop these notifications, you can disable notifications for app updates.
- Manually update the firmware on your QNAP device to the latest version. For details see Updating the Firmware Manually.
- Open App Center.
- Click
 (Settings).
 - Click the Update tab.
- Deselect "When updates are available, I want to".
- Click Apply.
Ensure that your QNAP device has the correct system time
If your QNAP device has the wrong system time, you may receive notifications that the system is unable to obtain app update information. To correct the system time, you can synchronize your QNAP device with an public NTP server. For details, see How to synchronize NAS system time with a public NTP server?
Ensure your QNAP device can connect to QNAP servers
First confirm if your device can connect to QNAP servers by performing the following steps:
- Open Control Panel.
- Go to System > Firmware Update > Firmware Update.
- Click Check for Updates.
If your QNAP device can connect to QNAP servers, the system will display a message that your firmware is up-to-date or there are available firmware updates. Otherwise you will receive a message that the firmware cannot be updated due to a network connection error.
If your QNAP device cannot connect to QNAP servers, you can try the following options.
1. Change your network settings:
Configure one or more of the following settings:
- Configure the DNS server address
- Go to Network & File Services > Network & Virtual Switch.
Network & Virtual Switch opens. - Go to Network > Interfaces.
- Identify the adapter that you want to configure and click
 (more settings) > Configure.
The Configure window opens. - Go to the DNS tab.
- Enable Use the following DNS server address.
- Set Primary DNS Server to "8.8.8.8".
- Set Secondary DNS Server to "8.8.4.4".
- Go to Network & File Services > Network & Virtual Switch.
- Configure the system to automatically select a default gateway
- Go to Control Panel > Network & File Services > Network & Virtual Switch.
The Network & Virtual Switch window opens. - Go to Network > Interfaces.
- Click System Default Gateway.
- Set System default gateway to Auto-select system default gateway.
- Go to Control Panel > Network & File Services > Network & Virtual Switch.
- Ensure your firewall is not blocking update.qnap.com.
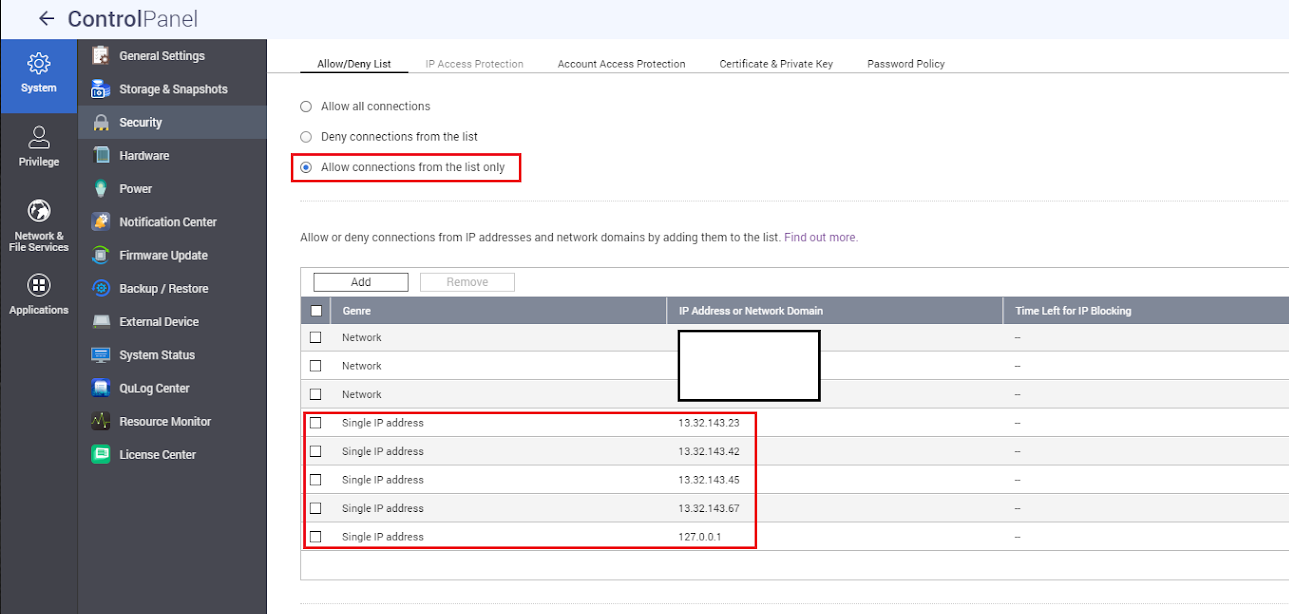
2. Ensure outgoing connections are not blocked by the Allow/Deny list:
Ensure that your Allow/Deny list is not blocking your QNAP device from connecting to QNAP servers by performing the following steps.
- Open Control Panel.
- Go to System > Security > Allow/Deny List.
- Select Allow connections from the list only.
- Add the following IP addresses to the list:
- 13.32.143.45
- 13.32.143.67
- 13.32.143.23
- 13.32.143.42
- 127.0.0.1

Further Reading
What firewall or proxy rules should I configure for WAN services?


