How do I configure SAML-based single sign-on for the QuWAN QBelt VPN server with Microsoft Entra ID as the Identity Provider?
Applicable Products
- QuWAN Orchestrator
- QVPN Client
- Microsoft Entra ID
Details
QuWAN Orchestrator enables the use of Security Assertion Markup Language (SAML)-based single-sign on (SSO) to exchange authentication and authorization data with an Identify Provider (IdP), for example, Microsoft Entra ID (Microsoft Azure AD). With this feature, users can utilize the same SAML IdP credentials to access various services that support SAML authentication. This eliminates the necessity of adding new credentials for each individual application and service.
Procedure
1. Creating a QuWAN QBelt VPN server application using Microsoft Entra ID (Azure AD)
- Go to https://portal.azure.com.
- Sign in using your Microsoft username and password.
- On the Microsoft Azure banner, click
 .
. - Click All services.
- Click Microsoft Entra ID.
- In the left panel, under Manage, select Enterprise applications.
- Click New application.
- Click Create your own application.
- Under What's the name of your app?, specify a name for your application.
 NoteUse a clear, descriptive name for your custom SAML app, like the service name itself (e.g., "QuWAN QBelt VPN Server").
 - Select Integrate any other application you don't find in the gallery (Non-gallery).
- Click Create.
Azure adds the application and redirects you to the application Overview page.

- On the side panel, click Users and groups, to assign specific users and groups to authorize access to the application.
For details, see Manage users and groups assignment to an application.
2. Configuring the Microsoft Entra ID (Azure AD) SSO for QuWAN QBelt VPN Server in QuWAN Orchestrator and Azure portal
To enable Microsoft Entra ID (Azure ID) SSO, you must create a link between Microsoft Entra ID users and their corresponding QuWAN QBelt VPN SAML SSO user groups.
- Go to https://quwan.qnap.com.
- Sign in using your QNAP account username and password.
- Select your organization.
- Go to VPN Server Settings > Privilege Settings.
- Go to SAML SSO.
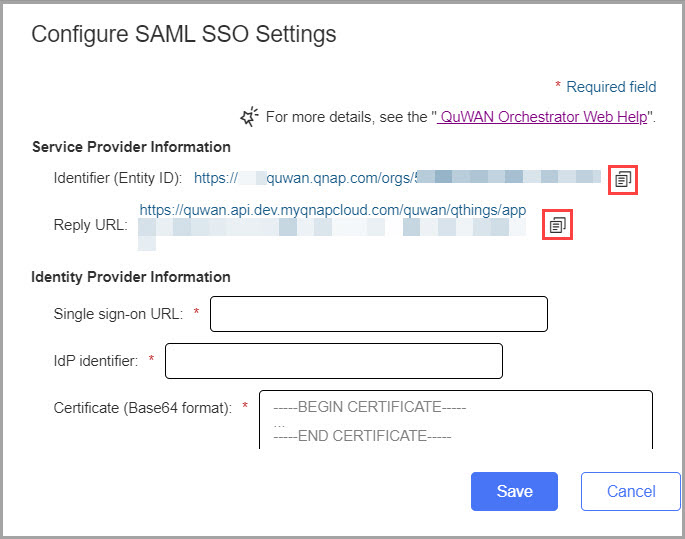
- Click Configure SAML SSO Now.
- Copy the Identifier (Entity ID) and Reply URL to the clipboard.

- Open Azure portal.
- Go to All services > Manage > Enterprise applications.
- Locate and open the QuWAN QBelt VPN Server enterprise application.
- Under Set up single sign on, click Get started.
- Select SAML as the single sign-on method.
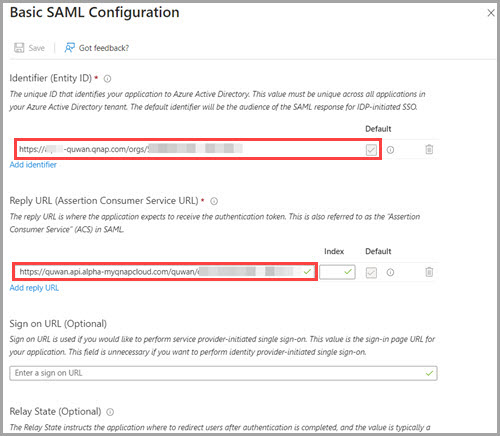
- Locate step 1, Basic SAML Configuration.
- Click Edit.
- Paste the copied Identifier (Entity ID) and Reply URL in their respective fields.

- Click Save.
- Click X to close the SAML configuration window.
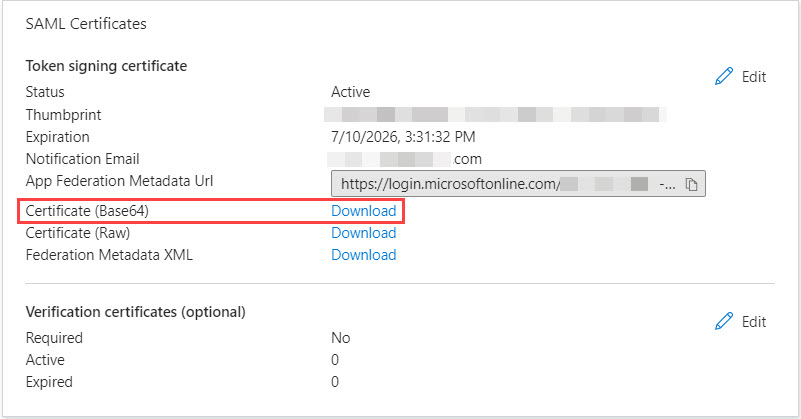
- Locate step 3, SAML Certificates.
- Next to Certificate (Base64), click Download.

- Locate step 4, Set up [Application_Name].
- Copy the Login URL and Microsoft Entra ID or Azure AD Identifier to the clipboard.

- Configure the attributes and claims.
- Locate step 2, Attributes & Claims.
- Click Edit.

- Click Add new claim.
- Specify the claim name as email.
- Next to Source attribute, select an attribute to correspond to the email claim. For example, select user.mail.

- Click Save.
- Click Add new claim.
- Specify the claim name as groups.
- Next to Source attribute, select an attribute to correspond to the groups claim. For example, select user.department.
- Click Save.Note
- To correspond the QuWAN SAML SSO user group with a group that is already created in Microsoft Entra ID, click Add group claim, select All groups, and select Custom group claim name. Enter the claim name as groups.
- For details on modifying claims, see Customize SAML token claims.
- Open QuWAN Orchestrator.
- Select your organization.
- Go to VPN Server Settings > Privilege Settings.
- Go to SAML SSO.
- Click Configure SAML SSO Now.
- Paste the single sign-on URL and IdP identifier.
- Open the download Base64 certificate using a text application.
- Copy the contents of the certificate file.

- Paste the content in the Certificate (Base64 format) field.
- Click Save.
- Add a new SAML SSO user group.
- In QuWAN Orchestrator, go to VPN Server Settings > Privilege Settings > SAML SSO.
- Next to SAML SSO User Rules, click Add.
- Enable the user rule.

- Configure the user rule settings.
Setting User Action Rule name Specify a name for the SAML SSO user rule. Attribute value The value corresponding to the source attribute configured in Microsoft Entra ID's group claims. Note- If you have configured the user.department attribute in Attributes and Claims in the Microsoft Azure portal, enter the department name of your organization as the attribute value.
- The value for the source attribute can be retrieved from the QuWAN QBelt VPN Server application within the Microsoft Azure portal. For example, select your user profile, go to Overview, and then click Properties. Identify the value associated with the Department field and copy the value.
If you choose Add Group Claim you must copy the Object ID. For example, select your group profile, go to Overview, and then copy the Object ID value. - Select Rule for all users to apply the attribute value to all the users.
Segment Select a pre-configured segment. Accessible hubs Select one or more hubs to connect to. - Optional: Enable Allow concurrent multidevice connections.
- Click Save.
- Click Apply.
QuWAN Orchestrator saves the SAML SSO settings.
3. Connecting to QuWAN QBelt VPN with QVPN Client and Microsoft Entra ID (Azure AD) SSO
After successfully configuring QuWAN SAML SSO, establish a connection to QuWAN QBelt VPN through the QVPN Client.
- Go to QNAP Utilities.
- Locate QVPN Client (formerly named QVPN Device Client).
- Download the utility to your device.
- Install the utility on the device.
- Open QVPN Client.
- Click Add a QuWAN Profile.
- Specify the organization ID.NoteYou can find the organization ID in QuWAN Orchestrator. Go to VPN Server Settings > Privilege Settings > SAML SSO.
- Click Next.
The Authentication Settings page appears. - Select SAML SSO as the service.
- Click Next.
QVPN Client prompts you to enter the Microsoft Entra ID (Azure AD) credentials once it opens the default browser. - Click OK.
- Enter your Microsoft Entra ID credentials and sign in.
- Close the browser and return to QVPN Client.
- Configure the profile settings.
- Specify a profile name.
- Select a regional hub from the drop-down menu.
You can either let the system automatically select the optimal hub for your needs, or you can manually choose a specific hub and specify the WAN port you want to connect to. - Optional: Select Connect immediately After Save if you want to connect to the QuWAN profile immediately after applying the settings.
- Locate the QuWAN profile in QVPN Client, and then click Connect.
QVPN Client opens the default system browser for user authentication. - Enter your Microsoft Entra ID credentials and sign in,
You can close the browser after logging in to Microsoft Entra and return to QVPN Client.
QVPN Client connects to the QuWAN QBelt VPN Server using Microsoft Entra ID SSO.
Further Reading
For details on Microsoft Entra ID's functions, visit the following web pages.
- What is Single Sign On in Microsoft Entra ID?
- Enable single sign-on for an enterprise application
- SAML authentication with Microsoft Entra ID


