-
What is Boxafe?
-
System requirements
-
Before you start
-
Manage Boxafe users
-
Create Boxafe users
-
Configure Boxafe user roles
-
-
Configure domains in Boxafe
-
Add domains to Boxafe
-
Add subdomains to Boxafe
-
Manage domain users
-
-
Configure Boxafe licenses
-
Purchase and activate Boxafe licenses
-
Assign Boxafe licenses to domain users
-
Assign Boxafe licenses to domain services
-
-
Back up domain data
-
Manage backed-up domain data
-
Manage Boxafe tasks
-
Further reading and resources
This guide applies to Boxafe 2.0 and later
What is Boxafe?
Boxafe is a NAS-based backup solution for cloud services such as Google Workspace and Microsoft 365. You can use Boxafe to back up cloud data from supported cloud services manually or automatically by schedule. Boxafe also supports backing up multiple versions of data. You can view and search your backed-up cloud data in Boxafe, and if needed, restore data to cloud services. If you have a large administrative/IT team in your organization, you can delegate Boxafe tasks, such as recurring cloud data backups, to other team members by utilizing custom Boxafe users and user roles. Boxafe is ideal for medium to large-sized organizations that need to record or safeguard cloud data of many users.
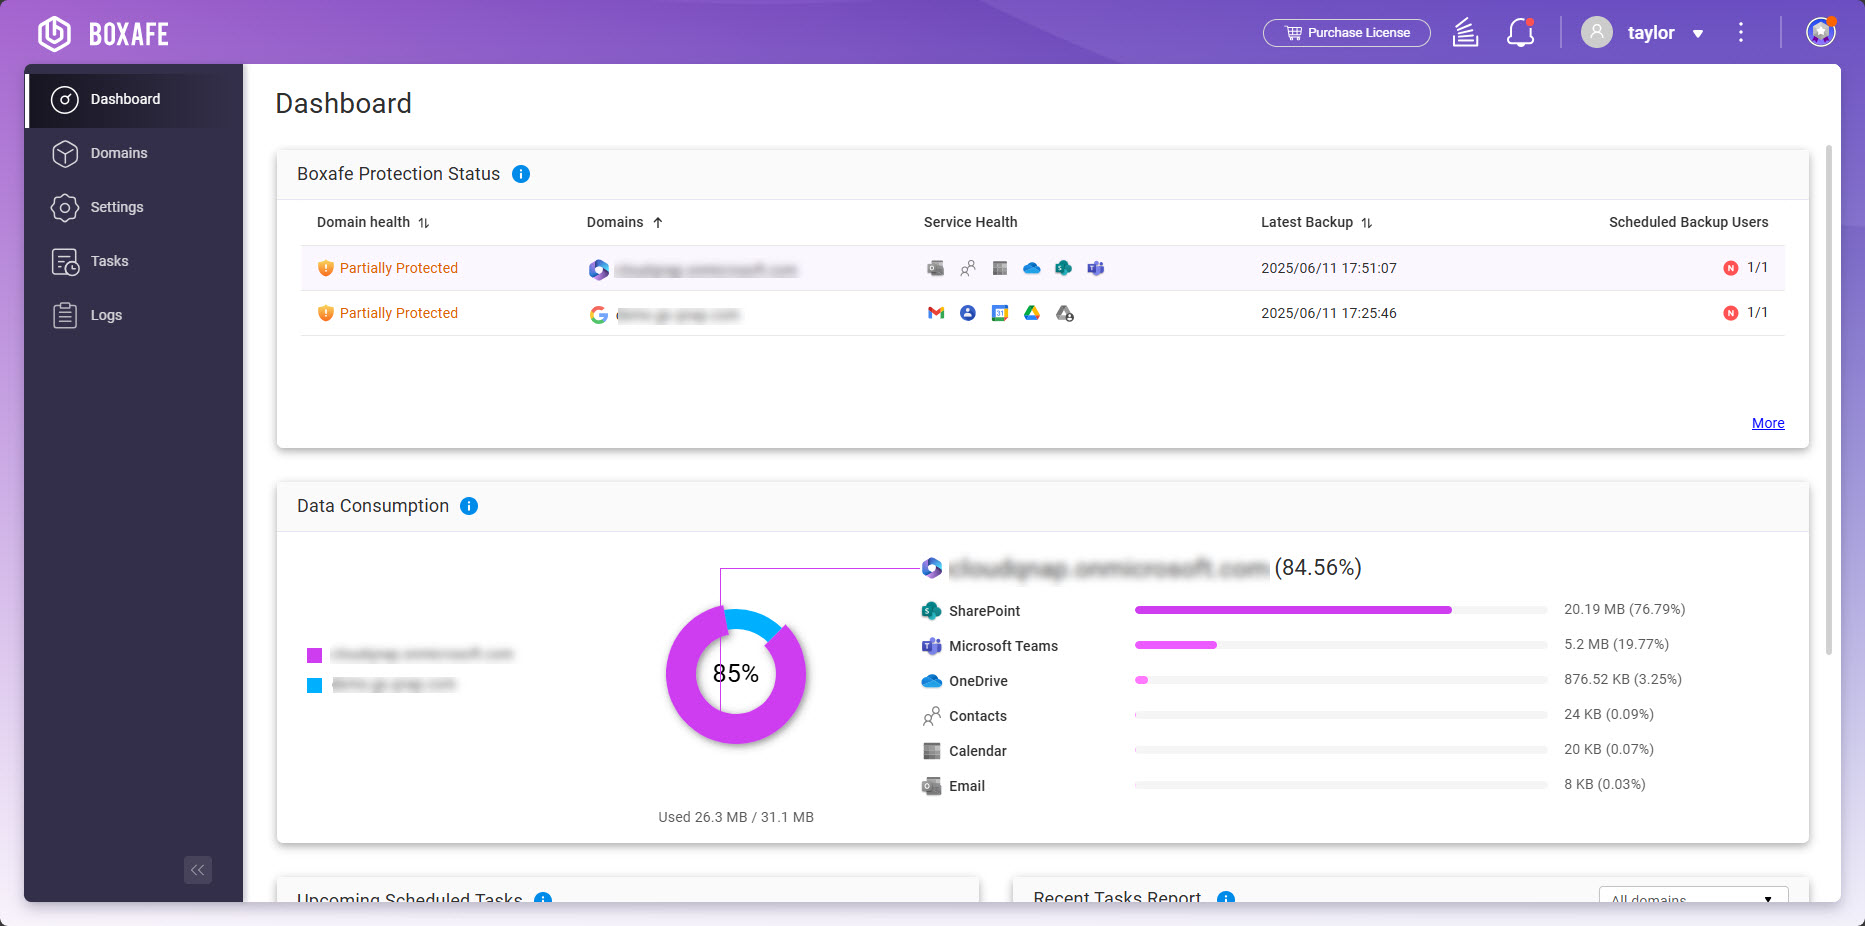
Cloud services supported by Boxafe
| Cloud Service Provider | Supported Services |
|---|---|
| Google Workspace |
|
| Microsoft 365 |
|
System requirements
Supported NAS operating systems:
- QTS 5.0.0 or later
- QuTS hero h5.0.0 or later
Before you start
Before you start using Boxafe, perform the following steps:
- Log onto your NAS as an administrator.
- Install Boxafe.
- Open App Center.
- Click
 to open the search bar.
 - Enter "Boxafe".
- Under the Boxafe app icon, click Install.
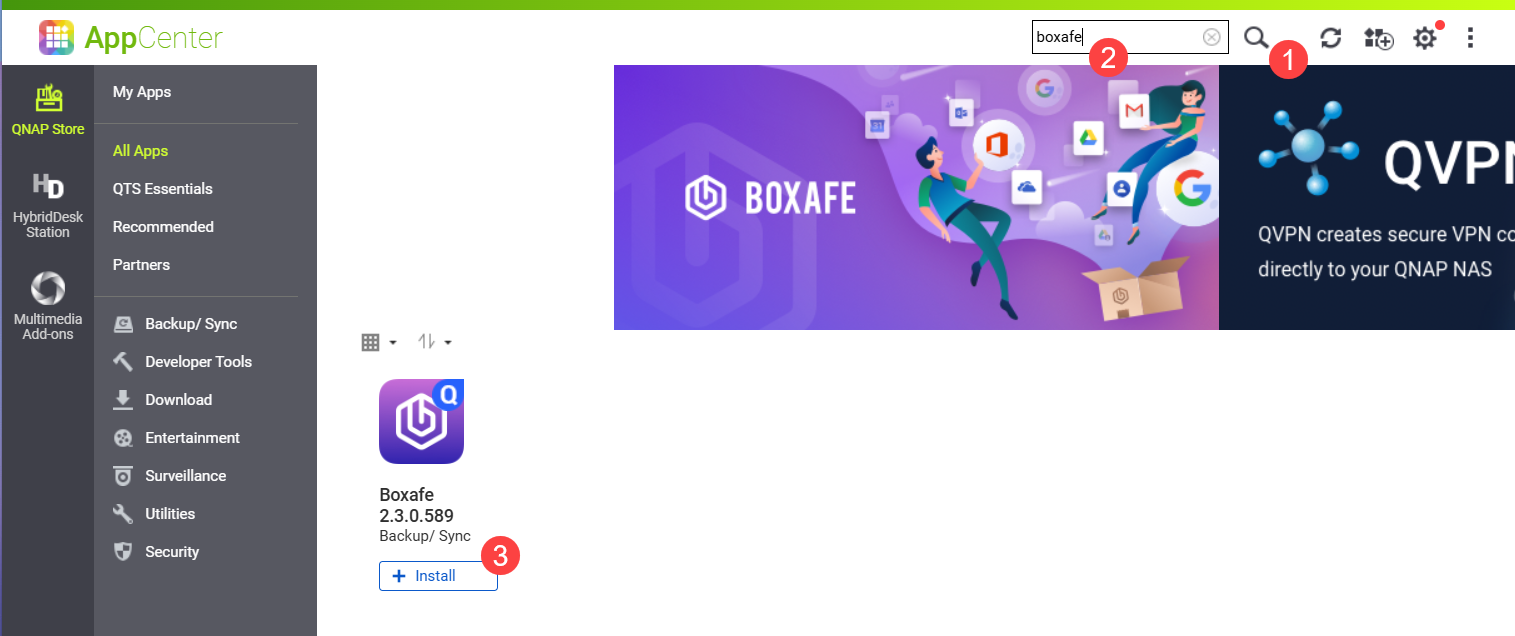
- Select a storage pool to install Boxafe and click OK.
- Obtain authorization for Boxafe from your domains:
- Optional: Purchase and activate premium Boxafe licenses.
For details, see the Configure Boxafe licenses section. - Open Boxafe.
Boxafe opens in a new browser tab. If you open Boxafe via a URL, then you need to log in to Boxafe with your NAS user account.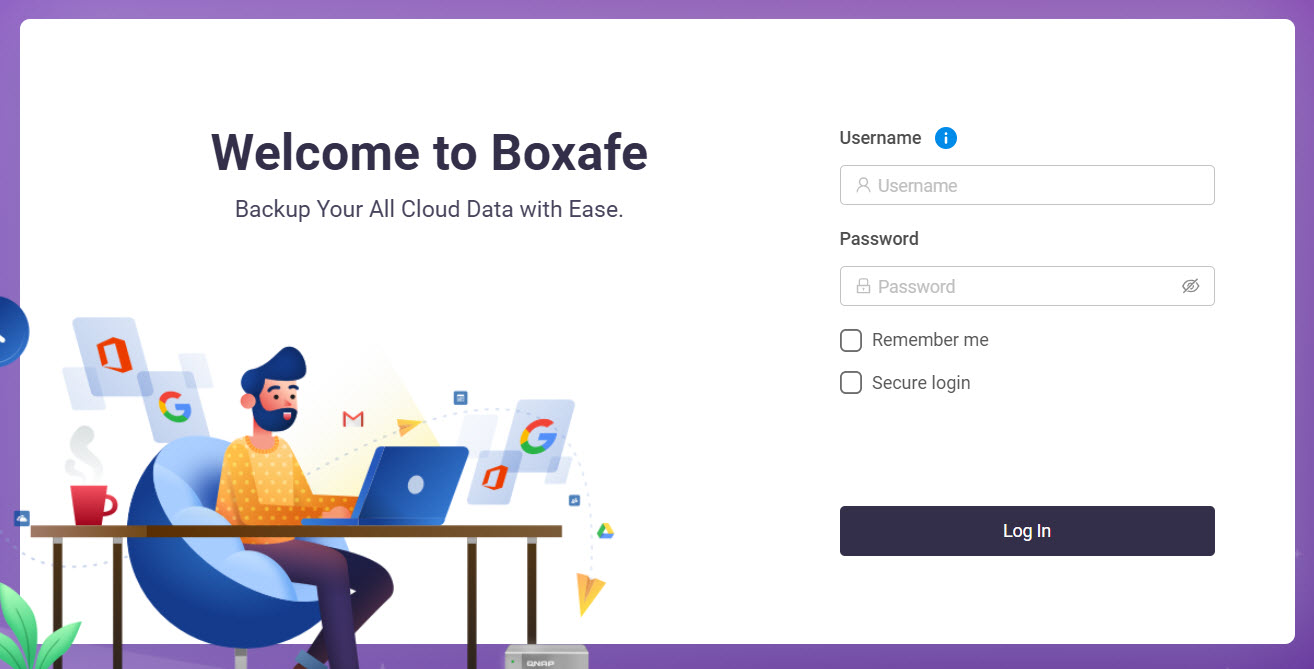 The Storage Path Configuration window opens.
 - For Storage path options, select an option.
For details on configuring the storage path, see How do I set up or change the storage path in Boxafe 2.0 and later?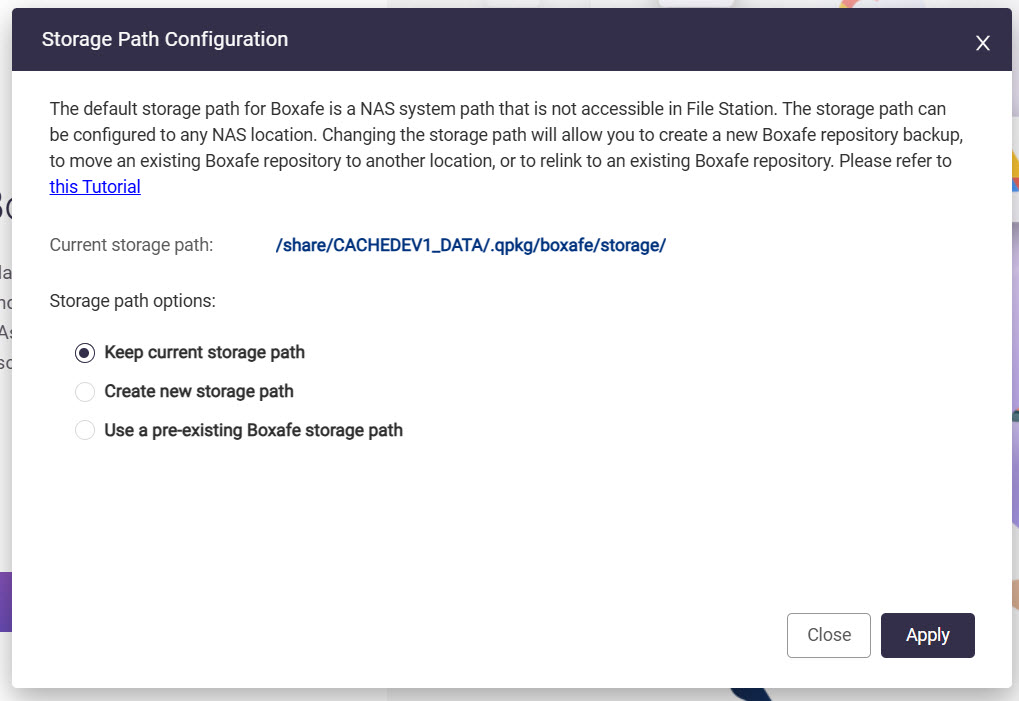
- Click Apply.
- To back up data from a domain, perform the following steps:
- Optional: Create Boxafe users.
- Optional: Configure Boxafe roles.
- Add one or more domains.
- Assign Boxafe licenses to domain users.
- Assign Boxafe licenses to domain services.
- Back up domain data.
Manage Boxafe users
A Boxafe user is a NAS user that has permission to perform Boxafe tasks. Creating Boxafe users allows Boxafe administrators to delegate Boxafe tasks to other NAS users. You can also create and assign roles to Boxafe users. Roles grant permissions that assigned users can perform in Boxafe.
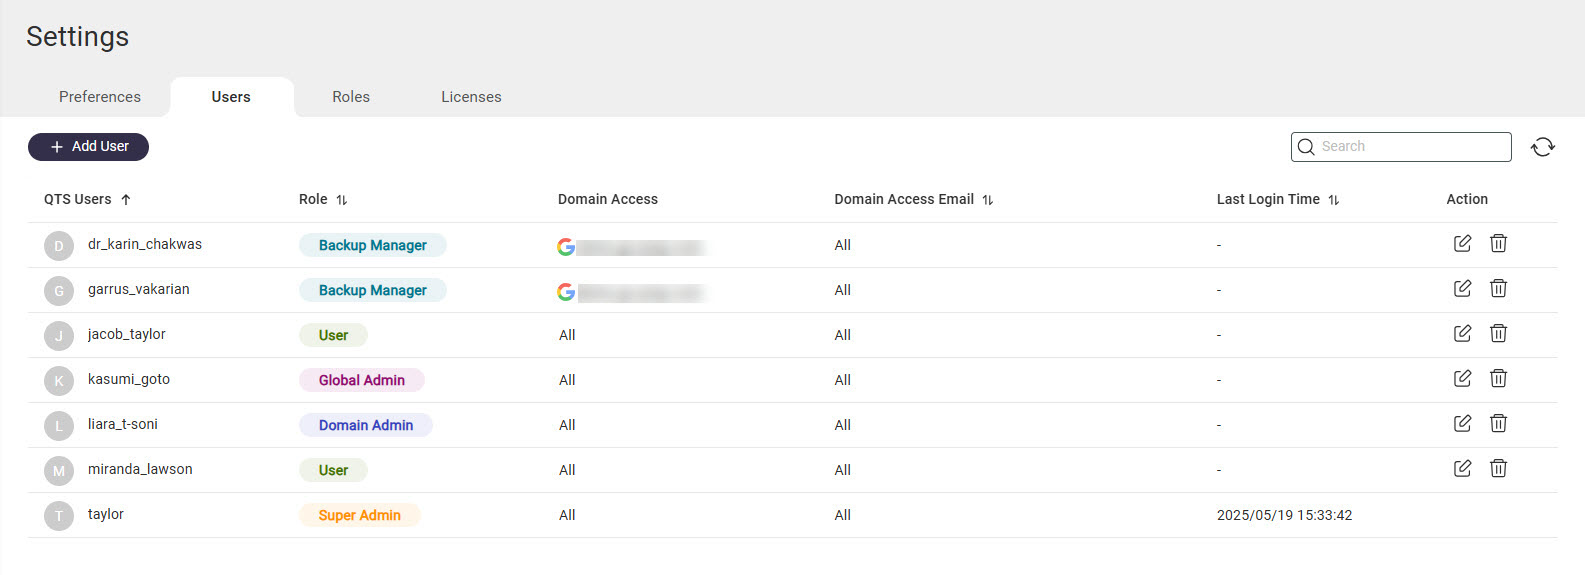
Create Boxafe users
- Open Boxafe.
- Go to Settings > Users.
- Click + Add User.
- For Select user, select a NAS user.
- For Select a role, select a Boxafe role. See Configure Boxafe user roles for details on Boxafe roles.
- For Select domain, select a domain if needed. If a domain is selected, the user will have access to that domain and will not have access to other domains.TipUsers with the role Super Admin or Global Admin can access all domains in Boxafe.
- Click Apply.
Configure Boxafe user roles
- Open Boxafe.
- Go to Settings > Roles.
- Click + Create Role to create a new role or click
 next an existing role to edit the role.
 - If creating a new role, specify a name for the role in the Role field.
- Select one or more permissions.
- Click Apply.
The selected permissions are applied to the role.
Configure domains in Boxafe
To back up or restore the data of a domain, the domain must be first added to Boxafe. You can also add subdomains of a domain to Boxafe.
Add domains to Boxafe
Before adding a domain, you must authorize Boxafe to access the domain. For details, see the steps in Before you start.
- Open Boxafe.
- Go to Domains.
- Click + Add Domain.
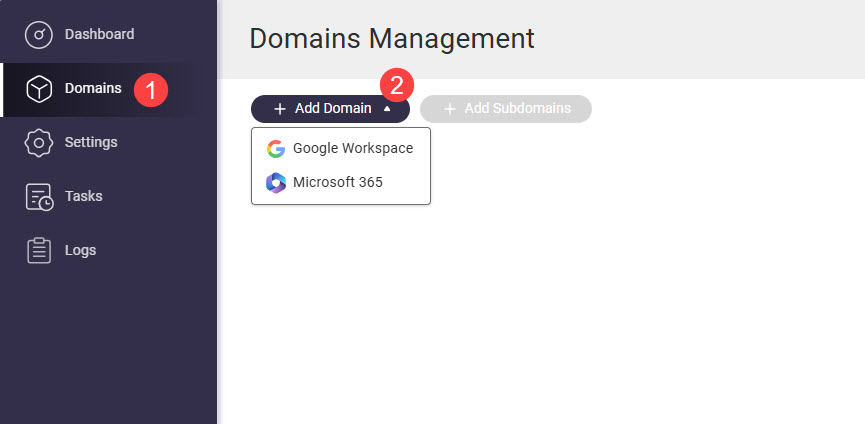
- Select Google Workspace or Microsoft 365.
The Add Domain window appears. - Authorize the domain by performing the following steps:
Domain Type Steps Google Workspace - Specify the following fields:
- Domain admin email address: Email address of the Google Workspace administrator used when generating a service key in Before you start.
- Service key: Upload the private service key JSON file generated in Before You start.
- Click Authorize.
- Google authorizes Boxafe to use the domain and the Domain info tab opens.
Microsoft 365 - Specify the following fields:
- Microsoft 365 endpoint
- Certificate password: Boxafe will generate a certificate file that can be used later to re-authenticate your Microsoft 365 domain. You will need to provide this password and the certificate file when you re-authenticate your Microsoft 365 domain.
- Confirm certificate password
- Click Authorize.
- Log into your Microsoft 365 domain.
- Microsoft authorizes Boxafe to use the domain.
- Your browser downloads the generated certificate file.
- Boxafe opens the Domain info tab.
- Specify the following fields:
- Verify that the Domain name and Admin email are correct.
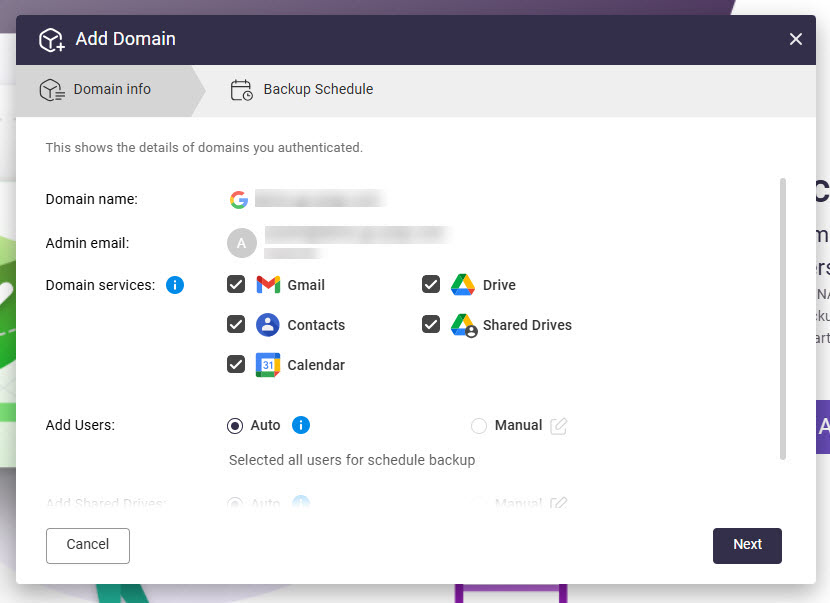
- For Domain services, select the domain services you want to back up.
- For Add Users, select one of the following:
- Auto: Automatically add all users of the domain to Boxafe.
- Manual: Manually add users of the domain to Boxafe by clicking
 and then selecting users.
- For Add Shared Drives (Google Workspace only), select one of the following:
- Auto: Automatically add all shared drives of the domain to Boxafe.
- Manual: Manually add shared drives of the domain to Boxafe by clicking
 and then selecting shared drives.
- For Add SharePoint Site (Microsoft 365 only), select one of the following:
- Auto: Automatically add all SharePoint sites of the domain to Boxafe.
- Manual: Manually add shared drives of the domain to Boxafe by clicking
 and then selecting SharePoint sites.
- For Add Microsoft Teams (Microsoft 365 only), select one of the following:
- Auto: Automatically add all teams of the domain to Boxafe.
- Manual: Manually add Teams of the domain to Boxafe by clicking
 and then selecting Teams.
- Click Next.
The Backup Schedule tab opens. - Configure a backup schedule. For details on configuring backup schedules, see Configure backup schedules for domain data.
- Click Add.
The domain is added to Boxafe.
Add subdomains to Boxafe
After adding a domain to Boxafe, you can add the subdomains of the domain and back up and restore data of the subdomain in the same way as backing up and restoring data for a domain.
- Open Boxafe.
- Go to Domains.
- Locate a domain and click
 to select it. This will be the parent domain of the subdomain.
 - Click
 .
.
The Add Subdomains window opens. - Click a subdomain to select it.
- Click Add Subdomains.
A confirmation window appears. - Click OK.
The subdomain is added to Boxafe and appears on the Domains page under the parent domain.
Manage domain users
- Open Boxafe.
- Go to Domains.
- Locate the domain and click
 in the Action column.
The Domain Settings page opens. - Go to the Users tab.
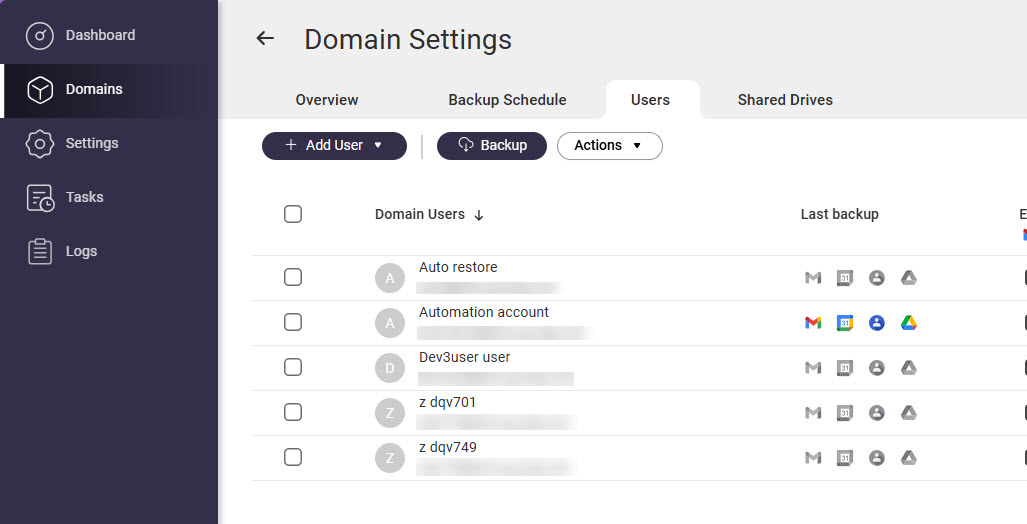 The Users page appears. Here you can view domain users added to Boxafe, add additional domain users, delete domain users, export a list of domain users, assign Boxafe licenses to users, and more.
Configure Boxafe licenses
Backing up and restoring domain service data in Boxafe requires Boxafe licenses. There are free Boxafe licenses available allowing you to back up and restore domain service data without purchasing any premium Boxafe licenses. The free Boxafe licenses available are:
| Free Boxafe License Type | Description |
|---|---|
| Boxafe for Google Workspace | Allows you to back up and restore the following:
|
| Boxafe for Microsoft 365 | Allows you to back up and restore the following:
|
To back up domain data for additional users or services, premium Boxafe licenses are required. To use a premium Boxafe license, the license must be purchased, activated, and then assigned individually to domain users and services in Boxafe.
Purchase and activate Boxafe licenses
- Go to the QNAP Software Store and purchase premium Boxafe licenses.
To back up a Google Workspace domain, a Boxafe For Google Workspace license is required. To back up a Microsoft 365 domains, a Boxafe for Microsoft 365 license is required. For details on purchasing licenses, see "Licenses > Buying a license using QNAP ID" in the QTS User Guide or QuTS hero User Guide. - Activate the Boxafe licenses. For details, see "Licenses > License activation" in the QTS User Guide or QuTS hero User Guide..
Assign Boxafe licenses to domain users
Assigning a Boxafe license to a domain user allows you to back up and restore the following user data:
| Service Provider | Domain services |
|---|---|
| Google Workspace |
|
| Microsoft 365 |
|
- Open Boxafe.
- Go to Domains.
- Locate the domain and click
 in the Action column.
The Domain Settings page opens. - Go to the Users tab.
- Select one or more users.
- Go to Actions > Licenses > Assign.
- Select a license.
- Click Select.
The selected license is assigned to the selected users.
Assign Boxafe licenses to domain services
Assigning a Boxafe license to a domain service allows you to back up and restore data from the service. The following services are supported:
| Service Provider | Domain services |
|---|---|
| Google Workspace |
|
| Microsoft 365 |
|
- Open Boxafe.
- Go to Domains.
- Locate the domain and click
 in the Action column.
The Domain Settings page opens. - Go to a service tab.
- Select one or more items.
- Go to Actions > Licenses > Assign.
- Select a license.
- Click Select.
The selected license is assigned to the selected items.
Back up domain data
You can configure a backup schedule to automatically back up domain data or manually back up domain data by selecting the users to back up or by selecting the services to back up.
Manually back up domain data for selected users
- Open Boxafe.
- Go to Domains.
- Locate the domain and click
 in the Action column.
The Domain Settings page opens. - Go to the Users tab.
- Select one or more users.
- Click
 .
.
The Backup window appears.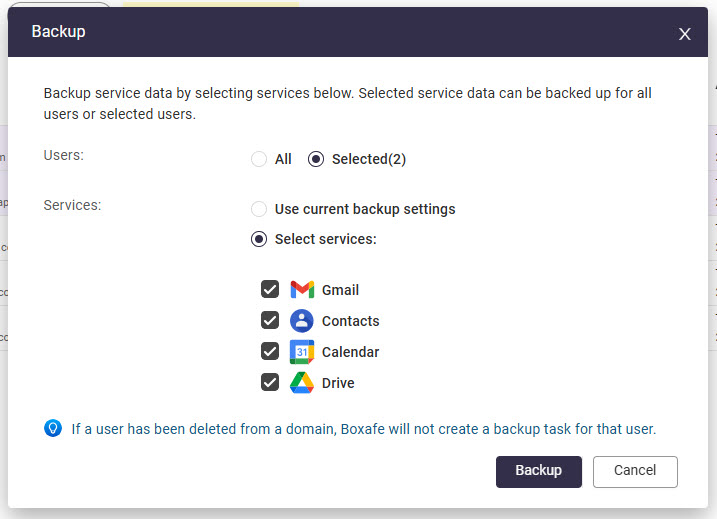
- For Services, select Select services and then select the domain services you want to back up.
- Click Backup.
Boxafe creates a backup task for the selected services and selected users. You can view backup tasks in Tasks.
Manually back up domain data for selected services
- Open Boxafe.
- Go to Domains.
- Locate the domain and click
 in the Action column.
The Domain Settings page opens. - Go to the tab of the service you want to back up. For example, if you want to back up Shared Drives, go to the Shared Drives tab.
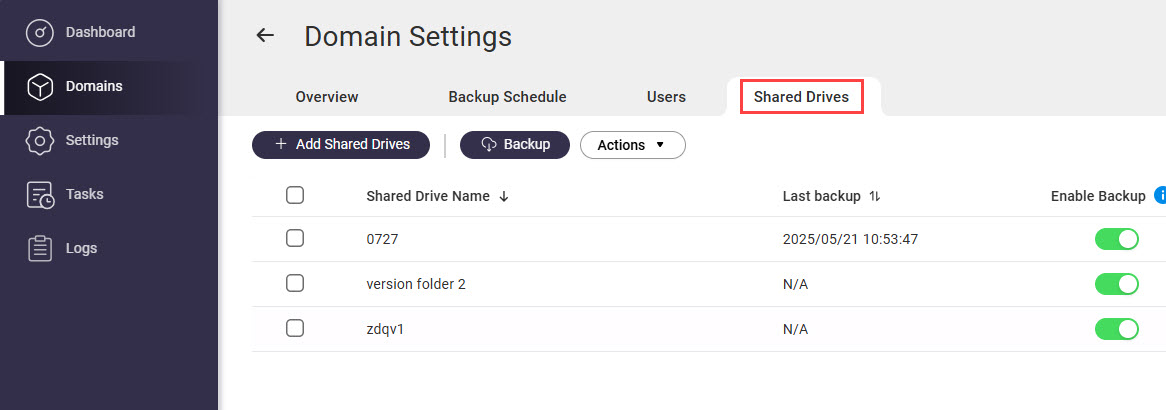
- Select one or more services.
- Click
 .
. - Click Backup.
Boxafe creates a backup task for the selected domain services. You can view backup tasks in Tasks.
Configure backup schedules for domain data
You can configure a single backup schedule for an entire domain, or configure individual schedules for each domain service.
Configure a backup schedule for a domain
- Open Boxafe.
- Go to Domains.
- Locate the domain and click
 in the Action column.
 - Go to the Backup Schedule tab.
- For Define backup schedule policy for, select All applications.
- For Backup type, select Scheduled.
- Specify the remaining settings.
- Click Update.
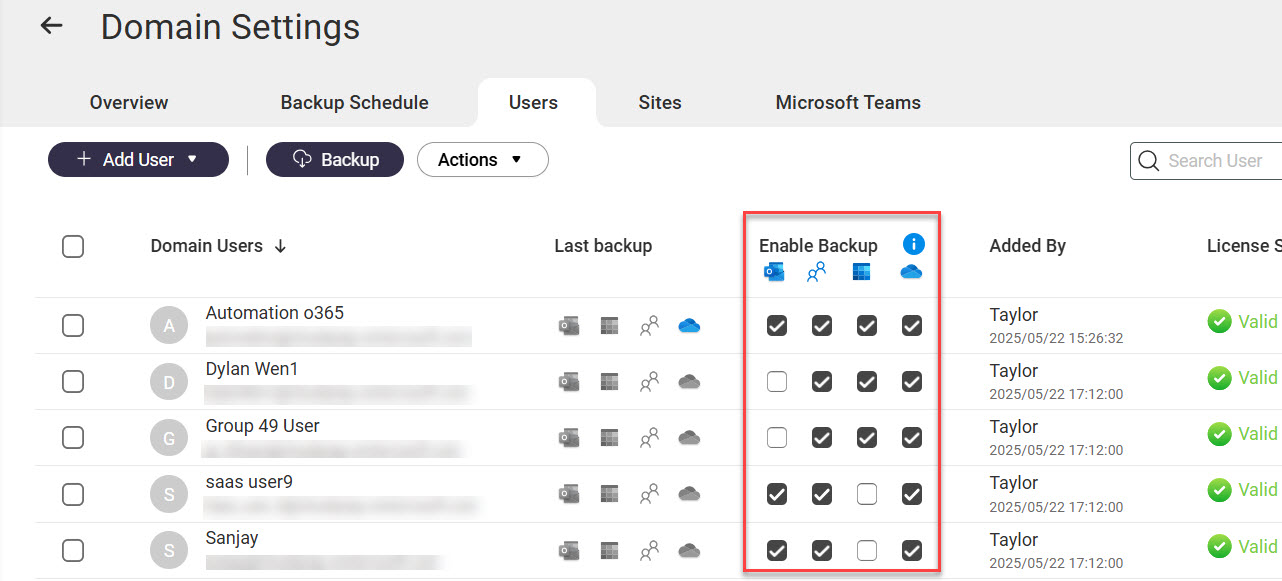
- Optional: Exclude users from scheduled backups.
- Go to Users.
- Locate a user.
- In the Enable Backup column, disable the domain services for the user you don't want to be included in the scheduled backup.
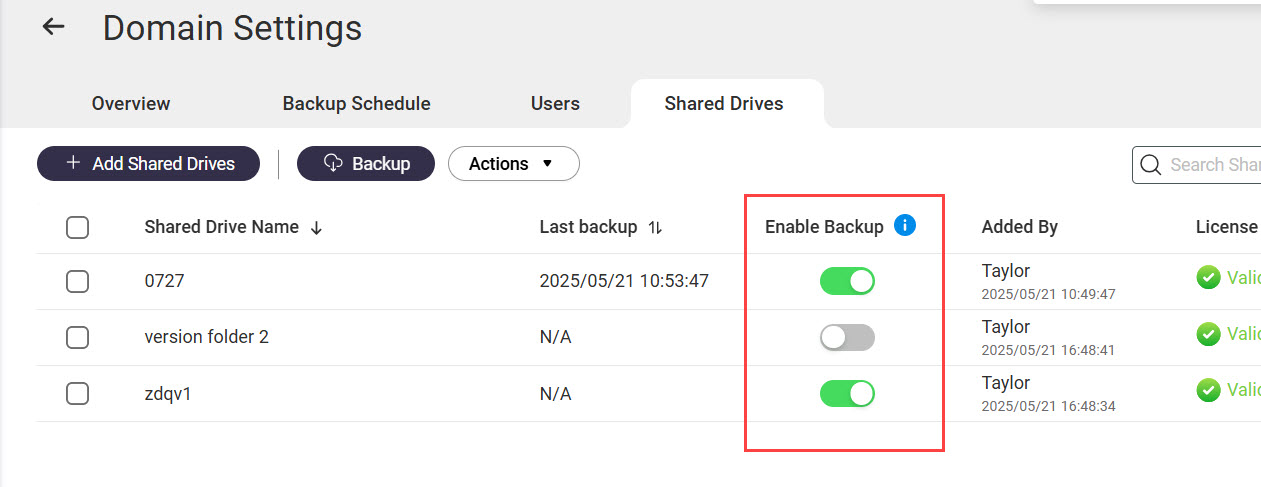
- Optional: Exclude domain services from scheduled backups.
- Go to the tab of the service you want to back up. For example, the Shared Drives tab.
- Locate the services.
- In the Enable Backup column, disable the toggle to exclude the service from scheduled backups.
Configure individual backup schedules for domain services
- Open Boxafe.
- Go to Domains.
- Locate the domain and click
 in the Action column.
 - Go to the Backup Schedule tab.
- For Define backup schedule policy for, select Individual applications.
A confirmation window appears. - Click OK.
- Go to the tab of the service you want to back up.
- For Backup type, select Scheduled.
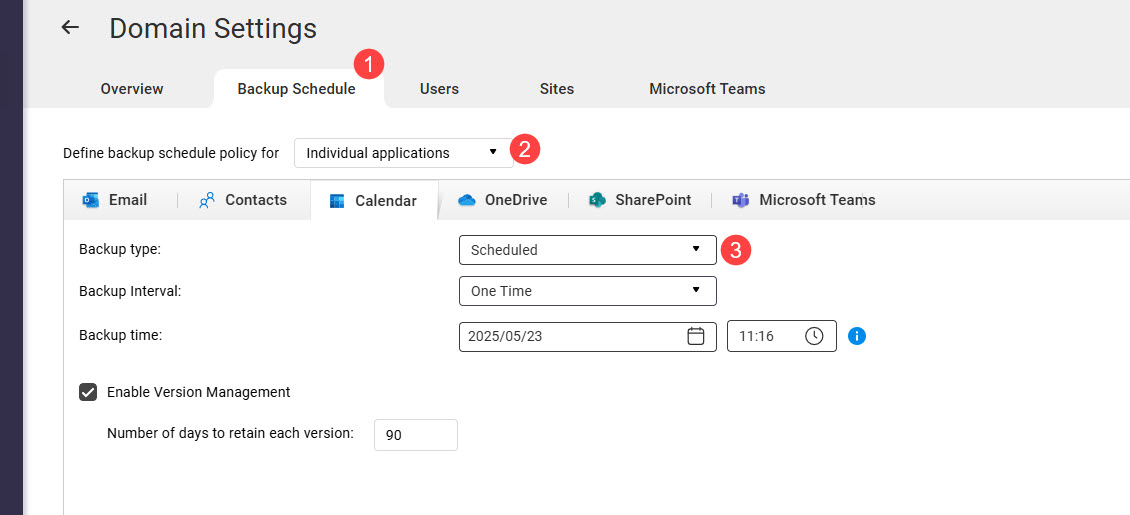
- Specify the remaining settings.
- Click Update.
Manage backed-up domain data
Domain data backed up in Boxafe can be viewed, restored, and exported.
View backed-up domain data
- Open Boxafe.
- Go to Domains.
- Click on a domain name.
- Go to one of the service tabs.
- In the top right corner, select an item.
The backed-up service data is displayed. Different services will display data differently and provide different user actions.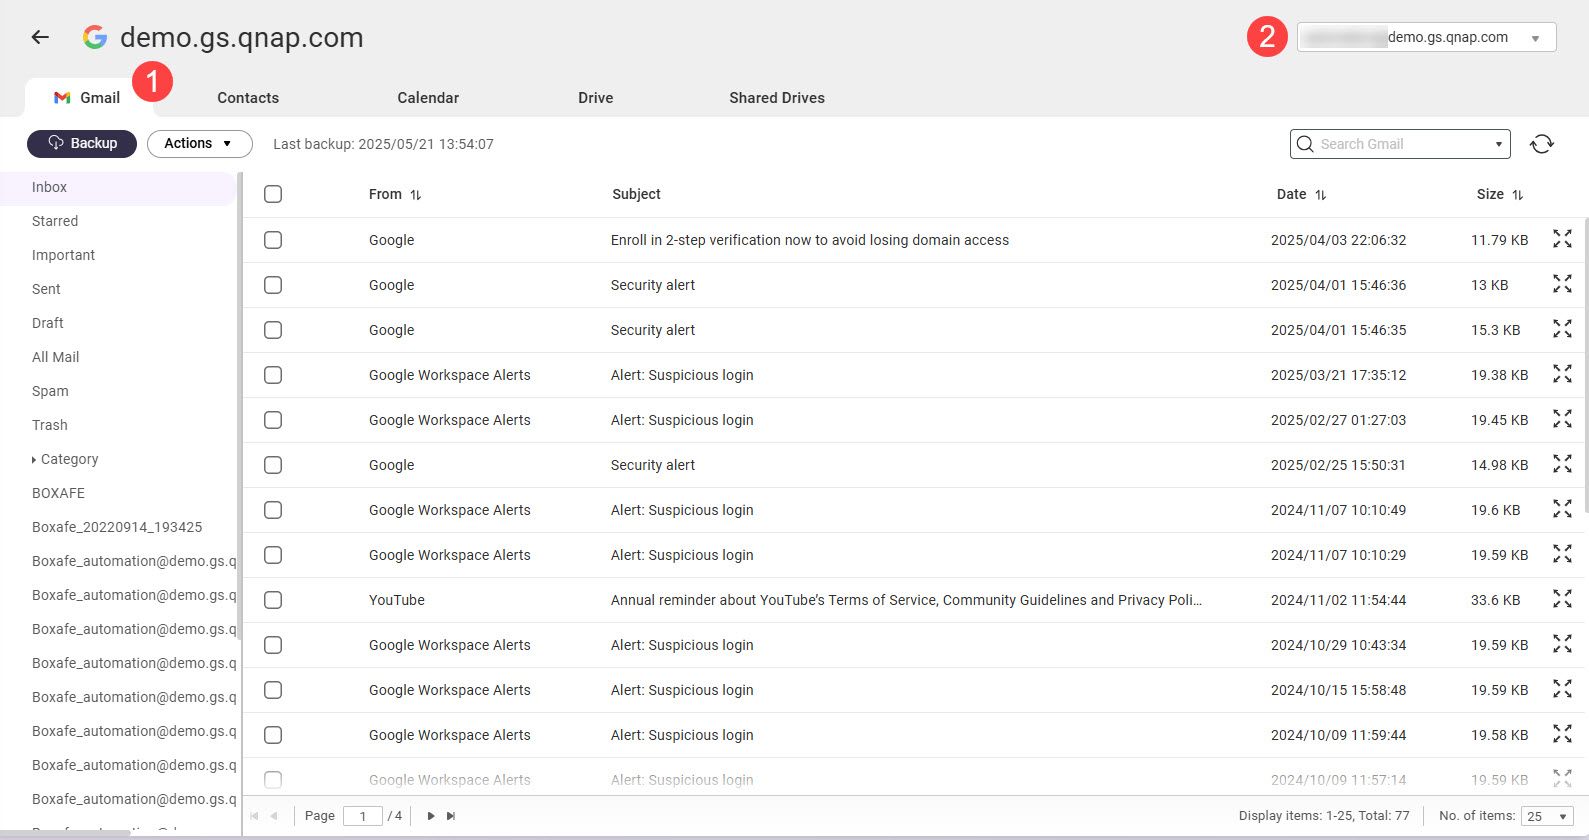
Restore backed-up domain data
- Open Boxafe.
- Go to Domains.
- Click on a domain name.
- Go to one of the service tabs.
- In the top right corner, select an item.
- For Version, select a backup version.
- Select one or more items.
- Go to Actions > Restore.
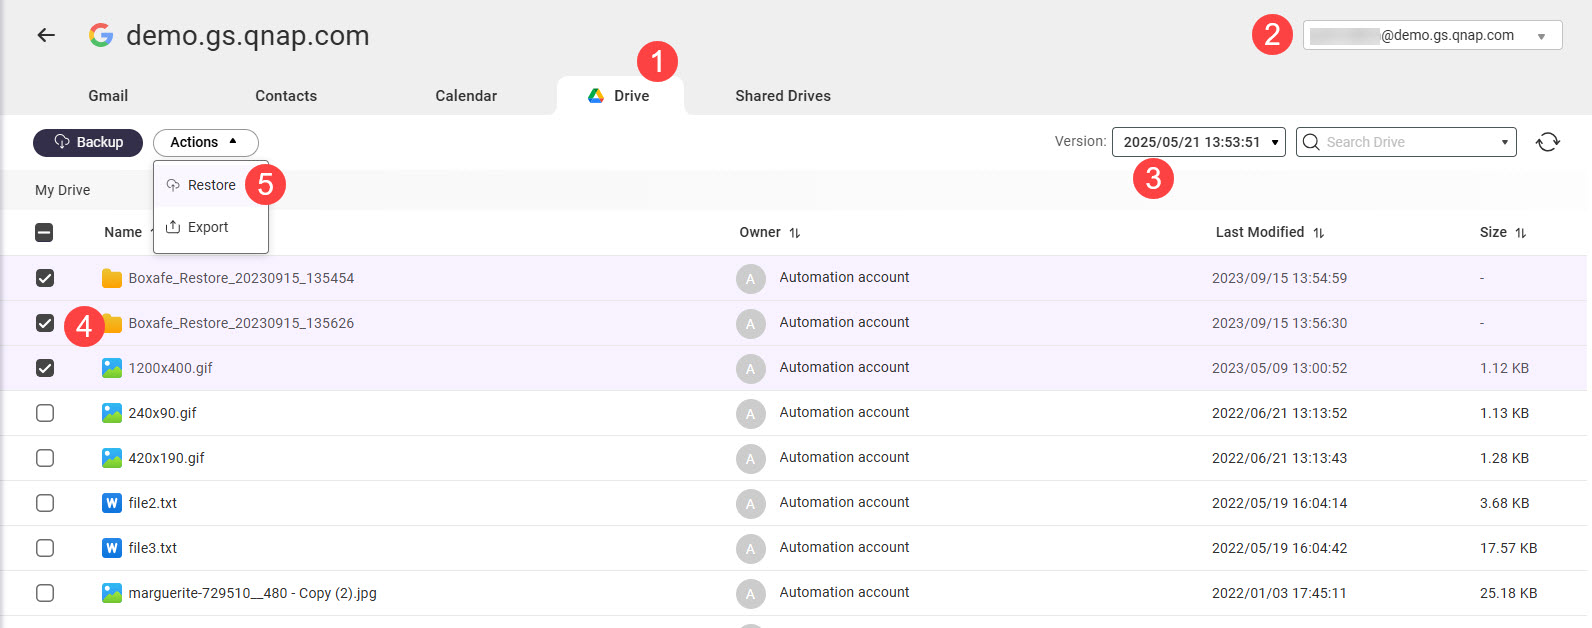 The Restore window opens.
 - Specify restore settings.
- Click Restore.
Boxafe creates a task to restore the selected data.
Export backed-up domain data
- Open Boxafe.
- Go to Domains.
- Click on a domain name.
- Go to one of the service tabs.
- In the top right corner, select an item.
- For Version, select a backup version.
- Select one or more items.
- Go to Actions > Export.
The Export window opens. - For Export to, select one of the following options:
- NAS (where Boxafe is hosted): Boxafe saves the exported data to the location specified by Export path.
- Download to local computer: Your browser downloads the exported data.
- Specify remaining export settings.
- Click Export.
A confirmation window opens. - Click Continue.
Boxafe exports the selected data.
Manage Boxafe tasks
Boxafe creates tasks to perform long-running actions such as backing up data. You can manage tasks in Tasks.

There are three types of tasks:
- Running tasks: Tasks that Boxafe is currently performing
- Scheduled tasks: Tasks that Boxafe will perform soon
- Completed tasks: Tasks that Boxafe recently completed
Stop running tasks
- Open Boxafe.
- Go to Tasks.
- Go to the Running Tasks tab.
- Locate a task and click
 .
.
A confirmation window appears.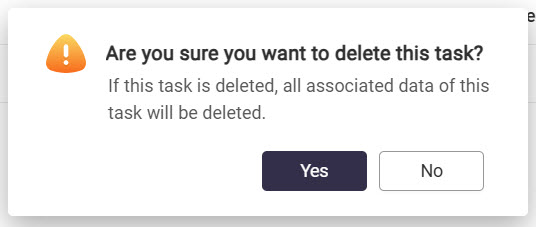
- Click Yes.
View subtasks of a task
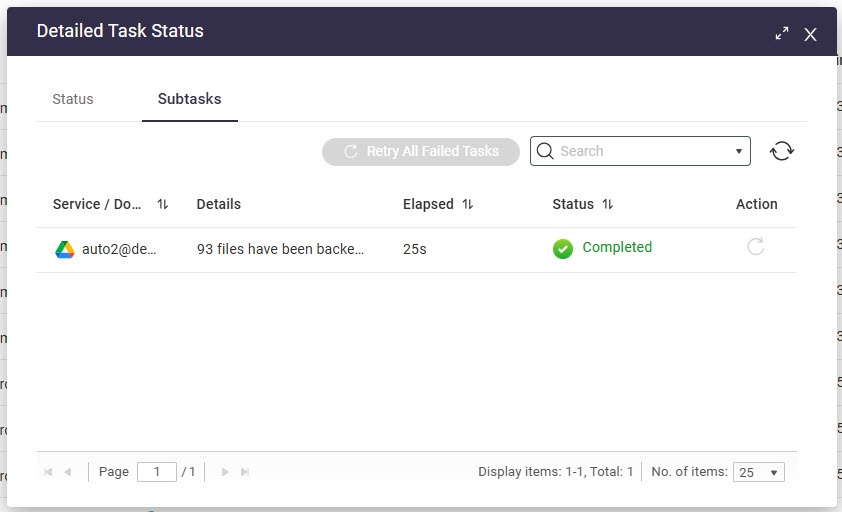
When a backup/restore task is created, a subtask for each domain service will be created to perform the action. You can view the status of a task's subtasks and retry failed subtasks.
- Open Boxafe.
- Go to Tasks.
- Go to the Running Tasks or Completed Tasks tab.
- Locate a task and click
 .
.
The Detailed Task Status window appears. - Go to the Subtasks tab.
Further reading and resources
- Boxafe: QNAP product page for Boxafe
- Knowledge Base: Searchable database of FAQs, tutorials, and web helps
- QNAP College: Instructional video tutorials
- QTS User Guide: Web help for the latest version of QTS
- QuTS hero User Guide: Web help for the latest version of QuTS hero


