How do I create a high-availability cluster?
Applicable Products
- QuTS hero h5.3.0 or later
- High Availability Manager 1.0 or later
Introduction
Setting up a high-availability (HA) environment is recommended when system uptime and service continuity are critical.
Common scenarios in which an HA environment is desirable include:
- Enterprise file services
You want to ensure that shared folders, SMB/NFS access, and iSCSI targets remain accessible during a hardware failure. - Virtualization and database hosting
You want to prevent VMs and databases from experiencing interruptions due to a single point of failure. - Critical backup infrastructure
You want to guarantee that your backup destination is always online during scheduled backup tasks.
If you have any of the above requirements, creating an HA cluster can help you ensure continuous service operation.
Requirements
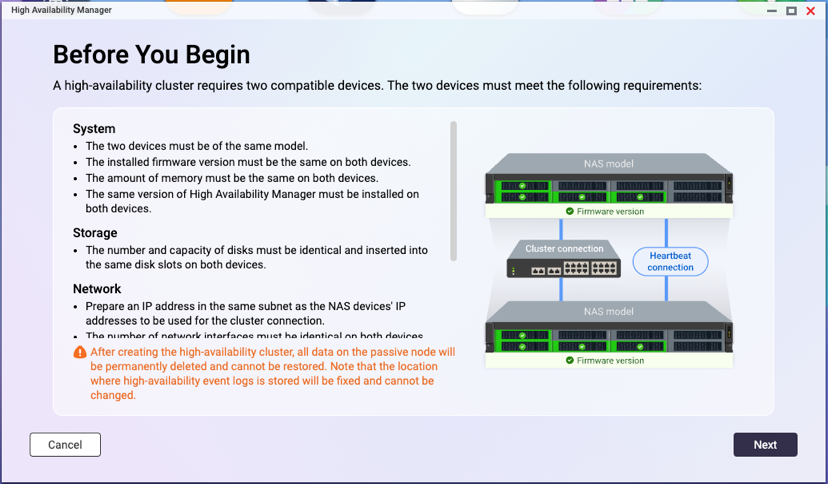
Before you can create an HA cluster, you must meet certain system, network configuration, and storage configuration requirements.
System Requirements
- You need two NAS devices of the same model.NoteHigh availability is supported on the x74 series and higher-end models.
- Both NAS devices must run the same operating system version (QuTS hero h5.3.0 or later).
- Both NAS devices must have the same total memory capacity.
- Both NAS devices must have the same version of High Availability Manager installed.
- The hostname of each NAS device must be unique.
- Certain applications are unsupported in a high-availability cluster. These applications must be disabled or removed before you can create the cluster.
For details on currently supported applications, see App Compatibility List for High Availability Environments. - Installed applications must be running the latest version.
Network Configuration Requirements
- Cluster connection
- The cluster connection on both NAS devices must be configured according to the following diagram:

- Use the same network interface on both NAS devices to connect to the same network.Note
- We recommend connecting them to the same network switch.
- If a vSwitch adapter is bound to this interface, you must remove the binding before the interface can be used for the HA cluster.
- On each NAS device, the network interface used for the primary cluster connection must be assigned a static IP address.NoteThe two static IP address on the two NAS devices must be in the same subnet.
- The cluster connection on both NAS devices must be configured according to the following diagram:
- Heartbeat connection
- The heartbeat connection between the NAS devices must be configured according to the following diagram:
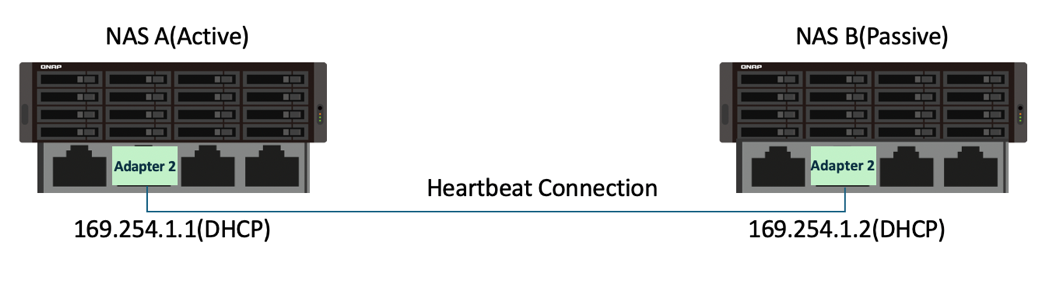
- The two NAS devices must be directly connected via the heartbeat interface, with no other devices in between.
- Use the same network interface on both NAS devices to connect to each other.Note
- The fastest and lowest-latency network interface is recommended.
- If a vSwitch adapter or VLAN is bound to this interface, you must remove the binding before the interface can be used for the HA cluster.
- The heartbeat connection always uses a fixed MTU size of 1500 bytes.
- On each NAS device, the network interface used for the heartbeat connection must be assigned a DHCP IP address.
- The heartbeat connection between the NAS devices must be configured according to the following diagram:
- Port trunking
- Port trunking for the cluster connection or heartbeat connection is optional.
- If you configure port trunking, you must ensure the following:
- The same network interfaces must be configured for port trunking on both NAS devices.
- The order of the port trunking setup must be the same on both NAS devices.
- The port trunking mode cannot be set to
balance-alborbalance-tlb.
Storage Configuration Requirements
- Both NAS devices must use disks with identical capacities installed in the same disk slots, as illustrated in the following diagram:

- All storage pools and shared folders must be in a healthy state.Read-Only Shared Folders
If a shared folder is in read-only mode, it may be due to abnormal file activity detected by Security Center. Go to Security Center > Unusual File Activity Monitoring > Report, identify any actions where the system set a shared folder to read-only mode, and then click Undo to reverse the actions. Once all read-only shared folders return to normal, you can proceed to set up your HA cluster.
- The current version of High Availability Manager does not support the following features:
- SnapSync jobs
Please remove any SnapSync jobs before creating the cluster. - LUN import/export jobs
Please remove any LUN import/export jobs before creating the cluster. - Immutable snapshots
Please ensure your storage pools do not contain any of the following:- Immutable snapshots (snapshots with a protection policy that prohibits deletion)
- Snapshot schedules that generate immutable snapshots
- Encrypted storage spaces (such as SED secure storage pools, encrypted LUNs, encrypted shared folders)
Please remove these configurations before creating the cluster. - WORM (Write Once, Read Many)
Please remove any WORM-enabled shared folders before creating the cluster. - External storage devices
External storage devices will not block the cluster creation process, but you will not be able to use them in the HA environment currently.
- SnapSync jobs
Creating an HA cluster
After confirming that you have met all the above system, network configuration, and storage configuration requirements, you can start creating your HA cluster.
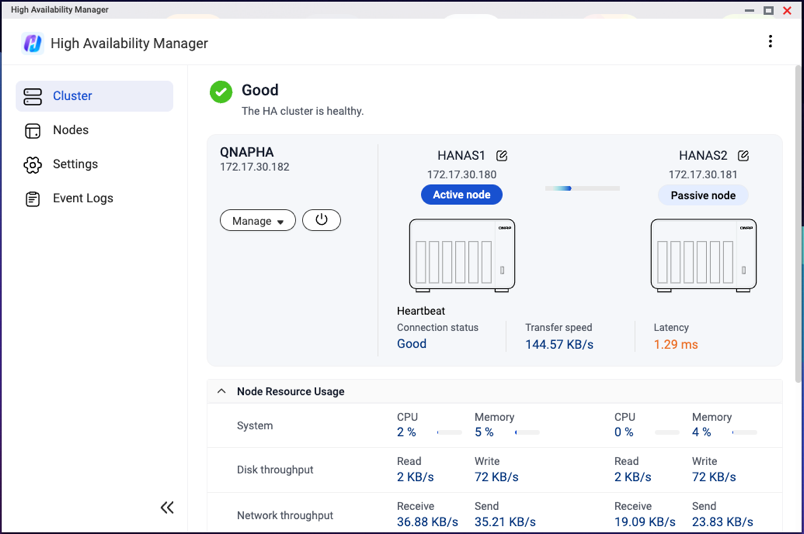
For illustration purposes, we will use the NAS devices and environment listed in the table below as an example in the steps to creating an HA cluster.
| Feature | NAS Device 1 | NAS Device 2 |
|---|---|---|
| Server name | HANAS1 | HANAS2 |
| Model | TVS-674T | TVS-674T |
| Role | Node A (Active) | Node B (Passive) |
| Installed disks | M.2 slot 1: 1TB SSD | M.2 slot 1: 1TB SSD |
| Adapter 1 IP address (Cluster connection) | 172.17.30.180 (Static IP) | 172.17.30.181 (Static IP) |
| Adapter 2 IP address (Heartbeat connection) | 169.254.8.171 (DHCP IP) | 169.254.11.98 (DHCP IP) |
- On each NAS device, configure the cluster interface.
For our example, the active node device is "HANAS1", and the passive node device is "HANAS2".- Log in to the NAS as an administrator.
- Go to Network & Virtual Switch > Network > Interfaces.
- Identify a network interface to be used for the cluster connection.
For our example, let's use Adapter 1. - Click
 > Configure.
The Configure window opens. - Go to the IPv4 tab.
- Next to Connection type, select Static IP.
- Next to Fixed IP Address, enter an IP address.
For our example, enter "172.17.30.180" for HANAS1 and "172.17.30.181" for HANAS2.
- On each NAS device, configure the heartbeat interface.
For our example, the active node device is "HANAS1", and the passive node device is "HANAS2".- Go to Network & Virtual Switch > Network > Interfaces.
- Identify a network interface to be used for the heartbeat connection.
For our example, let's use Adapter 2. - Click > Configure.
The Configure window opens. - Go to the IPv4 tab.
- Next to Connection type, select DHCP IP.
- Next to Fixed IP Address, enter an IP address.
For our example, enter "169.254.8.171" for HANAS1 and "169.254.11.98" for HANAS2.
- On each NAS device, install High Availability Manager.
- Go to App Center.
- Click
 and then enter "High Availability Manager".
High Availability Manager appears in the search results. - Click Install.
The system installs the application and creates a shortcut on the desktop.
- On the active node device, open High Availability Manager.
For our example, the active node device is "HANAS1".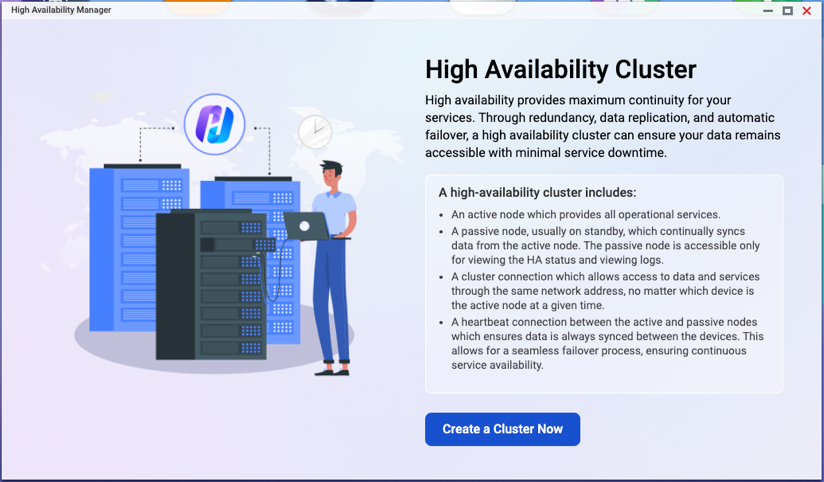
- Click Create a Cluster Now.
The Before You Begin page appears. - Verify that the configurations on the two NAS devices meet the listed requirements, and then click Next.
- Pair the two NAS devices.
- Under Cluster Connection, select a network interface.
For our example, select "Adapter 1". - Under Heartbeat Connection, select a network interface.
For our example, select "Adapter 2".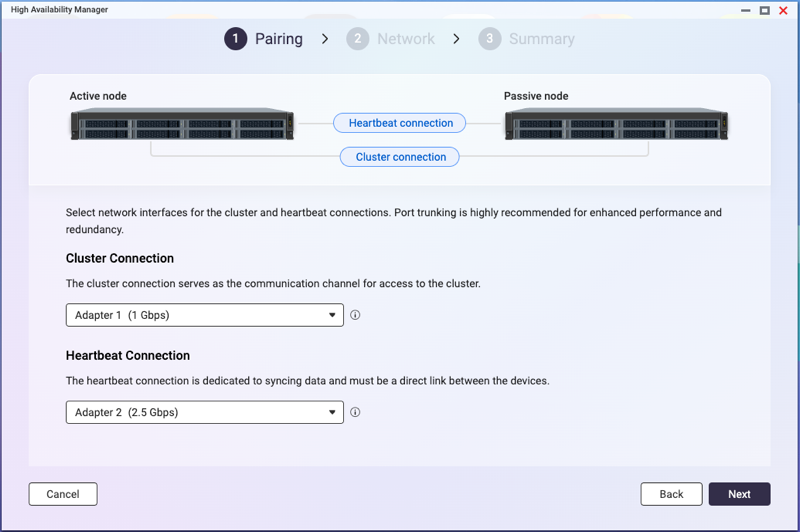
- Click Next.
- Enter the credentials of an administrator account for the passive node device.
For our example, the passive node device is "HANAS2".
- Click Next.
The system checks whether the two NAS devices meet the cluster creation requirements and displays the result.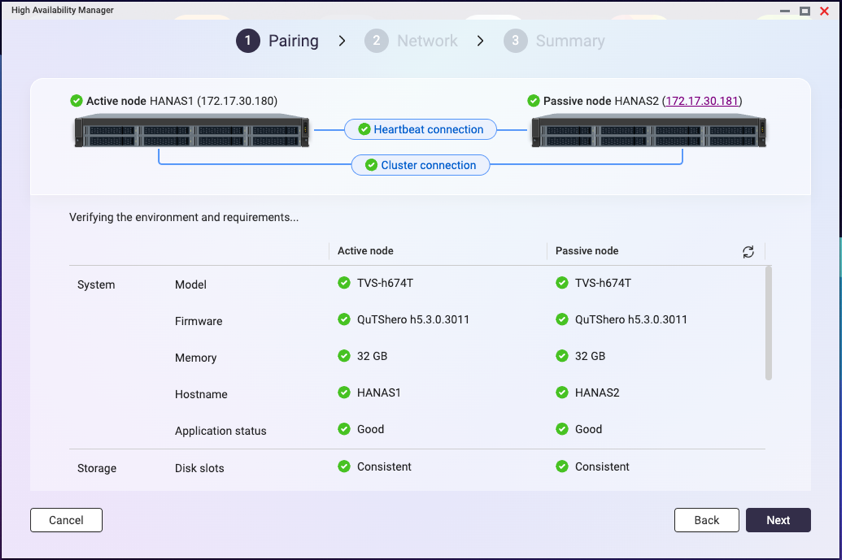 TipIf any requirement is not met, a red icon will appear next to the item. Hover over the infotip next to the icon to view details.
After resolving all issues, refresh the page to check again. - Once the check is complete and successful, click Next.
- Under Cluster Connection, select a network interface.
- Configure the cluster settings.
The cluster hostname and cluster IP address specified in these steps will be used for accessing services in the HA environment.- Specify a cluster hostname.Note
- The cluster hostname must contain 1 to 12 characters.
- The cluster hostname may only include letters (A-Z, a-z), numbers (0-9), and hyphens (-).
- The cluster hostname will replace the original server name. The original node names will become "aliases", which will only be shown within High Availability Manager and Storage Manager.
- Specify a cluster IP address.NoteThe cluster IP address must be a static IP address in the same subnet as the cluster interface IP addresses on the two NAS devices.

- Click Next.
- Specify a cluster hostname.
- Review the summary.

- Click Create.
A warning message appears.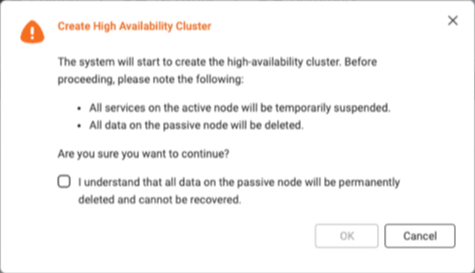
- Select I understand that all data on the passive node will be permanently deleted and cannot be recovered.NoteSome services may also become temporarily unavailable during the creation process.
- Click OK.
The system begins to create the HA cluster. This process may take several minutes depending on your system environment.ImportantDo not shut down the NAS devices during the cluster creation process.
Once the system finishes creating the HA cluster, you will see a final confirmation page.
You can now manage and monitor your HA cluster in High Availability Manager.