Applicable Products
- QuTS hero h5.3.0 or later
- High Availability Manager 1.0 or later
Introduction
Setting up a high-availability (HA) environment is recommended when system uptime and service continuity are critical.
Common scenarios in which an HA environment is desirable include:
- Enterprise file services
You want to ensure that shared folders, SMB/NFS access, and iSCSI targets remain accessible during a hardware failure. - Virtualization and database hosting
You want to prevent VMs and databases from experiencing interruptions due to a single point of failure. - Critical backup infrastructure
You want to guarantee that your backup destination is always online during scheduled backup tasks.
If you have any of the above requirements, creating an HA cluster can help you ensure continuous service operation.
Requirements
Before you can create an HA cluster, you must meet certain system, network configuration, and storage configuration requirements.
System Requirements
- You need two NAS devices of the same model.
Note
High availability is supported on the x74 series and higher-end models.
- Both NAS devices must run the same operating system version (QuTS hero h5.3.0 or later).
- Both NAS devices must have the same total memory capacity.
- Both NAS devices must have the same version of High Availability Manager installed.
- The hostname of each NAS device must be unique.
- Certain applications are unsupported in a high-availability cluster. These applications must be disabled or removed before you can create the cluster.
For details on currently supported applications, see App Compatibility List for High Availability Environments. - Installed applications must be running the latest version.
Network Configuration Requirements
- Cluster connection
- The cluster connection on both NAS devices must be configured according to the following diagram:
- Use the same network interface on both NAS devices to connect to the same network.
Note
- We recommend connecting them to the same network switch.
- If a vSwitch adapter is bound to this interface, you must remove the binding before the interface can be used for the HA cluster.
- On each NAS device, the network interface used for the primary cluster connection must be assigned a static IP address.
Note
The two static IP address on the two NAS devices must be in the same subnet.
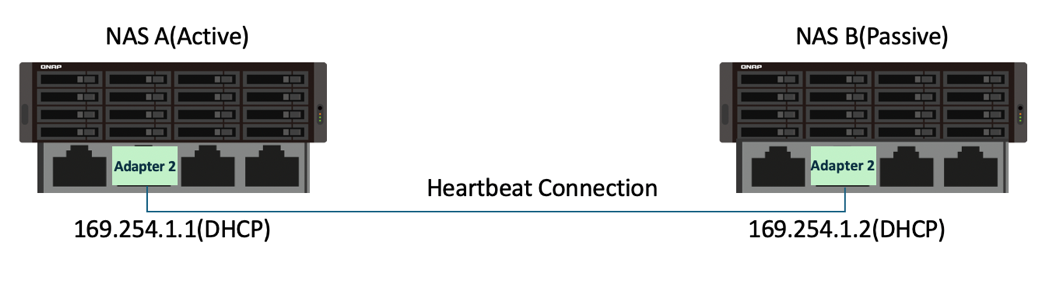
- Heartbeat connection
- The heartbeat connection between the NAS devices must be configured according to the following diagram:
- The two NAS devices must be directly connected via the heartbeat interface, with no other devices in between.
- Use the same network interface on both NAS devices to connect to each other.
Note
- The fastest and lowest-latency network interface is recommended.
- If a vSwitch adapter or VLAN is bound to this interface, you must remove the binding before the interface can be used for the HA cluster.
- The heartbeat connection always uses a fixed MTU size of 1500 bytes.
- On each NAS device, the network interface used for the heartbeat connection must be assigned a DHCP IP address.
- Port trunking
- Port trunking for the cluster connection or heartbeat connection is optional.
- If you configure port trunking, you must ensure the following:
- The same network interfaces must be configured for port trunking on both NAS devices.
- The order of the port trunking setup must be the same on both NAS devices.
- The port trunking mode cannot be set to
balance-alb or balance-tlb.
Storage Configuration Requirements
- Both NAS devices must use disks with identical capacities installed in the same disk slots, as illustrated in the following diagram:

- All storage pools and shared folders must be in a healthy state.
Read-Only Shared Folders
If a shared folder is in read-only mode, it may be due to abnormal file activity detected by Security Center. Go to Security Center > Unusual File Activity Monitoring > Report, identify any actions where the system set a shared folder to read-only mode, and then click Undo to reverse the actions. Once all read-only shared folders return to normal, you can proceed to set up your HA cluster.
- The current version of High Availability Manager does not support the following features:
- SnapSync jobs
Please remove any SnapSync jobs before creating the cluster. - LUN import/export jobs
Please remove any LUN import/export jobs before creating the cluster. - Immutable snapshots
Please ensure your storage pools do not contain any of the following:- Immutable snapshots (snapshots with a protection policy that prohibits deletion)
- Snapshot schedules that generate immutable snapshots
- Encrypted storage spaces (such as SED secure storage pools, encrypted LUNs, encrypted shared folders)
Please remove these configurations before creating the cluster. - WORM (Write Once, Read Many)
Please remove any WORM-enabled shared folders before creating the cluster. - External storage devices
External storage devices will not block the cluster creation process, but you will not be able to use them in the HA environment currently.
Creating an HA cluster
After confirming that you have met all the above system, network configuration, and storage configuration requirements, you can start creating your HA cluster.
For illustration purposes, we will use the NAS devices and environment listed in the table below as an example in the steps to creating an HA cluster.
| Feature | NAS Device 1 | NAS Device 2 |
|---|
| Server name | HANAS1 | HANAS2 |
| Model | TVS-674T | TVS-674T |
| Role | Node A (Active) | Node B (Passive) |
| Installed disks | M.2 slot 1: 1TB SSD | M.2 slot 1: 1TB SSD |
Adapter 1 IP address
(Cluster connection) | 172.17.30.180 (Static IP) | 172.17.30.181 (Static IP) |
Adapter 2 IP address
(Heartbeat connection) | 169.254.8.171 (DHCP IP) | 169.254.11.98 (DHCP IP) |
- On each NAS device, configure the cluster interface.
For our example, the active node device is "HANAS1", and the passive node device is "HANAS2".- Log in to the NAS as an administrator.
- Go to Network & Virtual Switch > Network > Interfaces.
- Identify a network interface to be used for the cluster connection.
For our example, let's use Adapter 1. - Click
 > Configure.
The Configure window opens. - Go to the IPv4 tab.
- Next to Connection type, select Static IP.
- Next to Fixed IP Address, enter an IP address.
For our example, enter "172.17.30.180" for HANAS1 and "172.17.30.181" for HANAS2.
- On each NAS device, configure the heartbeat interface.
For our example, the active node device is "HANAS1", and the passive node device is "HANAS2". - Go to Network & Virtual Switch > Network > Interfaces.
- Identify a network interface to be used for the heartbeat connection.
For our example, let's use Adapter 2. - Click > Configure.
The Configure window opens. - Go to the IPv4 tab.
- Next to Connection type, select DHCP IP.
- Next to Fixed IP Address, enter an IP address.
For our example, enter "169.254.8.171" for HANAS1 and "169.254.11.98" for HANAS2.
- On each NAS device, install High Availability Manager.
- Go to App Center.
- Click
 and then enter "High Availability Manager".
High Availability Manager appears in the search results. - Click Install.
The system installs the application and creates a shortcut on the desktop.
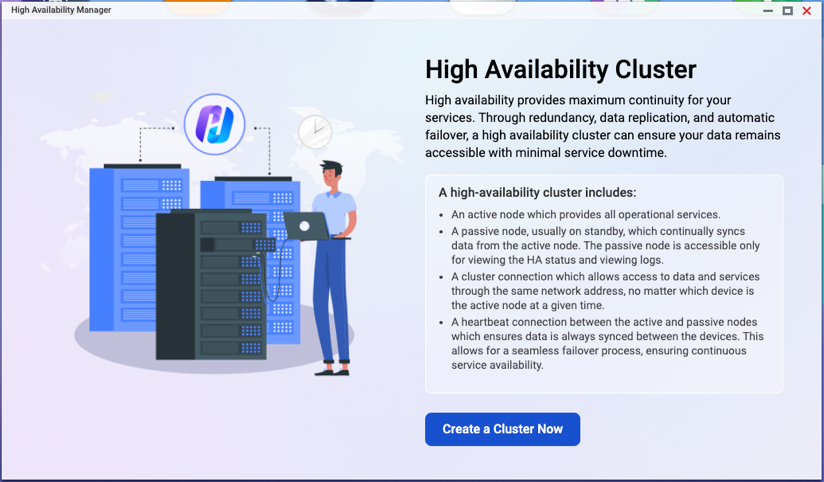
- On the active node device, open High Availability Manager.
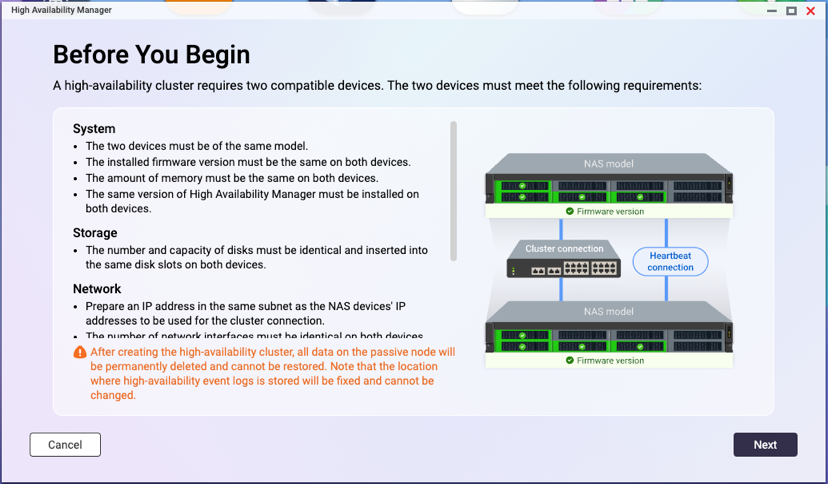
For our example, the active node device is "HANAS1". - Click Create a Cluster Now.
The Before You Begin page appears. - Verify that the configurations on the two NAS devices meet the listed requirements, and then click Next.
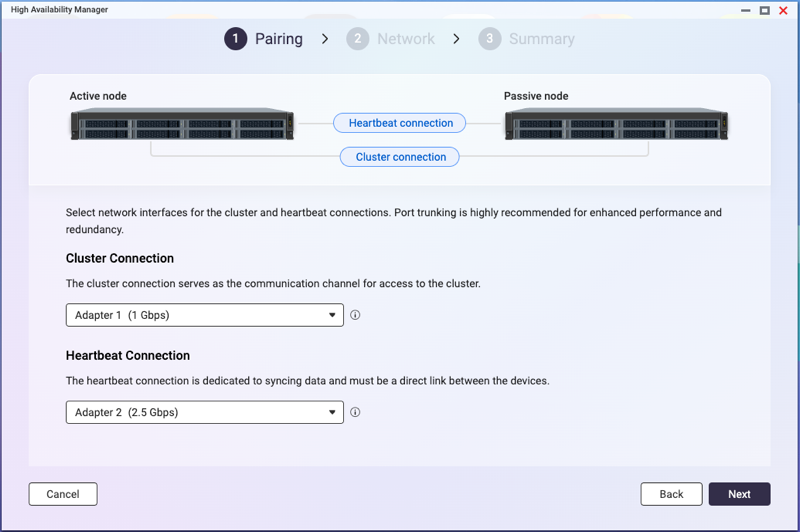
- Pair the two NAS devices.
- Under Cluster Connection, select a network interface.
For our example, select "Adapter 1". - Under Heartbeat Connection, select a network interface.
For our example, select "Adapter 2". - Click Next.
- Enter the credentials of an administrator account for the passive node device.
For our example, the passive node device is "HANAS2". - Click Next.
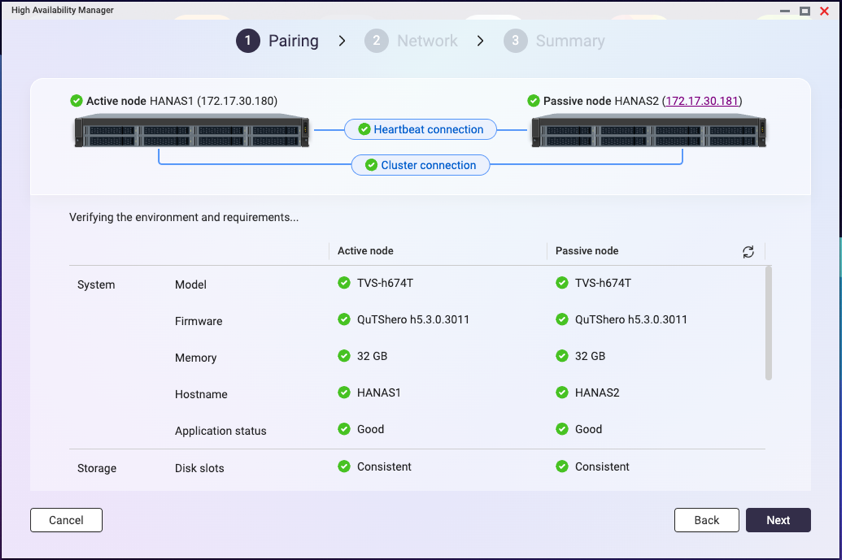
The system checks whether the two NAS devices meet the cluster creation requirements and displays the result.Tip
If any requirement is not met, a red icon will appear next to the item. Hover over the infotip next to the icon to view details.
After resolving all issues, refresh the page to check again.
- Once the check is complete and successful, click Next.
- Configure the cluster settings.
The cluster hostname and cluster IP address specified in these steps will be used for accessing services in the HA environment. - Specify a cluster hostname.
Note
- The cluster hostname must contain 1 to 12 characters.
- The cluster hostname may only include letters (A-Z, a-z), numbers (0-9), and hyphens (-).
- The cluster hostname will replace the original server name. The original node names will become "aliases", which will only be shown within High Availability Manager and Storage Manager.
- Specify a cluster IP address.
Note
The cluster IP address must be a static IP address in the same subnet as the cluster interface IP addresses on the two NAS devices.
- Click Next.
- Review the summary.
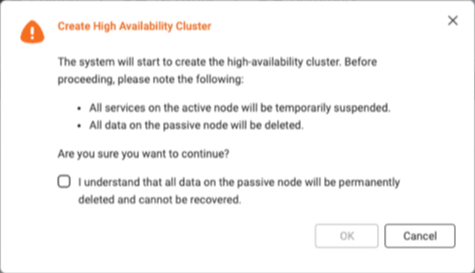
- Click Create.
A warning message appears. - Select I understand that all data on the passive node will be permanently deleted and cannot be recovered.
Note
Some services may also become temporarily unavailable during the creation process.
- Click OK.
The system begins to create the HA cluster. This process may take several minutes depending on your system environment.Important
Do not shut down the NAS devices during the cluster creation process.
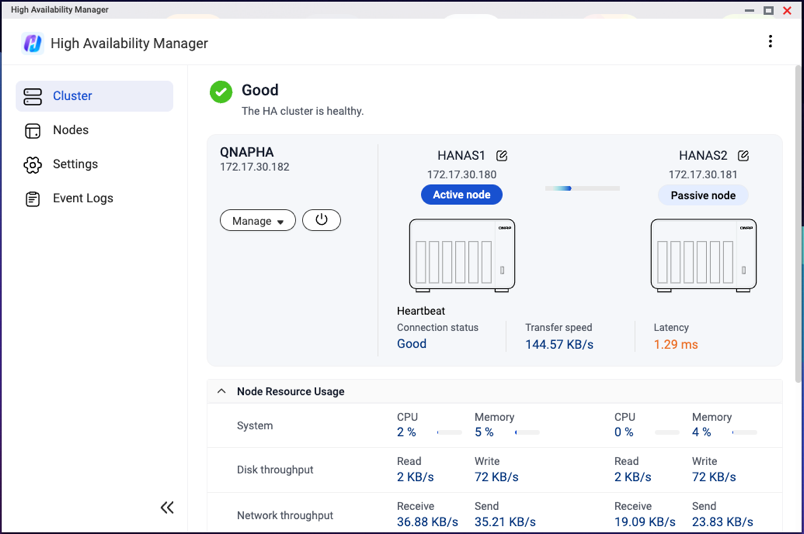
Once the system finishes creating the HA cluster, you will see a final confirmation page.
You can now manage and monitor your HA cluster in High Availability Manager.
Further Reading
適用產品
- QuTS hero h5.3.0 or later
- High Availability Manager 1.0 or later
簡介
當系統正常執行時間和服務連續性至關重要時,建議設定高可用性 (HA) 環境。
常見的 HA 環境需求情境包括:
- 企業文件服務
您希望確保在硬體故障期間,共享資料夾、SMB/NFS 存取和 iSCSI 目標仍然可用。 - 虛擬化和資料庫託管
您希望防止虛擬機和資料庫因單點故障而中斷。 - 關鍵備份基礎設施
您希望確保在排程備份任務期間,備份目的地始終在線。
如果您有上述需求,建立 HA 叢集可以幫助您確保服務的持續運行。
需求
在您建立 HA 叢集之前,必須滿足某些系統、網路配置和儲存空間配置需求。
系統需求
- 您需要兩臺相同型號的 NAS 裝置。
- 兩台 NAS 設備必須運行相同的操作系統版本 (QuTS hero h5.3.0 或更高版本)。
- 兩臺 NAS 裝置必須具有相同的總記憶體容量。
- 兩台 NAS 設備必須安裝相同版本的 High Availability Manager。
- 每臺 NAS 裝置的主機名稱必須唯一。
- 某些應用程式在高可用性叢集中不受支援。在您建立叢集之前,這些應用程式必須被禁用或移除。
有關當前支援的應用程式的詳細資訊,請參閱高可用性環境的應用程式相容性清單。 - 已安裝的應用程式必須執行最新版本。
網路配置需求
- 叢集連接
- 兩台 NAS 設備上的叢集連接必須根據以下圖示進行配置:
- 使用兩臺 NAS 裝置上的相同網路介面連線到相同的網路。
註
- 我們建議將它們連線到相同的網路交換器。
- 如果 vSwitch 配接器綁定到此介面,您必須在該介面用於 HA 叢集之前解除綁定。
- 在每台 NAS 設備上,用於主要叢集連接的網路介面必須分配靜態 IP 位址。
註
兩臺 NAS 裝置上的兩個靜態 IP 位址必須在相同的子網路中。
- 心跳連線
- 必須根據下圖配置 NAS 裝置之間的心跳連線:
- 兩臺 NAS 裝置必須透過心跳介面直接連線,中間不能有其他裝置。
- 使用相同的網路介面將兩臺 NAS 裝置連線在一起。
註
- 建議使用最快且延遲最低的網路介面。
- 如果此介面綁定了 vSwitch 配接器或 VLAN,必須先解除綁定才能用於 HA 叢集。
- 心跳連線始終使用固定的 MTU 大小 1500 位元組。
- 在每臺 NAS 裝置上,用於心跳連線的網路介面必須分配 DHCP IP 位址。
- Port Trunking
- Port Trunking 用於叢集連線或心跳連線是可選的。
- 如果您配置 Port Trunking,必須確保以下事項:
- 必須在兩台 NAS 設備上為 Port Trunking 配置相同的網路介面。
- Port Trunking 設置的順序必須在兩台 NAS 設備上相同。
- Port Trunking 模式不能設置為
balance-alb 或balance-tlb。
儲存空間配置要求
- 兩台 NAS 設備必須在相同的磁碟槽中安裝容量相同的磁碟,如下圖所示:
- 所有儲存空間儲存池和共用資料夾必須處於健康狀態。
唯讀共用資料夾
如果共用資料夾處於唯讀模式,可能是由於安全中心偵測到異常檔案活動。請前往安全中心 > 異常檔案活動監控 > 報告,識別系統將共用資料夾設為唯讀模式的任何操作,然後點選復原以撤銷這些操作。一旦所有唯讀共用資料夾恢復正常,您可以繼續設定您的 HA 叢集。
- 目前版本的 High Availability Manager 不支援以下功能:
- SnapSync 工作
請在建立叢集之前移除任何 SnapSync 工作。 - LUN 匯入 / 匯出工作
請在建立叢集之前移除任何 LUN 匯入 / 匯出工作。 - 不可變快照
請確保您的儲存空間儲存池不包含以下任何項目:- 不可變快照(具有禁止刪除的保護政策的快照)
- 快照產生不可變快照的排程
- 加密的儲存空間空間(例如 SED 安全儲存空間儲存池、加密 LUN、加密共用資料夾)
請在建立叢集之前移除這些設定。 - WORM(單寫多讀)
請在建立叢集之前移除任何啟用 WORM 的共用資料夾。 - 外部儲存空間裝置
外部儲存空間裝置不會阻止叢集的建立過程,但您目前無法在 HA 環境中使用它們。
建立 HA 叢集
確認您已滿足所有上述系統、網路配置和儲存空間配置要求後,您可以開始建立您的 HA 叢集。
為了說明,我們將使用下表中列出的 NAS 裝置和環境作為建立 HA 叢集的步驟示例。
| 功能 | NAS 裝置 1 | NAS 裝置 2 |
|---|
| 伺服器名稱 | HANAS1 | HANAS2 |
| 型號 | TVS-674T | TVS-674T |
| 角色 | 節點 A (主動) | 節點 B (被動) |
| 已安裝磁碟 | M.2 插槽 1:1TB SSD | M.2 插槽 1:1TB SSD |
轉接器 1 IP 位址
(叢集連接) | 172.17.30.180 (靜態 IP) | 172.17.30.181 (靜態 IP) |
網卡 2 IP 位址
(心跳連線) | 169.254.8.171 (DHCP IP) | 169.254.11.98 (DHCP IP) |
- 在每個 NAS 設備上,配置叢集介面。
在我們的範例中,主動節點設備是 "HANAS1",被動節點設備是 "HANAS2"。- 以系統管理員身份登入 NAS。
- 前往網路與虛擬交換器 > 網路 > 介面。
- 識別用於叢集連接的網路介面。
在我們的範例中,使用網卡 1。 - 點擊 > 配置。
將開啟配置視窗。 - 前往IPv4標籤。
- 在連接類型旁邊,選擇靜態 IP。
- 在固定 IP 位址旁邊,輸入 IP 位址。
在我們的範例中,為 HANAS1 輸入 "172.17.30.180",為 HANAS2 輸入 "172.17.30.181"。
- 在每台 NAS 設備上,配置心跳介面。
以我們的例子來說,主動節點設備是「HANAS1」,被動節點設備是「HANAS2」。 - 前往網路與虛擬交換器 > 網路 > 介面。
- 識別用於心跳連接的網路介面。
以我們的例子來說,使用 Adapter 2。 - 按一下 > 配置。
配置視窗開啟。 - 前往IPv4分頁。
- 在連接類型旁,選擇DHCP IP。
- 在固定 IP 位址旁,輸入 IP 位址。
以我們的例子來說,為 HANAS1 輸入「169.254.8.171」,為 HANAS2 輸入「169.254.11.98」。
- 在每台 NAS 設備上安裝 High Availability Manager。
- 前往 App Center。
- 按一下 然後輸入「High Availability Manager」。
High Availability Manager 顯示於搜尋結果。 - 按一下Install。
系統安裝應用程式並在桌面建立捷徑。
- 在主動節點設備上開啟 High Availability Manager。
以我們的例子來說,主動節點設備是「HANAS1」。 - 按一下立即建立叢集。
開始之前頁面顯示。 - 確認兩臺 NAS 裝置上的配置符合列出的要求,然後按一下下一步.
- 配對這兩個 NAS 裝置。
- 在叢集連線下,選擇一個網路介面。
在我們的範例中,選擇「Adapter 1」。 - 在心跳連線下,選擇一個網路介面。
在我們的範例中,選擇「Adapter 2」。 - 按一下下一步.
- 輸入被動節點裝置的系統管理員帳戶憑證。
在我們的範例中,被動節點裝置是 "HANAS2"。 - 按一下下一步。
系統會檢查兩台 NAS 裝置是否符合叢集建立要求,並顯示結果。提示
如果有任何要求未達成,項目旁會出現紅色圖示。將滑鼠懸停在圖示旁的資訊提示上以查看詳細資訊。
解決所有問題後,重新整理頁面再次檢查。
- 檢查完成且成功後,按一下下一步.
- 配置叢集設定。
在這些步驟中指定的叢集主機名稱和叢集 IP 位址將用於在 HA 環境中存取服務。 - 指定叢集主機名稱。
註
- 叢集主機名稱必須包含 1 到 12 個字元。
- 叢集主機名稱只能包含字母 (A-Z, a-z)、數字 (0-9) 和連字號 (-)。
- 叢集主機名稱將取代原始伺服器名稱。原始節點名稱將成為「別名」,僅在 High Availability Manager 和儲存空間管理器中顯示。
- 指定叢集 IP 位址。
註
叢集 IP 位址必須是與兩台 NAS 設備上的叢集介面 IP 位址在同一子網中的靜態 IP 位址。
- 按一下下一步。
- 檢閱摘要。
- 按一下建立。
警告訊息隨即顯示。 - 選擇我瞭解被動節點上的所有資料將被永久刪除且無法恢復。
- 點擊確定。
系統開始建立 HA 叢集。此過程可能需要幾分鐘,具體時間取決於您的系統環境。
系統完成 HA 叢集建立後,您將看到最終確認頁面。
您現在可以在 High Availability Manager 中管理和監控您的 HA 叢集。
進一步閱讀


 提示如果有任何要求未達成,項目旁會出現紅色圖示。將滑鼠懸停在圖示旁的資訊提示上以查看詳細資訊。