Applicable Products
- QuTS hero h5.3.0 or later
- High Availability Manager 1.0 or later
Introduction
Setting up a high-availability (HA) environment is recommended when system uptime and service continuity are critical.
Common scenarios in which an HA environment is desirable include:
- Enterprise file services
You want to ensure that shared folders, SMB/NFS access, and iSCSI targets remain accessible during a hardware failure. - Virtualization and database hosting
You want to prevent VMs and databases from experiencing interruptions due to a single point of failure. - Critical backup infrastructure
You want to guarantee that your backup destination is always online during scheduled backup tasks.
If you have any of the above requirements, creating an HA cluster can help you ensure continuous service operation.
Requirements
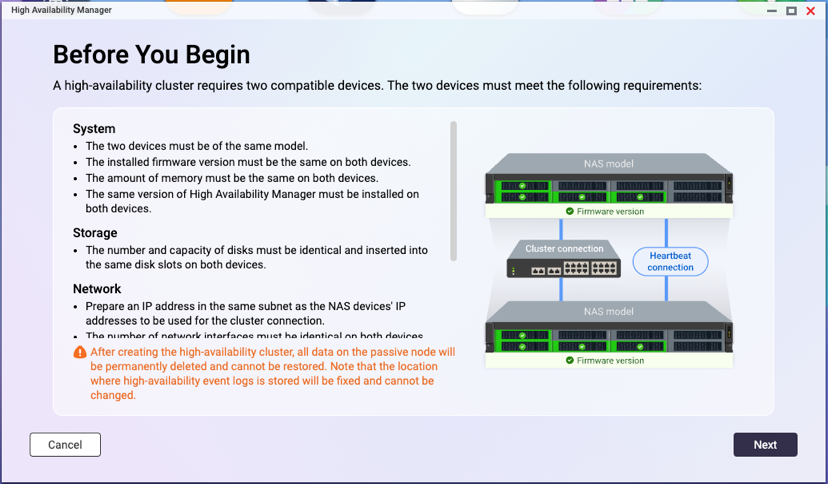
Before you can create an HA cluster, you must meet certain system, network configuration, and storage configuration requirements.
System Requirements
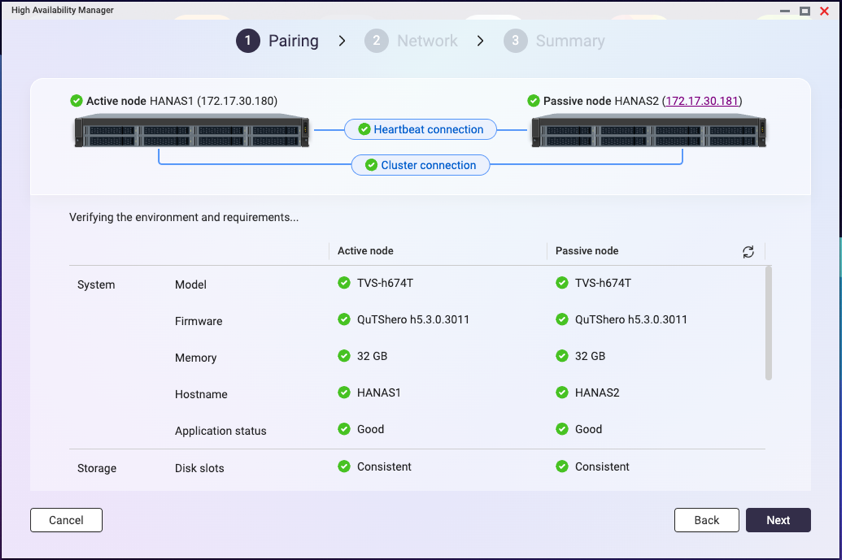
- You need two NAS devices of the same model.
Note
High availability is supported on the x74 series and higher-end models.
- Both NAS devices must run the same operating system version (QuTS hero h5.3.0 or later).
- Both NAS devices must have the same total memory capacity.
- Both NAS devices must have the same version of High Availability Manager installed.
- The hostname of each NAS device must be unique.
- Certain applications are unsupported in a high-availability cluster. These applications must be disabled or removed before you can create the cluster.
For details on currently supported applications, see App Compatibility List for High Availability Environments. - Installed applications must be running the latest version.
Network Configuration Requirements
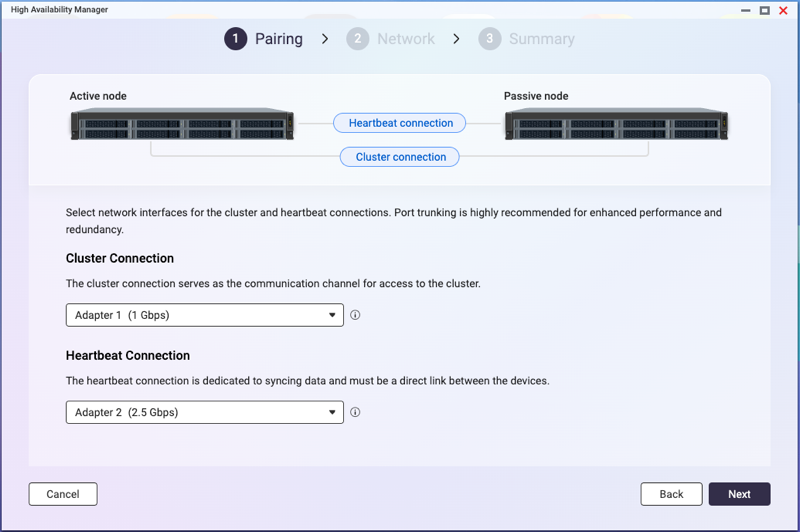
- Cluster connection
- The cluster connection on both NAS devices must be configured according to the following diagram:
- Use the same network interface on both NAS devices to connect to the same network.
Note
- We recommend connecting them to the same network switch.
- If a vSwitch adapter is bound to this interface, you must remove the binding before the interface can be used for the HA cluster.
- On each NAS device, the network interface used for the primary cluster connection must be assigned a static IP address.
Note
The two static IP address on the two NAS devices must be in the same subnet.
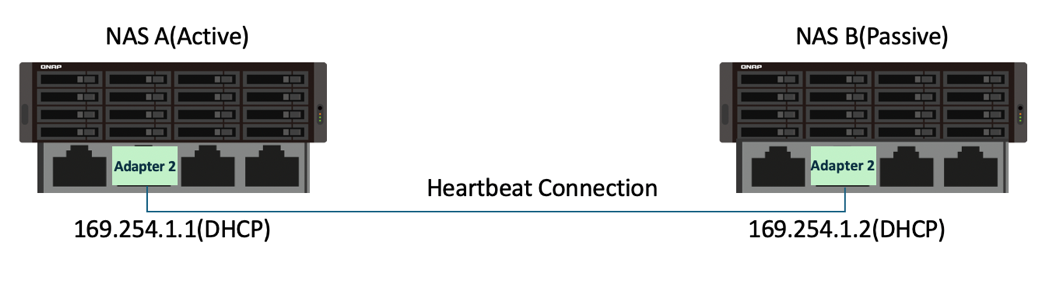
- Heartbeat connection
- The heartbeat connection between the NAS devices must be configured according to the following diagram:
- The two NAS devices must be directly connected via the heartbeat interface, with no other devices in between.
- Use the same network interface on both NAS devices to connect to each other.
Note
- The fastest and lowest-latency network interface is recommended.
- If a vSwitch adapter or VLAN is bound to this interface, you must remove the binding before the interface can be used for the HA cluster.
- The heartbeat connection always uses a fixed MTU size of 1500 bytes.
- On each NAS device, the network interface used for the heartbeat connection must be assigned a DHCP IP address.
- Port trunking
- Port trunking for the cluster connection or heartbeat connection is optional.
- If you configure port trunking, you must ensure the following:
- The same network interfaces must be configured for port trunking on both NAS devices.
- The order of the port trunking setup must be the same on both NAS devices.
- The port trunking mode cannot be set to
balance-alb or balance-tlb.
Storage Configuration Requirements
- Both NAS devices must use disks with identical capacities installed in the same disk slots, as illustrated in the following diagram:

- All storage pools and shared folders must be in a healthy state.
Read-Only Shared Folders
If a shared folder is in read-only mode, it may be due to abnormal file activity detected by Security Center. Go to Security Center > Unusual File Activity Monitoring > Report, identify any actions where the system set a shared folder to read-only mode, and then click Undo to reverse the actions. Once all read-only shared folders return to normal, you can proceed to set up your HA cluster.
- The current version of High Availability Manager does not support the following features:
- SnapSync jobs
Please remove any SnapSync jobs before creating the cluster. - LUN import/export jobs
Please remove any LUN import/export jobs before creating the cluster. - Immutable snapshots
Please ensure your storage pools do not contain any of the following:- Immutable snapshots (snapshots with a protection policy that prohibits deletion)
- Snapshot schedules that generate immutable snapshots
- Encrypted storage spaces (such as SED secure storage pools, encrypted LUNs, encrypted shared folders)
Please remove these configurations before creating the cluster. - WORM (Write Once, Read Many)
Please remove any WORM-enabled shared folders before creating the cluster. - External storage devices
External storage devices will not block the cluster creation process, but you will not be able to use them in the HA environment currently.
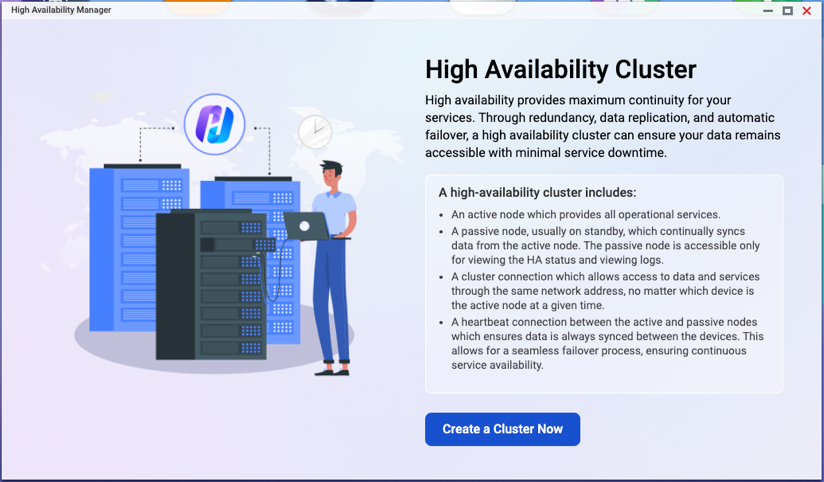
Creating an HA cluster
After confirming that you have met all the above system, network configuration, and storage configuration requirements, you can start creating your HA cluster.
For illustration purposes, we will use the NAS devices and environment listed in the table below as an example in the steps to creating an HA cluster.
| Feature | NAS Device 1 | NAS Device 2 |
|---|
| Server name | HANAS1 | HANAS2 |
| Model | TVS-674T | TVS-674T |
| Role | Node A (Active) | Node B (Passive) |
| Installed disks | M.2 slot 1: 1TB SSD | M.2 slot 1: 1TB SSD |
Adapter 1 IP address
(Cluster connection) | 172.17.30.180 (Static IP) | 172.17.30.181 (Static IP) |
Adapter 2 IP address
(Heartbeat connection) | 169.254.8.171 (DHCP IP) | 169.254.11.98 (DHCP IP) |
- On each NAS device, configure the cluster interface.
For our example, the active node device is "HANAS1", and the passive node device is "HANAS2".- Log in to the NAS as an administrator.
- Go to Network & Virtual Switch > Network > Interfaces.
- Identify a network interface to be used for the cluster connection.
For our example, let's use Adapter 1. - Click
 > Configure.
The Configure window opens. - Go to the IPv4 tab.
- Next to Connection type, select Static IP.
- Next to Fixed IP Address, enter an IP address.
For our example, enter "172.17.30.180" for HANAS1 and "172.17.30.181" for HANAS2.
- On each NAS device, configure the heartbeat interface.
For our example, the active node device is "HANAS1", and the passive node device is "HANAS2". - Go to Network & Virtual Switch > Network > Interfaces.
- Identify a network interface to be used for the heartbeat connection.
For our example, let's use Adapter 2. - Click > Configure.
The Configure window opens. - Go to the IPv4 tab.
- Next to Connection type, select DHCP IP.
- Next to Fixed IP Address, enter an IP address.
For our example, enter "169.254.8.171" for HANAS1 and "169.254.11.98" for HANAS2.
- On each NAS device, install High Availability Manager.
- Go to App Center.
- Click
 and then enter "High Availability Manager".
High Availability Manager appears in the search results. - Click Install.
The system installs the application and creates a shortcut on the desktop.
- On the active node device, open High Availability Manager.
For our example, the active node device is "HANAS1". - Click Create a Cluster Now.
The Before You Begin page appears. - Verify that the configurations on the two NAS devices meet the listed requirements, and then click Next.
- Pair the two NAS devices.
- Under Cluster Connection, select a network interface.
For our example, select "Adapter 1". - Under Heartbeat Connection, select a network interface.
For our example, select "Adapter 2". - Click Next.
- Enter the credentials of an administrator account for the passive node device.
For our example, the passive node device is "HANAS2". - Click Next.
The system checks whether the two NAS devices meet the cluster creation requirements and displays the result.Tip
If any requirement is not met, a red icon will appear next to the item. Hover over the infotip next to the icon to view details.
After resolving all issues, refresh the page to check again.
- Once the check is complete and successful, click Next.
- Configure the cluster settings.
The cluster hostname and cluster IP address specified in these steps will be used for accessing services in the HA environment. - Specify a cluster hostname.
Note
- The cluster hostname must contain 1 to 12 characters.
- The cluster hostname may only include letters (A-Z, a-z), numbers (0-9), and hyphens (-).
- The cluster hostname will replace the original server name. The original node names will become "aliases", which will only be shown within High Availability Manager and Storage Manager.
- Specify a cluster IP address.
Note
The cluster IP address must be a static IP address in the same subnet as the cluster interface IP addresses on the two NAS devices.
- Click Next.
- Review the summary.
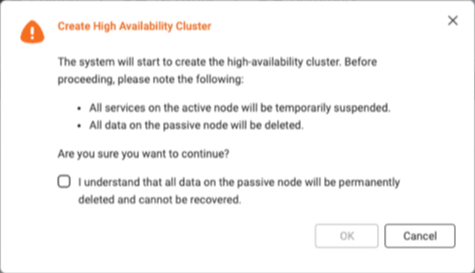
- Click Create.
A warning message appears. - Select I understand that all data on the passive node will be permanently deleted and cannot be recovered.
Note
Some services may also become temporarily unavailable during the creation process.
- Click OK.
The system begins to create the HA cluster. This process may take several minutes depending on your system environment.Important
Do not shut down the NAS devices during the cluster creation process.
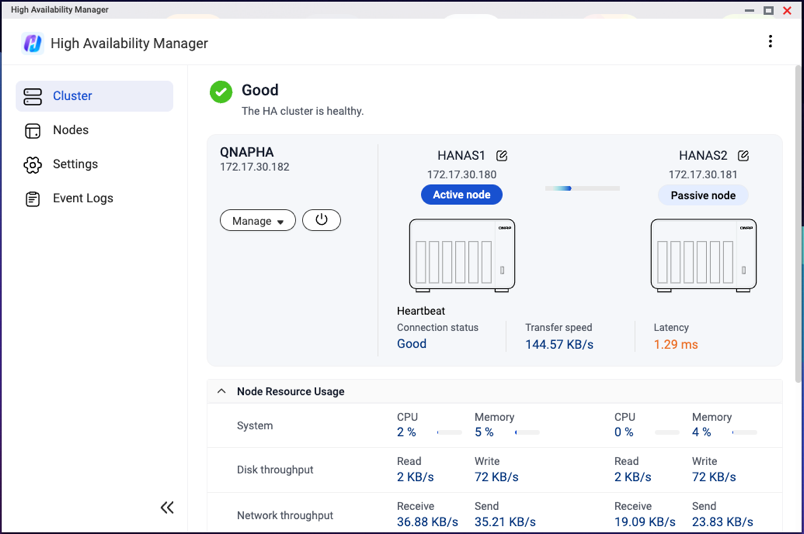
Once the system finishes creating the HA cluster, you will see a final confirmation page.
You can now manage and monitor your HA cluster in High Availability Manager.
Further Reading
対象製品
- QuTS hero h5.3.0 or later
- High Availability Manager 1.0 or later
はじめに
システムの稼働時間とサービスの継続性が重要な場合、高可用性 (HA) 環境の設定が推奨されます。
HA 環境が望ましい一般的なシナリオには以下が含まれます:
- エンタープライズファイルサービス
ハードウェア障害時に共有フォルダー、SMB/NFS アクセス、および iSCSI ターゲットがアクセス可能なままであることを保証したい。 - 仮想化およびデータベースホスティング
単一障害点による中断を防ぎたい。 - 重要なバックアップインフラストラクチャ
スケジュールされたバックアップタスク中にバックアップ先が常にオンラインであることを保証したい。
上記の要件がある場合、HA クラスターを作成することで、継続的なサービス運用を確保できます。
要件
HA クラスターを作成する前に、特定のシステム、ネットワーク構成、およびストレージ構成要件を満たす必要があります。
システム要件
- 同じモデルの NAS デバイスが 2 台必要です。
注意
高可用性は x74 シリーズおよび高性能モデルでサポートされています。
- 両方の NAS デバイスは同じオペレーティングシステムバージョン (QuTS hero h5.3.0 以降) を実行する必要があります。
- 両方の NAS デバイスは同じ総メモリ容量を持っている必要があります。
- 両方の NAS デバイスには同じバージョンの High Availability Manager がインストールされている必要があります。
- 各 NAS デバイスのホスト名は一意でなければなりません。
- 高可用性クラスターではサポートされていない特定のアプリケーションがあります。これらのアプリケーションは、クラスターを作成する前に無効化または削除する必要があります。
現在サポートされているアプリケーションの詳細については、高可用性環境のためのアプリ互換性リストを参照してください。 - インストールされたアプリケーションは最新バージョンである必要があります。
ネットワーク構成要件
- クラスター接続
- 両方の NAS デバイスのクラスター接続は、以下の図に従って構成する必要があります。
- 同じネットワークに接続するために、両方の NAS デバイスで同じネットワークインターフェースを使用してください。
注意
- 同じネットワークスイッチに接続することをお勧めします。
- このインターフェースに vSwitch アダプターがバインドされている場合、HA クラスターに使用する前にバインディングを解除する必要があります。
- 各 NAS デバイスで、プライマリクラスター接続に使用されるネットワークインターフェースには静的 IP アドレスを割り当てる必要があります。
注意
2 台の NAS デバイスの静的 IP アドレスは同じサブネット内でなければなりません。
- ハートビート接続
- NAS デバイス間のハートビート接続は、以下の図に従って構成する必要があります。
- 2 台の NAS デバイスは、ハートビートインターフェースを介して直接接続され、間に他のデバイスがないようにする必要があります。
- 両方の NAS デバイスで同じネットワークインターフェースを使用して接続します。
注意
- 最速で低遅延のネットワークインターフェースを推奨します。
- このインターフェースに vSwitch アダプターや VLAN がバインドされている場合、HA クラスターで使用する前にバインドを解除する必要があります。
- ハートビート接続は常に 1500 バイトの固定 MTU サイズを使用します。
- 各 NAS デバイスで、ハートビート接続に使用されるネットワークインターフェースには DHCP IP アドレスを割り当てる必要があります。
- ポートトランキング
- クラスター接続またはハートビート接続のためのポートトランキングはオプションです。
- ポートトランキングを設定する場合、以下を確認する必要があります。
- 両方の NAS デバイスで同じネットワークインターフェースがポートトランキング用に設定されている必要があります。
- 両方の NAS デバイスでポートトランキングの設定順序が同じである必要があります。
- ポートトランキングモードは設定できません
balance-alb またはbalance-tlb。
ストレージ構成要件
- 両方の NAS デバイスは、同じディスクスロットに同一容量のディスクをインストールする必要があります。以下の図に示されています:
- すべてのストレージプールと共有フォルダは正常な状態でなければなりません。
読み取り専用共有フォルダ
共有フォルダが読み取り専用モードの場合、セキュリティセンターによって異常なファイル活動が検出された可能性があります。次に進んでくださいセキュリティセンター > 異常なファイル活動の監視 > レポート、システムが共有フォルダーを読み取り専用モードに設定したアクションを特定し、次にクリックします元に戻すアクションを元に戻します。すべての読み取り専用共有フォルダーが通常に戻ったら、HA クラスターの設定を進めることができます。
- 現在の High Availability Manager バージョンは、以下の機能をサポートしていません:
- SnapSync ジョブ
HA クラスターを作成する前に、すべての SnapSync ジョブを削除してください。 - LUN インポート / エクスポート ジョブ
HA クラスターを作成する前に、すべての LUN インポート / エクスポート ジョブを削除してください。 - 不変のスナップショット
次のものが含まれていないことを確認してください:- 不変のスナップショット (削除を禁止する保護ポリシーを持つスナップショット)
- 不変のスナップショットを生成するスナップショットスケジュール
- 暗号化されたストレージスペース (SED セキュアストレージプール、暗号化された LUN、暗号化された共有フォルダーなど)
HA クラスターを作成する前に、これらの設定を削除してください。 - WORM (Write Once, Read Many)
HA クラスターを作成する前に、WORM 対応の共有フォルダーをすべて削除してください。 - 外部ストレージデバイス
外部ストレージデバイスはクラスターの作成プロセスを妨げませんが、現在の HA 環境では使用できません。
HA クラスターの作成
上記のシステム、ネットワーク構成、およびストレージ構成要件をすべて満たしていることを確認した後、HA クラスターの作成を開始できます。
説明のために、以下の表に記載された NAS デバイスと環境を例として、HA クラスターの作成手順を示します。
| 機能 | NAS デバイス 1 | NAS デバイス 2 |
|---|
| サーバー名 | HANAS1 | HANAS2 |
| モデル | TVS-674T | TVS-674T |
| 役割 | ノード A(アクティブ) | ノード B(パッシブ) |
| インストール済みディスク | M.2 スロット 1: 1TB SSD | M.2 スロット 1: 1TB SSD |
アダプター 1 IP アドレス
(クラスター接続) | 172.17.30.180(静的 IP) | 172.17.30.181 (静的 IP) |
アダプター 2 IP アドレス
(ハートビート接続) | 169.254.8.171 (DHCP IP) | 169.254.11.98 (DHCP IP) |
- 各 NAS デバイスでクラスターインターフェースを構成します。
例として、アクティブノードデバイスは「HANAS1」、パッシブノードデバイスは「HANAS2」です。- NAS に管理者としてログインします。
- ネットワークと仮想スイッチ > ネットワーク > インターフェースに移動します。
- クラスター接続に使用するネットワークインターフェースを特定します。
例として、アダプター 1 を使用します。 - クリック > 構成。
構成ウィンドウが開きます。 - IPv4タブに移動します。
- 接続タイプの横で、静的 IPを選択します。
- 固定 IP アドレスの横に、IP アドレスを入力します。
例として、HANAS1 に「172.17.30.180」、HANAS2 に「172.17.30.181」を入力します。
- 各 NAS デバイスで、ハートビートインターフェースを設定します。
例として、アクティブノードデバイスは「HANAS1」、パッシブノードデバイスは「HANAS2」です。 - ネットワークと仮想スイッチ > ネットワーク > インターフェースに移動します。
- ハートビート接続に使用するネットワークインターフェースを特定します。
例として、アダプター 2 を使用します。 - クリック > 設定。
設定ウィンドウが開きます。 - IPv4タブに移動します。
- 接続タイプの横で、DHCP IPを選択します。
- 固定 IP アドレスの横に、IP アドレスを入力します。
例として、HANAS1 には「169.254.8.171」、HANAS2 には「169.254.11.98」を入力します。
- 各 NAS デバイスに High Availability Manager をインストールします。
- App Center に移動します。
- クリック そして「High Availability Manager」を入力します。
High Availability Manager が検索結果に表示されます。 - クリックインストール。
システムがアプリケーションをインストールし、デスクトップにショートカットを作成します。
- アクティブノードデバイスで High Availability Manager を開きます。
例として、アクティブノードデバイスは「HANAS1」です。 - クリック今すぐクラスターを作成。
開始する前にページが表示されます。 - 2 つの NAS デバイスの設定がリストされた要件を満たしていることを確認し、クリックします次へ.
- 2 台の NAS デバイスをペアリングします。
- クラスター接続の下で、ネットワークインターフェースを選択します。
例として「アダプター 1」を選択します。 - ハートビート接続の下で、ネットワークインターフェースを選択します。
例として「アダプター 2」を選択します。 - クリック次へ.
- パッシブノードデバイスの管理者アカウントの資格情報を入力します。
例として、パッシブノードデバイスは「HANAS2」です。 - 次へをクリックします。
システムは、2 台の NAS デバイスがクラスター作成要件を満たしているかどうかを確認し、結果を表示します。ヒント
要件が満たされていない場合、項目の横に赤いアイコンが表示されます。アイコンの横にあるインフォチップにカーソルを合わせると詳細が表示されます。
すべての問題を解決した後、ページを更新して再確認します。
- チェックが完了し、成功したら、クリックします次へ.
- クラスターの設定を構成します。
これらの手順で指定されたクラスターのホスト名とクラスターの IP アドレスは、HA 環境でサービスにアクセスするために使用されます。 - クラスターのホスト名を指定します。
注意
- クラスターのホスト名は 1 から 12 文字でなければなりません。
- クラスターのホスト名には、文字(A-Z, a-z)、数字(0-9)、およびハイフン(-)のみを含めることができます。
- クラスターのホスト名は元のサーバー名を置き換えます。元のノード名は「エイリアス」となり、High Availability Manager およびストレージマネージャー内でのみ表示されます。
- クラスターの IP アドレスを指定します。
注意
クラスターの IP アドレスは、2 つの NAS デバイスのクラスターインターフェース IP アドレスと同じサブネット内の静的 IP アドレスでなければなりません。
- 次へをクリックします。
- 概要を確認します。
- 作成をクリックします。
警告メッセージが表示されます。 - 選択パッシブノード上のすべてのデータが永久に削除され、復元できないことを理解しています。
注意
作成プロセス中に一部のサービスが一時的に利用できなくなる場合があります。
- OKをクリックします。
システムは HA クラスターの作成を開始します。このプロセスはシステム環境によって数分かかる場合があります。重要
HA クラスターの作成中は NAS デバイスをシャットダウンしないでください。
システムが HA クラスターの作成を完了すると、最終確認ページが表示されます。
これで、High Availability Manager で HA クラスターを管理および監視できます。
さらに読む


 ヒント要件が満たされていない場合、項目の横に赤いアイコンが表示されます。アイコンの横にあるインフォチップにカーソルを合わせると詳細が表示されます。