[Important Security Notice] Fake Qfinder Pro Websites Detected. Learn more >

How to Set Up a Face Recognition Access Control System


Last modified date: 2021-04-27

Overview

This tutorial will walk you through how to configure an access control system for your location. QNAP assumes the user has already installed and connected the required cameras and door control hardware.

QNAP applications can provide a complete access control system. QVR Pro captures video streams. QVR Face performs facial recognitions on the streams. QVR DoorAccess checks the facial recognition data against approved files. If approved, QVR Pro triggers an open-door signal to allow access.
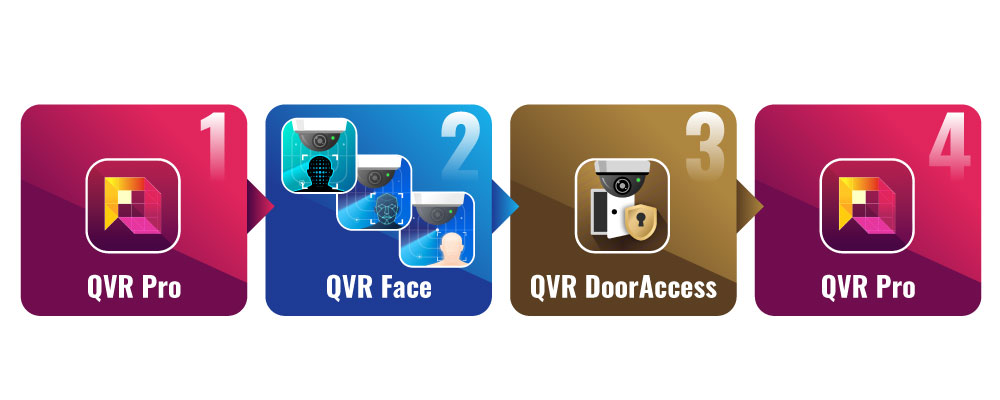
Name

Description

QVR Pro

QVR Pro is a comprehensive surveillance system that leverages the powerful storage features of the QNAP NAS.

QVR Face

QVR Face is a QTS application that analyzes camera streams and videos for facial recognition, delivering real-time analytics results and providing instant event notifications.

QVR DoorAccess

QVR DoorAccess is an intelligent door system that is fast and easy to deploy and manage. It can be easily integrated into an existing door access system with support for third-party card systems.

System Requirements

Category

Requirements

Hardware

  • A compatible QNAP NAS which meets the following requirements. For a list of supported NAS models, see https://www.qnap.com/solution/qvr-face/.
    • Supports Container Station

    • Minimum 8 GB memory

    • Minimum 10 GB hard disk space

  • A camera with a minimum resolution of 720P and 15fps.

Software

  • QTS 4.4.1 or later

  • Container Station version 1.9 or later

  • QVR Pro

  • QVR Face Tiger or QVR Face Insight

  • QVR DoorAccess

Note:

The minimum system requirements for creating live analytics tasks for QVR Pro camera streams are:

  • QTS 4.5.1

  • QVR Pro 2.0.0

  • QVR Face Tiger or QVR Face Insight 1.1.0

Face Recognition Access Control Settings

QVR Face, QVR Pro, and QVR DoorAccess allow users to easily create a comprehensive access control system.

This system lets users set rules that apply to the entire location or control access to specific doors within the system.

Analytics Tasks

The first step is to create an analytics task to detect people appearing in QVR Pro camera or RTSP streams. The analytics provided by QVR Face can be used for configuring profiles, groups, and event notifications for instant facial recognition.

Creating a Live Analytics Task for a QVR Pro Camera Stream

You can create live analytics tasks to detect people appearing in QVR Pro camera streams.

  1. Open QVR Face.
  2. Go to Live Analytics Tasks.
  3. Click Add Video Stream.
    Note:

    For creating subsequent tasks, click Create Task.

    The Create Task window appears.

  4. Select From QVR Pro.
  5. Specify the task name and the description.
  6. Select an analytics threshold.
  7. Optional: Enable gender, age, and emotion detection.
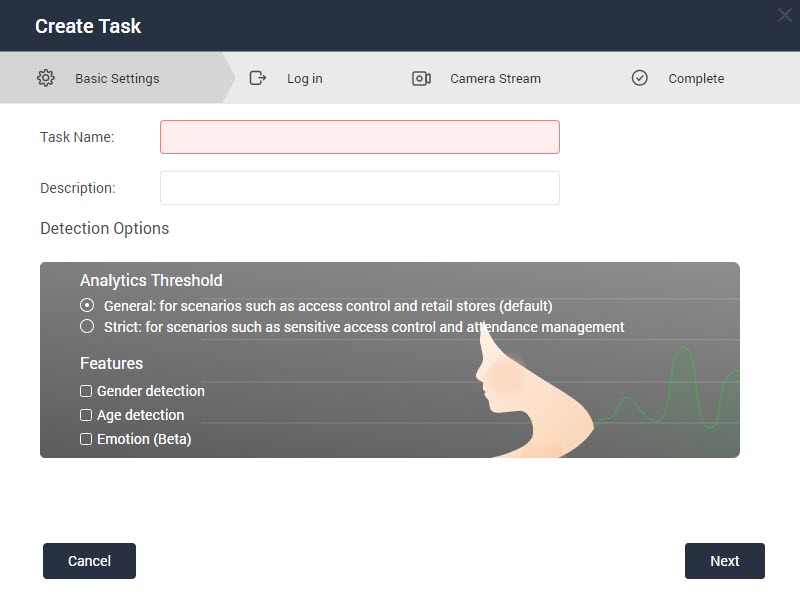
  8. Click Next.
  9. Specify the QVR Pro login information.

    Field

    User Action

    IP address

    Specify an IP address.

    Port number

    Specify a port number.

    Note:

    The default port number is 8080.

    Username

    Specify your username.

    Password

    Specify your password.

  10. Click Next.
  11. Select a camera stream.
  12. Click Next.
  13. Click Finish.

    QVR Face creates the live analytics task for the specified QVR Pro camera stream.

Creating a Live Analytics Task for an RTSP Stream

You can create live analytics tasks to detect people appearing in RTSP streams.

  1. Open QVR Face.
  2. Click Live Analytics Tasks.
  3. Click Add Video Stream.
    Tip:

    For creating subsequent tasks, click Create Task.

    The Create Task window appears.

  4. Select From RTSP.
  5. Specify the task name and the description.
  6. Select an analytics threshold.
  7. Optional: Enable gender, age, and emotion detection.
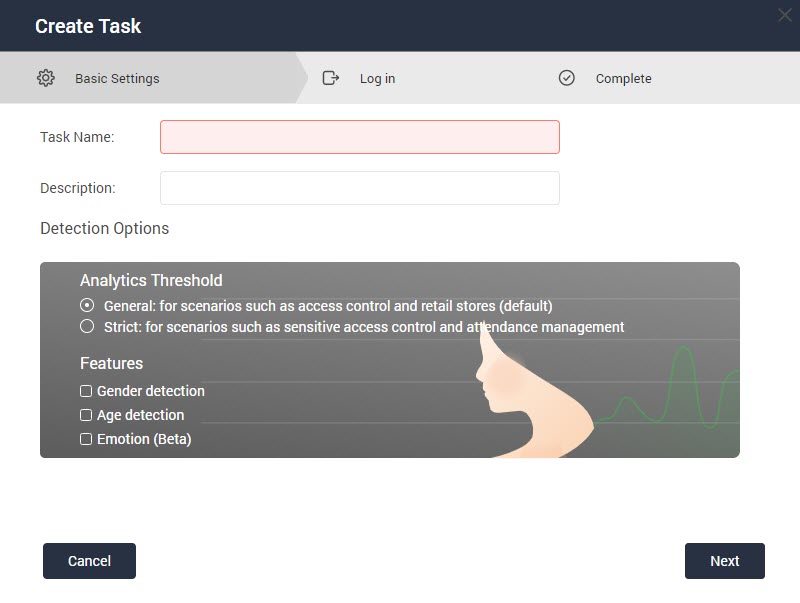
  8. Click Next.
  9. Specify the RTSP URL and login information.

    Field

    User Action

    RTSP URL

    Specify an RTSP URL.

    Username

    Specify your username.

    Password

    Specify your password.

  10. Click Next.
  11. Click Finish.

    QVR Face creates the live analytics task for the specified RTSP stream.

People Profiles

The second step is to create profiles for members. You can create profiles for people detected in video streams and generate analytics reports to better monitor attendance and control access within your organization.

Creating Profiles for Organization Members

You can upload photos to create profiles for the members of your organization or your family.

Important:

To increase the accuracy of facial recognition, ensure the following.

  • Uploaded photos are taken from various angles in which the person looks directly at the camera and 20 degrees up, down, to the left, and to the right.

  • Facial landmarks (shown as green dots) match the salient facial features of each person, such as eyes, nose, and lips.

  1. Open QVR Face.
  2. Click People & Groups.
  3. Click People.
  4. Click Create Profile.

    The Create Profile window appears.

  5. Specify the profile information.

    Field

    User Action

    Profile key

    Specify a unique profile key to identify this person.

    Tip:

    To avoid repetition, QNAP recommends using the ID number or the phone number of the person as the profile key.

    Name

    Specify a name for the person.

    Description

    Specify a description for the person.

    Group

    Select a group for the person.

    Tip:

    To create additional groups, go to Groups and click Create Group.

  6. Click .
  7. Select a photo source.

    Source

    User Action

    Live analytics task

    Take and select photos from a live analytics task.

    Local folder

    Select photos from a local folder on your computer.

    NAS

    Select photos from a shared folder on the NAS.

    Webcam

    Take and select photos from a webcam on your computer.

    Unknown face

    Select photos from unknown people in the QVR Face database.

    Note:

    You can upload a maximum of 10 photos for each profile.

  8. Click Apply.

    QVR Face creates a profile for the person.

Creating Profiles for Detected Unknown People

QVR Face assigns numbers to unknown people detected in streams or videos. You can create profiles for unknown people in the database.

  1. Open QVR Face.
  2. Click People & Groups.
  3. Click People.
  4. Select an unknown person.

    QVR Face displays the information of this person.

  5. Click Register new profile.

    The Create Profile window appears.

    Tip:

    If the detected face already belongs to a registered person, click Add this person to an existing profile to add this face to the existing profile.

  6. Specify the profile information.

    Field

    User Action

    Profile key

    Specify a unique profile key to identify this person.

    Tip:

    To avoid repetition, QNAP recommends using the ID number or the phone number of the person as the profile key.

    Name

    Specify a name for the person.

    Description

    Specify a description for the person.

    Group

    Select a group for the person.

    Tip:

    To create additional groups, go to Groups and click Create Group.

  7. Click Apply.

    QVR Face registers the unknown person and creates a profile.

Event Rules

The last step is to create event rules in QVR Face to trigger other applications via URLs.

Creating an Event Rule

This topic demonstrates how to set up an event rule in QVR Face. Users with access to QVR DoorAccess can set up different access rules for each door, create independent access logs, and search recorded videos for registered profiles. QVR Face also supports triggering third-party applications.

  1. Open QVR Pro.
  2. Open Event Management.
  3. Add a rule.
    1. Click + to add the first rule, or click Add to add additional rules.

      The Add window appears.

    2. Specify a name and a description for the rule.
    3. Specify a schedule.
    4. Click Next.
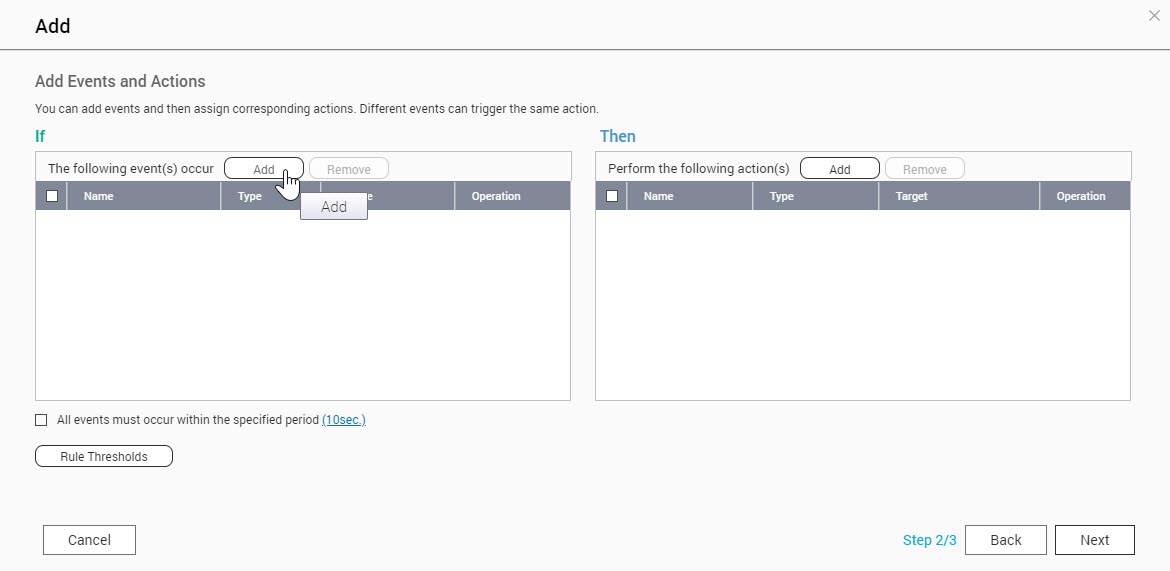
  4. Add an event.
    1. Under If, click Add.
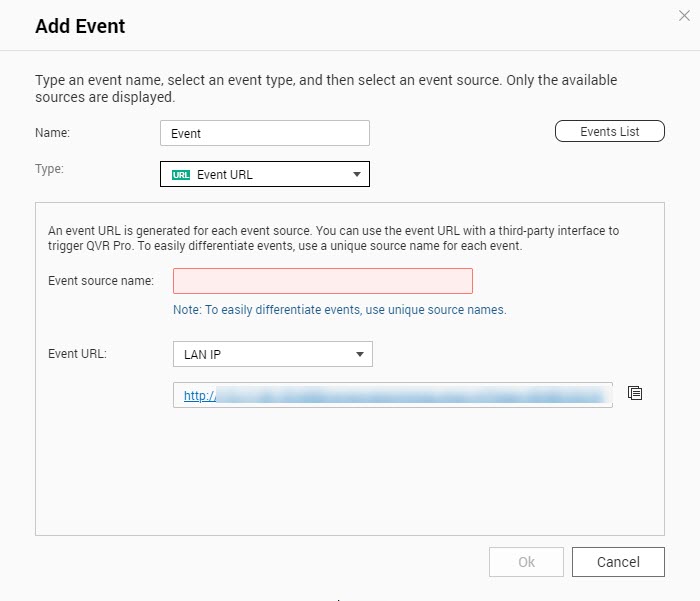
    2. Specify a name for the event.
    3. Under Type, select Event URL.
    4. Specify a source name.
    5. Copy the event URL for later use.
    6. Click OK.
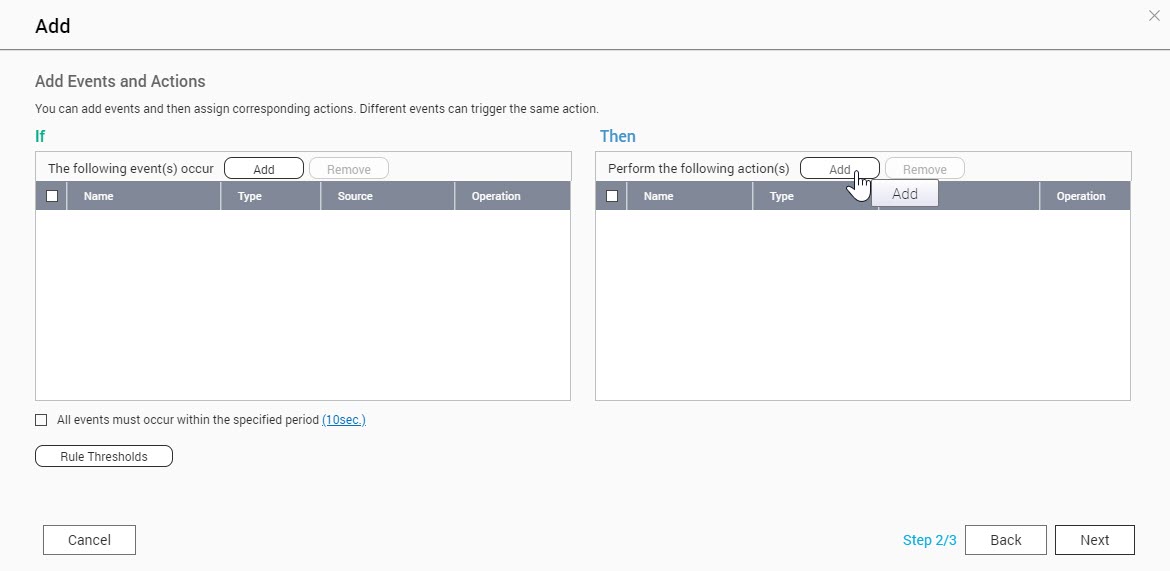
  5. Add an action.
    1. Under Then, click Add.
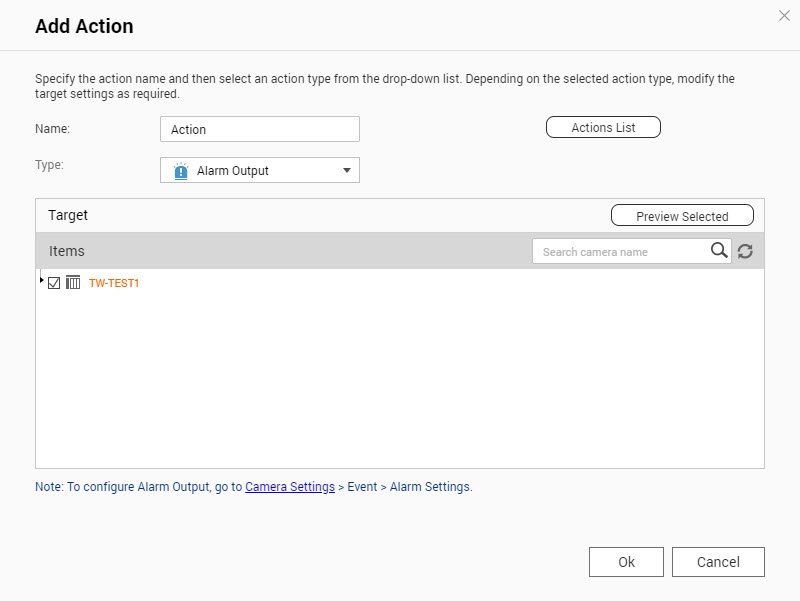
    2. Specify a name for the action.
    3. Under Type, select Alarm Output.
      Note:

      QVR Pro utilizes the Alarm Output function to trigger the camera's digital output.

    4. Click OK.
    5. Click Next.
    6. Click Finish.
    Note:

    If you are not using QVR DoorAccess, skip step 6.

  6. Configure QVR DoorAccess.
    Note:

    For a simpler configuration, see Add a Door to select the doors you want to access, then Add or Import Users to specify user information, and then Add an Access Rule to specify whether a user can access certain doors.

    Tasks

    Steps

    Add a Controller (Optional)

    See Adding a Controller.

    Add a Door

    Select the doors you want to access with QVR DoorAccess.

    1. Open QVR DoorAccess and then go to Doors.

    2. Click Add Door.

      1. Specify the door name.

      2. Click Action, and then enter the URL names and URLs from step 4.e for trigger actions.

      3. Click OK.

    Add or Import Users

    Select users and configure their access rights to specific doors.

    See Adding a User and Importing a User.

    Add an Access Rule

    See Adding a Door Access Rule.

    Save an Event Link

    Go to Doors.

    1. Click .

    2. Copy the event URL for later use.

  7. Go to QVR Face.
  8. Go to Overview.
  9. Select a live analytics task.
  10. Click .
    1. Specify the event name.
    2. Paste the event URL from Save an Event Link.
      Note:

      If you skipped step 6, paste the event URL from step 4.e.

    3. Select Profile name.
    4. Click Select all.
    5. Click Apply.

      QVR Face creates an event rule.

Adding a Controller

  1. Open QVR DoorAccess.
  2. Go to Controllers.
  3. Click Add Controller.

    The Add Controller window appears.

  4. Specify the controller information.
  5. Optional: Click Test to test the connection.
  6. Click OK.

    QVR DoorAccess adds the controller.

Adding a User

  1. Open QVR DoorAccess.
  2. Go to Users.
  3. Click Add User.

    The Add User window appears.

  4. Specify the user information.
  5. Click OK.

    QVR DoorAccess adds the user.

Importing a User

  1. Open QVR DoorAccess.
  2. Go to Users.
  3. Click Import.

    The Import Users window appears.

  4. Click Browse and then select a file to import.
  5. Click Next.
  6. Select the users you want to import.
  7. Click Finish.

    QVR DoorAccess imports the users.

Adding a Door Access Rule

  1. Open QVR DoorAccess.
  2. Go to Access Rules.
  3. Click Add Access Rule.

    The Add Access Rule window appears.

  4. Specify the rule name.
  5. Optional: Click Schedules, and then set the date.
  6. Click OK.

    QVR DoorAccess adds the door access rule.

Was this article helpful?

100% of people think it helps.
Thank you for your feedback.

Please tell us how this article can be improved:

If you want to provide additional feedback, please include it below.

Choose specification

      Show more Less
      Choose Your Country or Region
      open menu
      back to top