Applicable Models
- TS-509 Pro, TS-809 Pro, TS-809U
- TS-239 Pro, TS-239 Pro II, TS-239 Pro II+, TS-439 Pro, TS-439 Pro II, TS-439 Pro II+, TS-639 Pro, SS-439, SS-839
- TS-259 Pro, TS-259 Pro+, TS-459 Pro, TS-459 Pro+, TS-459 Pro II, TS-459U, TS-459U+, TS-559 Pro, TS-559 Pro+, TS-559 Pro II, TS-659 Pro, TS-659 Pro+, TS-659 Pro II, TS-859 Pro, TS-859 Pro+, TS-859U, TS-859U+
- HS-251, HS-251+, TS-x51 Series, TS-x51+ Series, TS-x51U Series
- TS-x53 Series
- TS-453mini
- TS-439U
- TS-469 Pro, TS-469L, TS-469U-RP
- TS-569 Pro, TS-569L, TS-669 Pro, TS-669L, TS-869 Pro, TS-869L, TS-869U-RP, TS-1269U-RP
- TS-451S
- TS-x53U Series, TS-x53S Series
Overview
This FAQ explains how to manually recover your NAS if it fails to start up. This FAQ only applies to the NAS models listed above.
NAS Recovery Requirements
To recover the NAS, you will need the following:
- An empty USB drive of at least 1 GB capacity
- A USB keyboard
- An HDMI cable, or a VGA cable
- A Windows PC
- A monitor
Recovering the NAS
You can recover your NAS by first creating a boot disk to restore basic NAS functionality and then updating the firmware with Qfinder Pro. If any part of the recovery process fails, see Further Troubleshooting below. To recover your NAS, perform the following steps:
Prepare the NAS and verify the state of the DOM
- Power off the NAS.
- Remove all drive trays.

- Connect the USB keyboard to a USB port on the NAS.
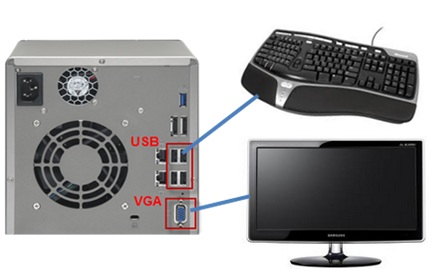
- If the NAS has a VGA or HDMI port, connect the NAS to a monitor with a corresponding HDMI or VGA Cable.
- If the NAS does not have either a VGA or HDMI port but does have a console port, then connect the NAS to a monitor via the console port. For details see, How do I enter BIOS and Console with 3.5mm Console port?
- Power on the NAS
BIOS information is displayed including the version and release date of the BIOS. - Wait until the DOM (Disk-on-module) starts up.
If the DOM fails to start up completely, then the DOM data has been corrupted and you can continue following this guide to recover the NAS.
Create a USB boot drive
- Download and install the Windows version of UNetbootin.
- Download the following Linux ISO file: http://distro.ibiblio.org/damnsmall/current/dsl-4.4.10-initrd.iso
- Connect the USB drive to a USB port on your PC.
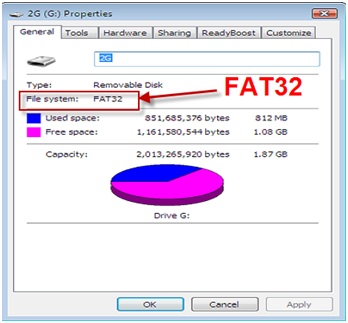
- Format the USB drive as FAT32:
- Open File Explorer.
- Open File Explorer.
- Locate the USB drive.
- Locate the USB drive.
A context menu appears. - Click Format.
The USB Format window appears. - Under File system, select Fat32.
- Click Start.
A confirmation window appears explaining that all data will be erased on the flash drive.
Warning
Formatting a USB flash drive will erase all its existing data. If you have data on the USB flash drive you want to preserve, copy the data to your PC first, then after formatting the USB flash drive, copy the data back.
- Open Unetbootin.
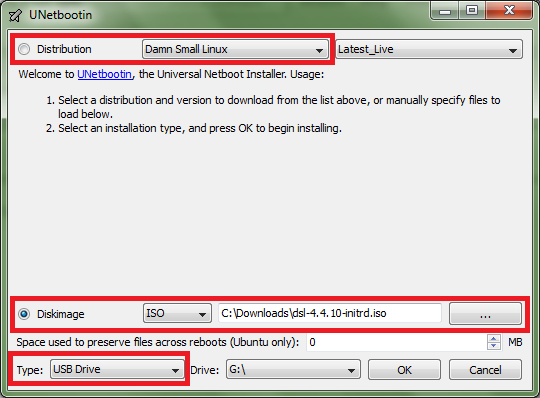
- For Distribution, select Damn Small Linux.
- For Diskimage, select ISO.
- Click "...".
- Locate and select the downloaded Linux ISO file from the previous steps.
- Click OK.
- For Type, select USB Drive.
- Click OK
UNetbootin installs the Linux ISO onto the USB drive.
- After installation is completed, click Exit.
- Download the NAS system image below corresponding to the NAS model:
- TS-239 Pro
- TS-239Pro II
- TS-239 Pro II+
- TS-259 Pro, TS-259 Pro+
- TS-439 Pro
- TS-439 Pro II
- TS-439 Pro II+
- TS-439U
- TS-459 Pro, TS-459 Pro+, TS-459 Pro II
- TS-459U, TS-459U+
- TS-469 Pro, TS-469L
- TS-469U-RP
- TS-509 Pro
- TS-559 Pro, TS-559 Pro+, TS-559 Pro II
- TS-569 Pro, TS-569L
- TS-639 Pro
- TS-659 Pro, TS-659 Pro+, TS-659 Pro II
- TS-669 Pro, TS-669L
- TS-809 Pro
- TS-809U
- TS-859 Pro, TS-859 Pro+
- TS-859U, TS-859U+
- TS-869 Pro, TS-869L
- TS-869U-RP
- TS-1269U-RP
- SS-439
- SS-839
- HS-251
- HS-251+
- TS-x51 Series
- TS-x51+ Series
- TS-x51U Series
- TS-451S
- TS-x53 Series
- TS-x53U Series
- TS-453mini
- TS-x53S Series
- Rename the NAS system image to "dom.img".
- Copy "dom.img" to the root folder of USB drive.
The USB drive can now be used as a USB boot drive to recover your NAS system's DOM.
Use the USB boot dive to recover the corrupted DOM
- Power off the NAS.
- Connect the USB drive to a USB port on the NAS.
- Power on the NAS and while the NAS is starting up, press the F11 key repeatedly until the NAS displays the BIOS menu.
Tip
The F11 key must be pressed at a specific time to trigger the BIOS menu. Pressing the F11 key repeatedly helps ensure the key will be pressed at the correct time.
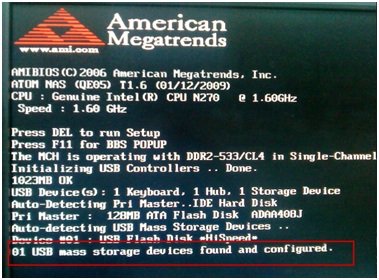
- Under Boot Device, select the USB drive.

Warning
Do not select USB DISK MODULE PMAP.
- On the following menu, select Default for monitor setting.

- Press Enter.
The NAS starts up and the following window is displayed:

- Press Ctrl+Alt+Del to open the command line.
- Input the following command:
sudo su
fdisk –l
The following partitions are present:
| Partition | Description |
|---|
| /dev/sda | The USB boot device |
| /dev/sdb or /dev/hda | The DOM (Disk On Module) which is either 126 MB or 515 MB in size |

- Enter the following commands:
mkdir usbdrive
mount /dev/sda1 /home/dsl/usbdrive
cd /home/dsl/usbdrive
- Enter the following command:
cp dom.img {0}
| Variable | Description |
|---|
| {0} | The path of the DOM. Either "/dev/sdb" or "/dev/hda" |
The NAS system image "dom.img" is copied from USB boot drive to the DOM.
- Reboot your NAS with the following command:
reboot
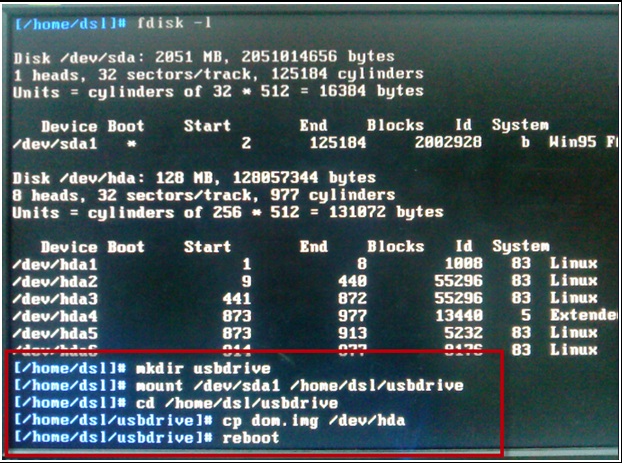
The NAS starts up correctly and Qfinder Pro can now find your NAS.
Update the NAS firmware (For firmware versions 1.x.x)
If the NAS system image downloaded above is version 1.x.x, then you must update your firmware to a newer version to complete the recovery process. Follow the steps below to update your firmware:
- If the NAS is a TS-239, TS-439, TS-439U, TS-509, TS-639, TS-809, TS-809U, SS-439 or SS-839, follow the steps in this tutorial:
http://wiki.qnap.com/wiki/NAS_Firmware_Update_When_No_HDD(s)_Installed - For all other x-86 based NAS, use Qfinder Pro to update the firmware:
- Download and install Qfinder Pro.
- Open Qfinder Pro.
- Locate your NAS in the device list.
- For details on using Qfinder Pro, see Qfinder Pro Help.
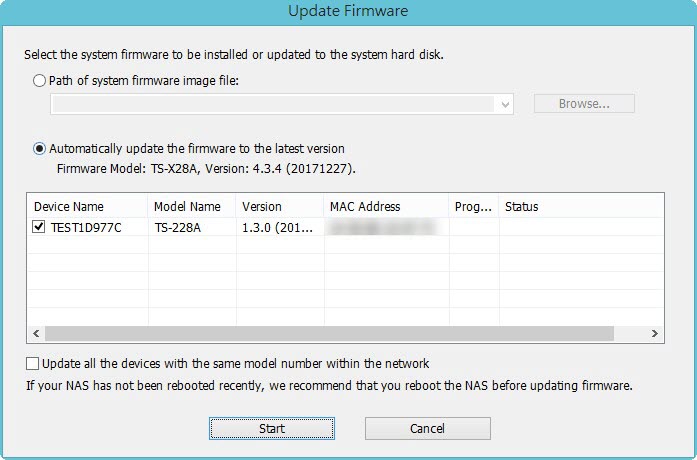
- Select Update Firmware and login with the default admin credential.
 The Update Firmware window opens.
 - Select Automatically update the firmware to the latest version.

- Click Start.
The NAS firmware will be updated to the latest version.
Install hard drives
- After the firmware is updated, perform the following steps to install hard drives:
- Attach the hard drives to the drive trays.
- Insert the drive trays into the NAS.
For details on installing hard drives, see your NAS User Guide availble for download from Download Center. - If the hard drives are not new, the firmware must be updated again while the hard drives are installed. For details, see Updating the NAS Firmware Using Qfinder Pro in How to search and manage a QNAP NAS using Qfinder Pro.
- If the hard drives are new, you can continue to initialize the NAS. For initializing QTS or QuTS hero on your NAS, see the following:
- QuTS hero Initialization (5.0.x)
- QTS Initialization (5.0.x)
Further Troubleshooting
- If the NAS BIOS failed to display:
Your NAS needs to be physically serviced by a qualified hardware technician. - If the steps of this guide could not be successfully completed:
Your NAS needs to be physically serviced by a qualified hardware technician. - If you were able to install the latest firmware version on your NAS with Qfinder Pro but after installing the hard drives, the NAS will not boot up:
The hard drives are faulty and need to be replaced. A NAS will fail to start up if the hard drives are faulty.
Further Reading
Firmware Recovery Guide
What to do if Firmware update is stuck?
Why won't my NAS boot after a firmware update?
What can I do if I can not access my NAS after firmware update?
What do I do if there was a power failure or network disconnection during a firmware update?
適用型號
- TS-509 Pro, TS-809 Pro, TS-809U
- TS-239 Pro, TS-239 Pro II, TS-239 Pro II+, TS-439 Pro, TS-439 Pro II, TS-439 Pro II+, TS-639 Pro, SS-439, SS-839
- TS-259 Pro, TS-259 Pro+, TS-459 Pro, TS-459 Pro+, TS-459 Pro II, TS-459U, TS-459U+, TS-559 Pro, TS-559 Pro+, TS-559 Pro II, TS-659 Pro, TS-659 Pro+, TS-659 Pro II, TS-859 Pro, TS-859 Pro+, TS-859U, TS-859U+
- HS-251, HS-251+, TS-x51 系列, TS-x51+ 系列, TS-x51U 系列
- TS-x53 系列
- TS-453mini
- TS-439U
- TS-469 Pro, TS-469L, TS-469U-RP
- TS-569 Pro, TS-569L, TS-669 Pro, TS-669L, TS-869 Pro, TS-869L, TS-869U-RP, TS-1269U-RP
- TS-451S
- TS-x53U 系列, TS-x53S 系列
概覽
本常見問題解釋瞭如果您的NAS無法啟動時如何手動恢復。本常見問題僅適用於上述列出的NAS型號。
NAS恢復要求
要恢復NAS,您將需要以下物品:
- 一個至少1 GB容量的空USB驅動器
- 一個USB鍵盤
- 一條HDMI線,或一條VGA線
- 一臺Windows PC
- 一臺顯示器
恢復NAS
您可以透過首先建立一個啟動盤來恢復基本的NAS功能,然後使用 韌體 更新 Qfinder Pro 來恢復您的NAS。如果恢復過程的任何部分失敗,請參見下面的進一步故障排除。要恢復您的NAS,請執行以下步驟:
準備NAS並驗證DOM的狀態
- 關閉NAS電源。
- 移除所有驅動器託盤。
- 將USB鍵盤連線到NAS上的USB埠。
- 如果NAS有VGA或HDMI埠,則使用相應的HDMI或VGA線將NAS連線到顯示器。
- 如果NAS既沒有VGA也沒有HDMI埠,但有控制檯埠,則透過控制檯埠將NAS連線到顯示器。詳情見,如何使用 3.5mm 控制檯埠進入 BIOS 和控制檯?
- 開啟NAS
顯示BIOS資訊,包括BIOS的版本和發布日期。 - 等待DOM(磁碟模組)啟動。
如果DOM未能完全啟動,則表示DOM資料已損壞,您可以繼續按照本指南進行NAS恢復。
建立USB啟動驅動器
- 下載並安裝 UNetbootin 的Windows版本。
- 下載以下Linux ISO檔案: http://distro.ibiblio.org/damnsmall/current/dsl-4.4.10-initrd.iso
- 將USB驅動器連線到PC上的USB埠。
- 將USB驅動器格式化為FAT32:
- 開啟檔案總管。
- 開啟檔案總管。
- 定位到USB驅動器。
- 定位到USB驅動器。
出現上下文選單。 - 點選格式化。
USB 格式化 視窗會出現。 - 在檔案系統下,選擇Fat32。
- 點選開始。
一個確認視窗會出現,解釋所有資料將在快閃記憶體驅動器上被擦除。
警告
格式化USB快閃記憶體驅動器將擦除其上所有現有資料。如果您想保留USB快閃記憶體驅動器上的資料,請先將資料複製到您的PC上,然後在格式化USB快閃記憶體驅動器後,將資料複製回來。
- 開啟Unetbootin。
- 對於發行版,選擇該死的小Linux。
- 對於磁碟映像,選擇ISO。
- 點選"..."。
- 從前面的步驟中定位並選擇下載的Linux ISO檔案。
- 點選確定。
- 對於型別,選擇USB 驅動器。
- 點選確定
UNetbootin 將 Linux ISO 安裝到 USB 驅動器上。
- 安裝完成後,點選退出。
- 下載與 NAS 型號相對應的 NAS 系統映像:
- TS-239 Pro
- TS-239Pro II
- TS-239 Pro II+
- TS-259 Pro, TS-259 Pro+
- TS-439 Pro
- TS-439 Pro II
- TS-439 Pro II+
- TS-439U
- TS-459 Pro, TS-459 Pro+, TS-459 Pro II
- TS-459U, TS-459U+
- TS-469 Pro, TS-469L
- TS-469U-RP
- TS-509 Pro
- TS-559 Pro, TS-559 Pro+, TS-559 Pro II
- TS-569 Pro, TS-569L
- TS-639 Pro
- TS-659 Pro, TS-659 Pro+, TS-659 Pro II
- TS-669 Pro, TS-669L
- TS-809 Pro
- TS-809U
- TS-859 Pro, TS-859 Pro+
- TS-859U, TS-859U+
- TS-869 Pro, TS-869L
- TS-869U-RP
- TS-1269U-RP
- SS-439
- SS-839
- HS-251
- HS-251+
- TS-x51 Series
- TS-x51+ Series
- TS-x51U Series
- TS-451S
- TS-x53 Series
- TS-x53U Series
- TS-453mini
- TS-x53S Series
- 將 NAS 系統映像重新命名為"dom.img"。
- 將"dom.img"複製到 USB 驅動器的根資料夾。
USB 驅動器現在可以作為 USB 啟動驅動器來恢復您的 NAS 系統的 DOM。
使用 USB 啟動驅動器來恢復損壞的 DOM
- 關閉 NAS。
- 將 USB 驅動器連線到 NAS 上的 USB 埠。
- 開啟 NAS,並在 NAS 啟動時,反覆按 F11 鍵,直到 NAS 顯示 BIOS 選單。
提示
必須在特定時間按 F11 鍵以觸發 BIOS 選單。反覆按 F11 鍵有助於確保在正確的時間按下鍵。
- 在啟動裝置下,選擇 USB 驅動器。
警告
不要選擇USB DISK MODULE PMAP。
- 在接下來的選單中,選擇監視器設定的預設值。
- 按輸入。
NAS 啟動,並顯示以下視窗:
- 按Ctrl+Alt+Del 開啟命令列。
- 輸入以下命令:
sudo su
fdisk –l
以下分割槽存在:
| 分割槽 | 描述 |
|---|
| /dev/sda | USB 啟動裝置 |
| /dev/sdb 或 /dev/hda | DOM(磁碟模組),大小為 126 MB 或 515 MB |
- 輸入以下命令:
mkdir usbdrive
mount /dev/sda1 /home/dsl/usbdrive
cd /home/dsl/usbdrive
- 輸入以下命令:
cpdom.img{0}
| 變數 | 描述 |
|---|
| {0} | DOM 的路徑。要麼是 "/dev/sdb" 要麼是 "/dev/hda" |
NAS 系統映像 "dom.img" 從 USB 啟動驅動器複製到 DOM。
- 使用以下命令重啟您的 NAS:
reboot
NAS 正確啟動,Qfinder Pro 現在可以找到您的 NAS。
更新 NAS 韌體 (對於 韌體 版本 1.x.x)
如果上面下載的 NAS 系統映像是版本 1.x.x,那麼您必須將您的 韌體 更新到新版本以完成恢復過程。按照以下步驟更新您的 韌體 :
- 如果 NAS 是 TS-239、TS-439、TS-439U、TS-509、TS-639、TS-809、TS-809U、SS-439 或 SS-839,請按照本教程中的步驟操作:
http://wiki.qnap.com/wiki/NAS_Firmware_Update_When_No_HDD(s)_Installed - 對於所有其他基於 x-86 的 NAS,使用 Qfinder Pro 更新 韌體 :
- 下載並安裝 Qfinder Pro 。
- 開啟 Qfinder Pro 。
- 在裝置列表中找到您的 NAS。
- 有關使用 Qfinder Pro 的詳細資訊,請參見 Qfinder Pro 幫助 。
- 選擇 更新 韌體 並使用 預設管理員憑證 登入。
 更新 韌體 視窗將開啟。
 - 選擇 自動將 韌體 更新到最新版本。
- 點選開始。
NAS 韌體 將更新至最新版本。
安裝硬碟
- 在 韌體 更新後,執行以下步驟以安裝硬碟:
- 將硬碟連線到硬碟託盤。
- 將硬碟託盤插入 NAS。
有關安裝硬碟的詳細資訊,請參閱從 下載中心 下載的 NAS 使用者指南。 - 如果硬碟不是全新的,則必須在安裝硬碟後再次更新 韌體 。詳情請見使用 Qfinder Pro 更新 NAS 韌體 於 如何使用 Qfinder Pro 搜尋和管理 QNAP NAS 。
- 如果硬碟是全新的,您可以繼續初始化 NAS。有關在您的 NAS 上初始化 QTS 或 QuTS hero 的資訊,請參閱以下內容:
- QuTS hero Initialization (5.0.x)
- QTS 初始化 (5.0.x)
進一步故障排除
- 如果 NAS BIOS 未能顯示:
您的 NAS 需要由合格的硬體技術人員進行實體維修。 - 如果無法成功完成本指南的步驟:
您的 NAS 需要由合格的硬體技術人員進行實體維修。 - 如果您能夠使用 Qfinder Pro 在您的 NAS 上安裝最新版本的 韌體 ,但在安裝硬碟後,NAS 無法啟動:
硬碟有故障,需要更換。如果硬碟有故障,NAS 將無法啟動。
進一步閱讀
Firmware Recovery Guide
What to do if Firmware update is stuck?
Why won't my NAS boot after a firmware update?
What can I do if I can not access my NAS after firmware update?
What do I do if there was a power failure or network disconnection during a firmware update?


