QuObjects Tutorial


Last modified date: 2025-09-18

QuObjects

QuObjects is a QNAP application that allows users to remotely access data on a QNAP NAS via Amazon S3 or OpenStack Swift object storage protocols.

With QuObjects, you can remotely access and manage shared folders, subfolders, and files on the NAS as storage spaces, buckets, and objects, respectively. Equipped with a dynamic dashboard for monitoring various statistics including data transfer and API call counts, QuObjects allows you to configure the service as a standalone server or a virtual host web server, and to create multiple security credentials for different users and projects.

Requirements


Requirement

Details

NAS model

  • All x86-based QNAP NAS models

  • The following 64-bit ARM QNAP NAS models:

    • TS-x32 series

    • TS-1635AX

Operating system

  • QTS 5.0.0 (or later)

  • QuTS hero h5.0.0 (or later)

    Note:

    QuTS hero support is only available with QuObjects 2.3 (or earlier).

  • QuTScloud c5.0.0 (or later)

Installing QuObjects

  1. Log on to the NAS as an administrator.
  2. Open App Center, and then click .

    A search box appears.

  3. Enter QuObjects.

    The QuObjects application appears in the search results.

  4. Click Install.

    A confirmation window appears.

  5. Click OK.

The system installs QuObjects.

To enable data transmission, you must click under Server Connection.

Configuring QuObjects Server Settings

You can configure QuObjects as a standalone server or a virtual host web server.

  1. Open QuObjects.
  2. Go to Server Settings.
  3. Select a server type.
     

    Server Type

    Description

    Standalone server

    Runs QuObjects as a standalone server on the system.

    Configure the following settings:

    • Port number: Specify a port number.

      Note:

      The default port number is 8010.

    • Connection type: Select HTTP or HTTPS.

    Virtual host web server

    Integrates the QuObjects storage service with the web server on the system.

    Important:

    For this setting to take effect, you must enable the web server in Control Panel > Applications > Web Server.

    For details, see the user guide for your QNAP operating system.

    Configure the following setting:

    • Hostname: Enter a unique name for the virtual host web server.

  4. Click Apply.

QuObjects saves the settings and updates the Amazon S3 and OpenStack service endpoint URLs.

Users and Access Keys

QuObjects allows you to add NAS users and domain users so that you can create access keys for each user.

Access keys allow remote applications to automatically access NAS data via QuObjects on behalf of a user, and provides more security than login credentials. You can create multiple access keys for each user to access and manage different projects.

Adding Users

Adding a user and access key allows the user to access data on the NAS through QuObjects.

  1. Open QuObjects.
  2. Go to User Management.
  3. Click Add User.

    The Add an Authorized User window appears.

  4. Select Local users or Domain users.

    A list of local NAS users or domain users appears.

  5. Select one or more users.
  6. Click Add.

QuObjects adds the selected users.

To add an access key for a user, see Adding an Access Key for a User.

Removing Users

Removing a user stops them from accessing data on the NAS through QuObjects.

Important:

If a user is deleted from the operating system, the user and their access keys remain valid until they are removed from QuObjects.

  1. Open QuObjects.
  2. Go to User Management.
  3. Select one or more users.
  4. Click Remove.

QuObjects removes the selected users.

Adding an Access Key for a User

Access keys are used by applications to remotely access data on behalf of a user. Instead of requiring the user's login credentials, two very long, randomly generated sequences of characters—a public key and a private key—are used for encryption and decryption. They are difficult for malicious actors to guess and safer than user passwords.

In QuObjects, you can create multiple access keys for each user and assign separate keys to each storage space or project. If an access key is compromised, you can delete the key without impacting other storage spaces or projects. QNAP recommends periodically replacing older access keys.

  1. Open QuObjects.
  2. Go to User Management.
  3. Identify a user.
  4. Click .

QuObjects creates an access key for the user.

To manage the access key, see Managing Access Keys.

Managing Access Keys

You can view access key details or delete access keys.

  1. Open QuObjects.
  2. Go to User Management.
  3. Identify a user.
  4. Click .

    QuObjects displays the associated access keys.

  5. Identify an access key.
  6. Perform any of the following tasks.
     

    Task

    User Action

    Unhide secret key/API key

    Click  to unhide the secret key/API key.

    Hide secret key/API key

    Click  to hide the secret key/API key.

    View access key details

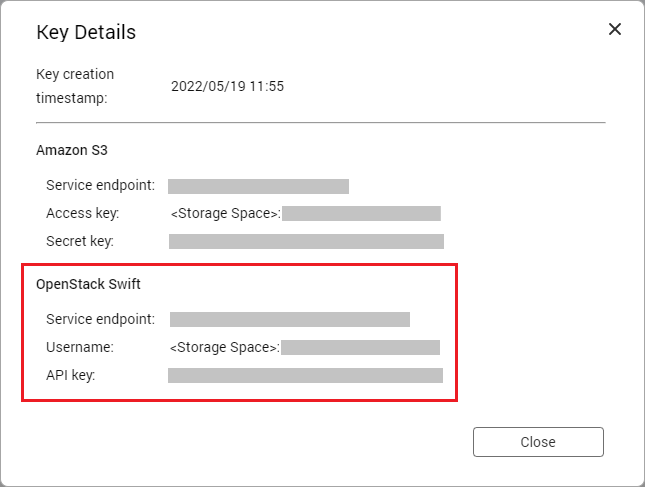
    Click  to view the access key creation date and the service endpoints and access key details for Amazon S3 and OpenStack Swift protocols.

    Delete access key

    Click  to delete the access key.

QuObjects performs the task.

Storage Spaces

QuObjects enables you to remotely access shared folders on the QNAP operating system as storage spaces. You can find most existing shared folders on the system listed as storage spaces in QuObjects. When you create or delete a storage space in QuObjects, the corresponding action is also applied to the shared folder on the system.

Creating a Storage Space

  1. Open QuObjects.
  2. Go to Storage Space.
  3. Click Create.

    The Create Storage Space window appears.

  4. Specify a folder name.
    Important:

    If you use CloudBerry for OpenStack Swift, unexpected errors can occur if you include spaces in the folder name.

  5. Select a volume to store the storage space.
  6. Next to Auto refresh usage, select an automatic refresh frequency.
  7. Select one or more users to grant access permissions to the storage space.
  8. Click Create.

QuObjects creates the storage space.

Configuring Storage Space Access Permissions

  1. Open QuObjects.
  2. Go to Storage Space.
  3. Identify a storage space.
  4. Click and select Edit.

    The Edit Storage Space window appears.

  5. Under Storage Space Permissions, select one or more users to grant access permissions.
  6. Click Apply.

QuObjects applies the access permission settings.

Managing a Storage Space

  1. Open QuObjects.
  2. Go to Storage Space.
  3. Identify a storage space.
  4. Perform any of the following tasks.
     

    Task

    User Action

    Edit

    Click and select Edit.

    Delete

    Click and select Remove.

    Note:

    Some default system folders cannot be deleted.

    Open in File Station

    Click and select Go to File Station.

    Refresh

    Click .

QuObjects performs the task.

Buckets and Objects

In QuObjects, a bucket in a storage space is a top-level folder in a shared folder in the QNAP operating system.

You can add and manage buckets in a storage space on the Buckets screen.

You can also view and manage objects and object versions in any bucket on the Object Explorer screen.

Adding a Bucket to a Storage Space

  1. Open QuObjects.
  2. Go to Buckets.
  3. Select a storage space.
  4. Click Create.

    The Create Bucket window opens.

  5. Specify a bucket name.
  6. Configure the permission setting.
     

    Option

    Description

    Private

    Users must use signed URLs to access the bucket and its objects.

    Public

    Any user can access the bucket and its objects anonymously.

  7. Optional:  Enable versioning.

    Versioning enables you to keep multiple versions of an object in the same bucket.

    1. Optional:  Select and specify the number of days to retain each version.
    2. Optional:  Select and specify the number of versions to retain.
  8. Optional:  Enable object lock.
    Note:
    • Object lock enables you to store objects using a WORM (Write Once Ready Many) model, which prevents objects from being deleted or overwritten for a specified amount of time.

    • Versioning is automatically enabled when object lock is enabled.

    1. Enable retention.

      Retention protects new objects added to the bucket from being deleted or overwritten.

    2. Select a retention mode.
       

      Retention Mode

      Description

      Governance

      Users with specific permissions (such as administrators) can delete or overwrite protected objects during the retention period.

      Compliance

      No user can delete or overwrite protected objects during the retention period.

    3. Specify the number of days to retain objects.
  9. Click Create.

QuObjects creates the bucket.

Managing Buckets

  1. Open QuObjects.
  2. Go to Buckets.
  3. Select a storage space.
  4. Identify a bucket.
  5. Perform any of the following tasks.
     

    Task

    User Action

    Edit

    Click and select Edit.

    Delete

    Click and select Remove.

    Open in File Station

    Click and select Go to File Station.

    Refresh

    Click .

QuObjects performs the task.

Managing Objects

On the Object Explorer screen, you can view and manage all objects and object versions in any bucket.

  1. Open QuObjects.
  2. Go to Object Explorer.
  3. Select a storage space.
  4. Select a bucket.
  5. Optional:  Click a folder to view files in the folder.
    Tip:

    To go back to a parent folder, click the parent folder in the folder path above the list.

  6. Select one or more files or file versions.
  7. Perform any of the following tasks.
     

    Task

    User Action

    Delete

    Click Delete to delete the selected files or file versions from the bucket and storage space.

    Download

    Click Download to download the selected files or file versions to your computer.

QuObjects performs the task.

Remote Access with CloudBerry Explorer

CloudBerry Explorer is an application developed by MSP360 that allows users to access, manage, and move data across local storage and cloud storage. You can use CloudBerry Explorer on your computer to manage the storage spaces and objects in QuObjects on your NAS.

CloudBerry Explorer is available for Windows and macOS. For product and installation details, see https://www.msp360.com/explorer/.

Accessing a Storage Space via Amazon S3 Protocol in CloudBerry Explorer

To access a QuObjects storage space in CloudBerry Explorer, you need to create an account. Each account in CloudBerry Explorer can only access a single storage space in QuObjects.

  1. Identify a storage space to access.
  2. Obtain the Amazon S3 access key details.
    1. Open QuObjects on your NAS.
    2. Go to User Management.
    3. Identify a user with permissions to access the storage space.
    4. Click .

      QuObjects displays all access keys belonging to the user.

    5. Identify an access key to use.

      To add an access key, see Adding an Access Key for a User.

    6. Click .

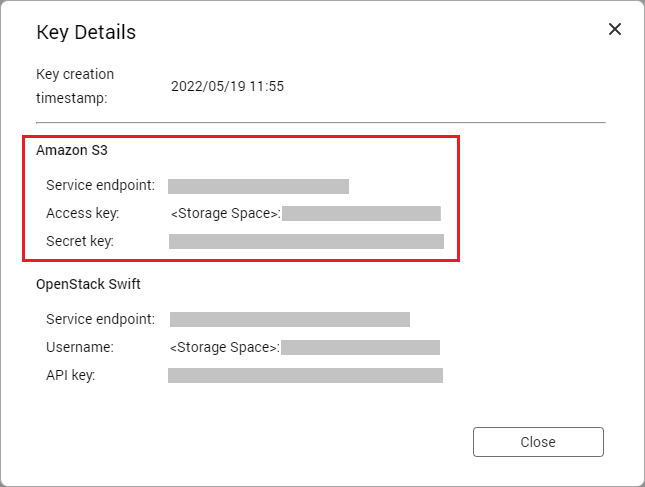
      The Key Details window opens.

    7. Under Amazon S3, take note of the service endpoint, access key, and secret key.
      Important:

      You will need to enter this information in CloudBerry Explorer later.

      Tip:

      To copy an item to your clipboard, hover the cursor over the item and click .

  3. Open CloudBerry Explorer on your computer.
  4. Go to File > Add New Account.

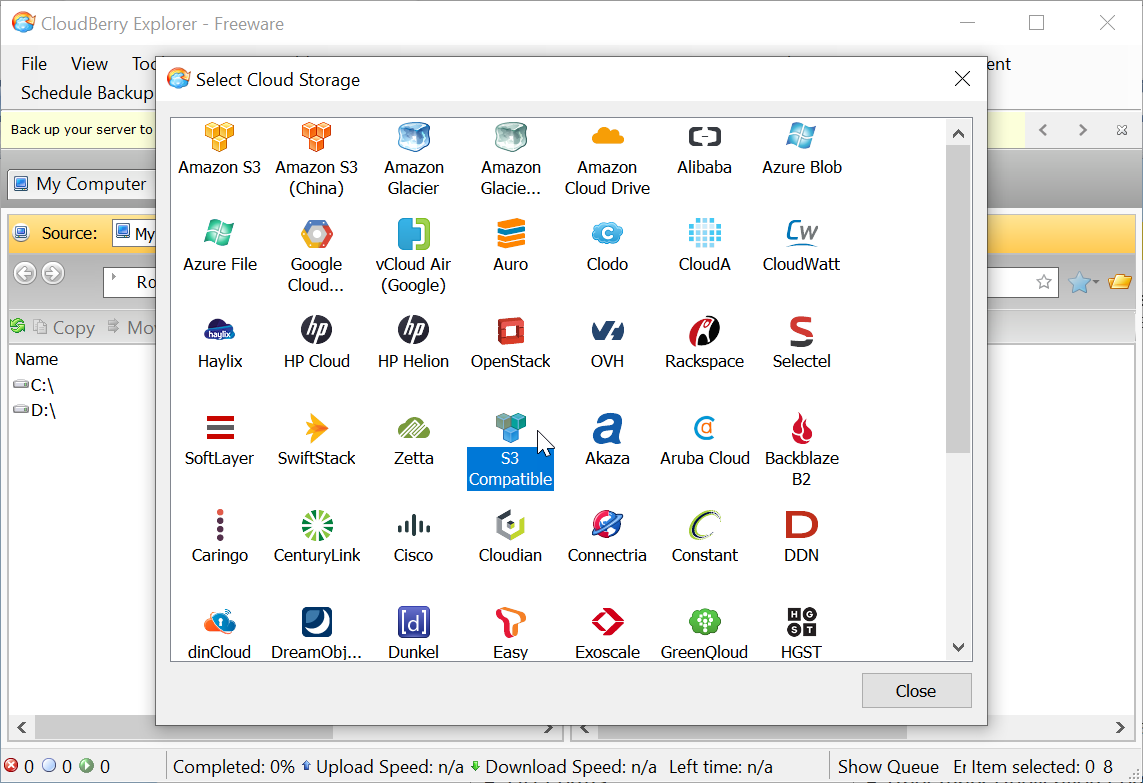
    The Select Cloud Storage window opens.

  5. Double-click S3 Compatible.

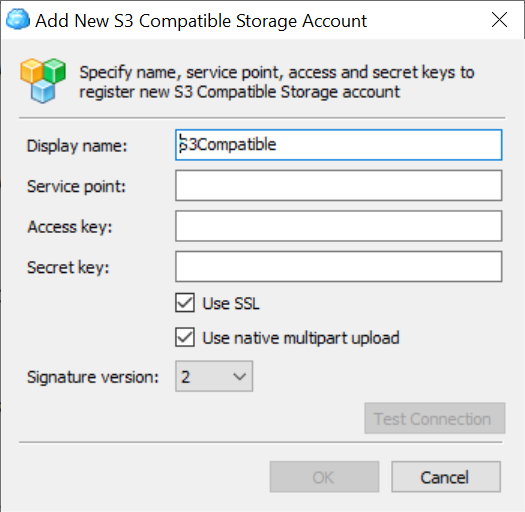
    The Add New S3 Compatible Storage Account window opens.

  6. Enter the account details.
    1. Specify a display name for the account.
    2. Next to Service point, enter the service endpoint you obtained earlier.
      Note:

      If you configured QuObjects as a virtual host web server, you must configure the DNS or modify your computer’s host files to map the virtual host name to the IP address of your NAS.

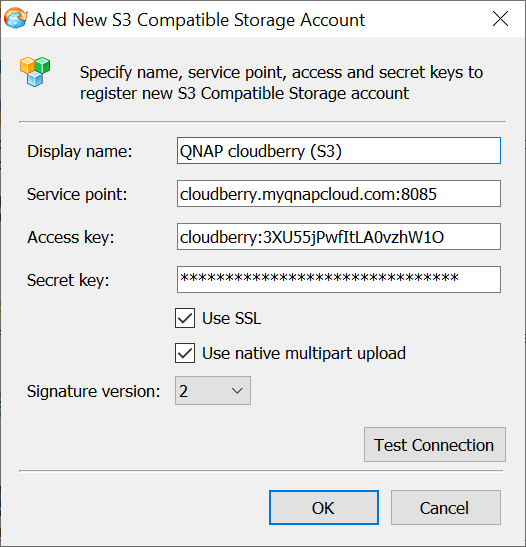
    3. Enter the access key you obtained earlier.
      Note:

      Replace at the beginning of the access key (before the colon) with the name of your storage space.

      In the screenshot example below, the storage space name is cloudberry.

    4. Enter the secret key you obtained earlier.
  7. Configure account settings.
    1. Optional:  Select Use SSL.
      Note:

      Enabling this setting will trigger a warning message later if your NAS uses a self-signed certificate.

    2. Optional:  Select Use native multipart upload.
    3. Select a signature version.
  8. Click Test Connection to confirm your settings.
  9. Click OK.

CloudBerry Explorer adds the account.

You can now access the storage space through the account in CloudBerry Explorer.

Accessing a Storage Space via OpenStack Protocol in CloudBerry Explorer

To access a QuObjects storage space in CloudBerry Explorer, you need to create an account. Each account in CloudBerry Explorer can only access a single storage space in QuObjects.

  1. Identify a storage space to access.
  2. Obtain the OpenStack Swift access key details.
    1. Open QuObjects on your NAS.
    2. Go to User Management.
    3. Identify a user with permissions to access the storage space.
    4. Click .

      QuObjects displays all access keys belonging to the user.

    5. Identify an access key to use.

      To add an access key, see Adding an Access Key for a User.

    6. Click .

      The Key Details window opens.

    7. Under OpenStack Swift, take note of the service endpoint, username, and API key.
      Important:

      You will need to enter this information in CloudBerry Explorer later.

      Tip:

      To copy an item to your clipboard, hover the cursor over the item and click .

  3. Open CloudBerry Explorer on your computer.
  4. Go to File > Add New Account.

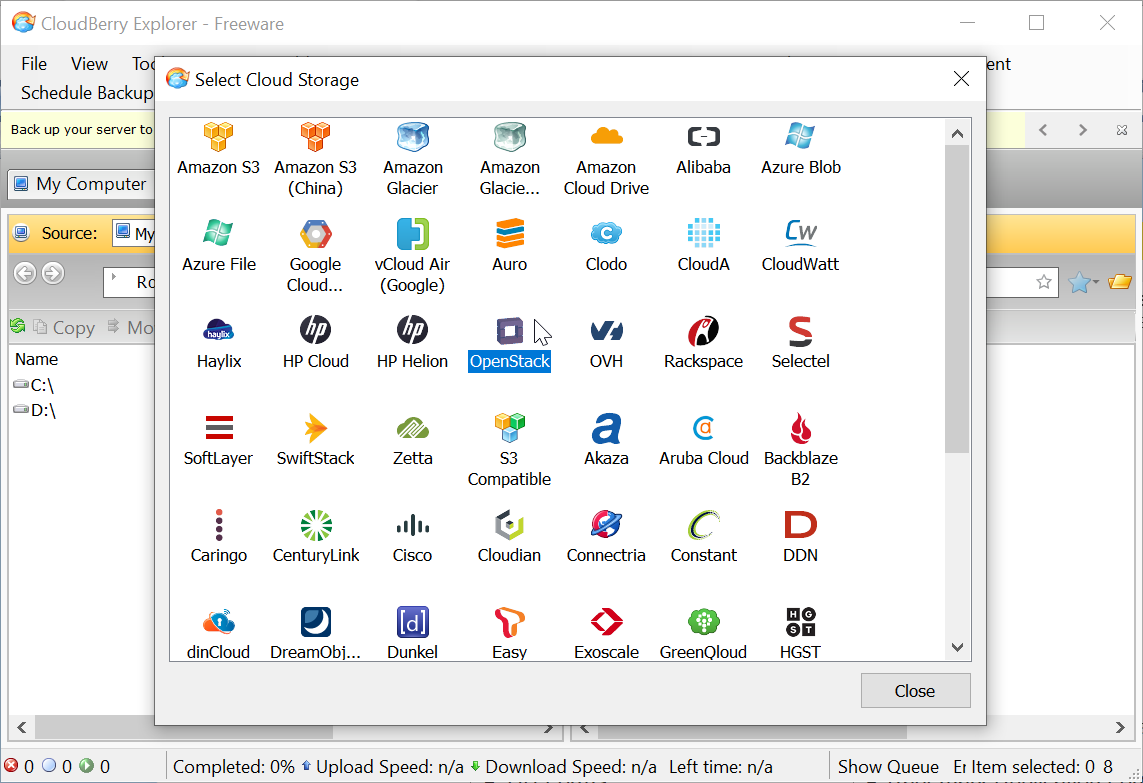
    The Select Cloud Storage window opens.

  5. Double-click OpenStack.

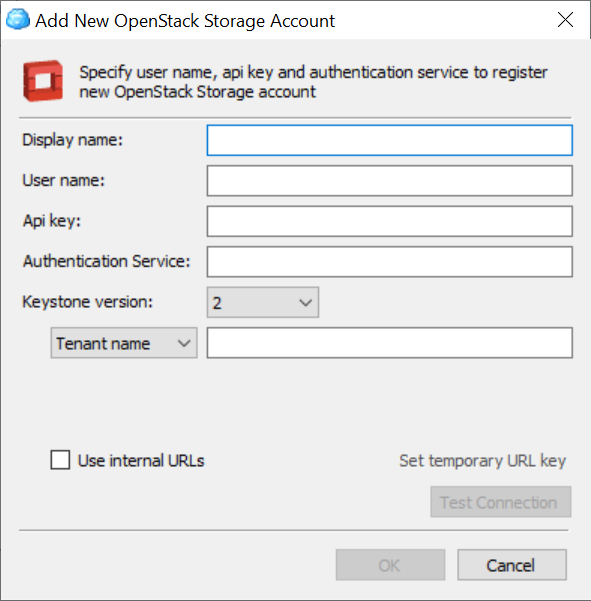
    The Add New OpenStack Storage Account window opens.

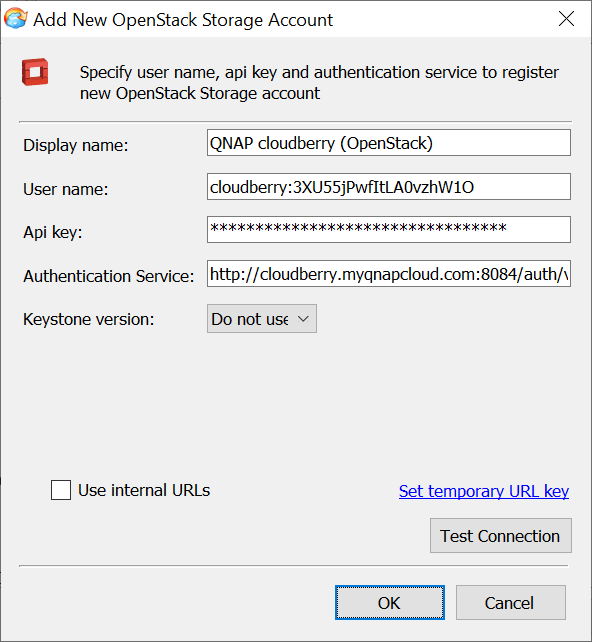
  6. Enter the account details.
    1. Specify a display name for the account.
    2. Enter the username you obtained earlier.
      Note:

      Replace at the beginning of the username (before the colon) with the name of your storage space.

      In the screenshot example below, the storage space name is cloudberry.

    3. Enter the API key you obtained earlier.
    4. Next to Authentication Service, enter the service endpoint you obtained earlier.
      Note:

      If you configured QuObjects as a virtual host web server, you must configure the DNS or modify your computer’s host files to map the virtual host name to the IP address of your NAS.

  7. Configure account settings.
    1. Select a keystone version.
      Note:

      You must select Do not use if your NAS uses a self-signed certifcate.

    2. Optional:  Select Use internal URLS.
  8. Click Test Connection to confirm your settings.
  9. Click OK.

CloudBerry Explorer adds the account.

You can now access the storage space through the account in CloudBerry Explorer.

Supported Object Storage APIs

QuObjects supports basic features of Amazon S3 and OpenStack Swift APIs. However, the APIs are designed for pure object storage, whereas QuObjects is designed with unified support for both object-based and file-based data access. Therefore, the behaviors of the APIs when used with QuObjects might differ slightly from expected. QNAP recommends testing before using QuObjects in production services.

Supported Amazon S3 APIs

QuObjects supports both path-style and virtual-hosted style Amazon S3 APIs for bucket, object, and multipart upload actions. API limits are listed at the end.

 
Table 1. Supported Amazon S3 APIs

Type

Supported APIs

Bucket APIs

  • DeleteBucket

  • GetLocation

  • GetService (list all buckets)

  • HeadBucket

  • ListObjects

  • PutBucket

  • Cross-origin resource sharing (CORS)

Object APIs

  • BulkDelete

  • CopyObject

  • DeleteObject

  • GetObject

  • HeadObject

  • PutObject

  • Presigned URLs

Multipart Upload APIs

  • CompleteMultipartUpload

  • InitiateMultipartUpload

  • ListParts

  • ListUploads

  • UploadPart

 
Table 2. Amazon S3 API Limits

Limit

Specification

Maximum number of buckets

No limits

Maximum number of objects per bucket

No limits

Maximum object size

  • QTS: 16 TiB

  • QuTS hero: 48.8 TiB

Minimum object size

0 B

Maximum object size per PUT operation

1 TiB

Maximum number of parts per upload

10000

Part size

5 MiB to 5 GiB. Last part can be 0 B to 5 GiB

Maximum number of parts returned per list parts request

10000

Maximum number of objects returned per list objects request

10000

Maximum number of multipart uploads returned per list multipart uploads request

1000

Supported OpenStack Swift APIs

QuObjects supports OpenStack Swift APIs for account, container, object, and endpoint actions. API limits are listed at the end.

 
Table 1. Supported OpenStack Swift APIs

Type

Supported APIs

Account APIs

  • Show account details and list containers

  • Create, update, or delete account metadata

  • Show account metadata

Container APIs

  • Create container

  • Create, update, or delete container metadata

  • Show container metadata

  • Delete container

Object APIs

  • Get object content and metadata

  • Create or replace object

  • Copy object

  • Delete object

  • Bulk delete objects

  • Show object metadata

  • Create or update object metadata

Endpoint APIs

  • List endpoints

  • Container Access Control Lists (ACLs)

 
Table 2. OpenStack Swift API Limits

Limit

Specification

Maximum number of buckets

No limits

Maximum number of objects per bucket

No limits

Maximum object size

1 TiB

Minimum object size

0 B

Maximum object sizer per PUT operation

1 TiB

Managing the Debug Log

  1. Open QuObjects.
  2. Go to > Debug Log.

    The Debug Log window opens.

  3. Perform any of the following tasks.
     

    Task

    User Action

    Include API logs

    Click  to include Amazon S3 and OpenStack Swift API logs in the debug log.

    Exclude API logs

    Click  to exclude Amazon S3 and OpenStack Swift API logs from the debug log.

    Download debug log

    Click Download Debug Log to download the debug log to your computer.

QuObjects performs the task.

Was this article helpful?

57% of people think it helps.
Thank you for your feedback.

Please tell us how this article can be improved:

If you want to provide additional feedback, please include it below.

Choose specification

      Show more Less

      Choose Your Country or Region

      open menu
      back to top