How to Use Image2PDF


Datum poslední úpravy: 2020-11-04

Image2PDF lets you organize your image files for quick access and viewing. It consolidates multiple image files scattered across different folders into one easy-to-manage PDF file. With Image2PDF, you can also create custom layouts and secure your PDF files. Image2PDF works well with File Station and Qfiling.


Availability and Requirements

  • Image2PDF is available in App Center on QTS 4.3.5 or later.

  • Image2PDF requires at least 2 GB of RAM for both x86 and ARM models.

Using Image2PDF with File Station

  1. Open File Station.
  2. Locate and select the image files you want to process.
    Important:

    Image files should be in JPG or PNG format and should contain a maximum of 50 million pixels.

  3. Click > Open with Image2PDF.

    The Image2PDF window appears.

  4. Optional: Add more image files.
    1. Click Add File.

      The Add File window appears.

    2. Locate and select the image files you want to add.
    3. Click OK.
  5. Optional: Remove image files.
    1. Select one or more image files.
    2. Click .
  6. Optional: Select a view mode.

    Mode

    User Action

    Thumbnail mode

    Select .

    In thumbnail mode, you can drag-and-drop image files to rearrange the order.

    List mode

    Select .

    In list mode, you can perform the following.

    • Click or to manually sort image files.

    • Click Show Information to view image file details.

  7. Optional: Sort the image files.
    1. Click .
    2. Select a sorting option.
  8. Click Next.
  9. Specify the following information.

    Field

    User Action

    File name

    Specify a file name.

    Files are automatically renamed if they have the same name as the existing files in the destination path.

    Path

    Select the path you want to save the PDF to.

    Orientation

    Select whether you want your PDF to have a portrait or landscape orientation.

    Page size

    Select the page size.

    Resolution

    Select the resolution.

  10. Click .

    The advanced settings appear.

  11. Specify any of the following information.

    Field

    User Action

    Header

    Select a header format.

    For custom headers, specify a header that contains up to 40 letters (A-Z, a-z) or numbers (0-9).

    Footer

    Select a footer format.

    For custom footers, specify a footer that contains up to 40 letters (A-Z, a-z) or numbers (0-9).

    File protection

    Select one or more file protection options.

    You can prevent other users from copying or printing the PDF. You can also add encryption by specifying a password that contains up to 32 letters (A-Z, a-z) or numbers (0-9).

    Margin

    Select a margin option.

    • No margin: 0 cm on all sides

    • Narrow: 1.27 cm on all sides

    • Wide: 2.4 cm on the top and bottom, 5.08 on the left and right

  12. Click Next.
  13. Review the task summary, and then click Apply.
     

    Image2PDF converts the image files to a PDF file.

    • Images are automatically centered and displayed in their original size.

    • Images that are larger than the page margins are resized to fit the page.

Using Image2PDF with Qfiling

  1. Open Qfiling.
  2. Click Create Qfiling Task.

    The Name & Source screen appears.

  3. Specify a task name that contains up to 64 ASCII characters.
  4. Under Source Path, select one or multiple source folders.
  5. Click Next.

    The Filing Rules screen appears.

  6. Add a picture source file filter.
    1. In the Source File Filters box, click .

      The source file filter screen appears.

    2. Select Picture.
    3. Configure the additional criteria.
      Tip:

      Click to add new criteria.

    4. Click Apply.
  7. Add file editing modules.
    1. In the File Editing box, click .

      The File editing modules screen appears.

    2. Select Image2PDF.

      The Image2PDF window appears.

    3. Specify the following information.

      Field

      User Action

      Sort by

      Select how you want to sort the image files.

      Orientation

      Select whether you want your PDF to have a portrait or landscape orientation.

      Page size

      Select the page size.

      Resolution

      Select the resolution.

    4. Click .

      The advanced settings appear.

    5. Specify any of the following information.

      Field

      User Action

      Header

      Select a header format.

      For custom headers, specify a header that contains up to 40 letters (A-Z, a-z) or numbers (0-9).

      Footer

      Select a footer format.

      For custom footers, specify a footer that contains up to 40 letters (A-Z, a-z) or numbers (0-9).

      File protection

      Select one or more file protection options.

      You can prevent other users from copying or printing the PDF. You can also add encyption by specifying a password that contains up to 32 letters (A-Z, a-z) or numbers (0-9).

      Margin

      Select a margin option.

      • No margin: 0 cm on all sides

      • Narrow: 1.27 cm on all sides

      • Wide: 2.4 cm on the top and bottom, 5.08 on the left and right

    6. Click Apply.
      Tip:

      You can add a watermark to the PDF by configuring the watermark settings.

    7. Click Apply.
  8. Configure the destination path.
    1. In the Destination Path box, click .

      The Destination Path screen appears.

    2. Select a destination path.
      Tip:

      Click to select an additional destination path.

    3. Click Apply.
  9. Configure the destination folder structure.
    1. In the Destination Folder Structure box, click .

      The Destination Folder Structure screen appears.

    2. Specify a folder structure.

      Option

      User Action

      Create a folder structure based on the specified criteria

      Select a folder structure based on one or more filing conditions.

      1. Click Edit.

      2. Click Add.

        Under Filing conditions, a menu list appears.

      3. Select a filing condition.

        Tip:

        To add an additional condition based on the first condition, click .

      Follow the original folder structure

      Select to keep the original folder structure after the filing task is complete.

      Flatten the folder structure

      Select to list individual files in the destination folder after the filing task is complete.

    3. Click Apply.
  10. Configure the destination file handling.
    1. In the Destination File Handling box, click .
    2. Specify any of the following information.

      Field

      User Action

      File conflict policy

      Select what to do with files with the same name.

      • Skip the files

      • Overwrite the files

      • Rename if a file exists with the same name

      Data integrity check

      Select to check for and correct invalid data.

      Naming methods

      Select how to handle specific files

      • Keep original file name

      • Name and index: Specify a file name and an index. Decide whether to position the index in front of or behind the file name.

      • Replace: Add a prefix, find and replace files, or add a suffix.

    3. Click Apply.
  11. Click Next.

    The Scheduling screen appears.

  12. Select the frequency of the Qfiling task.
  13. Click Next.

    The Summary screen appears.

  14. Review the summary, and then click Apply.

    Qfiling creates the Image2PDF task.

Task Queue

The Task Queue screen displays all ongoing tasks. You can filter the task list by selecting one or more sources or owners. On this screen, you can also start, stop, or view the details of each task.

Tip:

You can only add up to 50 tasks in the queue. To add more tasks, you need to manually delete existing tasks.

Task

User Action

Delete tasks

  1. Select one or more tasks from the list.

  2. Click Delete.

    A confirmation message appears.

  3. Click Yes.

Stop all tasks

  1. Click Stop All.

    A confirmation message appears.

  2. Click Yes.

Image2PDF stops all queued tasks, regardless if they are displayed on the Task Queue screen.

Start all tasks

  1. Click Start All.

    A confirmation message appears.

  2. Click Yes.

Image2PDF starts all queued tasks, regardless if they are displayed on the Task Queue screen.

Filter queued tasks

From the drop-down menu, select the sources and owners of the tasks you want displayed in the queue.

Task History

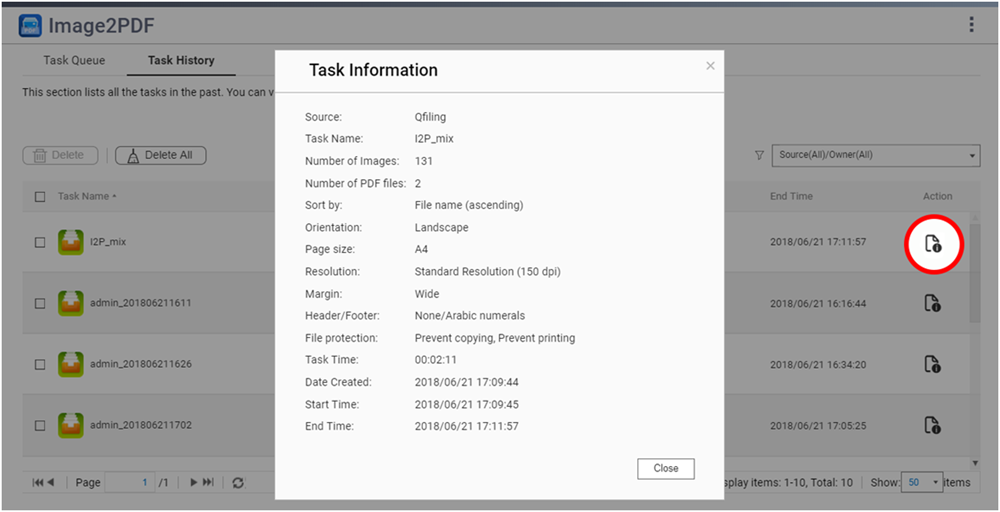
The Task History screen displays all completed tasks

Note:

Administrators can access data created by all users. Users can only access data created by themselves.
Task

User Action

Delete tasks

  1. Select one or more tasks from the list.

  2. Click Delete.

    A confirmation message appears.

  3. Click Yes.

Delete all tasks

  1. Click Delete All.

    A confirmation message appears.

  2. Click Yes.

Image2PDF deletes all tasks in Task History, regardless if they are displayed on the screen.

Filter queued tasks

From the drop-down menu, select the sources and owners of the tasks you want displayed on the Task History screen.

View task information

Click .

Byl tento článek užitečný?

70% lidí si myslí, že to pomáhá.
Děkujeme vám za vaši zpětnou vazbu.

Sdělte nám prosím, jak lze tento článek vylepšit:

Pokud chcete poskytnout další zpětnou vazbu, uveďte ji níže.

Zvolte specifikaci

      Zobrazit více Zobrazit méně

      Tato stránka v jiných zemích / oblastech:

      open menu
      back to top