How to use Boxafe 1.5


Last modified date: 2023-08-10

About Boxafe

Boxafe is a NAS-based backup solution for cloud services such as Google Workspace and Microsoft 365. You can back up data for email, contacts, calendars, Drive, Shared Drives, OneDrive, as well as SharePoint site accounts. Boxafe allows you to configure domain backups, restore data to the cloud, and view backup details at any time.

Getting Started

  1. Install Boxafe on your NAS.
  2. Create a Google service key or a Microsoft 365 authentication.
  3. Add a domain.
  4. Create or add a user.

Installation

Availability and Requirements


Requirement type

Details

Hardware

  • Boxafe is compatible with 64-bit Intel-based NAS, 64-bit AMD-based NAS, or 64-bit ARM-based NAS.

  • Minimum available memory of 2 GB and minimum total memory of 4 GB.

Software

  • QTS 4.4.2 (or later)

  • QuTS hero h4.5.0 (or later)

  • QuTScloud c4.5.1 (or later)

Application

Boxafe is available in the QNAP App Center.

Installing Boxafe

  1. Log on to QTS as administrator.
  2. Go to App Center, and then click .

    A search box appears.

  3. Type Boxafe, and then press ENTER.

    The Boxafe application appears in the search results.

  4. Click Install.

    The installation window appears.

  5. Select the volume where you want to install Boxafe.
  6. Click OK.

    QTS installs Boxafe.

Toolbar


No.

Description

User Actions

1

Background tasks

Shows all running tasks.

2

Event notifications

Shows all notifications including errors, warnings, and info.

Click More to view notification details in Logs.

3

User account

Shows current username.

Click to view log in details or log out of Boxafe.

4

Settings

  1. Click .

    The settings drop-down menu appears.

  2. You can perform any of the following actions:

    • Click to view Boxafe Quick Start.

    • Click to contact QNAP customer service.

    • Click  to change the language settings.

    • Click  to download the debug log.

    • Click to go to QNAP Customer Service.

    • Click to view QNAP's data privacy policy.

    • Click to view Boxafe app version details.

Dashboard

The Dashboard screen displays the protection status, data consumption, scheduled tasks, and task reports.

Domain Management

The Domain Management screen displays the domains, domain health status, domain administrators, domain users, and service health status. You can also edit domain settings, view domain logs, and delete domains.
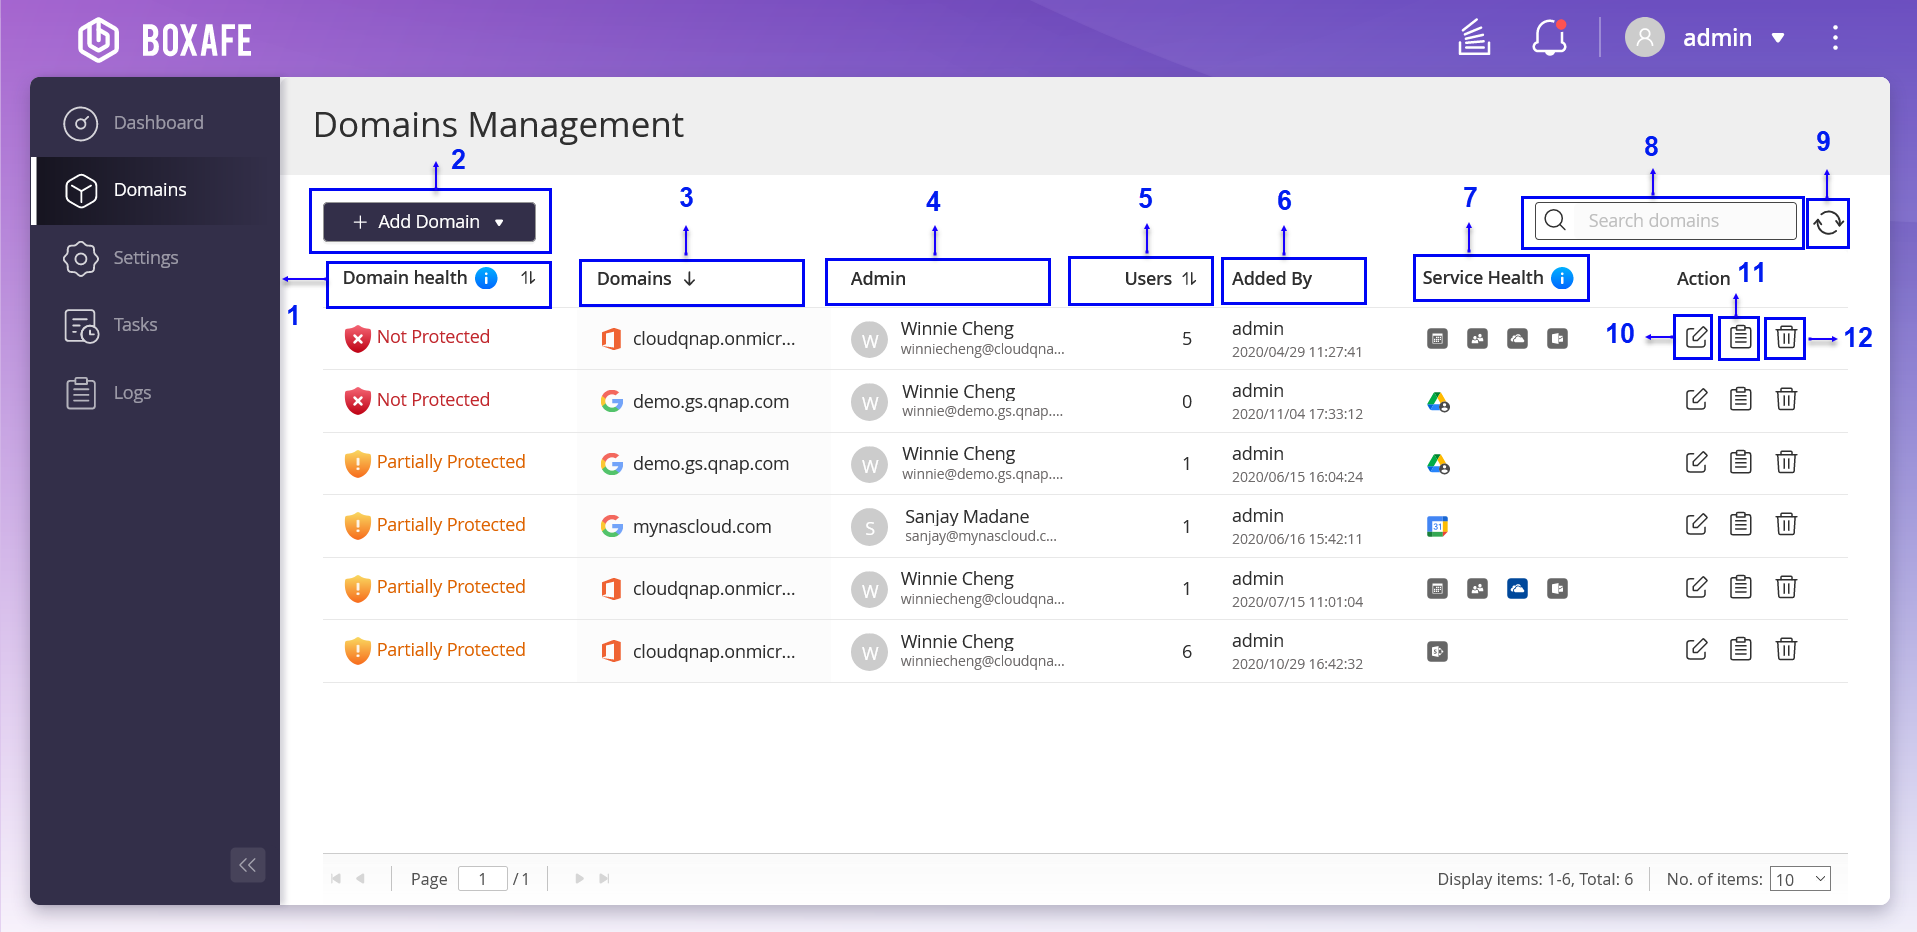
  

No.

Description

User Actions

1

Domain health

View domain health status.

2

Add Domain

Add a Microsoft 365 or Google Workspace domain to Boxafe for backup.

For details, see the following topics:

3

Domains

Displays the domain name.

4

Admin

Displays administrator name and email account.

5

Users

Displays the number of users.

6

Added By

Displays the user, who added the domain.

7

Service Health

Displays the domain account health status.

8

Search bar

You can set advanced search parameters in Boxafe search bars to quickly find emails, contacts, calendar, drives, OneDrives, Shared Drives, and SharePoint sites.

9

Refresh

Refresh domain information.

10

Edit domain information

Edit the domain information.

11

Logs

View the domain log status.

12

Delete

Delete the domain account.

Requirements for Adding a Domain

To add a Microsoft 365 or Google Workspace domain to Boxafe, you must acquire the required authentication and credentials from the respective service providers. 

Obtaining a Google Workspace Service Key

Boxafe for Google Workspace leverages Google’s OAuth 2.0 for authorization, ensuring security by allowing you to grant permissions to your service accounts. To add a Google Workspace domain to Boxafe for backup, you must create a Google Workspace service key (also known as a private key) to access Google Drive with the Drive SDK API. 

Granting Users Google Drive Access Using Drive SDK API

  1. Go to Google Admin.
  2. Log in to Google Admin.
    Note:

    Log in with the user credentials of the Google Workspace domain you want to backup with Boxafe.

  3. Click Apps.

    The Apps window appears.

  4. Click Google Workspace.

    The Google Workspace window appears.

  5. Click Drive and Docs.

    The Settings for Drive and Docs window appears.

  6. Click Features and Application.
  7. Go to Drive SDK.
  8. Click .
  9. Select Allow users to access Google Drive with the Drive SDK API.
  10. Click Save.

Enabling Google API and Services

  1. Go to Google API Console.
  2. Log in to the Google API Console.
    Note:

    You must log in using the credentials of a domain super administrator.

  3. Go to Dashboard.

    The Dashboard window appears.

  4. Click Select a project.

    The Select from window appears.

  5. Click New project.
  6. Specify the project name.
  7. Click Create.

    A confirmation message appears.

  8. Select the created project.
  9. Click Enable APIs and Services.

    The Google API page appears.

  10. Enable the following APIs:
    • Google Drive

    • Google Calendar API

    • Gmail API

    • Admin SDK

    • Google People API

  11. Go to the API Library.
  12. Enter the API name in the search bar.
  13. Click the API.
  14. Click Enable.

Creating a Google Service Key

  1. Go to Google API Console.
  2. Log in to the Google API Console.
    Note:

    You must log in using the credentials of a domain super administrator.

  3. Click .
  4. Go to IAM & admin > Service Accounts.
  5. Click Create Service Account.
  6. Specify the service account name.
  7. Click Create.

    The Create service account window appears.

  8. Click Select a Role.

    The Service account permissions page appears.

  9. Go to Project > Owner.
  10. Click Continue.

    The Create service account window appears.

  11. Click Done.

    The service key is downloaded to your computer.

Enabling Google Workspace Domain-Wide-Delegation

 
  1. Go to IAM & admin > Service Accounts.
  2. Click .
  3. Click Edit.

    The Service account status window appears.

  4. Click Show Domain-wide Delegation.
  5. Select Enable Domain-wide Delegation.
  6. Go to Product name for the consent screen.
  7. Enter the product name.

    For example, Boxafe.

  8. Click Add Key.
  9. Click Create new key.

    The Create private key window appears.

  10. Select JSON.
  11. Click Create.

    The private key is created.

  12. Click Save.
    Important:

    QNAP recommends keeping the generated private key safe. You will need the key for consecutive operations.

    • The private key is saved to your computer.

    • The Service accounts page appears.

  13. Go to the Domain wide delegation column.
  14. Click View Client ID.

    A side panel with the client ID appears.

  15. Copy the Client ID to the clipboard.
    Important:

    The Client ID is used to delegate domain-wide authority to your service account. QNAP recommends saving the ID on your computer.

  16. Go to Admin Console.
  17. Go to Security > Settings.

    The security settings window appears.

  18. Click API controls.

    The App access control page appears.

  19. Click MANAGE THIRD-PARTY APP ACCESS.
  20. Click OAuth App Name Or Client ID.
  21. Paste the Client ID into the search bar.
  22. Click Search.

    The app shows up in the search results.

  23. Select the app.
  24. Click Select.
  25. Return to API controls.
  26. Click MANAGE DOMAIN WIDE DELEGATION.
  27. Click Add new.

    The Add a new client ID window appears.

  28. Paste the client ID into the Client ID.
  29. Copy and paste the following list into OAuth scopes (comma-delimited):
    https://www.googleapis.com/auth/admin.directory.user.readonly,
    https://www.googleapis.com/auth/admin.directory.domain.readonly,
    https://www.googleapis.com/auth/calendar,
    https://www.googleapis.com/auth/calendar.events,
    https://www.googleapis.com/auth/drive,
    https://mail.google.com/,
    https://www.google.com/m8/feeds,
    https://www.googleapis.com/auth/userinfo.email,
    https://www.googleapis.com/auth/userinfo.profile,
    https://www.googleapis.com/auth/plus.me
  30. Click Authorize.

Obtaining Microsoft 365 Domain Authentication Credentials

Boxafe for Microsoft 365 leverages Microsoft Azure account authentication to ensure security and allows you to grant permissions to service accounts. To add a Microsoft 365 domain to Boxafefor backup, you must generate a client (application) ID, tenant (directory) ID, certificate, and add API permissions. 

Requirements


Category

Requirements

Hardware

A computer

Software

  • Minimum operating system version requirements: Windows 10 or Windows Server 16

  • PowerShell

  • Microsoft 365 administrator account

Generating a Microsoft 365 Tenant ID, Client ID, and Certificate

Important:

This task is only applicable to Boxafe 1.5 or later versions. For earlier versions of Boxafe, refer to the tutorial How to obtain authentication for adding a new Microsoft 365 domain in Boxafe.

  1. Power on your computer.
  2. Log in to Windows.
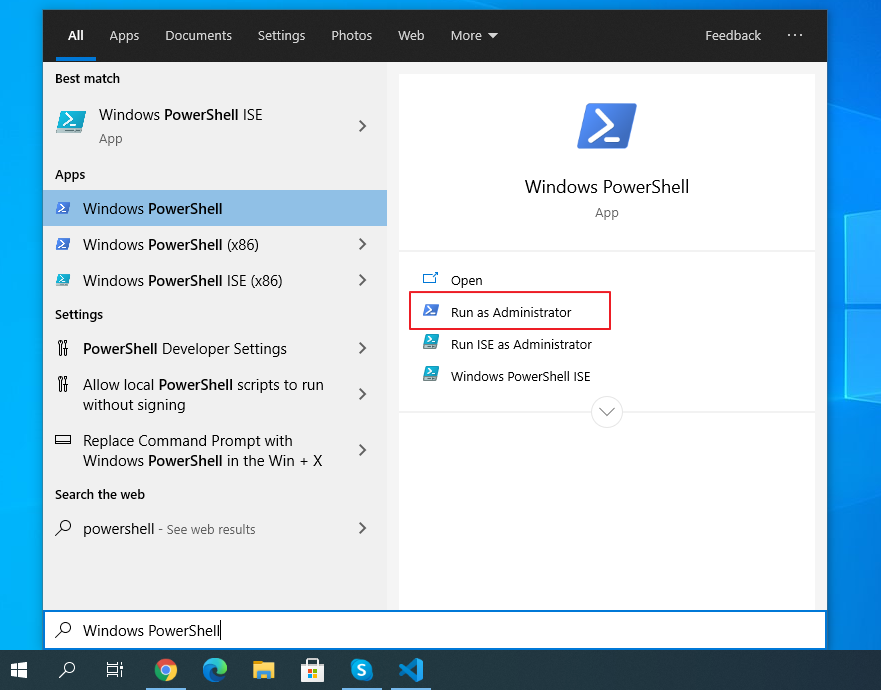
  3. Open PowerShell.
    1. Click Start.
    2. Search for PowerShell.
    3. Choose Windows PowerShell.
      Tip:

      Make sure you do not select Windows PowerShell (x86).

    4. Select Run as Administrator.
  4. Modify the execution policy by running the following command in PowerShell:

    Set-ExecutionPolicy -ExecutionPolicy RemoteSigned -Scope Process

    Note:

    For details about PowerShell execution policy, see: about_Execution_Policies

    A confirmation message appears.

  5. Enter Y or Yes.

    The PowerShell execution policy is modified.

  6. Download the BoxafeAppGenerator.ps1 PowerShell script and follow the instructions below:
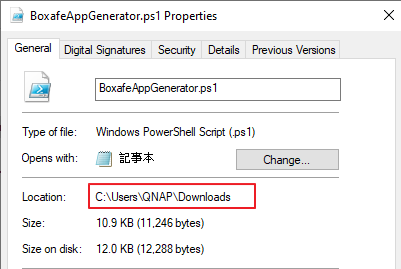
    1. Right-click on the BoxafeAppGenerator.ps1 file.

      A drop-down menu appears.

    2. Select Properties.

      The BoxafeAppGenerator.ps1 Properties page appears.

    3. Go to General.
    4. Copy the file Location details.
    5. Paste the file location into the value <location you copied> in the following command: 

      cd <location you copied>

      For example, if your location is C:\Users\QNAP\Downloads, then the command will become: cd C:\Users\QNAP\Downloads

      Opens the file location folder in PowerShell.

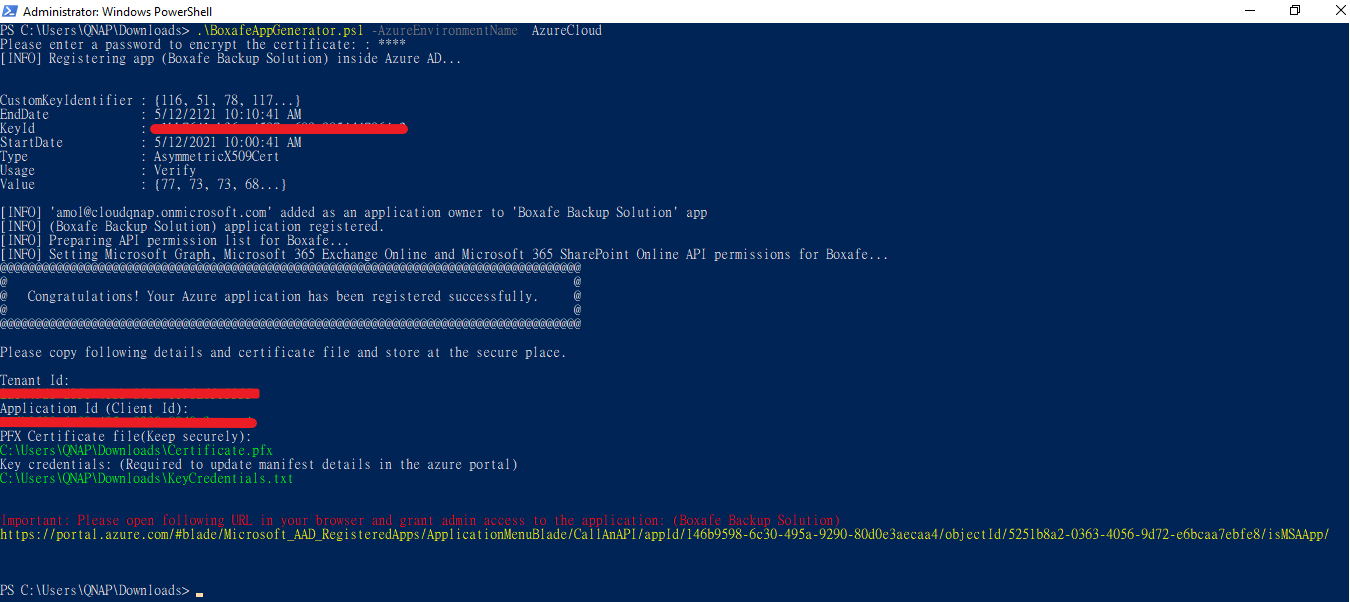
    6. Run the PowerShell script based on your Microsoft 365 domain region. For details, see the following table:
       

      Domain Region

      Command

      Microsoft 365 Global

      .\BoxafeAppGenerator.ps1 -AzureEnvironmentName AzureCloud

      Microsoft 365 operated by 21 Vianet (China)

      .\BoxafeAppGenerator.ps1 -AzureEnvironmentName AzureChinaCloud

      Microsoft 365 Germany

      .\BoxafeAppGenerator.ps1 -AzureEnvironmentName AzureGermanyCloud

      A certificate password configuration message appears.

  7. Specify a certificate password.
  8. Press Enter.

    A new certificate password is configured and the Microsoft Single Sign-On (SSO) window appears.

  9. Log in to Microsoft 365 as an administrator.
    • Boxafe is registered as a new application in Microsoft Azure AD.

      Tip:

      Do not close the window, you will need to return to the window later to complete Microsoft 365 authentication.

    • The Microsoft 365 tenant ID, client ID, and PFX certificate are generated and displayed in the PowerShell window.

      Tip:

      Do not close the PowerShell window or log out, you will need to return to the platform later to complete Microsoft 365 authentication.

  10. Go to the PowerShell window.
  11. Copy and save the Tenant Id, Application Id (Client Id), and PFX Certificate file (Keep securely).
    Important:

    Keep the Microsoft 365 authentication credentials safe. You will need the tenant ID, application ID (client ID), and PFX certificate to add the domain into Boxafe.

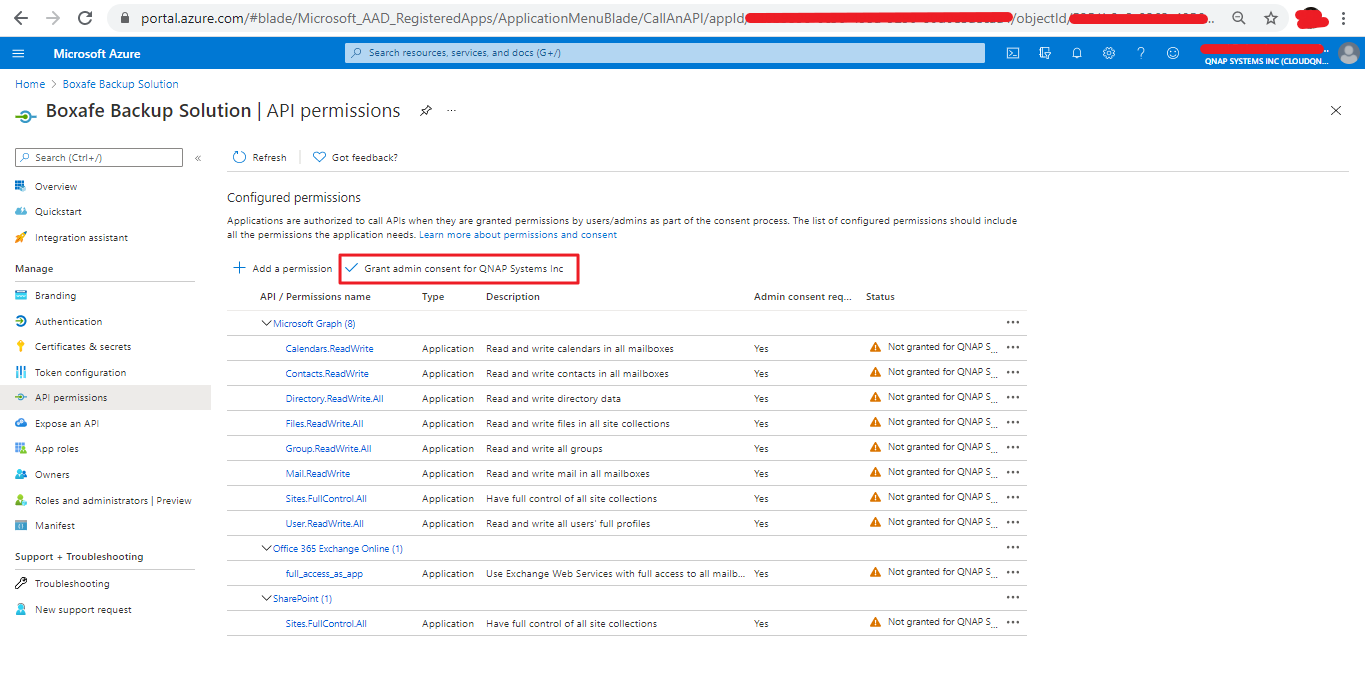
  12. Copy the generated URL shown at the bottom of the PowerShell window.
  13. Open the URL in a browser.

    The Boxafe Backup Solution API permissions window appears.

  14. Select Grant admin consent for QNAP Systems Inc.

    Boxafe is authorized to access your Microsoft 365 domain data.

Requesting Access to Microsoft Teams Protected APIs in Microsoft Graph

Important:

This Microsoft protected API access permission is only required for backing up Microsoft Teams data in Boxafe. You can skip this section if you do not need to back up Microsoft Teams data in Boxafe.

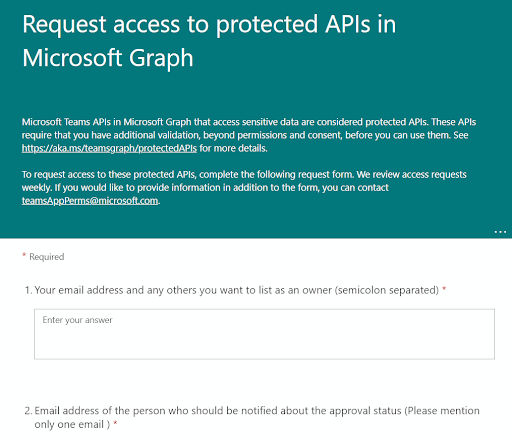
Microsoft Teams APIs in Microsoft Graph accesses sensitive data that are considered protected APIs. These APIs require additional validation and require you to submit the Request access to protected APIs in Microsoft Graph application form.

  1. Power on your computer.
  2. Log in to Windows.
  3. Open the Request access to protected APIs in Microsoft Graph form in a browser.

    The Request access to protected APIs in Microsoft Graph form appears.

  4. Specify the following information:
      

    No.

    Fields

    User Actions

    1

    Your email address and any others you want to list as an owner (semicolon separated)

    Enter the Microsoft 365 administrator email account or ID.

    2

    Email address of the person who should be notified about the approval status (Please mention only one email ) 

    Enter an email for receiving notifications.

    2

    May we contact you about your app's use of non-protected APIs? (E.g., reliability issues, advanced notice of breaking changes, throttling, etc)

    Select Yes.

    3

    Publisher name

    Enter your organization name.

    4

    App name

    Enter Boxafe.

    5

    App id(s) to enable application permissions for

    Enter the Microsoft 365 Client ID (Application ID).

    6

    What does your app do? Why does it exist? (2-3 sentences explaining to an admin who has never heard of your app what it is and why they want it)

    Copy and paste the following description into this field:

    Our solution is a backup and restore solution. With our app, users can backup their SaaS application data, like Microsoft 365 data and restore data whenever they need to.

    7

    Why does your app need read access to all messages in the tenant? (If you don't, you don't need protected APIs)

    Copy and paste the following description into this field:

    Our application is a backup solution. Our app helps users to back up their Microsoft Teams conversation. We provide an export conversation backups option.

    9

    What are the tenant IDs that this app needs to run in? (semicolon-separated. Put "all" if you're writing software for other organizations to use.)

    Enter the Microsoft 365 tenant ID.

    10

    Does your organization own all those tenants? (if no, your answer above should be "all", or you should get the tenant owner to submit the request)

    Select Yes.

  5. Click Next.
    Note:

    You can skip this page.

    The next question appears.

  6. Optional:  Answer the question: Anything else we need to know that doesn't fit in the above?

    You only need to respond to this question if there is anything worth noting.

  7. Click Submit.

    Your application to access Microsoft Teams protected APIs is submitted.

    Important:
    • It may take several days or weeks for Microsoft to process your application. Microsoft reviews access requests every Wednesday and implements approvals every Friday except during major holidays in the U.S. Submissions during holidays will be processed during the next work week.

    • If you would like to provide additional application information, contact: teamsAppPerms@microsoft.com

Granting Microsoft 365 Tenant Administrative Permissions for SharePoint Sites

Important:
  • You can skip this section if you do not need to back up Microsoft SharePoint site data in Boxafe.

  • You must obtain the Microsoft 365 Client ID, Tenant ID, and PFX Certificate before adding a SharePoint site to Boxafe.

  • The Microsoft 365 tenant administrative permissions are only required when adding a SharePoint site to Boxafe for backup. The permissions are not required when adding Microsoft 365 domains to Boxafe.

  1. Log in to the Microsoft Azure admin portal.
    Note:

    You must have Global admin credentials to log in to the Microsoft 365 domain.

  2. Go to Overview.
  3. Copy the Application (client) ID you obtained.
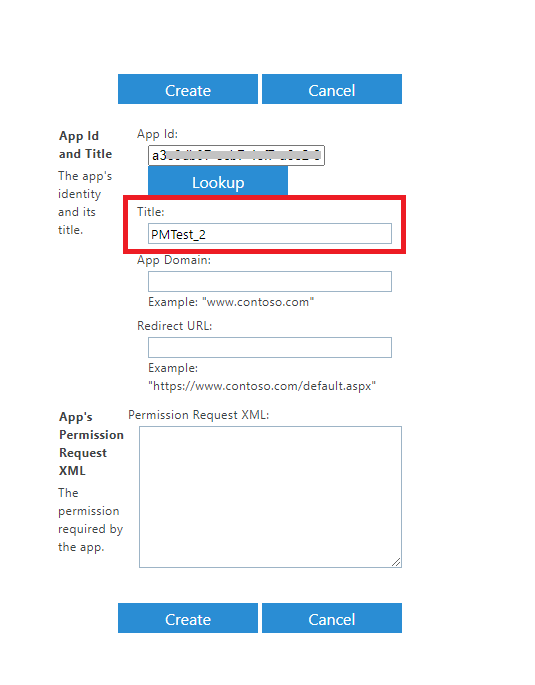
  4. Insert the tenant name into the following link: https://[tenant]-admin.sharepoint.com/_layouts/15/appinv.aspx.
    Note:

    The [tenant] name is the subdomain of your SharePoint Site. For example cloudqnap.sharepoint.com is the URL of your SharePoint site and cloudqnap is the tenant name.

  5. Open the link in the browser.
  6. Paste the ID into the App Id field.
  7. Click Lookup.

    The app title is generated.

  8. Enter the following information in the related fields:
     

    Fields

    Information

    App Domain:

    localhost

    Redirect URL:

    https://localhost

    App's Permission Request XML:

                  <AppPermissionRequests AllowAppOnlyPolicy="true"> <AppPermissionRequest Scope="http://sharepoint/content/tenant" Right="FullControl"/> </AppPermissionRequests> 
  9. Click Create.

    A confirmation message appears.

  10. Click Trust It.

    The Microsoft 365 tenant administrative permissions are granted to the SharePoint site.

Adding a Domain

Boxafe currently supports adding Google Workspace or Microsoft 365 domains for data backup.

Adding a Google Workspace Domain

Important:

You must obtain the service key to add a Google Workspace domain to Boxafe

  1. Open Boxafe.
  2. Go to Domains.
  3. Click Add New Domain.
  4. Specify the domain name.
  5. Specify the administrator email address.
  6. Upload the Google Workspace service key.
  7. Click Authorize.
  8. Optional:  Select the services for backup.
  9. Click Next.
  10. Select a backup schedule policy.
     

    Option

    Description

    All applications

    This includes the following services that will be selected for backup:
    • Gmail

    • Contacts

    • Calendar

    • Drive

    • Shared Drives

    Individual applications

    This includes the selected services for backup.

  11. Specify the following information.
     

    Backup Type

    User Actions

    One Time

    1. Specify the backup time.

    2. Select the number of months to retain the backed-up data.

      Note:

      This option is not available when backing up email.

    Manual

    Select the number of months to retain the backed-up data.

    Note:

    This option is not available when backing up email.

    Auto

    1. Select the frequency.

    2. Optional: Select the number of months to retain the backed-up data.

      Note:

      This option is not available when backing up email.

    3. Optional: Specify the stop time.

  12. Click Next.
  13. Select the users to add.
     

    Option

    Description

    Select all users (default option)

    Select this option to select all users registered on the selected domain.

    Select all users on this page

    Select this option to select all users shown on the displayed page.

  14. Optional:  Click Initiate backup after adding a user.
  15. Click Add.

Adding a Microsoft 365 Domain

  1. Open Boxafe.
  2. Go to Domains.
  3. Click Add New Domain.
  4. Obtain a Microsoft 365 authentication.
  5. Specify the following fields: 
    • Microsoft 365 endpoint

    • Domain admin email address

    • Directory (tenant) ID

    • Application (client) ID

    • Certificate file

    • Certificate password

  6. Click Authorize.
  7. Optional:  Select which Microsoft 365 services to back up.
  8. Select the users to add.
     

    Option

    Description

    Auto

    Automatically synchronize with Microsoft 365 and add new users to Boxafe.

    Manual

    Manually add users to Boxafe.

  9. Select the SharePoint sites to add.
     

    Option

    Description

    Auto

    Automatically synchronize with Microsoft 365 and add new sites for scheduled backup.

    Manual

    Manually add sites for scheduled backup.

  10. Select the Microsoft Teams to add.
     

    Option

    Description

    Auto

    Automatically synchronize with Microsoft 365 and add new Microsoft Teams for scheduled backup.

    Manual

    Manually add Microsoft Teams for scheduled backup.

  11. Click Next.
  12. Select the scope of the backup schedule.
     

    Option

    Description

    All Applications

    The backup schedule will apply to all applications.

    Individual Applications

    You can configure a different backup schedule for each application.

  13. Configure the backup schedule.
    1. Optional:  Select an application to configure a backup schedule.
      Note:

      This option is only available if you selected Individual Applications in the previous step.

    2. Select a backup schedule policy.
       

      Backup Type

      User Actions

      Continuous

      1. Specify the start date.

      2. Select Stop backup on and specify a date.

      Note:

      The system automatically creates a backup task for continuous backup.

      Manual

      Note:
      • No backup schedule is created.
      • This option is not available when backing up email.

      Scheduled

      1. Specify the backup interval.

      2. Specify the start date and time.

      3. Select Stop backup after and specify a date.

    3. Optional:  Select Delete older versions of backed up data after, and specify a period.
  14. Click Add.

    Boxafe adds the domain with the configured settings and backup schedule.

Editing Domain Data

You can edit the Google Workspace or Microsoft 365 domain information and configure the domain backup schedule policy.

Editing Domain Information

  1. Open Boxafe.
  2. Go to Domains.
  3. Select a domain.
  4. Go to the Action column.
  5. Click .

    The Edit Domain window appears.

  6. You can edit the following domain information:
     

    Domain Type

    Information

    Google Workspace

    • Service key

    • Enable or disable the following domain services:

      • Gmail

      • Contacts

      • Calendar

      • Drive

      • Shared Drives

        Note:

        You must go to Domain Settings to add or remove Shared Drives for data backup or data restoration.

    Microsoft 365

    • Client (Application) ID

    • Client secret

    • Tenant (Directory) ID

    • Enable or disable the following domain services:

      • Email

      • Calendar

      • Contacts

      • OneDrive

      • SharePoint

        Note:

        You must go to Domain Settings to add or remove SharePoint sites for data backup or data restoration.

  7. Click Update.

    The domain information is updated.

Configuring the Backup Schedule Policy

  1. Open Boxafe.
  2. Go to Domains.
  3. Select a domain.
  4. Click .

    The Edit Domain window appears.

  5. Click Backup Schedule.
  6. Specify the following:
     

    Fields

    User Actions

    Define backup schedule policy for

    You can select a backup policy for All applications or Individual applications.

    Backup type

    You can select one of the following backup types:

    • One Time: Back up applications only once during the specified time based on the selected backup policy.

    • Manual: Back up applications manually based on the selected backup policy.

    • Auto: Back up applications automatically based on the selected backup policy.

    Delete older versions of backed up data after

    Specify the expiration period for older backup data versions. You can select an expiration period option from the drop-down menu.

  7. Click Update.

Using Advanced Search to Find Domain Data

You can set advanced search parameters in the Boxafe search bar to quickly find emails, contacts, calendar, drives, OneDrives, Shared Drives, and SharePoint sites.

Using Advanced Search to Find Emails

  1. Open Boxafe.
  2. Go to Domains.
  3. Select a domain.
  4. Select one of the following:
     

    Domain Type

    User Actions

    Google Workspace

    Click Gmail.

    Microsoft 365

    Click Email.

  5. Go to the search bar.
  6. Click .

    The Advanced Search window appears.

  7. Specify the following search parameters:
     

    Search Parameter Category

    Parameters

    Email content

    • Subject: Search by email subject.

    • From: Search by email sender.

    • To: Search by email recipient.

    • Cc: Search by Cc recipient.

    • Bcc: Search by Bcc recipient.

    Email location

    • Current folder: Search in the current folder.

    • This folder and subfolders: Search in the current folders and its subfolders.

    • All Mail: Search all emails.

    Additional conditions

    • Include deleted emails: Search results will include deleted emails.

    • Only show emails with attachments: Search results only include emails with attachments.

  8. Optional:  Click Reset to clear search parameters.
  9. Click Search.

    All entries that meet the specified search parameters are listed.

Using Advanced Search to Find Contacts

  1. Open Boxafe.
  2. Go to Domains.
  3. Select a domain.
  4. Click Contacts.
  5. Go to the search bar.
  6. Click .
  7. Specify the following parameters:
    • Name: Search by contact name.

    • Email: Search by email name.

    • Nickname: Search by contact nickname.

    • Occupations: Search by contact occupation.

    • Phone numbers: Search by contact phone number.

  8. Optional:  Click Reset to clear search parameters.
  9. Click Search.

    All entries that meet the specified search parameters are listed.

Using Advanced Search to Find Calendar

  1. Open Boxafe.
  2. Go to Domains.
  3. Select a domain.
  4. Click Calendar.
  5. Go to the search bar.
  6. Click .

    The Advanced Search window appears.

  7. Specify the following search parameters:
    • Calendar: Search by calendar name.

    • Organizer: Search by calendar organizer.

    • Title: Search by calendar event title.

    • Event location: Search by event location.

  8. Optional:  Select Include attachments.
  9. Optional:  Click Reset to clear search parameters.
  10. Click Search.

    All entries that meet the specified search parameters are listed.

Using Advanced Search to Find a File in a Drive or OneDrive

  1. Open Boxafe.
  2. Go to Domains.
  3. Select one of the following domains:
     

    Domain Type

    User Actions

    Microsoft 365

    Click OneDrive.

    Google Workspace

    Click Drive.

  4. Click Drive.
  5. Go to the search bar.
  6. Click .

    The Advanced Search window appears.

  7. Specify the following search parameters:
      

    Domain Types

    Drive Types

    Search Parameters

    Microsoft 365

    OneDrive

    • File type: Specify the file type on the drive.

    • Owner: Specify an owner or select Anyone.

    • Date modified: Specify the date range for when the file was modified.

    • Item name: Select the file name or folder name.

    Google Workspace

    Drive

  8. Optional:  Click Reset to clear search parameters.
  9. Click Search.

    All entries that meet the specified search parameters are listed.

Using Advanced Search to Find a File in a Shared Drive or a SharePoint Site

  1. Open Boxafe.
  2. Go to Domains.
  3. Click Shared Drives.
  4. Select one of the following domains:
     

    Domain Type

    User Actions

    Microsoft 365

    Click SharePoint Site.

    Google Workspace

    Click Shared Drives.

  5. Specify the following search parameters:
    • File type: Search by file type.

    • Date modified: Search by date modified.

    • Item name: Search by item name.

  6. Optional:  Click Reset to clear search parameters.
  7. Click Search.

    All entries that meet the specified search parameters are listed.

Managing Domain Data

You can manage various Google Workspace and Microsoft 365 domain services data in Boxafe, including email, contacts, calendar, drive, Shared Drives, OneDrive, and SharePoint sites. You can back up data, restore data, or refresh domain data.

  1. Open Boxafe.
  2. Go to Domains.
  3. Click a domain.
  4. Select one of the following options:
      

    Service Types

    Options

    User Actions

    Google Workspace

    Gmail

    Click Gmail.

    Drive

    1. Click Drive.

    2. Select the drive version.

    Shared Drives

    1. Click Shared Drives.

    2. Select a Shared Drives version.

    Microsoft 365

    Email

    1. Click Email.

    2. Select an email.

    OneDrive

    1. Click OneDrive.

    2. Select a OneDrive backup version.

    SharePoint

    1. Click SharePoint.

    2. Select the SharePoint backup version.

    Common services

    Contacts

    1. Click Contacts.

    2. Select a contacts version.

    Calendar

    1. Click Calendar.

    2. Select the calendar version.

    3. Select the calendar date.

  5. Select one of the following options:
     

    Options

    User Actions

    Back Up Now

    1. Click Back Up Now.

    2. Click OK.

    Restore

    1. Click Restore.

    2. Click OK.

    Refresh list

    Click .

Exporting Domain Data to a Computer

You can export backed-up Google Workspace or Microsoft 365 domain data in Boxafe to your local computer.

  1. Open Boxafe.
  2. Go to Domains.
  3. Click a domain.
  4. Select one of the following options:
      

    Service Types

    Options

    User Actions

    Google Workspace

    Gmail

    1. Click Gmail.

    2. Select an email.

    Drive

    1. Click Drive.

    2. Select a drive backup file version.

    Shared Drives

    1. Click Shared Drives.

    2. Select a backup file version.

    3. Select a file.

    Microsoft 365

    Email

    1. Click Email.

    2. Select an email.

    OneDrive

    1. Click OneDrive.

    2. Select a OneDrive backup file version.

    Common services

    Contacts

    1. Click Contacts.

    2. Select a contact.

    Calendar

    1. Click Calendar.

    2. Select a calendar version.

    3. Select a date range.

    4. Select a calendar event.

  5. Click Export.

    The export drop-down menu appears.

  6. Select Computer.

    The export file window appears.

  7. Choose one of the following options:
     

    Option

    User Actions

    Open with

    1. Click Open with.

    2. Select an application.

    3. Select Do this automatically for files like this from now on.

    4. Click OK.

      The How do you want to open this file? window appears.

    5. Select an application.

      Follow the instructions displayed in the application setup wizard.

    Save file
    1. Click Save File.

    2. Select Do this automatically for files like this from now on.

    3. Click OK.

    The selected file is downloaded to your computer.

Exporting Domain Data to a NAS

You can export the backed-up Google Workspace or Microsoft 365 domain data in Boxafe to the Shared Folders on your QNAP NAS.

  1. Open Boxafe.
  2. Go to Domains.
  3. Click a domain.
  4. Select one of the following options:
      

    Service Types

    Options

    User Actions

    Google Workspace

    Gmail

    1. Click Gmail.

    2. Select an email.

    Drive

    1. Click Drive.

    2. Select a drive backup file version.

    Shared Drives

    1. Select a backup file version.

    2. Select a file.

    Microsoft 365

    Email

    Select an email.

    OneDrive

    1. Click OneDrive.

    2. Select a drive backup file version.

    Common services

    Contacts

    Select a contact.

    Calendar

    1. Click Calendar.

    2. Select a calendar version.

    3. Select a date range.

    4. Select a calendar event.

  5. Click Export.

    The export drop-down menu appears.

  6. Select NAS.

    The Select NAS Folder appears.

  7. Optional:  Click .

    Boxafe refreshes the shared folder list.

  8. Select a shared folder.
  9. Click Export.

    The Background Tasks window appears.

  10. Select the same name file policy.
  11. Click OK.

    The selected file is exported to the NAS shared folder.

Domain Settings

Domain Settings allows you to add and modify Google Workspace or Microsoft 365 domain users and services including Shared Drives and SharePoint sites.

Managing Domain Users

  1. Open Boxafe.
  2. Go to Domains.
  3. Click a domain.
  4. Go to Domain Settings.
  5. Select one of the following actions:
      

    No.

    Options

    User Actions

    1

    Add a domain user


    2

    Backup users

    1. Select one or multiple users.

    2. Click Backup.

      A confirmation message window appears.

    3. Click OK.

      The selected domain user data is backed-up.

    3

    Delete user

    1. Select one or multiple users.

    2. Click Delete User or .

      A confirmation message appears.

    3. Click Delete.

    4

    Search users

    Enter keywords to search for users.

    5

    Refresh list

    Click .

    6

    Sort list by last added

    • Click  or .

      Boxafe organizes the list by date in ascending order.

    • Click .

      Boxafe organizes the list by date in descending order.

    7

    Filter schedule

    1. Click .

      The schedule filter drop-down menu appears.

    2. Select a filter.

    3. Click Reset.

    4. Click OK.

    8

    Apply schedule

    1. Select one or multiple users.

    2. Enable Applied ().

    9

    Sort list by domain user

    • Click  or .

      Boxafe organizes the list by domain username in ascending alphabetical order.

    • Click .

      Boxafe organizes the list by the domain username in descending alphabetical order.

Managing Shared Drives

  1. Open Boxafe.
  2. Go to Domains.
  3. Select a Google Workspace domain.
  4. Go to Domain Settings.
  5. Click Shared Drives.
  6. Select one or multiple shared drives.
  7. You can perform one of the following actions:
      

    No.

    Options

    User Actions

    1

    Add shared drives

    1. Click + Add Shared Drives.

    2. Click Sync Shared Drives.

      The user list data is updated.

    3. Select a user.

    4. Select Initiate backup after adding a user.

    5. Click Add.

      The shared drive is added to the backup list.

    2

    Back up shared drives

    1. Click Backup.

      A confirmation message appears.

    2. Click OK.

    3

    Delete shared drives

    1. Click Delete or .

      A confirmation message appears.

    2. Click Delete.

    4

    Search shared drives

    Enter keywords to search for shared drives.

    5

    Refresh list

    Click .

    6

    Sort list by added by

    • Click  or .

      Boxafe organizes the list by date in ascending order.

    • Click .

      Boxafe organizes the list by date in descending order.

    7

    Filter schedule

    1. Click .

      The schedule filter drop-down menu appears.

    2. Select a filter.

    3. Click Reset.

    4. Click OK.

      A list of shared drives that meet the specified schedule filter are displayed.

    8

    Apply schedule

    Enable Applied ().

    9

    Sort list by last backup

    • Click  or .

      Boxafe organizes the list by last backup date in ascending order.

    • Click .

      Boxafe organizes the list by last backup date in descending order.

    10

    Sort list by shared drive name

    • Click  or .

      Boxafe organizes the list by shared drive name in ascending alphabetical order.

    • Click .

      Boxafe organizes the list by the shared drive name in descending alphabetical order.

Managing SharePoint Sites

  1. Go to Boxafe > Domains.
  2. Select a Microsoft 365 domain.
    Important:

    A SharePoint site has to be registered under the selected Microsoft 365 domain.

  3. Click Domain Settings.
  4. You can perform the following actions:
      

    No.

    Options

    User Actions

    1

    Add a SharePoint site

    1. Click +Add SharePoint Site.

    2. Select the SharePoint site you want to add to Boxafe.

    3. Select Start back up after adding a SharePoint site.

    4. Click Add.

      The SharePoint site is added to Boxafe.

    2

    Back up a SharePoint site

    1. Click Backup.

      A confirmation message appears.

    2. Click OK.

    3

    Delete a SharePoint site

    1. Click Delete or .

      A confirmation message appears.

    2. Click Delete.

    4

    Search bar

    Enter keywords to search SharePoint sites.

    5

    Refresh list

    Click .

    6

    Sort list by added by

    • Click  or .

      Boxafe organizes the list by date in ascending order.

    • Click .

      Boxafe organizes the list by date in descending order.

    7

    Filter schedule

    1. Click .

      The schedule filter drop-down menu appears.

    2. Select a filter.

    3. Click Reset.

    4. Click OK.

      The selected filter results are listed.

    8

    Apply schedule

    Enable Applied ().

    9

    Sort list by last backup

    • Click  or .

      Boxafe organizes the list by last backup date in ascending order.

    • Click .

      Boxafe organizes the list by last backup date in descending order.

    10

    Sort list by shared drive name

    • Click  or .

      Boxafe organizes the list by SharePoint site name in ascending alphabetical order.

    • Click .

      Boxafe organizes the list by the SharePoint site name in descending alphabetical order.

Managing Boxafe Users

The Settings screen displays QTS users, user roles, domain access, domain access email, and last login time. You can also add Boxafe users and edit user settings.

  1. Open Boxafe.
  2. Click Settings.
    Note:

    Only an administrator can modify Boxafe user settings.

  3. Select one of the following actions:
      

    No.

    Options

    User Actions

    1

    Add a Boxafe user

    1. Click +Add User.

    2. Specify the following information:

      • User

      • Role

      • Domain

      • Email address

    3. Click Apply.

    2

    Search Boxafe users

    1. Go to search bar.

    2. Enter keywords.

      A list of users that meet the search results is displayed.

    3

    Refresh list

    Click .

    The user list is refreshed.

    4

    Delete a Boxafe user

    1. Click .

      A confirmation message appears.

    2. Click Delete.

    5

    Edit a Boxafe user

    1. Click .

      The Edit User window appears.

    2. Specify the following:
      • Role

      • Domain

      • Email-ID

    3. Click Apply.

    6

    Sort list by last login time

    • Click  or .

      Boxafe organizes the list by last login time in ascending order.

    • Click .

      Boxafe organizes the list by last login time in descending order.

    7

    Sort list by domain access email

    • Click  or .

      Boxafe organizes the list by domain access email in ascending alphabetical order.

    • Click .

      Boxafe organizes the list by domain access email in descending alphabetical order.

    8

    Sort list by domain access

    • Click  or .

      Boxafe organizes the list by domain access name in ascending alphabetical order.

    • Click .

      Boxafe organizes the list by domain access name in descending alphabetical order.

    9

    Sort list by role

    • Click  or .

      Boxafe organizes the list by role name in ascending alphabetical order.

    • Click .

      Boxafe organizes the list by role name in descending alphabetical order.

    10

    Sort list by QTS users

    • Click  or .

      Boxafe organizes the list by QTS username in ascending alphabetical order.

    • Click .

      Boxafe organizes the list by QTS username in descending alphabetical order.

Managing Tasks

The Tasks screen displays all running, scheduled, and completed tasks. You can also view detailed task statuses and canceled tasks. For additional user actions, see the table below for details.
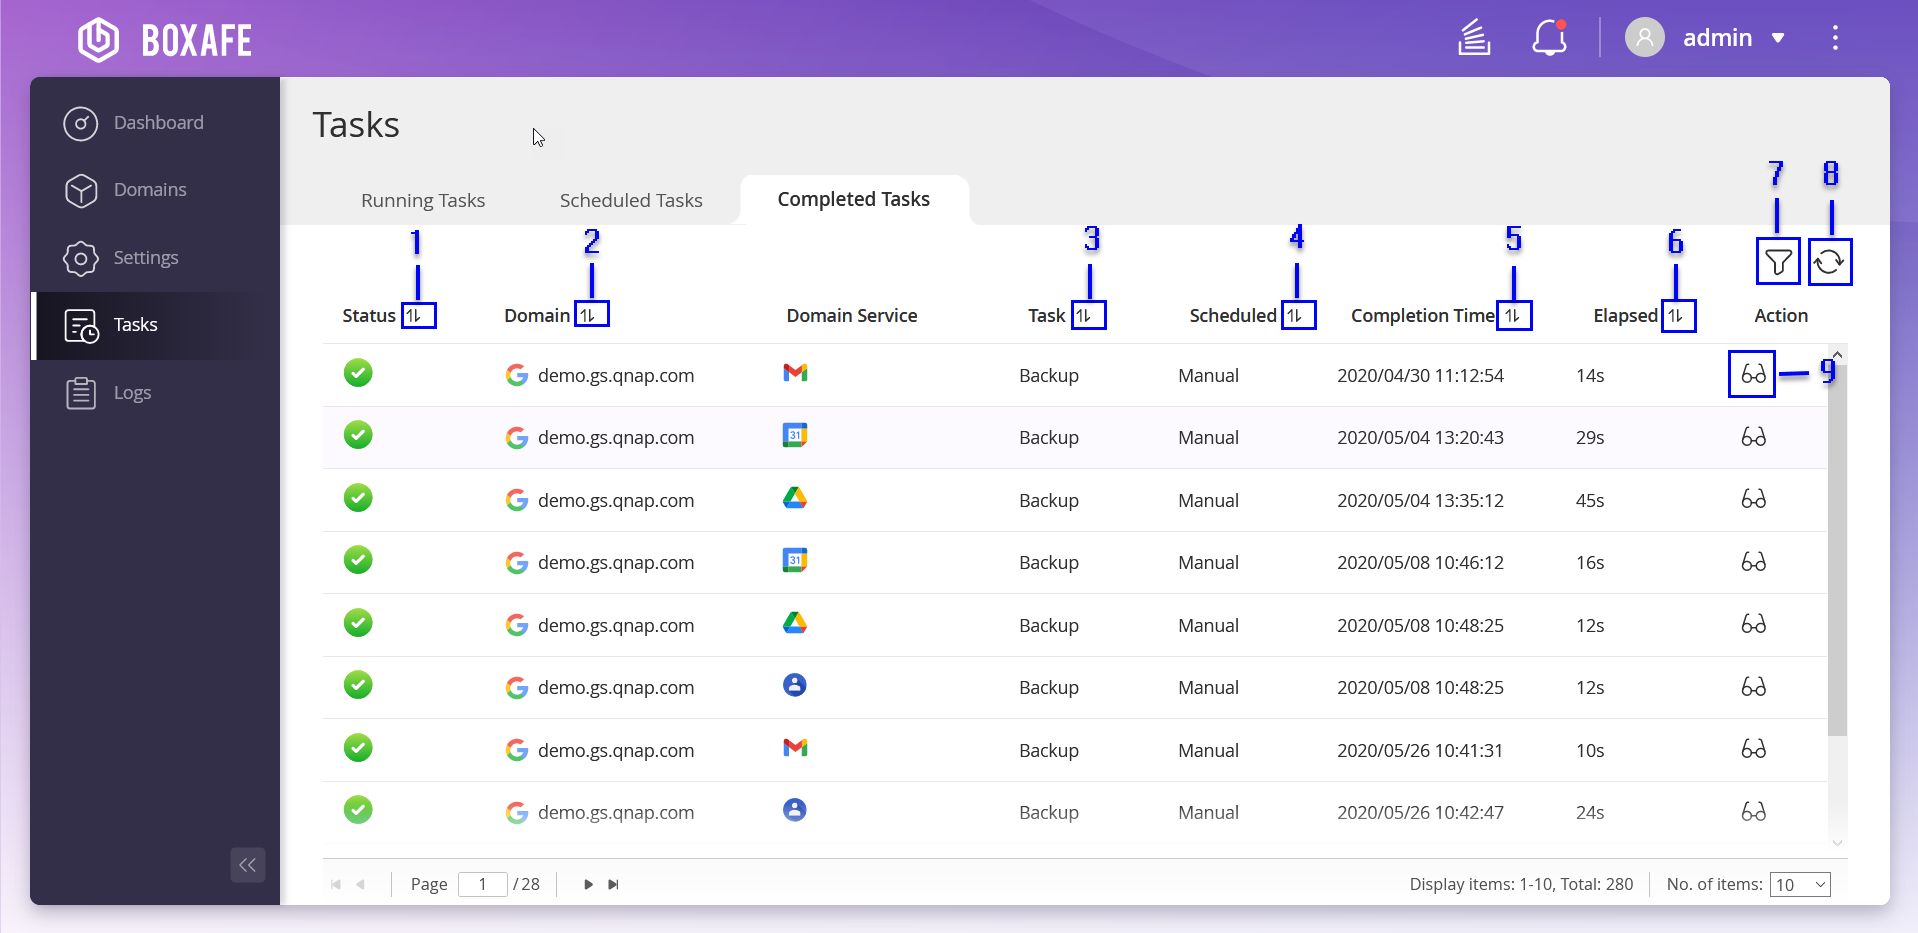
  

No.

Descriptions

User Actions

1

Sort list by task status

  • Click  or .

    Boxafe organizes the list by task status in ascending alphabetical order.

  • Click .

    Boxafe organizes the list by task status in descending alphabetical order.

2

Sort list by domain name

  • Click  or .

    Boxafe organizes the list by domain name in ascending alphabetical order.

  • Click .

    Boxafe organizes the list by domain name in descending alphabetical order.

3

Sort list by task type

  • Click  or .

    Boxafe organizes the list by task type in ascending alphabetical order.

  • Click .

    Boxafe organizes the list by task type in descending alphabetical order.

4

Sort list by task schedule

  • Click  or .

    Boxafe organizes the list by task schedule in ascending alphabetical order.

  • Click .

    Boxafe organizes the list by task schedule in descending alphabetical order.

5

Sort list by task completion time

  • Click  or .

    Boxafe organizes the list by task completion time in ascending order.

  • Click .

    Boxafe organizes the list by task completion time in descending order.

6

Sort list by task elapsed time

  • Click  or .

    Boxafe organizes the list by task elapsed time in ascending order.

  • Click .

    Boxafe organizes the list by task elapsed time in descending order.

7

Filter tasks


8

Refresh task list

Click .

9

View task status


Viewing Task Status

  1. Open Boxafe.
  2. Click Tasks.
  3. Select one of the options:
     

    Options

    User Actions

    Running Tasks

    Click Running Tasks.

    Scheduled Tasks

    Click Scheduled Tasks.

    Completed Tasks

    Click Completed Tasks.

  4. Click .

    The Detailed Task Status window appears.

  5. Optional:  Click .

    The task status is refreshed.

  6. Click Status.

    The task status appears.

  7. Optional:  Click Subtasks.

    The subtask status appears.

Filtering Tasks

  1. Open Boxafe.
  2. Click Tasks.
  3. Select one of the options:
     

    Options

    User Actions

    Running Tasks

    Click Running Tasks.

    Scheduled Tasks

    Click Scheduled Tasks.

    Completed Tasks

    Click Completed Tasks.

  4. Specify a date range.
  5. Select a domain.
  6. Optional:  Click Clear All Filters.

    All filters are removed.

  7. Click Apply.

    Only tasks that meet the filtered conditions are displayed.

Managing Logs

The Logs screen displays the severity, date and time, description, and domain associated with each event. You can export or delete all logs.
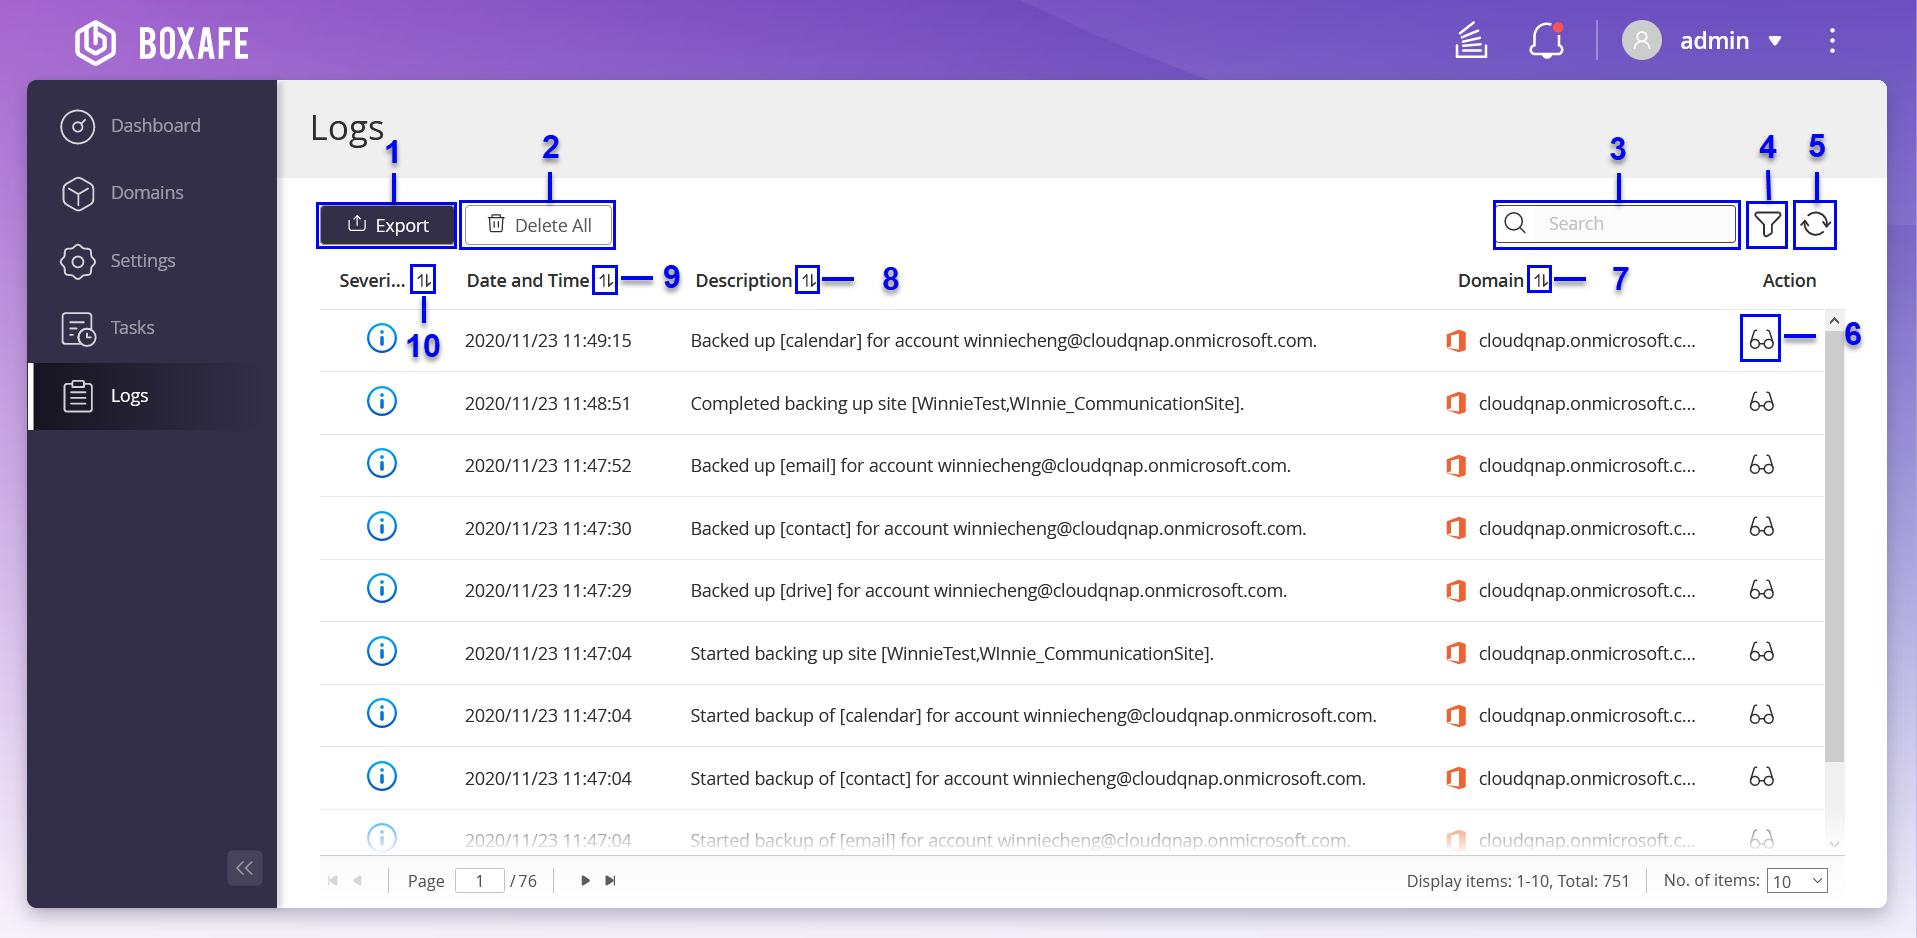
  

No.

Description

User Actions

1

Export logs

Exports all logs to your computer.

2

Delete all logs

  1. Click Delete All.

    A confirmation message appears.

  2. Click Delete.

    All logs are deleted.

3

Search logs

  1. Enter keywords in the search bar.

  2. Press Enter.

4

Filter logs

Filters logs based on specified conditions.

5

Refresh logs

Click .

6

View logs

  1. Click .

    The Detailed Task Status window appears.

  2. Click Status.

    The task status appears.

  3. Click Subtasks.

    The subtask status appears.

7

Sort by domain name

  • Click  or .

    Boxafe organizes the list by the domain name in ascending alphabetical order.

  • Click .

    Boxafe organizes the list by the domain name in descending alphabetical order.

8

Sort by description

  • Click  or .

    Boxafe organizes the list by the description in ascending alphabetical order.

  • Click .

    Boxafe organizes the list by the description in descending alphabetical order.

9

Sort by date and time

  • Click  or .

    Boxafe organizes the list by the date and time in ascending order.

  • Click .

    Boxafe organizes the list by the date and time in descending order.

10

Sort by severity level

  • Click  or .

    Boxafe organizes the list by the severity level in ascending order.

  • Click .

    Boxafe organizes the list by the severity level in descending order.

Exporting Logs

  1. Open Boxafe.
  2. Click Logs.
  3. Click Export.

    A confirmation message for exporting all logs appears.

  4. Click Export.

    The Opening boxafe-logs.csv window appears.

  5. Select one of the following options:
     

    Options

    User Actions

    Open with

    1. Click Open with.

    2. Select an application.

    Save File

    Click Save File.

  6. Optional:  Select Do this automatically for files like this from now on.
  7. Click OK.

    All logs are downloaded to your computer.

Filtering Logs

  1. Open Boxafe.
  2. Click Logs.

    A confirmation message for exporting all logs appears.

  3. Click .

    The filter conditions drop-down menu appears.

  4. Specify the following conditions:
     

    Filter Parameters

    User Actions

    Severity level

    1. Click .

      The severity level drop-down menu appears.

    2. Select a severity level.

    Date

    1. Click the date bar.

    2. Select a start date.

    3. Select an end date.

    Domain

    1. Click .

    2. Select a domain name.

  5. Optional:  Click Clear All Filters.

    All filter conditions are removed.

  6. Click Apply.

Was this article helpful?

33% of people think it helps.
Thank you for your feedback.

Please tell us how this article can be improved:

If you want to provide additional feedback, please include it below.

Teknik Özellik sSçin

      Daha fazla göster Daha az

      Diğer ülkelerde/bölgelerde bu site:

      open menu
      back to top