How to use SnapSync for backup and disaster recovery?
Applicable Products
QuTS hero h5.0.1 (or later)
This tutorial provides a step-by-step demonstration of how you can use SnapSync as a backup and disaster recovery solution.
- About SnapSync
- Setup Requirements
- Creating a Real-Time SnapSync Job
- Configuring Identical Users and Shared Folder Permissions
- Replacing the Source NAS with the Destination NAS after Disaster
About SnapSync
SnapSync is a disaster recovery solution that enables you to back up data from one QNAP NAS to another using block-level replication in real time. This means that whenever data is written to the source NAS, it is also immediately written to the destination NAS. This reduces the backup time and lowers the risk of data loss.
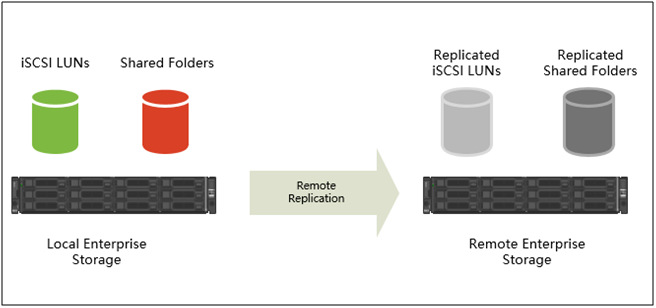
SnapSync uses AES-256 encryption to ensure the data is secure during transmission.
Setup Requirements
In this tutorial, we illustrate how to create a real-time SnapSync job between two NAS devices running QuTS hero.
The following conditions are required:
- For this tutorial, the source and destination NAS devices run on the same QuTS hero version.Note
- If the SnapSync versions are incompatible between the two NAS devices, you will be prompted to update the OS on one or both devices.
- SnapSync jobs can also be created between two NAS devices running QES, or between one NAS running QuTS hero and one NAS running QES.
For details on OS compatibility, see the SnapSync section in the QuTS hero User Guide.
- The destination NAS has the same user accounts that exist on the source NAS.NoteThis allows you to set identical user permissions for the folders on both NAS devices, so that you will not encounter user permission issues after replacing the source NAS with the destination NAS.
- The network connection between the two NAS devices must not use port forwarding or NAT virtual servers.
- If the two NAS devices are on different WANs, then they must be connected using a site-to-site VPN tunnel.
In the following instructions, we use the shared folder "Test" as the SnapSync job source. The shared folder has the following subfolders and structure:
- Test
- Test_1
- Test_1_1
- Test_2
- Test_1
After configuring a real-time SnapSync job, we demonstrate how to configure identical shared folder permissions on both NAS devices, and lastly how to replace the source NAS with the destination NAS.
Creating a Real-Time SnapSync Job
- Log in to the source NAS.
- Go to Storage & Snapshots > Snapshot Backup > SnapSync.
- Enable SnapSync service.

- Click Create a SnapSync Job.
 The Create a SnapSync Job wizard opens.
 - Click Sync to Remote.

- Specify a job name.NoteThe name cannot contain any of the following special characters: ` * = + [ ] \ | ; : ' " , < > / ? %
- Select the source storage pool.
- Select a shared folder.
For this tutorial, we select the shared folder "Test".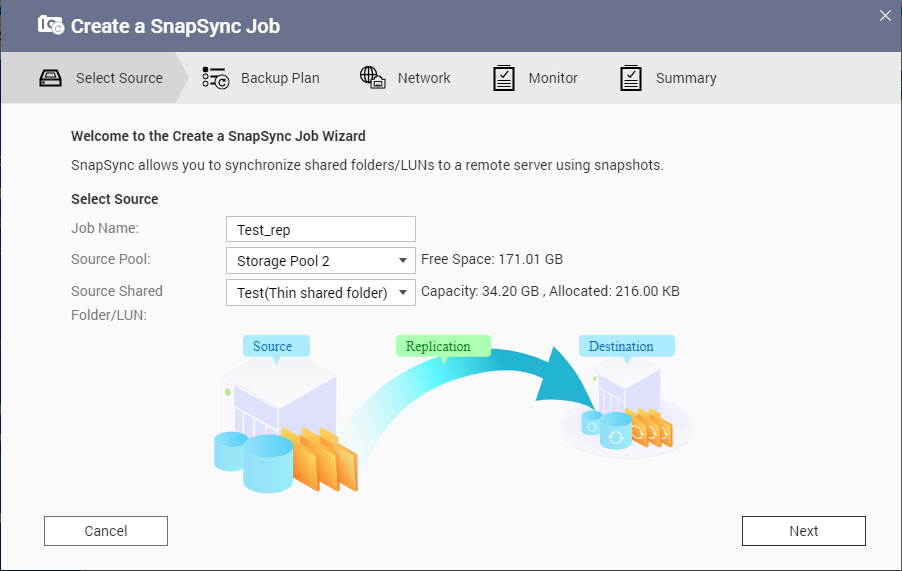 NoteShared folders and LUNs created via Instant Clone cannot be used as a source for SnapSync jobs.
 - Click Next.
- Select the destination remote NAS.
- Optional: Specify the remote SnapSync port number.NoteThe default is 8080.
- Optional: Enable HTTPS encryption.
- Specify an administrator account and password of the remote NAS.ImportantFor security reasons, QNAP does not recommend using the "admin" account.
- Click Connect.
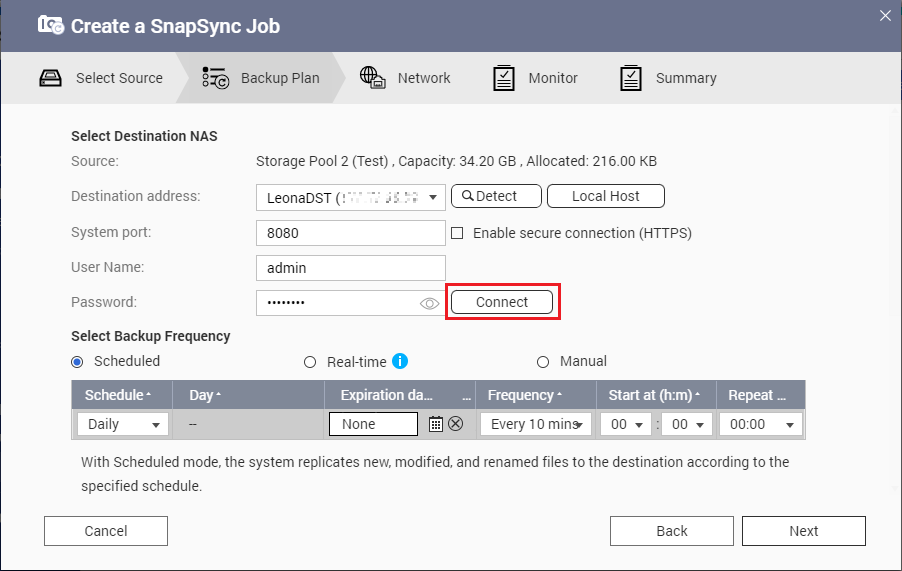 ImportantIf prompted, complete 2-step verification. This is required if the destination NAS has enabled 2-step verification.
 - After a successful connection, select Real-time for the backup frequency.
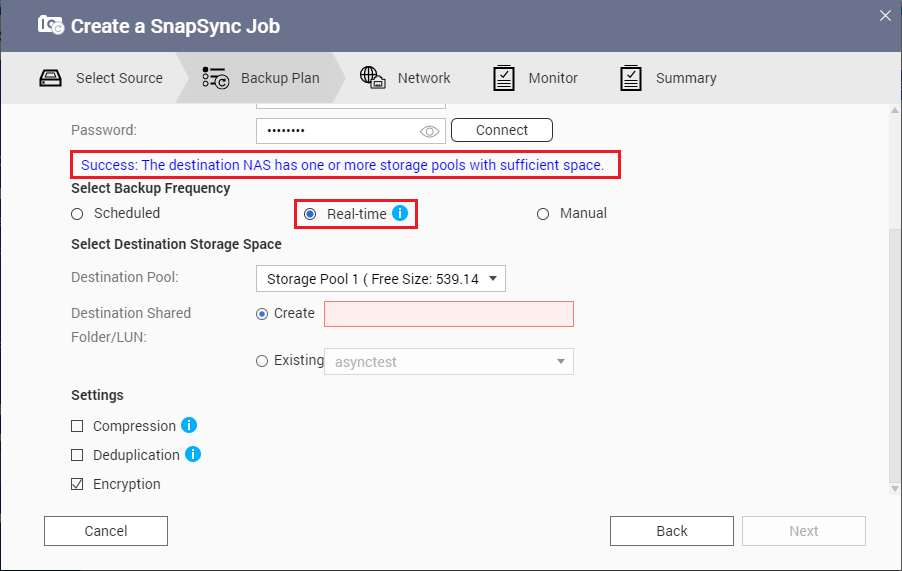
- Select the destination storage pool.
- Create a new shared folder with the same name as the source shared folder.

- Optional: Configure job options.
Setting Description Compressions SnapSync compresses the data before sending it to the destination. The destination NAS decompresses the data before saving it to disk. Enabling this setting can reduce transfer times if your NAS or the remote NAS has a slow network connection, or the two NAS devices are connecting via WAN. Deduplication SnapSync reduces the amount of storage and bandwidth needed by eliminating duplicate copies of repeated data. Encryption SnapSync encrypts the data during transmission to the destination NAS. The data is then decrypted before being stored at the destination. Support application consistent snapshots SnapSync creates application consistent snapshots. NoteThis option is only available for VMware vCenter and Volume Shadow Copy Service (VSS) aware applications running on a Windows server. You must install QNAP Snapshot Agent on the iSCSI initiator. - Click Next.
- Set the source and destination network adapters for this job.
Adapter Setting Description Auto-Select Network Adapter The system automatically selects the fastest network adapters at the source and destination for this job.
If either network adapter becomes disconnected, the system will select the fastest available adapter.Manual-Select Network Adapter Manually select the network adapters at the source and destination for this job. You can also select failover adapters, which the job uses if the either primary adapter becomes disconnected. NoteThe adapter lists are automatically filtered to only display adapters that can connect to the currently selected adapter. - Click Next.
- Configure the latency monitor.Note
- This setting is only available for real-time SnapSync jobs.
- Latency Monitor monitors the latency of the SnapSync job to ensure the job is running normally. If the job latency goes over the threshold six times within a minute, the system issues a warning notification.
- Enable Latency threshold.
- Set a threshold value, in milliseconds. The value must be 1–5000.TipTo determine the threshold value, run a SnapSync performance test by clicking Create a Performance Test. To view the average latency in previous performance tests, click Performance Report.
- Click Next.
- Review the SnapSync job details.
- Click Create.
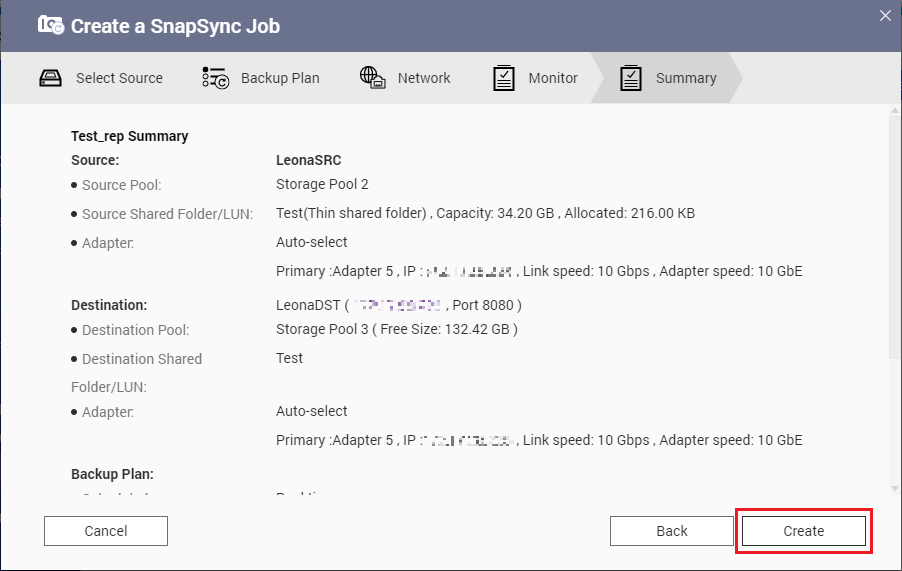 The system creates the real-time SnapSync job and replicates the shared folder to the destination NAS.
The new SnapSync job appears in Storage & Snapshots > Snapshot Backup > SnapSync.
- Verify the new shared folder has been created on the destination NAS.
- Log in to the destination NAS.
- Go to Storage & Snapshots > Storage > Storage/Snapshots.
- Click the destination storage pool.
The new shared folder should appear under the storage pool. NoteTo prevent accidental changes, the destination shared folder is set to read-only until the SnapSync connection is removed.
After creating the SnapSync job, we need to configure the access privileges for the replicated shared folder on the destination NAS, so that they match the access privilege settings for the shared folder on the source NAS.
Configuring Identical Users and Shared Folder Permissions
Although SnapSync is able to replicate a shared folder from the source NAS to the destination NAS, it cannot replicate the user permissions associated with the shared folder. This is true even if both the source and destination NAS devices have joined the same AD domain.
Users must replicate the shared folder permissions manually if they want the destination NAS to be able to replace the source NAS when disaster occurs.
- Ensure the user accounts on the source NAS also exist on the destination NAS.
- Log in to the source NAS.
- Go to Control Panel > Privilege > Users.
- Log in to the destination NAS.
- Go to Control Panel > Privilege > Users.
- Compare the two user lists.
- Optional: On the destination NAS, click Create and select a method to add accounts that appear on the source NAS but not on the destination NAS.NoteFor the purpose of this tutorial, we only need the user accounts "admin", "user1", and "user2".
- Note the user permissions for the shared folder on the source NAS.
- On the source NAS, go to Control Panel > Privilege > Shared Folders.
- Locate the shared folder.
For this tutorial, the shared folder is "Test". - Under Action, click the Edit Shared Folder Permission icon.
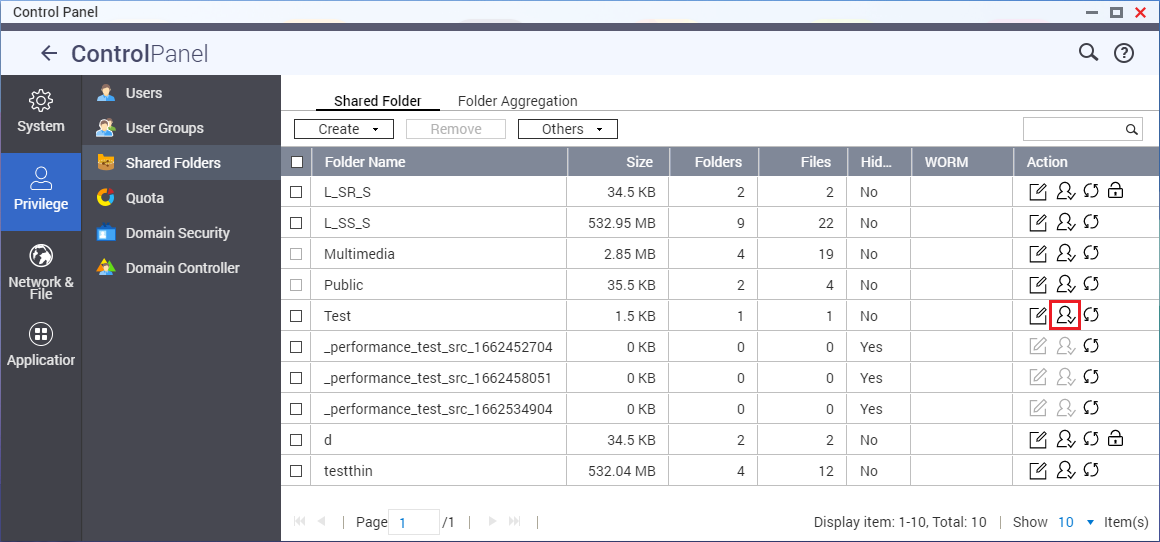 The Edit Shared Folder Permission window opens.
- Go to Users and groups permission.
- Note the individual permissions for each user.
- For each subfolder, click the subfolder and note the user permissions.NoteFor this tutorial, the user permissions for the folder "Test" and its subfolders are as follows:
Folder Permissions Test - admin: Read/Write
- user1: Read/Write
- user2: Read/Write
Test_1 - admin: Read/Write
- user1: Read/Write
- user2: Deny Access
Test_1_1 - admin: Read/Write
- user1: Read Only
- user2: Deny Access
Test_2 - admin: Read/Write
- user1: Deny Access
- user2: Read/Write
- Click Close.
- Replicate the user permissions for the same folder and subfolders on the destination NAS.
- On the destination NAS, go to Control Panel > Privilege > Shared Folders.
- Locate the shared folder.
- Under Action, click the Edit Shared Folder Permission icon.
The Edit Shared Folder Permission window opens. - Go to Users and groups permission.
- Optional: Click Add Users to add any missing users found in the source shared folder user permission list.
 The Add Users window opens.
- Configure the same user permissions for the shared folder and all subfolders as on the source NAS.
To follow the example for this tutorial, see the table in step 2f for details. - Click Apply.
The system saves the settings.
The disaster recovery setup is now complete.
If disaster occurs on the source NAS, you can now replace the source NAS with the destination NAS.
Replacing the Source NAS with the Destination NAS after Disaster
If any errors or any disaster occurs on the source NAS such that data on the source NAS is no longer accessible, you can replace the source NAS with the destination NAS and continue accessing the SnapSync data.
You will need to remove the SnapSync job and then configure the network settings on the destination NAS to be identical to the network settings on the source NAS.
- Verify there is no longer a connection between the source and destination NAS devices.
- Log in to the destination NAS.
- Go to Storage & Snapshots > Snapshot Backup > SnapSync.
- Identify the SnapSync job created from the source NAS.
- The Job Status should show "Connection failed".

- If the job status is normal but you still want to replace the source NAS with the destination NAS, click the Stop icon under Action.
- Click the Delete icon to delete the SnapSync job.
A confirmation window appears.
- Click OK.
- Ensure the source NAS is no longer connected to the network.NoteTo ensure the destination NAS can use the network settings of the source NAS, the source NAS must no longer be connected to the network, or else an IP conflict will occur. If the source NAS is accessible, you can also change the network settings on the source NAS first.
- Configure the network settings on the destination NAS.
- Go to Network & Virtual Switch > Network > Interfaces.
- Identify the main interface connection.
- Click the More icon and select Configure.
 The Configure window opens.
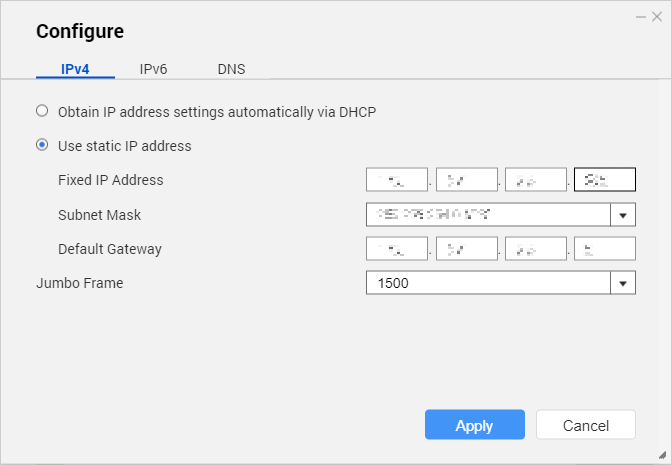
- Configure the same IP address settings that were previously used for the main interface connection on the source NAS.
- Click Apply.
You can now connect to the destination NAS and access the SnapSync data as you previously did with the source NAS.


