Connecting a QNAP NAS to an LDAP Directory
What is LDAP?
Lightweight Directory Access Protocol (LDAP) is a directory that stores information for users and groups on a central server. Administrators can use LDAP to manage users in an LDAP directory and allow the users to connect to multiple NAS servers by using the same username and password.

This application note is intended for administrators and users with knowledge of Linux servers, LDAP servers, and Samba. The LDAP feature on QNAP NAS devices requires a working LDAP server.
Requirements:
- LDAP server connection and authentication information
- LDAP structure (where the users and groups are stored)
- LDAP server security settings
Follow the steps below to connect a QNAP NAS to an LDAP directory.
- Log in to the NAS as administrator.
- Go to Control Panel > Privilege > Domain Security.
Note: By default, “No domain security” is enabled and only local NAS users can connect to the NAS. - Select LDAP authentication.

- Specify the following information:
| Field | Description |
|---|---|
| LDAP server host | Specify the host name or IP address of the LDAP server. |
| LDAP security | Specify how the NAS will communicate with the LDAP server:
|
| Base DN | Specify the LDAP domain. Example: dc=mydomain,dc=local |
| Root DN | Specify the LDAP root user. Example: cn=admin,dc=mydomain,dc=local |
| Password | Specify the root user password. |
| Users base DN | Specify the organizational unit (OU) where users are stored. Example: ou=people,dc=mydomain,dc=local |
| Groups base DN | Specify the organizational unit (OU) where groups are stored. Example: ou=group,dc=mydomain,dc=local |
- Click Apply.
- Optional: Configure LDAP authentication options.
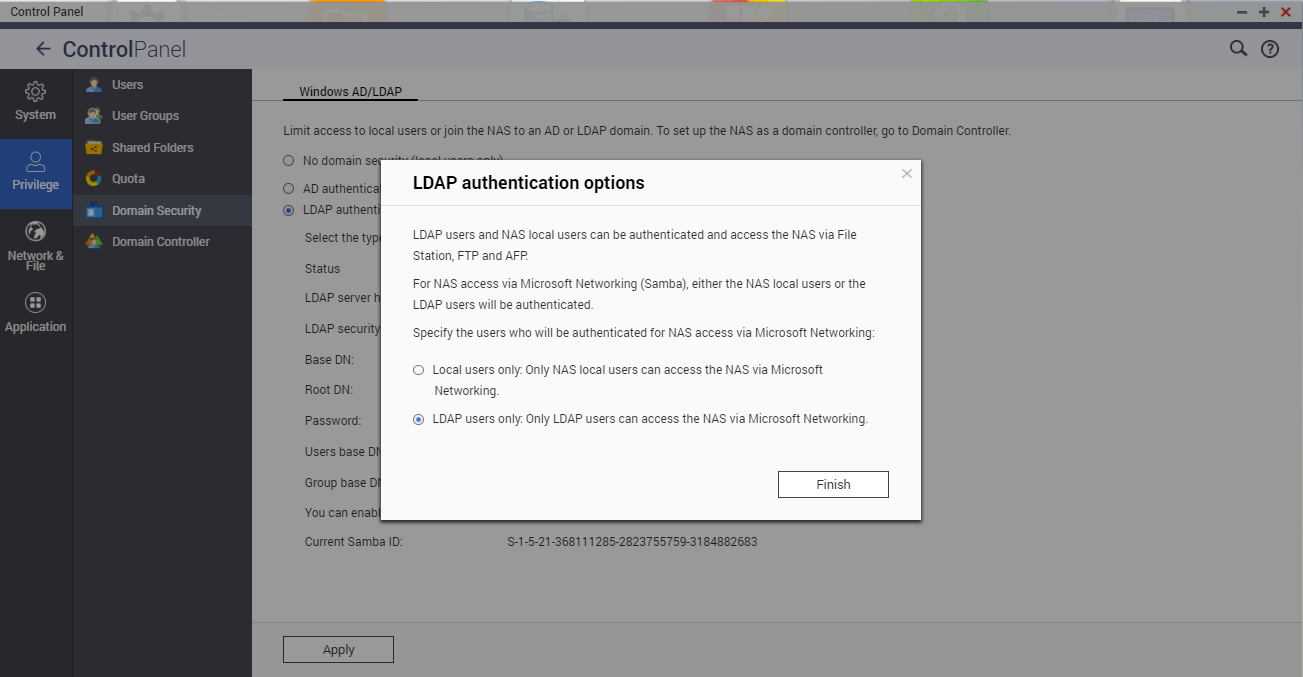
If Microsoft Networking is enabled before connecting the NAS to the LDAP directory, the LDAP authentication options window appears.- Select the users to authenticate.
- Local users only: Only local NAS users can access the NAS via Microsoft Networking.
- LDAP users only: Only LDAP users can access the NAS via Microsoft Networking.

- Select the users to authenticate.
- Click Finish.
Authenticating LDAP Users and Groups After Connecting the NAS to an LDAP Directory
Note:
- If Microsoft Networking is not enabled before you connect the NAS to the LDAP directory, you must authenticate LDAP users after connecting the NAS to the LDAP directory.
- LDAP users can access SMB shared folders, FTP, and AFP.
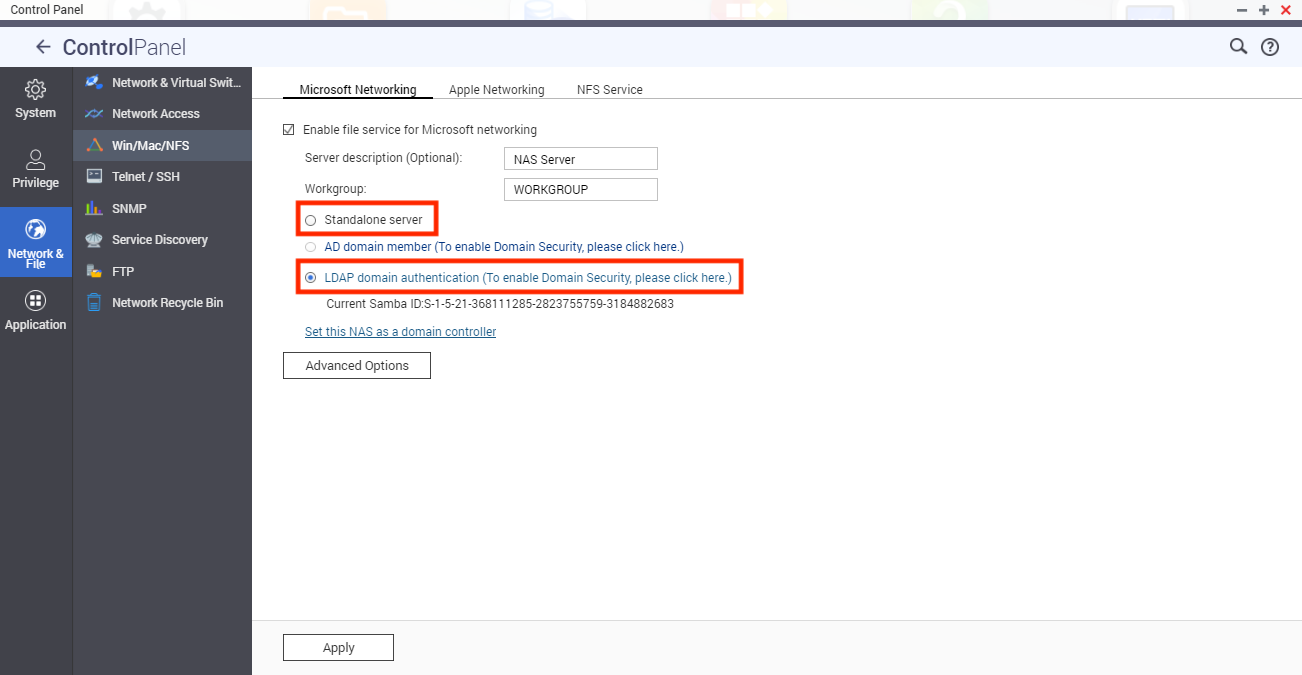
- Go to Control Panel > Network & File Services > Win/Mac/NFS.
- Select Enable file service for Microsoft Networking.
- Select the authentication type.
- Standalone server: Local NAS users only
- LDAP domain authentication: LDAP users only

- Click Apply.
Tip (administrator only):
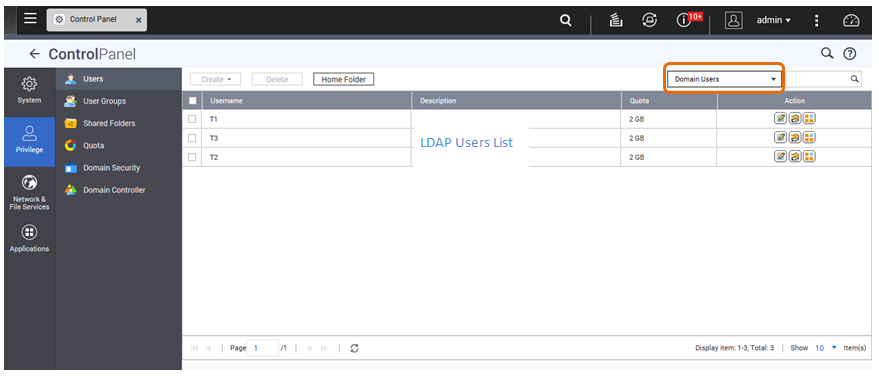
- Go to Control Panel > Privilege > Users and select Domain Users from the drop-down menu to view LDAP users.
- Go to Control Panel > Privilege > User Groups and select Domain Groups from the drop-down menu to view LDAP groups.

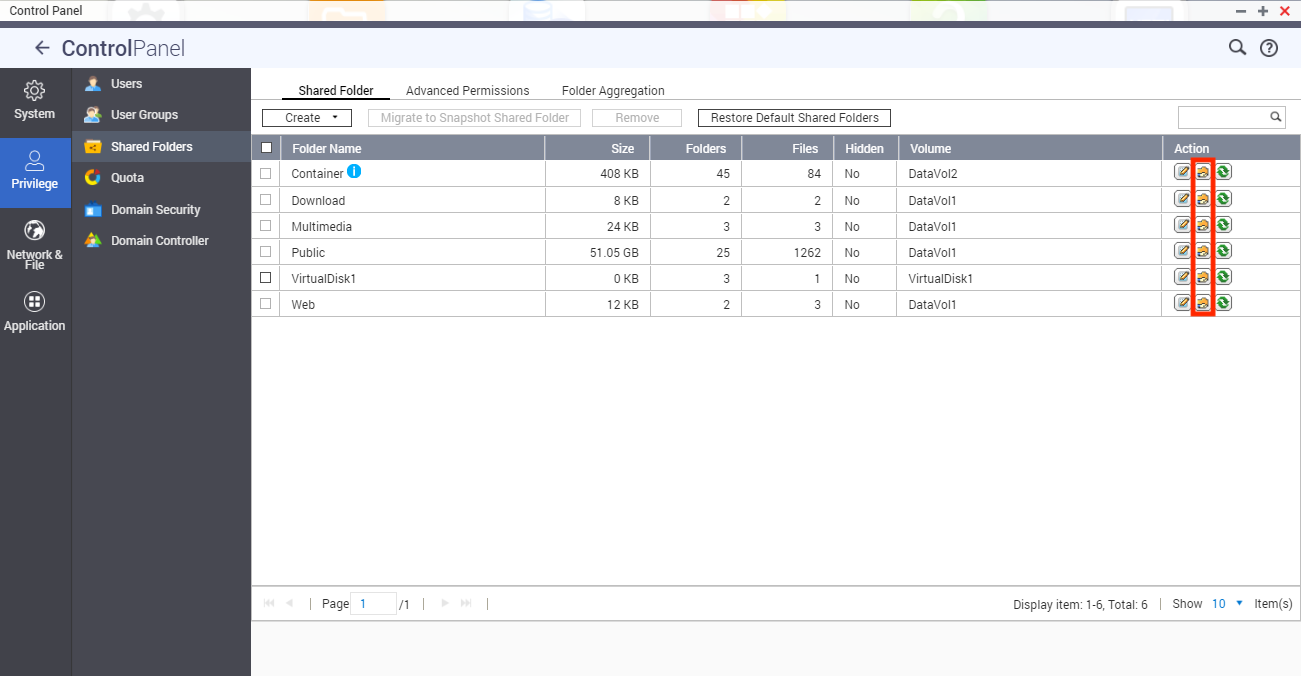
- Go to Control Panel > Privilege > Shared Folders > Edit Shared Folder Permissions (
 ) to specify shared folder permissions for LDAP domain users.

Technical Requirements for LDAP Authentication with Microsoft Networking
Authenticating LDAP users on Microsoft Networking (Samba) requires the following:
- Third-party software for synchronizing the LDAP and Samba password on the LDAP server.
- Importing the Samba schema to the LDAP directory.
(1) Third-party software:
Software solutions are available for managing LDAP users and the Samba password. For example:
- LDAP Account Manager (LAM): Provides a web interface. For details, go to http://www.ldap-account-manager.org/.
- smbldap-tools: Command line tool
- webmin-ldap-useradmin: LDAP user administration module for Webmin
(2) Samba schema:
For details on importing the Samba schema to the LDAP server, refer to supporting documentation or FAQs for the LDAP server.
The Samba schema file is required for importation and can be found in the directory examples/LDAP in the Samba source distribution.
Example: For open-ldap on the Linux server where the LDAP server is running (depending on the Linux distribution), follow these steps:
- Copy the Samba schema:
zcat /usr/share/doc/samba-doc/examples/LDAP/samba.schema.gz >
/etc/ldap/schema/samba.schema - Edit /etc/ldap/slapd.conf (the openldap server configuration file) and ensure that the following lines are in the file:
- include /etc/ldap/schema/samba.schema
- include /etc/ldap/schema/cosine.schema
- include /etc/ldap/schema/inetorgperson.schema
- include /etc/ldap/schema/nis.schema
Example Configurations
Note: The following configurations can be adapted to match the specific configuration of your LDAP server.
- Linux OpenLDAP Server:
Base DN: dc=qnap,dc=com
Root DN: cn=admin,dc=qnap,dc=com
Users Base DN: ou=people,dc=qnap,dc=com
Groups Base DN: ou=group,dc=qnap,dc=com - Mac Open Directory Server
Base DN: dc=macserver,dc=qnap,dc=com
Root DN: uid=root,cn=users,dc=macserver,dc=qnap,dc=com
Users Base DN: cn=users,dc=macserver,dc=qnap,dc=com
Groups Base DN: cn=groups,dc=macserver,dc=qnap,dc=com


