How to use TensorFlow with Container Station


Last modified date: 2019-09-24

About TensorFlow

TensorFlow™ is an open source software library for numerical computation using data flow graphs. Nodes in the graph represent mathematical operations, while the graph edges represent the multidimensional data arrays (tensors) communicated between them.

Installing TensorFlow in Container Station

  1. Assign GPUs to Container Station.
    1. Go to Control Panel > System > Hardware > Graphics Card.
    2. Under Resource Use, assign the GPUs to Container Station.
    3. Click Apply.
  2. Open Container Station.
  3. Use the correct image version.
    1. Click Images.
    2. Click Pull to the desired image is installed.
      Note: It is recommended to use the following version of TensorFlow based on what version of QTS and Nvidia Driver you have installed:
      QTS and Nvidia Driver Versions Tag Pull Command
      QTS 4.3.5 and Nvidia Driver v1.3.5 tensorflow/tensorflow:1.11.0-gpu docker pull tensorflow/tensorflow:1.11.0-gpu
      QTS 4.4.x and Nvidia Driver v2.0.0 tensorflow/tensorflow:1.11.0-gpu docker pull tensorflow/tensorflow:1.11.0-gpu
  4. Click Create.
  5. Search for the keyword "TensorFlow". Find tensorflow/tensorflow and click Install.
  6. Select a version of TensorFlow based on what version of QTS and Nvidia Driver you have installed.
    QTS and Nvidia Driver Versions Recommended Version
    QTS 4.3.5 and Nvidia Driver v1.3.5 1.11.0-gpu
    QTS 4.4.x and Nvidia Driver v2.0.0 1.11.0-gpu
  7. Click Next.
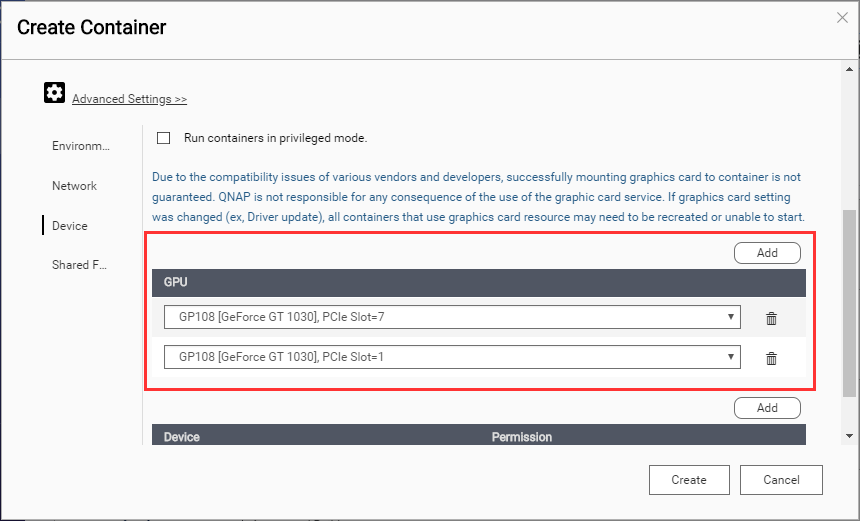
  8. Click Advanced Settings.
  9. Assign GPUs to the container.
    1. Go to Device.
    2. Click Add.
    3. Choose the GPUs to add to the container.
  10. Optional: Share a NAS folder with the container.
    1. Go to Shared Folder.
    2. Over Volume from Host, click Add.
      A new volume from host is added.
    3. Select a Host Path.
    4. Specify a Mount Point.
  11. Click Create.
    A Summary of your new container will be displayed.
  12. Review the container's settings.
  13. Click OK.
    The container image is installed..

Mounting an NVIDIA GPU via SSH

  1. Connect to your NAS via SSH.
  2. Mount GPUs to the container.
    1. Enter one of the following commands based on the GPU you want to mount.
      GPU to mount Command
      First
      –device /dev/nvidia0:/dev/nvidia0 \
      –device /dev/nvidiactl:/dev/nvidiactl \
      –device /dev/nvidia-uvm:/dev/nvidia-uvm \
      -v `/sbin/getcfg NVIDIA_GPU_DRV Install_Path -f
      /etc/config/qpkg.conf -d None`/usr/:/usr/local/nvidia
      Second
      –device /dev/nvidia0:/dev/nvidia0 \
      –device /dev/nvidia1:/dev/nvidia1 \
      –device /dev/nvidiactl:/dev/nvidiactl \
      –device /dev/nvidia-uvm:/dev/nvidia-uvm \
      -v `/sbin/getcfg NVIDIA_GPU_DRV Install_Path -f
      /etc/config/qpkg.conf -d None`/usr/:/usr/local/nvidia
      Both
      –device /dev/nvidia1:/dev/nvidia1 \
      –device /dev/nvidiactl:/dev/nvidiactl \
      –device /dev/nvidia-uvm:/dev/nvidia-uvm \
      -v `/sbin/getcfg NVIDIA_GPU_DRV Install_Path -f
      /etc/config/qpkg.conf -d None`/usr/:/usr/local/nvidia
    Note: Example commands based on your QTS and Nvidia Driver versions are listed below:
    QTS and Nvidia Driver versions Command
    QTS 4.3.5/4.3.6 and Nvidia Driver v1.3.5
    docker run -d –name tensorflow \
        –device /dev/nvidia0:/dev/nvidia0 \
        –device /dev/nvidiactl:/dev/nvidiactl \
        –device /dev/nvidia-uvm:/dev/nvidia-uvm \
        -v `/sbin/getcfg NVIDIA_GPU_DRV Install_Path -f /etc/config/qpkg.conf -d 
    None `/usr/:/usr/local/nvidia \
         -p 6006:6006 -p 8888:8888 \
        tensorflow/tensorflow:1.11.0-gpu
    QTS 4.4.x and Nvidia Driver v2.0.0
    docker run -d –name tensorflow \
       –device /dev/nvidia0:/dev/nvidia0 \
       –device /dev/nvidiactl:/dev/nvidiactl \
       –device /dev/nvidia-uvm:/dev/nvidia-uvm \-v `/sbin/getcfg NVIDIA_GPU_DRV Install_Path -f 
    /etc/config/qpkg.conf -d
    None`/usr/:/usr/local/nvidia \
        -p 6006:6006 -p 8888:8888 \
        tensorflow/tensorflow:1.11.0-gpu

Accessing the Container

  1. Open Container Station.
  2. Click Overview.
  3. Find the container you just installed and open the container's page.
  4. Copy the Token from the Console.
  5. Click the URL.
  6. Paste the Token into Password or Token.
  7. Click Log in.
You can now use Jupyter notebook with TensorFlow.

Was this article helpful?

63% of people think it helps.
Thank you for your feedback.

Please tell us how this article can be improved:

If you want to provide additional feedback, please include it below.

Teknik Özellik sSçin

      Daha fazla göster Daha az

      Diğer ülkelerde/bölgelerde bu site:

      open menu
      back to top