-
What is High Availability Manager?
-
System requirements
-
Storage configuration requirements
-
Network configuration requirements
-
Install High Availability Manager
-
Create a high-availability cluster
-
Configure secondary cluster interfaces
-
Configure a quorum server
-
Monitor and maintain the cluster
-
Cluster status
-
Cluster maintenance
-
-
Further reading and resources
This guide is applicable to High Availability Manager 1.0 and later.
What is High Availability Manager?
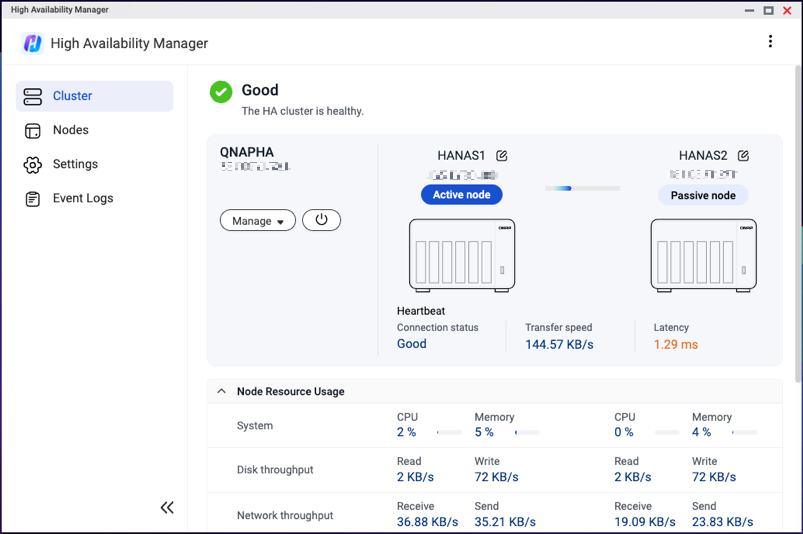
High Availability Manager allows you to create a high-availability (HA) environment for your QNAP NAS system in order to enable continuous service in the event of hardware failures.
By creating an HA cluster with two NAS devices, you let one device (the active node) manage all data operations and services, while the other device (the passive node) acts as a backup device that continuously synchronizes data and service settings from the active node. If the active node fails, the passive node will automatically take over to continue providing those services, ensuring uninterrupted business operations.
System requirements
- Operating system: QuTS hero h5.3.0 or later
- Two QNAP NAS devices with the following identical specifications:
- Device modelNoteHigh availability is supported on the x74 series and higher-end models. For the list of supported models, see High Availability Manager.
- Total memory capacity (8 GB minimum)
- Operating system version
- High Availability Manager version
- Device model
- The hostname of each NAS device must be unique.
- Unsupported applications must be removed or disabled.
For details, see App Compatibility List for High Availability Environments. - Installed applications must be running the latest version.
- The types and number of valid, activated licenses must be consistent between the two NAS devices.
Storage configuration requirements
- Disks
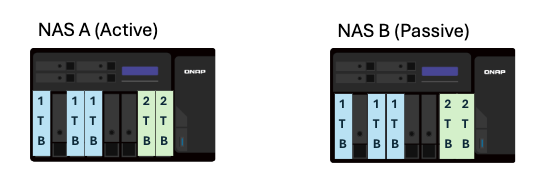
- Disks must be installed in the same slots on both devices.
- For each disk slot, the disks on both devices must have the same capacity.
- Example:
- Storage pools
- All storage pools must be in a healthy state.
- Unsupported storage features
Certain storage features are unsupported in an HA environment. Before creating your HA cluster, you must note or take action on the unsupported features below, listed by application.NoteFor the full list of unsupported features in an HA environment, including non-storage features, see Which QuTS hero features are currently not supported in high availability mode?- Storage Manager
For instructions on specific actions, see Storage Manager.- Encrypted storage spaces: Remove any SED secure storage pools, encrypted shared folders, and encrypted LUNs.
- WORM: Remove any WORM shared folders.
- External storage devices: While external storage devices do not block HA cluster creation, they currently cannot be used in an HA environment.
- Global settings for disk health: Settings in the Global Settings > Disk Health page are currently unavailable in an HA environment.
- Snapshot Manager
For instructions on specific actions, see Snapshot Manager.- SnapSync: Remove any SnapSync jobs.
- Snapshot import/export: Remove any snapshot import/export jobs.
- Immutable snapshots: Ensure your storage pools do not contain the following:
- Immutable snapshots (snapshots with a protection policy that prohibits deletion)
- Snapshot schedules that create immutable snapshots
- iSCSI & Fibre Channel
For instructions on specific actions, see iSCSI & Fibre Channel.- Encrypted LUNs: Remove any encrypted LUNs.
- LUN import/export: Remove any LUN import/export jobs.
- Storage Manager
Network configuration requirements
You can use Network & Virtual Switch on each NAS device to configure the relevant network settings on that device.
- Cluster connection
- This connection allows clients to connect to the cluster as whole, no matter which device is the active node at a given time.
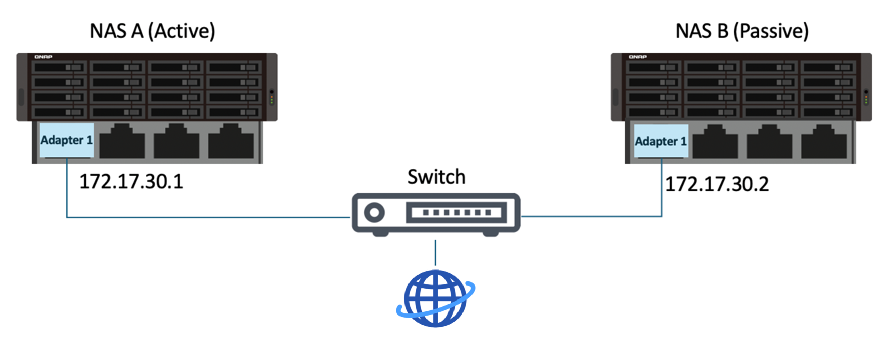
- Use the same network interface on both NAS devices to connect to the same network.
- We recommend connecting the devices to the same network switch.
- This interface cannot have any virtual switch configurations.
- This interface must be assigned a static IP address.
- The two static IP addresses on the two devices must be in the same subnet.
- Example:
- Heartbeat connection
- The heartbeat connection is a direct connection between the two devices in the cluster and enables data synchronization between the two devices.
- Use the same network interface on both NAS devices to connect to each other.
- We recommend using the fastest, lowest-latency network interface.
- This interface cannot have any VLAN or virtual switch configurations.
- This interface must be assigned a DHCP IP address.
- Example:

- Port trunking (optional)
If you configure pork trunking for any of the network interfaces on the NAS devices, you must ensure the following:- Port trunking must be configured on the same network interfaces on both devices in the cluster.
- The order of the port trunking setup must be the same on both devices.
- The port trunking mode cannot be set to
Balance-alb(active load balancing) orBalance-tlb(transit load balancing).
Install High Availability Manager
You must install the same version of High Availability Manager on both node devices.
- Log in to QuTS hero as an administrator.
- Open App Center.
- Click
 , and then enter "High Availability Manager".
High Availability Manager appears in the search results. - Click Install.
The system installs High Availability Manager.
Create a high-availability cluster
- Log in to the active node device as an administrator.
- Open High Availability Manager.
- Click Create a Cluster Now.
The cluster creation wizard opens. - Ensure you meet the listed requirements, and then click Next.
- Select the network interfaces for the cluster and heartbeat connections, and then click Next.NoteThe network interface selected for the cluster connection here will be the primary cluster interface.
You can set up secondary cluster interfaces after the cluster is created.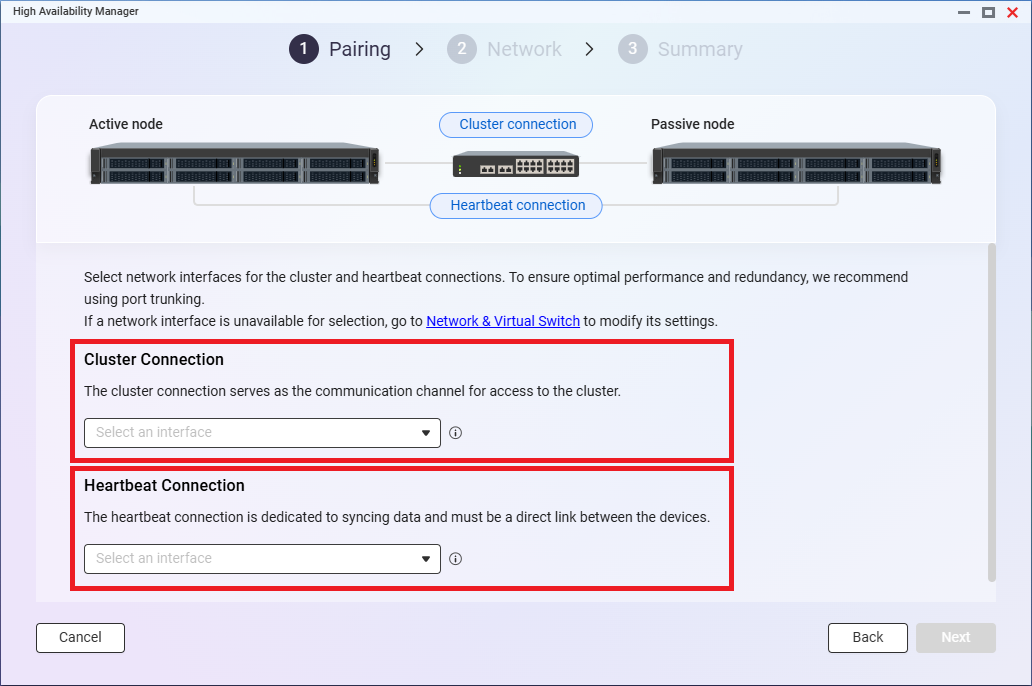
- Enter the credentials of an administrator account on the passive node device, and then click Next.
High Availability Manager checks whether the two devices meet the HA requirements.
If there are any issues, carefully read and resolve all issues, and then click the refresh icon. - When there are no unresolved issues, click Next.
- Specify a cluster hostname.Note
- The cluster hostname must contain 1 to 12 characters, start with a letter, and only contain letters (A-Z, a-z), numbers (0-9), and hyphens (-).
- The cluster hostname must be different from the two device hostnames.
- Specify a cluster IP address.Note
- This IP address allows external clients to access the cluster no matter which device is the active node at a given time.
- Use an available LAN IP address that is not currently used by other services.
- This IP address must be in the same subnet as the static IP addresses assigned to the cluster interface on each device.
- Click Next.
- Review the settings, and then click Next.
- Select I understand that all data on the passive node will be permanently deleted and cannot be recovered.
- Click OK.
High Availability Manager creates the cluster.
After the cluster is created, you can configure secondary cluster interfaces and a quorum server.
Configure secondary cluster interfaces
Secondary cluster interfaces provide redundancy for the primary cluster interface, allowing for continuous service availability if the primary cluster interface fails or requires maintenance. You can also use different cluster interfaces for different types of traffic or to help distribute traffic, preventing any single interface from becoming a bottleneck.
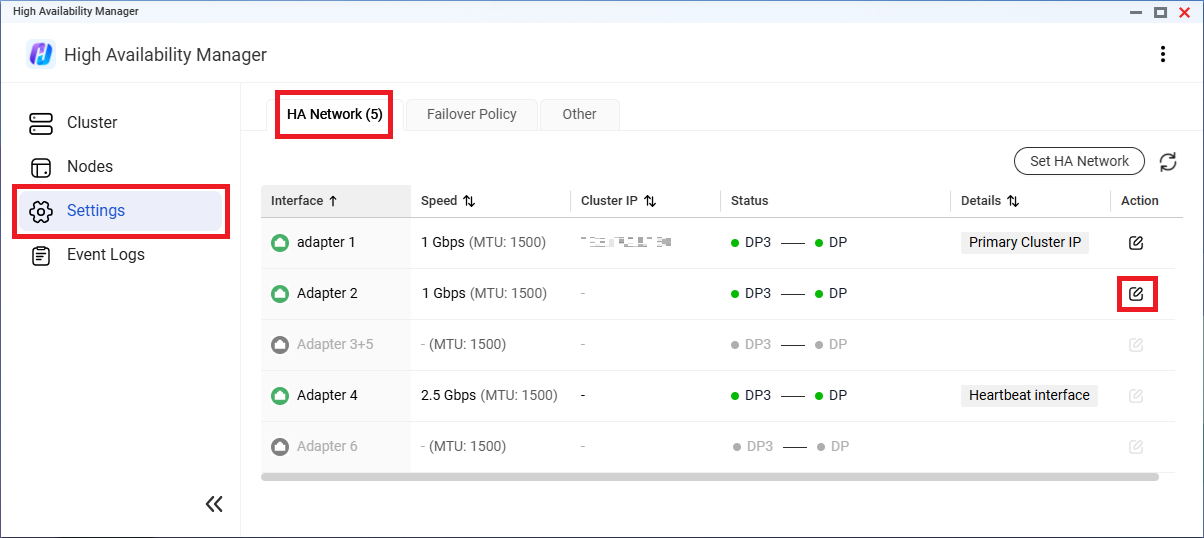
- Go to High Availability Manager > Settings > HA Network.
- Identify a network interface to set as a secondary cluster interface.Note
The network interface on each device must be connected to the network and assigned a static IP address, and the two static IP addresses must be in the same subnet.
- Under Action, click
 .
.
- Next to HA cluster interface, click
 .
. - Specify the cluster IP address.Note
- This IP address allows external clients to access the cluster no matter which device is the active node at a given time.
- This IP address must be in the same subnet as the static IP addresses for the network interfaces on the two devices.
- Optional: Specify a description.
- Click Apply.
High Availability Manager sets the network interface as a secondary cluster interface.
Configure a quorum server
Configuring a quorum server helps increase timing accuracy in failovers and switchovers. Once connected, the quorum server continuously monitors selected cluster interfaces to check the status of the cluster and the individual nodes. This allows High Availability Manager to accurately determine the condition of the cluster even when the nodes are disconnected from each other, reducing the chance of split-brain.
- Go to High Availability Manager > Settings > Failover Policy > Quorum Server.
- Select Enable quorum server.
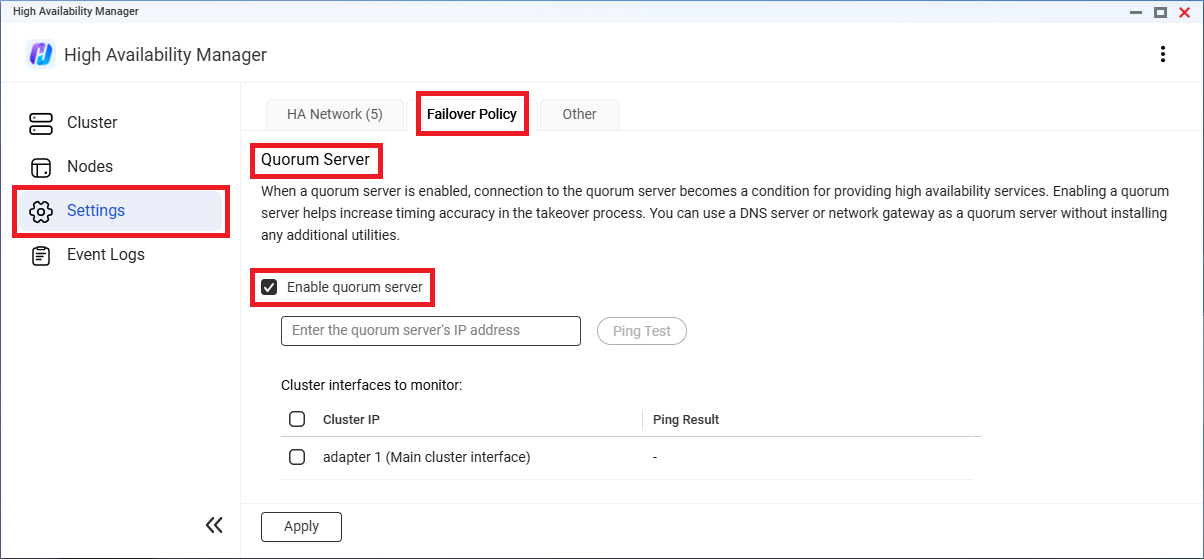
- Specify the quorum server's IP address.TipYou can use a DNS server or network gateway as a quorum server without installing any additional utilities.
- Select the cluster interfaces to monitor.
- Click Ping Test.
- Ensure the test result is "Ping OK" for all selected interfaces.Important
- If any selected interface fails the ping test, keeping it selected and then applying the settings could immediately trigger a failover.
- After the quorum server is enabled, any change in connectivity between the selected interfaces and the quorum server may trigger a failover.
- Click Apply.
High Availability Manager enables the quorum server.
Monitor and maintain the cluster
Cluster status
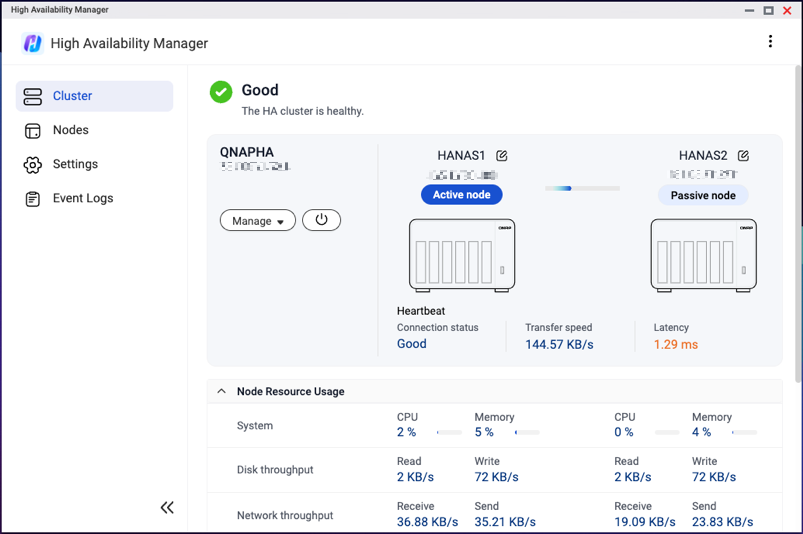
Once the cluster is created, you can monitor its status on the Cluster page.
If the cluster status changes from "Good" to "Processing...", "Error", or "Warning", certain functions may become temporarily unavailable. When the status changes to "Error" or "Warning", the page displays details and suggestions on how to resolve the triggering issue. If there are multiple issues, you can click Details to view the complete list.
Cluster maintenance
Your HA cluster may need occasional maintenance. Some common maintenance actions are listed below.
For further details about these actions, see the High Availability Manager Web Help.
| Action | User Action |
|---|---|
| Perform manual switchover | Go to Cluster, and then click Manage > Switch Over. |
| Recover from split-brain | Go to Cluster, and then click Recover from Split-Brain. |
| Update software | Go to Cluster, click Manage, and then click one of the following:
|
| Shut down or restart cluster | Go to Cluster, click  , and then click one of the following: , and then click one of the following:
|
| Shut down or restart a single node device | Go to Nodes, click  , and then click one of the following: , and then click one of the following:
|
| Remove passive node for device replacement | Go to Cluster, and then click Manage > Remove Passive Node. |
Further reading and resources
High Availability Manager
- High Availability Manager: Official landing page for High Availability Manager
- High Availability Manager Web Help
- App Compatibility List for High Availability Environments
- Frequently asked questions about high availability
- Which QuTS hero features are currently unsupported in High Availability Mode?
Other
- QuTS hero User Guide
- Knowledge Base: Searchable database of FAQs, tutorials, and web helps
- QNAP College: Instructional video tutorials


