Applicable Products
QuMagie
Analysis
If you can't see an image or video file in QuMagie, it may be caused by one or more of the following:
The file format of the image/video is not supported
If your file has a format or codec that is not supported by QuMagie, then that image/video will not appear in QuMagie or will not be displayed correctly. For a list of supported file formats, see What file formats and codecs do Photo Station & QuMagie support?
The file format of the image/video requires a license
Certain media file formats require a CAYIN MediaSign Player license. If you do not have the required license activated, then the image/video will not appear in QuMagie or will be displayed with a default generic thumbnail. For details on how to purchase and activate licenses, see "Licenses" in the QTS User Guide or QuTS hero User Guide.
The image/video is not in a content source folder
QuMagie only displays images/videos from content source folders. To ensure that QuMagie displays your image/video, you can move your image/video file into an existing content source folder, or add the parent folder of the image/video to QuMagie's content source folder list. To add folders to QuMagie's content source folders list:
Warning
Only shared folders can be content source folders. When adding a folder to QuMagie's content source folder list, ensure that the folder is a shared folder. For details on shared folders, see "Shared Folders" in the
QTS User Guide or
QuTS hero User Guide.
Tip
You can also manage QuMagie's content source folder list in QuMagie > Settings > Content Management (tab) > Content Sources (setting).
- Open Multimedia Console.
- Go to Content Management.
- Select the QuMagie tab.
- Under Content Sources, click Edit.
 The Edit sources window opens.
 - In the Select Folders panel, select one or more folders.
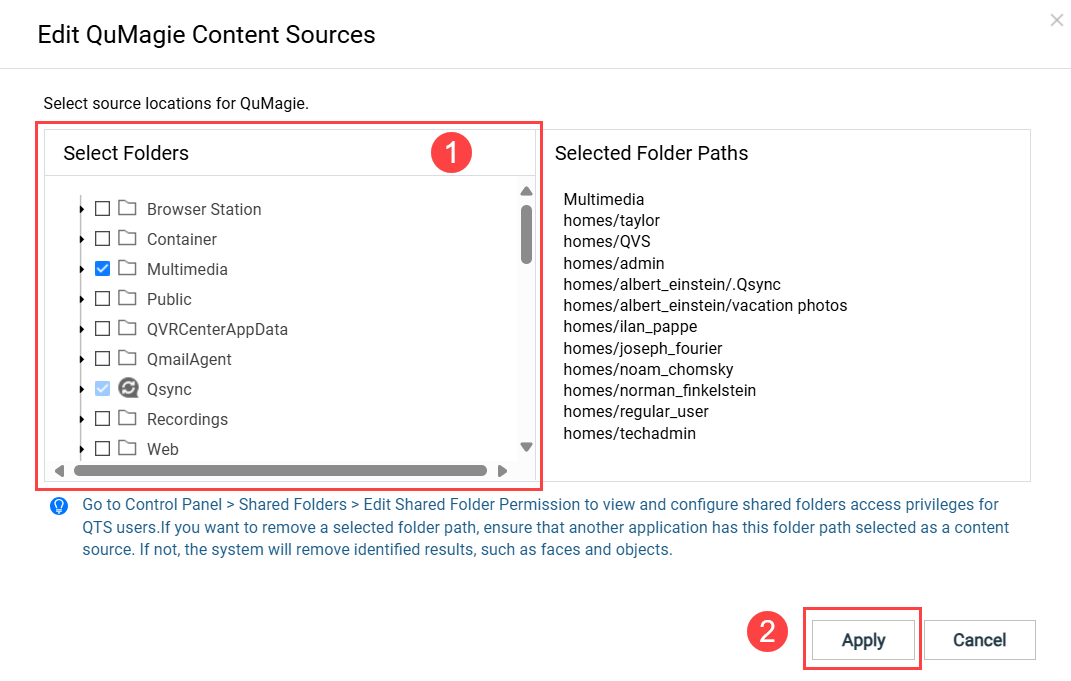
- Click Apply.
Multimedia Console adds the content sources.
You do not have read permissions for the image/video
If you do not have sufficient permissions for the image/video, then the image/video will not appear in QuMagie. To ensure you have sufficient permissions, do the following:
- Ensure you have sufficient permission for the content source folder.
- Open Control Panel.
- Go to Privilege > Shared Folders > Shared folder (tab).
- Locate the shared folder containing your image/video and click
 .
.
The Edit Shared Folder Permission window opens. - Enable either "Read Only" or "Read/Write" permissions for the appropriate users.
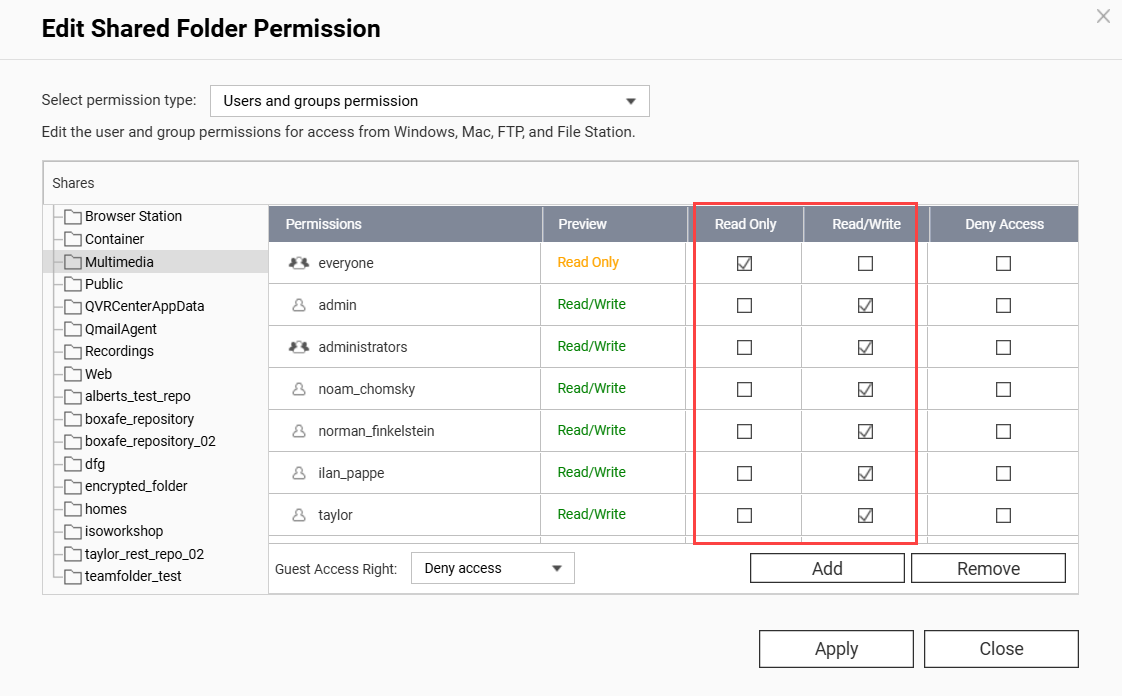
- Click Apply.
- Ensure you have sufficient permission on the individual image/video.
- Open File Station.
- Locate your image/video.
- Right click on the image/video to open the context menu and click Properties.
The Properties window opens. - Select the Permissions tab.
- Enable the "Read" permission for the appropriate groups.

- Click Apply.
QuMagie now has sufficient permissions to display your image/folder.
Your image/video file is above the maximum supported size
QuMagie may not display your image/video correctly if any of the following apply:
- The width x height of the image/video is greater than 500,000,000 pixels.
- Your NAS device has 2058 MB of total RAM or less and the width x height of the image/video is greater than 240,000,000 pixels.
- Your NAS device has 1024 MB of total RAM or less and the width x height of the image/video is greater than 51,000,000 pixels.
- The file size of the image/video is greater than 1/8 of your NAS device's total RAM.
- For TAS files, if the file is greater than 60 MB.
QuMagie settings are hiding images/videos with no thumbnails
To allow QuMagie to display images/videos even when those images/videos do not have thumbnails, do the following:
- Click on your profile icon on the top right.
- Click on Settings.
The Settings window appears. - Go to Miscellaneous (tab) > Display.
- Disable Only display media files with generated thumbnails.
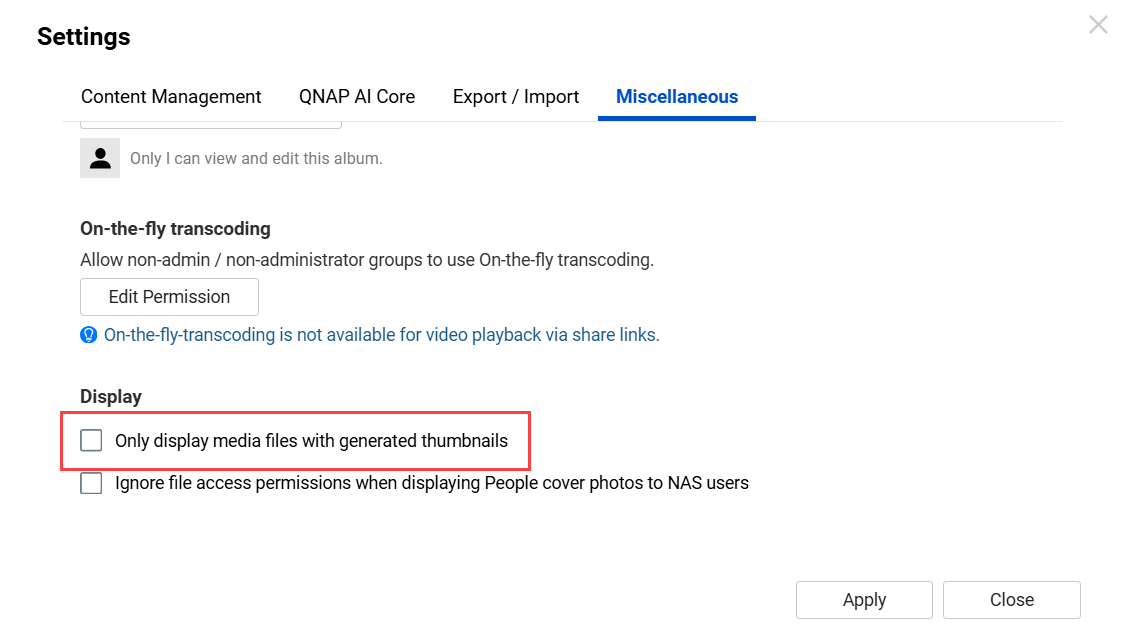
- Click Apply.
QuMagie now displays images/videos that do not have thumbnails.
The image/video file isn't indexed yet
For many multimedia apps, such as QuMagie, to display images/videos the image/video files must be indexed by your system. Indexing is a process of analyzing and storing media files so that they can be more efficiently used by multimedia apps. To ensure that your images/videos have been indexed, do the following:
- Open Multimedia Console.
- Go to Indexing.
- Under Settings, locate the Index field.
If your system is still indexing files, the Index field will be "Indexing...":
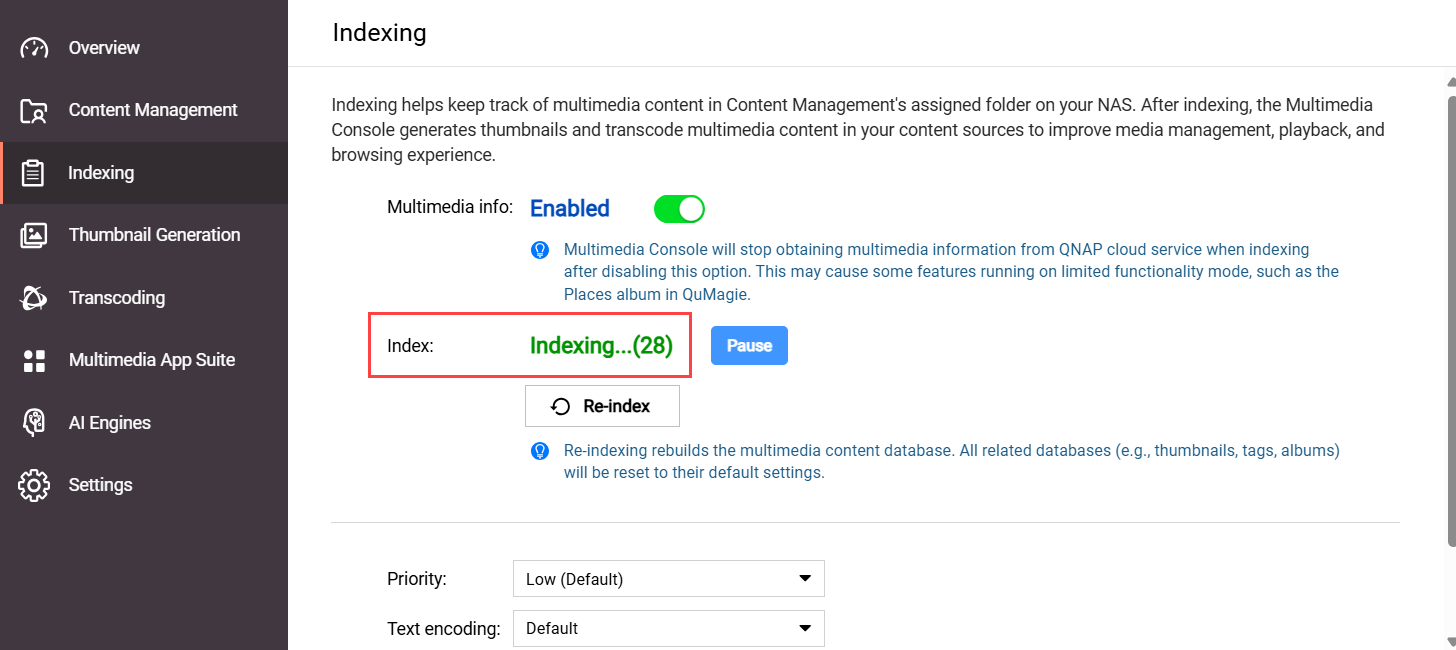 If your system has finished indexing files, the Index field will be "Completed":
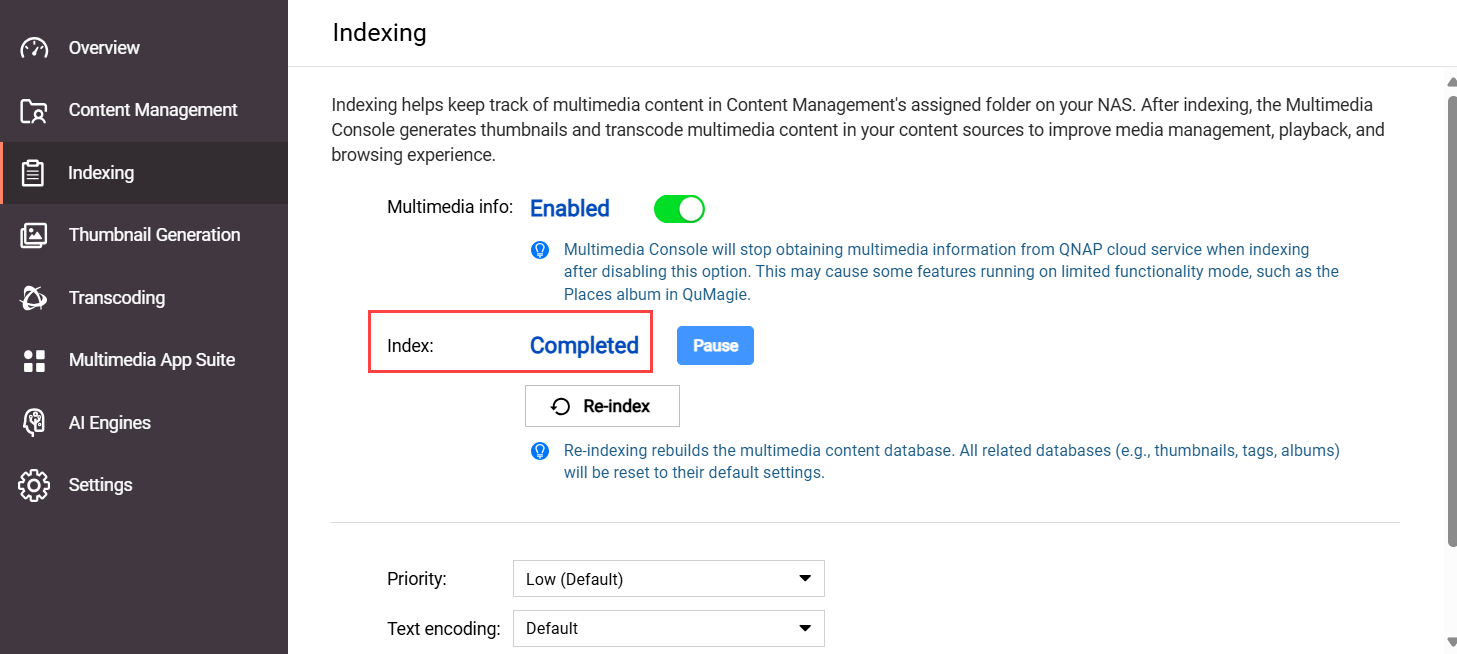
- If your system is still indexing files, wait until the indexing finishes, and then check your image/video in QuMagie again.
If the indexing status is Completed, but your image/video is still missing from QuMagie or not displayed correctly, see the section "The system media file index has been corrupted" in this FAQ.
The system file index has been corrupted
QuMagie may not be able to display images/videos, or display them correctly, if the system media index (also sometimes called the "Multimedia Console index/database") has become corrupted. For various reasons, the system media index may become corrupted. There is no way to confirm if the system file index is corrupted or not, but you can re-index the system file index and see if that resolves your issue:
Warning
Re-indexing the system media file index will delete and rebuild all indexed data. Data that will be deleted includes thumbnails, media file tags, QuMagie albums, and other things. Media files themselves are not affected.
- Open Multimedia Console.
- Go to Indexing.
- Under Settings, click Re-index.
 Your system will re-index all media files in your content source folders (not only QuMagie's content source folders). This may take some time. After the indexing is complete, you can check your image/video in QuMagie again.
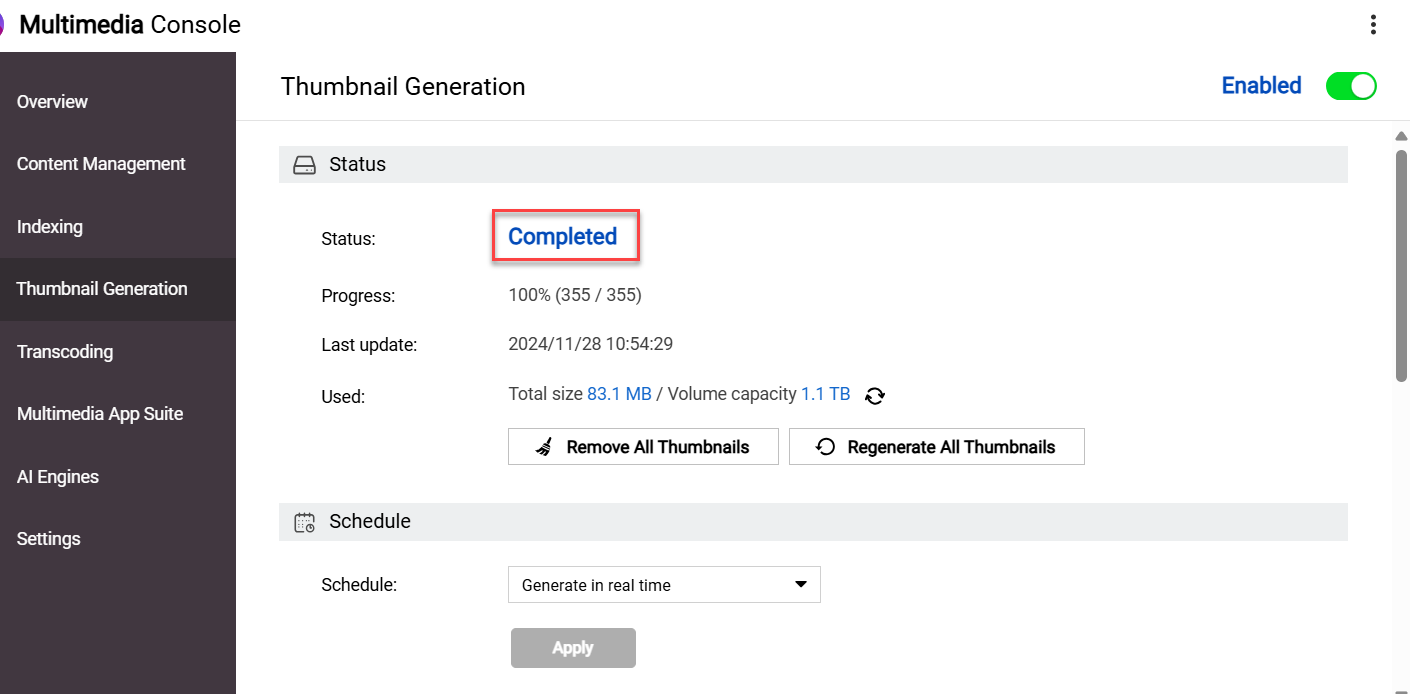
After resolving any of the above issues, you may still need to wait some time before seeing your image/video displayed correctly in QuMagie because your system must first generate a thumbnail for your image/video. To check the status of this thumbnail generation, go to Multimedia Console > Thumbnail Generation > Status. The status should be Completed:
If your images/videos appear in QuMagie but they are not displayed correctly, see Why are some images not displayed correctly in QuMagie?
If your images/videos are still not being displayed correctly in QuMagie, you can content QNAP support for further assistance.
Further Reading
対象製品
QuMagie
分析
QuMagieで画像やビデオファイルが表示されない場合、以下のいずれかが原因である可能性があります:
画像/ビデオのファイル形式がサポートされていない
ファイルがQuMagieでサポートされていない形式やコーデックの場合、その画像/ビデオはQuMagieに表示されないか、正しく表示されません。サポートされているファイル形式の一覧については、Photo StationとQuMagieはどのファイル形式とコーデックをサポートしていますか?を参照してください。
画像/ビデオのファイル形式にはライセンスが必要です
特定のメディアファイル形式にはCAYIN MediaSign Player ライセンスが必要です。必要なライセンスがアクティブでない場合、画像/ビデオはQuMagieに表示されないか、デフォルトの汎用サムネイルで表示されます。ライセンスの購入とアクティベートの詳細については、QTS ユーザーガイドまたはQuTS hero ユーザーガイドの「ライセンス」を参照してください。
画像/ビデオがコンテンツソースフォルダに含まれていない
QuMagieはコンテンツソースフォルダからのみ画像/ビデオを表示します。QuMagieが画像/ビデオを表示するようにするには、画像/ビデオファイルを既存のコンテンツソースフォルダに移動するか、画像/ビデオの親フォルダをQuMagieのコンテンツソースフォルダリストに追加できます。QuMagieのコンテンツソースフォルダリストにフォルダを追加するには:
警告
コンテンツソースフォルダは共有フォルダのみです。QuMagieのコンテンツソースフォルダリストにフォルダを追加する際は、そのフォルダが共有フォルダであることを確認してください。共有フォルダの詳細については、
QTS ユーザーガイドまたは
QuTS hero ユーザーガイドの「共有フォルダ」を参照してください。
ヒント
QuMagieのコンテンツソースフォルダリストは、QuMagie>設定>コンテンツ管理(タブ) >コンテンツソース(設定).
- 開くMultimedia Console.
- 移動コンテンツ管理.
- 選択QuMagie タブ.
- コンテンツソースの下で、編集をクリックします。
 ソースの編集 ウィンドウが開きます。
 - フォルダーを選択パネルで、1つ以上のフォルダーを選択します。

- クリック適用.
Multimedia Consoleがコンテンツソースを追加します。
画像/ビデオの読み取り権限がありません
画像/ビデオの権限が不十分な場合、QuMagieに画像/ビデオが表示されません。十分な権限を確保するために、以下を行ってください:
- コンテンツソースフォルダーに対して十分な権限を持っていることを確認してください。
- 開くコントロールパネル.
- 移動権限>共有フォルダー>共有フォルダー(タブ)。
- 画像/ビデオを含む共有フォルダーを見つけて
 をクリックします。
共有フォルダーの権限を編集ウィンドウが開きます。 - 適切なユーザーに対して「読み取り専用」または「読み取り/書き込み」権限を有効にします。

- クリック適用.
- 個々の画像/ビデオに対して十分な権限を持っていることを確認してください。
- 開くFile Station.
- 画像/ビデオを見つけます。
- 画像/ビデオを右クリックしてコンテキストメニューを開き、プロパティをクリックします。
プロパティウィンドウが開きます。 - 選択権限タブ。
- 適切なグループに対して「読み取り」権限を有効にします。

- クリック適用.
QuMagieは、画像/フォルダーを表示するための十分な権限を持っています。
画像/ビデオファイルがサポートされている最大サイズを超えています
以下のいずれかが適用される場合、QuMagieは画像/ビデオを正しく表示しない可能性があります:
- 画像/ビデオの幅 x 高さが500,000,000ピクセルを超えています。
- NASデバイスの総RAMが2058MB以下で、画像/ビデオの幅 x 高さが240,000,000ピクセルを超えています。
- NASデバイスの総RAMが1024MB以下で、画像/ビデオの幅 x 高さが51,000,000ピクセルを超えています。
- 画像/ビデオのファイルサイズがNASデバイスの総RAMの1/8を超えています。
- TASファイルの場合、ファイルが60MBを超えています。
QuMagieの設定がサムネイルのない画像/ビデオを非表示にしています
画像/ビデオにサムネイルがない場合でもQuMagieが表示できるようにするには、以下を行ってください:
- 右上のプロフィールアイコンをクリックします。
- 注意:
1. QNAシリーズのアダプターは、Thunderbolt 2 から Thunderbolt 3 アダプターを使用して接続した場合、動作しません。
2. 最適なパフォーマンスを確保するために、ローカルネットワーク環境内のすべてのデバイスでジャンボフレームをMTU 9000に設定し、電源モードを高パフォーマンスに切り替えることをお勧めします。MTUの設定方法 >` - `移動``Multimedia Console`。`表示`。
- 無効にする サムネイルのみ表示。
- クリック 適用。
QuMagieは、サムネイルがない画像/ビデオも表示します。
このページが正しく表示されない場合は、ここをクリックしてオンライン版をご覧ください。
多くの QuMagie などのアプリケーションで画像/ビデオを表示するには、システムによって画像/ビデオファイルがインデックス化されている必要があります。インデックス化は、メディアファイルを分析して保存するプロセスです。
- 開くMultimedia Console。
- 設定の下にある 設定 で、インデックス フィールドを見つけます。
システムがファイルをインデックス化している場合、インデックス の完了を待ちます。
 システムがまだファイルをインデックスしている場合は、インデックスが完了するまで待ってから、QuMagieで画像/ビデオを確認してください。開く
 - Multimedia Console
- .
設定の下で、インデックスを見つけます。
システムがファイルをインデックス化している場合、インデックス フィールドは「インデックス作成中...」になります。
 システムがまだファイルをインデックスしている場合は、インデックスが完了するまで待ってから、QuMagieで画像/ビデオを確認してください。システムがファイルのインデックスを完了している場合
. しかし、画像/ビデオがまだQuMagieに表示されないか、正しく表示されない場合は、「システム設定」セクションを参照してください。
QuMagieは、システムメディアインデックス(「Multimedia Console インデックス/データベース」とも呼ばれることがあります)が破損している場合、画像/ビデオを表示できない、または正しく表示できないことがあります。さまざまな理由で、システムメディアインデックスが破損することがあります。システムファイルインデックスが破損しているかどうかを確認する方法はありませんが、システムファイルインデックスを再インデックスして、問題が解決するかどうかを確認できます:
警告
システムメディアファイルインデックスを再インデックスすると、すべてのインデックスデータが削除され再構築されます。削除されるデータには、サムネイル、メディアファイルタグ、QuMagieアルバム、その他のものが含まれます。メディアファイル自体には影響はありません。
- 開くMultimedia Console.
- 移動するインデックス作成.
- 設定の下で、再インデックスをクリックします。
 システムは、コンテンツソースフォルダー内のすべてのメディアファイルを再インデックスします(QuMagieのコンテンツソースフォルダーだけでなく)。これには時間がかかる場合があります。インデックス作成が完了したら、QuMagieで再度画像/ビデオを確認できます。
上記の問題を解決した後でも、QuMagieで画像/ビデオが正しく表示されるまでに時間がかかる場合があります。これは、システムが最初に画像/ビデオのサムネイルを生成する必要があるためです。このサムネイル生成のステータスを確認するには、Multimedia Console > サムネイル生成 > ステータスに移動します。ステータスは完了:
 であるべきです。
QuMagieに画像/ビデオが表示されているが、正しく表示されていない場合は、なぜ一部の画像がQuMagieで正しく表示されないのですか?を参照してください。
QuMagieで画像/ビデオがまだ正しく表示されない場合は、QNAPサポートに連絡してさらなるサポートを受けてください。
さらに読む
 ソースの編集 ウィンドウが開きます。
 をクリックします。

 システムがまだファイルをインデックスしている場合は、インデックスが完了するまで待ってから、QuMagieで画像/ビデオを確認してください。開く
 システムがまだファイルをインデックスしている場合は、インデックスが完了するまで待ってから、QuMagieで画像/ビデオを確認してください。システムがファイルのインデックスを完了している場合
 システムは、コンテンツソースフォルダー内のすべてのメディアファイルを再インデックスします(QuMagieのコンテンツソースフォルダーだけでなく)。これには時間がかかる場合があります。インデックス作成が完了したら、QuMagieで再度画像/ビデオを確認できます。
 であるべきです。


