Applicable Models
- TS-110, TS-210, TS-410, TS-410U
- TS-112, TS-212, TS-412, TS-412U
- TS-119, TS-119P+, TS-219, TS-219P, TS-219P+, TS-419P, TS-419P+, TS-419U, TS-419U+
- TS-120, TS-220, TS-420, TS-420U
- TS-121, TS-221, TS-421, TS-421U
Overview
This FAQ explains how to manually recover your NAS if it fails to start up. This FAQ only applies to the NAS models listed above.
NAS Recovery Requirements
To recover the NAS, you will need the following:
- A Windows PC
- An Ethernet cable
- A thin pointed object to press the NAS reset button
Recovering the NAS
To recover the NAS, perform the following steps:
1. Create an Ubuntu virtual machine
Choose one of the following options to create an Ubuntu virtual machine on your Windows PC:
Option 1: WMware Workstation Player
- Download and install WMware Workstation Player.
- Download the ISO file below corresponding to the NAS model:
- Disable all wireless network connections on your PC.
- Connect your PC to the local network with an Ethernet cable.
- Open VMware Workstation Player.
- Click Create a New Virtual Machine.

The New Virtual Machine Wizard window appears and the Welcome to the New Virtual Machine Wizard page appears. - Under Installer disc image file (iso), click Browse.
- Select the downloaded ISO file.
- Click Open.

- Click "Next >".
The Select a Guest Operating System page appears. - Under Guest Operating System, select Linux.
- Under Version, select Ubuntu.

- Click "Next >".
The Name the Virtual Machine page appears. - Optional: Under Virtual Machine Name, specify a name for the Ubuntu virtual machine.
- Optional: Under Location, specify the location where the Ubuntu virtual machine will be installed.
- Click "Next >".
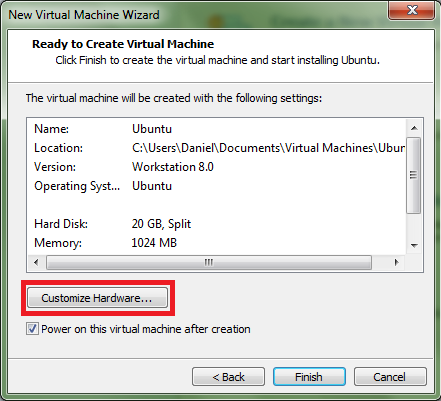
- Depending on the version of VMware Workstation Player, additional settings pages may appear. Configure additional settings and click "Next >" on each additional settings page until the Ready to Create Virtual Machine page appears.
- On the Ready to Create Virtual Machine page, review the Ubuntu virtual machine configuration.
- Click Customize Hardware.
The Hardware window appears.
- In the device list, select Network Adapter.
- Under Network Connection, select Bridged.

- Click Close.
- Click Finish.
The Ubuntu virtual machine is created and the Ubuntu virtual machine terminal opens in a new window. Depending on the version of VMware Workstation Player, you may need to manually start the Ubuntu virtual machine. - An Ubuntu virtual machine terminal opens. A login prompt may appear, but it is not necessary to log in.
The Ubuntu virtual machine is created and running.
Option 2: With a CD
- Download the ISO file from the links below that correspond to the NAS model:
- Burn the ISO file to a CD-R.
- Remove the CD-R from your PC.
- Power off your PC.
- Insert the CD-R into your PC.
- Power on your PC.
- Before your PC fully boots, enter the BIOS menu.
Tip
The method to enter your computer's BIOS menu during start-up will depend on the model and brand of your computer. The options and appearance of the BIOS menu will also depend on the model and brand of your computer. See your computer's users guide for details.
- Select the option to boot up your PC using the CD-R.
Your PC will boot up with Ubuntu as the operating system. - If a login prompt appears, then do not specify any credentials and press enter to continue.
Your PC is now running the Ubuntu operating system as a virtual operating system.
2. Reset the NAS
- Power off the NAS.
- Remove all drive trays.
- Connect the NAS to your PC with an Ethernet cable.
Tip
If your NAS has two LAN ports, only one LAN port can be used for NAS recovery. Depending on the NAS model, this may be the first or second LAN port.
- Reset the NAS by performing the following steps:
- Use a pointed thin object to press and hold the physical reset button on the NAS.

- Press and hold the power button on the NAS.
- Continue holding the power button and reset button simultaneously until an audio alert of two short beeps is issued. The NAS status LED will start flashing red and green. The LAN LED will also start flashing.
- Release the power button and reset button.
- After a short amount of time, the NAS status LED becomes red, and the LAN LED stops flashing and becomes orange or green.
- The Ubuntu virtual machine starts transferring data to the NAS. Do not power off or disconnect the NAS.
- After a short amount of time, approximately 5-10 minutes, an audio alert of one long beep or two short beeps is issued, and the NAS status LED becomes green.
- Optional: View the progress of the data transfer between the NAS and the Ubuntu virtual machine
- Log into the NAS via the Ubuntu virtual machine terminal with the following credentials:
- Enter the following command:
ifconfig
You can see the data transfer progress under TX under port eth0.
- The NAS automatically restarts. This restart may take several minutes.
- After the NAS restarts, an audio alert of one long beep is issues.
Qfinder Pro can now find the NAS
3. Install the latest available firmware version on the NAS with Qfinder Pro
- Download and install Qfinder Pro.
- Open Qfinder Pro.
- Locate your NAS in the device list.
- Right click on your NAS.
- Select Update Firmware.
 The Update Firmware window opens.
 - Select Automatically update the firmware to the latest version.

- Click Start.
The NAS firmware is updated to the latest version.
4. Install Hard Drives
- After the firmware is updated, perform the following steps to install hard drives:
- Attach the hard drives to the drive trays.
- Insert the drive trays into the NAS.
For details on installing hard drives, see the NAS User Guide available for download from Download Center. - If the hard drives are not new, the firmware must be updated again while the hard drives are installed. For details, see Updating the NAS Firmware Using Qfinder Pro in How to search and manage a QNAP NAS using Qfinder Pro.
- If the hard drives are new, you can continue to initialize the NAS. For details on initializing QTS, see QTS Initialization (5.0.x).
Further Troubleshooting
- If the NAS BIOS failed to display:
Your NAS needs to be physically serviced by a qualified hardware technician. - If the steps of this guide could not be successfully completed:
Your NAS needs to be physically serviced by a qualified hardware technician. - If you were able to install the latest firmware version on your NAS with Qfinder Pro but after installing the hard drives, the NAS will not boot up:
The hard drives are faulty and need to be replaced. A NAS will fail to start up if the hard drives are faulty.
Further Reading
Firmware Recovery Guide
What to do if Firmware update is stuck?
Why won't my NAS boot after a firmware update?
What can I do if I can not access my NAS after firmware update?
What do I do if there was a power failure or network disconnection during a firmware update?
適用機種
- TS-110, TS-210, TS-410, TS-410U
- TS-112, TS-212, TS-412, TS-412U
- TS-119, TS-119P+, TS-219, TS-219P, TS-219P+, TS-419P, TS-419P+, TS-419U, TS-419U+
- TS-120, TS-220, TS-420, TS-420U
- TS-121, TS-221, TS-421, TS-421U
概覽
本常見問題解釋瞭如何手動恢復您的NAS,如果它無法啟動。此常見問題僅適用於上述列出的NAS型號。
NAS恢復要求
要恢復NAS,您將需要以下物品:
- 一臺Windows PC
- 一條乙太網線
- 一個細長的物體用來按壓NAS重置按鈕
恢復NAS
要恢復NAS,請執行以下步驟:
1. 建立一個Ubuntu虛擬機器
選擇以下選項之一在您的Windows PC上建立一個Ubuntu虛擬機器:
選項1:WMware Workstation Player
- 下載並安裝 WMware Workstation Player 。
- 下載下面對應於NAS型號的ISO檔案:
- 在您的PC上禁用所有無線網路連線。
- 用乙太網線將您的PC連線到本地網路。
- 開啟VMware Workstation Player。
- 點選建立新的虛擬機器。
新虛擬機器向導窗口出現,歡迎使用新虛擬機器向導頁面出現。 - 在安裝程式光碟映像檔案(iso)下,點選瀏覽。
- 選擇下載的ISO檔案。
- 點選開啟。
- 點選"下一步 >"。
選擇客戶作業系統頁面出現。 - 在客戶作業系統下,選擇Linux。
- 在版本下,選擇Ubuntu。
- 點選"下一步 >"。
命名虛擬機器頁面出現。 - 可選:在虛擬機器名稱下,為Ubuntu虛擬機器指定一個名稱。
- 可選:在位置下,指定Ubuntu虛擬機器將被安裝的位置。
- 點選"下一步 >"。
- 根據VMware Workstation Player的版本,可能會出現額外的設定頁面。在每個額外的設定頁面上配置額外設定並點選"下一步 >",直到準備建立虛擬機器頁面出現。
- 在準備建立虛擬機器頁面上,檢視Ubuntu虛擬機器配置。
- 點選自定義硬體。
硬體窗口出現。
- 在裝置列表中,選擇網路介面卡。
- 在網路連線下,選擇橋接。
- 點選關閉。
- 點選完成。
Ubuntu虛擬機器被建立,並且Ubuntu虛擬機器終端在新視窗中開啟。根據VMware Workstation Player的版本,您可能需要手動啟動Ubuntu虛擬機器。 - Ubuntu虛擬機器終端開啟。可能會出現登入提示,但不需要登入。
Ubuntu虛擬機器被建立並執行。
選項2:使用CD
- 從下面與NAS型號相對應的連結下載ISO檔案:
- 將 ISO 檔案燒錄到 CD-R 上。
- 從您的 PC 中取出 CD-R。
- 關閉您的 PC。
- 將 CD-R 插入您的 PC。
- 開啟您的 PC。
- 在您的 PC 完全啟動之前,進入 BIOS 選單。
提示
進入電腦 BIOS 選單的方法在啟動時將根據您電腦的型號和品牌而有所不同。BIOS 選單的選項和外觀也將根據您電腦的型號和品牌而有所不同。詳情請參閱您電腦的使用者指南。
- 選擇使用 CD-R 啟動您的 PC 的選項。
您的 PC 將以 Ubuntu 作為作業系統啟動。 - 如果出現登入提示,則不要指定任何憑證並按 Enter 繼續。
您的 PC 現在以虛擬作業系統的形式執行 Ubuntu 作業系統。
2. 重置 NAS
- 關閉 NAS。
- 移除所有驅動器託盤。
- 使用乙太網路線將 NAS 連線到您的 PC。
提示
如果您的 NAS 有兩個 LAN 埠,只有一個 LAN 埠可用於 NAS 恢復。根據 NAS 型號,這可能是第一個或第二個 LAN 埠。
- 按照以下步驟重置 NAS:
- 使用尖銳的細長物體按住 NAS 上的物理重置按鈕。
- 按住 NAS 上的電源按鈕。
- 繼續同時按住電源按鈕和重置按鈕,直到發出兩個短嗶聲的音訊警報。NAS 狀態 LED 將開始紅綠閃爍。LAN LED 也將開始閃爍。
- 釋放電源按鈕和重置按鈕。
- 經過短暫時間後,NAS狀態LED變為紅色,而LAN LED停止閃爍並變為橙色或綠色。
- Ubuntu虛擬機器開始將資料傳輸到NAS。不要關閉電源或斷開NAS的連線。
- 經過短暫時間,大約5-10分鐘後,會發出一個長響或兩個短響的音訊警報,並且NAS狀態LED變為綠色。
- 可選:檢視NAS與Ubuntu虛擬機器之間的資料傳輸進度
- 透過Ubuntu虛擬機器終端機登入NAS,使用以下憑證:
- 輸入以下命令:
ifconfig
您可以在TX下的eth0埠下看到資料傳輸進度。
- NAS自動重新啟動。這次重新啟動可能需要幾分鐘。
- NAS重新啟動後,會發出一個長響的音訊警報。
Qfinder Pro 現在可以找到NAS
3. 在NAS上安裝最新可用的 韌體 版本,使用 Qfinder Pro
- 下載並安裝 Qfinder Pro 。
- 開啟 Qfinder Pro 。
- 在裝置列表中找到您的NAS。
- 右鍵點選您的NAS。
- 選擇更新 韌體 .
更新 韌體 視窗將開啟。 - 選擇自動更新 韌體 至最新版本。
- 點選開始。
NAS 韌體 更新至最新版本。
4. 安裝硬碟
- 在 韌體 更新後,執行以下步驟來安裝硬碟:
- 將硬碟連線到硬碟託盤。
- 將硬碟託盤插入NAS。
有關安裝硬碟的詳細資訊,請參閱可從 下載中心 下載的NAS使用手冊。 - 如果硬碟不是全新的,安裝硬碟後必須再次更新 韌體 。詳情見使用 Qfinder Pro 更新NAS 韌體 於 如何使用Qfinder Pro搜尋和管理QNAP NAS 。
- 如果硬碟是全新的,您可以繼續初始化NAS。有關初始化QTS的詳細資訊,請參閱 QTS初始化 (5.0.x) 。
進一步故障排除
- 如果NAS BIOS未能顯示:
您的NAS需要由合格的硬體技術人員進行實體維修。 - 如果本指南的步驟無法成功完成:
您的NAS需要由合格的硬體技術人員進行實體維修。 - 如果您能夠使用 Qfinder Pro 在NAS上安裝最新版本的 韌體 ,但安裝硬碟後NAS無法啟動:
硬碟有故障,需要更換。如果硬碟有故障,NAS將無法啟動。
進一步閱讀
Firmware Recovery Guide
What to do if Firmware update is stuck?
Why won't my NAS boot after a firmware update?
What can I do if I can not access my NAS after firmware update?
What do I do if there was a power failure or network disconnection during a firmware update?


