How to set up Proxmox VE backup space on a QNAP NAS?
Applicable Products
- QTS 5.2.3.3006 or later
- Proxmox Virtual Environment 8.2.2 or later
Introduction
Proxmox Virtual Environment (Proxmox VE) is an open-source enterprise virtualization platform for deploying and managing virtual machines (VMs), containers, high-availability clusters, and disaster recovery. Proxmox VE can back up VMs and containers to remote devices such as NAS devices, using its vzdump utility.
This tutorial shows two ways you can set up storage space on your QNAP NAS device as a backup destination for Proxmox VE.
Instructions
There are two ways you can set up storage space on your QNAP NAS as backup destination for Proxmox VE—through SMB and NFS.
For both methods, you will need to first configure a shared folder on your NAS.
Setting Up a NAS Shared Folder as SMB Backup Space in Proxmox VE
You can create a new shared folder to use exclusively as an SMB backup space for Proxmox VE. Before you can connect the shared folder to Proxmox VE, you must configure the folder's SMB permission settings and enable SMB service on the NAS.
- Create a shared folder on your QNAP NAS to be used by Proxmox VE.
- Log in to your NAS as an administrator.
- Open File Station.
- Click
 > Shared Folder.
- Specify the folder name, and then click Next.NoteFor illustration purposes, we'll name it "Penguin".

- Select RW (read/write access) for your administrator account, and then click Next.

- Next to Guest Access Right, select Read/Write.

- Click Finish.
The system creates the shared folder.
- Edit the shared folder's SMB permission settings.
- Open Control Panel.
- Go to Privilege > Shared Folders > Shared Folder.
- Identify the newly created shared folder.
- Under Action, click
 .
. The Edit Shared Folder Permission window opens.
 - Next to Select permission type, select Microsoft Networking host access.
- Click Add and enter the IP address of your Proxmox VE platform.

- Click Apply.
- Enable SMB service on your NAS.
- Go to Control Panel > Network & File Services > Win/Mac/NFS/WebDAV > Microsoft Networking (SMB).
- Select Enable file services for Microsoft Networking (SMB).

- Click Apply.
- Connect the shared folder on your NAS to Proxmox VE.
- Log in to your Proxmox VE platform.
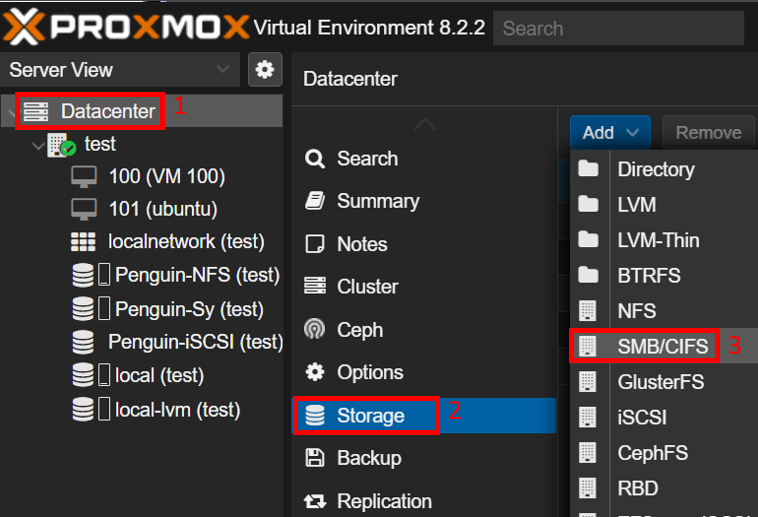
- Go to Datacenter > Storage.
- Click Add > SMB/CIFS.
- Next to ID, specify a name for the SMB storage.NoteFor illustration purposes, we'll name it "Penguin-SMB".
- Next to Server, enter the IP address of your NAS.
- Next to Username and Password, enter the credentials of your NAS administrator account.
- Next to Share, select the shared folder you created.

- Next to Content, select VZDump backup file.
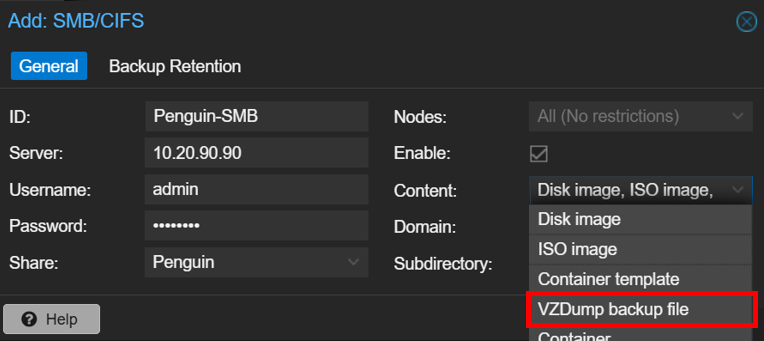
- Click Add.
- Create a backup job in Proxmox VE using the newly added SMB storage.
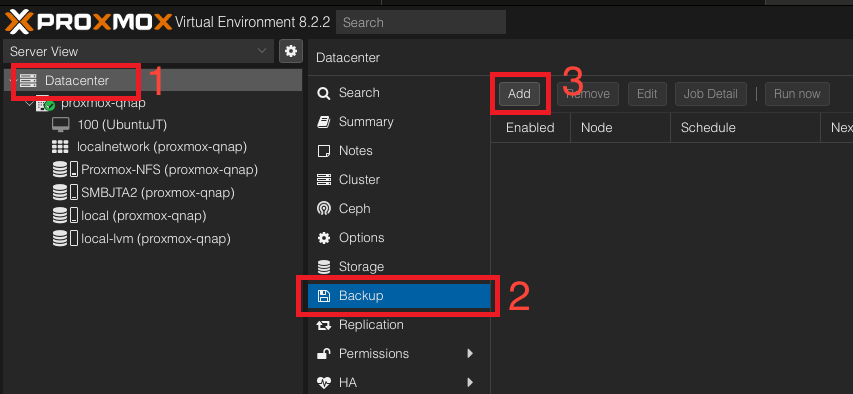
- Go to Datacenter > Backup.
- Click Add.
 The Create: Backup Job window opens.
 - Next to Storage, select the SMB storage.

- Configure the other settings.
- Click Create.
You can now back up data to the shared folder in Proxmox VE.
Setting Up a NAS Shared Folder as NFS Backup Space in Proxmox VE
You can create a new shared folder to use exclusively as an NFS backup space for Proxmox VE. Before you can connect the shared folder to Proxmox VE, you must configure the folder's NFS permission settings and enable NFS service on the NAS.
- Create a shared folder on your QNAP NAS to be used by Proxmox VE.
- Log in to your NAS as an administrator.
- Open File Station.
- Click > Shared Folder.
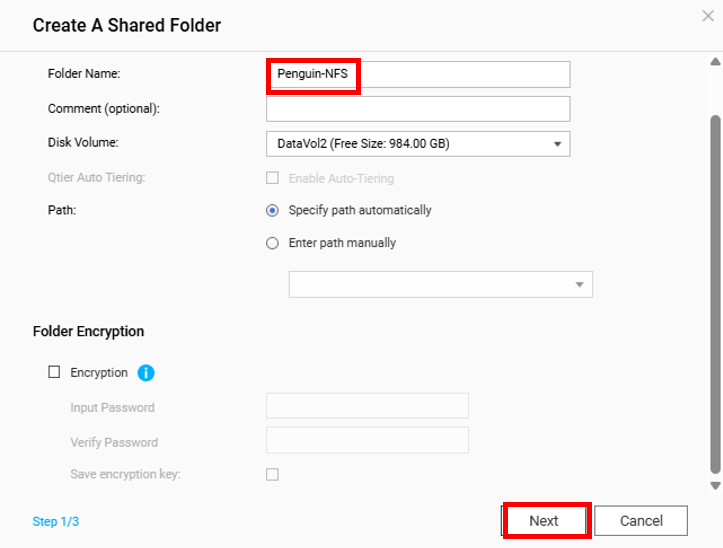
- Specify the folder name, and then click Next.NoteFor illustration purposes, we'll name it "Penguin-NFS".
- Select RW (read/write access) for your administrator account, and then click Next.
- Next to Guest Access Right, select Read/Write.
- Click Finish.
The system creates the shared folder.
- Edit the shared folder's NFS permission settings.
- Open Control Panel.
- Go to Privilege > Shared Folders > Shared Folder.
- Identify the newly created shared folder.
- Under Action, click .
 The Edit Shared Folder Permission window opens.
 - Next to Select permission type, select NFS host access.
- Select Access right.
- In the Allowed IP Address or Domain Name table, enter the IP address of your Proxmox VE platform.
- Select the read/write permission.

- Click Apply.
- Enable NFS service on your NAS.
- Go to Control Panel > Network & File Services > Win/Mac/NFS/WebDAV > NFS Service.
- Select Enable Network File System (NFS) service.
- Select all applicable NFS versions.

- Click Apply.
- Connect the shared folder on your NAS to Proxmox VE.
- Log in to your Proxmox VE platform.
- Go to Datacenter > Storage.
- Click Add > NFS.

- Next to ID, specify a name for the NFS storage.NoteFor illustration purposes, we'll name it "Penguin-NFS" (same as the shared folder's name).
- Next to Server, enter the IP address of your QNAP NAS.
- Next to Export, select the shared folder you created.
- Next to Content, select VZdump backup file.
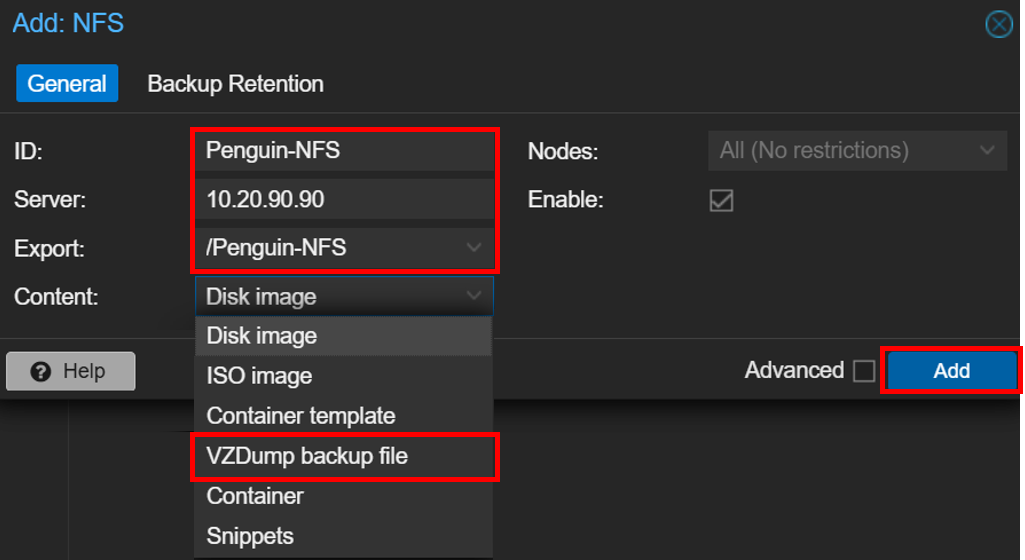
- Click Add.
- Create a backup job in Proxmox VE using the newly added NFS storage.
- Go to Datacenter > Backup.
- Click Add.
 The Create: Backup Job window opens.
 - Next to Storage, select the NFS storage.

- Configure the other settings.
- Click Create.
You can now back up data to the shared folder in Proxmox VE.
Further Reading and Resources
- How to set up Proxmox VE shared storage on a QNAP NAS?
- QNAP Knowledge Base (Searchable database of FAQs, tutorials, and web helps)
- QNAP Technical Support
- Proxmox Virtual Environment


