Applicable Products
Hardware
- QHora-301W
- QHora-321
- QHora-322
- QMiroPlus-201W
- QMiro-201W
Software
- QuWAN Orchestrator
- QuRouter 2.4.0 and later
- An Amazon Web Services (AWS) account
Details
This tutorial explains how to configure a route-based VPN between a QuWAN SD-WAN device and an AWS virtual private cloud (VPC). In a route-based VPN, the QuWAN device establishes an IPsec tunnel to the AWS virtual private gateway, and traffic is routed between the on-premises network and the AWS VPC using defined route tables. Only QNAP routers that have been added to QuWAN Orchestrator can be used for this setup. QuWAN Orchestrator manages the tunnel, handles routing, and maintains connectivity, while AWS routes traffic through the virtual private gateway, allowing secure, continuous communication between your network and cloud resources.
The steps cover configuring AWS VPC components, creating and attaching VPN gateways, downloading the AWS VPN configuration file, and applying the corresponding settings in QuWAN Orchestrator.
Important
- QuWAN site-to-site VPN only supports IKEv2.
- Both devices (QuWAN device and AWS VPC) must use the same configuration settings for the VPN to function correctly.
- Your QNAP device must be added to QuWAN Orchestrator before configuring the site-to-site VPN. To add your QNAP device to QuWAN Orchestrator, see the Configuration chapter in the QuWAN and QuWAN Orchestrator Web Help.
Warning
Implementing a site-to-site VPN introduces additional complexity to your network. Ensure you understand the security implications before enabling it.
Procedure
Note
AWS settings and interfaces may change over time. For the most up-to-date information, refer to the
AWS documentation.
Create a site-to-site connection VPN between your QNAP router and an AWS virtual private cloud (VPC)
A. Create a virtual private cloud
- Log in to https://console.aws.amazon.com/vpc/.
The VPC dashboard page appears. - Click Create VPC.
The Create VPC page appears. - Under VPC settings, select VPC only.
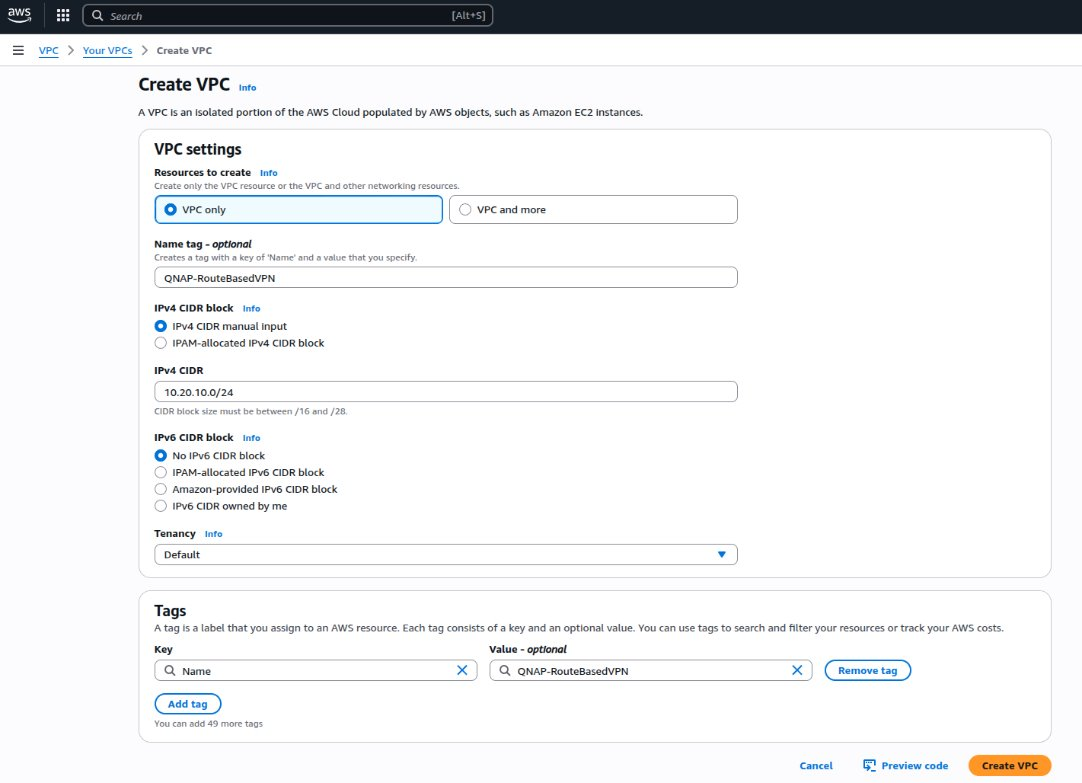
- Optional: Specify a name tag for the VPC, for example:
QNAP-RouteBasedVPN - Under IPv4 CIDR block, select IPv4 CIDR manual input.
- Specify the IPv4 address in CIDR format (e.g.,
10.20.10.0/24). - Under IPv6 CIDR block, select No IPv6 CIDR block.
- Optional: Select a tenancy option.
Note
Select whether EC2 instances in this VPC should use shared servers (default) or servers dedicated only to your account.
- Define one or more tags to help identify your resources, and assign a value to each tag.
- Optional: Click Preview code to visualize the relationships between the configured VPC resources.
- Click Create VPC.
AWS creates the VPC.
B. Create a subnet
- On the VPC dashboard side panel, go to Virtual private cloud > Subnets.
- Click Create subnet.
 The Create subnet page appears.
 - Selected your VPC from the drop-down menu.
- Specify a name tag for the subnet.
- Optional: Select an availability zone from the drop-down menu, or keep No Preference to let AWS choose one.
- Specify the IPv4 subnet CIDR block.
- Optional: Define one or more tags to help identify the VPC subnet, and assign a value to each tag.
- Click Create subnet.
C. Create an internet gateway
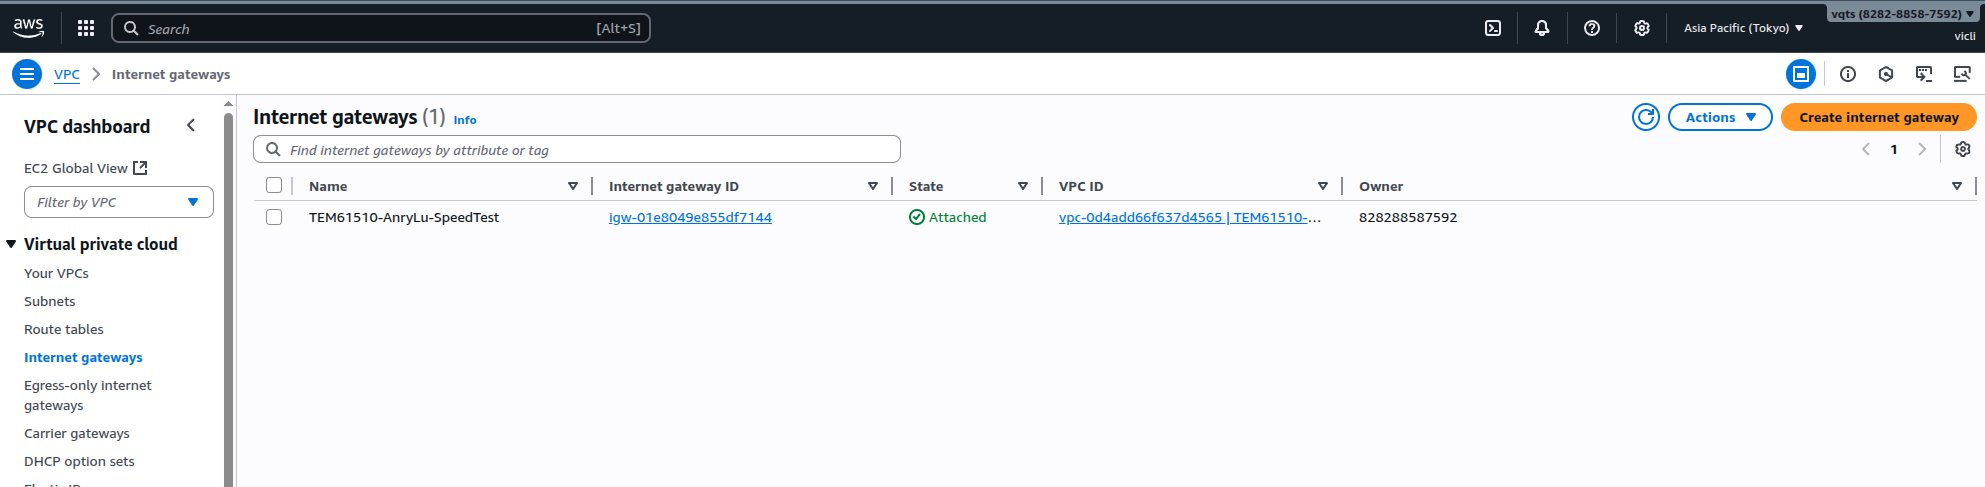
- On the VPC dashboard side panel, go to Virtual private cloud > Internet gateways.
- Click Create internet gateway.
- Optional: Define one or more tags to help identify the VPC internet gateway, and assign a value to each tag.
- Specify a name tag for the internet gateway.
- Click Create internet gateway.
AWS creates the internet gateway. - Click Actions, and then click Attach to VPC.
 The Attach to VPC page appears.
 - Click the search bar under Available VPCs, and then select the QuWAN VPC.
- Click Attach internet gateway.
AWS attaches the configured internet gateway to the QuWAN VPC.
D. Add the internet gateway to the route table
- On the VPC dashboard side panel, go to Virtual private cloud > Route tables.
- Identify the route table associated with the QuWAN VPC.
- Click the route table ID.
 The route table page appears.
 - Click Edit routes.
The Edit routes page appears. - Click Add route.
- Enter
0.0.0.0/0 as the destination. - Click the drop-down menu under Target, and select Internet Gateway.
A secondary field appears under Internet Gateway appears. - Select the previously configured internet gateway from the drop-down menu.

- Click Save changes.
AWS updates the route table.
E. Configure security groups for the VPC
- On the VPC dashboard side panel, go to Security > Security groups.
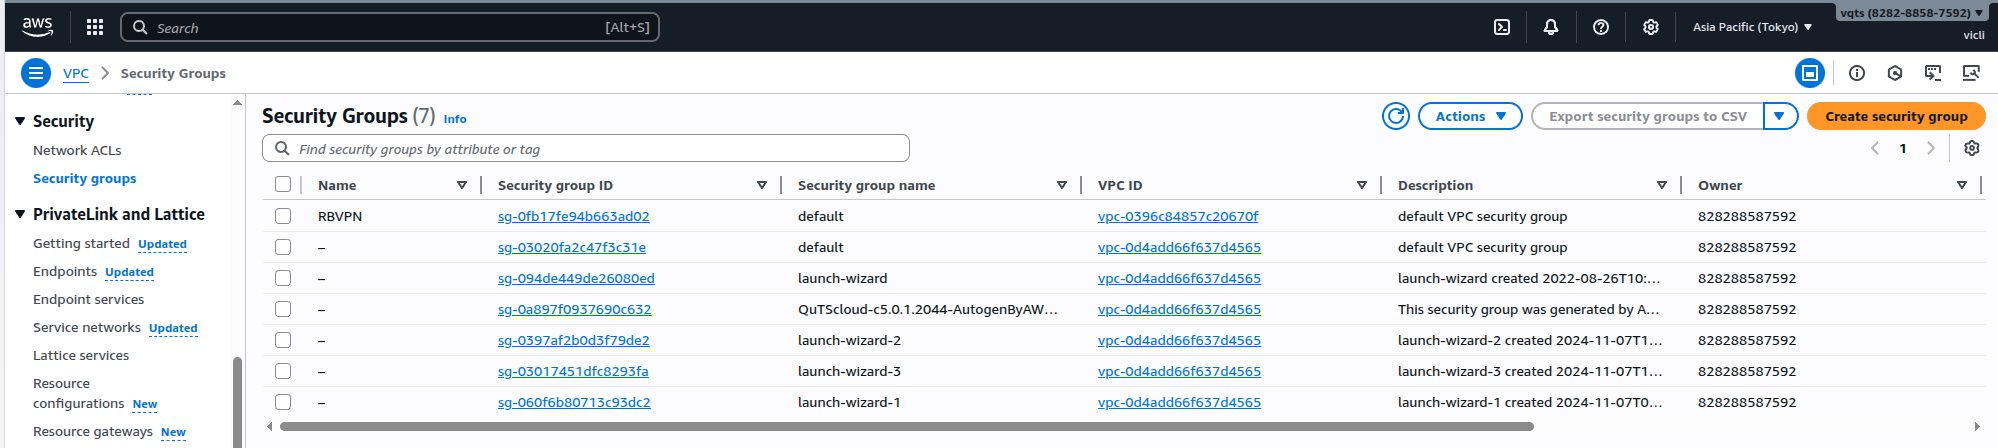
- Identify the security group associated with your VPC.
- Click the security group.
The security group page appears. - Click Edit inbound rules.
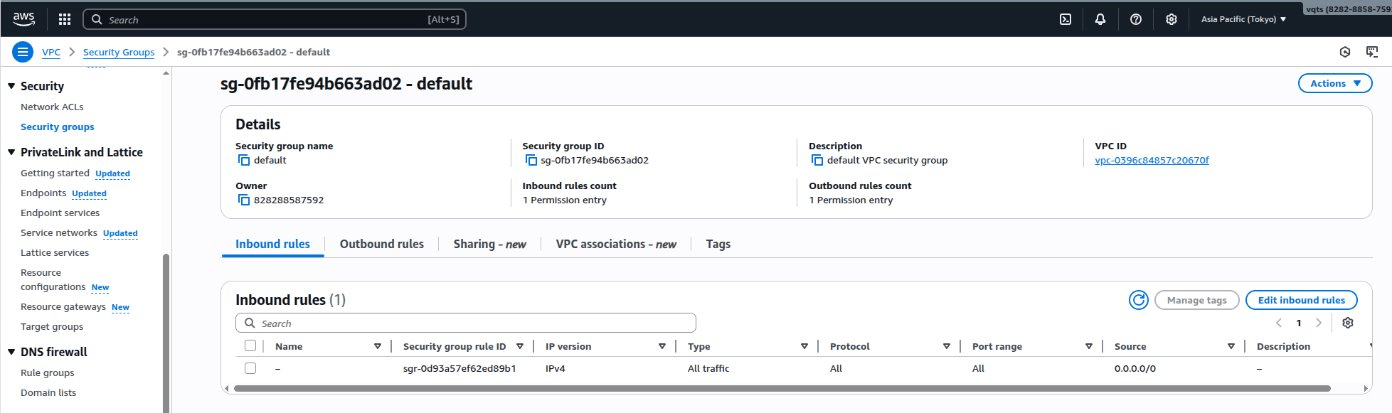 The Edit inbound rules page appears.
 - Click Add rule.
- Under Type, select All traffic.
- Under Source, select Anywhere-IPv4.
- Click Save rules.
AWS adds the security group to the QuWAN VPC.
F. Configure virtual private network (VPN) settings
- On the VPC dashboard side panel, go to Virtual private network (VPN) > Virtual private gateways.
- Click Create virtual private gateway.

- Specify a name tag for the VPN.
- Under Autonomous System Number (ASN), select Amazon default ASN.
Note
The ASN (Autonomous System Number) identifies AWS in the VPN connection. The default value is 64512, but it can be changed if it conflicts with your network.
- Optional: Define one or more tags to help identify the VPC subnet, and assign a value to each tag.
- Click Create virtual private gateway.
AWS creates the virtual private gateway. - On the Virtual private gateways page, select the virtual private gateway you configured.
- Click Actions, and then click Attach to VPC.
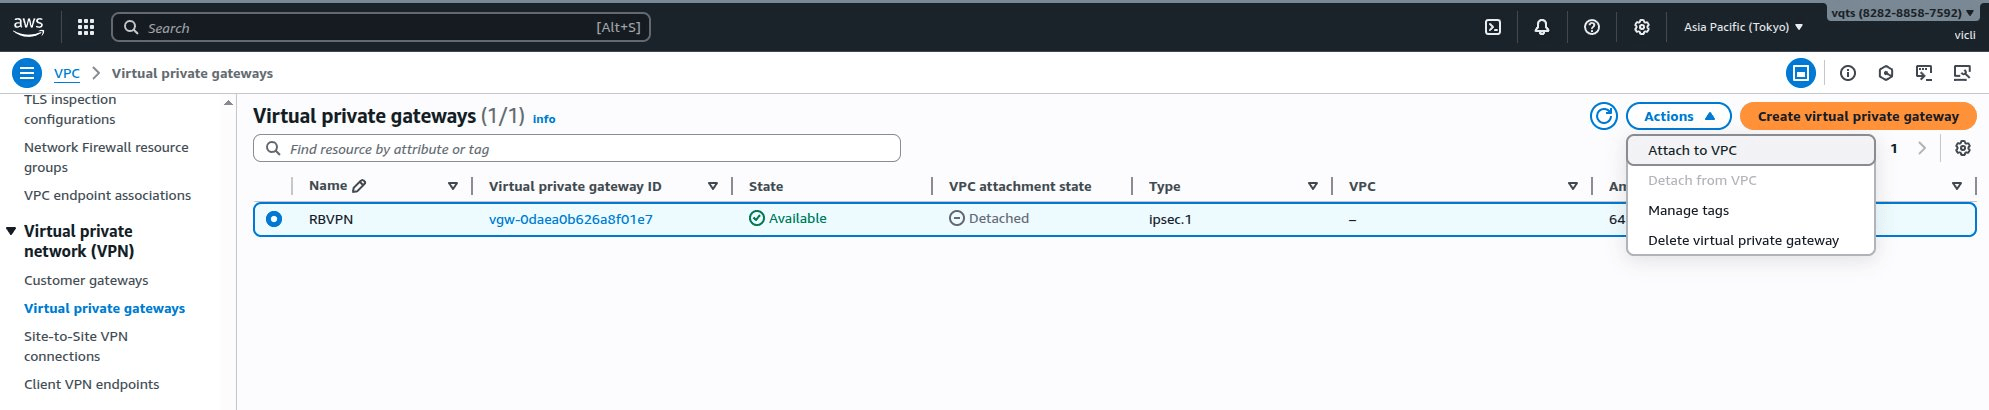 The Attach to VPC page appears.
 - Click the search bar under Available VPCs, and then select the QuWAN VPC.
- Click Attach to VPC.
AWS attaches the configured virtual private gateway to the QuWAN VPC.
G. Identify the LAN and WAN IP address of your QNAP router
- Log in to QuRouter.
- Go to the WAN settings page:
- For QHora routers: Network > Physical Network Settings > WAN
- For QMiro routers: Network > WAN and LAN > WAN
- Identify the active WAN interface.
- Copy the IP address provided for the WAN interface.
- Go to the LAN settings page:
- For QHora routers: Network > Physical Network Settings > LAN
- For QMiro routers: Network > WAN and LAN > LAN
- Identify the active LAN interface.
- Copy the IP address provided for the LAN interface.
H. Add the virtual private gateway to the route table
- On the VPC dashboard side panel, go to Virtual private cloud > Route tables.
- Identify the route table associated with the QuWAN VPC.
- Click the route table ID.
The route table page appears. - Click Edit routes.
The Edit routes page appears.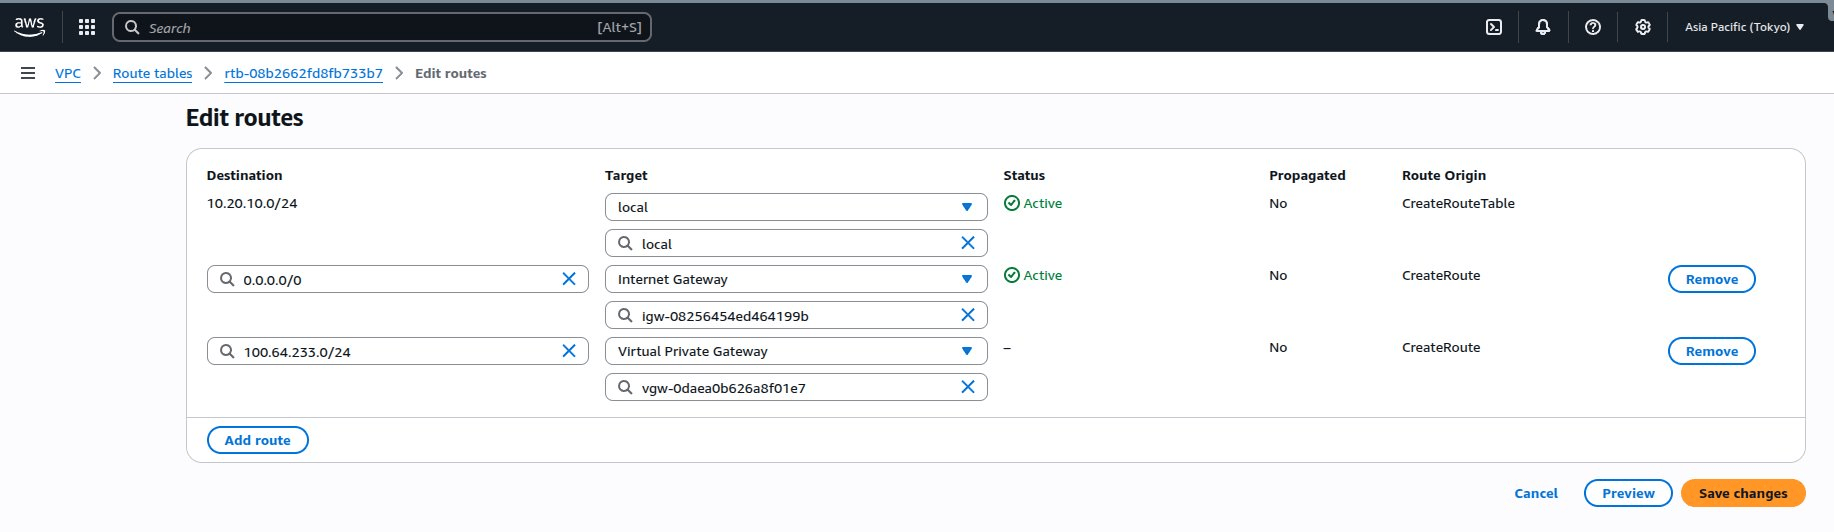
- Click Add route.
- Enter the copied QuRouter LAN interface IP address with its subnet in CIDR notation as the destination.
- Click the drop-down menu under Target, and select Virtual Private Gateway.
A secondary field appears appears under Internet Gateway. - Select the previously configured virtual private gateway from the drop-down menu.
- Click Save changes.
AWS updates the route table.
I. Create a customer gateway for the VPC
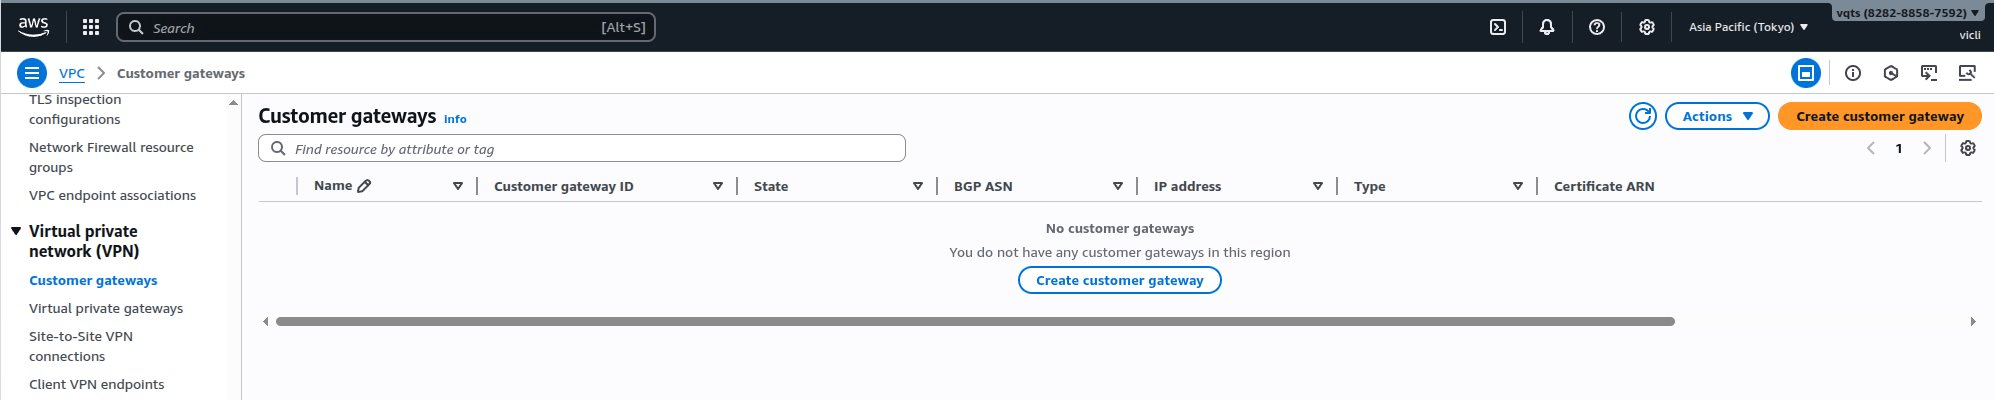
- On the VPC dashboard side panel, go to Virtual private network (VPN) > Customer gateways.
- Click Create customer gateway.
- Specify a name tag for the customer gateway.
- Enter the copied QuRouter WAN interface IP address in the IP address field.
- Optional: Click Add new tag to define one or more tags to help identify the customer gateway, and assign a value to each tag.
- Click Create customer gateway.
J. Create a site-to-site VPN connection
- On the VPC dashboard side panel, go to Virtual private network (VPN) > Site-to-site VPN connections.
- Click Create VPN connection.
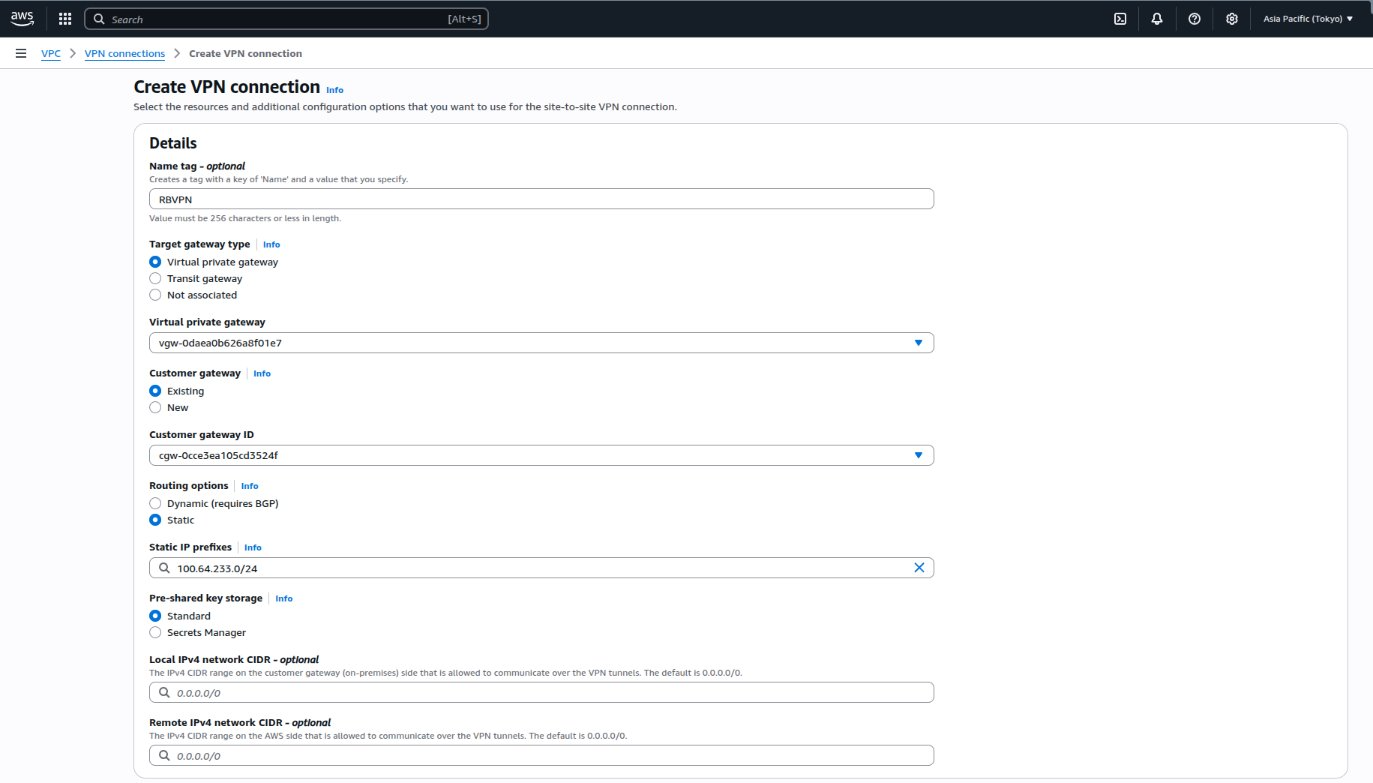
- Specify a name tag for the VPN connection.
- Under Target gateway type, select Virtual private gateway.
- Select the pre-configured virtual private gateway from the drop-down menu.
- Under Customer gateway, select Existing.
- Select the pre-configured customer gateway from the drop-down menu.
- Under Routing options, select Static.
- Enter the QuRouter LAN interface IP address with its subnet in CIDR notation in the
Add static IP prefix field. - Optional: Configure the pre-shared key storage, local IPv4 network CIDR, remote IPv4 network CIDR fields.
- Optional: Configure the primary and secondary tunnel settings.
- Optional: Click Add new tag to define one or more tags to help identify the customer gateway, and assign a value to each tag.
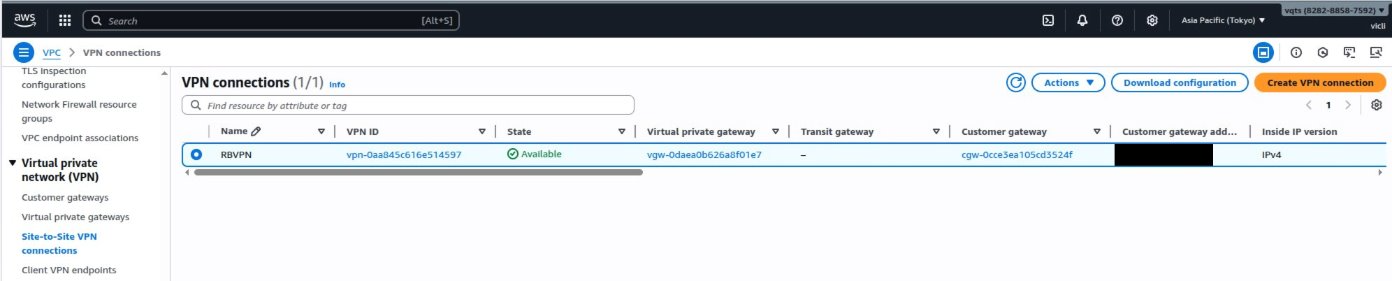
Note
AWS creates the Site-to-Site VPN connection with the QNAP router. On the VPN Connections page, verify that the connection status changes to Available.
K. Download the site-to-site VPN configuration file
- On the VPC dashboard side panel, go to Virtual private network (VPN) > Site-to-site VPN connections.
- Identify the site-to-site VPN connection you created in the previous step.
- Select the VPN connection.
- Click Download configuration.
The Download configuration window appears. - Under Vendor, select Strongswan.
- Under IKE version, select ikev2.
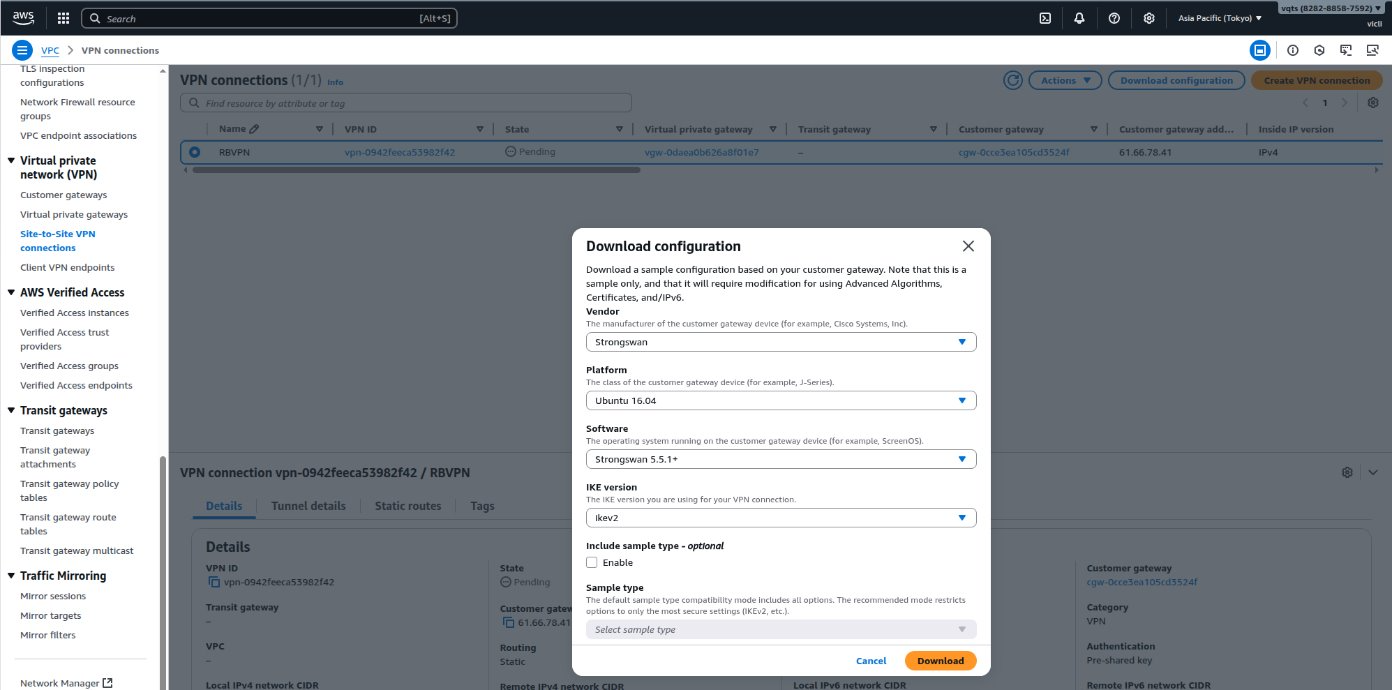
- Click Download.
The configuration file is downloaded in TXT format. - Click X on the Download configuration window.
Launch an EC2 (Elastic Cloud Compute) instance in AWS
- Go to https://console.aws.amazon.com/ec2/.
- On the side panel, go to Instances > Instances.
- Locate the Launch instances section.
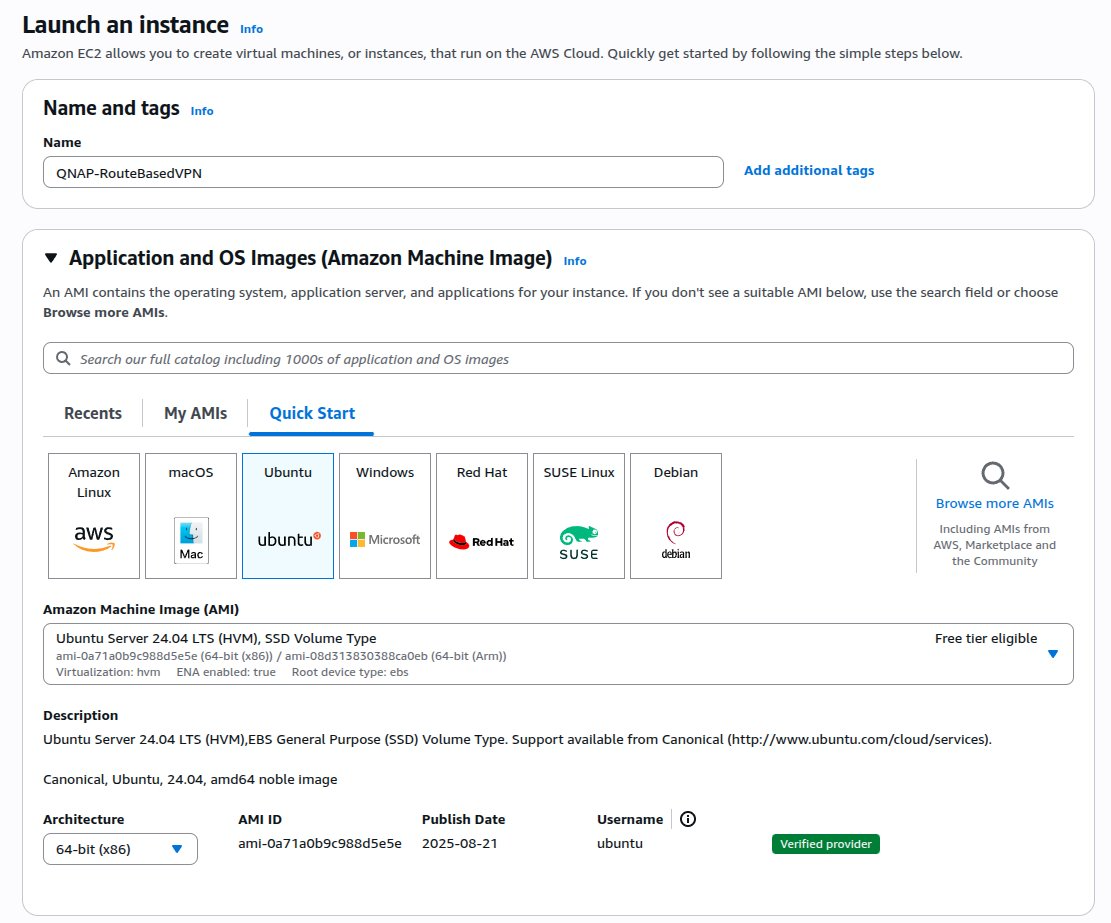
- Click Launch instance.
The Launch an instance page appears. - Specify a name tag for the instance.
- Under Application and OS Images (Amazon Machine Image), click Ubuntu.
- Under Key pair (login), click Create new key pair.
The Create key pair window appears.
- Specify a name for the key pair.
- Under Key pair type, select RSA.
- Under Private key file format, select .pem.
- Click Create key pair.
AWS downloads the key pair configuration file in the selected format. - Select the previously configured key pair from the drop-down menu in the Key pair (login) section.
- Click Edit in the Network settings section.
- Under VPC - required, select the pre-configured VPC.
- Under Auto-assign public IP, select Enable.
- Under Firewall (security groups), select Select existing security group.

- Under Common security groups, select the previously configured security group.
- Optional: Configure the storage and advanced settings.
- Click Launch instance.
AWS launches the EC2 instance.
Configure site-to-site VPN settings in QuWAN Orchestrator
- Log in to QuWAN Orchestrator using your QNAP ID credentials.
- Select your organization.
- Go to QuWAN Topology > Route-Based VPN.
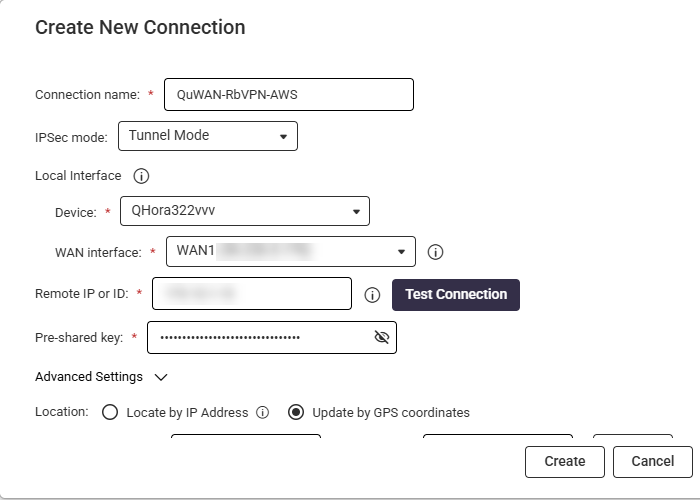
- Click Create New Connection.
The Create New Connection window appears. - Configure the route-based VPN connection settings.
| Setting | Description |
|---|
| Connection name | Assign a descriptive name (e.g., AWS Site-to-Site VPN). |
| IPsec mode | Select Tunnel Mode. |
| Device | Designate the appropriate hub for the connection. |
| WAN interface | Enter the desired WAN interface. |
| Remote IP or ID | Specify the public IP address or hostname of the remote gateway device. |
| Test Connection (Optional) | Click to ping the device to confirm the connection. |
| Pre-shared key | Establish a strong pre-shared key, ensuring identical configuration on the remote gateway. |
- Click Advanced Settings to configure the advanced route-based VPN connection settings.
| Setting | User Action | Example Value |
|---|
| Internet Key Exchange (IKE) |
| Version | Select IKEv2. | - |
| Authentication algorithm | Select a robust authentication algorithm. | AES-128 |
| Encryption | Select a strong encryption method. | AES-128 |
| DH group | Select the DH group size to determine the key strength used during the Diffie-Hellman exchange. | 14 |
| Security Association (SA) lifetime | Define the IKE Security Association (SA) duration to reduce cryptographic risks associated with key exposure. | 480 |
| Local ID (Optional) | Enter a local ID if you are using a Dynamic DNS (DDNS) service for the route-based VPN connection. | - |
| Encapsulating Security Payload (ESP) |
| Authentication algorithm | Select an authentication algorithm. | SHA-256 |
| Encryption | Select an encryption method. | AES-128 |
| Enable Perfect Forward Secrecy (PFS) | Enable to generate a new Diffie-Hellman (DH) key for each session, ensuring stronger security. | - |
| DH Group | Select the DH group size to define the key strength for the VPN connection. | 14 |
| Security Association (SA) lifetime | Define the SA lifetime duration to specify how long a security association remains valid before rekeying. | 60 minutes |
| Enable Dead Peer Detection (DPD) | Enable to identity and respond to peer device outages. | - |
| DPD timeout | Set the DPD timeout to define how long the device waits before considering the peer unresponsive. | 10 seconds |
- Select a location setting to specify how the device’s position is determined:
- Locate by IP Address: Automatically detects the location based on the device’s IP address.
- Update by GPS coordinates: Requires users to manually provide the latitude and longitude values.
- Enable Enable NAT mode to ensure that the VPN connection functions properly even when NAT devices are present in the network.
- Specify the local tunnel IP address to facilitate NAT-traversal.
- Under Destination Configuration, click Add Subnet.
- Specify the internal subnet of the remote network you want to access.
- Click
 .
. - Click Create.
Note
If the route-based VPN connection is successful, the
Status field displays the
Connected status.

Further Reading
적용되는 제품
하드웨어
- QHora-301W
- QHora-321
- QHora-322
- QMiroPlus-201W
- QMiro-201W
소프트웨어
- QuWAN Orchestrator
- QuRouter 2.4.0 이상
- AWS(Amazon Web Services) 계정
상세 정보
이 튜토리얼은 QuWAN SD-WAN 장치와 AWS 가상 사설 클라우드(VPC) 간의 경로 기반 VPN을 구성하는 방법을 설명합니다. 경로 기반 VPN에서 QuWAN 장치는 AWS 가상 사설 게이트웨이에 IPsec 터널을 설정하고, 정의된 라우트 테이블을 사용하여 온프레미스 네트워크와 AWS VPC 간의 트래픽을 라우팅합니다. QuWAN Orchestrator에 추가된 QNAP 라우터만 이 설정에 사용할 수 있습니다. QuWAN Orchestrator는 터널을 관리하고, 라우팅을 처리하며, 연결성을 유지하는 반면, AWS는 가상 사설 게이트웨이를 통해 트래픽을 라우팅하여 네트워크와 클라우드 리소스 간의 안전하고 지속적인 통신을 허용합니다.
단계는 AWS VPC 구성 요소 구성, VPN 게이트웨이 생성 및 연결, AWS VPN 구성 파일 다운로드 및QuWAN Orchestrator에 해당 설정 적용을 포함합니다.
중요
- QuWAN 사이트 간 VPN은 IKEv2만 지원합니다.
- 두 장치(QuWAN 장치와 AWS VPC)는 VPN이 제대로 작동하려면 동일한 구성 설정을 사용해야 합니다.
- 사이트 간 VPN을 구성하기 전에 QNAP 장치를QuWAN Orchestrator에 추가해야 합니다. QNAP 장치를QuWAN Orchestrator에 추가하려면구성장의QuWAN 및 QuWAN Orchestrator 웹 도움말을 참조하십시오.
경고
사이트 간 VPN을 구현하면 네트워크에 추가적인 복잡성이 발생합니다. 이를 활성화하기 전에 보안상의 영향을 충분히 이해하고 확인하도록 하십시오.
절차
참고
AWS 설정 및 인터페이스는 시간이 지남에 따라 변경될 수 있습니다. 가장 최신 정보를 얻으려면
AWS 문서을 참조하십시오.
QNAP 라우터와 AWS 가상 사설 클라우드(VPC) 간에 사이트 간 연결 VPN을 생성합니다.
A. 가상 사설 클라우드 생성
- https://console.aws.amazon.com/vpc/에 로그인합니다.
VPC 대시보드페이지가 나타납니다. - Create VPC를 클릭합니다.
Create VPC페이지가 나타납니다. - 아래VPC 설정을 선택합니다VPC만.
- 선택 사항: VPC에 대한 이름 태그를 지정합니다. 예를 들어:
QNAP-RouteBasedVPN - 아래에서IPv4 CIDR 블록을 선택합니다IPv4 CIDR 수동 입력.
- CIDR 형식으로 IPv4 주소를 지정합니다 (예:
10.20.10.0/24). - 아래에서IPv6 CIDR 블록을 선택합니다IPv6 CIDR 블록 없음.
- 선택 사항: 테넌시 옵션을 선택합니다.
참고
이 VPC의 EC2 인스턴스가 공유 서버(기본값)를 사용할지 아니면 계정에만 전용된 서버를 사용할지 선택합니다.
- 리소스를 식별하는 데 도움이 되는 하나 이상의 태그를 정의하고 각 태그에 값을 할당합니다.
- 선택 사항: 클릭합니다코드 미리보기구성된 VPC 리소스 간의 관계를 시각화합니다.
- VPC 생성을 클릭합니다.
AWS가 VPC를 생성합니다.
B. 서브넷 생성
- VPC 대시보드사이드 패널에서 이동합니다가상 프라이빗 클라우드>서브넷.
- 클릭합니다서브넷 생성.다음이서브넷 생성페이지가 나타납니다.
- 드롭다운 메뉴에서 VPC를 선택합니다.
- 서브넷에 대한 이름 태그를 지정합니다.
- 선택 사항: 드롭다운 메뉴에서 가용 영역을 선택하거나선호 없음을 유지하여 AWS가 선택하도록 합니다.
- IPv4 서브넷 CIDR 블록을 지정합니다.
- 선택 사항: VPC 서브넷을 식별하는 데 도움이 되는 하나 이상의 태그를 정의하고 각 태그에 값을 할당합니다.
- 클릭합니다서브넷 생성.
C. 인터넷 게이트웨이 생성
- VPC 대시보드사이드 패널에서 이동합니다가상 프라이빗 클라우드>인터넷 게이트웨이.
- 클릭합니다인터넷 게이트웨이 생성.
- 선택 사항: VPC 인터넷 게이트웨이를 식별하는 데 도움이 되는 하나 이상의 태그를 정의하고 각 태그에 값을 할당합니다.
- 인터넷 게이트웨이에 대한 이름 태그를 지정합니다.
- 인터넷 게이트웨이 생성을 클릭합니다.
AWS가 인터넷 게이트웨이를 생성합니다. - 클릭합니다작업, 그런 다음 클릭합니다VPC에 연결.해당VPC에 연결페이지가 나타납니다.
- 검색 표시줄을 클릭합니다사용 가능한 VPC, 그런 다음 QuWAN VPC를 선택합니다.
- 인터넷 게이트웨이 연결을 클릭합니다.
AWS가 구성된 인터넷 게이트웨이를 QuWAN VPC에 연결합니다.
D. 인터넷 게이트웨이를 라우트 테이블에 추가합니다
- VPC 대시보드사이드 패널에서 이동합니다가상 프라이빗 클라우드>라우트 테이블.
- QuWAN VPC와 연결된 라우트 테이블을 식별합니다.
- 라우트 테이블 ID를 클릭합니다.라우트 테이블 페이지가 나타납니다.
- 라우트 편집을 클릭합니다.
라우트 편집페이지가 나타납니다. - 클릭합니다라우트 추가.
- 입력합니다
0.0.0.0/0대상으로. - 대상아래 드롭다운 메뉴를 클릭하고인터넷 게이트웨이을 선택합니다.
인터넷 게이트웨이아래에 보조 필드가 나타납니다. - 드롭다운 메뉴에서 이전에 구성된 인터넷 게이트웨이를 선택합니다.
- 변경 사항 저장을 클릭합니다.
AWS가 라우트 테이블을 업데이트합니다.
E. VPC에 대한 보안 그룹 구성
- VPC 대시보드사이드 패널에서 이동합니다보안>보안 그룹.
- VPC와 연결된 보안 그룹을 식별합니다.
- 보안 그룹을 클릭합니다.
보안 그룹 페이지가 나타납니다. - 클릭합니다인바운드 규칙 편집.해당인바운드 규칙 편집페이지가 나타납니다.
- 클릭규칙 추가.
- 아래에서유형, 선택모든 트래픽.
- 아래에서소스, 선택Anywhere-IPv4.
- 규칙 저장을 클릭합니다.
AWS가 보안 그룹을 QuWAN VPC에 추가합니다.
F. 가상 사설망(VPN) 설정 구성
- VPC 대시보드사이드 패널에서 이동가상 사설망(VPN)>가상 사설 게이트웨이.
- 클릭가상 사설 게이트웨이 생성.
- VPN의 이름 태그를 지정합니다.
- 아래에서자율 시스템 번호(ASN), 선택Amazon 기본 ASN.
참고
ASN(자율 시스템 번호)은 VPN 연결에서 AWS를 식별합니다. 기본값은 64512이지만 네트워크와 충돌할 경우 변경할 수 있습니다.
- 선택 사항: VPC 서브넷을 식별하는 데 도움이 되는 하나 이상의 태그를 정의하고 각 태그에 값을 할당합니다.
- 가상 사설 게이트웨이 생성을 클릭합니다.
AWS가 가상 사설 게이트웨이를 생성합니다. - 에서가상 사설 게이트웨이페이지에서 구성한 가상 사설 게이트웨이를 선택합니다.
- 클릭작업, 그런 다음 클릭VPC에 연결.다음의VPC에 연결페이지가 나타납니다.
- 아래의 검색 표시줄을 클릭합니다.사용 가능한 VPC, 그런 다음 QuWAN VPC를 선택합니다.
- VPC에 연결을 클릭합니다.
AWS가 구성된 가상 사설 게이트웨이를 QuWAN VPC에 연결합니다.
G. QNAP 라우터의 LAN 및 WAN IP 주소 식별
- QuRouter에 로그인합니다.
- WAN 설정 페이지로 이동:
- QHora 라우터의 경우:네트워크>물리적 네트워크 설정>WAN
- QMiro 라우터의 경우:네트워크>WAN 및 LAN>WAN
- 활성 WAN 인터페이스를 식별합니다.
- WAN 인터페이스에 제공된 IP 주소를 복사합니다.
- LAN 설정 페이지로 이동:
- QHora 라우터의 경우:네트워크>물리적 네트워크 설정>LAN
- QMiro 라우터의 경우:네트워크>WAN 및 LAN>LAN
- 활성 LAN 인터페이스를 식별합니다.
- LAN 인터페이스에 제공된 IP 주소를 복사합니다.
H. 경로 테이블에 가상 사설 게이트웨이 추가
- VPC 대시보드사이드 패널에서 이동가상 사설 클라우드>라우트 테이블.
- QuWAN VPC와 연결된 라우트 테이블을 식별합니다.
- 라우트 테이블 ID를 클릭합니다.
라우트 테이블 페이지가 나타납니다. - 라우트 편집을 클릭합니다.
라우트 편집페이지가 나타납니다. - 클릭라우트 추가.
- 복사한 QuRouter LAN 인터페이스 IP 주소와 서브넷을 CIDR 표기로 입력하여 목적지로 설정합니다.
- 대상아래의 드롭다운 메뉴를 클릭하고가상 사설 게이트웨이를 선택합니다.
인터넷 게이트웨이아래에 보조 필드가 나타납니다. - 드롭다운 메뉴에서 이전에 구성한 가상 사설 게이트웨이를 선택합니다.
- 변경 사항 저장을 클릭합니다.
AWS가 라우트 테이블을 업데이트합니다.
I. VPC에 대한 고객 게이트웨이 생성
- VPC 대시보드사이드 패널에서 이동합니다가상 사설망 (VPN)>고객 게이트웨이.
- 클릭고객 게이트웨이 생성.
- 고객 게이트웨이에 대한 이름 태그를 지정합니다.
- IP 주소 필드에 복사한 QuRouter WAN 인터페이스 IP 주소를 입력합니다.
- 선택 사항: 클릭새 태그 추가고객 게이트웨이를 식별하는 데 도움이 되는 하나 이상의 태그를 정의하고 각 태그에 값을 할당합니다.
- 클릭고객 게이트웨이 생성.
J. 사이트 간 VPN 연결 생성
- VPC 대시보드사이드 패널에서 이동합니다가상 사설망 (VPN)>사이트 간 VPN 연결.
- 클릭VPN 연결 생성.
- VPN 연결에 대한 이름 태그를 지정합니다.
- 아래대상 게이트웨이 유형, 선택가상 사설 게이트웨이.
- 드롭다운 메뉴에서 미리 구성된 가상 사설 게이트웨이를 선택합니다.
- 아래고객 게이트웨이, 선택기존.
- 드롭다운 메뉴에서 미리 구성된 고객 게이트웨이를 선택합니다.
- 아래라우팅 옵션, 선택정적.
- QuRouter LAN 인터페이스 IP 주소와 서브넷을 CIDR 표기로 입력합니다
정적 IP 접두사 추가필드. - 선택 사항: 사전 공유 키스토리지, 로컬 IPv4 네트워크 CIDR, 원격 IPv4 네트워크 CIDR 필드를 구성합니다.
- 선택 사항: 기본 및 보조 터널 설정을 구성합니다.
- 선택 사항: 새 태그 추가를 클릭하여 고객 게이트웨이를 식별하는 데 도움이 되는 하나 이상의 태그를 정의하고 각 태그에 값을 할당합니다.
참고
AWS는 QNAP 라우터와 함께 사이트 간 VPN 연결을 생성합니다. VPN 연결페이지에서 연결 상태가사용 가능으로 변경되었는지 확인합니다.
K. 사이트 간 VPN 구성 파일 다운로드
- VPC 대시보드측면 패널에서 이동합니다가상 사설망(VPN)>사이트 간 VPN 연결.
- 이전 단계에서 생성한 사이트 간 VPN 연결을 식별합니다.
- VPN 연결을 선택합니다.
- 구성 다운로드를 클릭합니다.
구성 다운로드창이 나타납니다. - 아래에서벤더를 선택합니다Strongswan.
- 아래에서IKE 버전을 선택합니다ikev2.
- 다운로드를 클릭합니다.
구성 파일이 TXT 형식으로 다운로드됩니다. - 클릭X에서구성 다운로드창.
AWS에서 EC2(Elastic Cloud Compute) 인스턴스 실행
- https://console.aws.amazon.com/ec2/로 이동합니다.
- 측면 패널에서 이동합니다인스턴스>인스턴스.
- 다음을 찾습니다인스턴스 실행섹션.
- 인스턴스 실행를 클릭합니다.
인스턴스 실행페이지가 나타납니다. - 인스턴스에 대한 이름 태그를 지정합니다.
- 아래에서애플리케이션 및 OS 이미지(Amazon Machine Image)를 클릭합니다Ubuntu.
- 키 쌍(로그인)아래에서새 키 쌍 생성을 클릭합니다.
키 쌍 생성창이 나타납니다. - 키 쌍의 이름을 지정합니다.
- 아래에서키 쌍 유형을 선택합니다RSA.
- 아래에서개인 키 파일 형식을 선택합니다.pem.
- 키 쌍 생성을 클릭합니다.
AWS가 선택한 형식으로 키 쌍 구성 파일을 다운로드합니다. - 드롭다운 메뉴에서 이전에 구성한 키 쌍을 선택합니다키 쌍(로그인)섹션.
- 클릭편집에서네트워크 설정섹션.
- 아래에서VPC - 필수를 선택하여 사전 구성된 VPC를 선택합니다.
- 아래에서공용 IP 자동 할당을 선택합니다활성화.
- 아래에서방화벽 (보안 그룹)을 선택합니다기존 보안 그룹 선택.
- 아래에서일반 보안 그룹을 선택하여 이전에 구성한 보안 그룹을 선택합니다.
- 선택 사항: 스토리지및 고급 설정을 구성합니다.
- 인스턴스 실행을 클릭합니다.
AWS가 EC2 인스턴스를 실행합니다.
QuWAN Orchestrator에서 사이트 간 VPN 설정 구성
- QNAP ID 자격 증명을 사용하여QuWAN Orchestrator에 로그인합니다.
- 조직을 선택합니다.
- 이동합니다QuWAN 토폴로지>루트 기반 VPN.
- 새 연결 생성을 클릭합니다.
새 연결 생성창이 나타납니다. - 루트 기반 VPN 연결 설정을 구성합니다.
| 설정 | 설명 |
|---|
| 연결 이름 | 설명을 포함한 이름을 지정합니다(예: AWS 사이트 간 VPN). |
| IPsec 모드 | Select(선택)터널 모드. |
| 장치 | 연결에 적절한허브를 지정합니다. |
| WAN 인터페이스 | 원하는 WAN 인터페이스를 입력합니다. |
| 원격 IP 또는 ID | 원격 게이트웨이 장치의 공개 IP 주소 또는 호스트 이름을 지정합니다. |
| 연결 테스트(선택사항) | 장치에 핑을 보내 연결을 확인합니다. |
| 사전 공유 키 | 강력한 사전 공유 키를 설정하고, 원격 게이트웨이에서도 동일한 구성이 적용되도록 확인합니다. |
- 클릭고급 설정 고급 루트 기반 VPN 연결 설정을 구성합니다.
| 설정 | 사용자 작업 | 예시 값 |
|---|
| 인터넷 키 교환(IKE) |
| 버전 | Select(선택)IKEv2. | - |
| 인증 알고리즘 | 강력한 인증 알고리즘을 선택합니다. | AES-128 |
| 암호화 | 강력한 암호화 방법을 선택합니다. | AES-128 |
| DH 그룹 | Diffie-Hellman 교환 중 사용되는 키 강도를 결정하기 위해 DH 그룹 크기를 선택합니다. | 14 |
| SA(Security Association) 수명 시간 | 키 노출과 관련된 암호화 위험을 줄이기 위해 IKE 보안 연결(Security Association, SA) 기간을 정의합니다. | 480 |
| 로컬 ID(선택사항) | 루트 기반 VPN 연결에 동적 DNS(Dynamic DNS, DDNS) 서비스를 사용할 경우, 로컬 ID를 입력합니다. | - |
| ESP(Encapsulating Security Payload) |
| 인증 알고리즘 | 인증 알고리즘을 선택합니다. | SHA-256 |
| 암호화 | 암호화 방법을 선택합니다. | AES-128 |
| PFS(Perfect Forward Secrecy) 활성화 | 각 세션마다 새로운 Diffie-Hellman(DH) 키를 생성하여 보안을 강화합니다. | - |
| DH 그룹 | VPN 연결을 위한 키 강도를 정의하기 위해 DH 그룹 크기를 선택합니다. | 14 |
| SA(Security Association) 수명 시간 | 보안 연결이 재키 전까지 유효한 시간을 지정하기 위해 SA 수명 시간을 정의합니다. | 60분 |
| DPD(Dead Peer Detection) 활성화 | 피어 장치의 장애를 식별하고 해당 문제에 대응합니다. | - |
| DPD 시간 초과 | 피어가 응답하지 않는 것으로 간주하기 전에 장치가 기다리는 시간을 정의하기 위해 DPD 시간 초과를 설정합니다. | 10초 |
- 장치의 위치가 어떻게 결정되는지를 지정하기 위해 위치 설정을 선택합니다:
- IP 주소별로 찾기: 장치의 IP 주소를 기반으로 위치를 자동으로 감지합니다.
- GPS 좌표로 업데이트: 사용자가 위도 및 경도 값을 수동으로 제공해야 합니다.
- 활성화NAT 모드 활성화네트워크에 NAT 장치가 있을 때에도 VPN 연결이 정상적으로 작동하도록 합니다.
- NAT 트래버설을 원활하게 하기 위해 로컬 터널 IP 주소를 지정합니다.
- 아래에서대상 구성, 클릭서브넷 추가.
- 액세스하려는 원격 네트워크의 내부 서브넷을 지정합니다.
- 클릭.
- 클릭생성.
참고
루트 기반 VPN 연결이 성공하면
상태필드에
연결됨상태가 표시됩니다.
추가 읽기


