How do I set up QNAP MCP Assistant with Claude Desktop?Applicable Products
- QNAP NAS devices running QTS 5.2, QuTS hero h5.2, or later versions
- MCP Assistant
Introduction
This tutorial guides you through the process of setting up QNAP's MCP Assistant to work with Claude Desktop, which enables seamless integration between your QNAP NAS and Claude's AI capabilities. You can then use natural language commands to operate your NAS.
Prerequisites
Before your start, ensure that you have the following setup:
- QNAP NAS device with QTS 5.2, QuTS hero h5.2, or later versions
- Computer with internet connection (Windows or macOS; Claude Desktop is not available for Linux)
- Administrator access to your QNAP NAS
- Default MCP Assistant ports: 8442 and 8443
Procedure
- Install MCP Assistant (beta) from App Center.
- If your NAS runs QTS/QuTS hero 5.2.1 or later versions:
- Log in to your QNAP NAS.
- Go to the App Center.
- On the top-right corner, click

- Select Join the QNAP App Beta Program and click Apply.
- In the search bar, search for MCP Assistant.
- Click Install.
- If your NAS runs QTS/QuTS hero 5.2.0:
- Go to the webpage of App Center.
- Search for MCP Assistant.
- Click MCP Assistant from the search result.
- Select your NAS model.
- Download the installation file.
- Log in to your QNAP NAS.
- Go to App Center.
- On the right-top corner, click

- Select Install Manually.
- Click Browse and upload the installation file that you just downloaded from the QNAP website.
- Click Install.
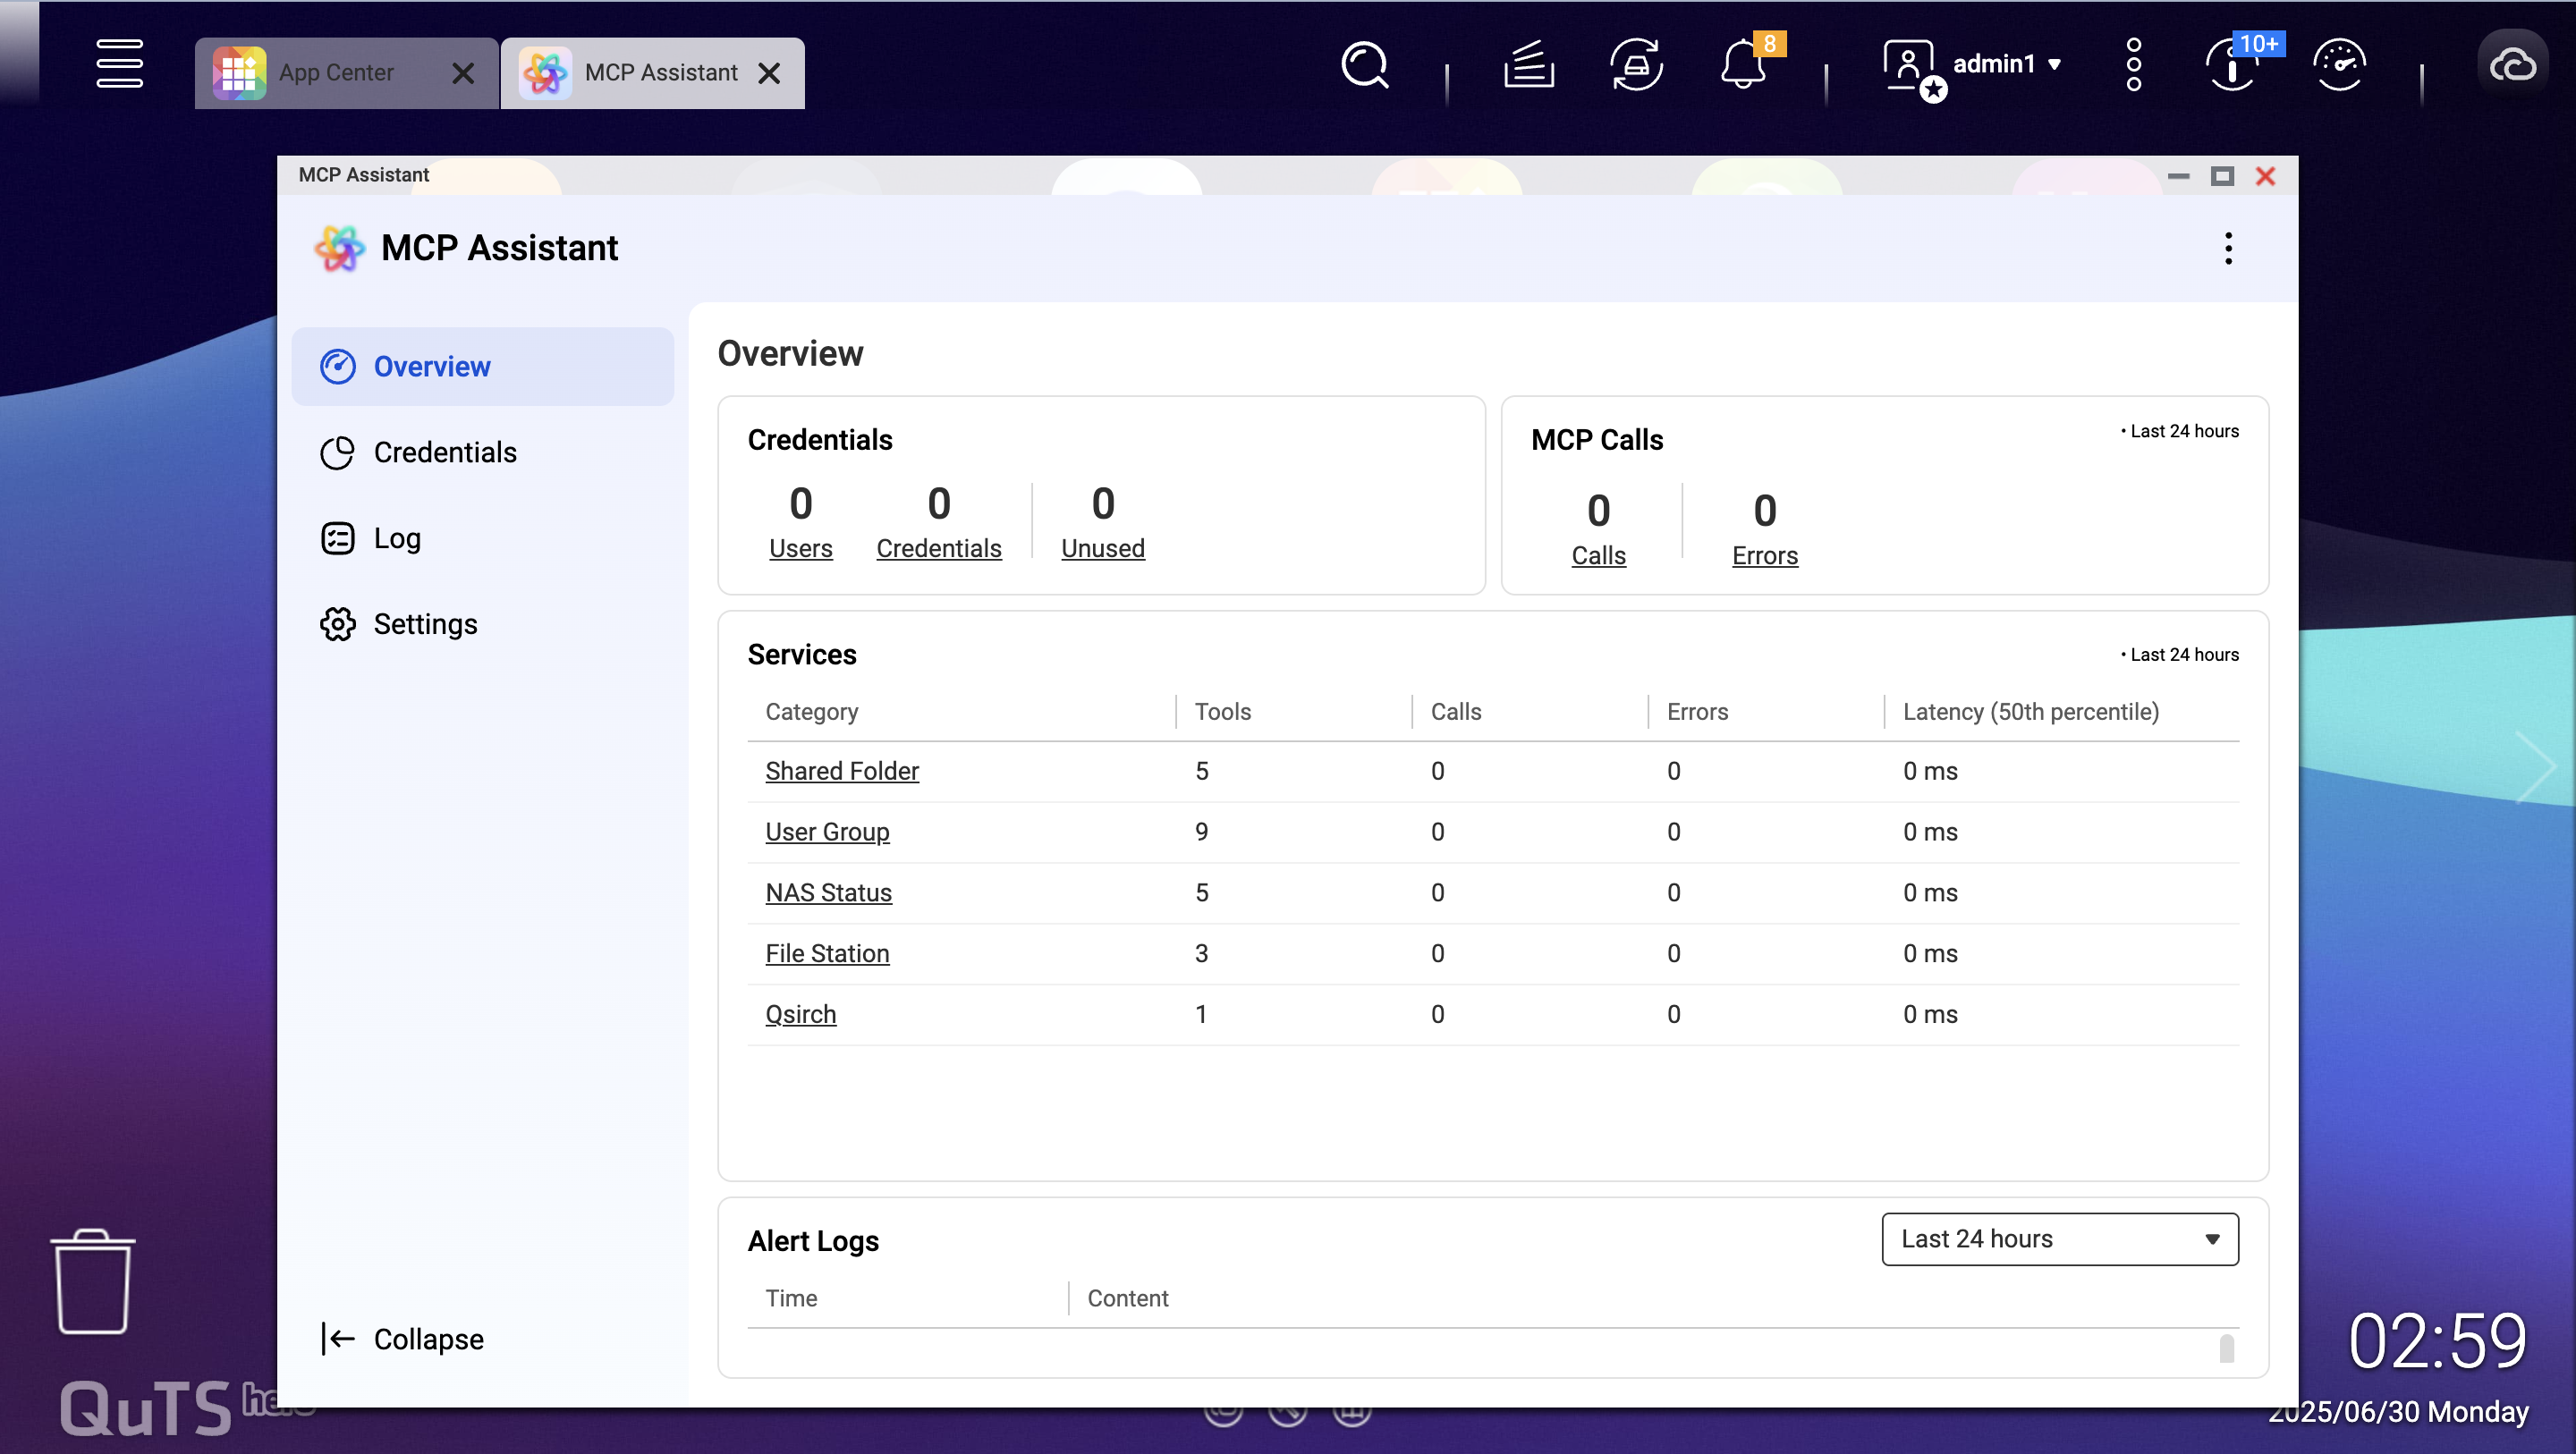
- Open MCP Assistant.
- Locate the MCP Assistant from the Main Menu.
- Launch MCP Assistant.
- Create credentials and download MCP Server.
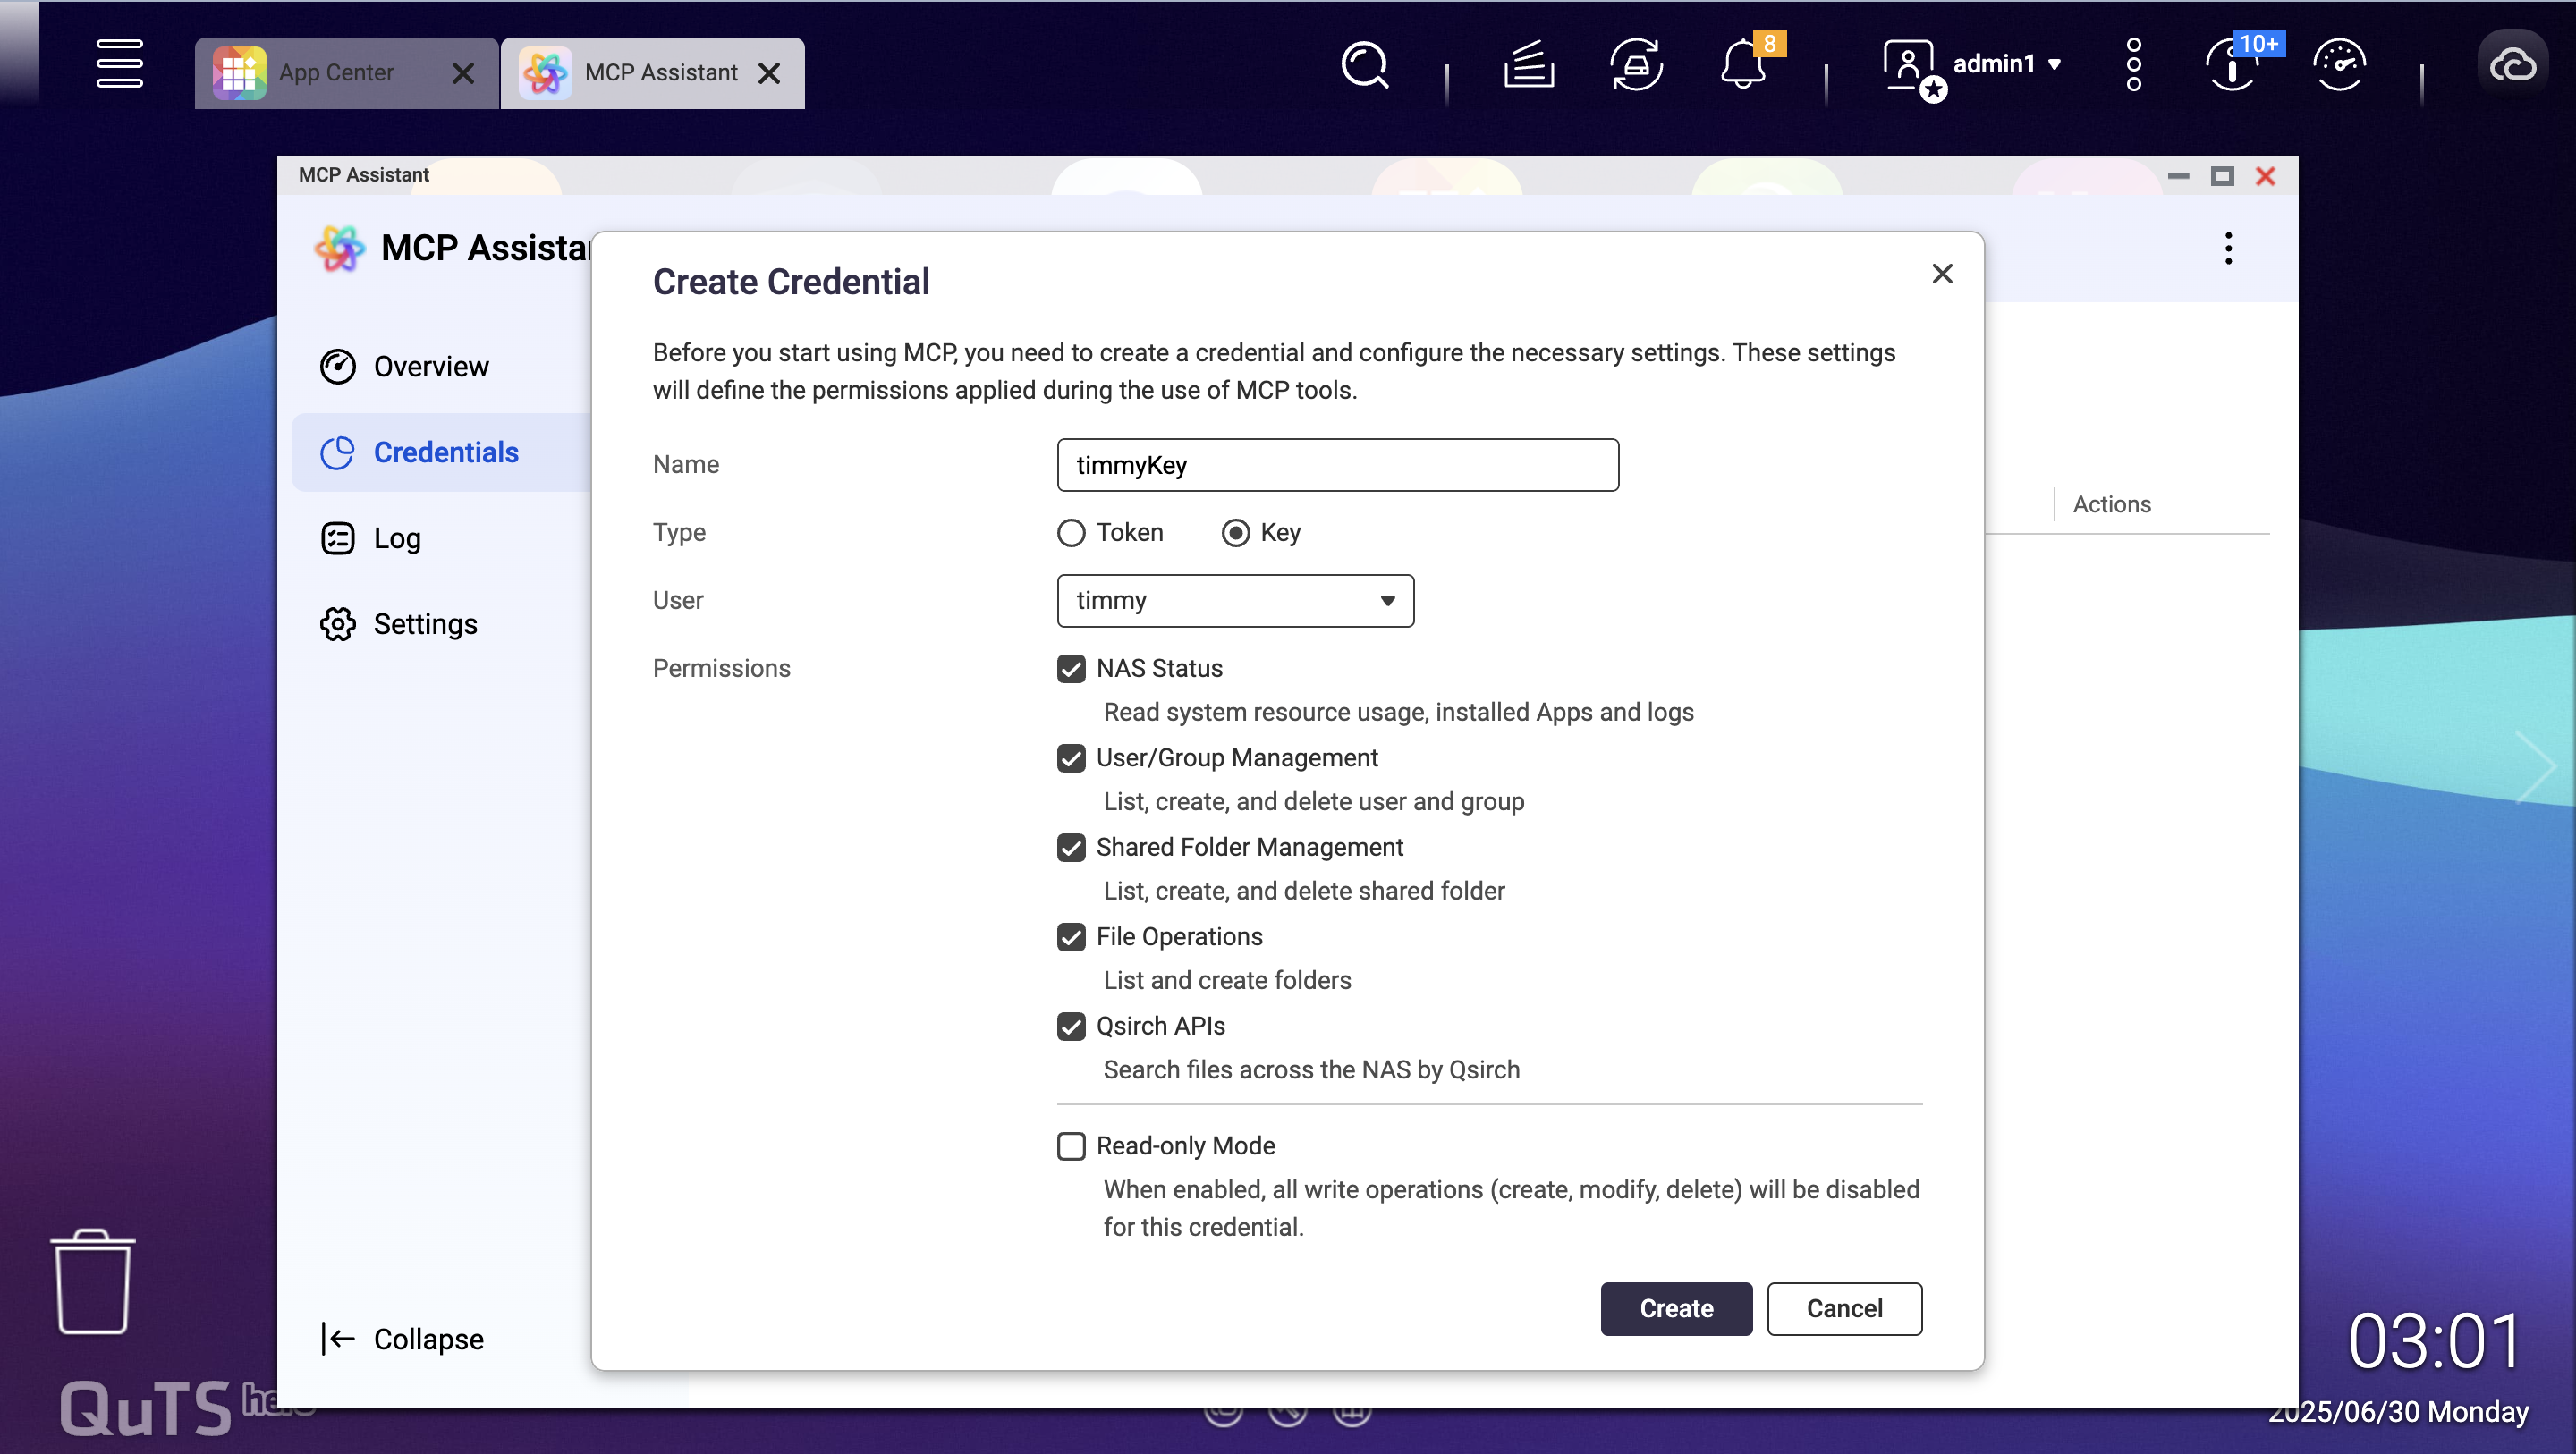
- In the MCP Assistant, go to the Credentials tab.
- Click Create to generate a new key.
- Enter a descriptive name for the key, select the key type, and choose the user account to associate with this key.
Tip
By default, Read-only Mode is enabled. To grant more privileges to a trusted user, you may uncheck this option.
- Specify which MCP tools the user can access.
- Click Create to complete key creation.
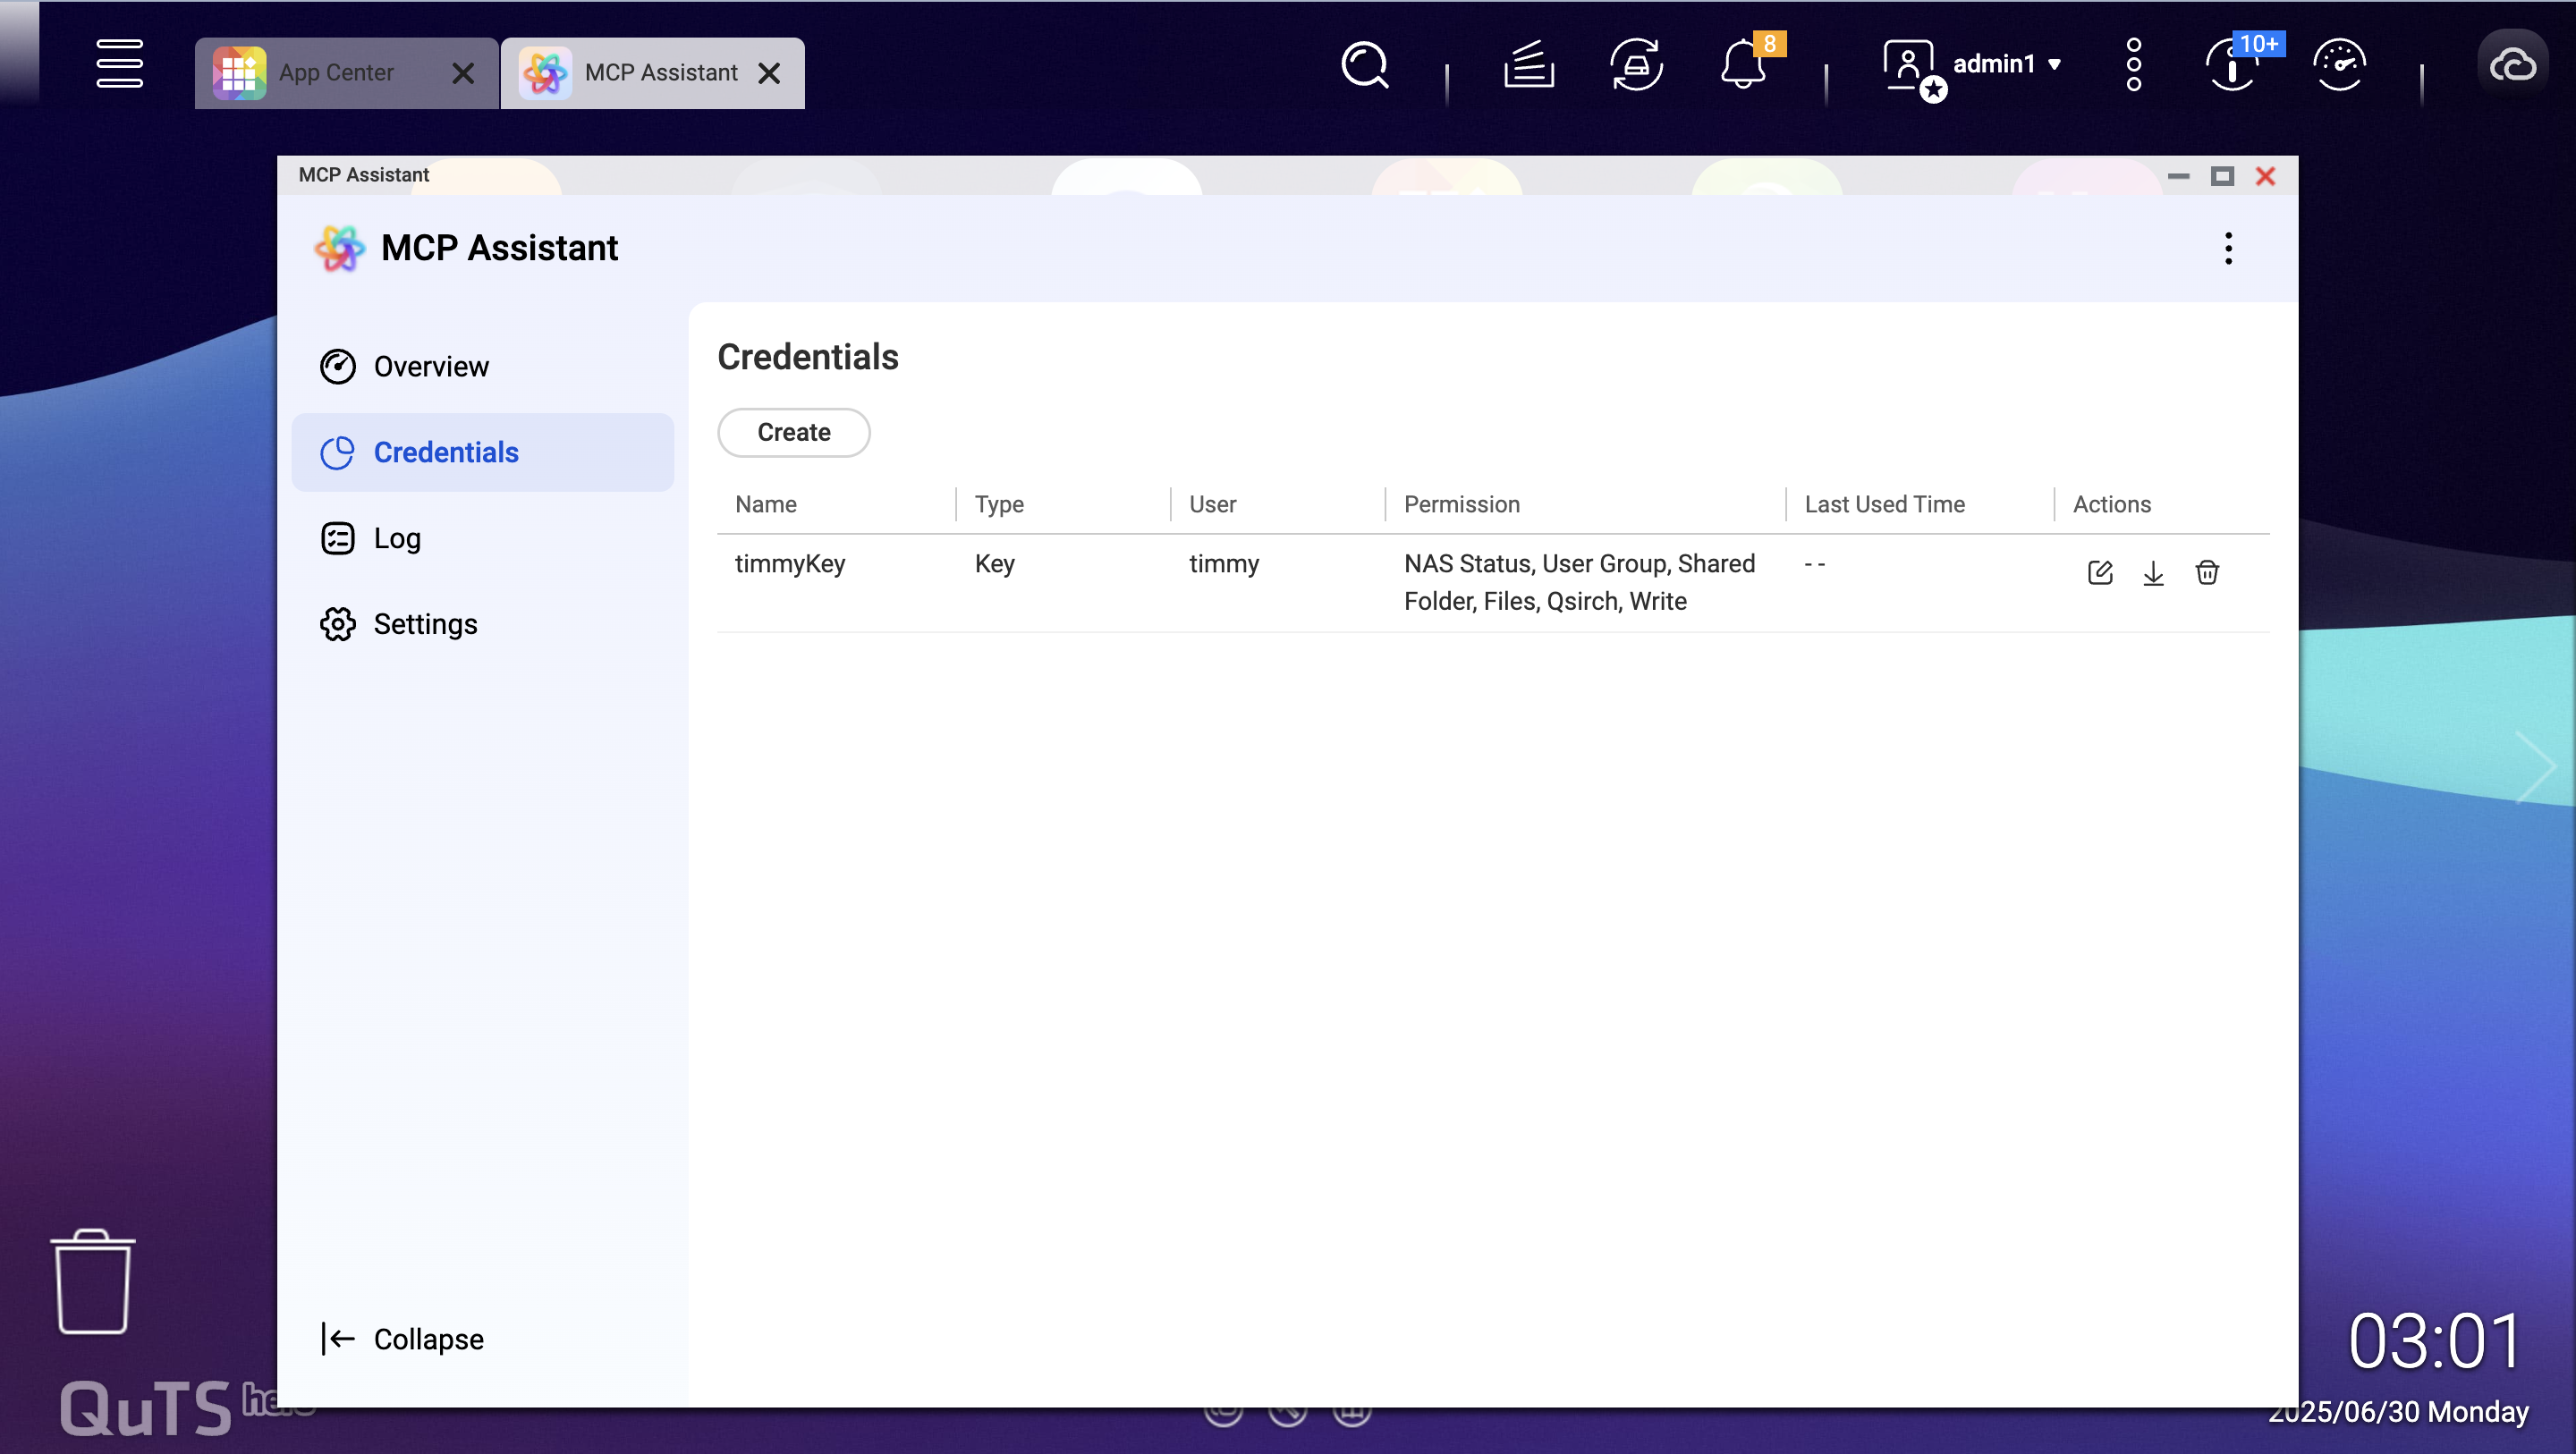
- After the key is created, click the download arrow under Actions.
- The Download Key and MCP Server dialog will appear, which allows you to download the authentication key and MCP Server files to your computer.
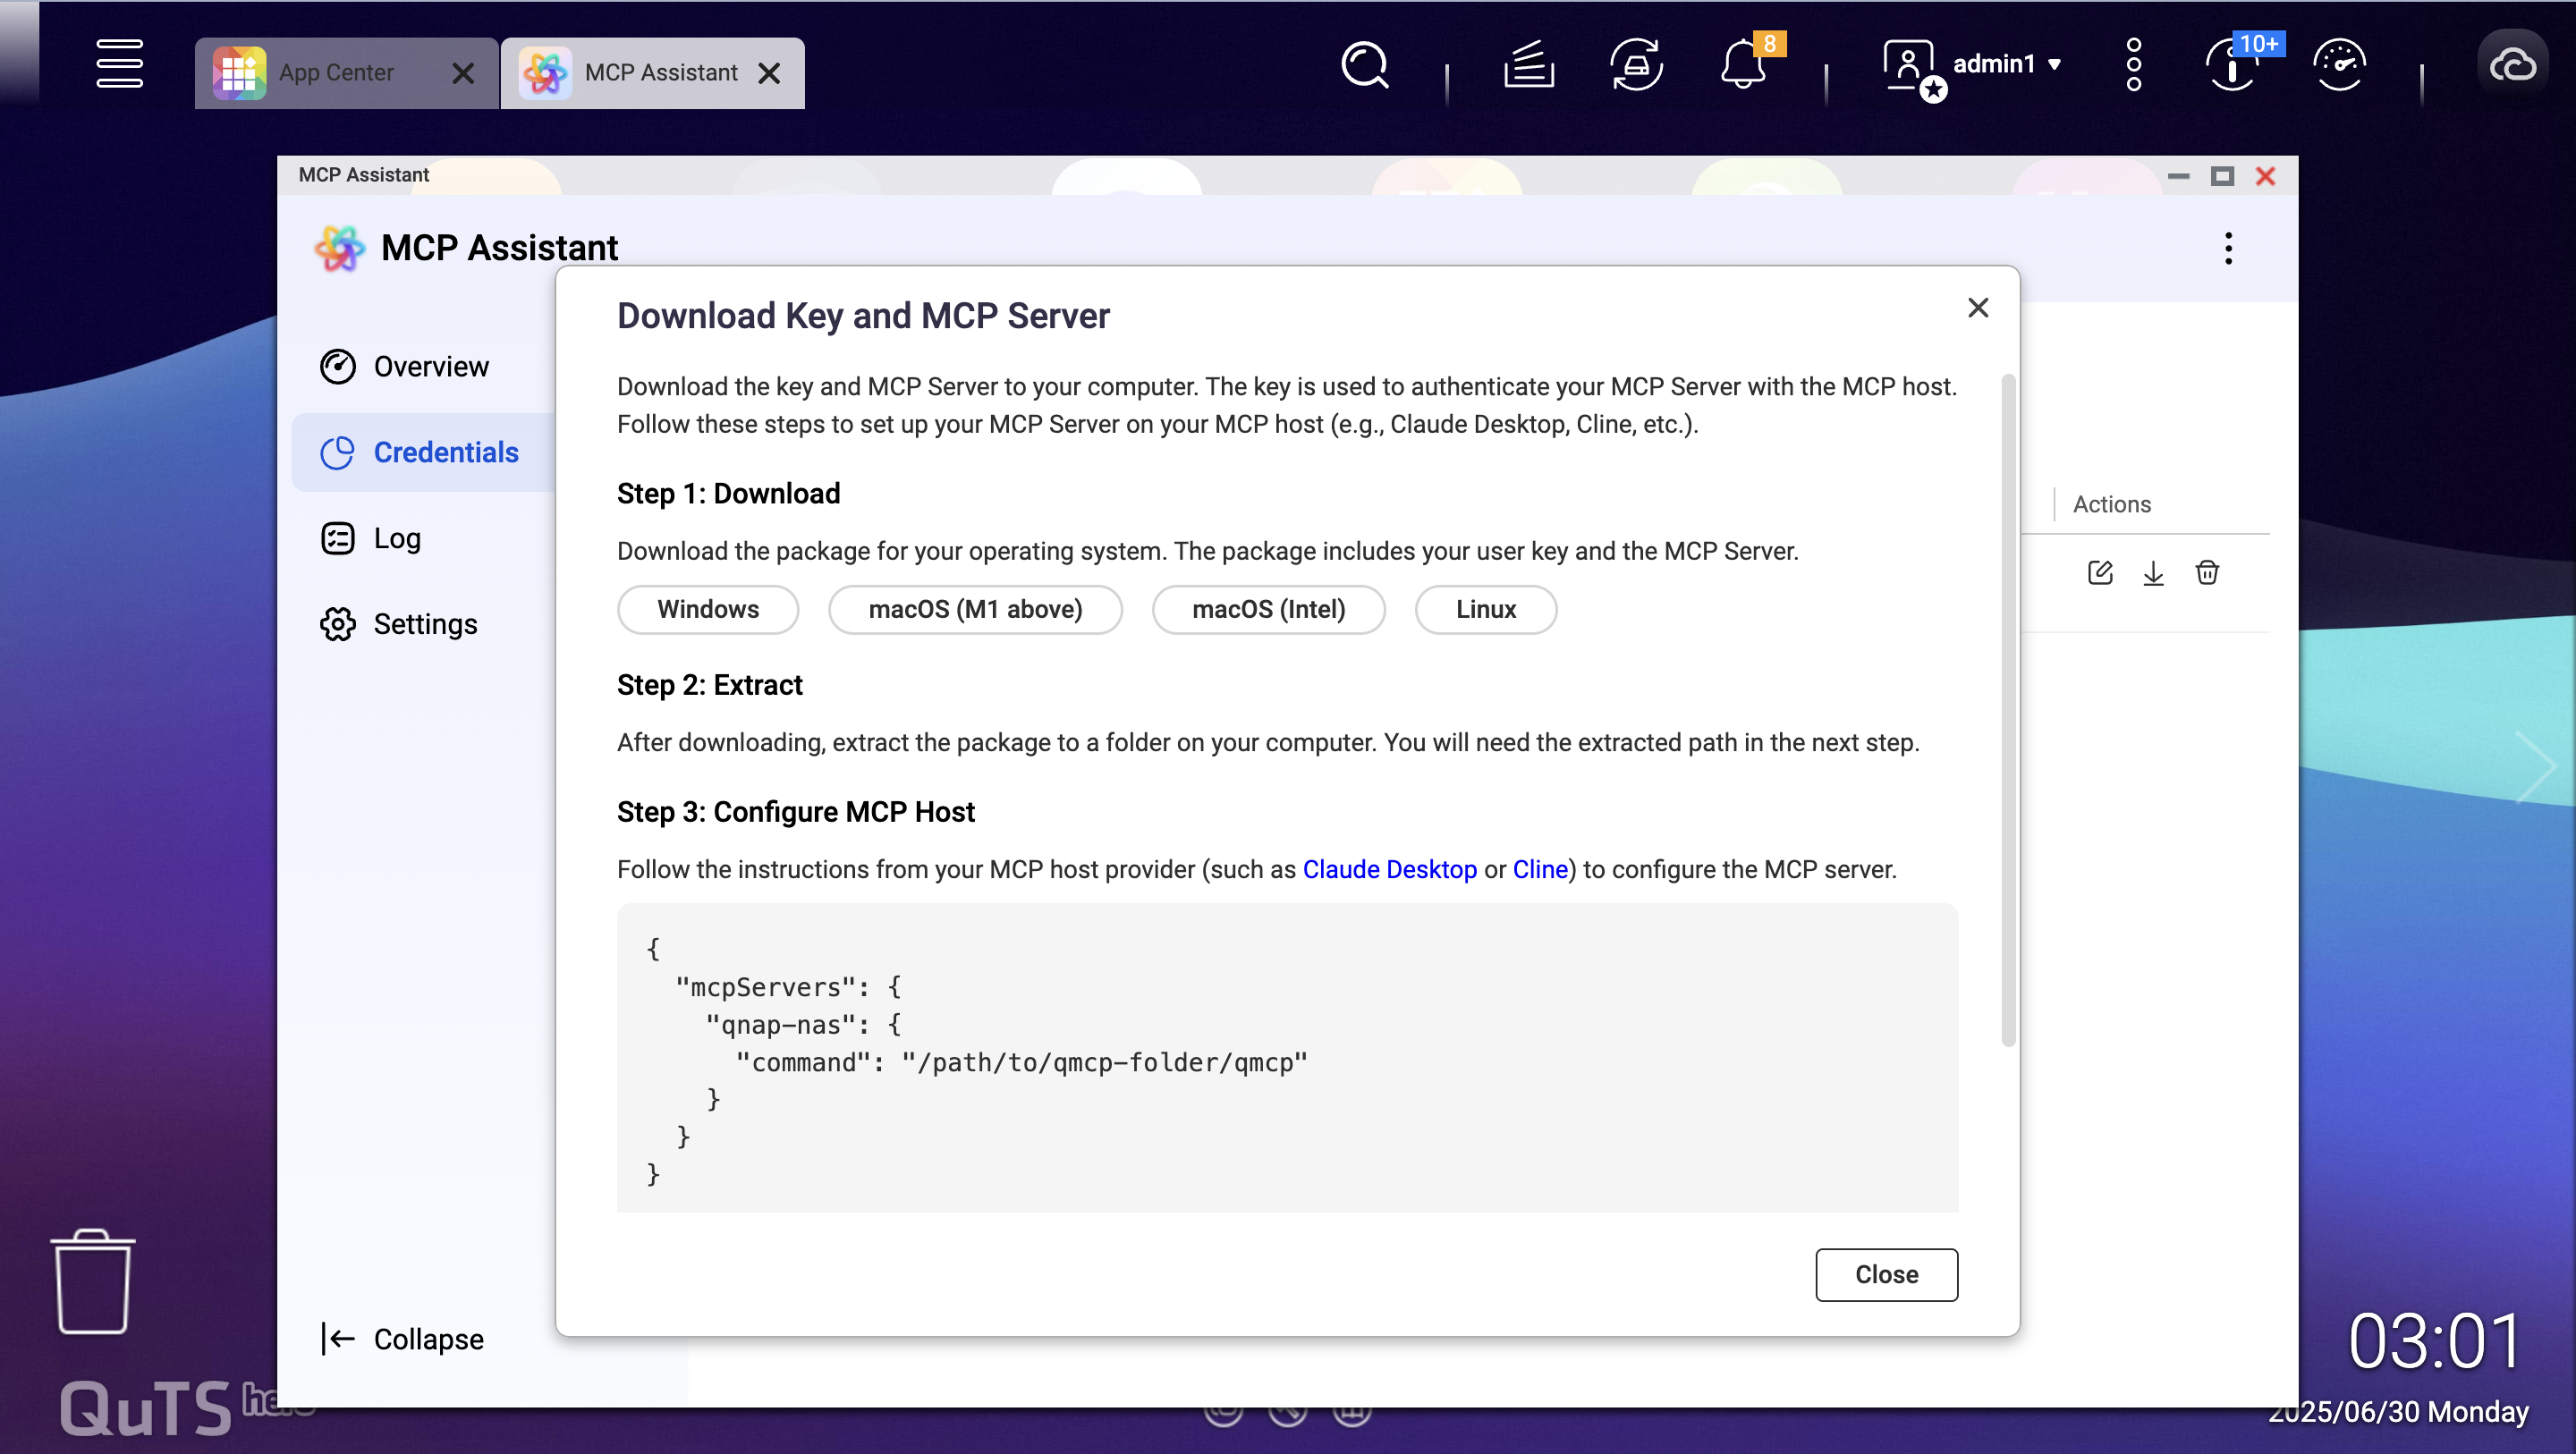
- Select your operating system:
- Windows – For Windows-based computers
- macOS (M1 and above) – For Apple Silicon Macs
- macOS (Intel) – For Intel-based Macs
- Linux – Claude Desktop is not available for Linux; use other MCP hosts.
- Click the button matching your OS to download the package, which includes both your user key and the MCP Server files.
- Extract the MCP Server ZIP package.
- Locate the downloaded file:
- The filename will vary (e.g., qmcp-darwin-arm64-250630_1502.zip).
- Check your Downloads folder or the location you selected.
- Extract the ZIP file:
- Windows: Right-click the ZIP file and select Extract All or use your preferred extraction tool.
- macOS: Double-click the ZIP file to extract it automatically or use a tool like The Unarchiver.
- Verify extraction:
- You should see a folder containing the MCP Server executable and configuration files.
- Note the folder path; you will need it for Claude Desktop configuration.
Important
Keep track of the extracted folder location for later configuration steps.
- Download Claude Desktop.
- Visit the official Anthropic website at claude.ai.
- Navigate to the Claude Desktop download section.
- Download the appropriate installer for your operating system:
- Windows: Download the .exe installer.
- macOS: Download the .dmg installer.
- Install Claude Desktop.
- Windows:
- Run the downloaded .exe installer.
- Follow the installation wizard prompts and accept the license agreement.
- Choose the installation location and complete the process.
- macOS:
- Open the downloaded .dmg file.
- Drag Claude Desktop to the Applications folder.
- If prompted, go to System Preferences > Security & Privacy and allow the application to run.
- Open Claude Desktop.
- Launch Claude Desktop from your desktop shortcut.
- If this is your first time launching Claude:
- Sign in with your Anthropic account.
- Complete any initial setup procedures.
- Accept terms of service if prompted.
Edit the configuration of Claude Desktop.
- Locate the configuration file:
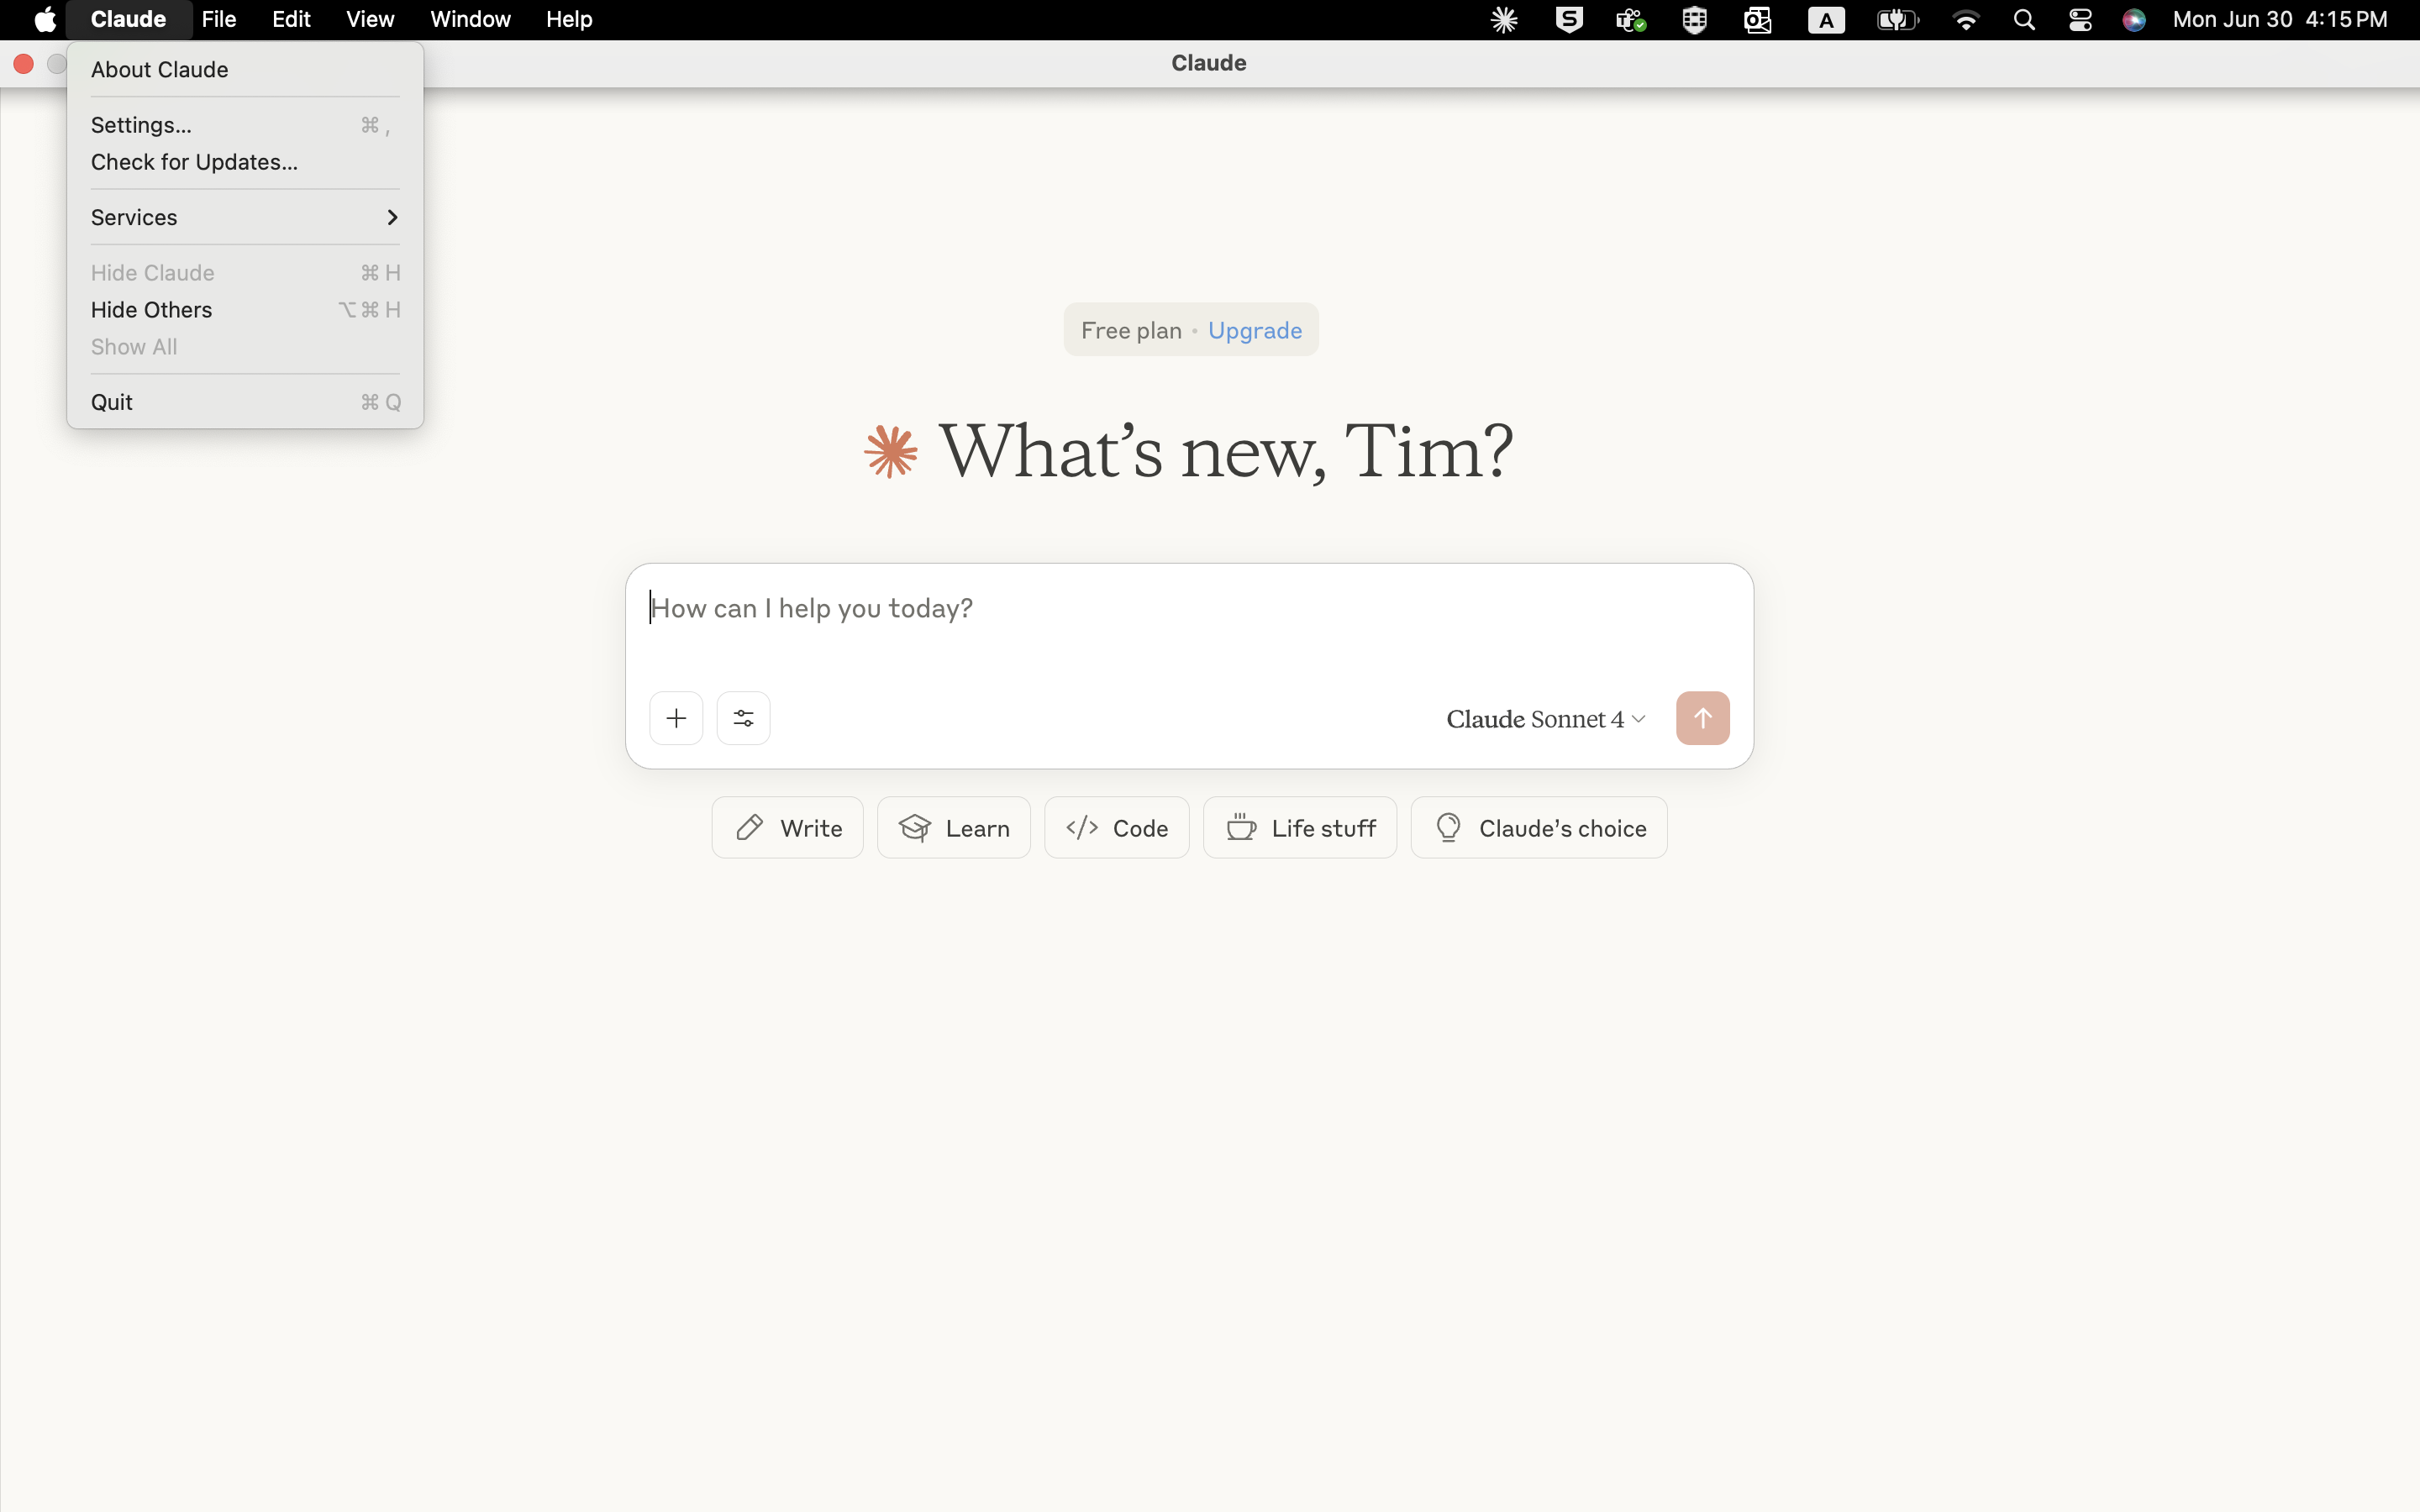
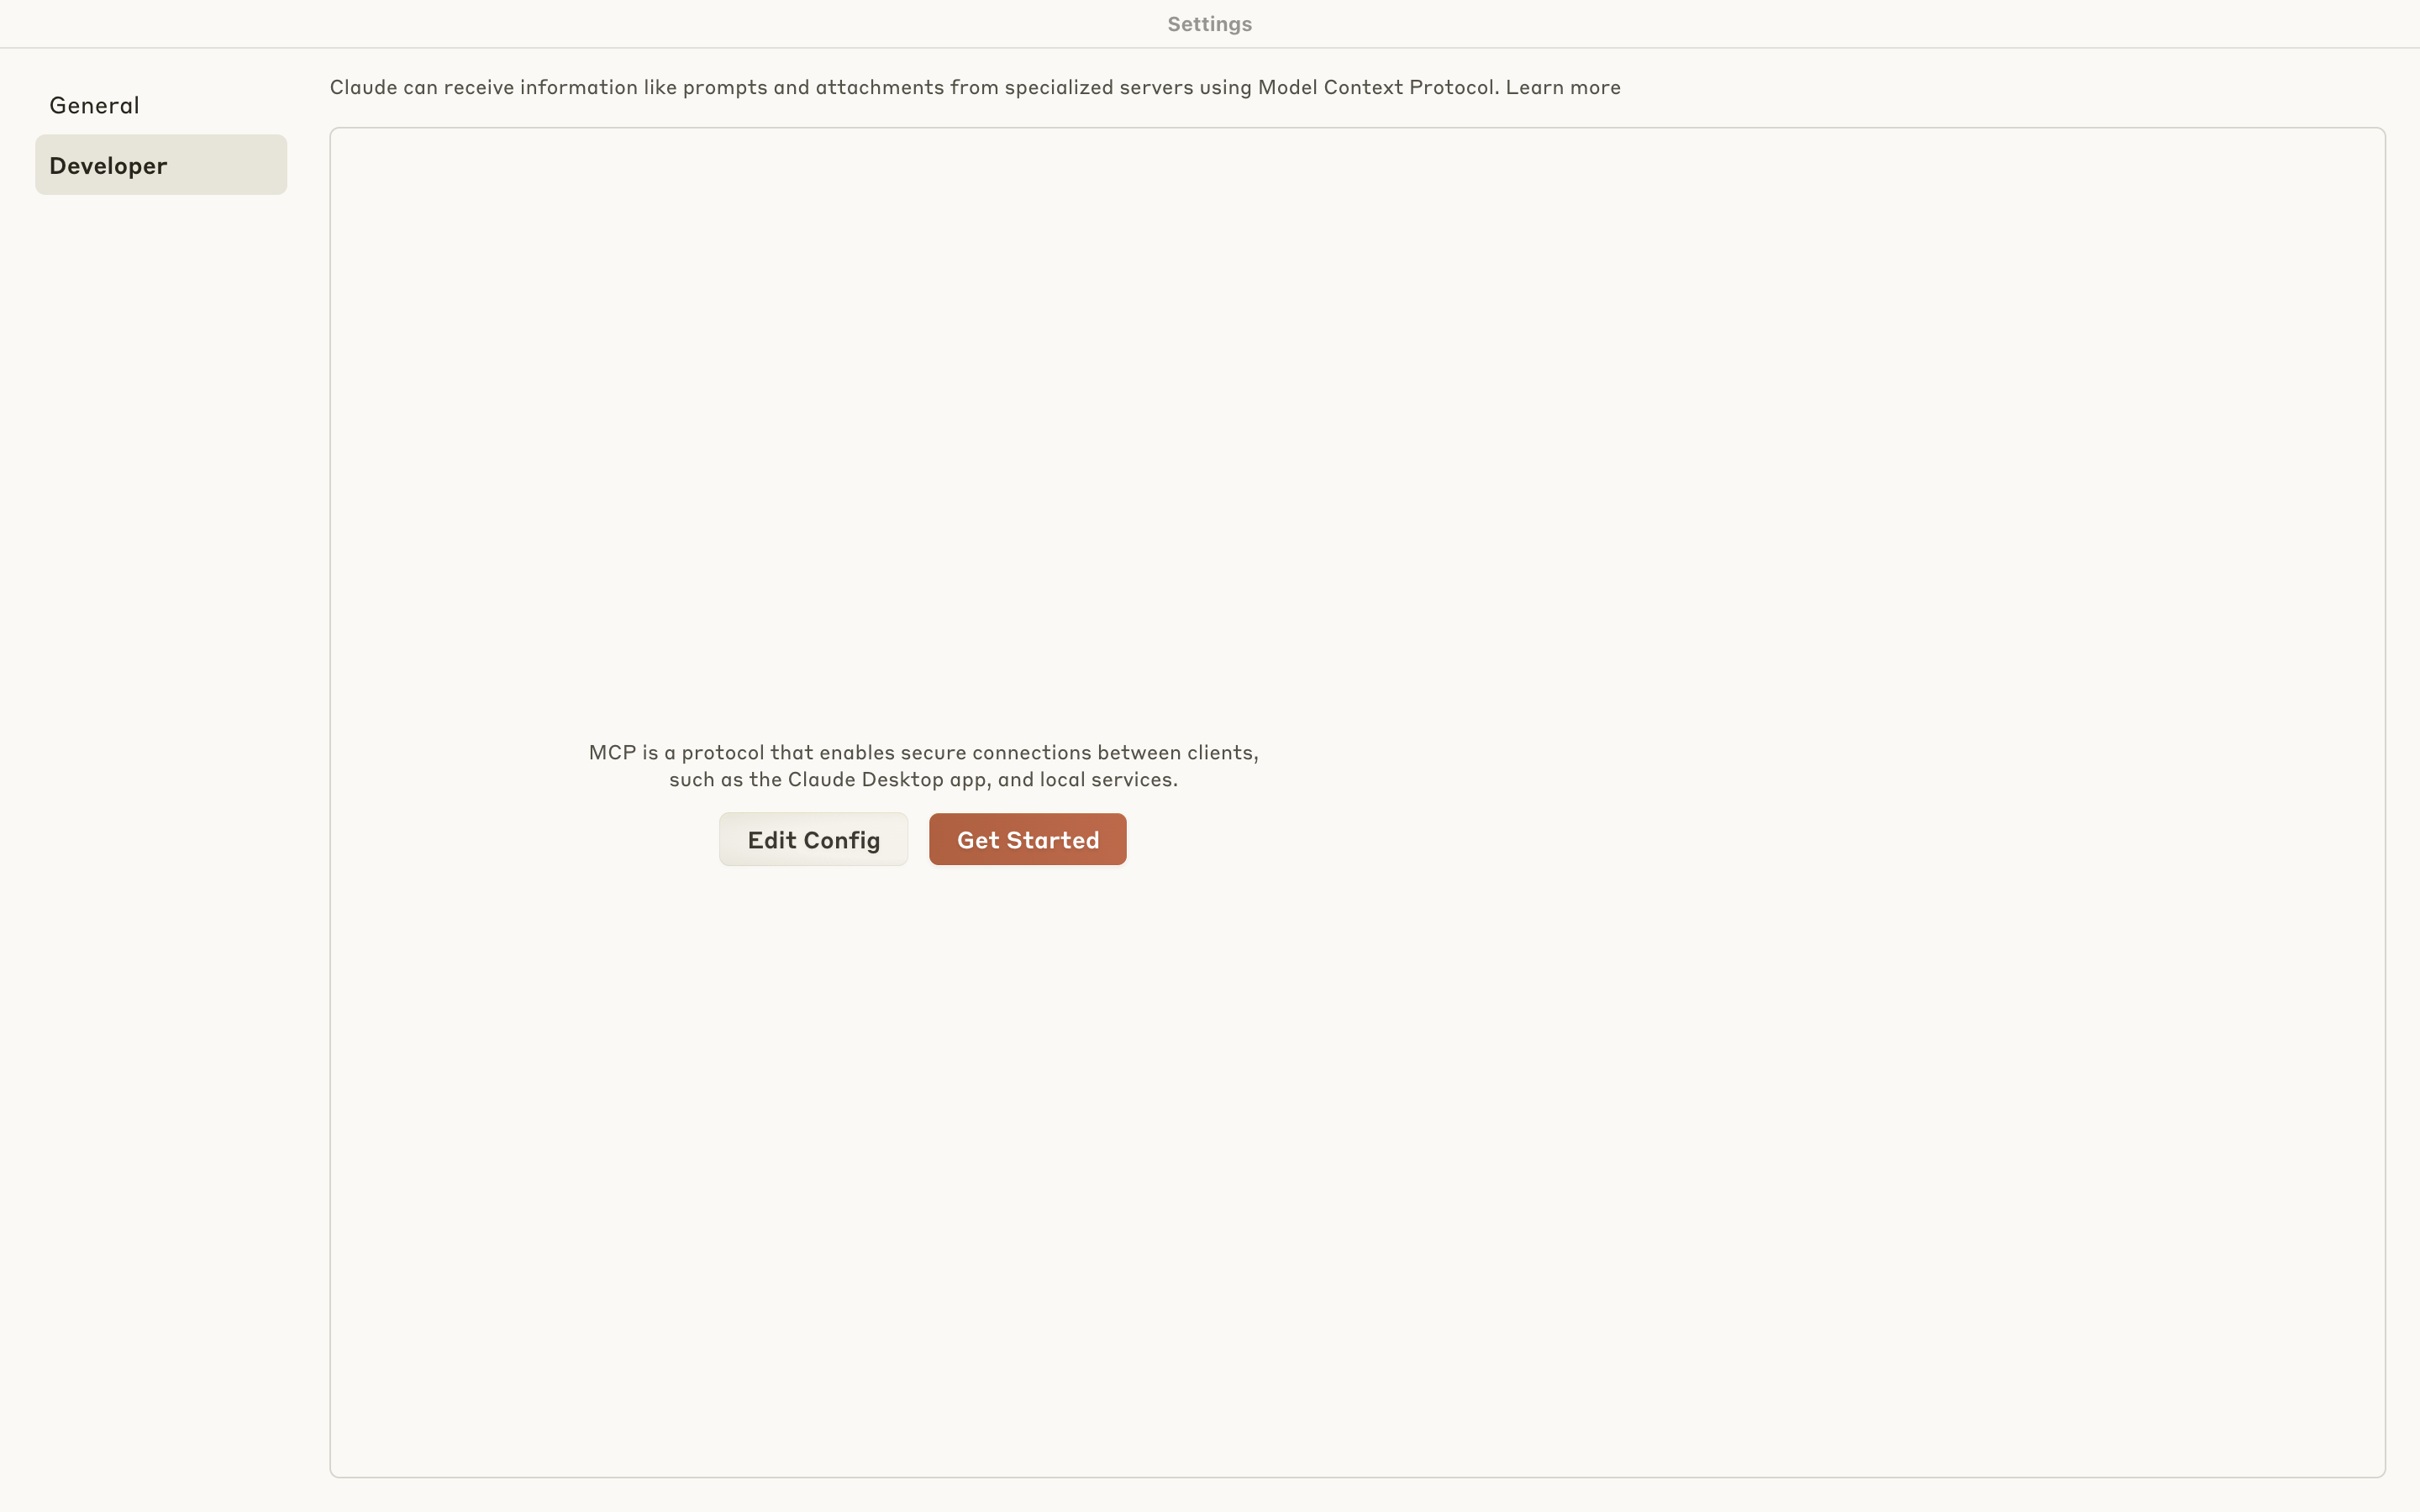
- Use Claude Desktop UI: Menu (top left) > Settings > Developer > Edit Config.
- You may also find the configuration file here:
- Windows: %APPDATA%\Claude\claude_desktop_config.json
- macOS: ~/Library/Application Support/Claude/claude_desktop_config.json
Edit the file:
- Open in a text editor (e.g., Notepad++, VS Code, TextEdit).
Add the MCP Server configuration as shown in the MCP Assistant dialog. For example:
{
  "mcpServers": {
    "qnap-nas": {
      "command": "/path/to/qmcp-folder/qmcp"
    }
  }
}
Replace /path/to/qmcp-folder/qmcp with the actual path to your extracted MCP Server executable.
- On Windows, use double backslashes (\\) instead of single backslashes (\). For example:
C:\\Users\\YourName\\Downloads\\qmcp-folder\\qmcp.exe.
Save the configuration file.
Allow execution of the MCP Server.
- macOS users:
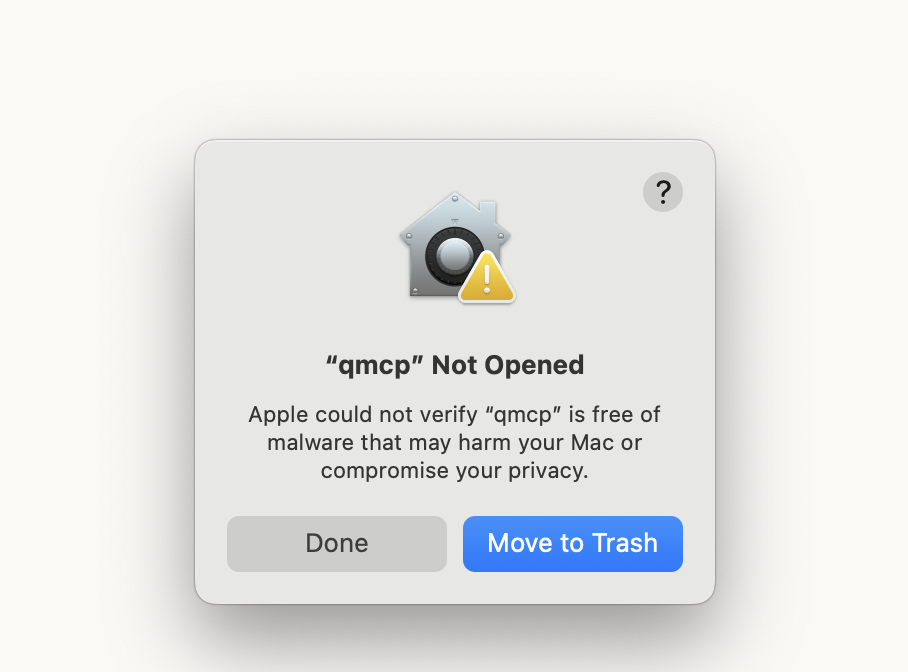
- You may see a security warning when running the MCP Server executable. Click Done to close the warning.
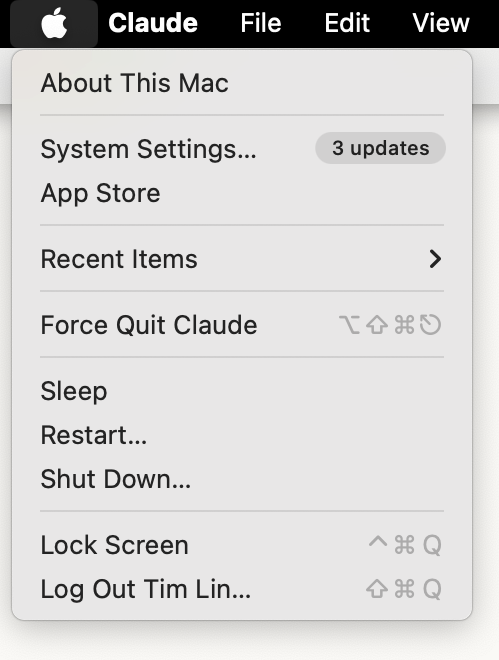
- Go to Apple Menu > System Settings > Privacy & Security > Security.
- Click Allow Anyway next to the blocked qmcp executable.
- Only allow executables from trusted sources to avoid risks.

- Windows users:
- Ensure antivirus or firewall software does not block the MCP Server executable.
- Add exceptions if necessary.
- Re-open Claude Desktop and test the setup.
- To load your previous configuration, completely quit Claude Desktop and reopen it.
- macOS: Force Quit the app or close the app in Activity Monitor.
- Windows: open Task Manager, locate the app, and select End task.
If this does not work, restart your computer.
- Test with prompts such as:
- Can you access my QNAP NAS?
- Show me the status of my NAS storage.
- List the files in my shared folders.
- Verify Claude responds with successful interactions related to your NAS.
- If errors appear, check the user interface for details.
Troubleshooting Tips
Below are tips for quickly troubleshooting common issues.
- Connection issues: Ensure that the MCP Server path in the configuration file is correct.
- Permission errors: Ensure that the MCP Server executable has appropriate permissions.
- Authentication problems: Ensure that the authentication key from MCP Assistant is in the correct location.
- Firewall blocking: Ensure that your firewall allows MCP Server communication.
Conclusion
You have successfully set up QNAP MCP Assistant with Claude Desktop. You can now leverage Claude's AI capabilities to interact with your QNAP NAS through natural language commands, including file management and system monitoring.
QNAP MCP Assistant を Claude Desktop でセットアップする方法対象製品
- QTS 5.2、QuTS hero h5.2、またはそれ以降のバージョンを実行している QNAP NAS デバイス
- MCP Assistant
はじめに
このチュートリアルでは、QNAP の MCP Assistant を Claude Desktop と連携させる手順を説明します。これにより、QNAP NAS と Claude の AI 機能とのシームレスな統合が可能になります。その後、自然言語コマンドを使用して NAS を操作できます。
前提条件
開始する前に、以下のセットアップを確認してください:
- QTS 5.2、QuTS hero h5.2、またはそれ以降のバージョンを搭載した QNAP NAS デバイス
- インターネット接続があるコンピュータ(Windows または macOS; Claude Desktop は Linux では利用できません)
- 管理者 QNAP NAS へのアクセス
- デフォルトの MCP Assistant ポート: 8442 および 8443
手順
- App Center から MCP Assistant (ベータ) をインストールします。
- NAS が QTS/QuTS hero 5.2.1 以降のバージョンを実行している場合:
- QNAP NAS にログインします。
- 次に進みますApp Center。
- 右上隅でクリック

- 選択QNAP App ベータプログラムに参加 そしてクリック 適用。
- 検索バーで検索MCP Assistant。
- クリックインストール。
- NAS が QTS/QuTS hero 5.2.0 を実行している場合:
- App Center のウェブページ に進みます。
- 検索MCP Assistant。
- クリックMCP Assistant検索結果から。
- NAS モデルを選択します。
- インストールファイルをダウンロードします。
- QNAP NAS にログインします。
- App Center に進みます。
- 右上隅でクリック

- 選択手動でインストール。
- クリックブラウズQNAP のウェブサイトからダウンロードしたインストールファイルをアップロードします。
- クリックインストール。
- MCP アシスタントを開く。
- メインメニューから MCP アシスタントを見つけます。
- MCP アシスタント を起動します。

- 資格情報を作成し、MCP サーバーをダウンロードします。
- MCP アシスタントで、資格情報タブに移動します。
- クリック作成新しいキーを生成します。
- キーの説明名を入力し、キーの種類を選択し、このキーに関連付けるユーザーアカウントを選択します。
ヒント
デフォルトでは、読み取り専用モード が有効になっています。信頼できるユーザーにより多くの権限を与えるには、このオプションのチェックを外すことができます。
- ユーザーがアクセスできる MCP ツールを指定します。
- クリック作成キーの作成を完了します。
- キーが作成された後、アクション
- キーと MCP サーバーのダウンロード ダイアログが表示され、認証キーと MCP サーバーファイルをコンピュータにダウンロードできます。


- オペレーティングシステムを選択します:
- Windows– Windows ベースのコンピュータ用
- macOS (M1 以上)– Apple シリコン Mac 用
- macOS (Intel)– Intel ベースの Mac 用
- Linux– Linux では Claude Desktop は利用できません。他の MCP ホストを使用してください。
- OS に対応するボタンをクリックして、ユーザーキーと MCP サーバーファイルを含むパッケージをダウンロードします。
- MCP サーバー ZIP パッケージを解凍します。
- ダウンロードしたファイルを見つけます:
- ファイル名は異なる場合があります(例:qmcp-darwin-arm64-250630_1502.zip)。
- ダウンロードフォルダまたは選択した場所を確認します。
- ZIP ファイルを解凍します:
- Windows:ZIP ファイルを右クリックして、すべて展開を選択するか、お好みの解凍ツールを使用します。
- macOS:ZIP ファイルをダブルクリックして自動的に解凍するか、The Unarchiver のようなツールを使用します。
- 解凍を確認します:
- MCP サーバーの実行ファイルと設定ファイルを含むフォルダが表示されるはずです。
- フォルダパスをメモしておきます。Claude Desktop の設定に必要です。
重要
後の設定手順のために、解凍したフォルダの場所を追跡します。
- Claude Desktop をダウンロードします。
- claude.ai で公式 Anthropic ウェブサイトを訪問します。
- Claude Desktop のダウンロードセクションに移動します。
- オペレーティングシステムに適したインストーラーをダウンロードします:
- Windows:.exe インストーラーをダウンロードします。
- macOS:.dmg インストーラーをダウンロードします。
- Claude Desktop をインストールします。
- Windows:
- ダウンロードした.exe インストーラーを実行します。
- インストールウィザードのプロンプトに従い、ライセンス契約に同意します。
- インストール場所を選択し、プロセスを完了します。
- macOS:
- ダウンロードした.dmg ファイルを開きます。
- Claude Desktop をアプリケーションフォルダにドラッグします。
- プロンプトが表示された場合、システム環境設定 > セキュリティとプライバシーそして、アプリケーションを実行できるようにします。
- Claude Desktop を開きます。
- デスクトップショートカットから Claude Desktop を起動します。
- Claude を初めて起動する場合:
- Anthropic アカウントでサインインします。
- 初期設定手続きを完了します。
- プロンプトが表示されたらサービス利用条件を受け入れます。
Claude Desktop の設定を編集します。
- 設定ファイルを見つけます:
- Claude Desktop UI を使用します:メニュー (左上) > 設定 > 開発者 > 設定を編集。
- 設定ファイルはここにもあります:
- Windows:%APPDATA%\Claude\claude_desktop_config.json
- macOS: ~/Library/Application Support/Claude/claude_desktop_config.json


ファイルを編集します:
- テキストエディタで開きます (例: Notepad++, VS Code, TextEdit)。
MCP Assistant ダイアログに表示されるように MCP サーバーの設定を追加します。例:
{
  "mcpServers": {
    "qnap-nas": {"command": "/path/to/qmcp-folder/qmcp"}
  }
}
置き換え /path/to/qmcp-folder/qmcp 実際の MCP サーバー実行可能ファイルのパスに。
- Windows では、単一のバックスラッシュ (\) の代わりに二重バックスラッシュ (\\) を使用します。例:
C:\\Users\\YourName\\Downloads\\qmcp-folder\\qmcp.exe.
設定ファイルを保存します。
MCP サーバーの実行を許可します。
- macOS ユーザー:
- MCP サーバー実行可能ファイルを実行すると、セキュリティ警告が表示されることがあります。クリック完了警告を閉じます。
- 移動Apple メニュー > システム設定 > プライバシーとセキュリティ > セキュリティ。
- クリックとにかく許可ブロックされた qmcp 実行ファイルの横に。
- リスクを避けるために信頼できるソースからの実行ファイルのみを許可します。


- Windows ユーザー:
- ウイルス対策またはファイアウォールソフトウェアが MCP サーバー実行ファイルをブロックしないようにしてください。
- 必要に応じて例外を追加します。
- Claude Desktop を再度開いてセットアップをテストします。
- 以前の設定を読み込むには、Claude Desktop を完全に終了して再度開いてください。
- macOS:アプリを強制終了するか、アクティビティモニターでアプリを閉じます。
- Windows:タスクマネージャーを開き、アプリを見つけて選択します。タスクの終了。
これがうまくいかない場合は、コンピューターを再起動してください。
- 次のようなプロンプトでテストします:
- 私の QNAP NAS にアクセスできますか?
- 私の NAS ストレージのステータスを見せてください。
- 共有フォルダ内のファイルを一覧表示します。
- Claude が NAS に関連する成功したやり取りを返すことを確認します。
- エラーが表示された場合は、詳細についてユーザーインターフェースを確認してください。
トラブルシューティングのヒント
以下は、一般的な問題を迅速にトラブルシューティングするためのヒントです。
- 接続の問題:設定ファイル内の MCP サーバーのパスが正しいことを確認してください。
- 権限エラー:MCP サーバー実行ファイルに適切な権限があることを確認してください。
- 認証の問題:MCP アシスタントからの認証キーが正しい場所にあることを確認してください。
- ファイアウォールのブロック: あなたのファイアウォールが MCP サーバーの通信を許可していることを確認してください。
結論
QNAP MCP アシスタントを Claude Desktop と共に正常にセットアップしました。これで、Claude の AI 機能を活用して、自然言語コマンドを通じて QNAP NAS と対話し、ファイル管理やシステム監視を行うことができます。


