How to use and set up your Network & Virtual switch?
About Network & Virtual Switch
Network & Virtual Switch is a QTS utility that centralizes the creation, configuration, and control of network connections. Network & Virtual Switch also manages physical network interfaces, virtual adapters, Wi-Fi, and Thunderbolt connections in addition to controlling DHCP, DDNS,and gateway services.
Basic and Advanced Mode
Network & Virtual Switch features two separate usage modes. Switch between these modes by clicking Basic or Advanced in the Network & Virtual Switch menu pane.
| Mode | Description |
|---|---|
Basic | This mode is well-suited for most users, and requires minimal configuration of network settings.
|
Advanced | This mode is best-suited for power-users who need more control over the configuration of network settings.
|
Overview
This screen provides a general overview of the network topology, IP address, status, and usage information for each device on the network.

Interfaces
This screen provides access to basic network settings and allows the configuration of physical adapters. This screen also contains settings related to IPv4, IPv6, DNS, port trunking, VLAN, Thunderbolt, USB QuickAccess, and Wi-Fi.

IP Address
Configuring IPv4 Settings
- Identify the adapter that you want to configure, then click
 > Configure.
The Configure window opens.
- Configure the IPv4 settings.

Setting Description Obtain IP address settings automatically via DHCP
If the network supports DHCP, the adapter automatically obtains the IP address and network settings.
Use static IP address
Manually assign a static IP address. You must specify the following information:
Fixed IP Address
Subnet Mask
Default Gateway
Jumbo Frame
Jumbo Frames are Ethernet frames that are larger than 1500 bytes. They are designed to enhance Ethernet networking throughput, and to reduce CPU usage when transferring large files. QTSsupports the following MTU sizes:1500 bytes (default)
4074 bytes
7418 bytes
9000 bytes
Important:All connected network devices must enable Jumbo Frames and use the same MTU size.
Only certain NAS models support Jumbo Frames.
Using Jumbo Frames requires a network speed of 1000 Mbps or faster.
Network Speed
Select the network transfer rate allowed by the NAS network environment.
Tip:Selecting Auto-negotiation will automatically detect and set the transfer rate.
Important:The Network Speed field is automatically set to Auto-negotiation and hidden when configuring 10GbE & 40GbE adapters.
Configuring IPv6 Settings
- Identify the adapter that you want to configure and then click
 > Configure.
The Configure window opens.
- Configure the IPv6 settings.
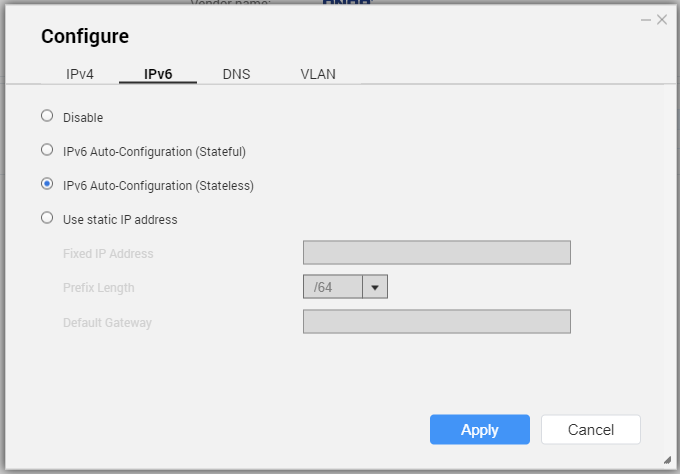
Setting Description Disable
Do not assign an IPv6 address.
IPv6 Auto-Configuration (Stateful)
The adapter automatically acquires an IPv6 address and DNS settings from the DHCPv6-enabled server.
Important:This option requires an available DHCPv6-enabled server on the network.
IPv6 Auto-Configuration (Stateless)
The adapter automatically acquires an IPv6 address and DNS settings from the router.
Important:This option requires an available IPv6 RA(router advertisement)-enabled router on the network.
Use static IP address
Manually assign a static IP address to the adapter. You must specify the following information:
Fixed IP Address
Prefix length
Tip:Obtain the prefix length information from your network administrator.
Default Gateway
DNS
A Domain Name System (DNS) server translates a domain name into an IP address.
Configuring DNS Settings
- Identify the adapter that you want to configure, then click > Configure.
The Configure window opens.
- Select one of the following options:
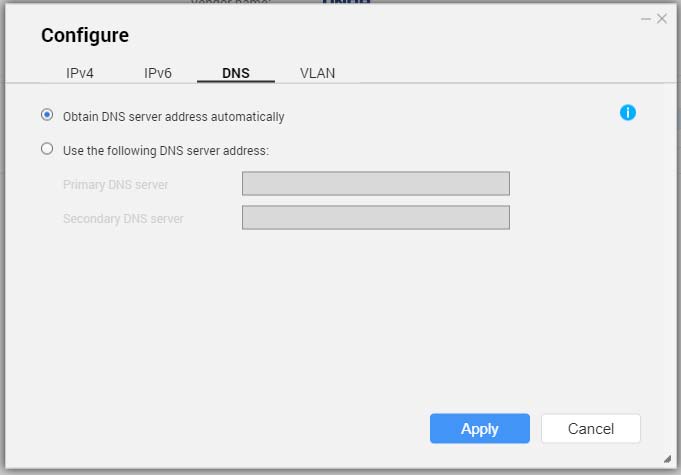
Setting Description Obtain DNS server address automatically
Automatically obtain the IP address using DHCP.
Use the following DNS server address
Manually assign the IP address for the primary and secondary DNS servers.
Important:QNAP recommends specifying at least one DNS server to allow URL lookups.
Virtual LANs (VLANs)
A Virtual LAN (VLAN) is a group of hosts which communicate as if they were attached to the same broadcast domain even if they are in different locations. You can use VLANs to increase security and flexibility, while decreasing network latency and load.
Adding an Interface to a VLAN
When using both port trunking and a VLAN, port trunking must be configured first.
- Identify the adapter that you want to configure, then click > Configure.
The Configure window opens.
- Go to the VLAN tab.

Setting Description Obtain DNS server address automatically
Automatically obtain the IP address using DHCP.
Use the following DNS server address
Manually assign the IP address for the primary and secondary DNS servers.
Important:QNAP recommends specifying at least one DNS server to allow URL lookups.
Port Trunking
Port trunking combines two or more Ethernet interfaces for increased bandwidth, load balancing and fault tolerance (failover). Load balancing is a feature that distributes workloads evenly across multiple Ethernet interfaces for higher redundancy. Failover ensures that a network connection remains available even if a port fails.
Configuring Port Trunking
Before configuring Port Trunking, ensure at least two network interfaces are connected to the same switch.
- Click Port Trunking.

The Port Trunking window opens.
- Click Add.
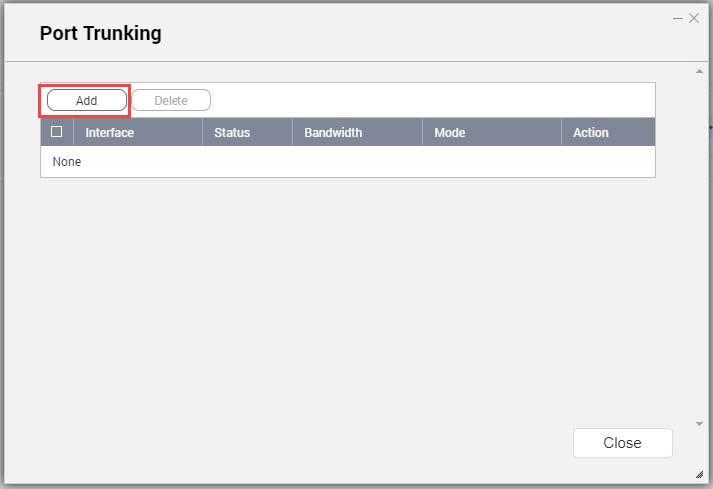
The Port Trunking (Add) window opens.
- Select two or more network interfaces to add to the trunking group.
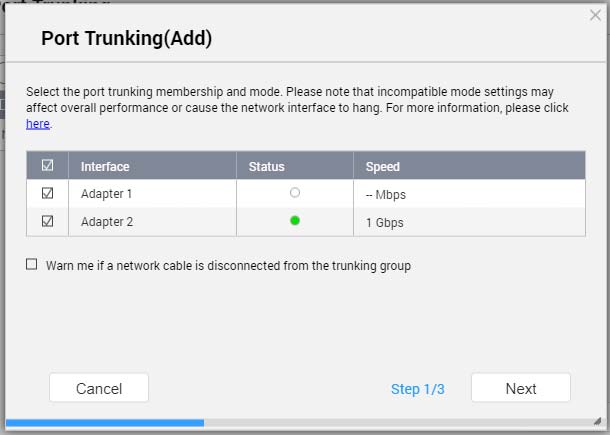
- Select a switch type.
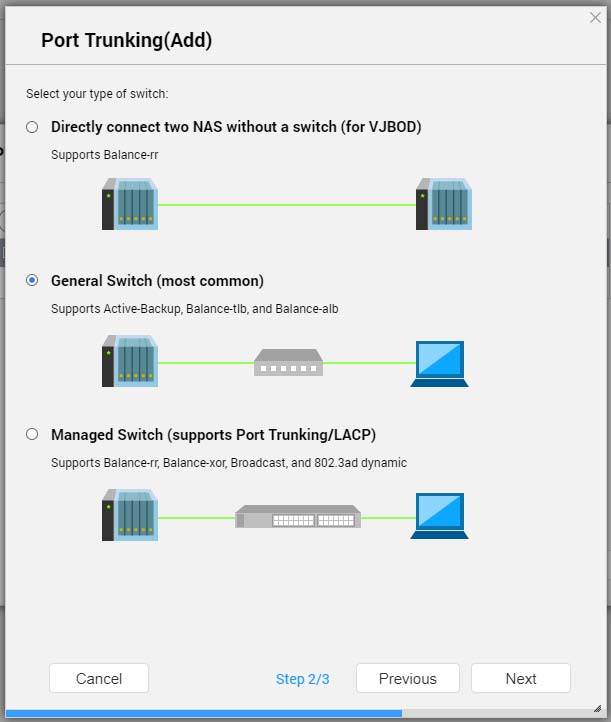
- Select a trunking mode.
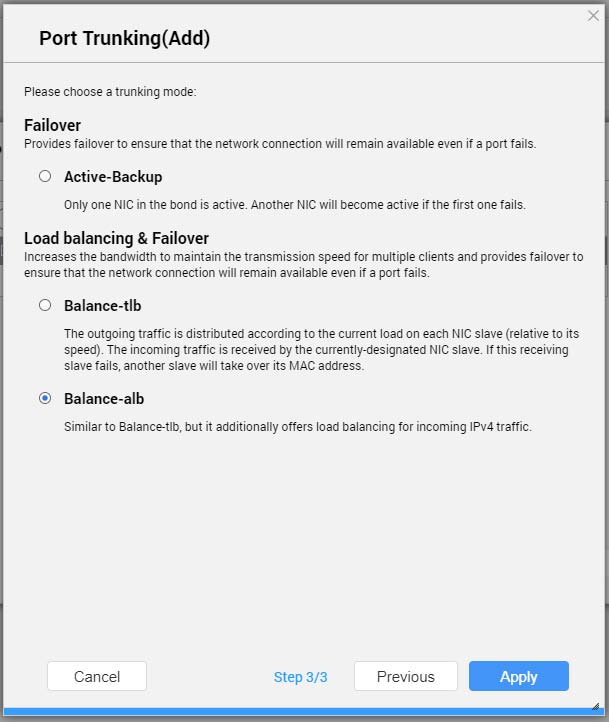 Important:
Some port trunking modes must be supported by your network switches. Selecting an unsupported mode may affect network performance or cause the network interface to freeze.
Mode Description Fault Tolerance (Failover)
Active-Backup
All traffic is sent and received using the interface that was first added to the trunking group. If this primary interface becomes unavailable, the secondary interface will become active.
Broadcast
Transmits the same network packets to all the network interface cards.
Load balancing & Failover
Balance-tlb
Incoming traffic is received by the current interface. If the interface fails, a slave interface takes over the MAC address of the failed interface. Outgoing traffic is distributed based on the current load for each interface relative to the interface's maximum speed.
Balance-alb
Similar to Balance-tlb, but offers additional load balancing for incoming IPv4 traffic.
Balance-rr
Transmits network packets sequentially to each network interface card in order to distribute the internet traffic among all the NICs.
Balance-xor
Transmits network packets using the Hash algorithm, which selects the same NIC slave for each destination MAC address.
802.3ad dynamic
Uses a complex algorithm to aggregate NICs and configure speed and duplex settings.
System Default Gateway
The system default gateway serves as the network access point for the NAS. By default, all external network traffic will pass through the gateway. A network interface must be specified for the default gateway.
Configuring the System Default Gateway
- Click System Default Gateway.

The System Default Gateway window opens.
- Configure the system default gateway.
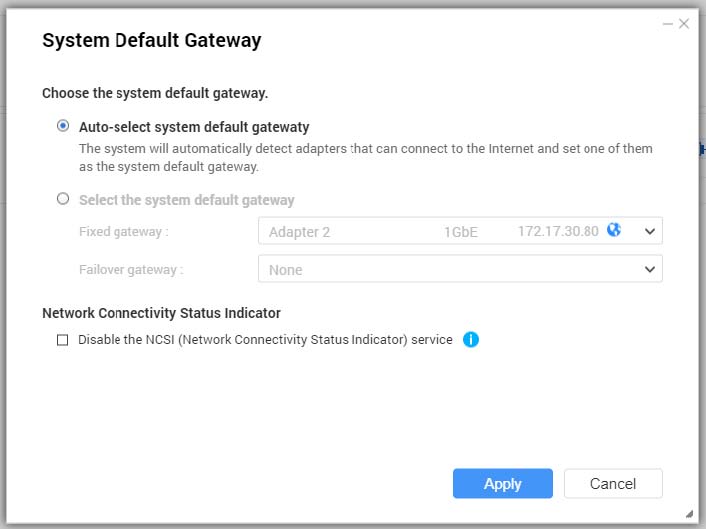
Setting Description Auto-select system default gateway
QTS automatically detects all adapter, virtual switch, PPPoE, and VPN connections that can be used to connect to the internet. It selects one of these connections and then sets it as the default gateway.
Select the system default gateway
Manually assign an adapter to serve as the system default gateway. Optionally, set a backup failover gateway. The failover default gateway field is only available when multiple interfaces are connected.
Tip:When assigning a PPPoE or VPN connection as the default gateway, ensure a stable physical connection is also set as the failover default gateway.
USB QuickAccess
This screen controls the configuration and management of USB QuickAccess services on the NAS. USB QuickAccess allows a computer to connect to the NAS using a USB cable and the Common Internet File System (CIFS).

USB QuickAccess is only available on certain models.
It is not possible to configure, delete, or disable DHCP servers created with USB QuickAccess.
Enabling USB QuickAccess
- Click
 .
.
Configuring the USB QuickAccess IP address
- Click
 .
.The Configure window opens.
Configuring USB QuickAccess Authentication
- Click
 .
.The Configuration window opens.
Wi-Fi
This screen controls the configuration and management of Wi-Fi connections accessible from the NAS.
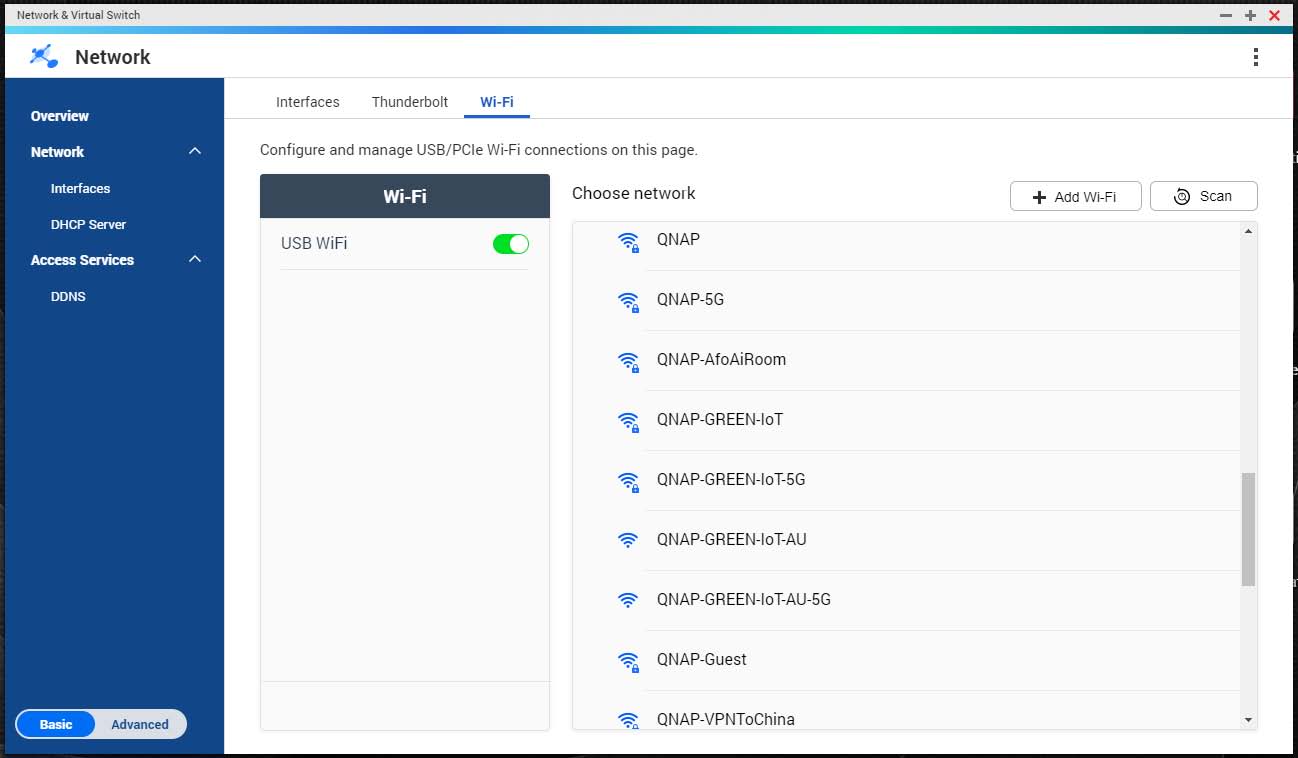
A USB or PCIe Wi-Fi device must be installed to access these features.
For a list of compatible USB Wi-Fi dongles, visit http://www.qnap.com/compatibility, then select .
For a list of compatible PCIe Wi-Fi cards, visit http://www.qnap.com/compatibility, then select .
QTS supports the simultaneous use of multiple PCIe Wi-Fi cards, but only one USB Wi-Fi dongle can be in used at a time.
Enabling Wi-Fi
- Click
 .
.
Connecting to a Wireless Network
- Optional: Click Scan to search for accessible networks.
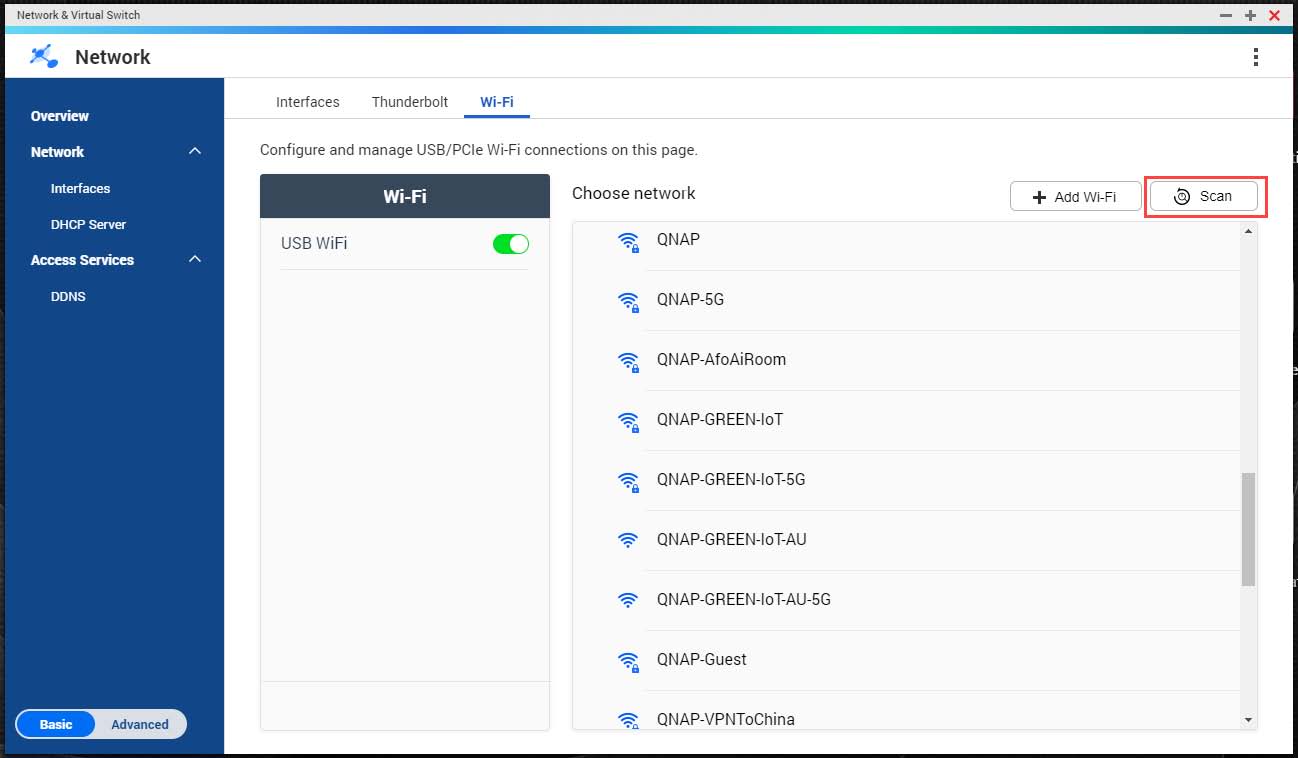
- Select a wireless network from the list.
Icon Description 
The Wi-Fi network requires a password.

Connect to a Wi-Fi network without a password.

The Wi-Fi connection cannot access the internet.
The Wi-Fi connection requires an additional login.
Tip:QTS does not support networks that require an additional login.
The settings panel expands.
- Click Connect.

- Optional: Configure connection settings.
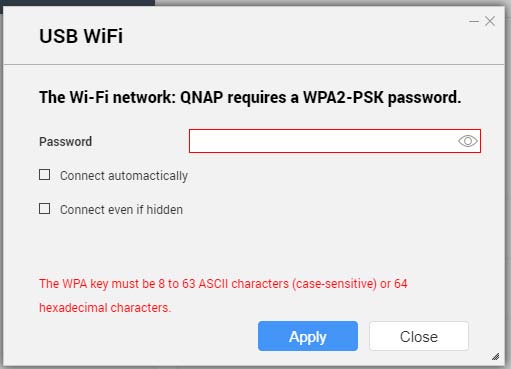
Setting Description Password
Enter the password provided by the network administrator.
Tip:Click
 to make the password visible.
Connect automatically
Automatically connect to this network whenever it is in range.
Connect even if hidden
Attempt to connect to this network even if the SSID is hidden.
Adding a Wireless Network
- Click Add Wi-Fi.

The Connect to a Wi-Fi network window opens.
- Configure connection settings.
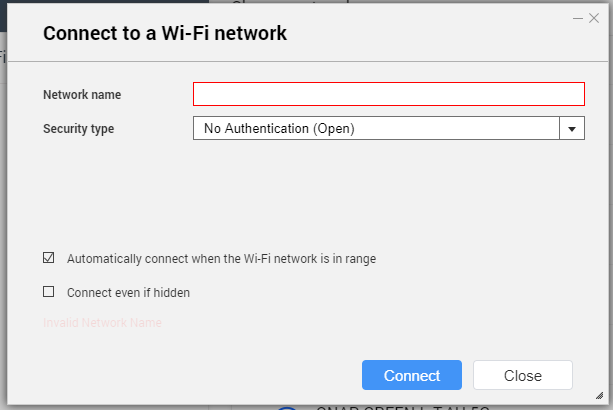
Setting Description Network Name
Enter the name of the wireless network.
Security Type
Select the encryption used by the wireless network.
Password
Enter the password provided by the network administrator.
Tip:Click
to make the password visible.Automatically connect when the
Automatically connect to this network whenever it is in range.
Connect even if hidden
Attempt to connect to this network even if the SSID is hidden.
Connection Messages
| Message | Description |
|---|---|
Connected | The NAS is currently connected to the Wi-Fi network. |
Connecting | The NAS is trying to connect to the Wi-Fi network. |
Out of range or hidden SSID | The wireless signal is not available or the SSID is not being broadcast. |
Failed to get IP | The NAS is connected to the Wi-Fi network but could not get an IP address from the DHCP server. Check the router settings. |
Association failed | The NAS cannot connect to the Wi-Fi network. Check the router settings. |
Incorrect key | The entered password is incorrect. |
Auto connect | Automatically connect to the Wi-Fi network. This is not supported if the SSID of the Wi-Fi network is hidden. |
Thunderbolt
This screen displays port and connection information related to any Thunderbolt interfaces on the NAS.
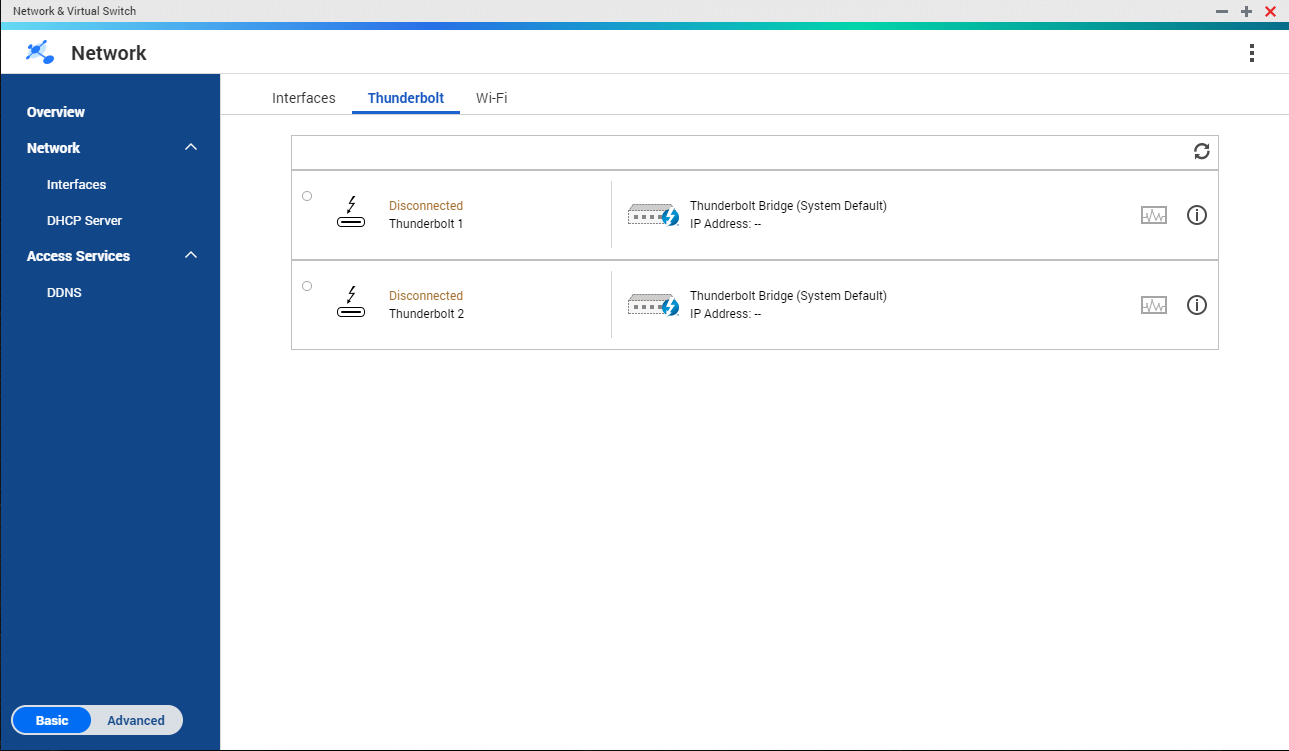
Thunderbolt to Ethernet (T2E)
Thunderbolt to Ethernet functionality allows the Thunderbolt port to act as an Ethernet interface.
QNAP recommends using Qfinder Pro when configuring Thunderbolt to Ethernet.
Due to Thunderbolt driver issues, T2E connections using Thunderbolt 2 may have connectivity problems when connecting to Windows. Thunderbolt 3 connections are unaffected.
Enabling T2E with Qfinder Pro
Qfinder Pro is a utility for Windows, Mac, and Linux that allows you to quickly find and access a QNAP NAS over a LAN.
Qfinder Pro automatically configures the /etc/sysctl.conf settings file on macOS.
Enabling T2E on macOS
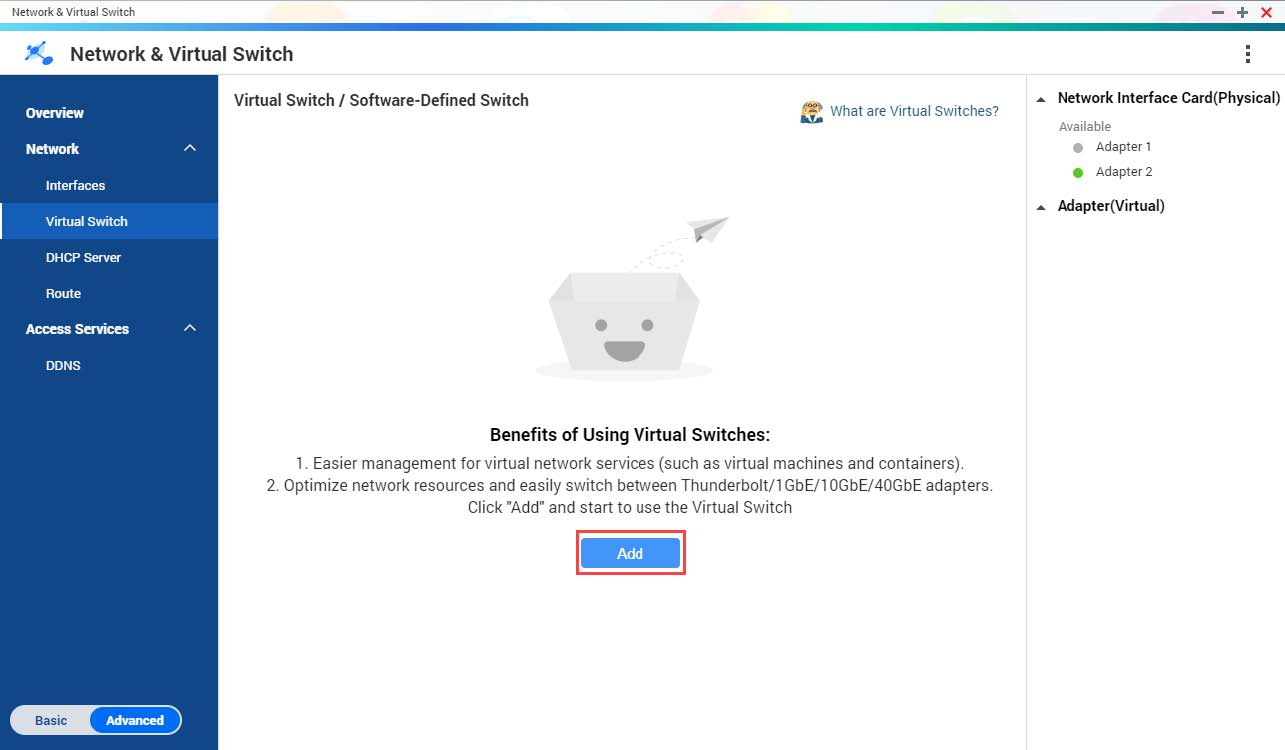
Virtual Switches
This screen controls the configuration and management of virtual switches running on the NAS. Virtual Switches allow physical interfaces and virtual adapters to communicate with each other.

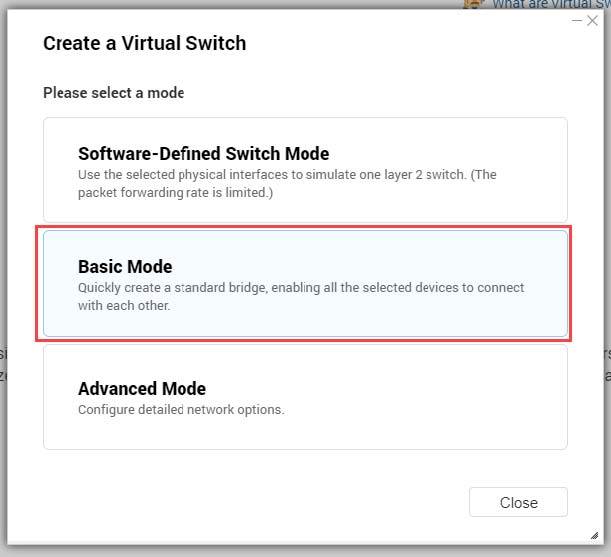
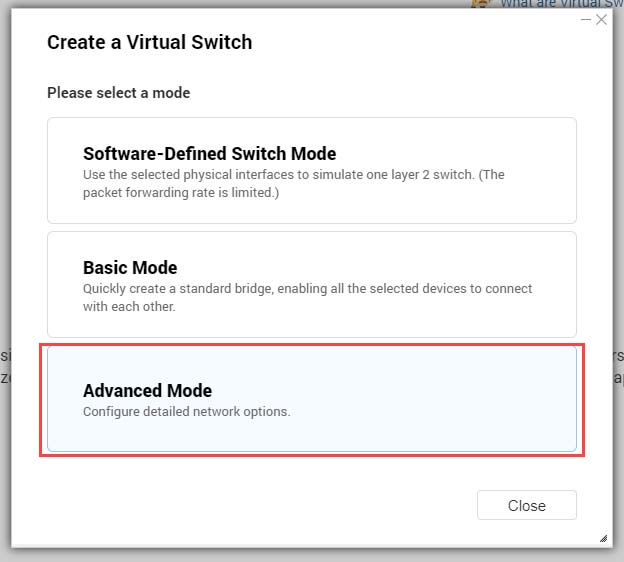
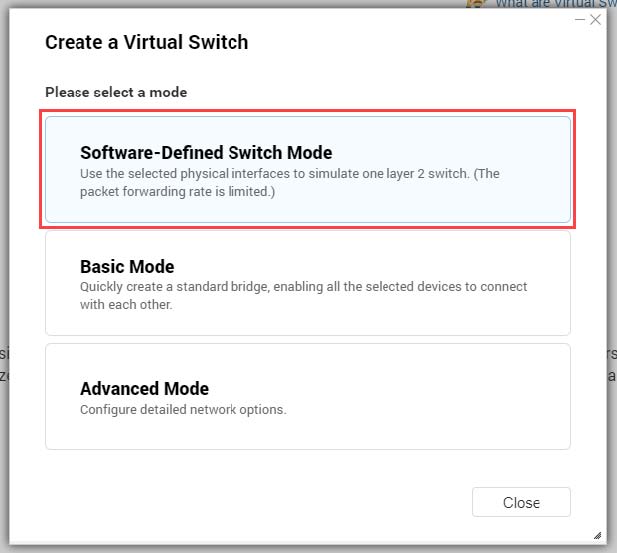
QTS supports three different virtual switch modes.
| Mode | Description |
|---|---|
Basic | This mode is well-suited for most users, and requires minimal configuration of network settings. |
Advanced | This mode is best-suited for power-users who need more control over the configuration of network settings. |
Software-Defined Switch | This mode is suited for power-users who need to simulate an L2 physical switch. Important: Packet forwarding rates are limited when using this mode. |
To access this page, Network & Virtual Switch must be operating in Advanced Mode.
Creating a Virtual Switch in Basic Mode
- Click Add.
The Create a Virtual Switch window opens.
- Select Basic Mode.
- Select one or more adapters.
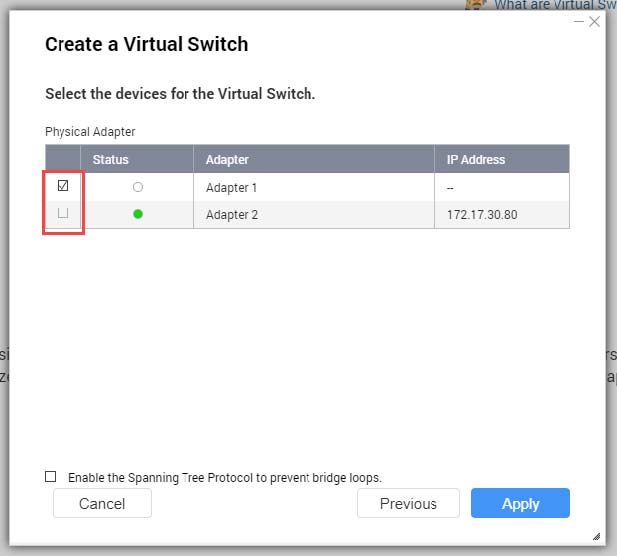
- Optional: Select Enable the Spanning Tree Protocol.
 Tip:
Tip:Enabling this setting prevents bridge loops.
Creating a Virtual Switch in Advanced Mode
- Click Add.
The Create a Virtual Switch window opens.
- Select Advanced Mode.
- Select one or more adapters.

- Optional: Select Enable the Spanning Tree Protocol.Tip:
Enabling this setting prevents bridge loops.
- Configure the virtual switch IP address.

Address Type Description DHCP Client
Assigns a dynamic IP address to the virtual switch.
Static IP
Assigns a static IP address to the virtual switch.
Tip:Examine your network setup for guidance on how to best configure these settings.
Do not assign IP Addresses
Does not assign an IP address to the virtual switch after creation.
Tip:This setting should be used when creating a virtual switch for special purposes, such as when building an external or isolated network.
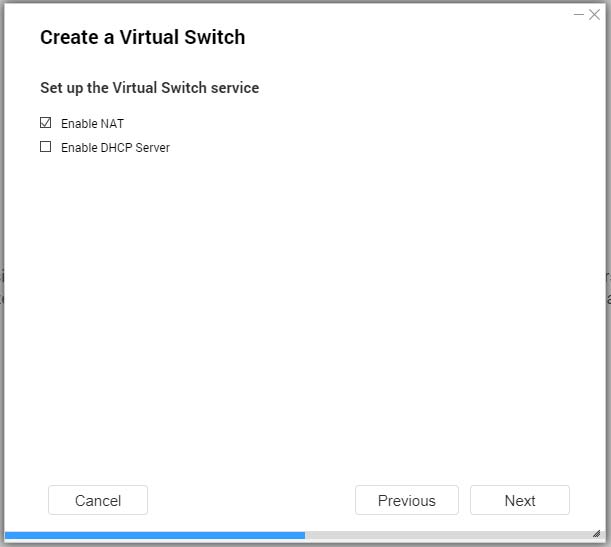
- Configure the virtual switch services.
- Enable the NAT service.
 Important:
The virtual switch must be configured with a static IP address. The IP address cannot be within the subnet of an interface that is currently in use.
The IP address of the virtual switch cannot be in a reserved range that doesn't support forwarding:
127.xxx.xxx.xxx
169.254..xxx.xxx
192.0.2.xxx
198.51.100.xxx
203.0.113.xxx
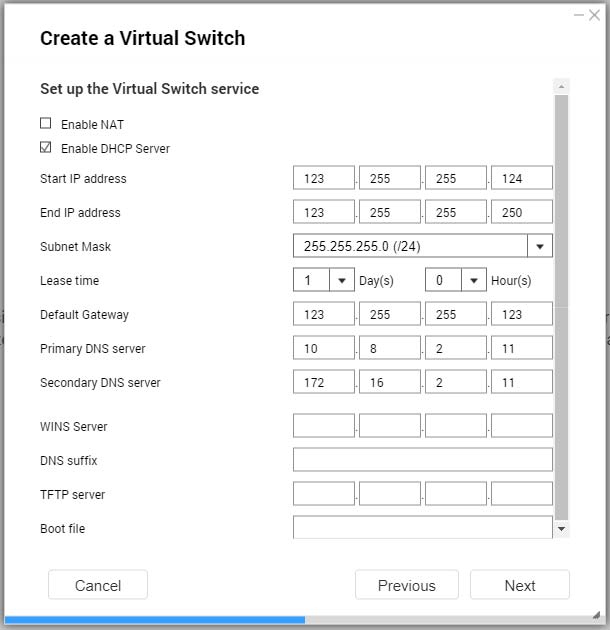
- Optional: Enable the DHCP Server.
 Important:
The virtual switch must be configured with a static IP address. The IP address cannot be within the subnet of an interface that is currently in use.
To avoid IP address conflicts, do not enable DHCP server if there is another DHCP server running on the local network.
Setting Description Start IP Address
Specify the starting IP address in a range allocated to DHCP clients.
End IP Address
Specify the ending IP addresses in a range allocated to DHCP clients.
Subnet Mask
Specify the subnet mask used to subdivide your IP address.
Lease Time
Specify the length of time that an IP address is reserved for a DHCP client. The IP address is made available to other clients when the lease expires.
Default Gateway
Specify the IP address of the default gateway for the DHCP server.
Primary DNS Server
Specify a DNS server for the DHCP server.
Secondary DNS Server
Specify a secondary DNS server for the DHCP server.
Important:QNAP recommends specifying at least one DNS server to allow URL lookups.
WINS Server
Specify the WINS server IP address.
Tip:Windows Internet Naming Service (WINS ) converts computer names (NetBIOS names) to IP addresses, allowing Windows computers on a network to easily find and communicate with each other.
DNS Suffix
Specify the DNS suffix.
Tip:The DNS suffix is used for resolving unqualified or incomplete host names.
TFTP Server
Specify the public IP address for the TFTP server.
Tip:QTS supports both PXE and remote booting of devices
Boot File
Specify location and file name of the TFTP server boot file.
Tip:QTS supports both PXE and remote booting of devices
- Enable the NAT service.
- Configure the virtual switch IPv6 address.
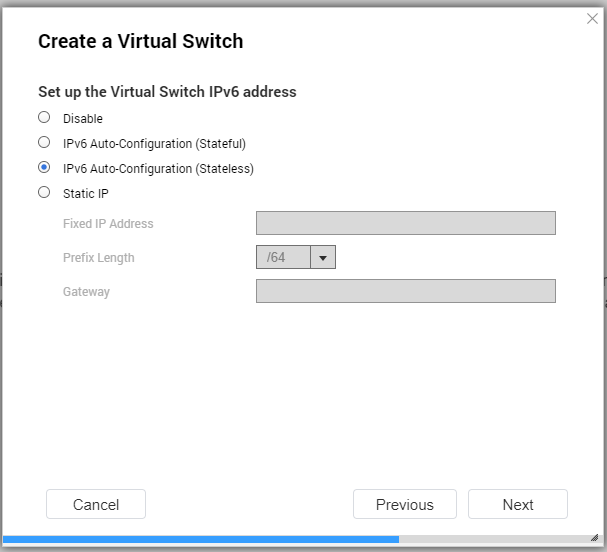
Setting Description Disable
Do not assign an IPv6 address.
IPv6 Auto-Configuration (Stateful)
The adapter automatically acquires an IPv6 address and DNS settings from the DHCPv6-enabled server.
Important:This option requires an available DHCPv6-enabled server on the network.
IPv6 Auto-Configuration (Stateless)
The adapter automatically acquires an IPv6 address and DNS settings from the router.
Important:This option requires an available IPv6 RA(router advertisement)-enabled router on the network.
Use static IP address
Manually assign a static IP address. You must specify the following information:
Fixed IP Address
Prefix length
Tip:Obtain the prefix length information from your network administrator.
Default Gateway
- Configure the DNS settings.
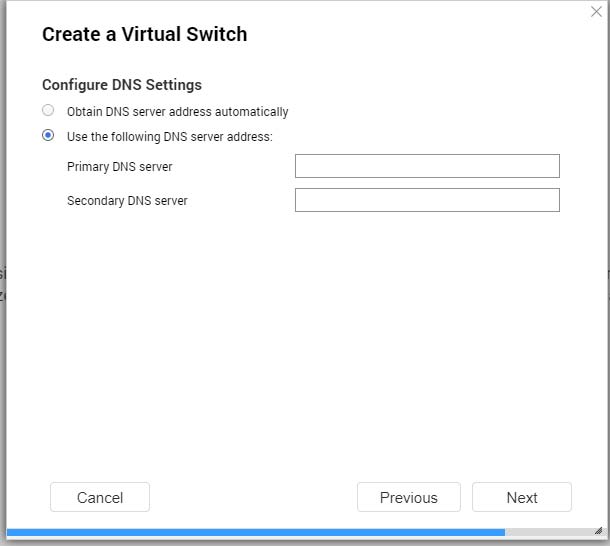
Setting Description Obtain DNS server address automatically
Automatically obtain the DNS server address using DHCP.
Use the following DNS server address
Manually assign the IP address for the primary and secondary DNS servers.
Important:QNAP recommends specifying at least one DNS server to allow URL lookups.
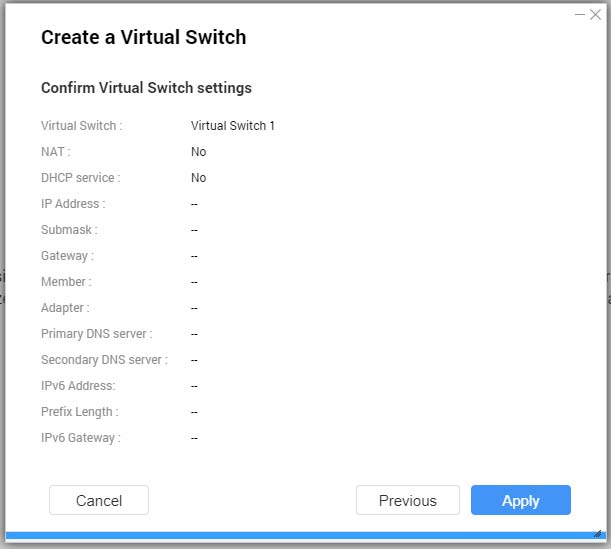
- Confirm the virtual switch settings.
Creating a Virtual Switch in Software-defined Switch Mode
To avoid bridge loops, please ensure any Ethernet cables are connected to the same switch before configuring a Software-defined Switch.
- Click Add.
The Create a Virtual Switch window opens.
- Select Software-defined Switch Mode.
- Select one or more adapters.
- Optional: Select Enable the Spanning Tree Protocol.Tip:
Enabling this setting prevents bridge loops.
DHCP Server
This screen controls the creation and management of Dynamic Host Configuration Protocol (DHCP) servers. DHCP servers can assign IPv4 addresses to clients on the network, while RADVD servers assign IPv6 addresses.

Do not create a new DHCP server if one already exists on the network. Enabling multiple DHCP servers on the same network can cause IP address conflicts or network access errors.
Creating a DHCP Server
- Click Add.

The DHCP Server window opens.
- Select an interface.

- Select the network environment for the DHCP server.

Option Description Enable DHCP server on the current network.
The adapter keeps the existing IP address and subnet mask.
The DHCP server shares the subnet mask with the adapter and is assigned the next available IP address.
Reassign an IP address to the adapter and enable a DHCP server on a new subnet.
The adapter is assigned a new IP address and subnet mask.
The DHCP server uses a different subnet mask and IP address.
Enable DHCP server for another subnet.
The adapter keeps the existing IP address and subnet mask.
The DHCP server uses a different subnet mask and IP address.
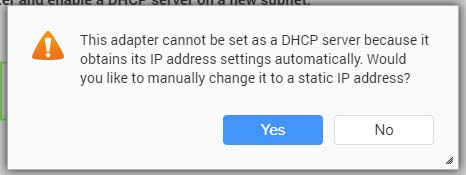
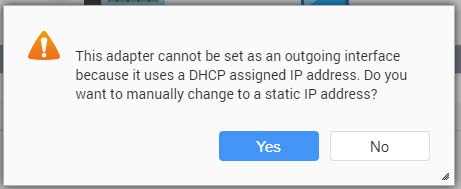
- Configure a static IP address for the adapter.Important:
A static IP address must be configured when creating a DHCP server.
- Click Yes.
- Configure IP address settings.
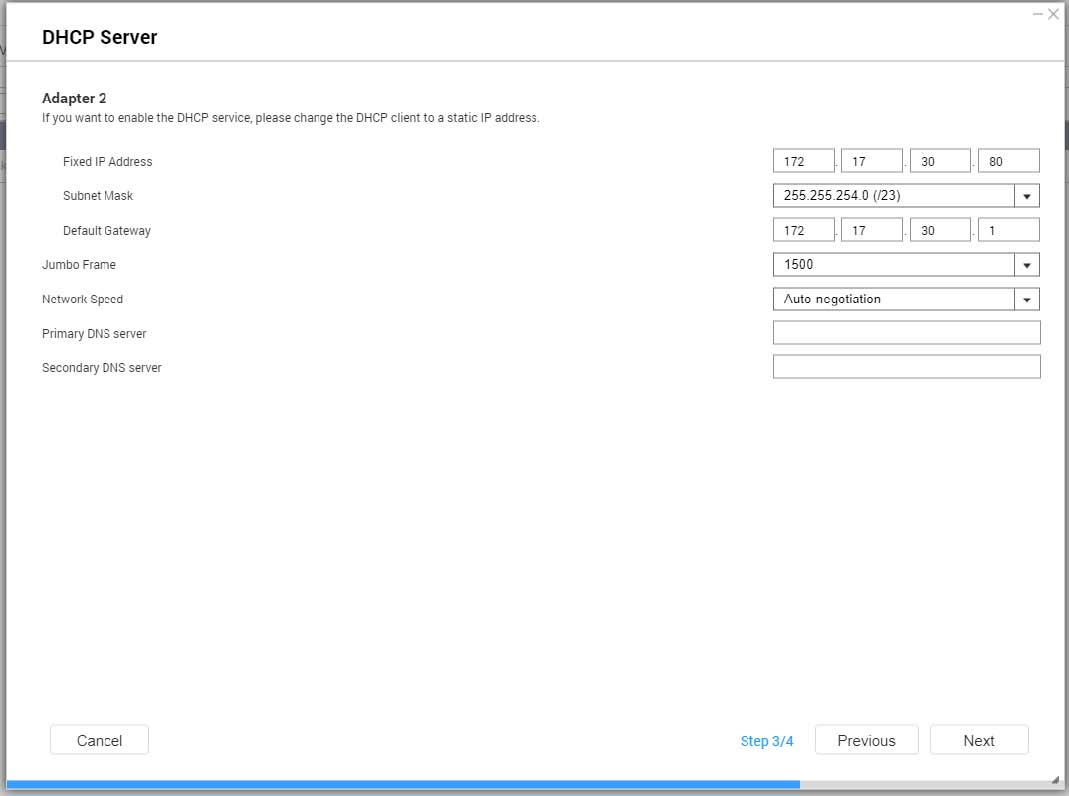
Setting Description Fixed IP Address
Specify a fixed IP address.
Tip:Examine your network setup for guidance on how to best configure these settings.
Subnet Mask
Specify the subnet mask used to subdivide your IP address.
Default Gateway
Specify the IP address of the default gateway for the adapter.
Jumbo Frame
Jumbo Frames are Ethernet frames that are larger than 1500 bytes. They are designed to enhance Ethernet networking throughput, and to reduce CPU usage when transferring large files. QTSsupports the following Jumbo Frame sizes:1500 bytes (default)
4074 bytes
7418 bytes
9000 bytes
Important:Jumbo Frames are only supported by certain NAS models.
Using Jumbo Frames requires a network speed of 1000 Mbps or faster. All connected network devices must enable Jumbo Frames and use the same MTU size.
Network Speed
Specify the speed at which the adapter will operate.
Tip:Auto-negotiation will automatically detect and set the transfer rate.
Primary DNS Server
Assign an IP address for the primary DNS server.
Secondary DNS server
Assign an IP address for the secondary DNS server.
Important:QNAP recommends specifying at least one DNS server to allow URL lookups.
- Click Yes.
- Configure DHCP settings.
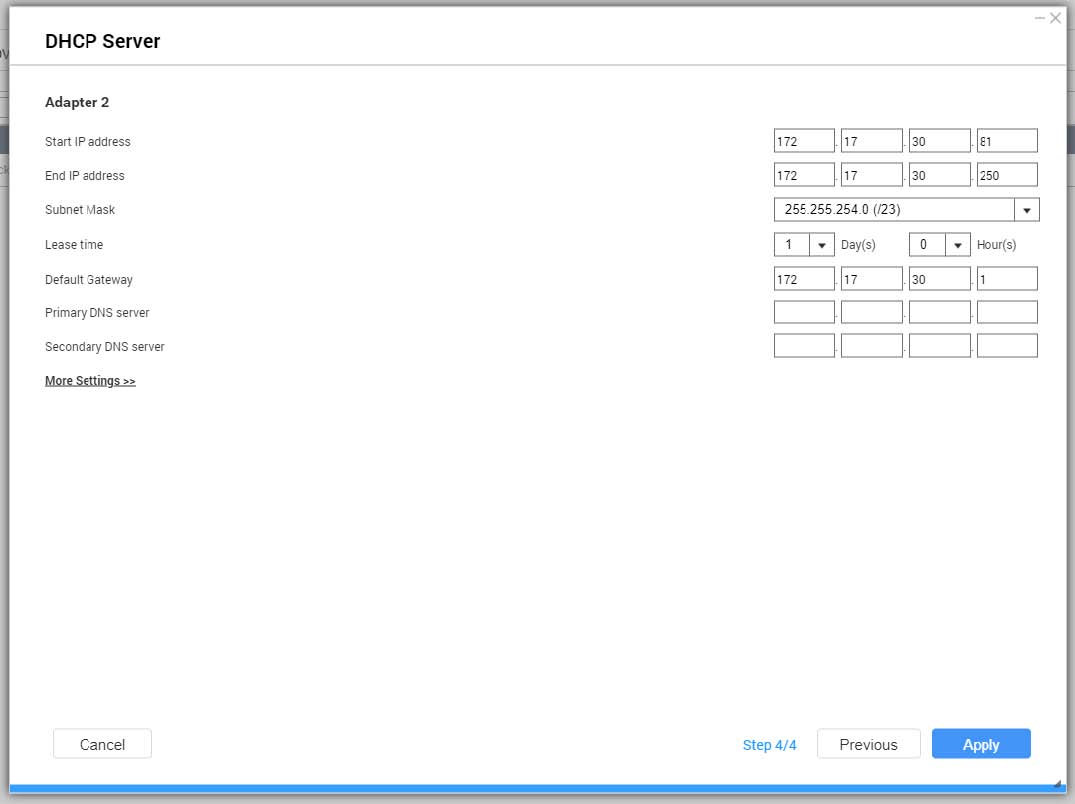
Setting Description Start IP Address
Specify the starting IP address in a range allocated to DHCP clients.
End IP Address
Specify the ending IP addresses in a range allocated to DHCP clients.
Subnet Mask
Specify the subnet mask used to subdivide your IP address.
Lease Time
Specify the length of time that an IP address is reserved for a DHCP client. The IP address is made available to other clients when the lease expires.
Default Gateway
Specify the IP address of the default gateway for the DHCP server.
Primary DNS Server
Specify a DNS server for the DHCP server.
Secondary DNS Server
Specify a secondary DNS server for the DHCP server.
Important:QNAP recommends specifying at least one DNS server to allow URL lookups.
WINS Server
Specify the WINS server IP address.
Tip:Windows Internet Naming Service (WINS) converts computer names (NetBIOS names) to IP addresses, allowing Windows computers on a network to easily find and communicate with each other.
DNS Suffix
Specify the DNS suffix.
Tip:The DNS suffix is used for resolving unqualified or incomplete host names.
TFTP Server
Specify the public IP address for the TFTP server.
Tip:QTS supports both PXE and remote booting of devices
Boot File
Specify location and file name of the TFTP server boot file.
Tip:QTS supports both PXE and remote booting of devices
RADVD
This screen controls the creation and management of Router Advertisement Daemon (RADVD) servers. This service sends messages required for IPv6 stateless auto-configuration. This service periodically sends router advertisement (RA) messages to devices on the local network, and can also send a router solicitation messages when requested from a connected node.

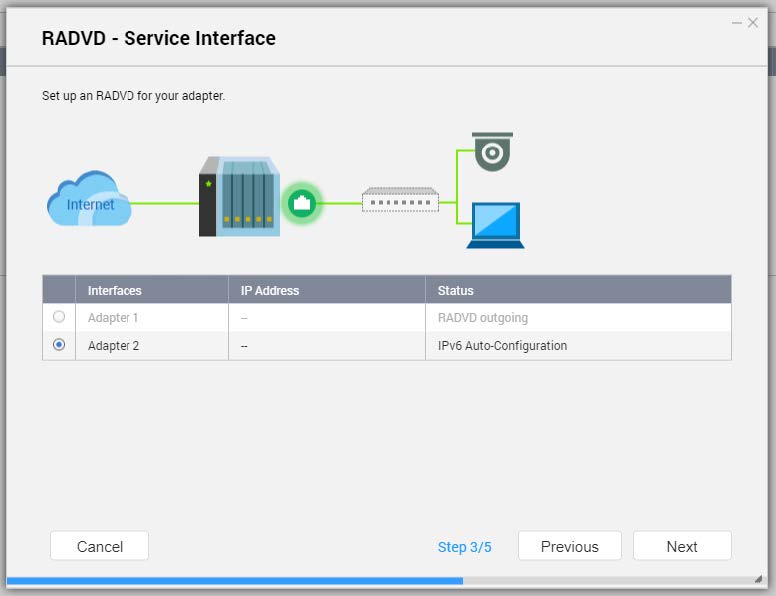
Creating an RADVD Server
- Select the outgoing interface.

- Configure a static IP address for the adapter.Important:
A static IP address must be configured when creating a RADVD server.
- Click Yes.
- Optional: Configure Static IP address settings.
Setting Description Fixed IP Address
Specify a fixed IP address.
Tip:Examine your network setup for guidance on how to best configure these settings.
Prefix Length
Specify the prefix length for the adapter.
Tip:Obtain the prefix and the prefix length information from your ISP.
Default Gateway
Specify the IP address of the default gateway for the DHCP server.
Primary DNS Server
Assign an IP address for the primary DNS server.
Secondary DNS server
Assign an IP address for the secondary DNS server.
Important:QNAP recommends specifying at least one DNS server to allow URL lookups.
- Click Yes.
- Select a second adapter for the RADVD service interface.
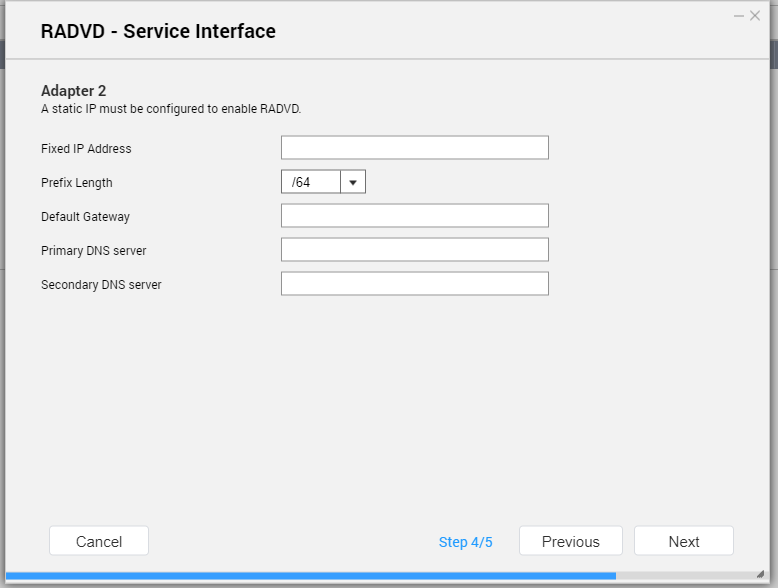
- Optional: Configure a static IP address for the second RADVD adapter.Important:
Creating an RADVD interface requires that the adapter use a static IP address. If the adapter already uses a static IP address, skip this step.
- Click Yes.
- Configure Static IP address settings.
Setting Description Fixed IP Address
Specify a fixed IP address.
Tip:Examine your network setup for guidance on how to best configure these settings.
Prefix Length
Specify the prefix length for the adapter.
Tip:Obtain the prefix and the prefix length information from your ISP.
Default Gateway
Specify the IP address of the default gateway for the adapter.
Primary DNS Server
Specify the DNS server address.
Secondary DNS server
Specify the DNS server address.
Important:QNAP recommends specifying at least one DNS server to allow URL lookups.
- Click Yes.
- Configure the RADVD server settings.
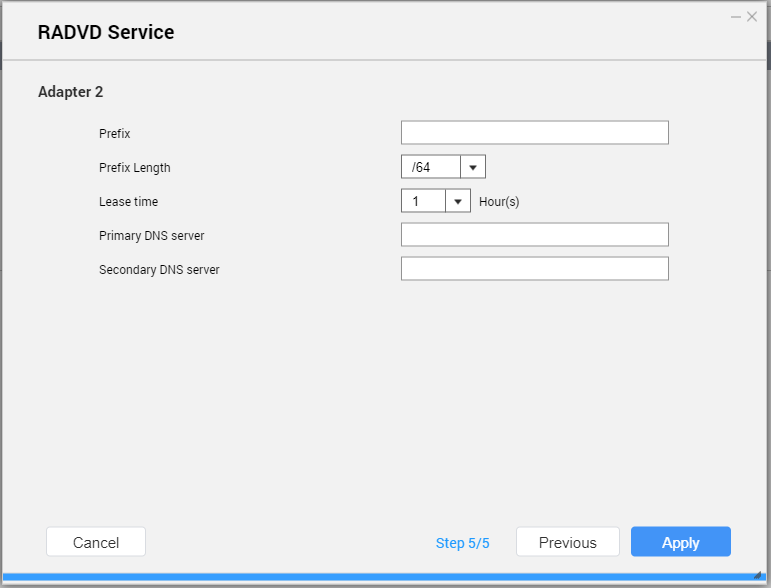
Setting Description Prefix
Specify the routing prefix for the adapter.
Tip:Examine your network setup for guidance on how to best configure these settings.
Prefix Length
Specify the prefix length for the adapter.
Tip:Obtain the prefix and the prefix length information from your ISP.
Lease Time
Specify the length of time that an IP address is reserved for a DHCP client. The IP address is made available to other clients when the lease expires.
Primary DNS Server
Specify the DNS server address.
Secondary DNS server
Specify the DNS server address.
Important:QNAP recommends specifying at least one DNS server to allow URL lookups.
Route
This screen controls the creation of static routes. Under normal circumstances, QTS automatically obtains routing information after it has been configured for Internet access. Static routes are only required in special circumstances, such as having multiple IP subnets located on your network.
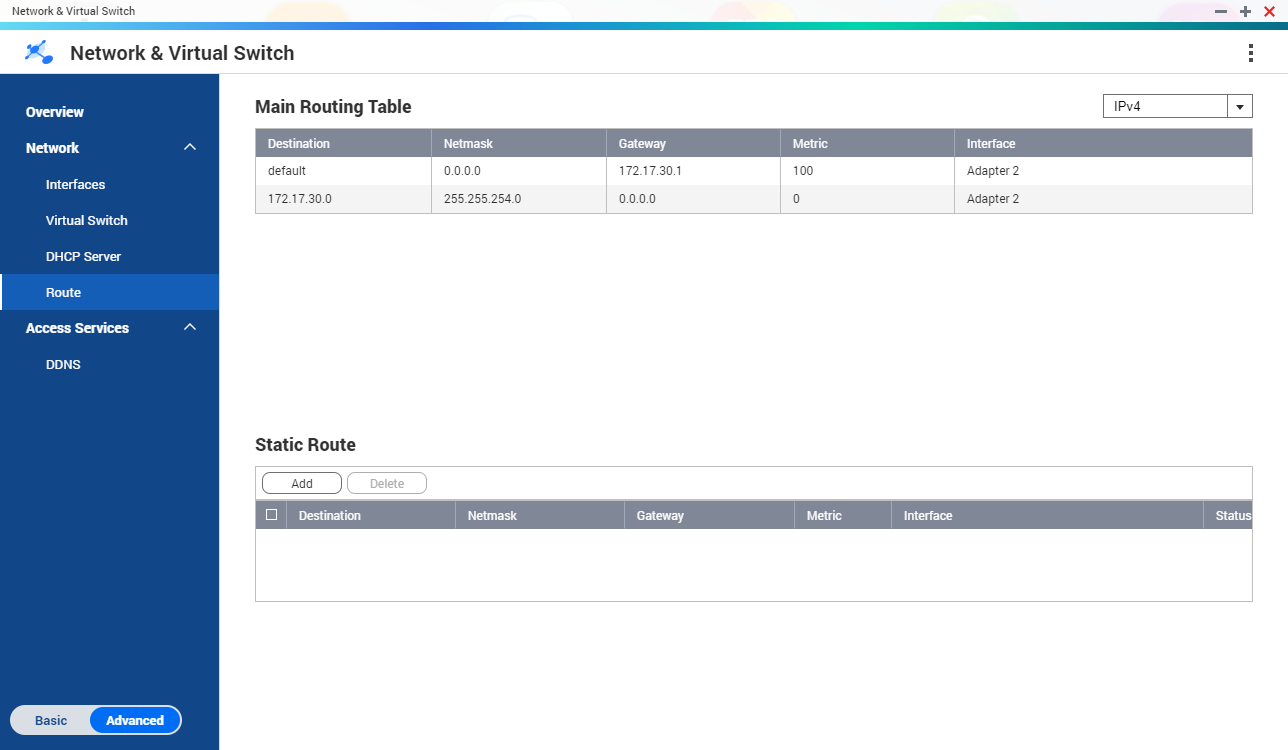
Creating a Static Route
- Click Add.

The Static Route (IPv4) window opens.
- Configure the IP address settings.
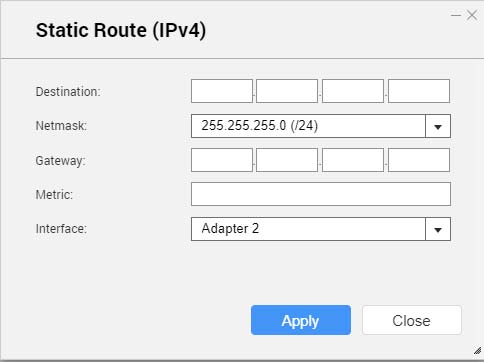
Setting Description Destination
Specify a static IP address where connections are routed to.
Netmask
Specify the IP address of the destination's netmask.
Gateway
Specify the IP address of the destination's gateway.
Metric
Specify the number of nodes that the route will pass through.
Note:Metrics are cost values used by routers to determine the best path to a destination network.
Interface
Select the interface that connections should be routed through.
DDNS
This screen controls the management of Dynamic Domain Name System (DDNS) services. DDNS allows access to the NAS from the internet using a domain name rather than an IP address.
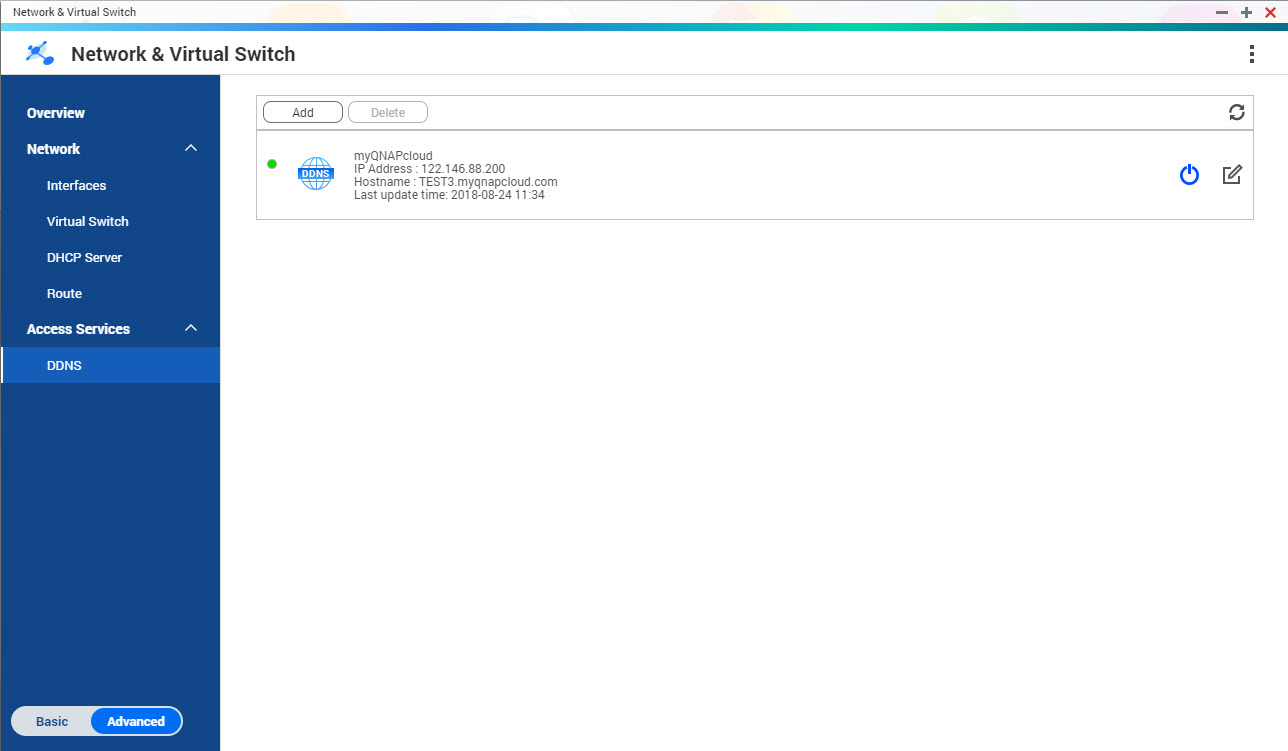
Adding a DDNS Service
- Click Add.
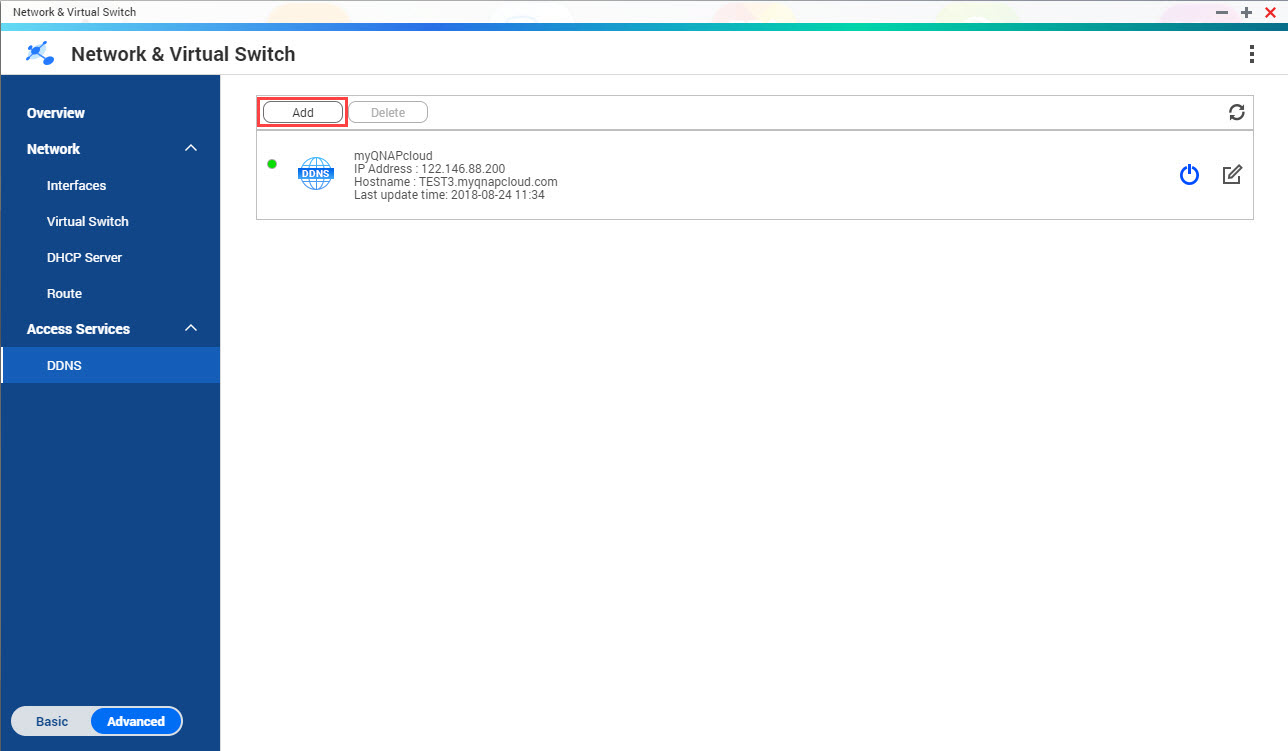
The DDNS (Add) window opens.
- Configure the DDNS settings.
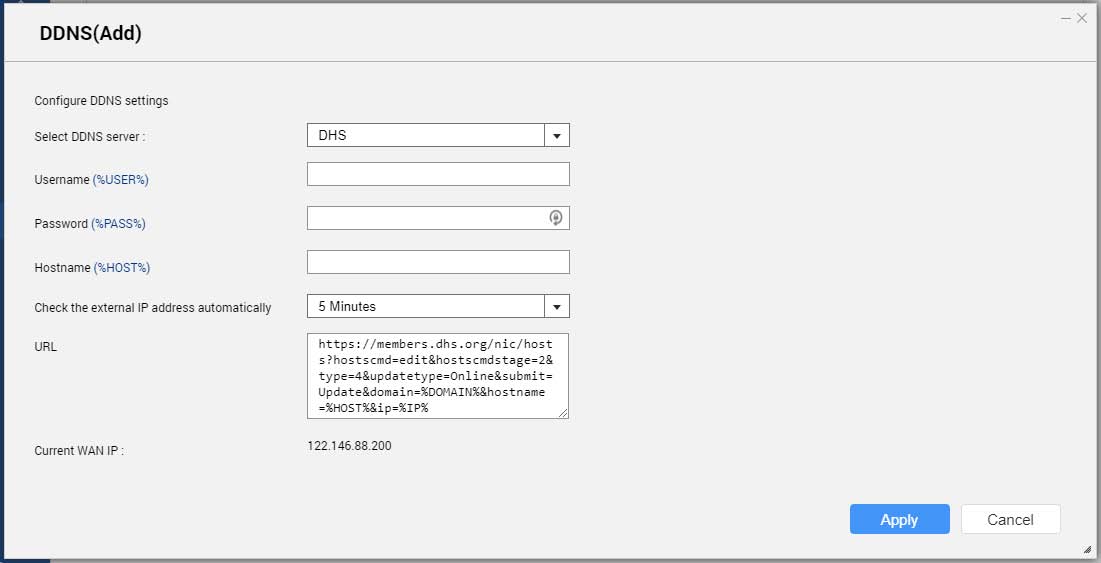
Setting Description Select DDNS server
Select the DDNS service provider.
Username
Specify the username for the DDNS service.
Password
Specify the password for the DDNS service.
Hostname
Specify the hostname or domain name for the DDNS service.
Check the External IP Address
Specify how often to update the DDNS record.


