Storage & Snapshots Quick Start Guide for QuTS hero
-
What is Storage & Snapshots?
-
System requirements
-
Before you start
-
Create storage space in 2 steps
-
Step 1: Create a storage pool with RAID
-
Step 2: Create a shared folder
-
-
Manage your storage
-
Manage disks
-
Manage storage units
-
-
Protect your data
-
Take snapshots
-
Back up your data
-
-
Improve your read performance
-
Cache acceleration
-
-
Further reading and resources
This guide is applicable to QuTS hero h5.1.0 or later.
What is Storage & Snapshots?
Storage & Snapshots is a built-in utility in QuTS hero for creating, managing, and monitoring storage space on your QNAP NAS.
After initializing your NAS, you'll need to create some storage space in Storage & Snapshots so that you can store data, install applications, and fully utilize all the available functions in QuTS hero.
Learn more about the storage architecture and storage units in QuTS hero.
System requirements
Operating system: QuTS hero
Before you start
Make sure you meet the following requirements before creating your first storage units in Storage & Snapshots:
- Prepare disks.
- Use compatible disks. For details, see Compatibility List.
- Back up any existing data on your disks before initializing the NAS or creating a RAID group.
- When creating a RAID group, for best performance use disks of the same brand, capacity, and disk type (all HDD, all SSD, or all SAS).NoteIf you mix disks in a RAID group, all disks will function according to the speed of the slowest disk and the capacity of the smallest disk.
- You have initialized your NAS and installed QuTS hero.
- You are logged in as an administrator.
- Make sure your installed disks have the following statuses in Storage & Snapshots > Storage > Disks/VJBOD > Disks:
- Health Status: Good
- Status: Ready
- Used Type: Free
Create storage space in 2 steps
Before your NAS can start storing data, you must create a storage pool to serve as the system storage pool. After that, you can install applications and create shared folders.
Step 1: Create a storage pool with RAID
- Open Storage & Snapshots and go to Storage > Storage/Snapshots.
- Click New Storage Pool to open the Create Storage Pool Wizard.
- Click Start, and then click Next.
- Select disks to include in your storage pool.NoteTo prevent data loss due to disk failure, we recommend selecting at least two disks so that you can select RAID 1 or above for the RAID type.
- Optional: Under Mode, configure one or more disks to serve as spare disks.NoteA spare disk allows your system to automatically replace a faulty disk in a RAID group. The system can then rebuild the RAID group so that it regains its data protection capability as soon as possible.
- Optional: Select a different RAID type.
The system automatically selects the most optimized RAID type based on the disks selected.
For details, see RAID types in the QuTS hero User Guide. - Follow the remaining steps in the wizard.
For details on configuration options, see Creating a storage pool in the QuTS hero User Guide.
After your first storage pool is created, you can install applications and create shared folders for storing and sharing files.
Step 2: Create a shared folder
QuTS hero automatically creates some default shared folders in the system storage pool. You can create additional shared folders to organize your files and configure different permission settings for each folder.
- Open Control Panel and go to Privilege > Shared Folders > Shared Folder.TipIn QuTS hero, you can also create a shared folder in Storage & Snapshots by going to Storage > Storage/Snapshots.
- Click Create, and then select Shared Folder to open the shared folder creation wizard.
- Specify a name for your new folder.
- Select a space allocation method:
- Thin provisioning (default)
- Storage space is allocated from the storage pool to the folder as data is written to the folder.
- This option maximizes storage utilization and is useful for dynamic storage spaces and limited storage shared by multiple users.
- Thick provisioning
- Storage space is pre-allocated. The capacity is reserved and expandable.
- This option is suitable for general use.
- Thin provisioning (default)
- Follow the remaining steps in the wizard.
For details on configuration options, see Creating a shared folder in the QuTS hero User Guide.
Manage your storage
Manage disks
- Open Storage & Snapshots and go to Storage > Disks/VJBOD > Disks.
The screen shows a comprehensive overview of all disks in your system.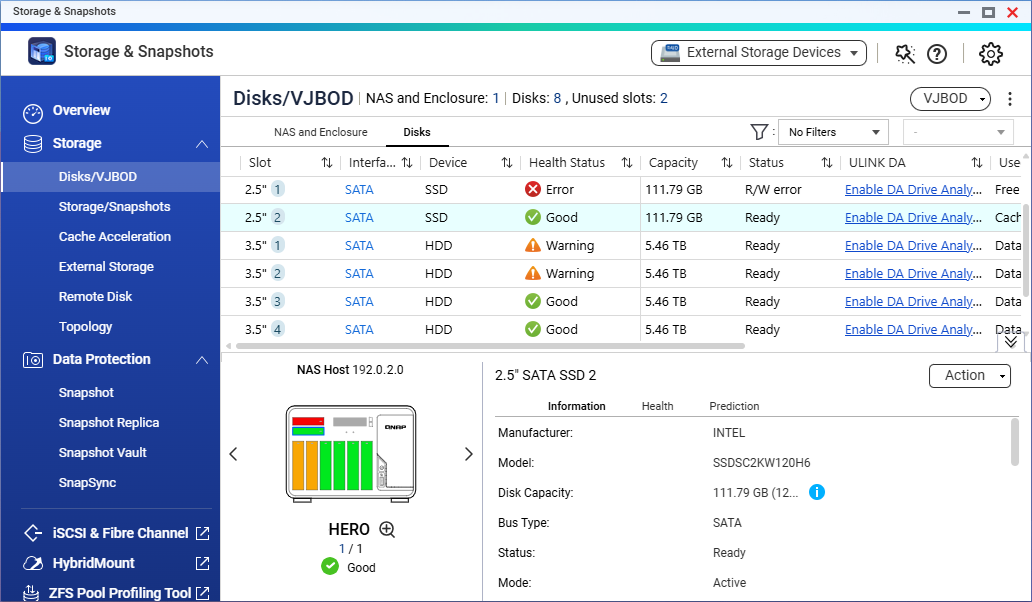
- Check disk statuses.
- Click a disk to display additional disk information in the bottom pane.
- You can also access the Action menu to perform various operations on the disk.
Manage storage units
- Open Storage & Snapshots and go to Storage > Storage/Snapshots.
The screen shows a hierarchical view of your storage units, including storage pools, shared folders, and LUNs.
- Click a storage unit, and then click Manage.
- The storage unit's management window opens with further details about the storage unit.
- The management window also includes an Action menu for useful operations such as setting threshold alerts, increasing free space, resizing the storage unit, and more.
To learn more about specific actions you can take on your storage units in Storage & Snapshots, see the following:
- For storage pools, see Storage pools in the QuTS hero User Guide.
- For shared folders, see Shared folders in the QuTS hero User Guide.
Protect your data
Take snapshots
A snapshot protects data by recording the state of a storage unit at a specific point in time. With snapshots, you can:
- Restore a storage unit to a previous state.
- Access and restore previous versions of files and folders.
- Create an identical copy of a storage unit.
For details, see FAQs about snapshots and the Snapshots section in the QuTS hero User Guide.
Back up your data
We recommend using the 3-2-1 strategy to back up your data: Keep three total copies of your data, store two copies on different media, and store one copy off-site.
QNAP provides a native backup solution with the Hybrid Backup Sync application, which allows you to easily back up data on your NAS to another device or to a cloud storage space. For details, see Hybrid Backup Sync.
Improve your read performance
Cache acceleration
You can use one or more SSDs to create an SSD cache, which allows you to improve the read performance of your NAS.
For details on compatible NAS models and requirements, see SSD Cache Acceleration.
To create an SSD cache in Storage & Snapshots, go to Storage > Cache Acceleration, and click the + button.
For detailed instructions, see Creating the SSD Cache in the QuTS hero User Guide.
Further reading and resources
- Storage & Snapshots: Official QNAP landing page for Storage & Snapshots
- Knowledge Base: Searchable database of FAQs, tutorials, and web helps
- QNAP College: Instruction video tutorials
- Download Center: Latest firmware files, hardware user guides, and other information available for download
- Compatibility List: Lists of HDD and SSD models and external devices that are compatible with QNAP devices
- QuTS hero User Guide: Web help for the latest version of QuTS hero, including a detailed chapter on Storage & Snapshots


