How to Use KoiMeeter
About KoiMeeter
KoiMeeter is a new generation video conferencing solution with built-in wireless projection features. Upgrading your QNAP device to this new generation video conference system is simple. To use KoiMeeter with your QNAP device, install the KoiMeeter app and then connect an HDMI display and a USB camera. It's that simple. With KoiMeeter, video conference participants can collaborate using wireless screen sharing features through the browser-based Insight View, call other video conferencing systems, and record and play back meeting sessions.
- Installation
- Using the App
- HDMI User Interface
- Wireless Projection
- Video Conferencing
- KoiMeeter Content Management System (CMS)
Installation
Requirements
|
Category |
Requirements |
|---|---|
|
Hardware |
A compatible QNAP device connected to the following:
|
|
Software |
QTS 4.4.1 or later. |
-
For more information about KoiMeeter compatible devices, go to https://www.qnap.com/go/solution/koimeeter/.
-
KoiMeeter is available in the QNAP App Center.
Installing KoiMeeter
- Go to App Center, and then click
 .
.
A search box appears.
Configuring the System Default Gateway
You must configure system default gateway settings for calling other KoiMeeter compatible QNAP devices or for conference participants to join an ongoing video conference.
-
The video conference call host and conference participants must have the same system default gateway settings configured on their respective QNAP devices.
-
You must have administrator permissions to configure this setting.
- Log on to QTS.
- Go to .
- Click System Default Gateway.
- Click Select the system default gateway.
- Select Fixed gateway.
- Select the same system default gateway IP address as the video conference host device.
- Click Apply.
Setting Up Hardware
For details about hardware requirements, see Requirements.
- Connect the HDMI display to your device.
Important:
KoiMeeter currently only supports a maximum of two HDMI outputs, even when the QNAP device has three HDMI ports.
Figure 1. KoiMeeter hardware set up using a HS-453DX NAS.
Using the App
KoiMeeter provides multiple input and control methods. In addition to keyboard control, it also supports remote control and computer mouse navigation.
Keyboard Controls
The following table describes KoiMeeter keyboard controls and functions.

|
No. |
Key |
Action |
No. |
Key |
Action |
|---|---|---|---|---|---|
|
1 |
 |
Return to previous page |
6 |
 |
Navigate up |
|
2 |
 |
Displays information about the KoiMeeter app |
 |
Navigate to the right |
|
|
3 |
 |
Volume up |
 |
Navigate down |
|
|
4 |
 |
Volume down |
 |
Navigate to the left |
|
|
5 |
  |
Select options |
7 |
 |
Displays menu |
Remote Control
If your QNAP device has a built-in IR sensor, you can navigate KoiMeeter with a remote control. The following table desccribes the remote control general navigation functions.
Your QNAP device remote control may require separate purchase. For details, see your device user guide Hardware Specification topic or go to QNAP Accessories Store.

|
No. |
Button |
Action |
No. |
Button |
Action |
|---|---|---|---|---|---|
|
1 |
+ |
Volume up |
6 |
Up |
Navigate up |
|
2 |
OK |
Select |
Right |
Navigate to the right |
|
|
3 |
Return |
Return to previous page |
Down |
Navigate down |
|
|
4 |
i |
Displays information about the KoiMeeter app |
Left |
Navigate to the left |
|
|
5 |
- |
Volume down |
7 |
Menu |
Menu |
Mouse Control
The following table lists common mouse commands for navigating KoiMeeter.

|
No. |
Button |
Action |
|---|---|---|
|
1 |
Left click |
Click once to select options |
|
2 |
Scroll wheel |
Roll the wheel up or down to scroll vertically |
|
3 |
Right click |
Click to return to previous page |
HDMI User Interface
The Wireless Presentation screen displays the wireless projection IP address and PIN code. You can also make video calls and configure wireless projection settings.

KoiMeeter HDMI Display Settings
The Settings screen displays the room name, the IP address, and the KoiMeeter version. You can also modify the language, screen resolution, camera, audio output, audio input settings, and even switch to the HybridDesk Station app.
QNAP recommends you check all KoiMeeter settings before proceeding with operations.

Switching to HybridDesk Station
You can switch between KoiMeeter and HybridDesk Station app easily.
Switching Back to KoiMeeter
You can return to KoiMeeter after switching to the HybridDesk Station app.
- Click
 .
.
The Switch to KoiMeeter window appears.
Wireless Projection
You can use KoiMeeter to share your presentation with others on HDMI displays or through Insight View. You can use wireless screen sharing for collaboration and for sharing content in a local conference room or remotely during a video conference.
Insight View Interface
Insight View is a browser-based interface built into KoiMeeter for performing wireless screen sharing in real time. This interface allows you to share screens and switch between multiple HDMI display layouts. Conference participants can view your shared content by logging into the Insight View interface using the same KoiMeeter wireless projection IP address and PIN code. Insight View currently supports Google Chrome and Mozilla Firefox browsers.
PIN Code Screen
The PIN code screen appears after you enter the wireless projection IP address in your browser's address bar.

Screen Modes
When your QNAP device is connected to two HDMI displays, you can switch between different screen layout modes by clicking  . Insight View currently supports three screen modes.

|
Screen Modes |
Unselected |
Selected |
|---|---|---|
|
Screen mode menu |
|
Shows the screen mode drop-down menu. |
|
Two screens |
 |
 |
|
Full screen |
 |
 |
|
Picture-in-picture |
 |
 |
Two Screens
Two Screens is the default screen layout when a QNAP device is connected to two HDMI displays and shows the screens next to each other. You can switch to Two Screens layout by clicking .

Full Screen
Full Screen mode shows the full view of a specified HDMI display, and only shows one display at a time. Click the screen you want to show in Full Screen mode and then click .

Picture-in-Picture
The Picture-in-Picture mode shows a specified HDMI display in full screen mode, and the unspecified HDMI display appears in a smaller window. You can drag the smaller window around the Insight View interface. To switch to Picture-in-Picture mode, click the HDMI display you want to show in full screen mode and then click .

People Count
This icon  shows the total number of people calling that joined the current wireless screen sharing session.

Settings
Settings allow you to configure Insight View's language settings or view the online KoiMeeter tutorial. Click  to change settings.

Accessing Insight View
KoiMeeter only supports Google Chrome and Mozilla Firefox.
Wireless Screen Sharing
-
KoiMeeter supports up to two HDMI displays. If you are using two HDMI displays, the shared screen will only be shown on the specified display. In a single HDMI display setup, the shared screen replaces the previously displayed content.
-
KoiMeeter only supports Google Chrome and Mozilla Firefox.
- Select the content that you want to share.
Note:
Both Google Chrome and Mozilla Firefox can share your screen or a specific application. Minimizing the application will stop the wireless presentation. You can only choose to share a specific browser tab when using Google Chrome.
Figure 1. Wireless screen sharing using Google Chrome. Figure 2. Wireless screen sharing using Mozilla Firefox.
- Click Share.
Note:
Clicking Share replaces the content on the display with your shared content.
The screen you are projecting is highlighted in blue and a timer showing the presentation time appears in the left corner.

Stopping Wireless Screen Sharing
You can stop an established wireless screen sharing anytime.
- Click Stop.
Figure 1. Shows end meeting countdown when PIN code required is enabled.

-
Displays the end meeting countdown and starts countdown.
Note:You must have administrator permission and enable PIN code required in the KoiMeeter app to configure the Meeting session countdown.
-
Shows End the Meeting and Extend the Meeting.
Note:If any conference participants want to share screens and extend the current meeting, click Extend the Meeting before the meeting session countdown expires. The PIN code regenerates once the countdown expires and you must start a new wireless screen sharing session.
-
Chat Room

The following table describes actions you can perform in Chat Room:
|
No. |
Element |
Action |
|---|---|---|
|
1 |
The Messages window |
Click |
|
2 |
Username |
Click on the blue text to specify or modify your chat username. |
|
3 |
Text box |
Click on the gray text to enter your chat message. |
|
4 |
Upload files |
Click |
|
5 |
Expand or collapse |
|
 to collapse the
 Sending Messages Using Chat Room
- Click the chat box in Insight View.

- Optional: Click
 to view chat history.

-
The Messages window appears in the right panel.
-
All sent messages appear in the Messages window.
Note:All chat messages are automatically saved and uploaded to Meeting Minutes in the KoiMeeter app when the wireless screen sharing session ends.
-
Sending Files Using Chat Room
- Click the chat box in Insight View.
- Click
 .
.
The upload file window appears.
- Click
 to view uploaded files.

-
The Messages window appears in the right panel.
-
All sent files are displayed in the Messages window.
Note:All chat files are automatically saved and uploaded to Meeting Minutes in the KoiMeeter app when the wireless screen sharing session ends.
-
Video Conferencing
Starting a Video Conference
KoiMeeter's HDMI interface allows you to make video calls.
- Perform any of the following actions during a call.
Task
Action
End the call
Click
 .
.Record the session
Click
 .Tip:
.Tip:Click the icon again to stop recording.
Note:This feature is only available on the licensed version of KoiMeeter.
Turn off the camera
Click
 .Tip:
.Tip:Click the icon again to turn on the camera.
Mute the microphone
Click
 .Tip:
.Tip:Click the icon again to unmute.
Joining or Declining a Video Conference
You must have a compatible KoiMeeter device to join a video conference.
To join a video conference, your QTS device System Default Gateway settings must be the same as the video conference host device settings. For details, see Configuring the System Default Gateway.
Perform any of the following actions during an incoming video call.
|
Task |
Action |
|---|---|
|
Join video call |
Click |
|
Decline video call |
Click |
 .
. .
.If you have disabled Auto answer calls in the KoiMeeter app, the video call automatically cancels when there is no response after more than one minute.
KoiMeeter Content Management System (CMS)
You can configure the KoiMeeter app settings by logging into the app backend on a QTS device. You must have administrator permissions or the QTS device account to access the KoiMeeter Content Management System (CMS).
KoiMeeter App Interface
The following table describes the KoiMeeter app interface elements and features.

|
No. |
Element |
Description |
No. |
Element |
Description |
|---|---|---|---|---|---|
|
1 |
Settings |
Click |
4 |
Left panel |
Lists all KoiMeeter app features. |
|
2 |
Account |
Shows current user logged into the KoiMeeter app or the app log out option. |
5 |
Expand or collapse |
|
|
3 |
Right panel |
Displays selected app feature information. |
- |
- |
- |
 to select
  to expand the right panel.
 to collapse the right panel.
Meeting Minutes
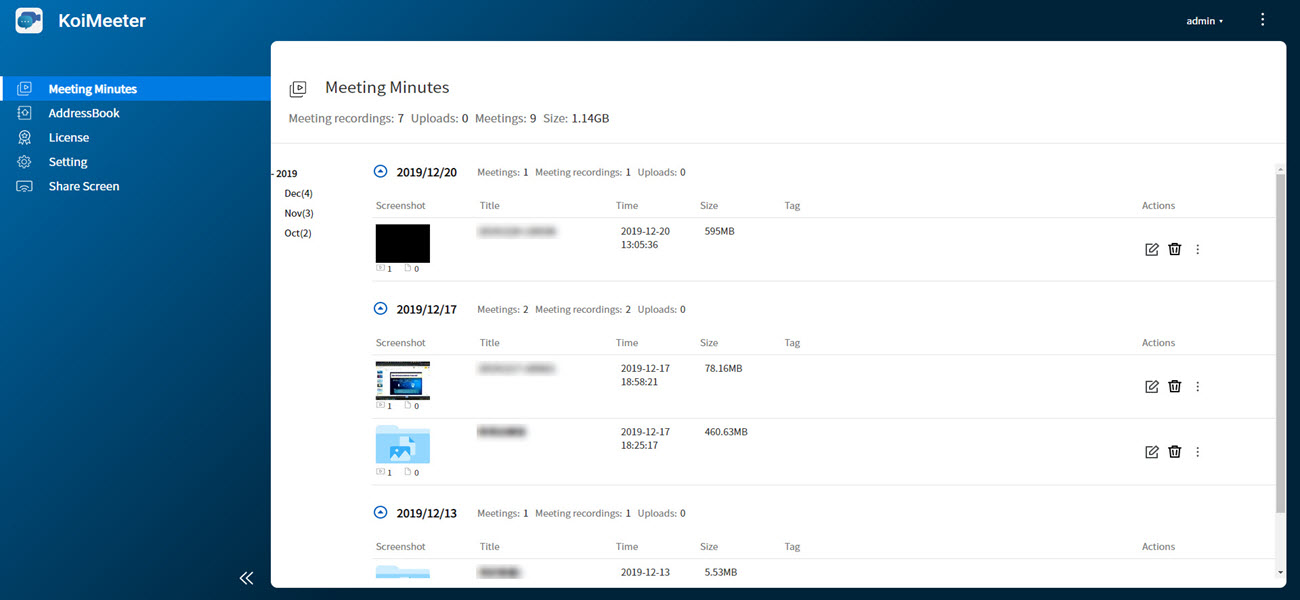
On the Meeting Minutes screen, you can view the number of meeting recordings, chat records, automatically uploaded files, meetings, and meeting file sizes. You can also manage the recorded meeting files. The following table describes Meeting Minutes features and functions.
|
Task |
Action |
|---|---|
|
Edit meeting file information |
Click |
|
Delete meeting file |
Click |
|
Display other actions in a drop down menu |
Click |
|
Open meeting file |
Select Open from the drop-down menu. |
|
Download meeting file |
Select Download from the drop-down menu. |
|
Display meeting file details |
Select Information from the drop-down menu. |
 .
. .
. .
.AddressBook

On the AddressBook screen, you can view the device names and device IP addresses. You can also import, export, add, and edit device names, device IP addresses, and categorize devices. The following table describes AddressBook features and functions.
|
Task |
Action |
|---|---|
|
Export device information |
Click Note:
KoiMeeter supports exporting device information in JSON file format. |
|
Import device information |
Click Note:
KoiMeeter supports importing device information in JSON file format. |
|
Add categories or devices |
Click |
|
Edit device information |
Click |
|
Change device category |
Click |
|
Delete device |
Click |
|
Display action options |
Click |
 .
. .
. .
. .
.License
On the License screen, the total presentation time per session and the total number of channels are displayed. You can upgrade your KoiMeeter license to get unlimited presentation time, meeting recordings, and more features. Click  to buy or upgrade a license.

Settings
On the Settings screen, you can modify the KoiMeeter app configurations.

The following table describes the settings you can change in KoiMeeter.
|
Setting |
Description |
|---|---|
|
Audio output |
Change selected audio output device. |
|
Audio input |
Change selected audio input device. |
|
PIN code required |
Enable or disable PIN code. Note:
When PIN code required is enabled, conference participants must enter the PIN code every time to join a KoiMeeter video conference or wireless screen sharing session. |
|
Meeting session countdown |
Configure the countdown time until KoiMeeter automatically ends wireless screen sharing or a video conference. Important:
You must enable PIN code required to configure the Meeting session countdown. |
|
Wireless projection IP address |
Select the IP address you want to use for wireless projection. Note:
The wireless projection IP address will list all network settings configured on your device, including IP addresses of multiple network adapters or virtual switches. Make sure you select an IP address that your computer can access. For details, see Accessing Insight View. |
|
Auto answer calls |
Enable to automatically answer all incoming video calls. Tip:
If Auto answer calls is disabled, the video call automatically ends when there is no response for more than 1 minute. |
|
Apply |
Click |
 to save setting changes.
Share Screen
Clicking Share Screen redirects you to the Insight View share screen interface. For details, see Wireless Screen Sharing.


