Setting up a Basic Xsan Environment with QNAP NAS Storage and Fibre Channel


Release date: 2020-08-12


Introduction to QNAP NAS and Xsan

Xsan is Apple's clustered file system, which enables multiple macOS workstations to access shared storage space. With Xsan, multiple clients can simultaneously read from or write to the same file while seeing the same file content. Here we will demonstrate a simple setup of Xsan using QNAP NAS storage space over a Fibre Channel (FC) network.

Role

Hardware

Installed Software

Xsan MDC (Metadata Controller)

  • Apple Mac Pro
  • Thunderbolt to FC adapter connected to the Thunderbolt port on the Mac Pro

Xsan CLIENT

  • Apple Mac Pro
  • Thunderbolt to FC adapter connected to the Thunderbolt port on the Mac Pro

Shared storage

QNAP NAS with an FC card installed

For NAS and FC card compatibility, see https://www.qnap.com/go/solution/fibrechannel-san.

The latest version of QTS

Ethernet Switch

  • Gigabit Ethernet switch
  • Ethernet cables, connecting the Ethernet switch to the NAS, Xsan MDC, and each Xsan client.

N/A

Fibre Channel (FC) Switch

  • FC Switch
  • FC cables, connecting the FC switch to the NAS, Xsan MDC, and each Xsan client.

N/A

Storage Configuration

An Xsan volume requires three kinds of data storage space: user data, file metadata, and file journal data.

Data Type

Space Consumed

Recommended RAID Configuration

Configuration for Demo

Metadata

Approximately 10 GB per 10 million files

RAID 1

  • RAID 1
  • 30 GB
  • Space shared by metadata and file journal data

File journal

64 KB to 512 MB per volume

RAID 1

User data

Dependent on user

  • RAID 5
  • User data space should be kept separate from metadata and file journal space for improved performance.
  • RAID 5
  • 500 GB

Configuring the Xsan MDC (Metadata Controller)

  1. Update macOS to the latest version.
  2. Configure macOS to set its time and date automatically using a network time protocol (NTP) server.
    Important: To prevent time skew, ensure all for all computers in the Xsan environment use the same NTP server.
  3. Ensure the hostname of the MDC is DNS resolvable.
    Tip: For a small network, a simple solution is to install the application dnsmasq on the MDC. Then configure each computer in the Xsan environment to use the MDC's IP address as a DNS server.
  4. Download the macOS Server app from the Apple App Store.
  5. Install macOS Server.
  6. Create a Thunderbolt to FC connection.
    1. Install the latest FC adapter drivers.
    2. Connect the Thunderbolt to FC adapter to the computer.
    3. Check the FC connection through the adapter’s utility software.

Configuring an Xsan Client

Run the following steps on each client in the Xsan environment.

  1. Update macOS to the latest version.
  2. Configure macOS to set its time and date automatically using a network time protocol (NTP) server.
    Important: To prevent time skew, ensure all for all computers in the Xsan environment use the same NTP server.
  3. Ensure the hostname of the MDC is DNS resolvable.
    Tip: For a small network, a simple solution is to install the application dnsmasq on the MDC. Then configure each computer in the Xsan environment to use the MDC's IP address as a DNS server.
  4. Create a Thunderbolt to FC connection.
    1. Install the latest FC adapter drivers.
    2. Connect the Thunderbolt to FC adapter to the computer.
    3. Check the FC connection through the adapter’s utility software.

Configuring the QNAP NAS

  1. Prepare a QNAP NAS with an FC card installed.
    For a list of compatible NAS devices and Fibre Channel cards, see https://www.qnap.com/solution/fibrechannel-san.
  2. Create the metadata and journal data LUN.
    1. Log into QTS.
    2. Go to Storage & Snapshots > Storage > Storage/Snapshots.
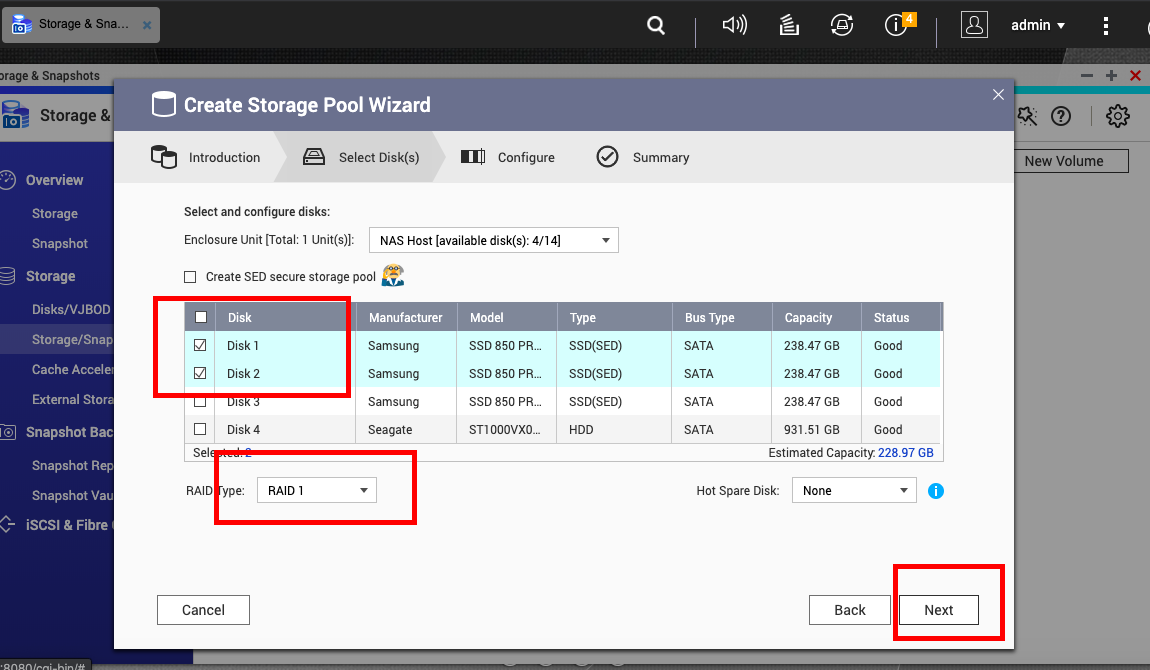
    3. Click Create, and then select New Storage Pool.
      The Create Storage Pool Wizard window opens.
    4. Click Next.
    5. At Select Disk(s), select two disks and then set the RAID type to RAID 1.
    6. Click Next, and then Next again.
    7. Click Create, and then confirm OK.
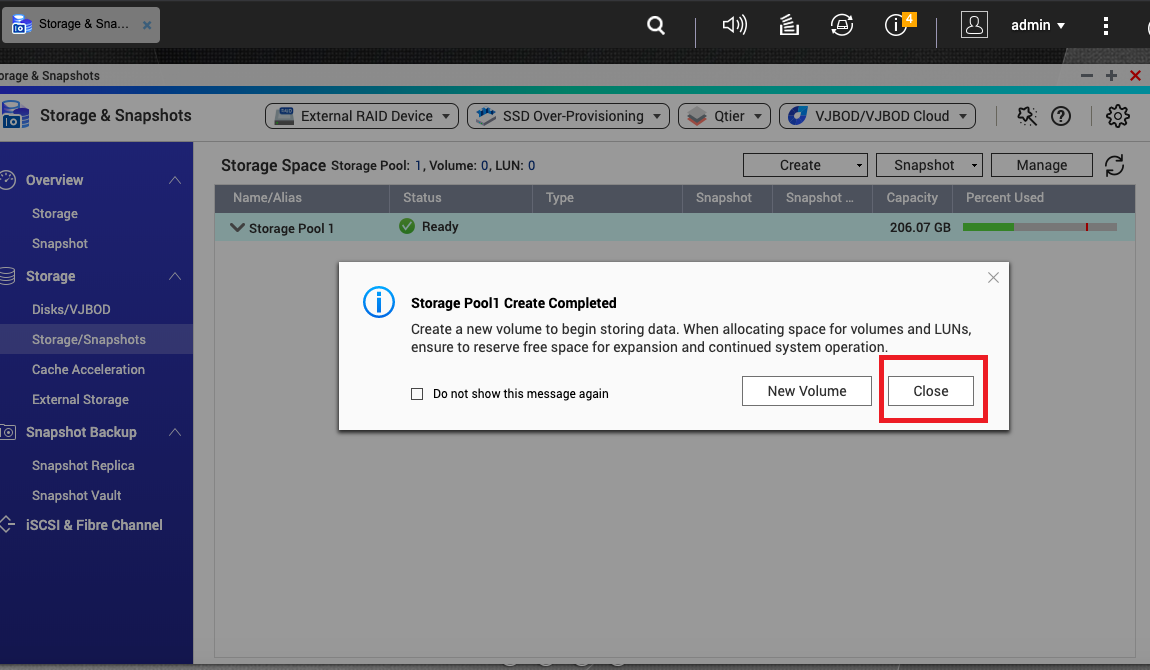
      QTS creates the storage pool and then displays the information on the Storage/Snapshots screen. A window opens, asking whether you want to create a new volume.
    8. Click Close.
      You are returned to Storage/Snapshots.
    9. Click Create, and then select New Block-Based LUN.
      The Block-Based LUN Creation Wizard opens.
    10. Under Location, select the RAID 1 pool that you created in the previous steps. Select Thick instant allocation, and then click Next.
    11. Configure LUN Name and LUN capacity, and then click Next
    12. Click Finish.
      QTS creates the LUN.
  3. Create the user data LUN.
    1. Follow the same steps as you did for creating the metadata and journal data storage pool, but this time select the following options:
      • Total disks: 3
      • RAID Type: RAID 5
    2. Follow the same steps as you did for creating the metadata and journal data LUN, but this time select the following options:
      • Location: RAID 5 storage pool
  4. Map each LUN to an FC port.
    1. Log into QTS.
    2. Go to iSCSI & Fibre Channel > Fibre Channel > FC Storage.
    3. Under Unmapped LUNs select the user data LUN.
    4. Click Action, and then select Edit LUN Mapping.
      The Edit LUN Mapping window opens.
    5. Select Map to FC port group, and then select All FC ports. Select Enable LUN and do not configure LUN masking (Every FC initiator will see the LUN), and then click OK.
    6. Repeat the above steps to map the metadata and journal data LUN.
      The LUNs are now listed under Default - All FC Ports.
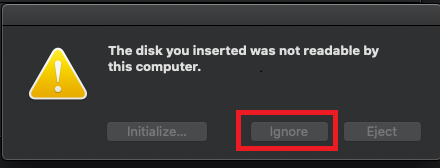
  5. After mapping the LUNs, you might see a warning message appear on macOS on the MDC and all clients. If you see this message, click Ignore.

Xsan Topology

The following is an example of a basic Xsan topology:
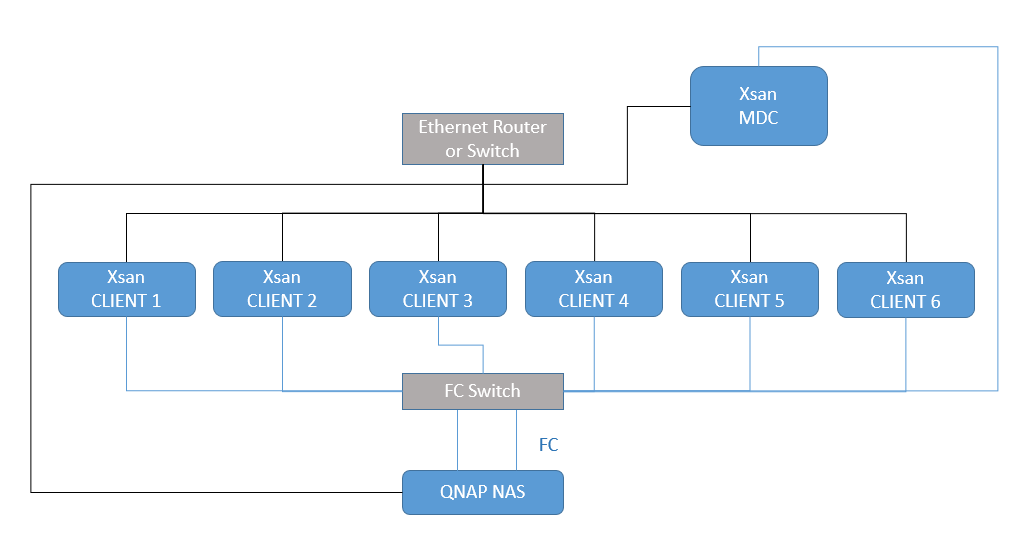
Here is a simplified version where the MDC and a client are connected directly to the FC ports on the NAS.

  • Fibre Channel (FC)
    • Connect all the clients and the NAS with FC cables.
    • Performance is dependent on the bandwidth of the NAS FC card, SFP transceivers, FC cables, Thunderbolt to FC adapter, and FC switch.
  • Ethernet
    • Connect all the computers and the NAS to a Gigabit router or switch with Ethernet cables.
    • Apple recommends creating three independent Ethernet networks which connect all computers in the Xsan environment: Internet, Distributed LAN Client (DLC), and metadata. For simplicity, in this tutorial we only create the metadata network.
    • Assign a static IP address to each computer in the Xsan network, and ensure all computers have valid DNS entries.
      Tip: If you want to use a DHCP router to assign IP addresses, you can reserve each IP address as static in the router’s setting.

Configuring Xsan

  1. Log onto the MDC.
  2. Configure macOS to never sleep.
    1. Go to Apple menu > System Preferences > Energy Saver.
    2. On the Battery screen, perform one of the following actions depending on your macOS version:
      • Slide Computer Sleep to Never.
      • Select Prevent computer from sleeping automatically when the display is turned off.
    3. Repeat the previous action on the Power Adapter screen.
  3. Go to macOS Server > Advanced > Xsan.
  4. Enable the Xsan service.
    The Xsan Getting Started wizard opens.
  5. Select Create a new SAN, and then click Next.
  6. If Open Directory is not enabled on the MDC, then follow the wizard to set up Open Directory.
  7. Specify a unique SAN name.
  8. Enter the directory administrator login name and password.
    These credentials were specified during Open Directory setup.
  9. Follow the wizard to complete the setup.

Creating an Xsan Volume

  1. Log onto the MDC.
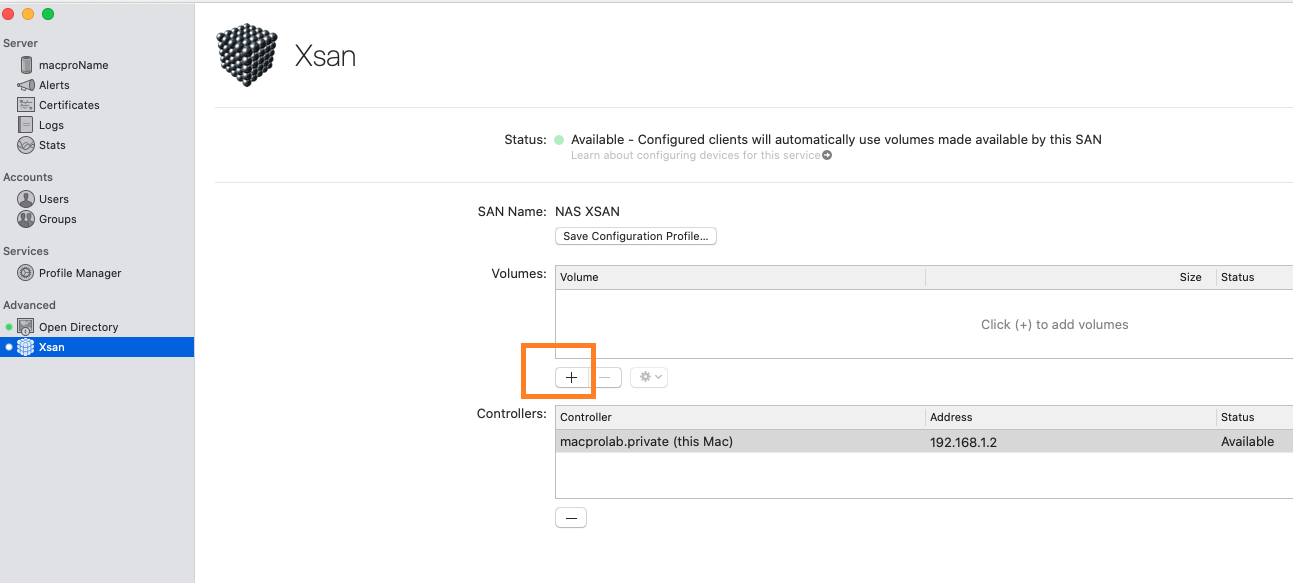
  2. Go to macOS Server > Advanced > Xsan.
  3. Under Volumes, click +.
  4. Specify a unique volume name.
  5. Configure the volume settings.
    In this tutorial we are using the default settings.
  6. Assign NAS storage to the volume.
    1. In the storage pool list, select the metadata and journal data storage pool.
    2. Click Edit.
      The Edit Storage Pool window opens.
    3. Under Type, select Metadata and Journal.
    4. Give the metadata and journal LUN a meaningful name.
    5. Check the checkbox of the metadata and journal LUN, and then click OK.
      The Edit Storage Pool window closes.
    6. In the storage pool list, select the user data storage pool and then click Edit.
      The Edit Storage Pool window opens.
    7. Under Type, select User data only.
    8. Give the user data LUN a meaningful name.
    9. Check the checkbox of the user data LUN, and then click OK.
      The Edit Storage Pool windows closes.
  7. On the Volume screen, click Create.
    A warning says that all data in the storage space will be deleted.
  8. Confirm OK.

The volume is created. The new volume appears in the Xsan volume list.

Configuring an Xsan SAN Client with an Xsan Profile

Xsan configures clients by giving them a configuration profile which is generated by the SAN. There are two methods; manually apply the profile, or use Profile Manager. Here we will manually apply the configuration profile to the client. Apply to the following steps to each client in the Xsan environment.

  1. Log onto the MDC.
  2. Go to macOS Server > Advanced > Xsan.
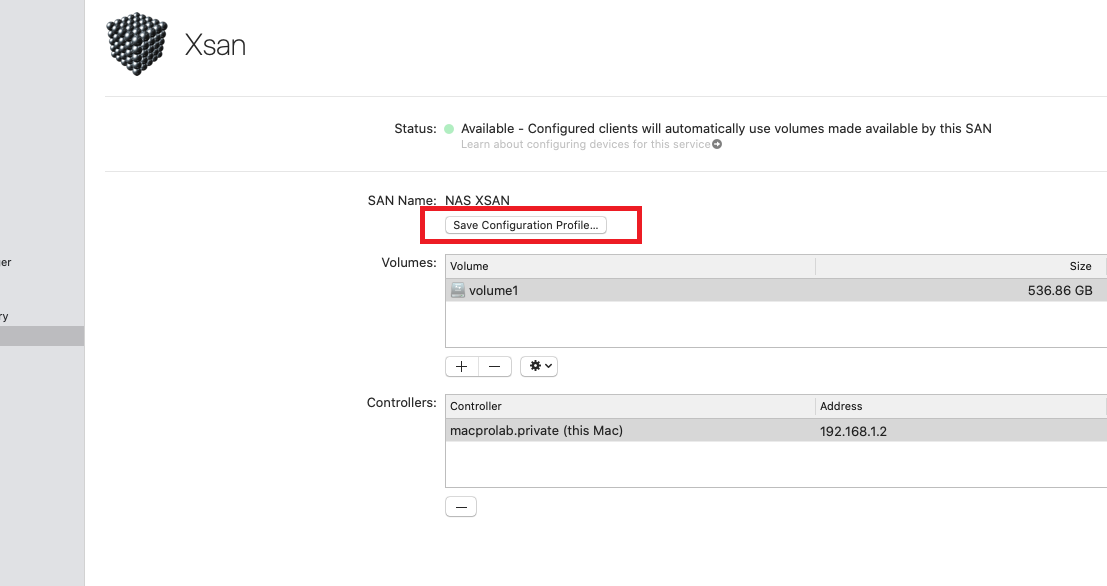
  3. Click Save Configuration Profile.
  4. Save the resulting configuration profile file.
  5. Copy the configuration profile to a client.
    Tip: You can share the file over Ethernet, or use a USB flash drive to copy and save the file to the client computer.
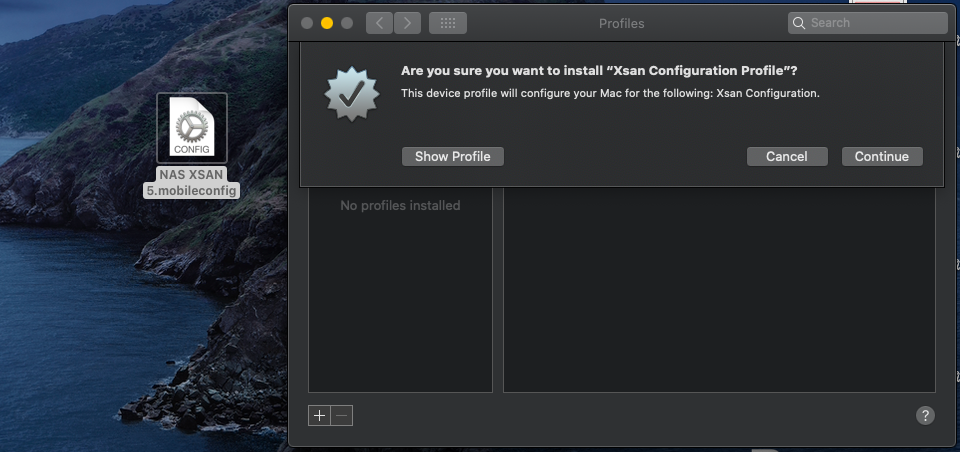
  6. On the client computer, double click the configuration file.
  7. Follow the prompts to install the configuration profile.
    This process requires you to enter the administrator passwords of the MDC and the client.
  8. If you encounter an error such as CPDomainPlugin:101, then try the following workaround: Configuring an Xsan Client using Terminal.
  9. Repeat the above steps for each Xsan client.

Configuring an Xsan Client using Terminal

When configuring a client with the Xsan configuration profile, you might encounter an error such as CPDomainPlugin:101. If you encounter this error, try the following steps as a workaround.

  1. Log onto the MDC.
  2. Open Finder, and then go to /Library/Preferences/Xsan/.
  3. Show hidden files by pressing hotkeys Command + Shift + Period.
  4. Make a copy of the file /Library/Preferences/Xsan/.auth_secret named auth_secret.
    The copy has no period at the start of the filename. This makes it a non- system file, which allows us to copy it to the client.
  5. Copy the following files from the MDC to the client computer:
    • /Library/Preferences/Xsan/fsnameservers
    • /Library/Preferences/Xsan/auth_secret
    • /Library/Preferences/Xsan/config.plist
  6. Log onto the client.
  7. Copy the file fsnameservers to /Library/Preferences/Xsan/
  8. Edit the file config.plist.
    1. Open config.plist in a text editor.
    2. Locate the following line in the file:
      <key>role</key><string>CONTROLLER</string>
    3. Replace CONTROLLER with CLIENT, as follows:
      <key>role</key><string>CLIENT</string>
    4. Save the changes, and then move config.plist to /Library/Preferences/Xsan/.
  9. Move the auth_secret file to the client using the following one-line command:
    sudo mv / [your_file_path_here]/auth_secret  /Library/Preferences/Xsan/.auth_secret
    Important: In this command we re-add the “.” prefix to the file.
  10. Load XSAN on the client using the following command:
    sudo launchctl load -w /System/Library/LaunchDaemons/com.apple.xsan.plist

Mounting an Xsan Volume

Perform these steps on every client and on the MDC.

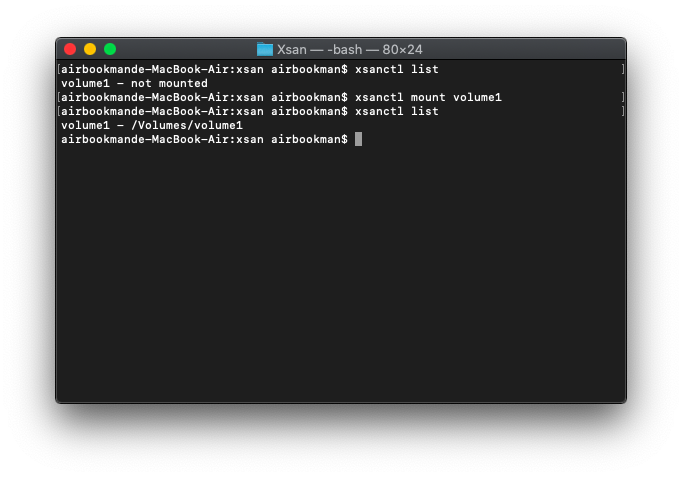
  1. In macOS, open Terminal.
  2. Enter the following command to show the volume name.
    xsanctl list
  3. Enter the following command to mount the volume.
    xsanctl mount [volume name] In this tutorial, the command is xsanctl mount volume1.

The mounted volume appears in Finder.

Was this article helpful?

86% of people think it helps.
Thank you for your feedback.

Please tell us how this article can be improved:

If you want to provide additional feedback, please include it below.

Válassza ki a specifikációt

      Mutass többet Kevesebb

      Ez a webhely más országokban / régiókban:

      open menu
      back to top