-
What is NetBak PC Agent?
-
System requirements
-
Before you start
-
Back up your Windows PC or server
-
Create a USB boot drive
-
Restore your Windows PC or server with a USB boot drive
-
Restore files to your Windows PC or server with HDP Backup Explorer
-
Further reading and resources
This guide is applicable to NetBak PC Agent 1.1.0 and later
What is NetBak PC Agent?
NetBak PC Agent is a flexible and powerful Windows PC and server application that can back up your Windows PC/server system and data to your QNAP NAS. Backups can be performed manually or automatically by schedule. You can also restore your Windows PC/server with NetBak PC Agent by creating a USB boot drive.
To back up your Windows PC/server system and data to your NAS, NetBak PC Agent connects to Hyper Data Protector (HDP) on your NAS. HDP is a high-speed backup and restore application for Windows PCs/servers and virtual machines. You can manage your backup data, backup schedule and more in HDP. For more details on HDP, see Hyper Data Protector.
You can restore individual files and folders backed up by NetBak PC Agent by using HDP Backup Explorer. For more details on HDP Backup Explorer, see How do I restore files to my Windows PC or server with HDP Backup Explorer?
System requirements
- NAS operating system:
- QTS 4.5.4 or later
- QuTS hero h4.5.4 or later
- Hyper Data Protector 2.0 or later is installed and running on your QNAP NAS.
- Windows PC operating system: Windows 10 or 11
- Windows server operating system: Windows Server 2016, 2019, or 2022
Before you start
Make sure you meet the following requirements before you back up or restore your Windows PC or server:
- You are a NAS administrator.
- While backing up or restoring your PC/server, ensure that:
- Your PC/server has a stable network connection to your NAS.
- HDP is running on your NAS.
- NetBak PC Agent is installed on your Windows PC/server.
To install NetBak PC Agent, download the NetBack PC Agent utility, run the executable file, and follow the installation steps. - A USB drive with at least 1 GB capacity is required to create a USB boot drive for restoring your Windows PC/server.
Back up your Windows PC or server
Backing up your Windows PC/server consists of creating a backup job in NetBak PC Agent and then running the backup job:
- Open NetBak PC Agent on your Windows PC or server.
- Log in using your NAS account.
After logging in, Netback PC Agent automatically creates an inventory in HDP for your PC/server. An HDP inventory stores configuration and connection information for your PC/server and allows you to easily manage your backups.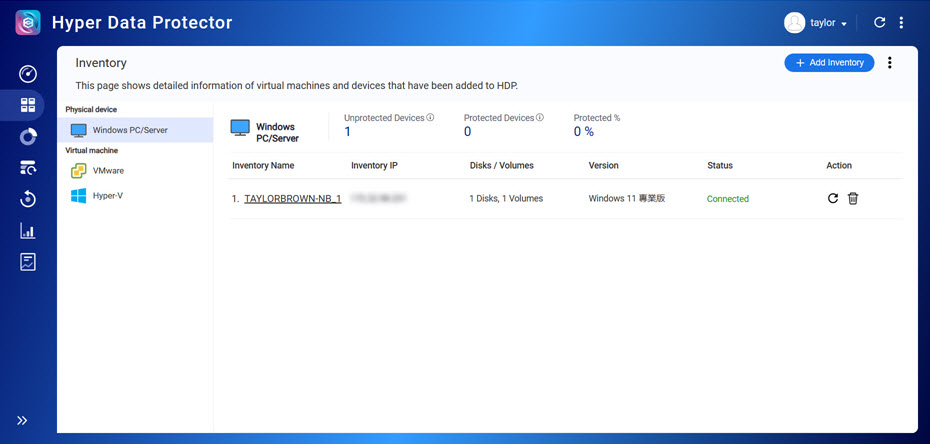
The Create Backup Job window appears.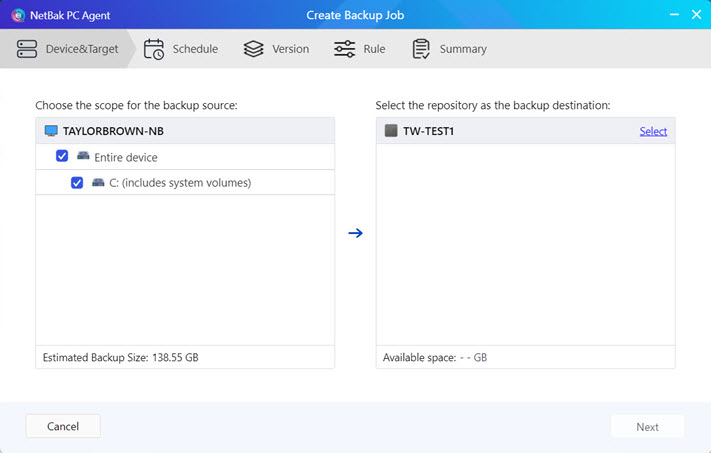
- Create a repository on your NAS.
A repository is a shared folder on your NAS where your backup data is stored.- Click Select next to your NAS device.

- Follow the remaining steps to create a repository.
- Click Next.
- Click Select next to your NAS device.
- Specify when you want the backup job to run. You can run the backup job manually at any time, automatically based on a schedule, or automatically based on a trigger event.

- Click Next and follow the remaining steps to create the backup job.
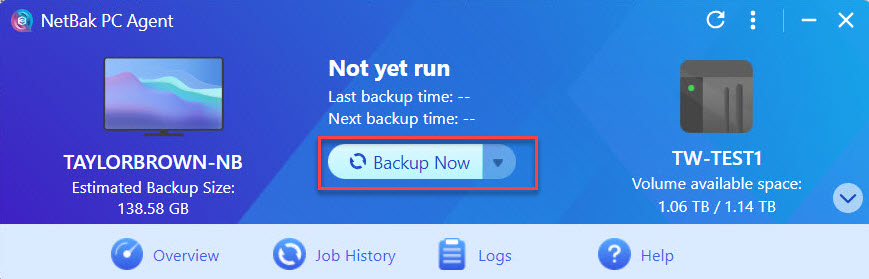
- After creating the backup job, run the backup job by clicking Backup now.WarningWhile your PC/server is being backed up:
- Your PC/server must maintain a stable network connection to your NAS.
- Do not power off, restart, or put your PC/server to sleep.
- Do not power off, restart, or put your NAS to sleep.
Create a USB boot drive
To restore your PC/server, you need to create a USB boot drive in NetBak PC Agent. A USB boot drive only needs to be created once and can be used to restore your PC/server with any backed up version of your PC/server. Backup data is not stored on the USB boot drive itself but is downloaded from HDP on your NAS during the restore process.
- Insert the USB into your PC/server.
- Open NetBak PC Agent on your Windows PC or server.
- Log in using your NAS account.
- Click
 (down arrow) on the bottom right corner and click Create USB Boot Drive.
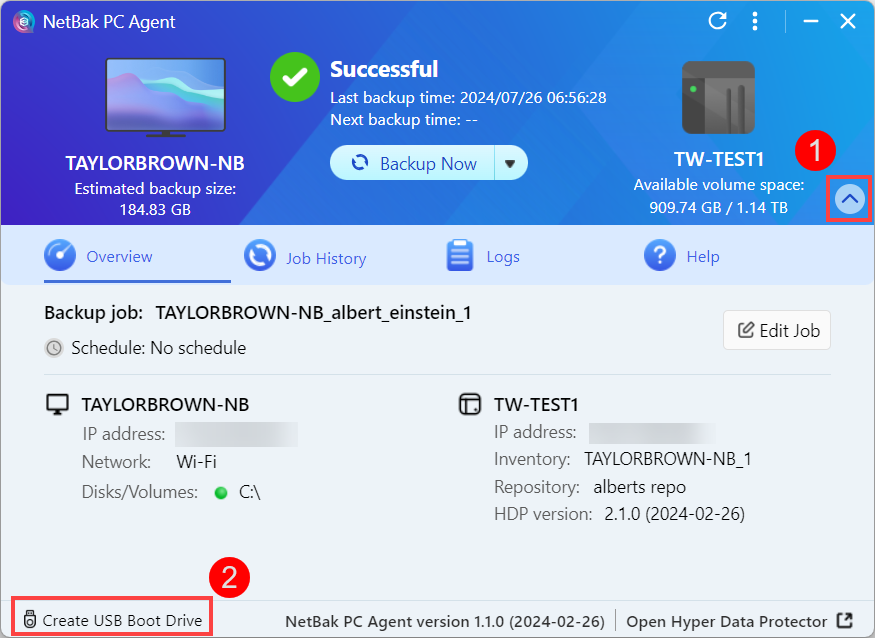 The NetBak PC Agent Recovery Media Creator window opens.
 - Under USB Drive, select your USB drive then click Next.WarningThe USB drive will be formatted and all data will be deleted. Ensure any important USB data is safely backed up before continuing.
- Follow the remaining steps of NetBak PC Agent Recovery Media Creator to create a USB boot drive.
For details, see the section "Create a USB Boot Drive" in How do I back up and restore my Windows PC or server with NetBak PC Agent?
Restore your Windows PC or server with a USB boot drive
After creating a USB boot drive, you can use the drive to restore your Windows PC/server:
- Power off your PC/server.
- Insert your USB boot drive into your PC/server.
- Power on your PC/server.
- Enter the BIOS screen. The method for entering the BIOS screen may vary depending on the manufacturer of your PC/server.TipYou can enter the BIOS screen on most devices by repeatedly pressing the F2 key before Windows finishes booting up.
- After entering the BIOS screen, configure the boot order of your PC/server so that the USB boot drive has the highest boot priority. The method for configuring the boot order may vary depending on the manufacturer of your PC/server.
- Leave the BIOS screen and continue booting up the PC/server.
- Your PC/server must maintain a stable network connection to your NAS.
- Do not power off, restart, or put your PC/server to sleep.
- Do not power off, restart, or put your NAS to sleep.
If the restore process is interrupted or fails to complete, you can repeat the steps above to try again.
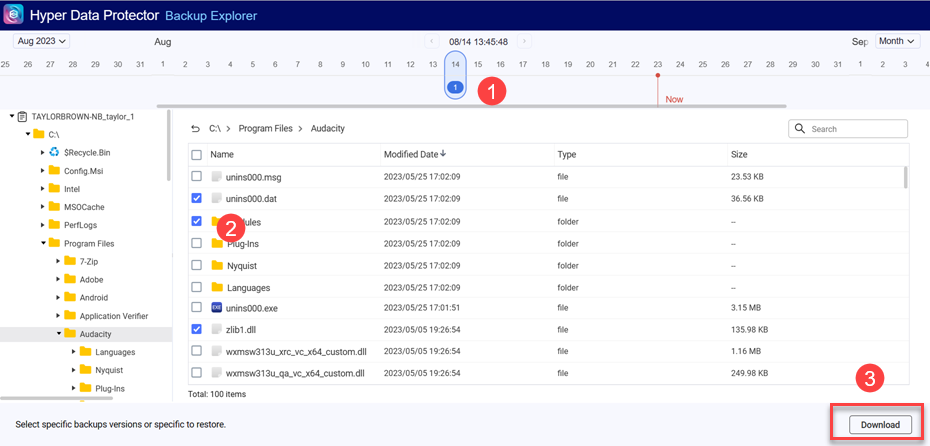
Restore files to your Windows PC or server with HDP Backup Explorer
You can use HDP Backup Explorer to restore backups of files and folders to your Windows PC/server:
- Open NetBak PC Agent on your Windows PC or server.
- Log in using your NAS account.
- Select Backup Explorer from the drop-down list.
 The HDP Backup Explorer window appears.
 - In HDP Backup Explorer, select your backup version, select the files and folders, then click Download to download the files/folders to your PC/server. You can then replace the original files/folders with the downloaded files/folders if needed.
 For more details, see the section "Restore a file or folder with HDP Backup Explorer" in How do I restore files to my Windows PC or server with HDP Backup Explorer?
Further reading and resources
- NetBak PC Agent: Official QNAP landing page for NetBak PC Agent
- Hyper Data Protector (HDP): Official QNAP landing page for Hyper Data Protector (HDP
- NetBak PC Agent Utility: Download page for NetBak PC Agent
- Knowledge Base: Searchable database of FAQs, tutorials, and web helps
- QNAP College: Instructional video tutorials
- QTS User Guide: Web help for the latest version of QTS
- QuTS hero User Guide: Web help for the latest version of QuTS hero


