How to use Surveillance Station (Local Display) in HD Station?
Overview
Surveillance Station (Local Display) on HD Station allows Turbo NAS devices to output high-resolution video from IP cameras. All the users need to do is connect their Turbo NAS to an HD-capable display via HDMI to instantly begin monitoring all of their surveillance activity. Users can control Surveillance Station (Local Display) by using a USB keyboard & mouse as well as the QNAP mobile app Qremote.
Please note: This feature is only supported by the TS-x69, TS-x51, TS-x53, TVS-x63, TVS-x63+, TS-x70, TS-x70 Pro, TVS-x71, TVS-x71U, TS-x79, TS-ECx79, TS-x79U, TVS-ECx80, TS-ECx80U, TS-ECx80 Series. (The TS-269H is not supported.)
Limitations:
- To use Surveillance Station (Local Display), you must be running the corresponding version of Surveillance Station. Click here for more details.
- Surveillance Station (Local Display) only supports software decoding and may experience performance issues if the Turbo NAS is subject to resource-intensive operations. If you encounter performance issues, please try lowering the resolution or changing the video compression to MJPG.
- Digital zoom in/out is not supported by the TS-x69 series.
- Live view and playback supports hardware decoding in the TS-x51, TS-x53, TVS-x71 and TVS-x71U series (a minimum of 4GB RAM is required.)
Contents
- Starting Using Surveillance Station (Local Display)
-
Monitoring
- Live view
- PTZ Control Panel
- Display mode
- Options
- Video Playback
Starting Using Surveillance Station (Local Display)
Please follow the below steps to set up Surveillance Station (local display)
- Make sure Surveillance Station 5.0.0 (or newer) has been installed in your App Center. Then please go to “Control Panel” > “Applications” > “HD Station”. Install the Surveillance Station from the list or manually.
- Make sure the IP cameras have been configured in the Surveillance Station and are connected to the network.
- Connect a USB keyboard & mouse to the Turbo NAS.
- Connect a monitor to the Turbo NAS via HDMI.
-
Click on the Surveillance Station (Local Display) in HD Station.

-
Please enter your User Name and Password to login.

Monitoring
Upon successfully logging in, the monitoring screen will be shown. Here you can monitor IP cameras, change the display mode, enable or disable manual recording, control the PTZ cameras, and more.

|
Event Notification
|
PTZ Control Panel
If the IP camera supports PTZ (Pan/Tilt/Zoom) you can use the control panel on the NVR to adjust the viewing angle of the IP camera. These functions are available depending on the camera model. Please consult the camera's documentation for more details. Please note that the digital zoom function will be disabled when the PTZ function is in use.
|
Display Mode
The NVR supports various display modes for monitoring. Click the correct icon to switch the display mode.
|
Options
To configure advanced monitor settings, click  .
.
The following options are provided under the ‘General’ tab.
-
Event Notification:
- When the ”Enable alert for all surveillance events” option is enabled and a surveillance event is triggered, the alert icon will be instantly shown on the monitoring page. Click on the icon to view the alert details.
- Display Order: Click ”Reset” to reprioritize the monitoring channels to the default order.

The following options are provided under the “Video” tab.
- Highlight the video window when an event is triggered: The video window will flash if an event is triggered.
- Display unauthorized channels: Select this option to show the channels that the user does not have the right to monitor.
- Display unconfigured channels: Select this option to show the channels that have not been configured.
Video Playback
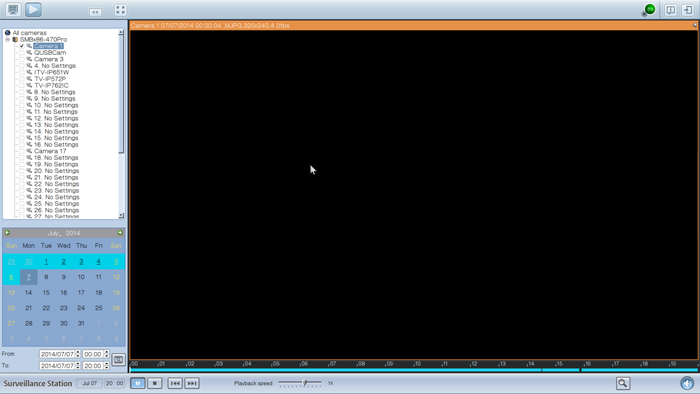
The videos on the Turbo NAS can be played on the local display. To use this feature, click ![]() on the monitoring screen. Most of the icons on the playback screen are identical to those on the monitoring screen.
on the monitoring screen. Most of the icons on the playback screen are identical to those on the monitoring screen.
|
Note: The playback access right to the IP cameras is required to play the videos. Login to the Surveillance Station using the web-based administration interface as the administrator and edit the playback access right in ”Privilege Settings”. |
-
When the playback screen is shown, select a camera channel on the left.

-
Select the date you want to play (must be underlined with blue-color background.)

-
Select the start and end time of the video and click
 to start searching. The videos that match the search criteria will be played automatically.

|
Note: The number of days between the start and end dates must be less than or equal to 2. |
Playback Settings:

Play, pause, stop, reverse play a video file, or select to play the previous or next file. When playing a video, use the scroll bar to adjust the playback speed or click the digital zoom icon to zoom in/out of the video.
Right click on the IP camera channel and select the following options:
- Full screen
- Keep aspect ratio
- Deinterlace (available on selected camera models only)
- Keep original size


 to enable or disable sequential mode. Click
  to define the time interval of which the channels will be displayed.


