


How do I back up and restore Oracle Databases running on Windows servers using HDP for PC/VM?
Applicable Products
- HDP for PC/VM
- HDP PC Agent
Starting from version 2.3.1, the product previously known as HDP has been renamed to HDP for PC/VM.
Starting from version 1.3.0, the product previously known as NetBak PC Agent has been renamed to HDP PC Agent.
Details
This guide demonstrates how to back up and restore Oracle Database servers using QNAP’s HDP PC Agent and HDP for PC/VM. These tools ensure comprehensive data protection and efficient recovery for your Oracle Database.
Back Up Oracle Database
Hyper Data Protector uses Volume Shadow Copy Service (VSS) to create data snapshots, ensuring consistency and accuracy during backups. To enable VSS backup, switch the database to ARCHIVELOG mode.
Step 1: Switch the database mode to ARCHIVELOG to perform VSS backups.
Use SQL*Plus to connect to the Oracle Database server. At the command prompt, execute the following commands with an account in the Administrator group, replacing {db_instance} with your database System Identifier (SID):
set ORACLE_SID={db_instance}
        set TWO_TASK=
        SQLPLUS /NOLOG
Enter the following commands in SQL*Plus to shut down the database:
CONNECT / AS SYSDBA
        SHUTDOWN IMMEDIATE
Enter the following commands in SQL*Plus to mount the database and enable ARCHIVELOG mode:
STARTUP MOUNT;
        ALTER DATABASE ARCHIVELOG;
        ALTER DATABASE OPEN;
Step 2: Back up Oracle Database
Create and configure a backup task for your server. Refer to these guides for assistance:
Restore Oracle Database
QNAP offers various methods for restoring Oracle Database backups. Select the method that best suits your requirements.
Restore an Entire Server
You can use Hyper Data Protector to restore the entire server to a Hypervisor or use HDP PC Agent to restore it to a physical server.
For details, refer to the Using Hyper Data Protector to Back Up Hypervisors to a QNAP NAS or HDP PC Agent Quick Start Guide.
Restore an Oracle Database
When testing or developing Oracle Database applications, or analyzing an existing Oracle Database with third-party tools, you may need to restore the database to a different server.
Follow these steps to restore the entire Oracle Database to any restore point using SPFILE, CONTROLFILE, DATAFILE, and LOGFILE.
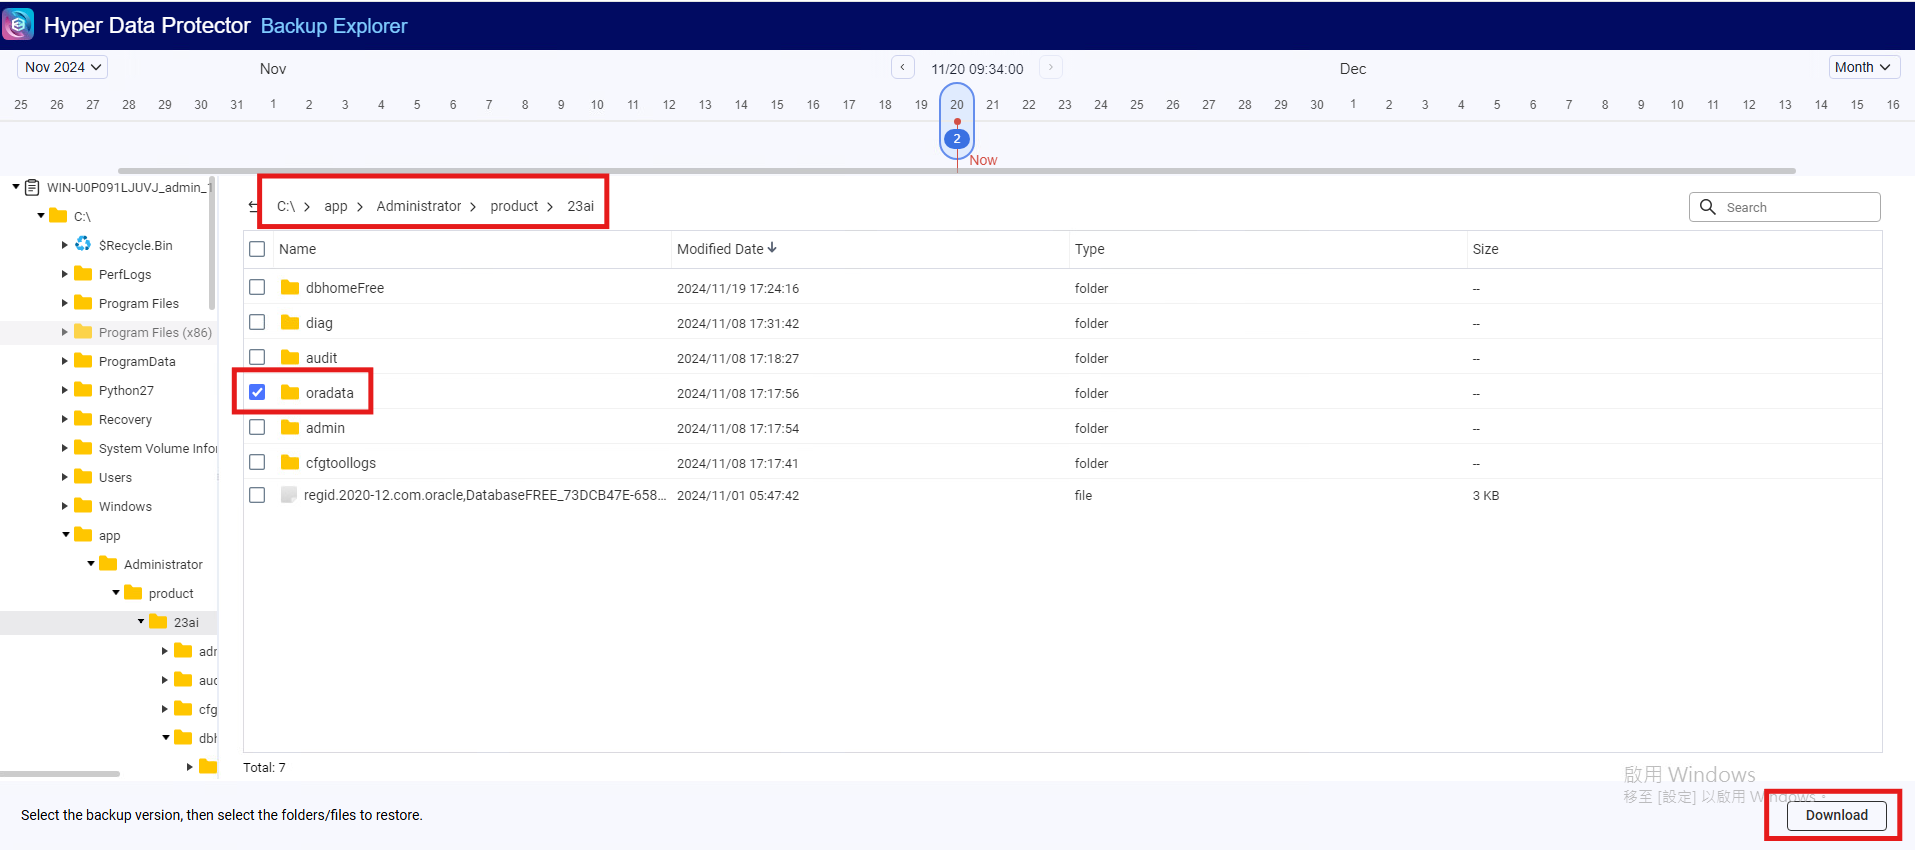
Step 1: Download Database Files
- Open the Backup Explorer in Hyper Data Protector.
- Select the database version you want to restore.
- Locate and download the required database files
Step 2: Prepare the Restoration Environment
- Install Oracle Database on the target server.
- Use the Oracle Database Configuration Assistant to create a new database {db_identifier}.
- Open a command prompt as an administrator and execute the following commands:
set ORACLE_SID={db_identifier}
SQLPLUS /NOLOG- Connect to the database using the sys account:
CONNECT SYS/{sys password} AS SYSDBA- Shut down the database:
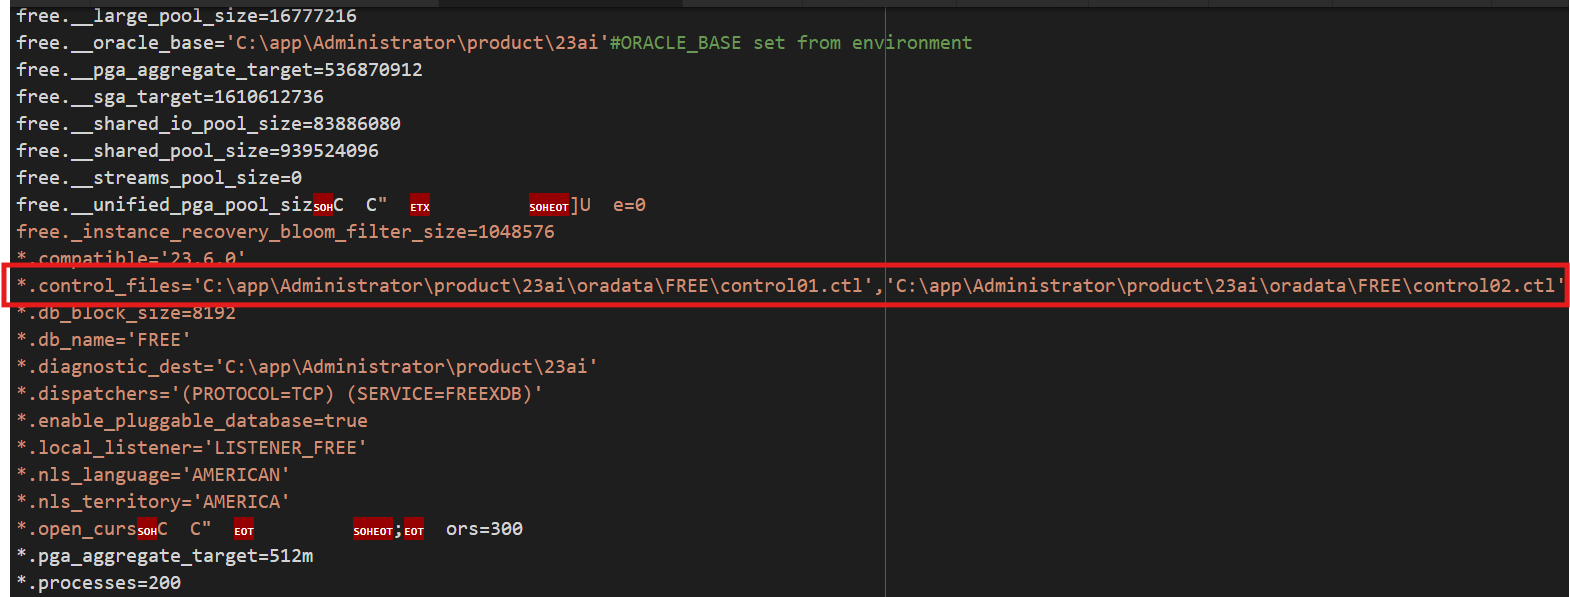
SHUTDOWN IMMEDIATE;Step 3: Locate CONTROLFILE Information
- Open the SPFILE{db_name}.ora file from the backup using a text editor.
- Locate the CONTROL_FILES parameter to find the control file paths.
*.control_files='C:\app\Administrator\product\23ai\oradata\FREE\control01.ctl','C:\app\Administrator\product\23ai\oradata\FREE\control02.ctl'Example:
Step 4: Use the Restored Files
- Mount the database in NOMOUNT mode:
STARTUP NOMOUNT;- Specify the control files in the database configuration:
ALTER SYSTEM SET CONTROL_FILES='{first_path}', -
        '{second_path}', -
        …
        '{nth_path}', -
        …
        '{last_path}' SCOPE=SPFILE;
Example:
ALTER SYSTEM SET CONTROL_FILES='C:\Netbak\CTRL\CONTROL01.CTL', 'C:\Netbak\CTRL\CONTROL02.CTL' SCOPE=SPFILE;- Stop and start the database:
SHUTDOWN IMMEDIATE;
STARTUP MOUNT;- Verify that the control file has been set to the specified control file.
SELECT name FROM v$controlfile;Example output:
SQL> SELECT name FROM v$controlfile;

        NAME
        --------------------------------------------------------------------------------
        C:\NETBAK\CTRL\CONTROL01.CTL
C:\NETBAK\CTRL\CONTROL02.CTL- Verify the paths of data and log files:
SELECT Name FROM v$datafile;
        SELECT Member FROM v$logfile;
Example output:
SQL> SELECT Name FROM v$datafile;

        NAME
        --------------------------------------------------------------------------------
        C:\APP\ADMINISTRATOR\PRODUCT\23AI\ORADATA\FREE\SYSTEM01.DBF
        C:\APP\ADMINISTRATOR\PRODUCT\23AI\ORADATA\FREE\PDBSEED\SYSTEM01.DBF
        C:\APP\ADMINISTRATOR\PRODUCT\23AI\ORADATA\FREE\SYSAUX01.DBF
        C:\APP\ADMINISTRATOR\PRODUCT\23AI\ORADATA\FREE\PDBSEED\SYSAUX01.DBF
        C:\APP\ADMINISTRATOR\PRODUCT\23AI\ORADATA\FREE\USERS01.DBF
        C:\APP\ADMINISTRATOR\PRODUCT\23AI\ORADATA\FREE\PDBSEED\UNDOTBS01.DBF
        C:\APP\ADMINISTRATOR\PRODUCT\23AI\ORADATA\FREE\UNDOTBS01.DBF
        C:\APP\ADMINISTRATOR\PRODUCT\23AI\ORADATA\FREE\FREEPDB1\SYSTEM01.DBF
        C:\APP\ADMINISTRATOR\PRODUCT\23AI\ORADATA\FREE\FREEPDB1\SYSAUX01.DBF
        C:\APP\ADMINISTRATOR\PRODUCT\23AI\ORADATA\FREE\FREEPDB1\UNDOTBS01.DBF
        C:\APP\ADMINISTRATOR\PRODUCT\23AI\ORADATA\FREE\FREEPDB1\USERS01.DBF

        SQL> SELECT Member FROM v$logfile;

        MEMBER
        --------------------------------------------------------------------------------
        C:\APP\ADMINISTRATOR\PRODUCT\23AI\ORADATA\FREE\REDO03.LOG
        C:\APP\ADMINISTRATOR\PRODUCT\23AI\ORADATA\FREE\REDO02.LOG
        C:\APP\ADMINISTRATOR\PRODUCT\23AI\ORADATA\FREE\REDO01.LOG
5. Rename the data and log file paths to their new locations:
ALTER DATABASE RENAME FILE '<old location/old file name>' TO '<new location/new file name>';Example output:
ALTER DATABASE RENAME FILE 'C:\APP\ADMINISTRATOR\PRODUCT\23AI\ORADATA\FREE\SYSTEM01.DBF' TO 'C:\Netbak\oradata\FREE\SYSTEM01.DBF';
        ALTER DATABASE RENAME FILE 'C:\APP\ADMINISTRATOR\PRODUCT\23AI\ORADATA\FREE\PDBSEED\SYSTEM01.DBF' TO 'C:\Netbak\oradata\FREE\PDBSEED\SYSTEM01.DBF';
        ALTER DATABASE RENAME FILE 'C:\APP\ADMINISTRATOR\PRODUCT\23AI\ORADATA\FREE\SYSAUX01.DBF' TO 'C:\Netbak\oradata\FREE\SYSAUX01.DBF';
        ALTER DATABASE RENAME FILE 'C:\APP\ADMINISTRATOR\PRODUCT\23AI\ORADATA\FREE\PDBSEED\SYSAUX01.DBF' TO 'C:\Netbak\oradata\FREE\PDBSEED\SYSAUX01.DBF';
        ALTER DATABASE RENAME FILE 'C:\APP\ADMINISTRATOR\PRODUCT\23AI\ORADATA\FREE\USERS01.DBF' TO 'C:\Netbak\oradata\FREE\USERS01.DBF';
        ALTER DATABASE RENAME FILE 'C:\APP\ADMINISTRATOR\PRODUCT\23AI\ORADATA\FREE\PDBSEED\UNDOTBS01.DBF' TO 'C:\Netbak\oradata\FREE\PDBSEED\UNDOTBS01.DBF';
        ALTER DATABASE RENAME FILE 'C:\APP\ADMINISTRATOR\PRODUCT\23AI\ORADATA\FREE\UNDOTBS01.DBF' TO 'C:\Netbak\oradata\FREE\UNDOTBS01.DBF';
        ALTER DATABASE RENAME FILE 'C:\APP\ADMINISTRATOR\PRODUCT\23AI\ORADATA\FREE\FREEPDB1\SYSTEM01.DBF' TO 'C:\Netbak\oradata\FREE\FREEPDB1\SYSTEM01.DBF';
        ALTER DATABASE RENAME FILE 'C:\APP\ADMINISTRATOR\PRODUCT\23AI\ORADATA\FREE\FREEPDB1\SYSAUX01.DBF' TO 'C:\Netbak\oradata\FREE\FREEPDB1\SYSAUX01.DBF';
        ALTER DATABASE RENAME FILE 'C:\APP\ADMINISTRATOR\PRODUCT\23AI\ORADATA\FREE\FREEPDB1\UNDOTBS01.DBF' TO 'C:\Netbak\oradata\FREE\FREEPDB1\UNDOTBS01.DBF';
        ALTER DATABASE RENAME FILE 'C:\APP\ADMINISTRATOR\PRODUCT\23AI\ORADATA\FREE\FREEPDB1\USERS01.DBF' TO 'C:\Netbak\oradata\FREE\FREEPDB1\USERS01.DBF';

        ALTER DATABASE RENAME FILE 'C:\APP\ADMINISTRATOR\PRODUCT\23AI\ORADATA\FREE\REDO03.LOG' TO 'C:\Netbak\oradata\FREE\REDO03.LOG';
        ALTER DATABASE RENAME FILE 'C:\APP\ADMINISTRATOR\PRODUCT\23AI\ORADATA\FREE\REDO02.LOG' TO 'C:\Netbak\oradata\FREE\REDO02.LOG';
        ALTER DATABASE RENAME FILE 'C:\APP\ADMINISTRATOR\PRODUCT\23AI\ORADATA\FREE\REDO01.LOG' TO 'C:\Netbak\oradata\FREE\REDO01.LOG';
6. Recover the database:
RECOVER DATABASE;7. Open the database:
ALTER DATABASE OPEN;By following these steps, you can successfully restore your Oracle Database to a new server or restore point using Hyper Data Protector.


