How to Configure WireGuard VPN Server and Client Settings in QuRouter
- How to Configure WireGuard VPN Server and Client Settings in QuRouter
- WireGuard
- Enabling a WireGuard VPN Server
- Adding a WireGuard VPN User
- Connecting to WireGuard on Windows 10
- Connecting to WireGuard on macOS 10.13
- Connecting to WireGuard on iOS
- Connecting to WireGuard on Android 7.0
How to Configure WireGuard VPN Server and Client Settings in QuRouter
This tutorial explains how to configure WireGuard on your QNAP router using QuRouter.
WireGuard
WireGuard is an open-source VPN protocol that uses User Datagram Protocol (UDP) for network communication. The protocol uses several cryptography tools to implement secure VPN tunneling.
Enabling a WireGuard VPN Server
- Click
 .
. 
- The QVPN Settings page appears.
- Configure the WireGuard settings.
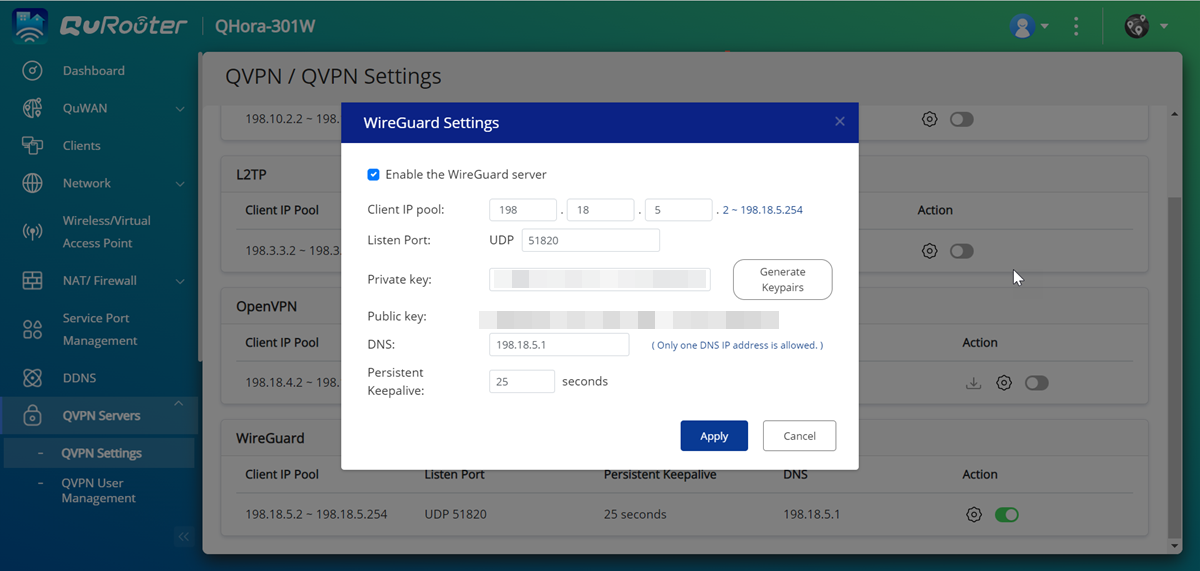
Setting
User Action
Client IP pool
Enter a fixed IP subnet for the VPN server.Important:By default, this server reserves the use of IP addresses from 198.18.7.1/24. If another connection is configured to use this range, an IP conflict error will occur. Before adding this server, ensure a VPN client is not configured to use this range as well.
Listen port
Specify a UDP port number between 1 and 65535.
Note:The default WireGuard port number is 51820.
Private key
Click Generate Keypairs to automatically populate a unique 32-byte private key.
DNS Server
Specify a DNS server for the WireGuard server.
Persistent keepalive
Specify the interval in seconds to send keepalive packets if the peer is behind a firewall.
- Configure the WireGuard settings.
- Click
 .
. A confirmation message appears.
QuRouter enables the WireGuard server.
Adding a WireGuard VPN User
- In the WireGuard section, click Add.

The Add WireGuard User page appears.

- Download the WireGuard configuration file.
- Under Actions, click
 .
. 
The Download WireGuard Configuration window appears.
- Click Download.
QuRouter downloads the WireGuard user configuration file.
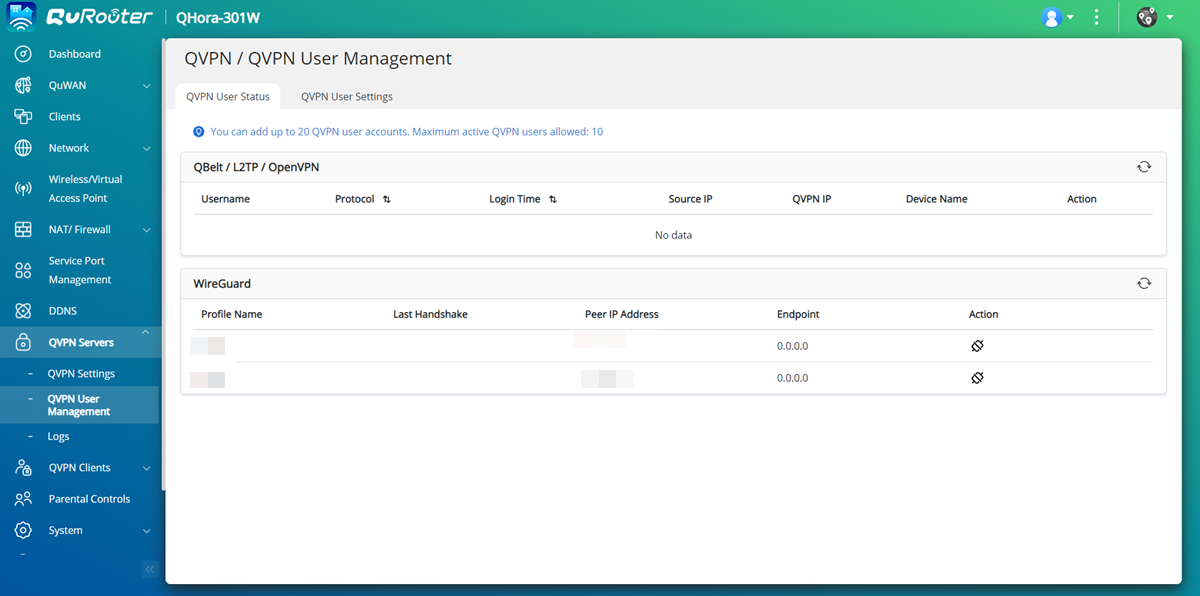
Tip:To view the user status and disconnect the VPN connection of the user, go to .
- Under Actions, click
Connecting to WireGuard on Windows 10
Download and install WireGuard from the WireGuard website.
- Click Add Tunnel.
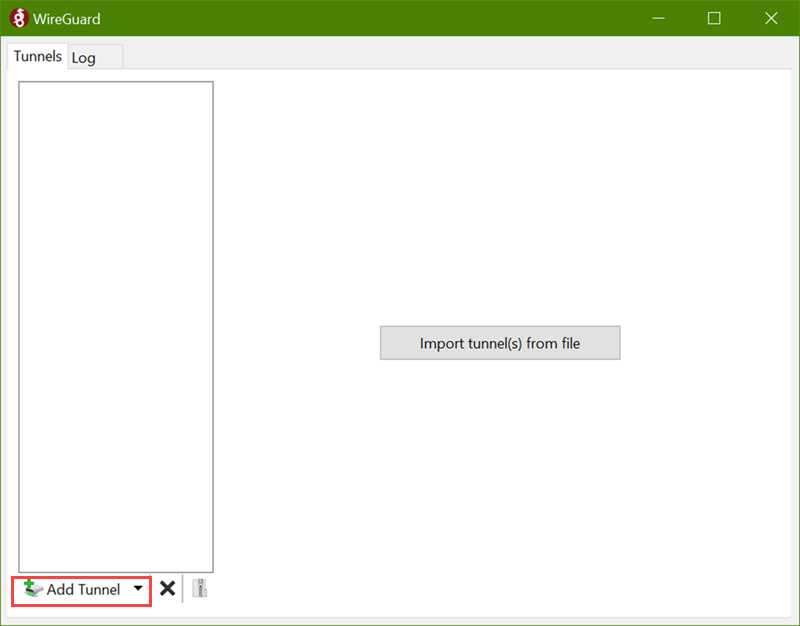
A File Explorer window opens.
- Click Open.
WireGuard uploads the configured settings.

- Click Edit to make revisions to the tunnel settings.

The Edit tunnel window appears.
- Modify the tunnel settings.
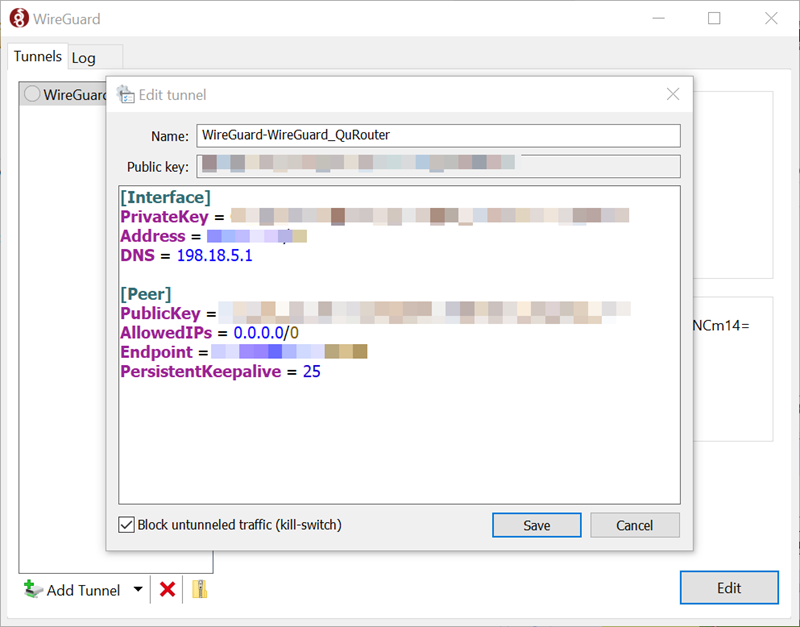
Setting
User Action
Name
Specify a name for the tunnel.
Public key
Copy the public key.
Important:Ensure that you paste the copied public key in the QVPN Service WireGuard VPN server peer settings page.
Interface
Private key
The private key is automatically generated when creating a new tunnel.
Address
Enter a IP subnet specified in the WireGuard VPN server page.
DNS Server
Specify a dedicated DNS server IP address that the WireGuard VPN client can access through the VPN tunnel.
Peer
Public key
Copy and paste the public key from the WireGuard VPN server page.
Note:The base64-encoded public key generated in the QVPN Service WireGuard VPN server page is required to authenticate both server and client.
Allowed IPs
Specify a list of addresses that are routed to the peer. Enter at least one IP subnet containing the internal IP addresses of the WireGuard connection. To allow packets from any IP subnet, enter 0.0.0.0/0.
Endpoint
Specify the IP address of the WireGuard server using the IP address:listen port format.
Example: 192.168.10.1:51820.
- Click Activate.

The WireGuard application establishes a VPN tunnel with the VPN server.

Connecting to WireGuard on macOS 10.13
Download and install WireGuard from the WireGuard website.
- Click Import tunnel(s) from file.
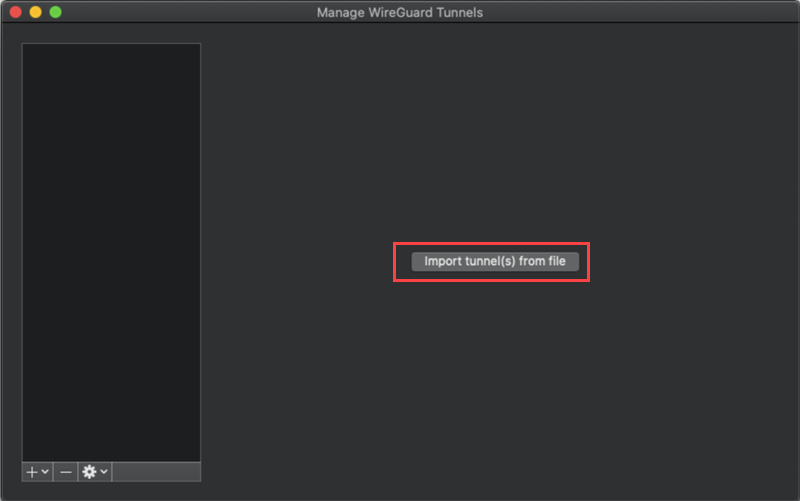
A Finder window opens.
- Click Import.
WireGuard uploads the configured settings.
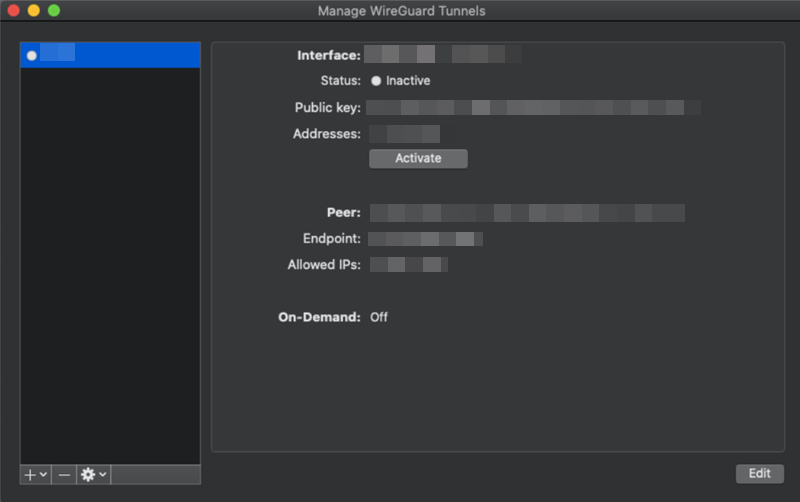
- Click Edit to make revisions to the tunnel settings.

The Edit tunnel window appears.
- Modify the tunnel settings.

Setting
User Action
Name
Specify a name for the tunnel.
Public key
Copy the public key.
Important:Ensure that you specify the copied public key in the QVPN Service WireGuard peer settings page.
On-Demand
Specify the network interface for the WireGuard connection.
Interface
Private key
The private key is automatically generated when creating a new tunnel.
Address
Enter a IP subnet specified in the WireGuard VPN server page.
DNS server
Specify a dedicated DNS server IP address that the WireGuard VPN server can access through the VPN tunnel.
Peer
Public key
Copy and paste the public key from the WireGuard VPN server page.
Note:The base64-encoded public key generated in the QVPN Service WireGuard VPN server page is required to authenticate both server and client.
Allowed IPs
Specify a list of addresses that are routed to the peer. Enter at least one IP subnet containing the internal IP addresses of the WireGuard connection. To allow packets from any IP subnet, enter 0.0.0.0/0.
Endpoint
Specify the IP address of the WireGuard server using the IP address:listen port format.
Example: 192.168.10.1:51820.
Persistent keepalive
Specify an optional interval in seconds to send keepalive packets if the peer is behind a firewall.
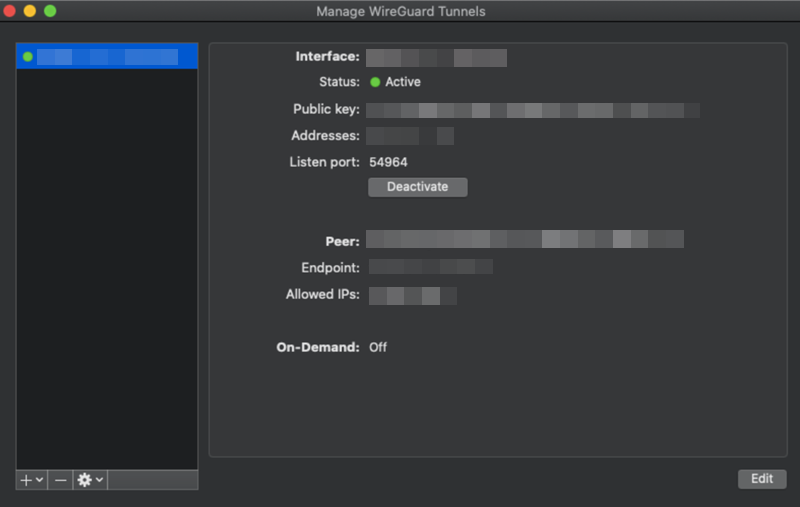
- Click Activate.

The WireGuard application establishes a VPN tunnel with the VPN server.
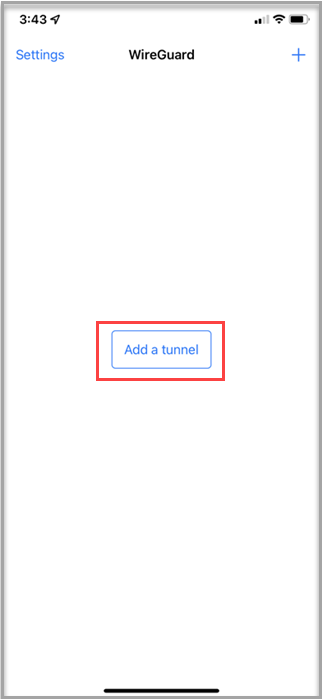
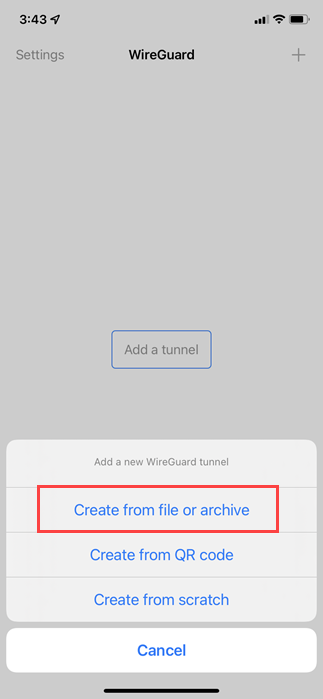
Connecting to WireGuard on iOS
Download and install WireGuard from the WireGuard website.
- Tap Add a tunnel.
- Tap Create from file or archive.
A file manager window appears.
- Select the WireGuard configuration file downloaded from QuRouter.

WireGuard uploads the configuration file.
- Tap the WireGuard configuration file.

WireGuard displays the configuration details.
- Configure the tunnel settings. Note:
Open the WireGuard user configuration file downloaded from QuRouter to specify the tunnel information on the mobile device.

Setting
User Action
Name
Specify a name for the tunnel.
Private key
Tap Generate Keypairs to automatically populate a unique 32-byte private and public key.
Public key
Copy the public key to the clipboard.
Important:Ensure that you paste the copied public key in the QuRouter WireGuard VPN server peer settings page.
Addresses
Enter a IP subnet specified in the WireGuard VPN server page.
Listen port
Specify an optional UDP port number between 1 and 65535.
Tip:To allow the application to select the listen port, leave the field blank.
MTU
Specify an optional MTU value.
Note:The recommended value is 1420.
Tip:To allow the application to select the MTU value, leave the field blank.
DNS servers
Specify a dedicated DNS server IP address that the WireGuard VPN client can access through the VPN tunnel.
- Configure the peer settings.

Setting
User Action
Public key
Copy and paste the public key from the WireGuard VPN server page.
Note:The base64-encoded public key generated in the QuRouter WireGuard VPN server page is required to authenticate both server and client.
Pre-shared key
Specify an optional key only if the pre-shared key setting has been configured on the VPN server device.
Important:Ensure that the pre-shared key is specified in both the VPN server and client configuration page to connect to the VPN tunnel.
Endpoint
Specify the IP address of the WireGuard server using the IP address:listen port format.
Example: 192.168.10.1:51820.
Allowed IPs
Specify the list of addresses that are routed to the peer.
Note:-
Enter at least one IP subnet containing the internal IP addresses of the WireGuard connection.
-
To allow packets from any IP subnet, enter 0.0.0.0/0.
Tip:To exclude private IP addresses, select Exclude private IPs.
Persistent keepalive
Specify an optional interval in seconds to send keepalive packets if the peer is behind a firewall.
On-demand activation
Select the network interface for the WireGuard connection.
-
- Beside Active, tap
 .
.
The WireGuard app establishes a VPN tunnel with the VPN server.

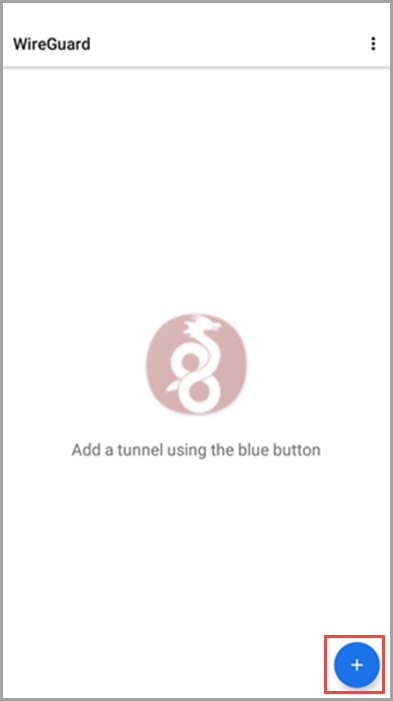
Connecting to WireGuard on Android 7.0
Download and install WireGuard from the WireGuard website.
- Tap +.
- Tap IMPORT FROM FILE OR ARCHIVE.
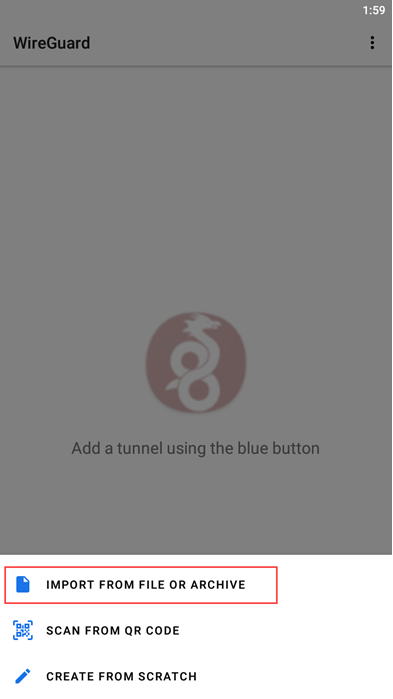
A file manager window appears.
- Tap
 .
. The WireGuard configuration page opens.
- Modify the tunnel settings. Note:
Copy the tunnel information from the WireGuard user configuration file downloaded from QuRouter.

Setting
User Action
Name
Specify a name for the tunnel.
Private key
Tap
 to generate the private key for the VPN connection.
Public key
Copy the public key.
Important:Ensure that you enter the copied public key in the QuRouter WireGuard VPN server peer settings page.
Addresses
Enter a IP subnet specified in the WireGuard VPN server page.
Listen port
Specify an optional UDP port number between 1 and 65535.
Tip:To allow the application to select the listen port, leave the field blank.
DNS servers
Specify a dedicated DNS server IP address that the WireGuard VPN client can access through the VPN tunnel.
MTU
Specify an optional MTU value.
Note:The recommended value is 1420.
Tip:To allow the application to select the MTU value, leave the field blank.
- Optional: Tap ALL APPLICATIONS.
The applications page appears.

- Tap
 .
. WireGuard creates and saves the VPN tunnel settings.
- Tap
 .
. The Connection request window appears.
WireGuard establishes a VPN tunnel with the VPN server.


