Applicable Products
Details
This tutorial explains how to create a firmware update schedule in AMIZcloud. A schedule lets you automatically deploy firmware updates to selected devices, either in batches or sequentially. You can specify the update type, timing, and frequency, skip updates when devices report alerts or warnings, and configure notifications to maintain secure and consistent firmware management across your organization.
Procedure
Create a firmware update schedule
- Log in to AMIZcloud.
- Select one of the device management modes:
 : QNAP ID device management mode
Note
In this mode, you can only manage QNAP devices that you have registered with your QNAP ID.
 : QNAP organization device management mode
- Go to Scheduled Tasks > Firmware Updates.
- Click Create.
The Site Selection window opens.Note
If you have not selected an organization after logging in to AMIZcloud, clicking Create opens the organization and site selection window.
- Select a site.
- Click OK.
The Create Firmware Update Schedule window opens. - Select one or more devices.
- Click Next.
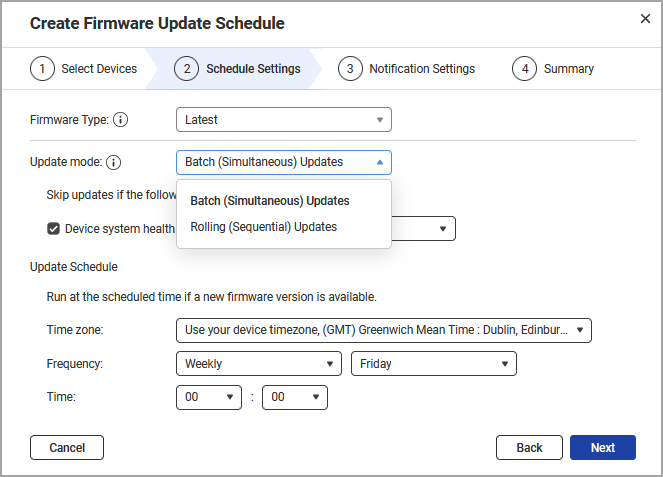
- Configure the schedule settings:
- Select a firmware type:
- Critical: Fixes critical vulnerabilities and system issues. Recommended for high-security needs.
- Quality: Includes features, enhancements, bug fixes, and security updates, tested for maximum stability.
- Latest: Provides the newest features, enhancements, bug fixes, and security updates for early adopters.
- Select an update mode:
- Batch (Simultaneous) Updates: Updates all selected devices at once.
- Rolling (Sequential) Updates: Updates devices one by one to minimize downtime.
- Optional: Configure the update priority for the selected devices.
- Click Set Update Priority.
The Set Update Priority window opens. - Choose how device priority is determined for rolling updates:
- Reset device priority order: Click Restore Default to reset the device priority order to the system-defined default for rolling updates, discarding any manual changes.
- Manually assign device priority order: Manually define the sequence in which devices are updated during rolling updates.
To manually adjust device priority, you can either click and drag the priority control, or select a device and, under Action, click  > Move to Top or Move to Bottom, then click Apply.
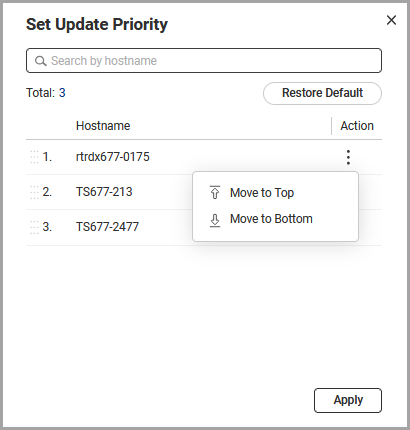
- Optional: Enable Device system health status is as follows to skip updates if a device reports the following conditions:
- Optional: Enable If a device update fails, skip the remaining devices in the schedule.
Note
This option appears only if you select Rolling (Sequential) Updates as the update mode. When enabled, if an update fails on a device, the schedule will skip updating the remaining devices in the sequence.
This helps prevent potential issues from affecting other devices and allows you to investigate the failure before continuing.
- Enable Pause updates if a device's health status degrades after updating.
Note
This option appears only if you select Rolling (Sequential) Updates as the update mode. When enabled, AMIZcloud pauses the firmware update schedule if a device shows degraded health after updating.
Devices continue to update one by one at the predefined interval set in the schedule.
- Schedule the update to run at a specific time only when a new firmware version is available:
- Select a time zone for the update schedule.
- Choose the frequency of the updates.
- Specify the time when the update should run.
- Click Next.
The Notification Settings page appears. - Configure notification recipients.
- Select one or more email recipients.
- Click Next.
- Specify a name for the schedule.
- Optional: Add a description.
- Review the schedule settings.
- Click Create.
The Create Firmware Update Schedule window appears. - Enter your QNAP ID password to confirm the schedule settings.
- Click Verify.
AMIZcloud verifies the account password, and creates the firmware update schedule.
Manage firmware update schedules
After creating a firmware update schedule, you can view and manage all schedules from the Firmware Updates page, including enabling or disabling schedules, removing schedules, and reviewing update history.
The following table describes the available schedule management tasks.
| Task | User Action |
|---|
| Remove one or more schedules | - Next to the schedule name, click
 . . - Click Action, and then click Remove schedule.
The Remove schedule window appears. - Click OK.
Note You can also delete individual schedules by clicking Action > > Remove.
|
| Disable a schedule | - Identify a schedule.
- Under Status, click
 . .
|
| View firmware update schedule history | - Identify a schedule.
- Under Action, click
 . .
AMIZcloud displays the schedule history.
|
| Run a scheduled firmware update immediately | - Identify a schedule.
- Under Action, click Update Now.
AMIZcloud immediately starts updating the firmware for all devices in the schedule.
|
| Edit an existing schedule | - Identify a schedule.
- Under Action, click Edit.
The Edit Firmware Update Schedule window appears. - Configure the schedule settings.
- Click Apply.
|
適用產品
詳細資訊
本教學說明如何在 AMIZcloud 中建立韌體更新排程。排程可讓您自動將韌體更新部署至選定的設備,無論是批次或依序進行。您可以指定更新類型、時間和頻率,當設備報告警示或警告時跳過更新,並配置通知以維持安全且一致的韌體管理。
程式
建立韌體更新排程
- 登入 AMIZcloud。
- 選擇其中一種裝置管理模式:
- :QNAP ID 裝置管理模式
註
在此模式下,您只能管理已使用您的 QNAP ID 註冊的 QNAP 裝置。
- :QNAP 組織裝置管理模式
- 前往Scheduled Tasks > 韌體更新。
- 按一下Create。
隨即開啟Site Selection 視窗。註
如果您在登入 AMIZcloud 後尚未選擇組織,按一下 Create 會開啟組織和站點選擇視窗。
- 選擇一個站點。
- 按一下OK。
隨即開啟Create 韌體更新 Schedule視窗。 - 選擇一個或多個裝置。
- 按一下 下一步。
- 配置排程設定:
- 選擇韌體類型:
- 重要:修復重要漏洞和系統問題。建議用於高安全性需求。
- 品質:包含功能、增強、錯誤修復和安全更新,經過最大穩定性測試。
- 最新:提供最新功能、增強、錯誤修復和安全更新,適合早期採用者。
- 選擇更新模式:
- 批次(同步)更新:一次更新所有選定的裝置。
- 迴圈(順序)更新:逐一更新裝置以減少停機時間。
- 選擇性:設定選定裝置的更新優先順序。
- 按一下設定更新優先順序。
設定更新優先順序視窗隨即開啟。 - 選擇如何決定迴圈更新的裝置優先順序:
- 重設裝置優先順序:按一下 恢復預設 以重設裝置優先順序為系統定義的迴圈更新預設值,捨棄任何手動更改。
- 手動分配裝置優先順序:手動定義裝置在循環更新期間的更新順序。
若要手動調整裝置優先順序,您可以按一下並拖曳優先順序控制項,或選擇裝置,然後在動作下,按一下> 移至頂部或移至底部,然後按一下套用。
- 選擇性:啟用 裝置系統健康狀態如下 以跳過更新如果裝置報告以下情況:
- 選擇性:啟用 如果裝置更新失敗,則跳過排程中的剩餘裝置。
註
此選項僅在您選擇滾動(順序)更新作為更新模式時出現。啟用後,如果某設備更新失敗,排程將跳過序列中剩餘設備的更新。
這有助於防止潛在問題影響其他設備,並允許您在繼續之前調查失敗原因。
- 啟用如果裝置的健康狀態在更新後下降,則暫停更新。
註
此選項僅在您選擇滾動(順序)更新作為更新模式時出現。啟用後,如果某設備在更新後顯示健康狀態下降,AMIZcloud 將暫停韌體更新排程。
設備將在排程中設定的預定間隔逐一更新。
- 僅在有新韌體版本可用時,安排更新在特定時間運行:
- 選擇更新排程的時區。
- 選擇更新的頻率。
- 指定更新應執行的時間。
- 按一下下一步。
顯示通知設定頁面。 - 配置通知接收者。
- 選擇一個或多個電子郵件接收者。
- 按一下下一步。
- 指定排程的名稱。
- 選填:新增說明。
- 檢查排程設定。
- 按一下建立。
顯示建立韌體更新 排程視窗。 - 輸入您的 QNAP ID 密碼以確認排程設定。
- 按一下驗證。
AMIZcloud 驗證帳戶密碼,並建立韌體更新排程。
管理韌體更新排程
建立韌體更新排程後,您可以從韌體更新頁面檢視和管理所有排程,包括啟用或停用排程、移除排程及檢視更新歷史。
下表描述了可用的排程管理任務。
| 任務 | 使用者操作 |
|---|
| 移除一個或多個排程 | - 在排程名稱旁按一下。
- 按一下動作,然後按一下移除排程。
移除排程視窗隨即顯示。 - 按一下確定。
註 您也可以按一下來刪除個別排程 動作 > > 移除。
|
| 停用排程 | - 識別排程。
- 在狀態下按一下。
|
| 查看韌體更新排程歷史 | - 識別排程。
- 在動作下按一下。
AMIZcloud 顯示排程歷史。
|
| 立即執行排程的韌體更新 | - 識別排程。
- 在動作下按一下立即更新。
AMIZcloud 立即開始更新排程中所有裝置的韌體。
|
| 編輯現有排程 | - 識別排程。
- 在動作下按一下編輯。
編輯韌體更新排程視窗隨即顯示。 - 設定排程。
- 按一下套用。
|


