How to get authentication credentials for adding a Microsoft 365 Domain to HDP for SaaS
Starting from version 2.4, the product previously known as Boxafe has been renamed to HDP for SaaS.
How to get authentication credentials for adding a Microsoft 365 domain to HDP for SaaS?
This tutorial will guide you through how to register a Microsoft Azure Active Directory (AD) application and generate a certificate for authorizing HDP for SaaS to back up Microsoft 365 domain data. Additional instructions are provided in this tutorial on how to obtain API access permissions to back up Microsoft Teams and SharePoint Sites data in HDP for SaaS.
Requirements
| Category | Requirements |
|---|---|
| Hardware | A computer |
| Software |
|
Generating a Microsoft 365 Tenant ID, Client ID, and Certificate
- Power on your computer.
- Log in to Windows.
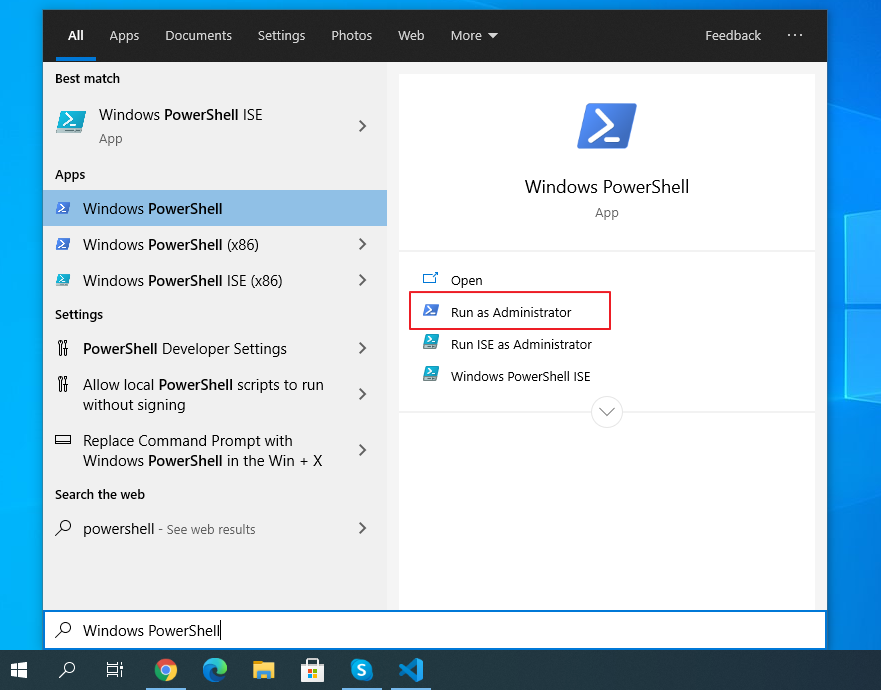
- Open PowerShell.
- Click Start.
- Search for PowerShell.
- Choose Windows PowerShell.
 Tip:
Tip:Make sure you do not select Windows PowerShell (x86).
- Select Run as Administrator.
- Modify the execution policy by running the following command in PowerShell:
Set-ExecutionPolicy -ExecutionPolicy RemoteSigned -Scope ProcessTipFor details about PowerShell execution policy, see about_Execution_Policies.A confirmation message appears.
- Enter Y or Yes.
The PowerShell execution policy is modified.

- Download the BoxafeAppGenerator.ps1 PowerShell script and follow the instructions below:
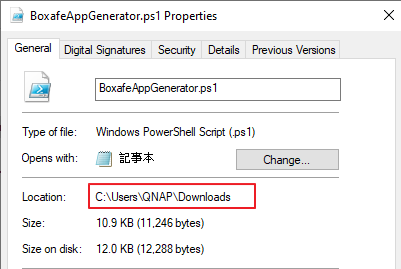
- Right-click on the BoxafeAppGenerator.ps1 file.
A drop-down menu appears.
- Select Properties.
The BoxafeAppGenerator.ps1 Properties page appears.
- Go to General.
- Copy the file Location details.
- Paste the file location into the value in the following command:
cd <file_location>For example, if your location is C:\Users\QNAP\Downloads, then the command will become: cd C:\Users\QNAP\Downloads
Opens the file location folder in PowerShell.

- Run the PowerShell script based on your Microsoft 365 domain region. For details, see the following table:
Domain Region
Command
Microsoft 365 Global
.\BoxafeAppGenerator.ps1 -AzureEnvironmentName AzureCloudMicrosoft 365 operated by 21 Vianet (China)
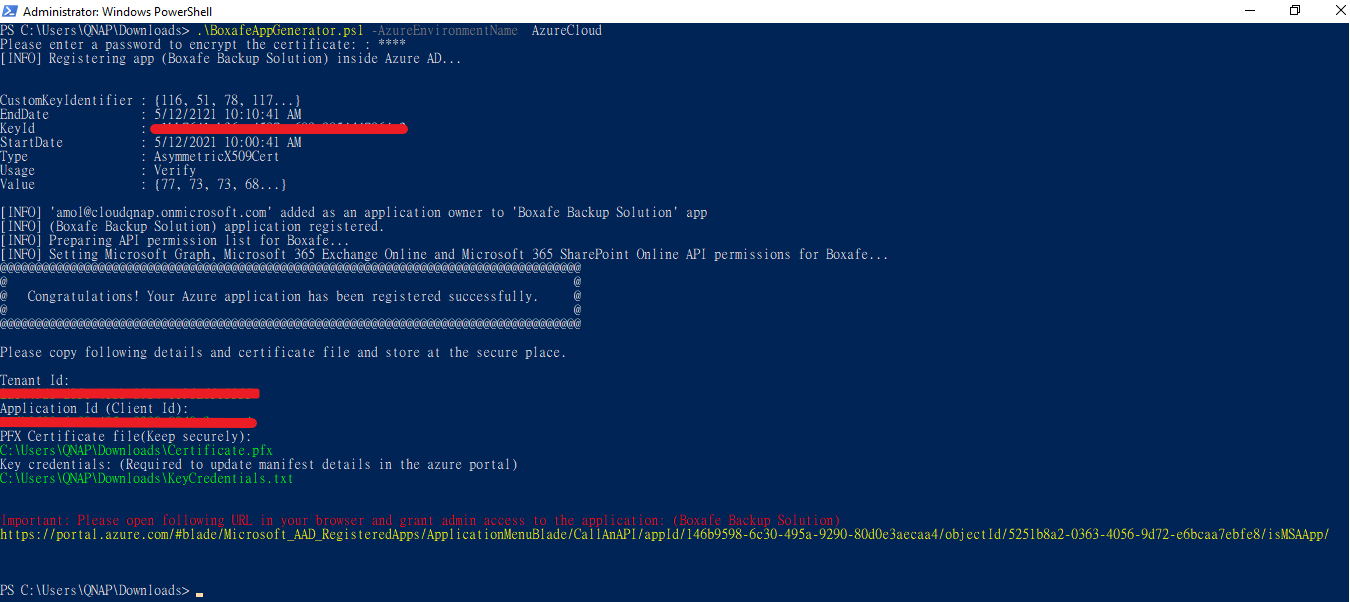
.\BoxafeAppGenerator.ps1 -AzureEnvironmentName AzureChinaCloudA certificate password configuration message appears.

- Right-click on the BoxafeAppGenerator.ps1 file.
- Specify a certificate password.
- Press Enter.
A new certificate password is configured and the Microsoft Single Sign-On (SSO) window appears.

- Log in to Microsoft 365 as an administrator.
- HDP for SaaS is registered as a new application in Microsoft Azure AD.WarningDo not close the window, you will need to return to the window later to complete Microsoft 365 authentication.
- The Microsoft 365 tenant ID, client ID, and PFX certificate are generated and displayed in the PowerShell window.
 WarningDo not close the PowerShell window or log out, you will need to return to the platform later to complete Microsoft 365 authentication.
- HDP for SaaS is registered as a new application in Microsoft Azure AD.
- Go to the PowerShell window.
- Copy and save the Tenant Id, Application Id (Client Id), and PFX Certificate file (Keep securely).TipKeep the Microsoft 365 authentication credentials safe. You will need the tenant ID, application ID (client ID), and PFX certificate to add the domain into HDP for SaaS.
- Copy the generated URL shown at the bottom of the PowerShell window.

- Open the URL in a browser.
The HDP for SaaS Backup Solution API permissions window appears.
- Select Grant admin consent for QNAP Systems Inc.
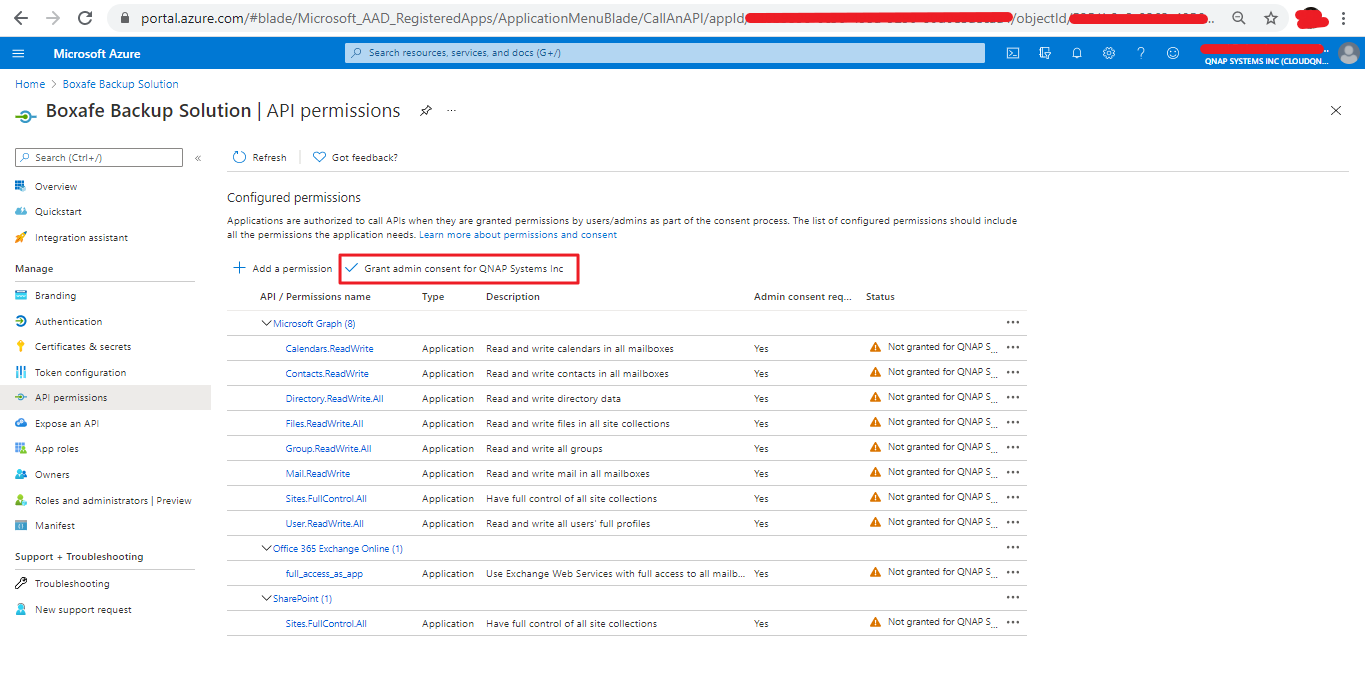
The HDP for SaaS is authorized to access your Microsoft 365 domain data.
Granting Microsoft 365 Tenant Administrative Permissions for SharePoint Sites
- You can skip this section if you do not need to back up Microsoft SharePoint site data in HDP for SaaS.
- You must obtain the Microsoft 365 Client ID, Tenant ID, and PFX Certificate before adding a SharePoint site to HDP for SaaS. For details, see Generating a Microsoft Azure Client ID and Tenant ID.
- The Microsoft 365 tenant administrative permissions are only required when adding a SharePoint site to HDP for SaaS for backup. The permissions are not required when adding Microsoft 365 domains to HDP for SaaS.
- Log in to the Microsoft Azure admin portal.NoteYou must have Global admin credentials to log in to the Microsoft 365 domain.
- Go to Overview.
- Copy the Application (client) ID you obtained from Generating a Microsoft 365 Tenant ID, Client ID, and Certificate.
- Insert the tenant name into the following link: https://[tenant]-admin.sharepoint.com/_layouts/15/appinv.aspxNote:
The [tenant] name is the subdomain of your SharePoint Site. For example cloudqnap.sharepoint.com is the URL of your SharePoint site and cloudqnap is the tenant name.

- Open the link in the browser.
- Paste the ID into the App Id field.
- Click Lookup.
The app title is generated.
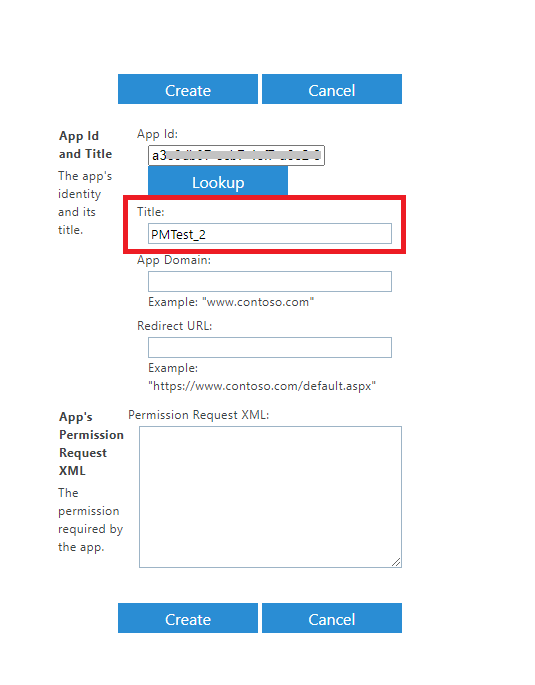
- Enter the following information in the related fields:
Fields
Information
App Domain:
localhost
Redirect URL:
https://localhost
App's Permission Request XML:
<AppPermissionRequests AllowAppOnlyPolicy="true"> <AppPermissionRequest Scope="http://sharepoint/content/tenant" Right="FullControl"/> </AppPermissionRequests> - Click Create.
A confirmation message appears.
- Click Trust It.
The Microsoft 365 tenant administrative permissions are granted to the SharePoint site.
Adding a Microsoft 365 Domain
- Open HDP for SaaS.
- Go to Domains.
- Click Add New Domain.
- Obtain a Microsoft 365 authentication.
For details, see Generating a Microsoft 365 Tenant ID, Client ID, and Certificate.
- Specify the following fields:
- Microsoft 365 endpoint
- Domain admin email address
- Directory (tenant) ID
- Application (client) ID
- Certificate file
- Certificate password
- Click Authorize.
- Optional: Select which Microsoft 365 services to back up.
- Select the users to add.
Option
Description
Auto
Automatically synchronize with Microsoft 365 and add new users to HDP for SaaS.
Manual
Manually add users to HDP for SaaS.
- Select the SharePoint sites to add.
Option
Description
Auto
Automatically synchronize with Microsoft 365 and add new sites for scheduled backup.
Manual
Manually add sites for scheduled backup.
- Select the Microsoft Teams to add.
Option
Description
Auto
Automatically synchronize with Microsoft 365 and add new Microsoft Teams for scheduled backup.
Manual
Manually add Microsoft Teams for scheduled backup.
- Click Next.
- Select the scope of the backup schedule.
Option
Description
All Applications
The backup schedule will apply to all applications.
Individual Applications
You can configure a different backup schedule for each application.
- Configure the backup schedule.
- Optional: Select an application to configure a backup schedule.Note:
This option is only available if you selected Individual Applications in the previous step.
- Select a backup schedule policy.
Backup Type
User Actions
Continuous
- Specify the start date.
- Select Stop backup on and specify a date.
TipThe system automatically creates a backup task for continuous backup.Manual
No backup schedule is created. This option is not available when backing up email.
Scheduled
- Specify the backup interval.
- Specify the start date and time.
- Select Stop backup after and specify a date.
- Optional: Select Delete older versions of backed up data after, and specify a period.
- Optional: Select an application to configure a backup schedule.
- Click Add.
HDP for SaaS adds the domain with the configured settings and backup schedule.


