QNAP ES NAS Backup using Veeam Backup & Replication
Overview
For enterprise users, storage always plays an important role. To provide uninterrupted service for information system, companies should build backup mechanisms for their IT environment.
Our QNAP ES NAS has a backup mechanism called “SnapSync”. For the instructions, see this application note:
Remote replicate iSCSI LUN and Shared Folder using SnapSync on QNAP Enterprise Storage
Third-party backup solutions are also available for QNAP ES NAS (including Symantec BE, Veeam, and NAKIVO). Veeam Backup & Replication provides backup, restore and replication functionality for virtual machines that use VMware vSphere and Microsoft Hyper-V hypervisors.
Veeam Backup & Replication is positioned as a part of the Veeam Availability Suite bundle (which includes Veeam ONE for monitoring, reporting and capacity planning), but can also be installed as a standalone product. It is available in three editions based on the level of provided functionality. The product is licensed by the number of CPU sockets purchased.
This document is a step-by step guide for using Veeam Backup & Replication deployment on a QNAP ES NAS storage system.
Before starting
Definition:
- Veeam BR stands for Veeam Backup & Replication
Note:
- This application note has been written and tested using Veeam BR 9.5 with Windows Server 2012R2 (A virtual machine on VMware ESXi 6.5), in an Active Directory environment for accessing the shared folders & iSCSI LUN.
- This application note describes the connection between Veeam BR and a QNAP NAS. It does not describe the full usage of the backup software.
- In this application note we use a domain called ‘axellab.local’. This is an example should be changed to match your domain information.
- Consult the Veeam BR 9.5 documentation for more information regarding its specific functions.
- Ensure that your QNAP NAS uses the most up-to-date firmware and application versions.
Minimal configuration:
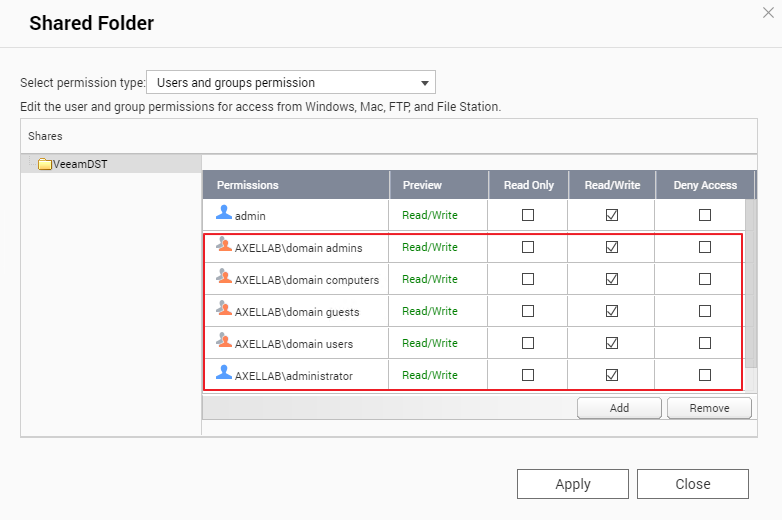
- Assign read/write access right of the shared folder to domain accounts (If Veeam BR mounted ES NAS datastore through domain accounts).
- Veeam BR services on the Windows server must run with the same domain user account used for the shared folder on the NAS, with administrative privileges on that server.
- You have the DNS entry of your NAS on the DNS server.
- The Windows server with BR is the client of the correct DNS server: your domain DNS server.
- The DNS suffix has been correctly set up in the Windows server with Veeam BR.
- If necessary, you can use an iSCSI drive and a shared folder to store the backups from Veeam BR.
Architecture

Veeam BR architecture is composed of three parts:
- A central backup server (Veeam BR Server): It controls and manages the backup source and destination.
- VM Backup source: It can be a server, PC, virtual machine or datastore of the ES NAS.
- VM Backup destination: It can be the backup server itself or network storage connected by iSCSI or Microsoft Networking.
Veeam Backup & Replication 9 for Windows can be used with QNAP ES NAS:
- To backup data to QNAP ES NAS
- To restore data from QNAP ES NAS
System configuration
In our demonstration, the following configuration is used:
- Storage device: QNAP ES NAS series with QES 2.0.0 (or later).
- ESXi hosts: VMware vSphere ESXi 6.5
- Veeam BR Server: Windows server 2012 R2 64-bit (Virtual machine on vSphere ESXi)
| Server Network Settings | ||
|---|---|---|
| Setting | Value | Description |
| AD server IP | 192.168.8.10 | Active Directory server (axellab.local) |
| vCenter server IP | 192.168.8.23 | vCenter server 6.5 |
| ESXi 1 host | 192.168.8.24 | ESXi Server in cluster1 |
| ESXi 2 host | 192.168.8.25 | ESXi Server in cluster1 |
| Storage Network Settings (Site A) | ||
|---|---|---|
| Setting | Value | Description |
| SCA Management IP | 192.168.8.40 | Management IP of controller A |
| SCA Ethernet1 IP | 10.10.8.40 | Data port 1 IP of controller A |
| SCA Ethernet2 IP | 10.10.12.40 | Data port 2 IP of controller A |
| SCB Management IP | 192.168.8.41 | Management IP of controller B |
| SCB Ethernet1 IP | 10.10.8.41 | Data port 1 IP of controller B |
| SCB Ethernet2 IP | 10.10.12.41 | Data port 2 IP of controller B |
| Backup source pool | VeeamSRC | RAID 0 pool at controller A |
| Backup destination pool | VeeamDST | RAID 10 pool at controller B |
| iSCSI LUN1 | VeeamSRC | iSCSI LUN for production VM on VeeamSRC pool |
| Shared Folder | VeeamDST | VM Backup destination datastore on VeeamDST pool |
Configuring the Veeam BR
You need a client PC to install Veeam BR (Veeam BR Server). We created a virtual machine based on VMware vSphere ESXi (the configuration of the Veeam BR server is in the below table). The BR services on the Windows server must run with the same domain user account used for the shared folder on the NAS, with administrative privileges on that server.
In our case the domain is “axellab.local”.
| Veeam BR Server information | |||||
|---|---|---|---|---|---|
| Operating System | Windows server 2012 R2 - 64-bit (Virtual machine) | ||||
| FQDN Name | VeeamA.axellab.local | ||||
| CPU/RAM | Intel Xeon CPU E3-1220 v3 3.10GHz (2 processors) / 8.00 GB | ||||
| Network Setting | IP Address | Subnet | Gateway | DNS | |
| Internet port | 192.168.8.51 | 255.255.248.0 | 192.168.8.1 | 192.168.8.10 | |
| Data port1 | DHCP | 255.255.252.0 | - | - | |
| Data port2 | DHCP | 255.255.252.0 | - | - | |
Installing Veeam BR
- Start your Veeam BR 9.5 installation image. Click “Install”.

- Read and accept the license agreement. Click “Next”.

- Click “Browse” and select your Veeam BR license file. Click “Next”.

- Click “Browse” to select the install location. Click “Next”.

- Veeam BR will check your system configuration. If your system does not meet minimum requirements, click “Install” to deploy missing feature. When all the statuses as listed as “Passed”, click “Next”.

- Click “Install”. The installation process will take some time. When the “Installation succeeded” window is displayed, click “Finish” to complete the Veeam BR installation.


- Start Veeam BR 9.5 and enter the backup server name or IP address, backup service port number, and the user log in credentials. Click “Connect”. In this example we use “localhost”.

- You will log in and see the following interface.

QNAP ES NAS setting
VM source datastore configuration:
The VM source datastore is where the production virtual machine is stored. In our example we named it “VeeamSRC”.
Although it is difficult to change the basic VM architecture, we recommend using iSCSI LUN as the VM source datastore.
- It is recommended to set the virtual machine's virtual disk type to “Thick Provision” to attain higher backup and restore performance. Reference: Veeam official website
- iSCSI LUNs will help improve the backup performance of Veeam proxy server. (See: Details will be elaborated).

VM destination datastore configuration:
In our example we named the VM destination datastore mounted on Veeam BR server “VeeamDST”. VeeamDST is used to store the VM backup data of Veeam.
Before connecting the datastore from the ES NAS to the Veeam BR server, we must create an iSCSI LUN or shared folder (recommend) on the ES NAS for backup files. For more information, read the following application note: Set up a VMware ESXi Datastore via NFS with QNAP Enterprise-Class ES NAS
Recommended settings for the shared folder:
- Veeam recommends using RAID 10 for the backup destination pool to improve backup speed. Reference Link: Veeam official website
- We recommend using a shared folder for the backup destination datastore.
- It is recommended to disable deduplication and compression on the target share on the ES NAS to improve I/O performance.
- It is not recommended for the target share on the ES NAS to exceed 90% capacity of the Pool. The pool will have randomly-allocated capacity when the pool is almost full, resulting in low performance.
Refer to the below table and image for an example VM DST datastore configuration.
| VM source datastore configuration | ||||
|---|---|---|---|---|
Storage |
Name |
RAID type |
Capacity |
Description |
Pool |
VeeamDST |
RAID 10 |
5.08 TB |
VM destination pool at controller B. |
Shared |
VeeamDST |
None |
3.50 TB |
VM DST datastore at pool “VeeamDST”. |

Connect to the ES NAS shared folder using Veeam BR server
To use Veeam BR with the shared folders on QNAP NAS, you need to:
- Create a shared folder on the NAS to store the backup data.
- Assign read/write access rights of the shared folder to domain accounts (If Veeam BR mounted ES NAS datastore through domain accounts).
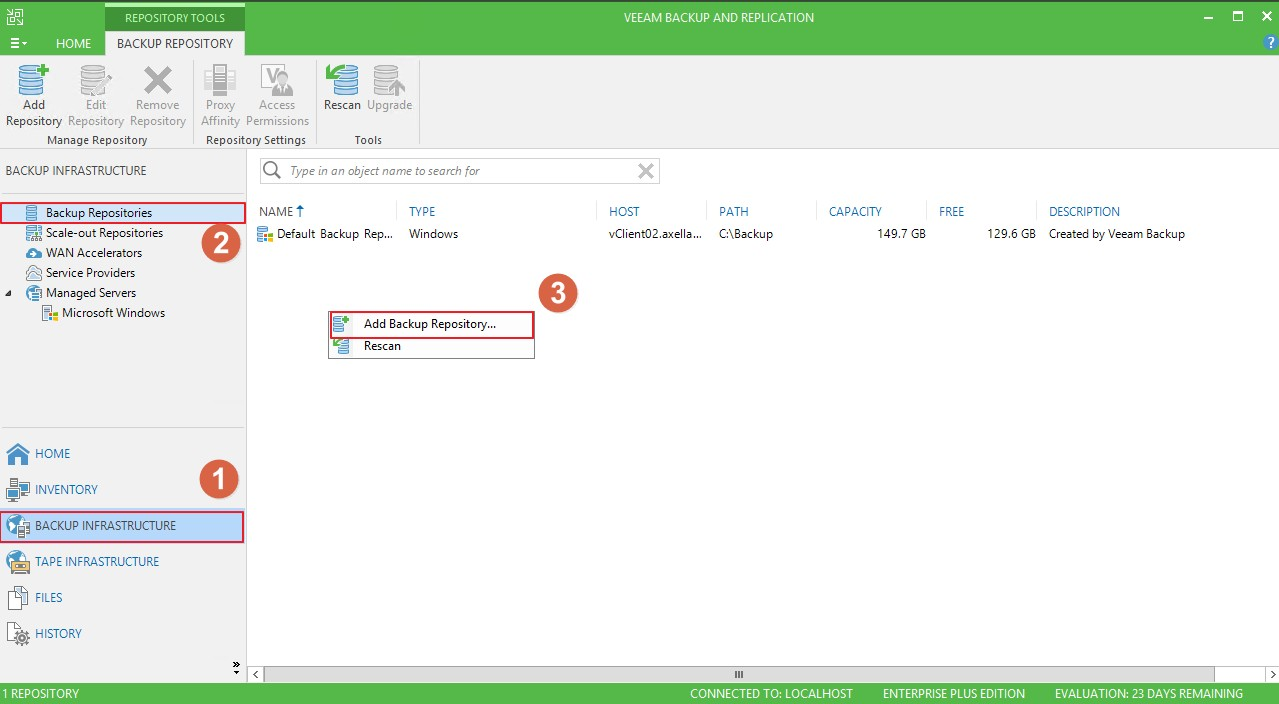
- Open Veeam BR. Click “BACKUP INFRASTRUCTURE”, select “Backup Repositories”, right-click in the right window, and select “Add Backup Repository...”.
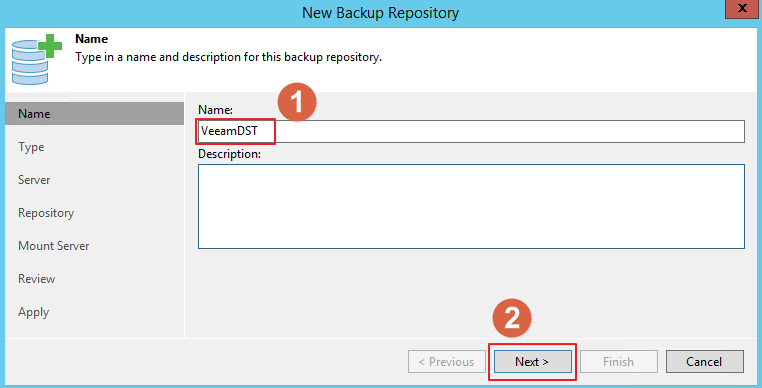
- Enter a name for the datastore. Click “Next”.
-
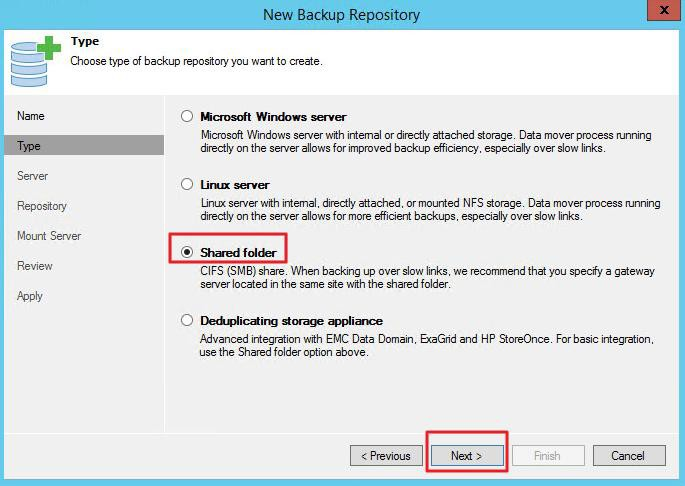
Select “Shared Folder”. Click “Next”.
- Enter the shared folder path and select “Automatic selection” for the Gateway server. Enable “This share requires access credentials” and click “Add”.
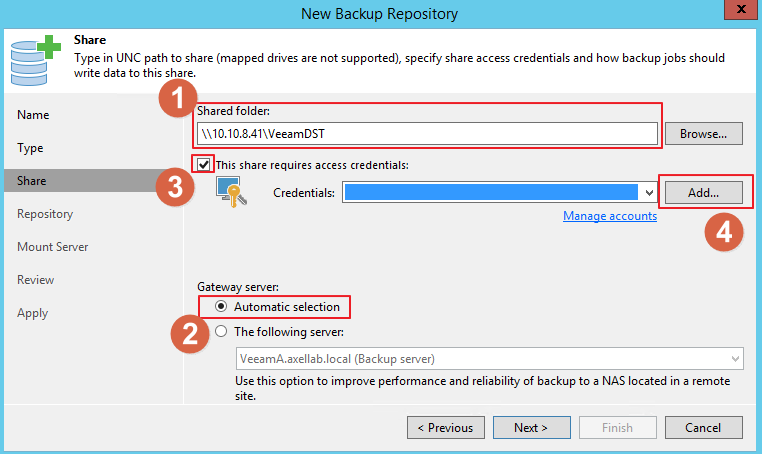
Note: Follow the steps to check your Shared Folder Path:
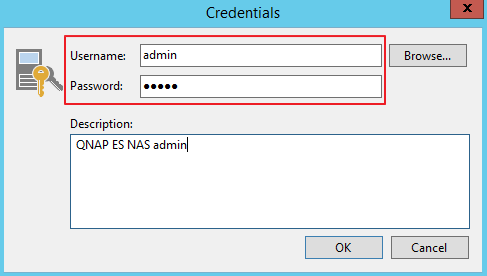
(Log in to QES > Click the “Shared Folders” desktop icon > Click the Shared Folder that you want to mount on Veeam > Action > Edit Properties > Copy the Shared Path) - Enter the username and password of the ES NAS administrator. Click “OK”.
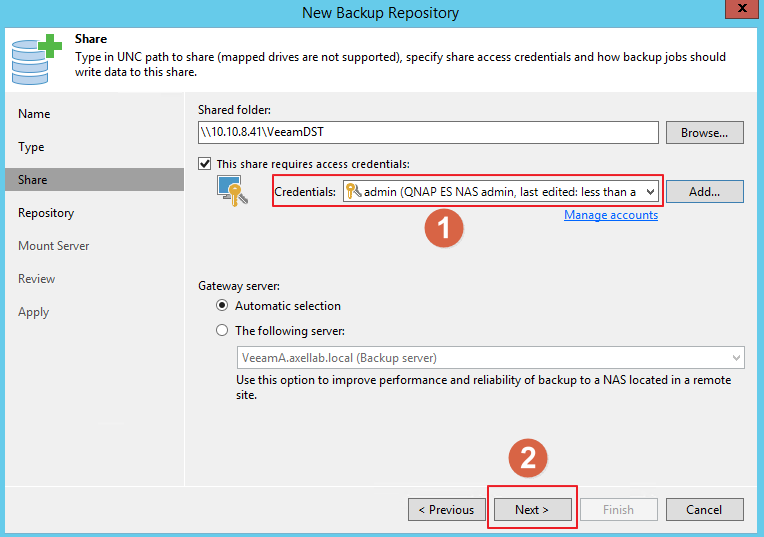
- The credentials will be found. Click “Next”.
- Task Limitation for Backup Repositories :
- The maximum number of concurrent tasks depends on the number of CPU cores available on the backup repository. It is strongly recommended that you define task limitation settings using the following rule: 1 task = 1 CPU core. It is recommended to configure 2 GB RAM per core.
- For regular backup chains, Veeam Backup & Replication creates 1 task per job.
For per-VM backup chains, Veeam Backup & Replication creates 1 task per every VM chain (that is, every VM added to the job).
If you use backup repositories for backup copy jobs, you must also consider tasks for read operations. - When you limit the number of tasks for the backup repository, keep in mind the storage throughput. If the storage system is not able to keep up with the number of tasks that you have assigned, it will be the limiting factor. It is recommended that you test components and resources of the backup infrastructure to define the workload that they can handle.
Reference: Veeam official website

- In Advanced Settings, enable “Align backup file data blocks”. Click “OK”.

- Click “Next” until you reach the “Apply” page. Once the configuration is complete, click “Finish”.
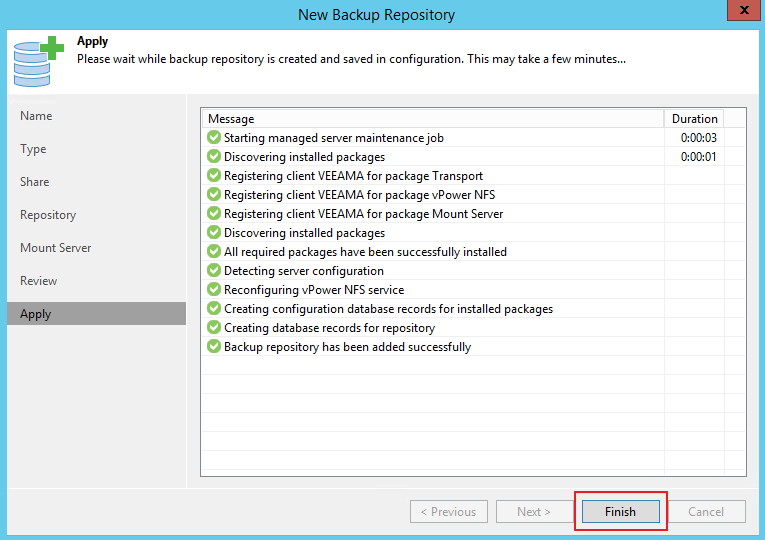
- “VeeamDST” will be displayed in the datastore list.

Add Virtualization Servers and Hosts
In this case, we use VMware vSphere for hypervisor infrastructure.
You must add to the backup infrastructure VMware vSphere servers that you plan to use as the source and target for backup, replication and other activities.
You can add VMware vCenter Servers and ESX(i) hosts. If an ESX(i) host is managed by a VMware vCenter Server, it is recommended that you add the VMware vCenter Server, not a standalone ESX(i) host. If you move VMs between ESX(i) hosts managed by the VMware vCenter Server, you will not have to re-configure jobs in Veeam Backup & Replication. Veeam Backup & Replication will automatically locate migrated VMs and continue processing them as usual.
- Open Veeam BR. Click “BACKUP INFRASTRUCTURE”, select “Managed Servers”, and select “VMWARE VSPHERE”.
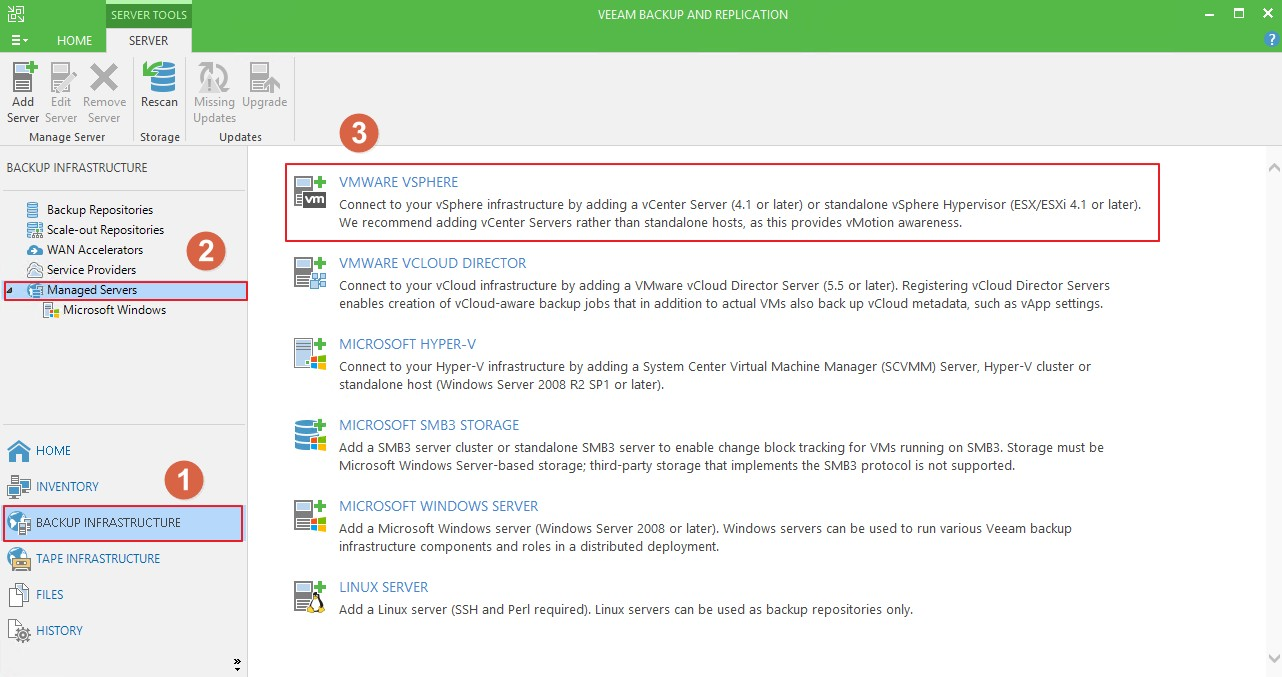
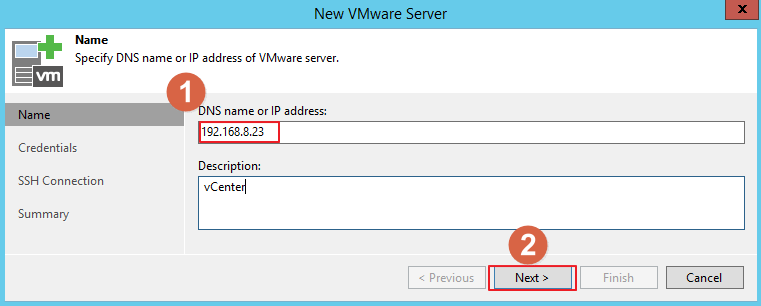
- Enter the vCenter IP Address and click “Next”.
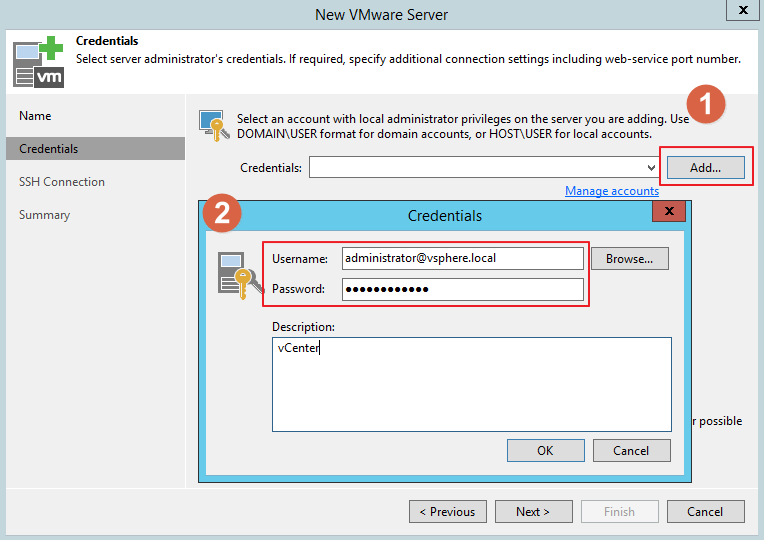
- Click “Add” and enter the log in credentials for vCenter.
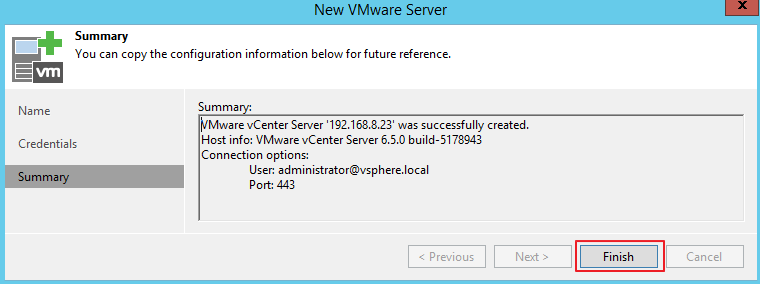
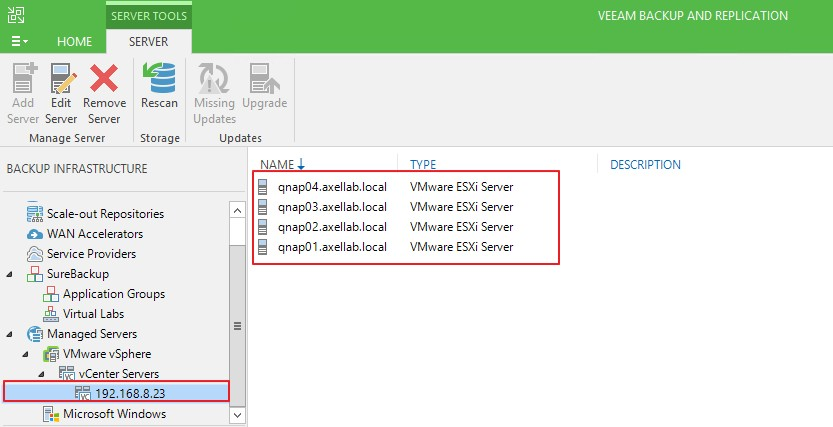
- If you connect to vCenter successfully, click “finish”. You will then see your vCenter server and all VMware ESXi servers.
Installing Veeam Proxy server
About Proxy server
- Transport Modes
Job efficiency and time required for job completion greatly depends on the transport mode. The transport mode is a method used by the Veeam Data Mover to retrieve VM data from the source and write VM data to the target.
For data retrieval, Veeam Backup & Replication offers the following modes (starting from the most efficient):
- Direct storage access [san] (Best performance)
- Virtual appliance [hotadd]
- Network [nbd]
Reference: Veeam official website
- How to trigger your Veeam backup job in “Direct storage access [san]” mode?

Reference: Veeam official website
A backup proxy is an architecture component that sits between the backup server and other components of the backup infrastructure. While the backup server administers tasks, the proxy processes jobs and delivers backup traffic.
Proxy server settings
- Create two proxy servers then install Veeam BR on server in your environment (in this example, our VMware environment).

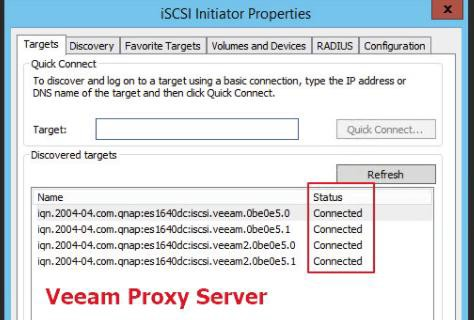
- In both proxy servers, connect to the VM source LUN target (VM in LUN that you want to backup).
(Optional step: If you use an iSCSI LUN as the VM source datastore)
- Go to the main Veeam server. Click “BACKUP INFRASTRUCTURE”, select “Backup Proxies”, right-click on the right window, and select “Add VMware Backup Proxy...”.

- Click “Add New” to add a Veeam proxy server. Enter your credentials. Click “Next”.

- Go to “Transport mode” and click “Choose”. Veeam recommends using “Automatic selection”.
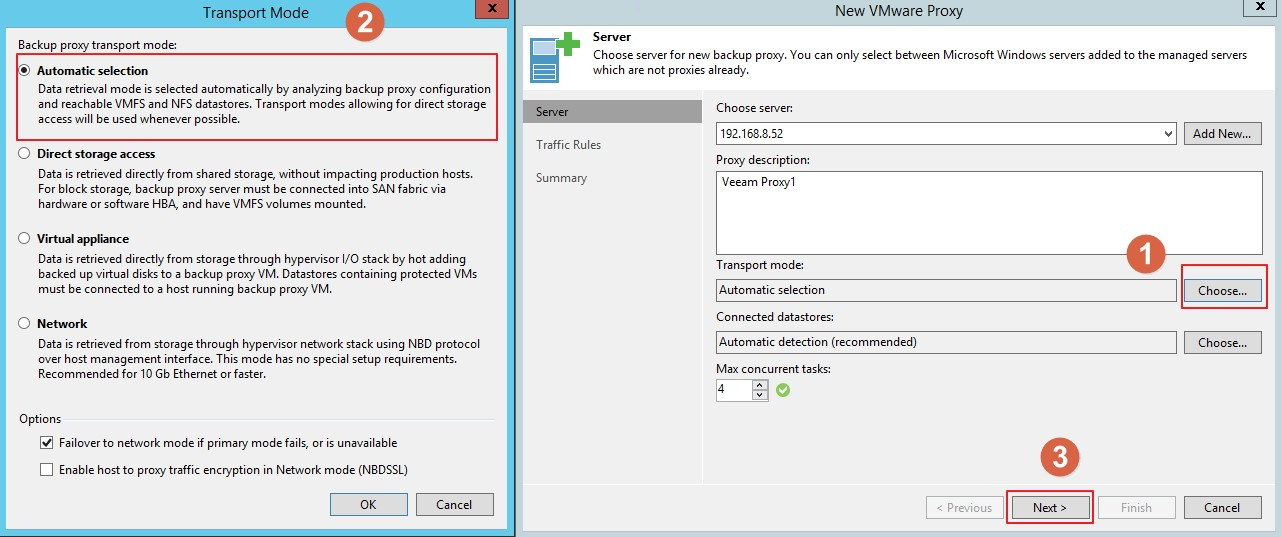
- After configuration, you will see your Veeam proxy servers in the server list.

Reference:
https://helpcenter.veeam.com/docs/backup/vsphere/add_vmware_proxy.html?ver=95
Backup
Veeam BR can backup many types of server or computer (including Windows, Linux, macOS, and VMware server). Veeam BR can also back up virtual machines, disks, and files.
This section will assist you in backing up data to a QNAP ES NAS.
Back up to the datastore of ES NAS
Create Backup Job
Veeam BR can back up physical/virtual servers or computers that are on Veeam BR’s server list. In this example, we will back up a virtual machine to the ES NAS.
- Click “HOME”, select “Jobs”, right click on the right window and click “VMware vSphere...”.

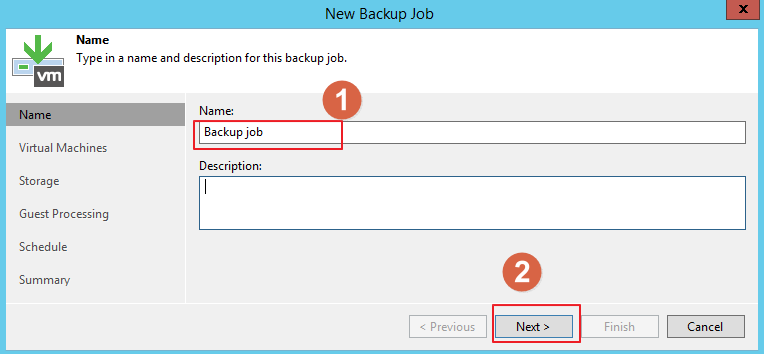
- Enter the job name and click “Next”.
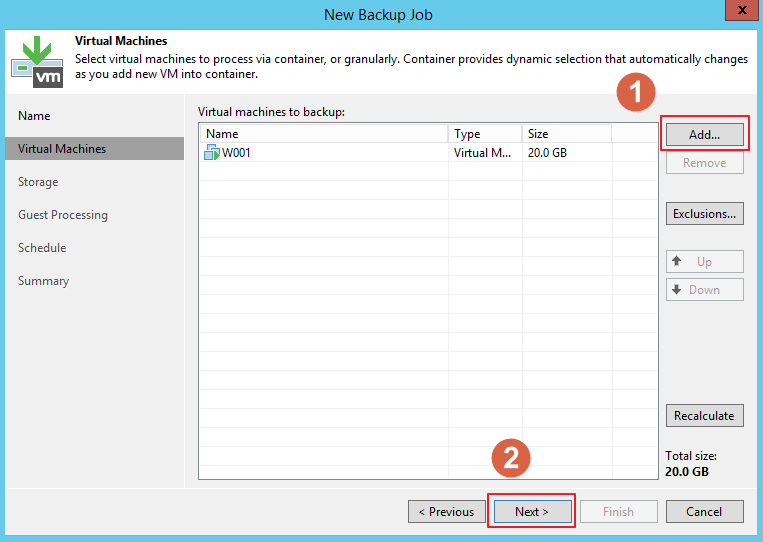
- Click “Add...” to add the VM to back up. Click “Next”.
- In this step we will choose the backup repository. The proxy server will share backup computing load and help to trigger transport mode to “SAN”.
Select “VeeamDST” as the backup repository, and click “Advanced”.

- In Advanced Settings you can configure data reduction (by default, every option is selected) and the compression level.

Veeam offers four different storage optimization settings that impact the size of read blocks and hash calculations for deduplication:
Local – Recommended when using a disk-based repository. When this setting is selected, Veeam reads data and calculates hashes in 1 MB chunks.
LAN – This is recommended when using a file-based repository such as SMB shares. When this setting is selected, Veeam reads data and calculates hashes in 512 KB chunks.
WAN – This is recommended when backing up directly over a slow connection or for replication as it creates the smallest backup files at the cost of memory and backup performance. When this setting is selected, Veeam reads data and calculates hashes in 256 KB chunks.
Local (>16 TB) – This is recommended for large backup jobs with more than 16 TB of source data in a job. When this setting is selected, Veeam reads data hashes and calculates data on 4 MB blocks.
The smaller the block size, the more CPU resources required for hash calculations and the more RAM will be used to store those hashes.
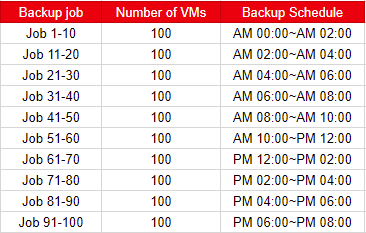
We recommend using “LAN” to get the most efficient solution with ES NAS shared folders. - In the schedule setting page, you can configure the backup job schedule. If you have many backup jobs, we recommend scheduling based on each job's VM capacity and backup time to stagger the backup schedule.

For example: If you have 100 backup jobs, then 1000 VMs need to be backed up.
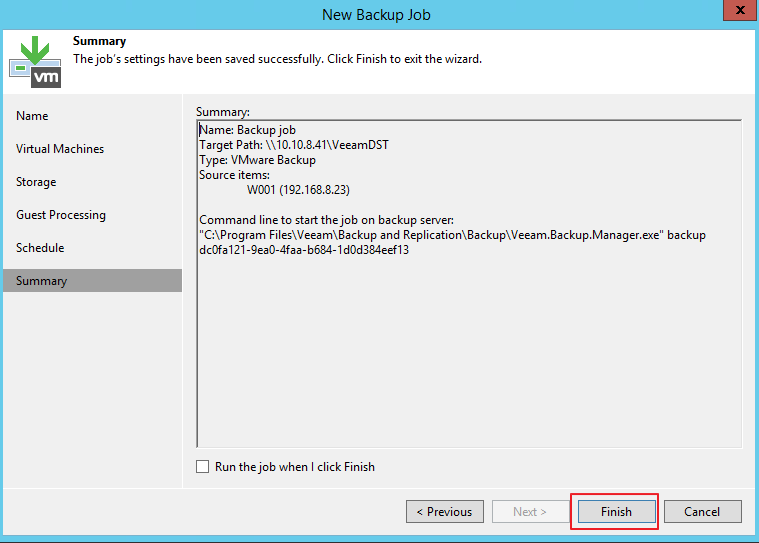
- After completing the schedule settings, go to next page and click “Finish”.
- Right click on the backup job and click “Start”.

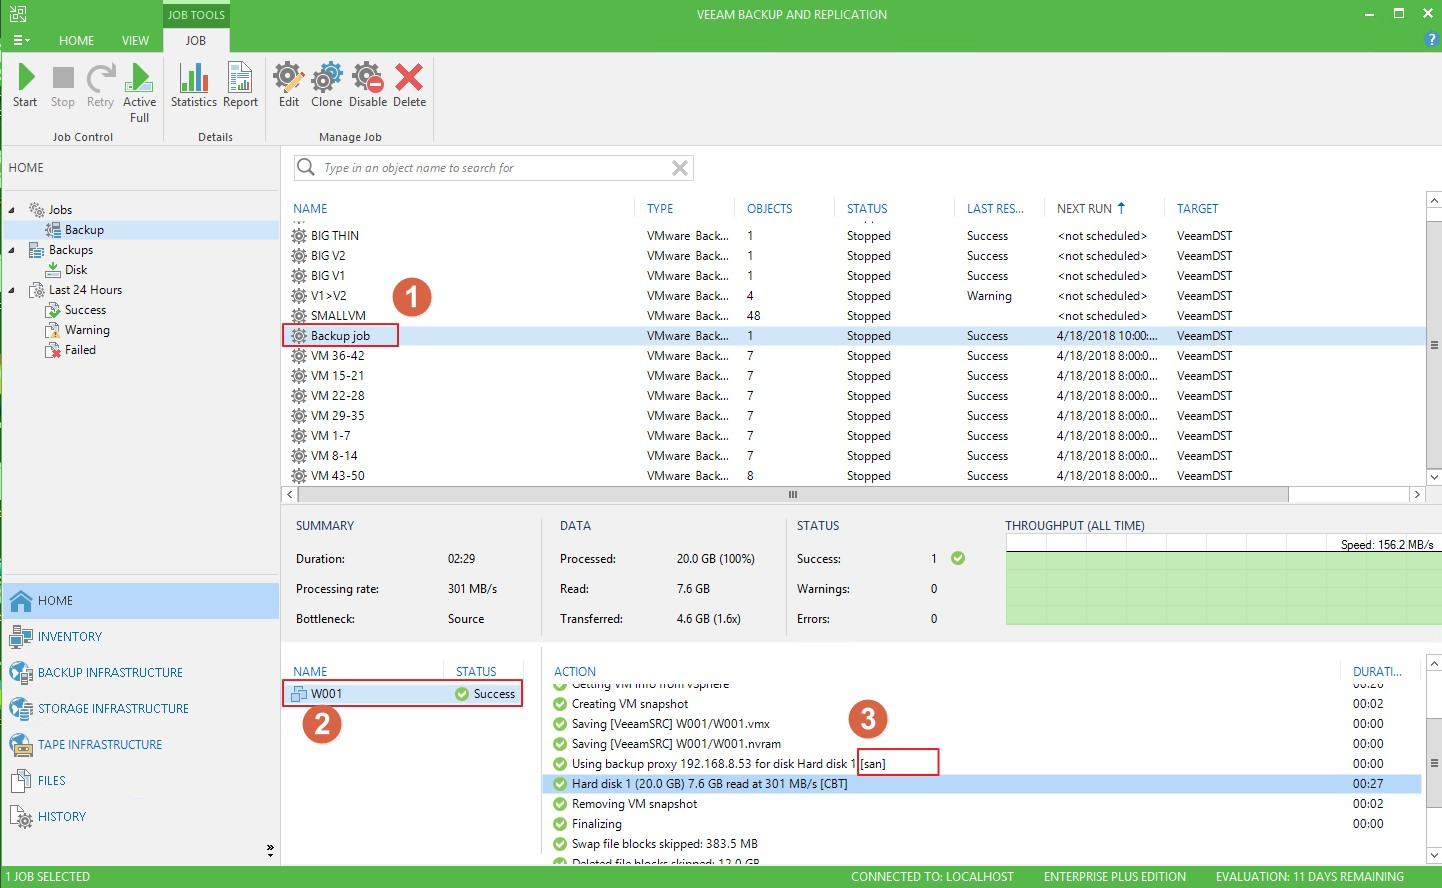
- When running a backup job, you can view its backup transmission mode [san] by clicking the backup job and the VM.
- Network traffic settings
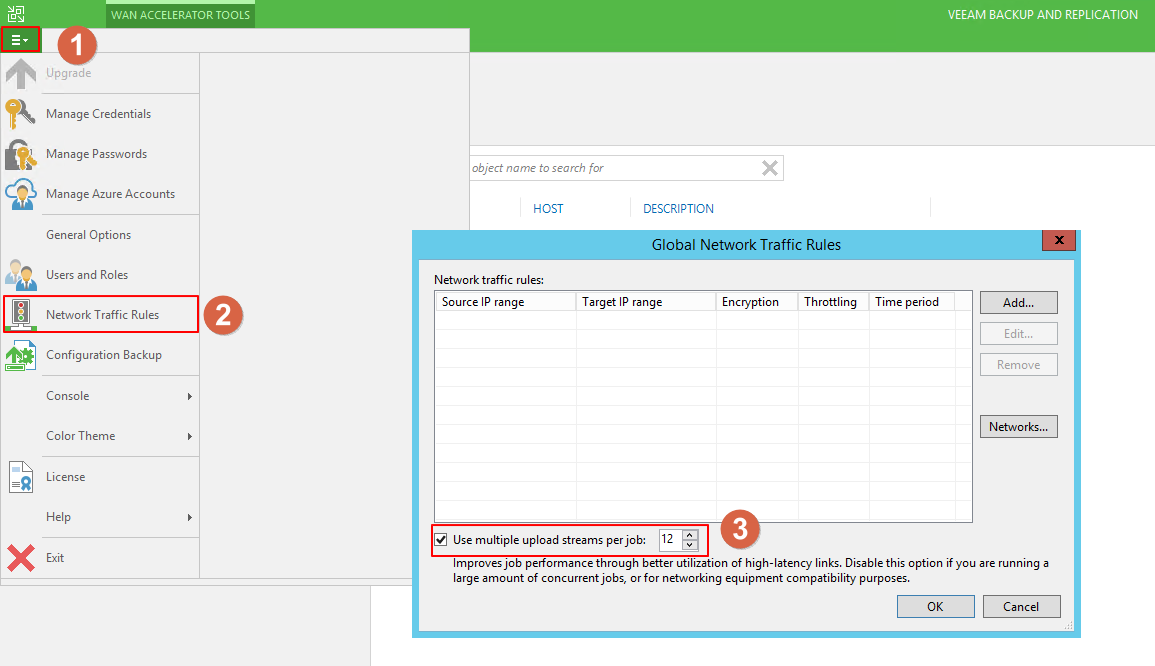
Another parameter that may affect backup performance is “Use multiple upload streams per job”. By default, Veeam Backup & Replication uses multithreaded data transfer for every job session.
Open the “Settings”, go to “Network traffic”, and select “Use multiple upload streams per job”. We recommend setting this above 10.
Back up a computer disk/files to ES NAS
Veeam BR also provides file-level backup.
But the requirement of file level’s backup, you have to add only one server that you want to backup.
In this example, we add a vCenter server to Veeam BR. vCenter server including many virtual machines. Veeam BR can only backup virtual machines. To back up “AD server’s disk C:\” you must add the “AD server” to the server list.
-
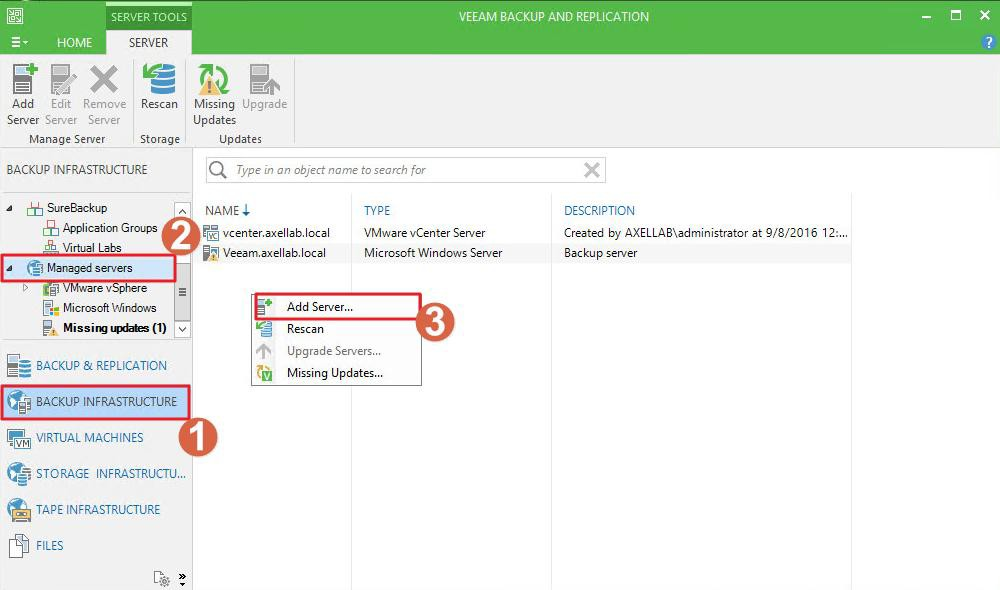
Click “BACKUP INFRASTRUCTURE”, select “Managed servers”, right-click on the right window, and select “Add Server...”.
-
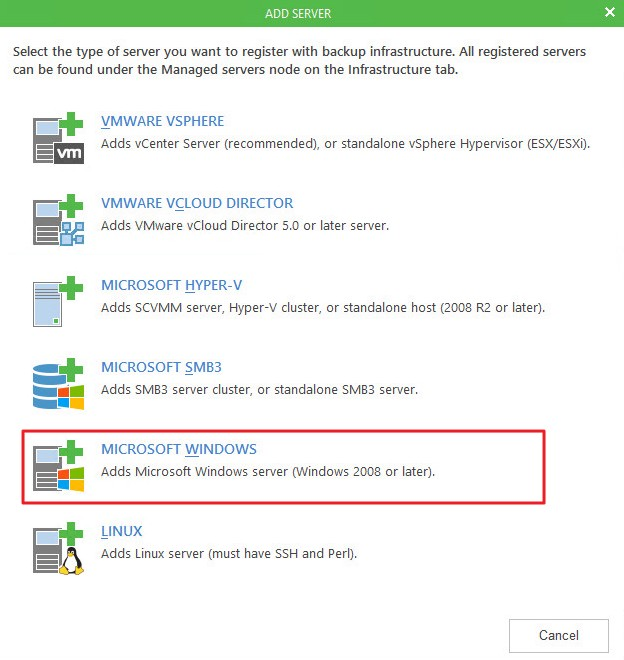
As our AD server uses Microsoft Windows Server 2012 R2, select “MICROSOFT WINDOWS”.
-
Enter the DNS name (ad.axellab.local ) or IP address of the AD server. Click “Next”.
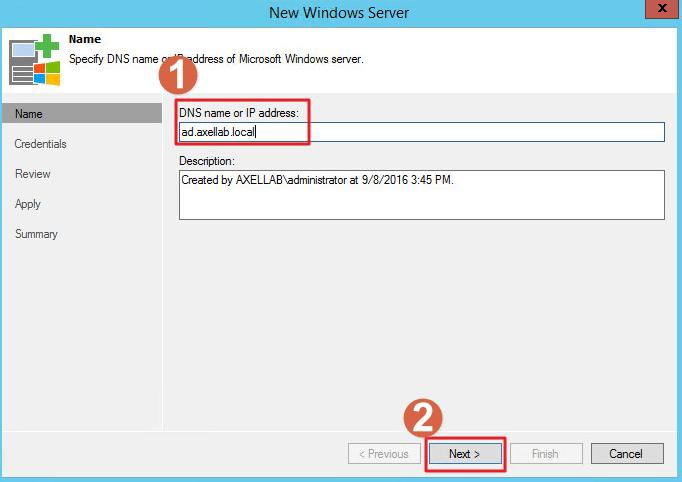
- Click “Next”.
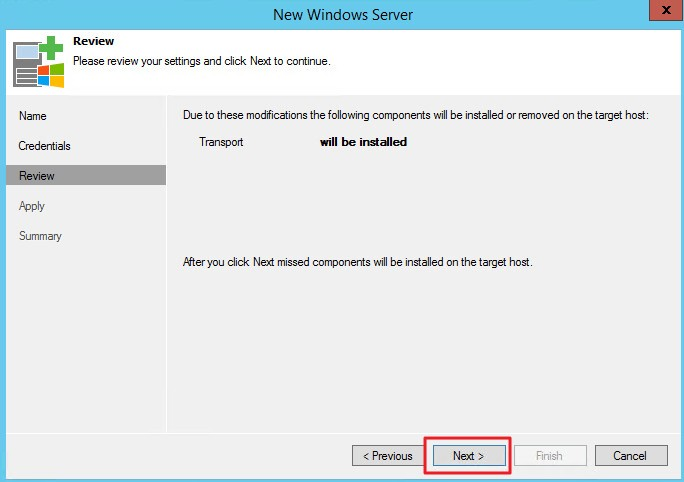
- Click “Next”.
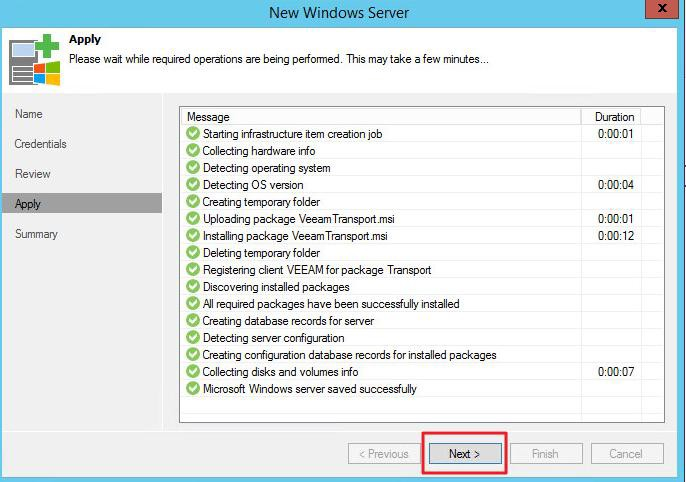
- Click “Finish”.

- The AD server will be mapped to Veeam BR.

- Click “FILES”, find the server “ad.axellab.local” and select “Local Disk (C:)”. In the right window you will see the files on the AD server's disk (C:).

- You can back up the disk, folders, or files by creating a new backup job.
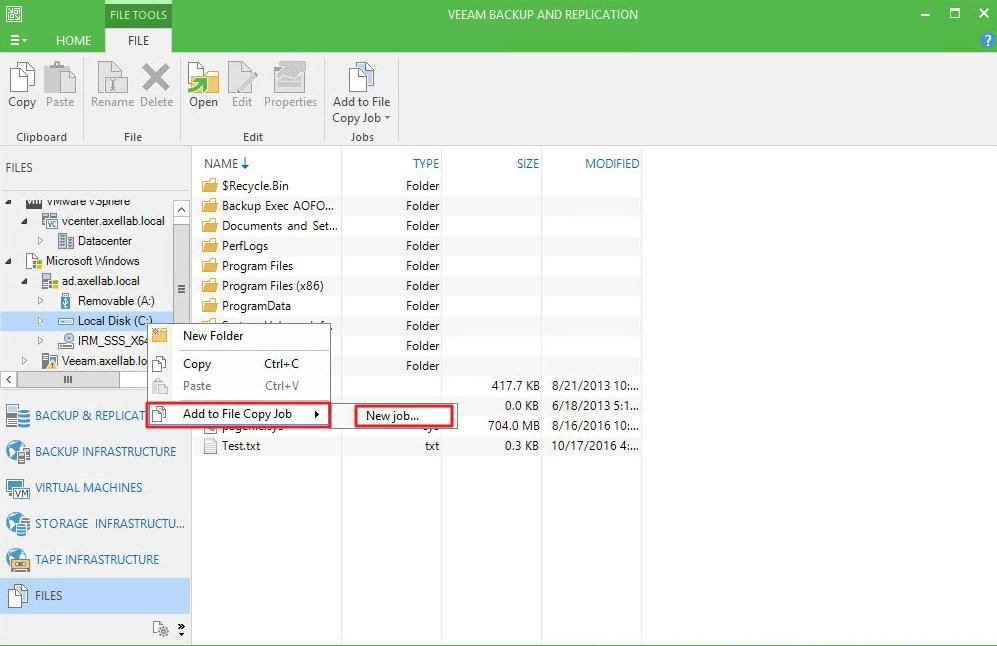

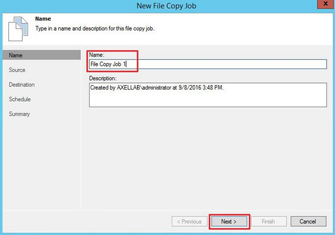
- Enter the name of the backup job and click “Next”.
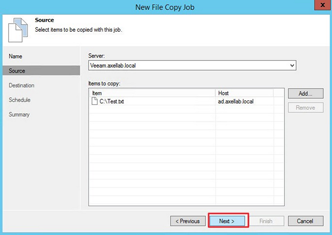
-
Select the VMware ESXi server to save the backup file, then click “Browse” to select the storage mounted on the VMware ESXi server.

- Select the QNAP ES NAS storage “FAEFileServer” for back up file saving.

Note:
For more information on setting up VMware ESXi datastores, refer to the following datasheets.
# iSCSI drive:
Set up a VMware ESXi Datastore via iSCSI with QNAP Enterprise-Class ES NAS
# Shared Folder:
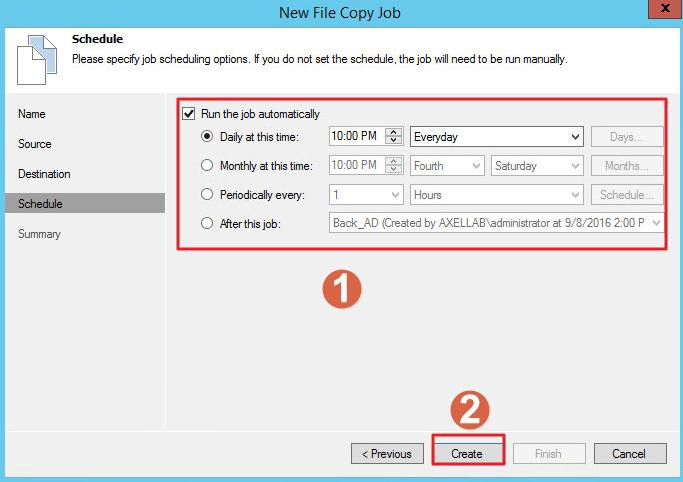
Set up a VMware ESXi Datastore via NFS with QNAP Enterprise-Class ES NAS - Configure the backup schedule and click “Create”.
- Click “Finish”.
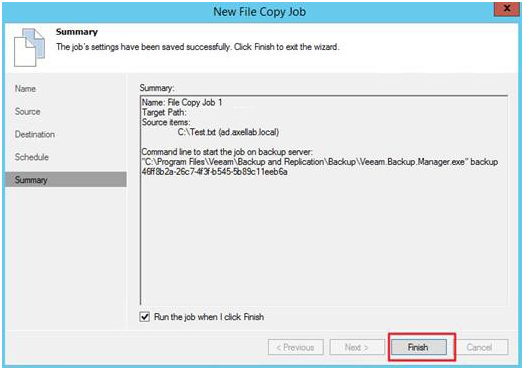
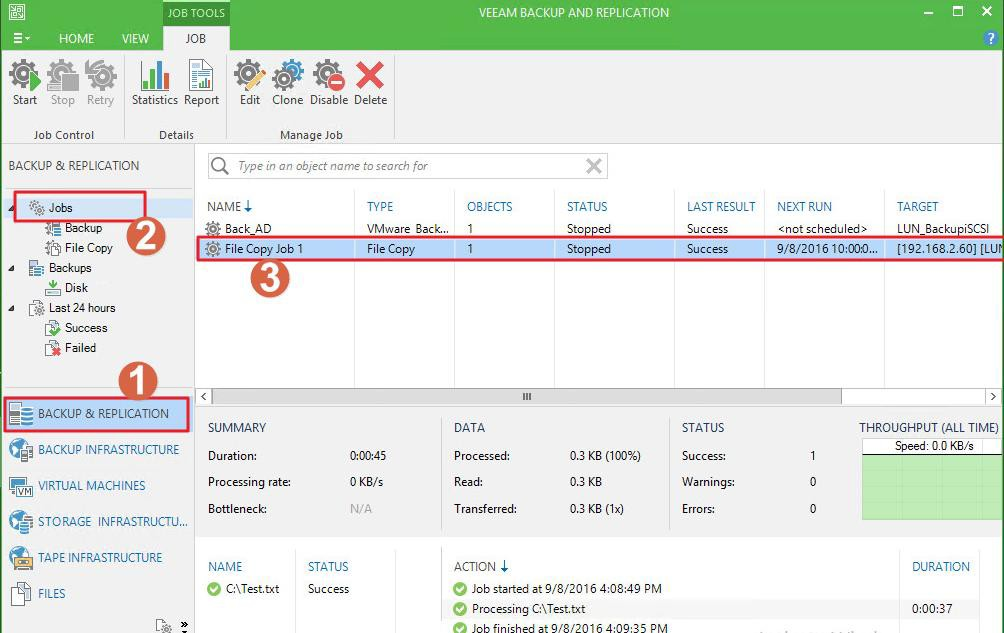
- The file copy job will be displayed.
Back up VMware datastore files to ES NAS
If you want to back up a VMware datastore (iSCSI drive, Shared Folder) in VMware ESXi, Veeam BR can back up the datastore’s files or folders.
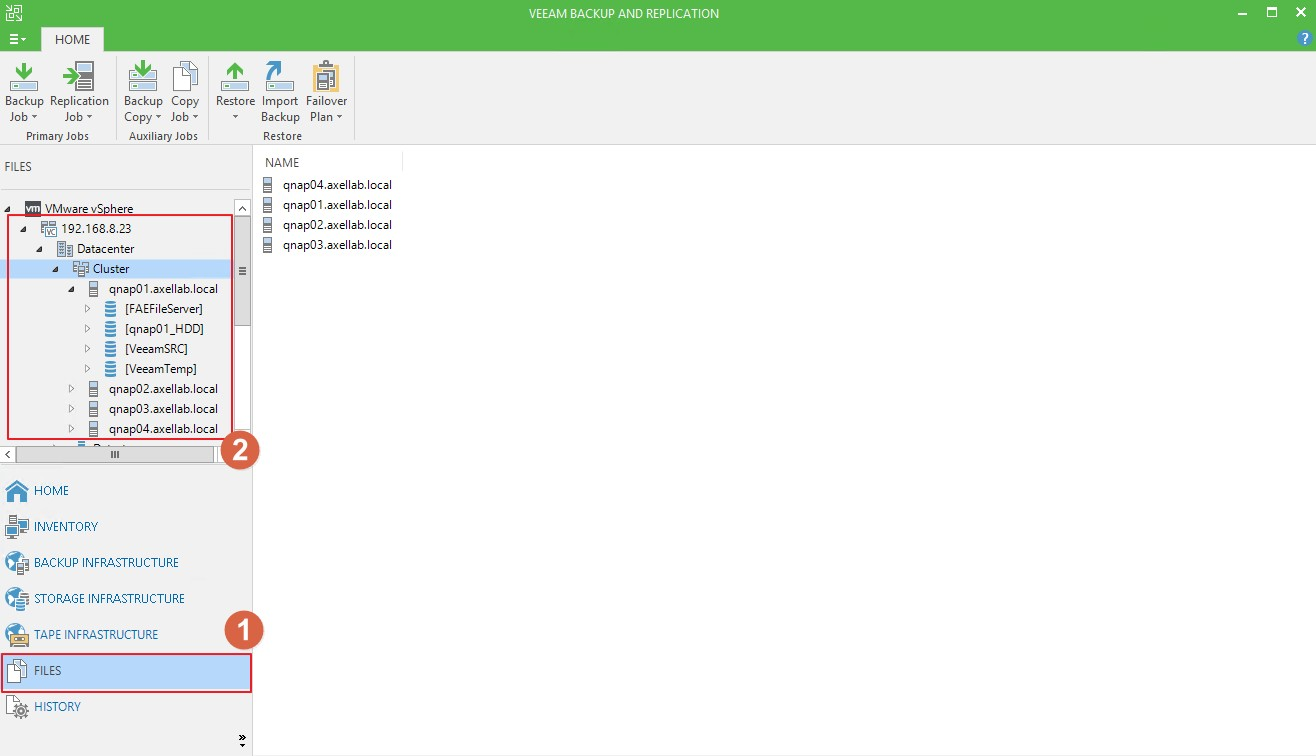
- Click “FILES” and find the ESXi server’s datastore.
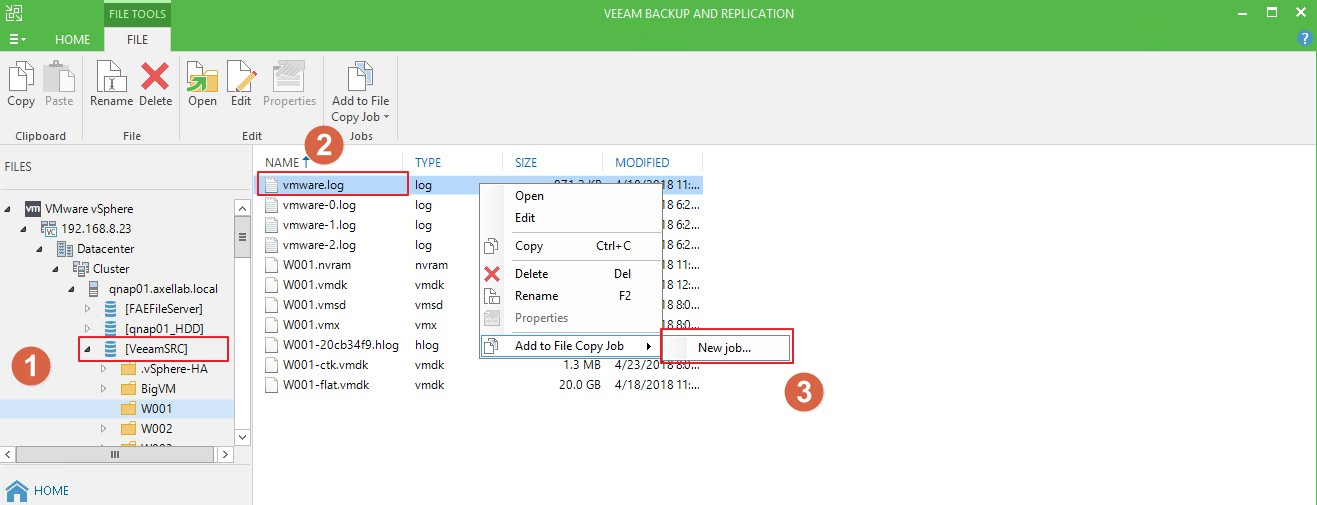
- Select the QNAP ES NAS datastore “LUN_BackiSCSI”. Right click on the file to back up and select “Add to File Copy Job > New job”.
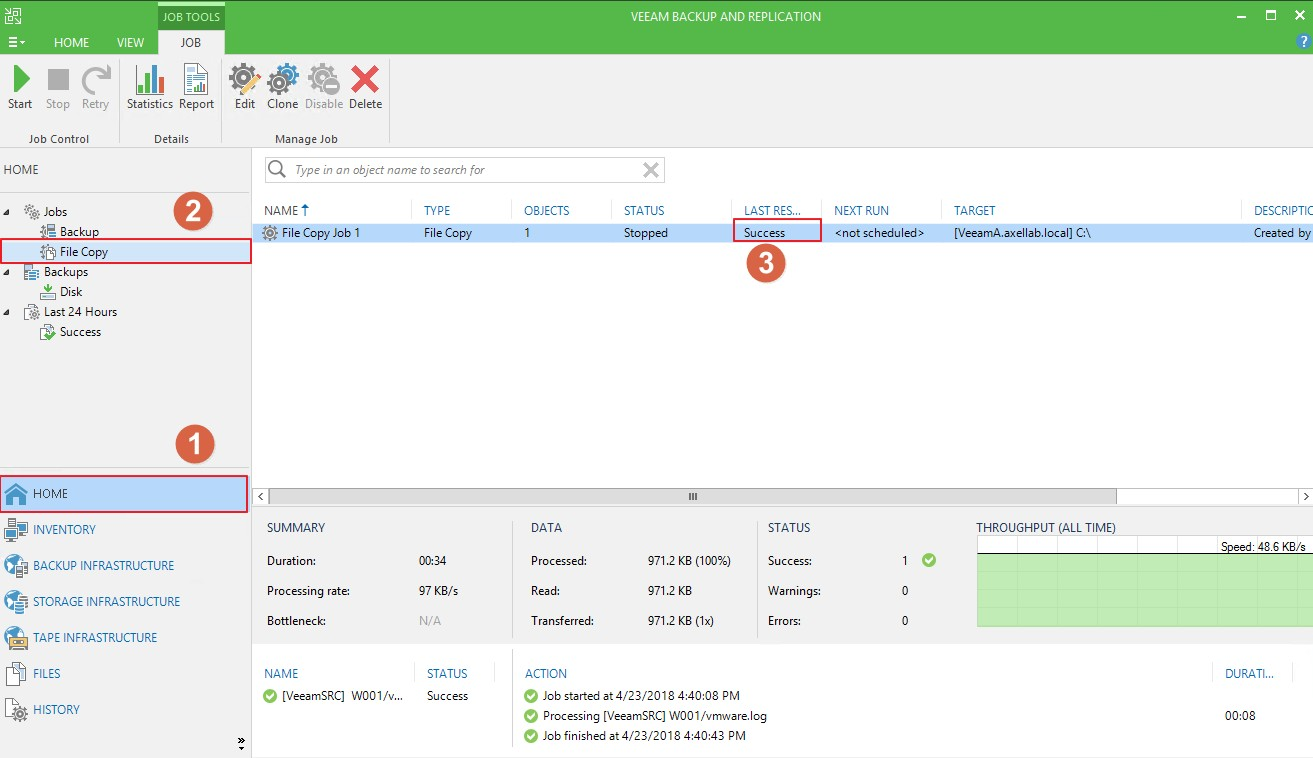
- Bypass the backup job's setting, and the file copy job will be displayed.
To restore data from the ES NAS
Veeam BR can use a simple operation to restore data. In this section we will describe how to restore a VM from an ES NAS SRC datastore using Veeam BR.
- Click “HOME” and select “Restore”. All of the finished backup jobs will be listed.
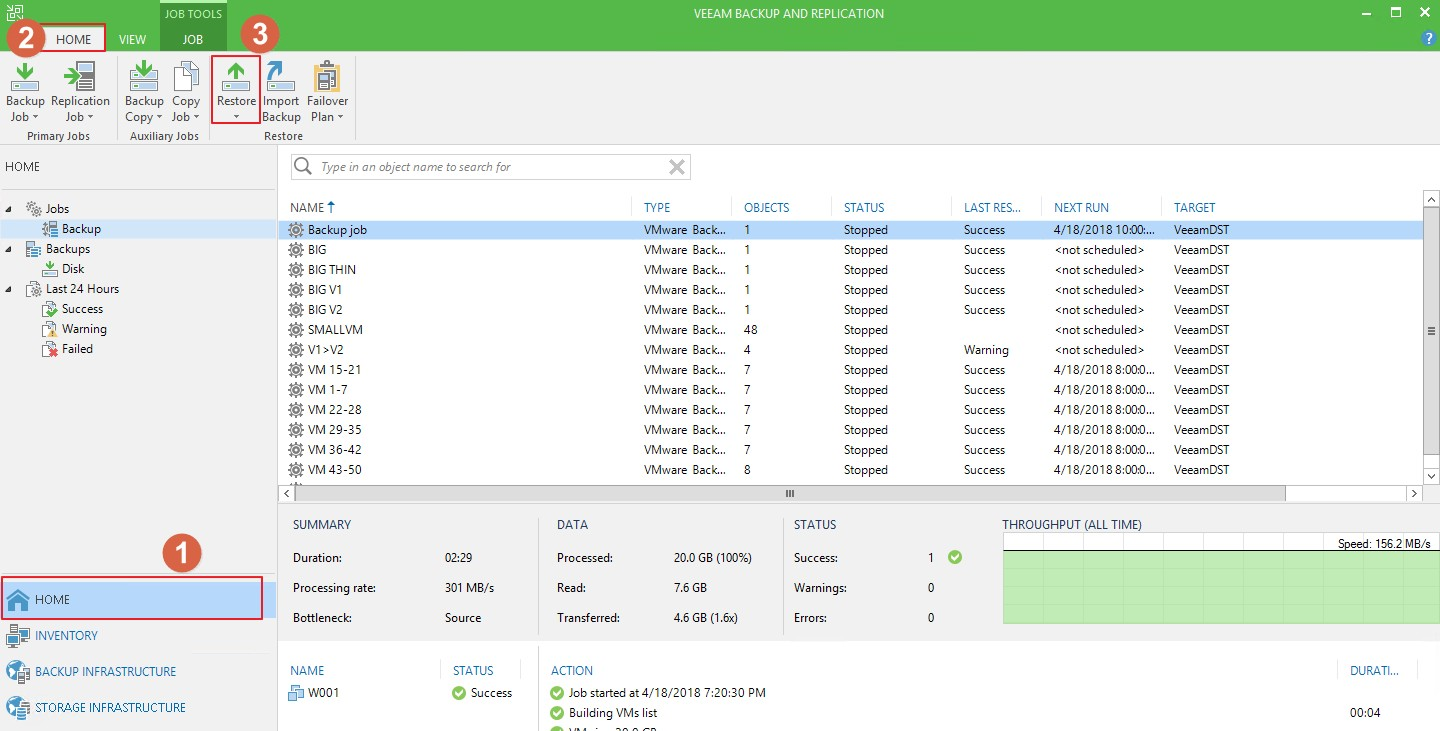
- Configure your restore job and click “Next”.

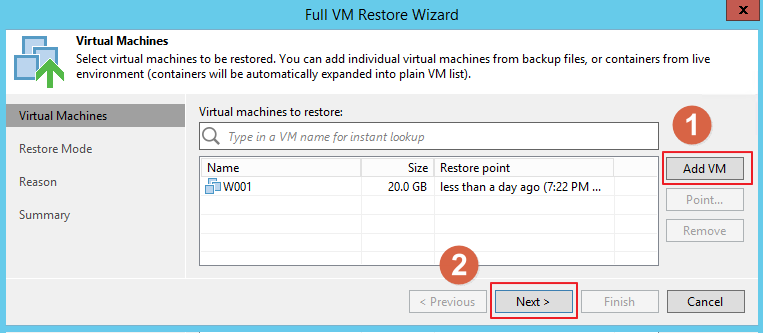
- Add the VM that you want to restore and click “Next”.
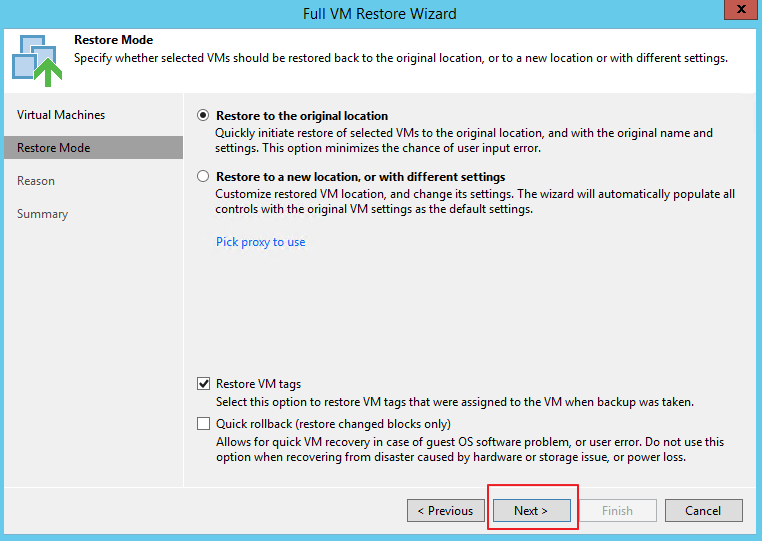
- Select “Restore to the original location” and click “Next”.
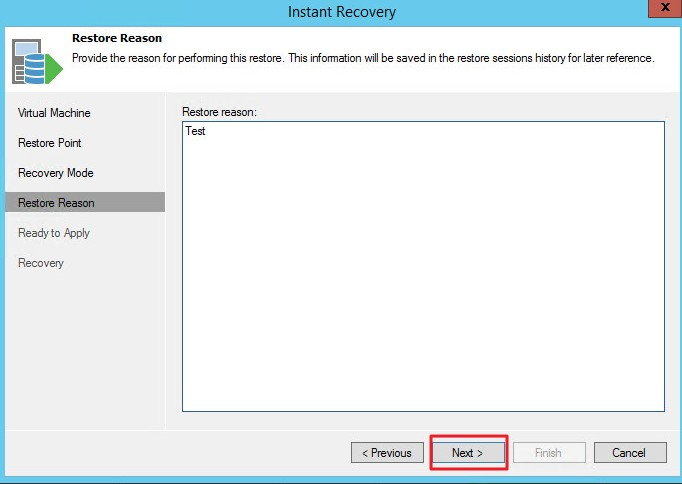
- Add a reason for restoring and click “Next”.
- Before clicking “Finish” you can choose to enable “Power on target VM after restoring”.
A VM can be restored to its original location or to a new location. When you restore a VM to its original location, the primary VM is automatically turned off and deleted before the restoration process. This type of restore process ensures the quickest recovery and minimizes the number of mistakes which can be potentially caused by changed VM settings.
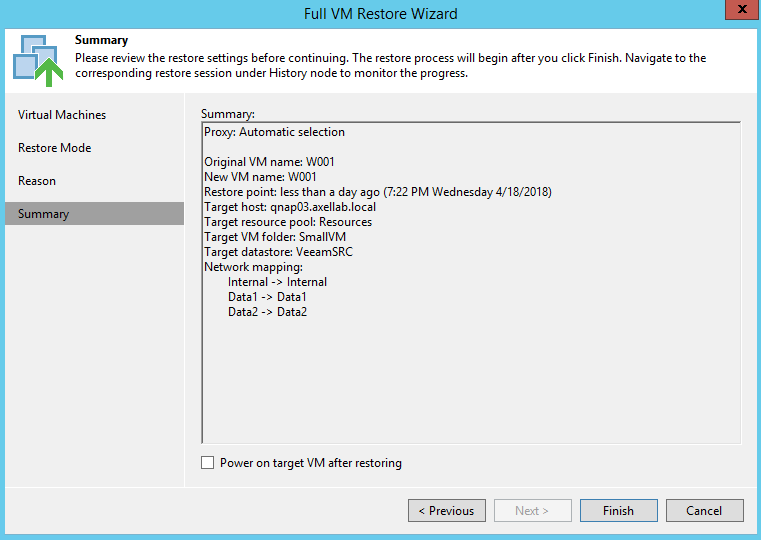
- Click “Finish”, then run the restore job.

About restore performance
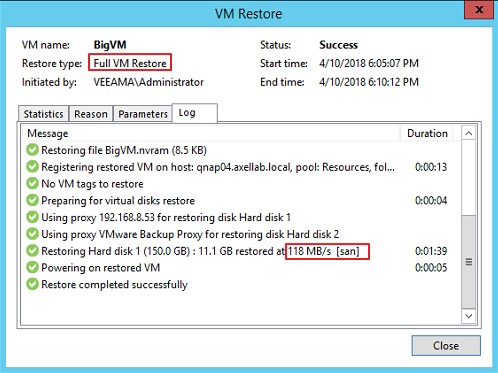
- Veeam does not provide any best practices for using their restore program. However, if Veeam can trigger san transport mode, the restoration performance is good. Reference: Veeam official website
- In our internal tests (10G LAN), restore operations were performed while running 4 backup jobs at the same time. The restoration performance can maintain over 100 MB/s.
# Backup job:


# Restore job:
