How to connect macOS to LDAP services by using an open directory utility for accessing files on QNAP NAS

Introduction:
Lightweight Directory Access Protocol (LDAP) is a directory that can store the information of all the users and groups in a centralized server. Using LDAP, administrators can manage users in the LDAP directory and users can connect to multiple NAS with the same username and password.
This tutorial explains the process of setting up macOS devices to connect to a QNAP NAS using LDAP accounts. The environment must have a LDAP server and a QNAP NAS must be joined to the same LDAP server.
If you do not have a current LDAP server, you can use the built-in LDAP Server of a QNAP NAS.
Note:
- Your NAS must be joined to the LDAP directory.
- macOS X10.6 (or later) is recommended. This document uses X10.15.2 in its screenshots.
Topic as below:
- (Optional)Using the built-in LDAP service on QNAP NAS for user management
- Before joining macOS to the LDAP directory you must disable LDAP Server Authentication on the NAS
- Joining macOS to the LDAP directory
Optional: Using the built-in LDAP service on QNAP NAS for user management
QNAP NAS provides LDAP Server functionality, allowing you to consolidate your IT infrastructure. If you are using a dedicated LDAP server then this step is not required.
-
Enabling the LDAP Server
- Log in to QTS as the administrator.
- Go to Control Panel > Applications > LDAP Server.

- Select Enable LDAP Server.
- Enter a Full domain name.
- Enter a password.
- Click Apply.
The LDAP Server is now enabled and ready to use.
Creating LDAP Users and Groups
- Go to the Users tab.
- Click Create a User, Create Multiple Users or Batch Import Users based on your requirements.

- Follow the wizard to create LDAP users.
Joining the NAS to an LDAP Domain
- Go to the LDAP Server tab.
- Click Domain Security.

Control Panel > Privilege > Domain Security opens.
- Select LDAP authentication.
- Set the Select the type of LDAP server as LDAP server of local NAS.
- Click Apply.

The NAS is now a client of the LDAP server.
Checking LDAP domain users and their permissions
- Go to Privilege > Users.
- Select Domain Users.
- Click


- Adjust permission settings based on your requirements.
- Click Apply.

Before joining macOS to the LDAP directory you must disable LDAP Server Authentication on the NAS
From QTS version 4.3.3, the LDAP Server requires authentication. As macOS does not send any LDAP authentication, LDAP Server authentication must be disabled.
- Go to Control Panel > Network & File Services > Telnet/SSH.
- Select Allow SSH Connection.
- Connect to the NAS using an SSH client (such as PuTTY).
- Log in using the admin account.
- Run the following command to disable LDAP authentication: /sbin/setcfg "LDAP Server" "Require Authc" "FALSE"
- Run the following command to restart the LDAP server: /etc/init.d/ldap_server.sh restart
Joining macOS to the LDAP directory
- Log in to macOS as the administrator.
- Go to System Preferences.
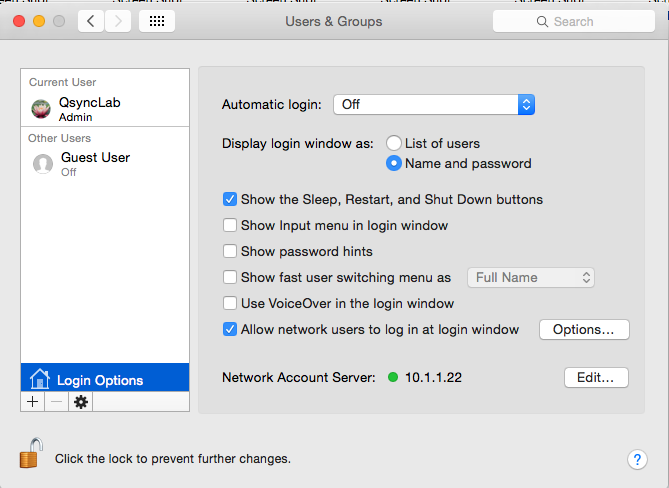
- Click Users & Groups.

- Click Login Options.

- Click Join….

A server selection window opens. - Enter the IP address of the LDAP server.
- Click OK.

- Select Allow network users to log in at log in window.
- Click Edit….

A server list window opens. - Click Open Directory Utility.

The Directory Utility window opens. - Select LDAPv3.

- Click

- Select RFC2307 in LDAP Mappings.

The Search Base Suffix window opens. - Enter the base suffix of the LDAP server.
- Click OK.

- Click Edit.

The server settings window opens. - Go to the Security tab.
- Select Use authentication when connecting.
- Enter the Distinguished Name.
- Enter the Password.
- Click OK.

- Click OK.

- Restart the Mac.
- Go to the Directory Utility.
- Go to the Directory Editor.

LDAP users can now be viewed under the LDAP server you just set up.
Enabling the home folder for LDAP users
- Open Users & Groups.

- Click Login Options.
- Click Edit….
- Click Open Directory Utility.

- Choose LDAPv3.

- Click
 .
. - Select your LDAP server.
- Click Edit….

The server settings window opens. - Go to Search & Mappings.

- Select RFC2307 in Access this LDAPv3 server using.
The Search Base Suffix window opens. - Enter the base suffix of the LDAP server.
- Click OK.

The Search Base Suffix window closes. - Find Users > NFSHomeDirectory under Record Types and Attributes.

- Select #/Users/$uid$ under Map to any items in list.

- Click OK.
The server settings window closes. The LDAP Mappings are now Custom. - Click OK.

- Open the Directory Utility.
- Go to the Directory Editor.

The home folder for users are listed under NFSHomeDirectory.
Accessing the NAS via AFP
Users can log into macOS devices using LDAP and mount their home folder (or another shared folder) via AFP.
- Log in to macOS.
- Go to Finder > Go > Connect to Server…

The Connect to Server window opens. - Enter afp://<YOUR NAS IP ADDRESS>.
- Click Connect.

A login window opens. - Select Registered User.
- Enter your QNAP NAS username.
- Enter your QNAP NAS password.
- Click Connect.

A folder selection window opens. - Select the home folder.

- Click OK.

You can now access files stored on your home folder from Finder.


