-
What is Security Center?
-
System requirements
-
Before you start
-
Install Security Center
-
-
Key security policies
-
Manage security applications and security checkups
-
Enable a security application
-
Run a security checkup scan
-
Schedule a security checkup scan
-
Apply security suggestions
-
Manage security checkup results
-
-
Select a security policy
-
View security advisories
-
Report a security vulnerability
-
Monitor unusual file activities
-
Add a volume to monitor
-
Manage monitored sources
-
Undo actions taken on unusual file activity
-
View event logs
-
-
Further reading and resources
This guide is applicable to Security Center 3.0.0 and later versions.
What is Security Center?
Security Center is an integrated security platform for QNAP NAS devices, serving as both a centralized control hub for security applications and a proactive security monitoring tool. It scans the NAS device for threats, detects anomalous file activities, and allows users to configure monitoring settings for file activity changes.
Through Security Center, you can enable and manage the following security applications on your NAS device:
- Antivirus: Protect your NAS from malicious attacks by performing manual or scheduled scans. Antivirus detects and neutralizes threats such as viruses, malware, and Trojans by either deleting, quarantining, or reporting infected files. For details, see the Antivirus section in the Services chapters of the QTS User Guide or QuTS hero User Guide.
- Malware Remover: A built-in security utility designed to detect and eliminate malware that may be embedded in files or software. Malware Remover employs multi-layered protection, allowing users to run immediate or scheduled scans to prevent unauthorized access and maintain optimal system performance. For details, see the Malware Remover chapter in the QTS User Guide or QuTS hero User Guide.
- QuFirewall: A network security application that safeguards your NAS against unauthorized access and cyber threats by implementing firewall rules, IP filtering, and geofencing to block malicious connections. For details, see How to Use QuFirewall.
By consolidating security management and proactive threat detection, Security Center enhances NAS security, reducing the risk of data breaches and ensuring a secure operating environment.

System requirements
Security Center is compatible with the following QNAP operating systems:
- QTS 5.2.0 or later versions
- QuTS hero h5.2.0 or later versions
- QuTScloud c5.2.0 or later versions
Before you start
Install Security Center
- Log in to your NAS as an admin.
- Open App Center.
- Locate Security Center.
- Optional: Click the app icon to view the app information.
- Click Install.ImportantAfter installing Security Center, the first time you launch the application, a prompt appears requiring you to select a security policy. You can either select Scan Now to initiate an immediate system check or choose Later. If you choose Later, Security Center automatically applies the default Basic Security Policy to the system. You can change the security policy by clicking Security Policy in the side panel.
- Select the target data volume for app installation.NoteThis option appears only if the NAS device storage includes multiple storage spaces.
- Click OK.
App Center installs Security Center on your NAS device.
Key security policies
Security policies define the rules and guidelines that govern the protection of systems, data, and networks. These policies establish the necessary controls to mitigate risks, ensure compliance, and safeguard sensitive information. The following table outlines critical security rules and a brief description of their purpose.
To view the security policies and their descriptions, click Security Policy in the side panel.
| Rule | Description |
|---|---|
| Is the NAS using the latest firmware? | Keep firmware updated to fix security issues. |
| Has the default admin password been changed? | Change the default password to prevent unauthorized access. |
| Do password policy settings require a minimum of 5 characters? | Ensure strong password policies to reduce security risks. |
| Does the NAS allow Telnet connections? | Disable Telnet, which is an unencrypted service and vulnerable to attacks. |
| Can the system admin service be accessed from the internet? | Restrict access to prevent external threats. |
| Is your NAS directly exposed to the internet? | Ensure the NAS is protected from unauthorized external access. |
| Does the NAS enable Network Access Protection? | Blocks IPs after multiple failed login attempts. |
| Does the NAS disable running user-defined processes at startup? | Prevents unauthorized processes from running. |
| Are there file changes in the specified directory? | Monitor file changes to detect potential security threats. |
| Are file changes exceeding the threshold? | Alerts are triggered for abnormal file activity. |
| Can the NAS schedule a Malware Remover scan? | Ensure regular scans to detect and remove malware. |
| Does the NAS update Malware Remover automatically? | Enable automatic updates to use the latest virus database. |
| Has the SQL server root password been changed? | Change the default SQL server root password to secure the SQL server. |
| Are access controls set to "Private" or "Customized"? | Restrict access to prevent unauthorized users. |
| Are all NAS apps updated? | Keep applications up-to-date to maintain security. |
Manage security applications and security checkups
You can use Security Center to centrally enable or disable individual security applications, including Antivirus, Malware Remover, and QuFirewall.
In addition to application management, you can configure and run security checkups to assess system security, schedule automated scans, and apply recommended security enhancements. Security Center provides a unified interface to monitor scan results, review detected vulnerabilities, and implement preventive measures to maintain system integrity and mitigate security risks.
Enable a security application
- Open Security Center.
- Identify a security application.
- Click
 .
.
Run a security checkup scan
- Open Security Center.
- Go to Security Checkup.
- Click Scan.
Security Center performs a security checkup scan.
Schedule a security checkup scan
- Open Security Center and go to Security Checkup.
- Click
 .
.
The Scan schedule window appears.
- Click Enable schedule.
- Select the days on which the scan should run.
- Select the time to run the scan.
- Click Apply.
Security Center schedules the security checkup scan.
Apply security suggestions
After performing a security checkup scan, Security Center generates a list of recommended security configurations to mitigate detected risks. You can apply these recommendations automatically or manually based on your preferred level of control.
- Open Security Center and go to Security Checkup.
- Click Suggested Settings Assistant.
The Suggested Settings Assistant window appears.
- Select one of the following:
- Auto: Select one or more risk items to automatically apply the recommended security configurations. Security Center will adjust the relevant system settings without requiring manual configuration. After selecting the items, click Apply suggestion to confirm and implement the changes.
- Manual: Click the links provided in the window to manually configure the recommended security settings. This option allows you to review and apply each change individually.
- Click Close.
Manage security checkup results
Security Center allows you to review and manage security checkup results to maintain system security. You can either view details about a specific checkup result or ignore it if the identified risks will not impact system performance or security.
- Open Security Center and go to Security Checkup.
- Identify the security checkup result you want to assess.
- Under Action, click
 .
. - Perform one of the following tasks:
- View description: Click Description to view information about the checkup result, including potential security risks and recommended actions.
- Ignore result: Click Ignore result to exclude the checkup result from future assessments.
Select a security policy
Security Center provides predefined security policies that apply varying levels of access control and network restrictions to protect your NAS. Choose a policy based on your network exposure and operational requirements, or configure a custom policy to define specific security rules.
- Open Security Center and go to Security Policy.

- Select a security policy based on your network environment and security requirements.
- Basic Security Policy: Enables essential security protections while maintaining flexibility for network services. This option is ideal if your NAS is on a private network or used primarily for basic storage.
- Intermediate Security Policy: Offers enhanced protection while allowing access to essential services. Recommended if your NAS is connected to an external network or used for data sharing.
- Advanced Security Policy: Enforces strict security controls, restricting certain network functions to protect the NAS. Best suited for business environments where security is a priority.
- Custom Security Policy: Allows you to manually configure security rules and settings to match your specific requirements.
- Click Apply.
A confirmation window appears. - Click OK.
Security Center applies the selected security policy and prompts you to run a new security checkup scan to assess your system based on the updated settings.
- Optional: Click Yes.
Security Center runs the security checkup scan.
View security advisories
In Security Center, you can subscribe to security advisories, enable notifications for new advisories, or view all published advisories. These options help you monitor potential vulnerabilities and security updates for your system.
- Open Security Center and go to Security Advisory.
- Perform any of the following tasks in the Security Advisory section:
- Subscribe to security advisories: Click Subscribe to select and receive QNAP security advisory updates.NoteAfter clicking Subscribe, the system redirects you to the QNAP official website, where you can configure your subscription preferences by selecting the specific security advisory topics you wish to receive.
- Enable advisory notifications: Click
 to receive notifications about new security advisories when you log into your QNAP operating system.
 - View all security advisories: Click
 to open the QNAP Security Advisories webpage and see all published advisories.
- Subscribe to security advisories: Click Subscribe to select and receive QNAP security advisory updates.
Report a security vulnerability
If you discover a security vulnerability in a QNAP product, you can report it through the QNAP Security Bounty program. The vulnerability report must be prepared using the prescribed format provided in the Vulnerability Report Suggested Format section of the QNAP Security Bounty webpage. This format defines the mandatory fields, including product name, version, vulnerability summary, access permissions, CVSS score, and step-by-step reproduction instructions. Encrypt your completed report using the PGP encryption key available on the QNAP Security Bounty Program page, then email the encrypted report to security@qnap.com for review by the QNAP Security Team.
- Open Security Center and go to Security Advisory.
- Click .
- Scroll down to the Vulnerability Report Suggested Format section on the QNAP Security Bounty Program page.
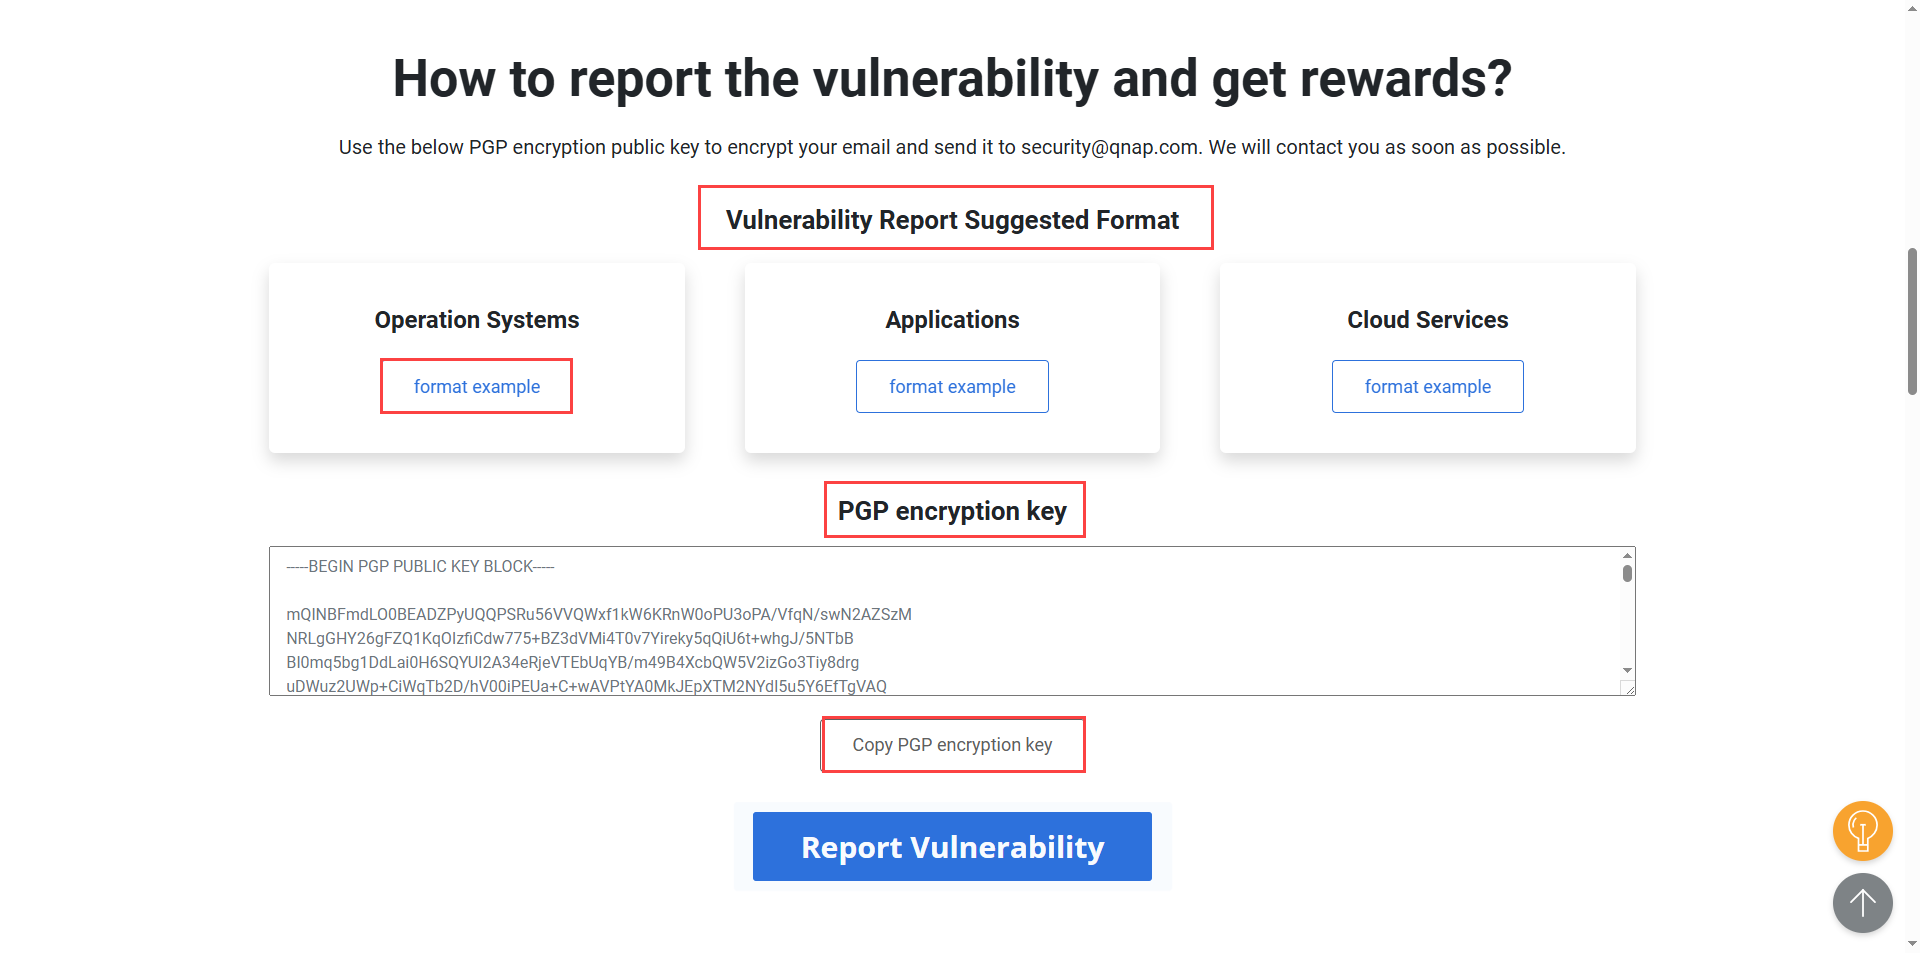
- Click format example to view the recommended report template.
- Copy the template content and paste it into your email body.
- Populate the template with the relevant details of your identified security threat or vulnerability.
- On the QNAP Security Bounty Program page, scroll down to the PGP encryption key section.
- Click Copy PGP encryption key to copy the displayed encryption key.
- Use a PGP encryption tool to encrypt your completed vulnerability report file using the copied public key.
- Attach the encrypted file to your email.
- Send your report to
security@qnap.com.
Monitor unusual file activities
Security Center monitors file activities on your NAS and establishes a baseline of normal behavior. If deviations from this baseline are detected, such as high file upload rates or mass deletions, the system generates event logs. Notifications are triggered only if you have configured the corresponding notification rules in Notification Center. For details, see the "Creating an event notification rule" topic in the Notification Center chapter of the QTS User Guide or QuTS hero User Guide.
Unusual activity does not necessarily indicate a security threat, but may indicate patterns that differ from standard file operations. Examples include significant file uploads, bulk file deletions, or modifications.
Add a volume to monitor
- Open Security Center and go to Unusual File Activity Monitoring.
- Click Add Source.
The Add Sources window appears. - Select one or more volumes to monitor.
- Click Apply.
Manage monitored sources
Define the directories and file activities to monitor for security events, to ensure that detection of unauthorized changes and access attempts.
- Open Security Center and go to Unusual File Activity Monitoring > Settings.
- Identify a source volume, click
 .
.
The Monitoring Settings window appears.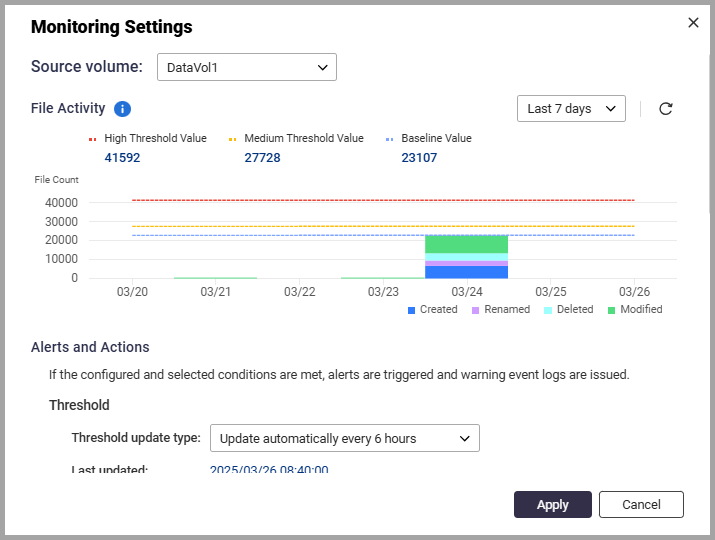
- Configure the settings for the selected source volume.
- Select the threshold update frequency.
- Enable Number of file changes over the medium threshold value to trigger an alert when file changes exceed the medium threshold.
- Select Number of file changes over the high threshold value to trigger an alert when file changes exceed the high threshold.
- Next to Selected Actions, click
 , and select one or more actions that should be performed when the alert is triggered:
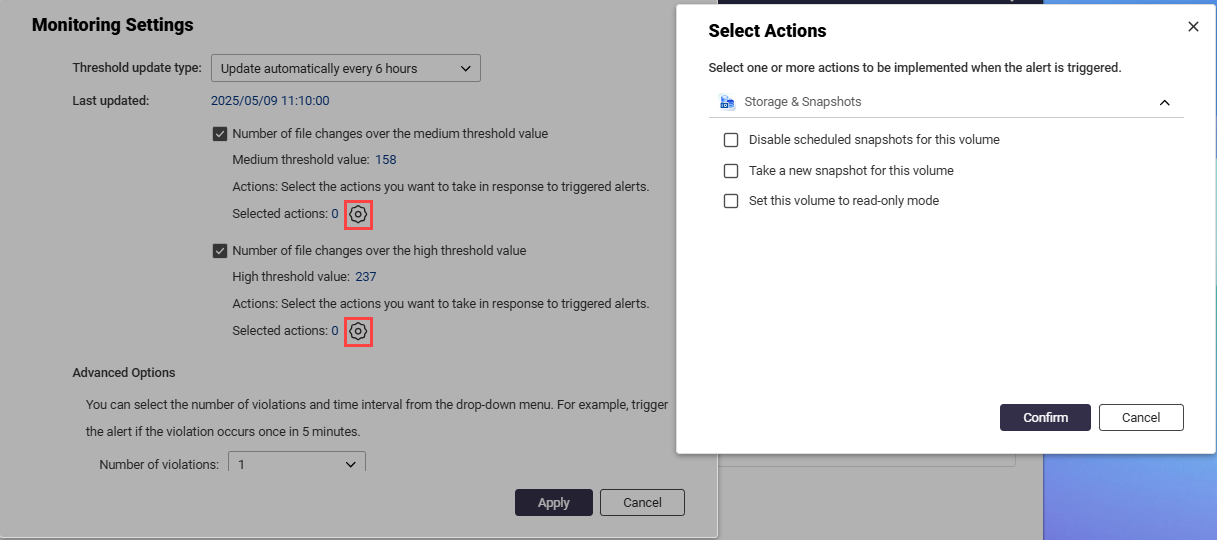
- Disable scheduled snapshots for this volume: Prevents scheduled snapshots from running.
- Take a new snapshot for this volume: Creates a snapshot when the alert is triggered.
- Set this volume to read-only mode: Restricts file modifications on the volume.NoteThis option is available for both the medium and high threshold settings.
- Click Confirm to apply the actions.
- Configure advanced options.

- Specify how many occurrences of a violation are required to trigger an alert.
- Select the time interval to specify the period within which the violations must occur.
- Optional: Enable Do not trigger the alert when the baseline value is lower than the specified value, then specify the threshold value to prevent alerts from triggering below the defined baseline.
- Enable Security Center monitors the file activities of the specified directory, and issues a warning event log when one or more file changes are detected to monitor specific file directories, and click Browse to select the directory to monitor.
- Click to select one or more actions that should be performed on the selected directory when the alert is triggered.
- Click Apply to save the settings for the monitored source volume.
Undo actions taken on unusual file activity
- Open Security Center and go to Unusual File Activity Monitoring > Report.
- Identify a file activity where a preventive action was applied.
- Click Undo.NoteYou cannot undo preventive actions while the system is performing the Take a New Snapshot monitoring task.
Security Center reverses the preventive action taken on the file activity that triggered the alert.
View event logs
Security Center allows users to review event logs related to unusual file activity. These logs provide detailed records of detected threats, preventive actions taken, and system responses. Monitoring event logs helps users analyze security incidents and take necessary actions.
- Open Security Center and go to Unusual File Activity Monitoring > Event Log.
- Perform any of the following tasks:
- Search keywords: Enter specific keywords to filter logs and quickly locate relevant events.
- Select a severity level: Filter logs by severity level to view events based on their significance.
Further reading and resources
- Security Center: Official QNAP landing page for Security Center
- Knowledge Base: Searchable database of FAQs, tutorials, and web helps
- QNAP College: Instruction video tutorials
- Download Center: Latest firmware files, hardware user guides, and other information available for download
- QTS User Guide: Web help for the latest version of QTS, including a detailed chapter on License Center
- QuTS hero User Guide: Web help for the latest version of QuTS hero, including a detailed chapter on License Center


