How to Set Up and Use QVPN Service and QVPN Device Client


Last modified date: 2024-05-30

QVPN Service

About QVPN Service

QVPN Service is a centralized tool for the creation and management of VPN servers and client connections on your QNAP device.

See the following table for details on QVPN Service compatibility.


QVPN Service Version

Supported Firmware

Supported Protocols

QVPN Service 2.0.x

  • QTS 4.3.6

  • QTS 4.4.0

  • QBelt

  • L2TP

  • PPTP

  • OpenVPN

QVPN Service 2.1.x

QTS 4.3.6 (TS-128 and TS-228 only)

  • L2TP

  • PPTP

  • OpenVPN

QVPN Service 2.2.x

QTS 4.4.1

  • QBelt

  • L2TP

  • PPTP

  • OpenVPN

QVPN Service 2.3.x

QTS 4.5.x

QVPN Service 2.4.x

QTS 5.0.x (ARM)

QVPN Service 3.0.x

QTS 5.0.x (x86)

  • QBelt

  • L2TP

  • PPTP

  • OpenVPN

  • QuWAN QBelt

  • WireGuard

Parts of the User Interface

The QVPN Service user interface has three main areas.
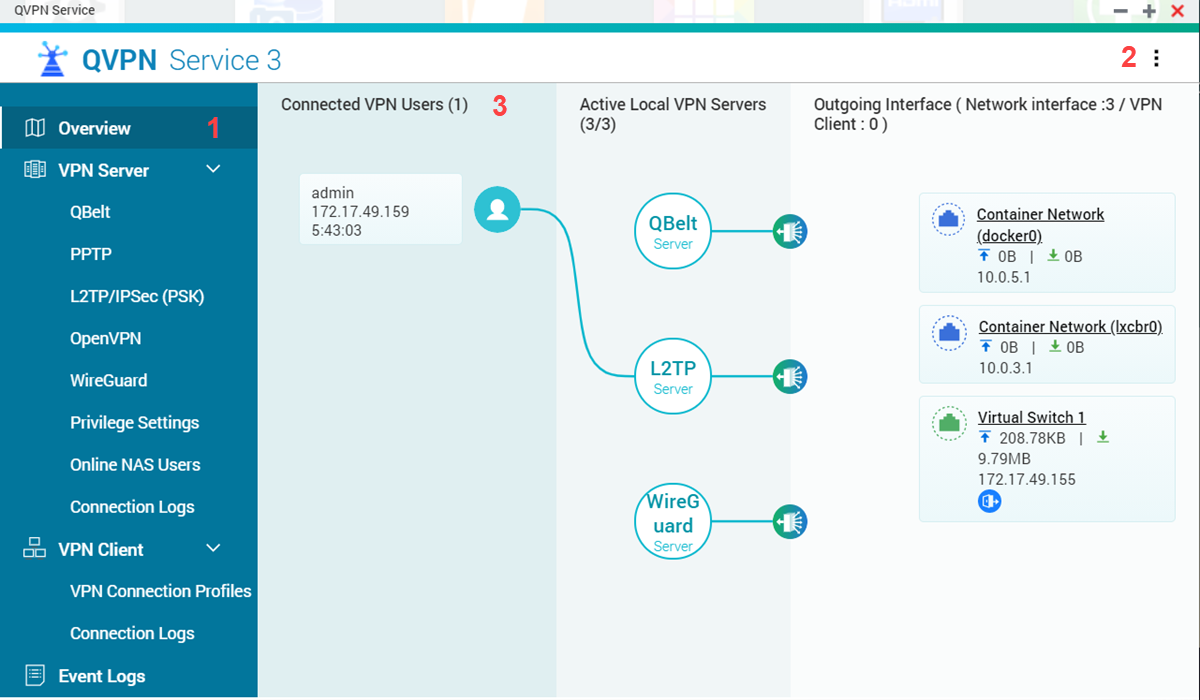
  

Label

Area

Description

1

Menu

The menu has four sections: Overview, VPN Server, VPN Client, and Event Logs

Tip:

You can click  or  to collapse or expand the submenu items.

2

Toolbar

Click  to access the following options:

  • Help: Opens the QVPN Service Help panel.

  • About: Displays the QVPN Service version.

3

Main Panel

The main panel displays the selected screen.

Overview

The Overview screen provides a general overview of the status of QVPN Service.


Section

Description

Connected VPN Users

Displays information related to any users currently connected to local VPN servers. Includes the following information:

  • Username
  • Source IP address
  • Connection duration
  • Device name (QBelt only)
For more detailed information, go VPN Server > Online NAS Users.

Active Local VPN Servers

Displays information related to any VPN servers running on the NAS. Includes both active connections and outgoing network interfaces.

To view server settings, click the server icon.

Outgoing Interface

Displays information related to the outgoing network interfaces of each local VPN server Includes the following information:

  • Active VPN connections
  • Profile name
  • IP address
  • Additional detailed information.

VPN Server Settings

Enabling a QBelt VPN Server

QBelt is a proprietary communications protocol incorporating DTLS and AES-256 encryption.

QVPN Service 2.1.x does not support the use of the QBelt protocol.

  1. Open QVPN Service.
  2. Go to VPN Server > QBelt.

    The QBelt page appears.

  3. Click Enable QBelt server.
     
  4. Configure the QBelt VPN server settings.
     

    Setting

    User Action

    VPN client IP pool

    Specify a range of IP addresses available to connected VPN clients.

    Important:

    By default, this server reserves the use of IP addresses from 10.6.0.0/24. If another connection is configured to use this range, an IP conflict error will occur. Before adding this server, ensure a VPN client isn't configured to use this range as well.

    Server Port

    Specify the UDP server port used to access this server.

    Tip:

    Default port: 443

    Preshared key

    Specify a key (password) to verify connecting VPN clients.

    Important:
    • As a security best practice, QNAP recommends specifying a strong preshared key.

    • Ensure that the pre-shared key is specified in both the VPN server and client configuration page to connect to the VPN tunnel.

    Maximum number of clients

    Specify the number of connected clients allowed at one time.

    Important:

    The number must be between 5 and 60.

    Network interface

    1. Click  to specify an available network interface to use when connecting to the VPN server. Available options include:

      • All (Auto Detect)

      • None

      • Manually assign

    2. Click Apply.

    DNS Server

    Specify a DNS server for the QBelt server.

    Note: The DNS Quick Wizard can help configure this setting. For more information, please see Configuring the DNS Quick Wizard Settings.
  5. Optional:  Select Enable Debug Log.
    Tip:

    Enable debug log to record QBelt operations and errors that occur when executing the VPN server functions.

    Warning:

    Enabling the debug log function may affect the VPN server performance.

  6. Click Apply.

QVPN Service saves the QBelt VPN server settings.

Enabling a PPTP VPN Server

PPTP (Point-to-Point Tunneling Protocol) enables secure data transfer from a remote location to the NAS by creating a virtual private network (VPN). PPTP is supported on Windows, Mac, Linux, and mobile devices.

Tip:

The PPTP server listens for client connections on TCP port 1723.

Important:

QVPN Service does not support PPTP if the QTS instance is hosted on Microsoft Azure, Google Cloud, or Catalyst Cloud because these cloud platforms do not support Generic Routing Encapsulation (GRE) protocol that is required to encapsulate point-to-point network links.

  1. Open QVPN Service.
  2. Go to VPN Server > PPTP.
  3. Click Enable PPTP VPN server.
  4. Configure the PPTP VPN server settings.
     

    Setting

    User Action

    VPN Client IP Pool

    Specify a range of IP addresses available to connected VPN clients.

    Important:

    By default, this server reserves the use of IP addresses from 10.0.0.0/24. If another connection is configured to use this range, an IP conflict error will occur. Before adding this server, ensure a VPN client isn't configured to use this range as well.

    Maximum number of clients

    Specify the number of connected clients allowed at one time.

    Important:

    The number must be between 5 and 60.

    Authentication

    Select an authentication method.

    Encryption

    Select an encryption method.

    Network interface

    1. Click  to specify an available network interface to use when connecting to the VPN server. Available options include:

      • All (Auto Detect)

      • None

      • Manually assign

    2. Click Apply.

    DNS Server

    Specify a DNS server for the PPTP server.

    Note: The DNS Quick Wizard can help configure this setting. For more information, please see Configuring the DNS Quick Wizard Settings.
  5. Click Apply.

QVPN Service saves the PPTP VPN server settings.

Enabling an L2TP/IPSec VPN Server


L2TP (Layer Two Tunneling Protocol) is a combination of the Point-to-Point Tunneling Protocol (PPTP) and Layer 2 Forwarding (L2F). While PPTP only establishes a single tunnel between two end points, L2TP supports multiple tunnels.

IPsec is often used to secure L2TP packets by providing confidentiality, authentication and integrity checks.

The combination of these two protocols provides a high-security VPN solution known as L2TP/IPSec. L2TP/IPSec is supported on Windows, Mac, Linux, and mobile devices.

Tip:
The L2TP/IPSec server listens for client connections on the following UDP ports:
  • 500

  • 1701

  • 4500


  1. Open QVPN Service.
  2. Go to VPN Server > L2TP/IPSec.
  3. Click Enable L2TP/IPSec VPN Server.
  4. Configure the L2TP/IPSec VPN server settings.
     

    Setting

    User Action

    VPN client IP pool

    Specify a range of IP addresses available to connected VPN clients.

    Important:

    By default, this server reserves the use of IP addresses from 10.2.0.0/24. If another connection is configured to use this range, an IP conflict error will occur. Before adding this server, ensure a VPN client isn't configured to use this range as well.

    Preshared key

    Specify a key used to verify connecting VPN clients.

    Important:
    • As a security best practice, QNAP recommends specifying a strong preshared key.

    • Ensure that the pre-shared key is specified in both the VPN server and client configuration page to connect to the VPN tunnel.

    Maximum number of clients

    Specify the number of connected clients allowed at one time.

    Important:

    The number must be between 5 and 60.

    Authentication

    Select an authentication method.

    Network interface

    1. Click  to specify an available network interface to use when connecting to the VPN server. Available options include:

      • All (Auto Detect)

      • None

      • Manually assign

    2. Click Apply.

    DNS Server

    Specify a DNS server for the L2TP/IPSec server.

    Note: The DNS Quick Wizard can help configure this setting. For more information, please see Configuring the DNS Quick Wizard Settings.
  5. Click Apply.

QVPN Service saves the L2TP/IPSec VPN server settings.

Enabling an OpenVPN Server

OpenVPN is an open-source VPN solution encrypted and protected by SSL.

  1. Open QVPN Service.
  2. Go to VPN Server > OpenVPN.
  3. Click Enable OpenVPN server.
  4. Configure the OpenVPN VPN settings.
     

    Setting

    User Action

    VPN client IP pool

    Specify a range of IP addresses available to connected VPN clients.

    Important:

    By default, this server reserves the use of IP addresses from 10.8.0.0/24. If another connection is configured to use this range, an IP conflict error will occur. Before adding this server, ensure a VPN client isn't configured to use this range as well.

    Server Port

    Specify the port used to access this server.

    Maximum number of clients

    Specify the number of connected clients allowed at one time.

    Important:

    The number must be between 5 and 60.

    Encryption

    Select an encryption method.

    Network interface

    1. Click  to specify an available network interface to use when connecting to the VPN server. Available options include:

      • All (Auto Detect)

      • None

      • Manually assign

    2. Click Apply.

    DNS Server

    Specify a DNS server for the OpenVPN server.

    Note: The DNS Quick Wizard can help configure this setting. For more information, please see Configuring the DNS Quick Wizard Settings.
  5. Optional:  Select Use this connection as a default gateway for remote devices.
  6. Optional:  Select Enable compressed VPN link.
    Tip:

    This setting compresses data before transferring it over the VPN. This will increase data transfer speeds, but requires additional CPU resources. This setting is enabled by default.

  7. Click Apply.

QVPN Service saves the OpenVPN VPN server settings.

Downloading an OpenVPN Configuration File

An OpenVPN Configuration File or Certificate is used to import settings to an OpenVPN client.
Tip:

Clients must import an updated configuration file or certificate after every change to the OpenVPN server settings.

  1. Open QVPN Service.

    For details, see Enabling an OpenVPN Server.

  2. Click Download Configuration File.
    Important:
    • The OpenVPN certificate should only be used with QVPN versions earlier than v1.1. In all other cases, please use the OpenVPN configuration file instead.

QVPN Service downloads the OpenVPN configuration file.

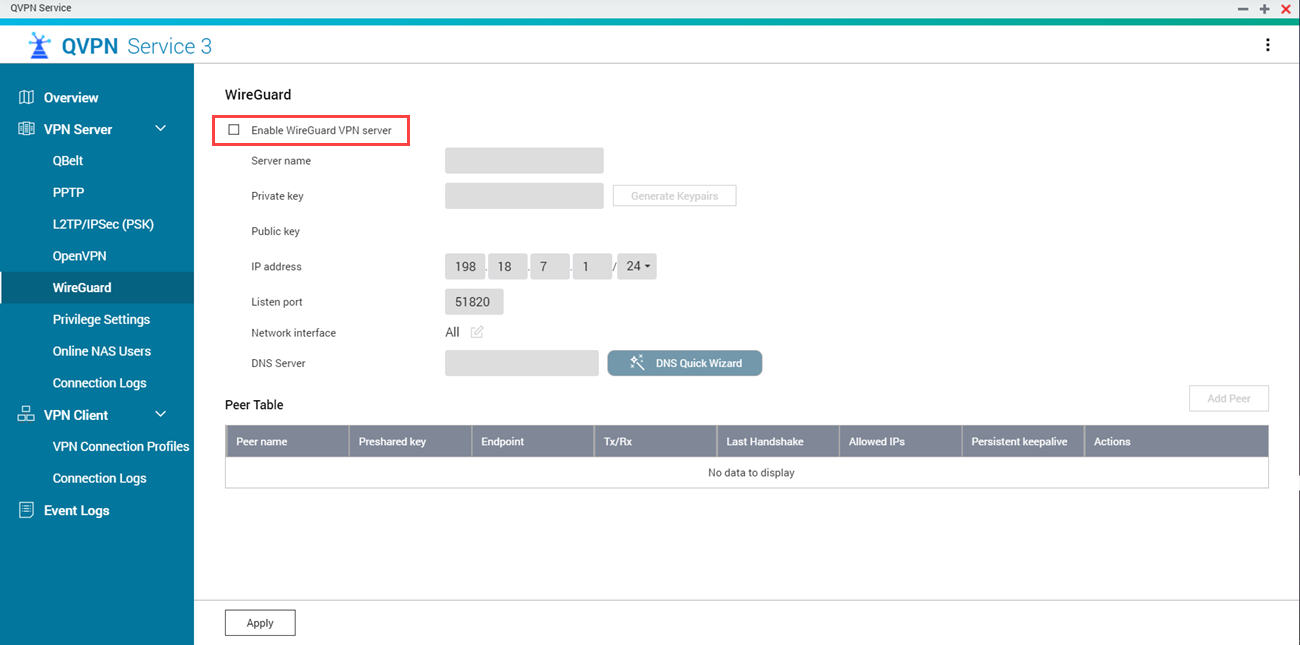
Enabling a WireGuard VPN Server

WireGuard is an open-source VPN protocol that uses User Datagram Protocol (UDP) for network communication. The protocol uses several cryptography tools to implement secure VPN tunneling.

  1. Open QVPN Service.
  2. Go to VPN Server > WireGuard.
  3. Click Enable WireGuard VPN Server.
  4. Configure the WireGuard settings.
     

    Setting

    User Action

    Server name

    Specify a name for the VPN server.

    Note:

    Requirements:

    Valid characters: A–Z,  a–z, 0–9

    Private key

    Click Generate Keypairs to automatically populate a unique 32-byte private key.

    IP address

    Enter a fixed IP subnet for the VPN server.
    Important:

    By default, this server reserves the use of IP addresses from 198.18.7.1/24. If another connection is configured to use this range, an IP conflict error will occur. Before adding this server, ensure a VPN client isn't configured to use this range as well.

    Listen port

    Specify a UDP port number between 1 and 65535.

    Note:

    The default WireGuard port number is 51820.

    Network interface (next hop)

    Specify an available network interface to use when connecting to the VPN server. Available options include:

    • All (Auto Detect)

    • None

    • Manually assign

    DNS Server

    Specify a DNS server for the WireGuard server.

    Note: The DNS Quick Wizard can help configure this setting. For more information, please see Configuring the DNS Quick Wizard Settings.
  5. Click Add Peer.

    The Add Peer window appears.

  6. Configure the peer settings.
     

    Setting

    User Action

    Peer name

    Specify a name for the peer.

    Note:

    Requirements:

    • Valid characters: A–Z,  a–z, 0–9

    • Valid special characters: Hyphen (-)

    Public key

    Enter the public key generated in the WireGuard application in the VPN client device.

    Advanced Settings

    Pre-shared key

    Specify an optional pre-shared key only if the VPN client device supports the pre-shared key function.

    Important:
    • As a security best practice, QNAP recommends specifying a strong preshared key.

    • Ensure that the pre-shared key is specified in both the VPN server and client configuration page to connect to the VPN tunnel.

    Endpoint

    Specify an optional endpoint IP address in the IP address:listen port format.

    Example: 192.168.10.1:51820.

    Persistent keepalive

    Specify the interval in seconds to send keepalive packets if the peer is behind a firewall.

  7. Click Apply.

    QVPN Service adds the peer.

  8. Click Apply.

QVPN Service applies the WireGuard VPN server settings.

Configuring the DNS Quick Wizard Settings

Domain Name System (DNS) is a service that translates a website’s name to its IP address. DNS makes it easier for users to access websites and services with an easy-to-remember URL (such aswww.qnap.com) instead of a difficult and long IP address. The DNS Quick Wizard helps users choose the DNS service that best meets their needs. The default options in this wizard work best in most cases, but advanced users can also manually configure additional DNS services.

Note: This wizard is accessible after enabling any of the VPN servers in QVPN Service.
  1. Open QVPN Service.
  2. Select a VPN server.
  3. Enable the VPN server.
  4. Click DNS Quick Wizard.

    The Setting DNS window opens.

  5. Click Next.
  6. Select a DNS option.
     

    Option

    User Action

    Public DNS

    Select a DNS from a list of public sources.

    NAS default

    Use the default DNS server.

    Tip:

    This option can increase the security of VPN connections.

    Note:

    This option is not applicable to WireGuard VPN settings.

    Manually assign

    Manually enter the IP address for a DNS service.

  7. Click Apply.

QVPN Service applies the DNS settings to the VPN server or client.

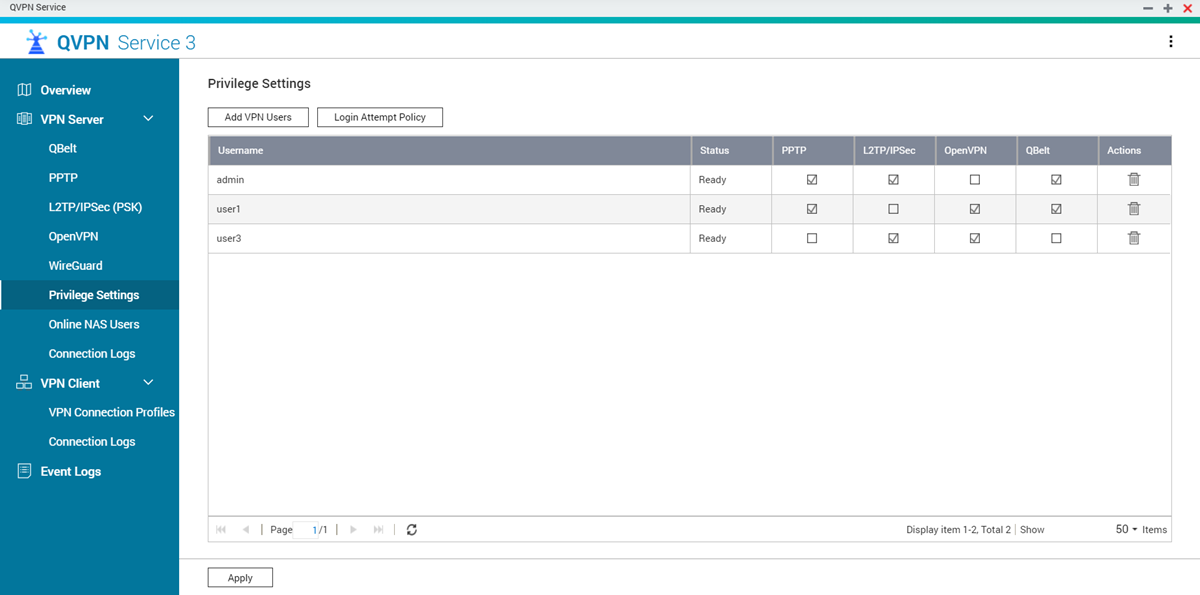
Privilege Settings

To view the list of VPN users accounts, delete VPN user accounts, and manage approved access rights for each VPN server, go to VPN Server > Privilege Settings.

Adding a VPN User

  1. Open QVPN Service.
  2. Go to VPN Server > Privilege Settings.
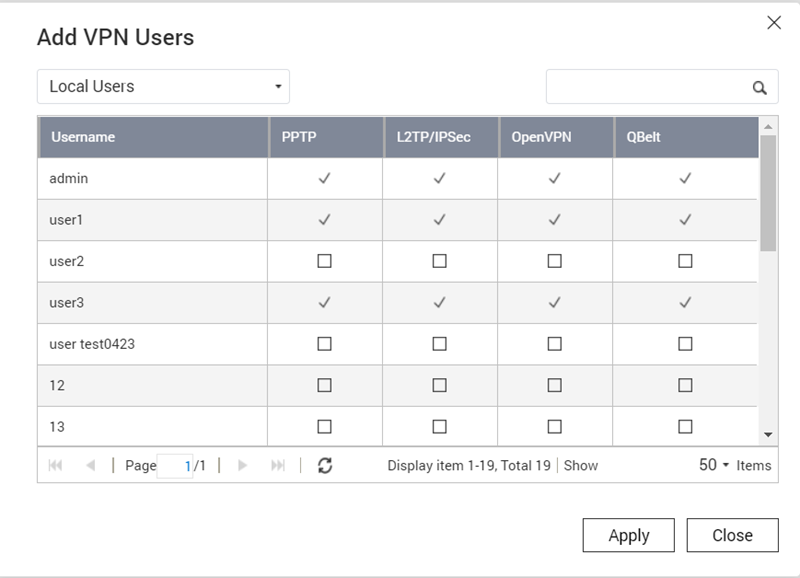
  3. Click Add VPN Users.

    The Add VPN Users window opens.

  4. Locate an existing user account.
    Tip:

    You can switch between local user accounts and domain user accounts with the menu at the top of this window.

  5. Select the VPN server types.
  6. Click Apply.

QVPN Service adds the VPN user.

Configuring the Login Attempt Policy for VPN Users

The login attempt policy prevents brute-force attacks during the VPN connection authentication process.

  1. Open QVPN Service.
  2. Go to VPN Server > Privilege Settings.
  3. Click Login Attempt Policy.

    The Login Attempt Policy window opens.

  4. Click Enable.
  5. Configure the policy settings.
     

    Setting

    User Action

    Number of login attempts

    Select the number of failed attempts before further attempts are denied.

    Login failure block time

    Specify the frequency for resetting the failed login attempt counter.

  6. Click Apply.

QVPN Service applies the login attempt policy settings.

Monitoring Online NAS Users

The Online NAS Users window lists connections to VPN servers running on the NAS. It includes information about log-in time, up time, username, source IP, VPN client IP, and connection method.
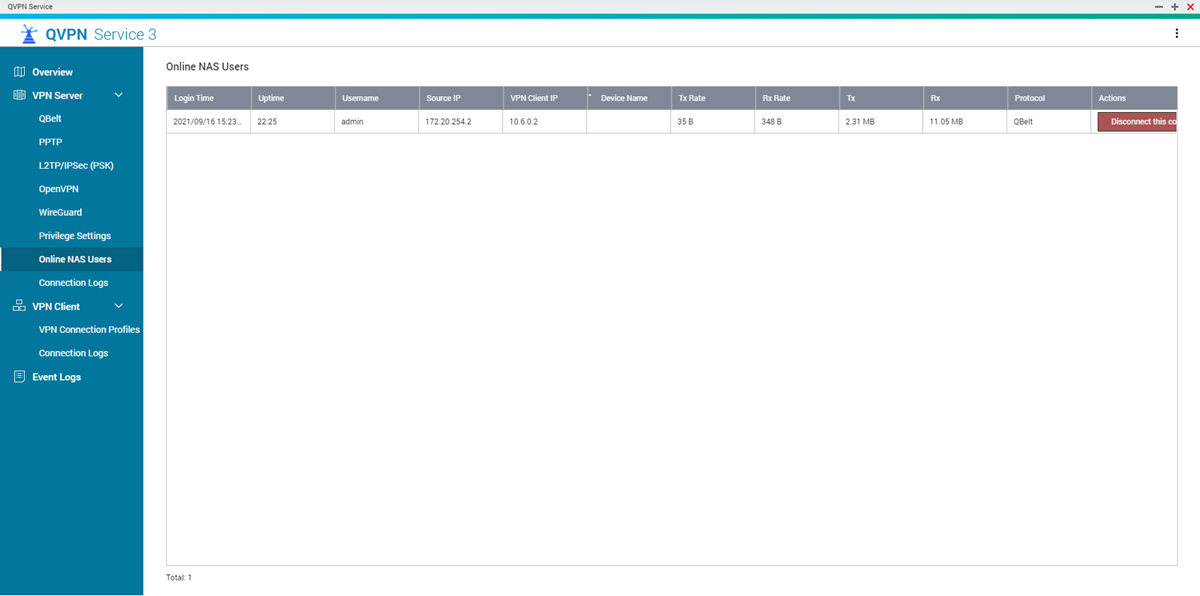
Tip:

Under Actions, click Disconnect this connection to disable the VPN tunnel connection.

Managing VPN Server Connection Logs

The Connection Logs page displays a record of connections to the VPN servers in QVPN Service. Recorded information includes the connection date, the connection duration, username, source IP, and other detailed information.

Tip:

Click Clear Logs to delete all the VPN server connection logs.

VPN Client Settings

The QVPN Service client allows the NAS to remotely connect to VPN servers using the PPTP, OpenVPN, L2TP/IPSec, QBelt, or WireGuard protocols.

Important:
  • When adding an OpenVPN connection, an OpenVPN configuration file is required to establish the connection.

  • The L2TP, PPTP, and QBelt VPN connection cannot re-resolve the domain name (server address) when automatically reconnecting to the VPN server after changing the server IP address. In case the IP address has been changed, you must reconnect to the VPN server manually.

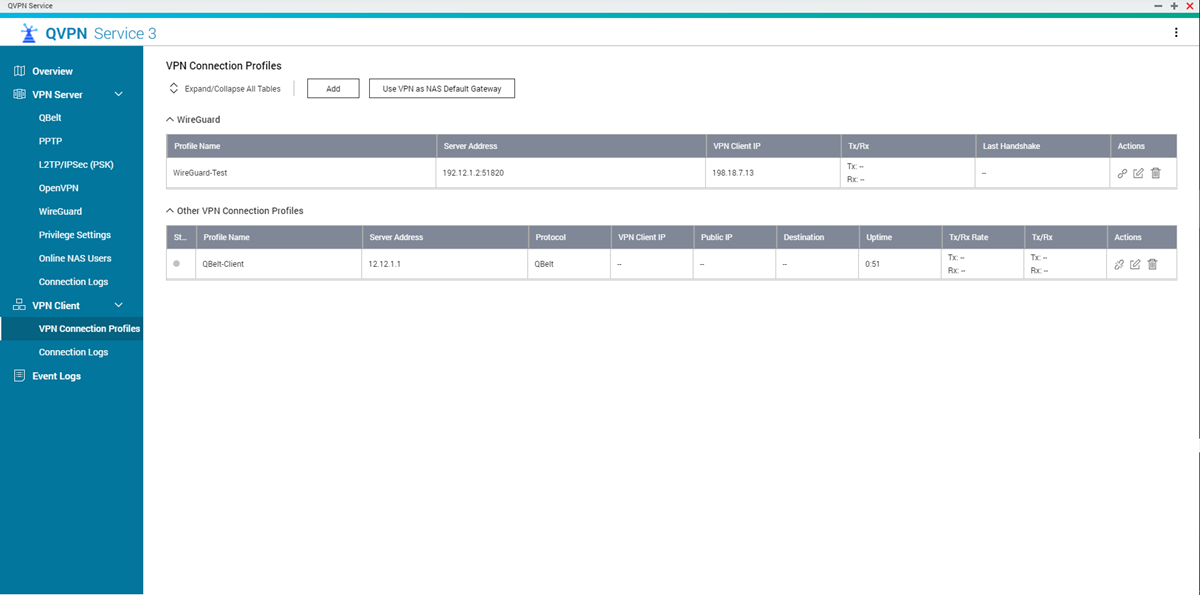
VPN Client Connection Profiles

To view the existing VPN client connection profiles, go to VPN Client > VPN Connection Profiles. You can perform the following actions on a VPN client connection profile.

Important:

By default, VPN servers in QVPN Service reserve the use of the following IP subnets. If another connection is configured to use this range, an IP conflict error will occur. Before adding this connection, ensure an IP conflict does not exist.

If the enabled VPN server is using the reserved IP subnet, you cannot use the same IP subnet to configure your VPN client connection profile.


VPN Server

IP subnet

PPTP

10.0.0.0/24

L2TP

10.2.0.0/24

OpenVPN

10.8.0.0/24

QBelt

10.6.0.0/24

WireGuard

198.18.7.0/24


Action

User Action

Connect

Click  to connect the VPN client connection profile to the VPN server.

Edit

Click  to modify the VPN client connection profile.

Delete

Click  to delete the VPN client connection profile.

Creating a QBelt VPN Client Connection

  1. Open QVPN Service.
  2. Go to VPN Client > VPN Connection Profiles.
  3. Click Add.
  4. Select QBelt.

    A notification about reserved IP address appears.

  5. Click Enable.

    The Create VPN Connection (QBelt) window opens.

  6. Configure the VPN connection settings.
     

    Setting

    User Action

    Profile Name

    Specify a name to help identify this profile.

    Server Address

    Specify the IP address for the VPN server.

    Username

    Specify the username to access the VPN server.

    Password

    Specify the password to access the VPN server.

    Preshared key

    Specify the key provided by the VPN server administrator.

    Important:

    As a security best practice, QNAP recommends specifying a strong preshared key.

    Server Port

    Specify the port used to access this server.

    Specify the subnet mask

    Specify the subnet mask.

  7. Optional:  Select Reconnect when the VPN connection is lost.
  8. Optional:  Select Enable Debug Log.
    Tip:

    Enable debug log to record QBelt operations and errors that occur when executing the VPN server functions.

    Warning:

    Enabling the debug log function may affect the VPN server performance.

  9. Click Create.

QVPN Service saves the QBelt VPN client settings.

Creating a PPTP VPN Client Connection

  1. Open QVPN Service.
  2. Go to VPN Client > VPN Connection Profiles.
  3. Click Add.
  4. Select PPTP.
    The Create VPN Connection (PPTP) window opens.
  5. Configure the VPN connection settings.
     

    Setting

    User Action

    Profile Name

    Specify a name to help identify this profile.

    Server Address

    Specify the IP address for the VPN server.

    Username

    Specify the username to access the VPN server.

    Password

    Specify the password to access the VPN server.

    Authentication

    Select an authentication method.

    Encryption

    Select an encryption method.

    Specify the subnet mask

    Specify the subnet mask.

  6. Optional:  Select Reconnect when the VPN connection is lost.
  7. Click Create.

QVPN Service saves the PPTP VPN client settings.

Creating an L2TP/IPSec VPN Client Connection

  1. Open QVPN Service.
  2. Go to VPN Client > VPN Connection Profiles.
  3. Click Add.
  4. Select L2TP/IPSec.

    A notification about reserved IP address appears.

  5. Click Enable.

    The Create VPN Connection (L2TP/IPSec) window opens.

  6. Configure the VPN connection settings.
     

    Setting

    User Action

    Profile Name

    Specify a name to help identify this profile.

    Server Address

    Specify the IP address for the VPN server.

    Username

    Specify the username to access the VPN server.

    Password

    Specify the password to access the VPN server.

    Authentication

    Select an authentication method.

    Preshared key

    Specify the key provided by the VPN server administrator.

    Specify the subnet mask

    Specify the subnet mask.

  7. Optional:  Select Reconnect when the VPN connection is lost.
  8. Click Create.

QVPN Service saves the L2TP/IPSec VPN client settings.

Creating an OpenVPN Connection

  1. Open QVPN Service.
  2. Go to VPN Client > VPN Connection Profiles.
  3. Click Add.
  4. Select OpenVPN.

    A notification about reserved IP address appears.

  5. Click Enable.

    A File Explorer window opens.

  6. Locate the OpenVPN configuration file on your device.
  7. Click Open.

    The Create VPN Connection (OpenVPN) window opens.

  8. Configure the VPN connection settings.
     

    Setting

    User Action

    Profile Name

    Specify a name to help identify this profile.

    Username

    Specify the username to access the VPN server.

    Password

    Specify the password to access the VPN server.

    Specify the subnet mask

    Specify the subnet mask.

  9. Optional:  Select Reconnect when the VPN connection is lost.
  10. Click Apply.

QVPN Service saves the OpenVPN VPN client settings.

Creating a WireGuard VPN Client Connection

You can configure your device as a WireGuard VPN client in QVPN Service only to connect to a WireGuard server configured on a different device.

  1. Open QVPN Service.
  2. Go to VPN Client > VPN Connection Profiles.
  3. Click Add.
  4. Select WireGuard.

    The Create VPN Connection (WireGuard) window opens.

  5. Configure the VPN connection settings.
     

    Setting

    User Action

    Server name

    Specify a name for the VPN server.

    Note:

    Requirements:

    Valid characters: A–Z,  a–z, 0–9

    Private key

    Click Generate Keypairs to automatically populate a unique 32-byte private and public key.

    Public key

    Copy the public key to the clipboard.

    Important:

    Ensure that you specify the copied public key in the WireGuard peer settings page.

    IP address

    Enter a IP subnet specified in the WireGuard VPN server page.

    Listen port

    Specify an optional UDP port number between 1 and 65535.

    DNS Server

    Specify a dedicated DNS server IP address that the WireGuard VPN server can access through the VPN tunnel.

    Note: The DNS Quick Wizard can help configure this setting. For more information, please see Configuring the DNS Quick Wizard Settings.
  6. Configure the peer settings.
     

    Setting

    User Action

    Public key

    Copy and paste the public key from the WireGuard VPN server page.

    Note:

    The base64-encoded public key generated in the QVPN Service WireGuard VPN server page is required to authenticate both server and client.

    Endpoint

    Specify the IP address of the WireGuard server using the IP address:listen port format.

    Example: 192.168.10.1:51820.

    Advanced Settings

    Pre-shared key

    Specify the key only if the pre-shared key setting has been configured on the VPN server device.

    Important:

    Ensure that the pre-shared key is specified in both the VPN server and client configuration page to connect to the VPN tunnel.

    Allowed IPs

    Specify the list of addresses that are routed to the peer.

    Note:
    • Enter at least one IP subnet containing the internal IP addresses of the WireGuard connection.

    • To allow packets from any IP subnet, enter 0.0.0.0/0.

    Persistent keepalive

    Specify the interval in seconds to send keepalive packets if the peer is behind a firewall.

  7. Click Create.

QVPN Service creates the WireGuard VPN client connection profile.

Using a VPN as the NAS Default Gateway

Important:
  • If the primary VPN disconnects, the default gateway switches automatically.

  • This option is unavailable if the NAS default gateway has already been changed from auto to fixed. For more information, go to the Network & Virtual Switch documentation.

  1. Open QVPN Service.
  2. Go to VPN Client > VPN Connection Profiles.
  3. Click Use VPN as NAS Default Gateway.

    The Use VPN as NAS Default Gateway window opens.

  4. Click
  5. Select a VPN profile.
  6. Optional:  Enable a Backup VPN.
    1. Select a backup VPN profile.
    2. Specify a delay.
  7. Optional:  Select Allow other network devices in the same subnet to connect to the VPN through the NAS.
  8. Click Apply.

QVPN Service enables the VPN gateway.

Managing VPN Client Connection Logs

The Connection Logs page displays a record of connections to the VPN clients in QVPN Service. Recorded information includes the connection date, the connection duration, username, source IP, and other detailed information.

Tip:

Click Clear Logs to delete all the VPN client connection logs.

QVPN Service Event Logs

The Event Logs page displays a record of events related to the QVPN Service. Common events include enabling or disabling services, changing settings, and adding or removing configuration files.

Tip:

Event logs are also kept in the System Event Log section in QuLog Center.

QuWAN Orchestrator VPN Server

Configuring QuWAN QBelt VPN Server Settings

In addition to QVPN Service, QNAP also allows you to use QuWAN Orchestrator to configure your hub devices as QBelt VPN servers. After setting up a VPN server in the SD-WAN cloud solution, you can add multiple VPN users and clients can use QVPN Device Client to connect to the hub.

QBelt is a QNAP proprietary communications protocol incorporating DTLS and AES-256 encryption. QuWAN Orchestrator enables users to configure their QuWAN hub devices as QBelt VPN servers.

Important:

You can configure the QuWAN QBelt VPN server settings only on QNAP NAS, QGD switches, QuCPE, and third-party hypervisors configured with QuWAN vRouter Edition.

  1. Open QuWAN Orchestrator.
  2. Go to VPN Server Settings > QuWAN QBelt VPN Server.
  3. Identify a hub.
  4. Click .
    Note:

    Hubs listed on the QuWAN QBelt VPN Server page are automatically configured with the default VPN server settings. You can edit the settings based on your VPN requirements.

    The VPN server configuration window appears.

  5. Configure the QuWAN QBelt VPN server settings.
     

    Setting

    User Action

    VPN User IP Range

    Assign a fixed IP address range to the VPN users.

    Subnet mask

    Specify the subnet mask used to subdivide your IP address.

    UDP service port

    Click Service Management to assign a port number for the UDP service port.

    Tip:

    Click  to refresh the UDP service port number.

    Maximum number of VPN users

    Specify the maximum number of VPN users that can connect to the VPN server.

    Note:

    The maximum allowed number of VPN users changes depending on the specified subnet mask.

    DNS servers

    Specify the IP address of the DNS servers.

    Tip:
    • You can specify up to three DNS servers.

    • Separate entries with a comma (,).

  6. Click Save.

QuWAN Orchestrator saves the VPN server settings.

Tip:

Click  to enable the VPN server.

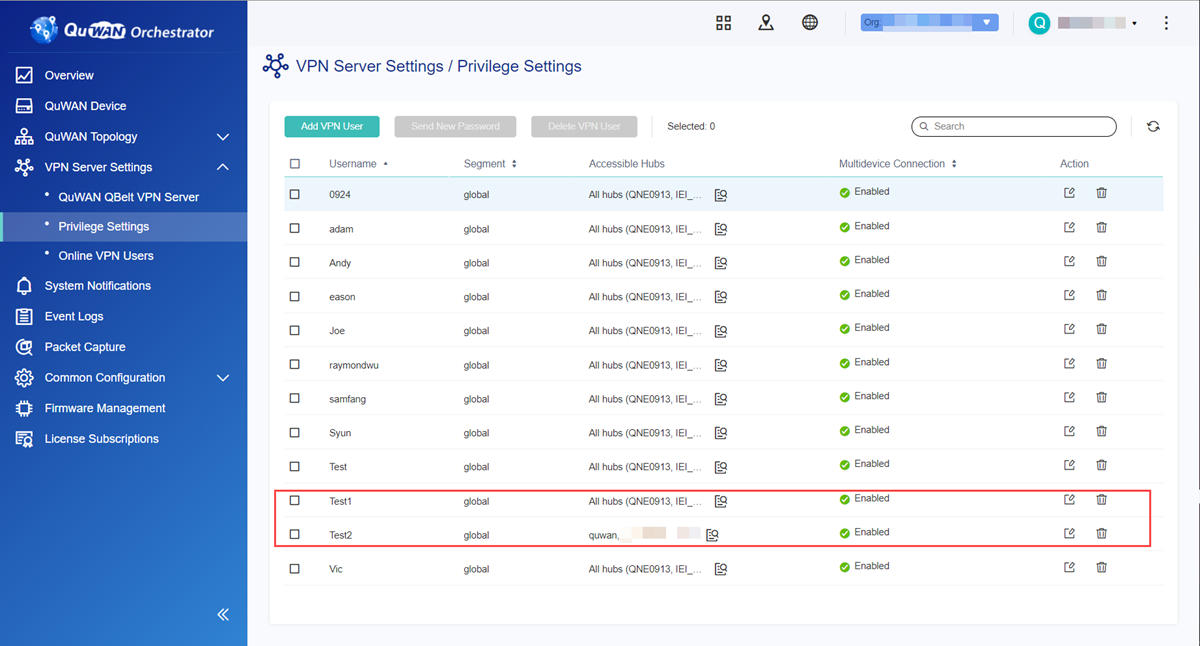
Adding a VPN User

  1. Open QuWAN Orchestrator.
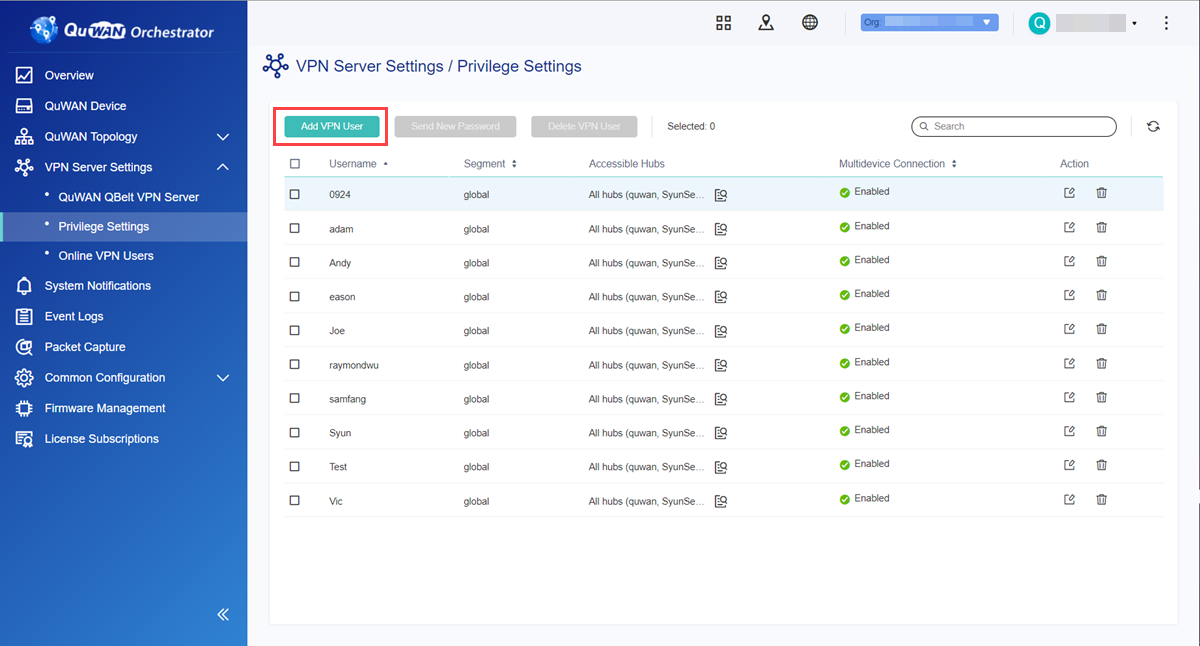
  2. Go to VPN Server Settings > Privilege Settings.
  3. Click Add VPN User.

    The Add VPN User window appears.

  4. Configure the VPN user settings.
     

    Setting

    User Action

    Username

    Specify the name of the VPN user.

    Tip:

    Username requirements:

    • Length: 1–32 characters

    • Valid characters: A–Z,  a–z, 0–9

    Email Address

    Specify the email address of the VPN user.

    Accessible Hubs

    Select any available QuWAN hub that is configured as a VPN server.

    Tip:
    • You can select more than one VPN server.

    • The VPN user can only connect to the selected hubs.

    Segment

    Select a preconfigured segment belonging to the VPN user to apply segmentation firewall rules.

    Tip:

    You can share one segment among multiple VPN users.

    Multi-device Accessibility

    Select to allow the VPN user account to connect from multiple devices at the same time.

    Tip:
    • To add multiple VPN users, click Add VPN User.

    • To delete the newly added VPN user, click .

  5. Click Create.

QuWAN Orchestrator adds the VPN user.

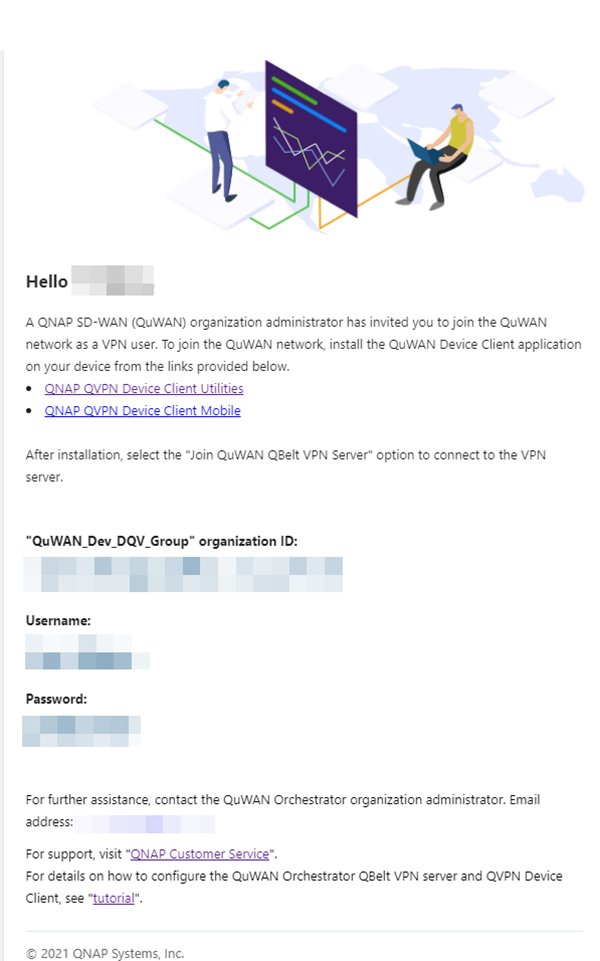
After you add the VPN user in QuWAN Orchestrator, the email recipient receives an email containing the organization ID, username, and password. Ensure that the recipient enters this information in QVPN Device Client while configuring the QuWAN QBelt VPN settings.
Deleting a VPN User

  1. Open QuWAN Orchestrator.
  2. Go to VPN Server Settings > Privilege Settings.
  3. Select a method for deleting the VPN users.

      1. Identify a VPN user.

      2. Click .

        A confirmation message appears.

      3. Click Delete.


      1. Identify a VPN user.

      2. Beside the VPN user username, click .

        Tip:

        You can select multiple VPN users.

      3. Click Delete VPN User.

        A confirmation message appears.

      4. Click Delete.

QuWAN Orchestrator deletes the VPN user and sends an email to the VPN user confirming the removal of VPN user privileges.

Sending a New Password to VPN Users

You can reset the VPN user password by sending emails to the assigned email address. You can use this process for multiple VPN users at once.

  1. Open QuWAN Orchestrator.
  2. Go to VPN Server Settings > Privilege Settings.
  3. Identify a VPN user.
  4. Beside the VPN user username, click .
    Tip:

    You can select multiple VPN users.

  5. Click Send New Password.

    A confirmation message appears.

  6. Click Send.

QuWAN Orchestrator sends the one-time password email to the selected VPN user.

Disconnecting Online VPN Users

To limit the number of online VPN users or deny access to suspicious VPN users, you can disconnect online VPN users who are connected to the QuWAN Orchestrator VPN servers.

  1. Open QuWAN Orchestrator.
  2. Go to VPN Server Settings > Online VPN Users.
  3. Identify an online VPN user.
  4. Beside the login date, click .
    Tip:

    You can select multiple VPN users.

  5. Click Disconnect.

    A confirmation message appears.

  6. Click Disconnect.

QuWAN Orchestrator disconnects the selected VPN users.

QVPN Device Client

About QVPN Device Client

The QVPN Device Client manages connections to VPN servers running on a QNAP device. Consolidating tools for monitoring VPN connection speeds, reviewing connection logs, and accessing services running on the device, the client is available on Windows, macOS, iOS, or Android devices.

Tip:

The QVPN Device Client only supports connections to QBelt servers running on the device.

See the following table for details on QVPN Device Client protocol compatibility.


Platform

Supported Protocols

Windows

  • L2TP

  • OpenVPN

  • PPTP

  • QBelt

  • QuWAN QBelt VPN Server

macOS

  • L2TP

  • QBelt

  • QuWAN QBelt VPN Server

  • Android

  • iOS

  • QBelt

  • QuWAN QBelt VPN Server

Viewing the Current VPN Connection Details

The Current VPN Connection screen displays information related to the currently connected VPN profile including information related to location, IP address, and uptime. Additionally, this screen provides quick access to applications running on the device.

Viewing the QVPN Device Client Connection Logs

The Connection Logs screen displays log records for the QVPN Device Client. Common events include enabling or disabling services, changing settings, and adding or removing configuration files.
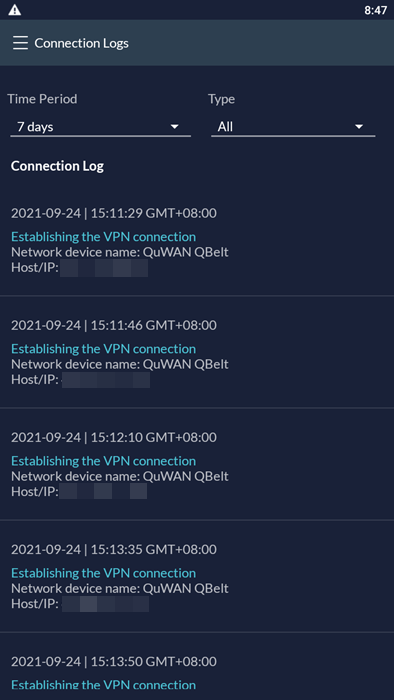
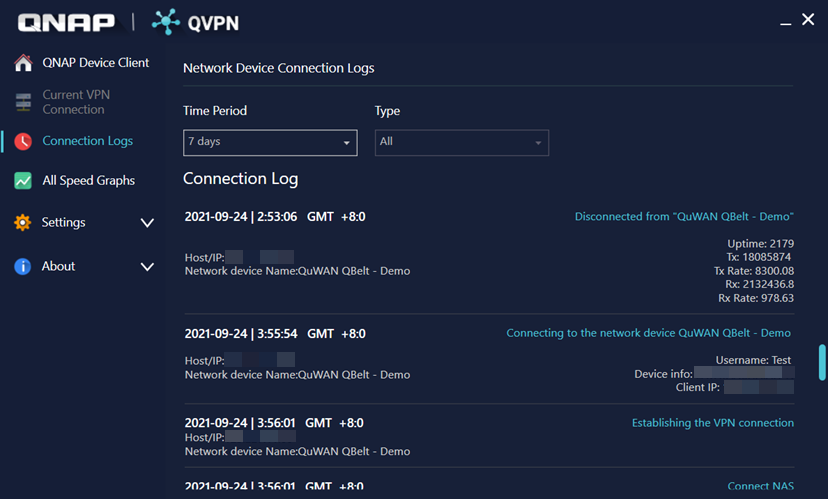
Figure 1. QVPN Device Client - Mobile
Figure 2. QVPN Device Client - PC

Monitoring the VPN Speed Graphs

To view upload and download speeds for VPN connections during the selected time period, go to All Speed Graphs.
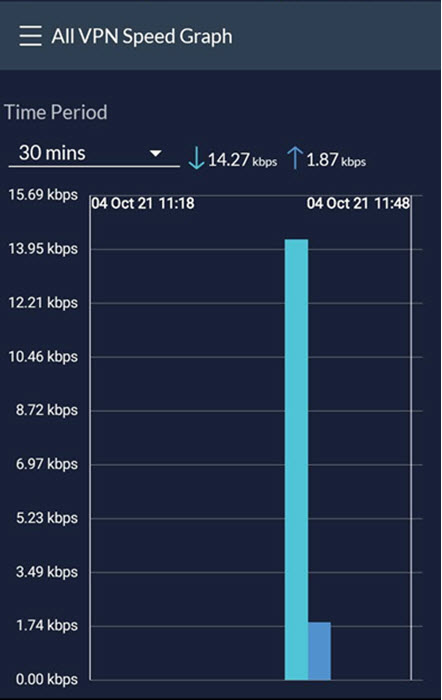
Figure 1. QVPN Device Client - Mobile
Figure 2. QVPN Device Client - PC

Accessing QVPN Device Client Settings

To access the QVPN Device Client settings, go to Settings.
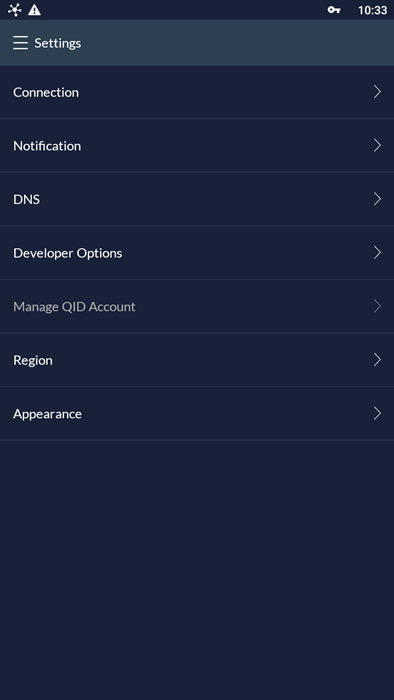
Figure 1. QVPN Device Client - Mobile
Figure 2. QVPN Device Client - PC

Connecting to a QVPN Server

Windows

Connecting to QBelt on Windows 10

Install QVPN Device Client from the QNAP website.

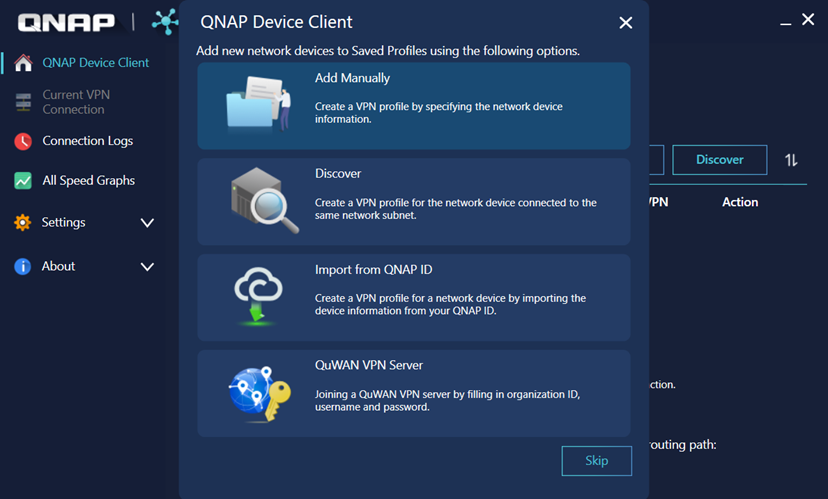
  1. Open QVPN Device Client.
  2. Select an option.
     

    Option

    User Action

    Add Manually

    Manually configure the VPN connection.

    Discover

    Search for a network device connected to the same network segment.

    1. Select a network device from the list.

    2. Click Next.

    Import from QNAP ID

    Search for a network device connected to your QNAP ID.

    1. Specify the QNAP ID and password.

    2. Click Sign in.

    3. Select the network devices.

    4. Click Import.

    5. Identify a device to configure.

    6. Click .

    7. Click Edit Network Device.

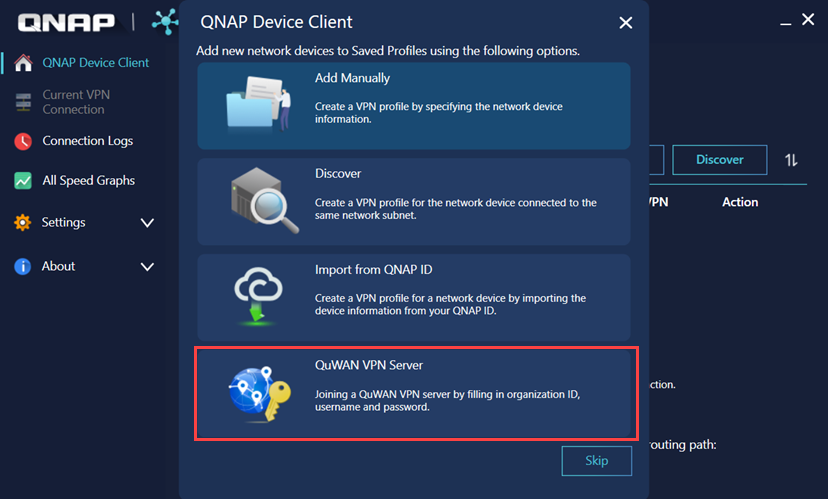
    QuWAN VPN Server

    Connect to a hub configured as a VPN server on QuWAN Orchestrator

    For details, see QuWAN Orchestrator VPN Server.

  3. Configure the VPN profile.
     

    Field

    User Action

    Device Type

    Select the type of device.

    Profile Name

    Enter a name for the VPN profile.

    Host/IP or myQNAPcloud Name

    Enter the IP address of the VPN server or myQNAPcloud internet address.

    VPN Type

    Select the VPN protocol.

    Pre-shared key

    Enter the VPN pre-shared key.

    Important:

    This field is only visible if the VPN profile cannot be automatically configured.

    VPN port

    Enter the QBelt VPN server port number.

    Important:

    This field is only visible if the VPN profile cannot be automatically configured.

    Username

    Specify a QVPN client username.

    Password

    Specify a QVPN client password.

  4. Configure the optional settings.
     

    Setting

    User Action

    Remember Me

    Enable to stay logged in even after closing the application.

    Secure Login (SSL)

    Enable to increase the login security.

    Connect Immediately After Save

    Enable to immediately connect to the QVPN server after saving the network device information.

    Advanced Options

    Detect port automatically

    Enable to allow the application to automatically detect the VPN service port.

    LAN port

    Specify the LAN port number.

    Internet port

    Specify the internet port number.

  5. Click Save
  6. Select the created profile.
  7. Click Connect.
  8. Optional:  Configure tier 2 connection.
    1. Click Add Network.
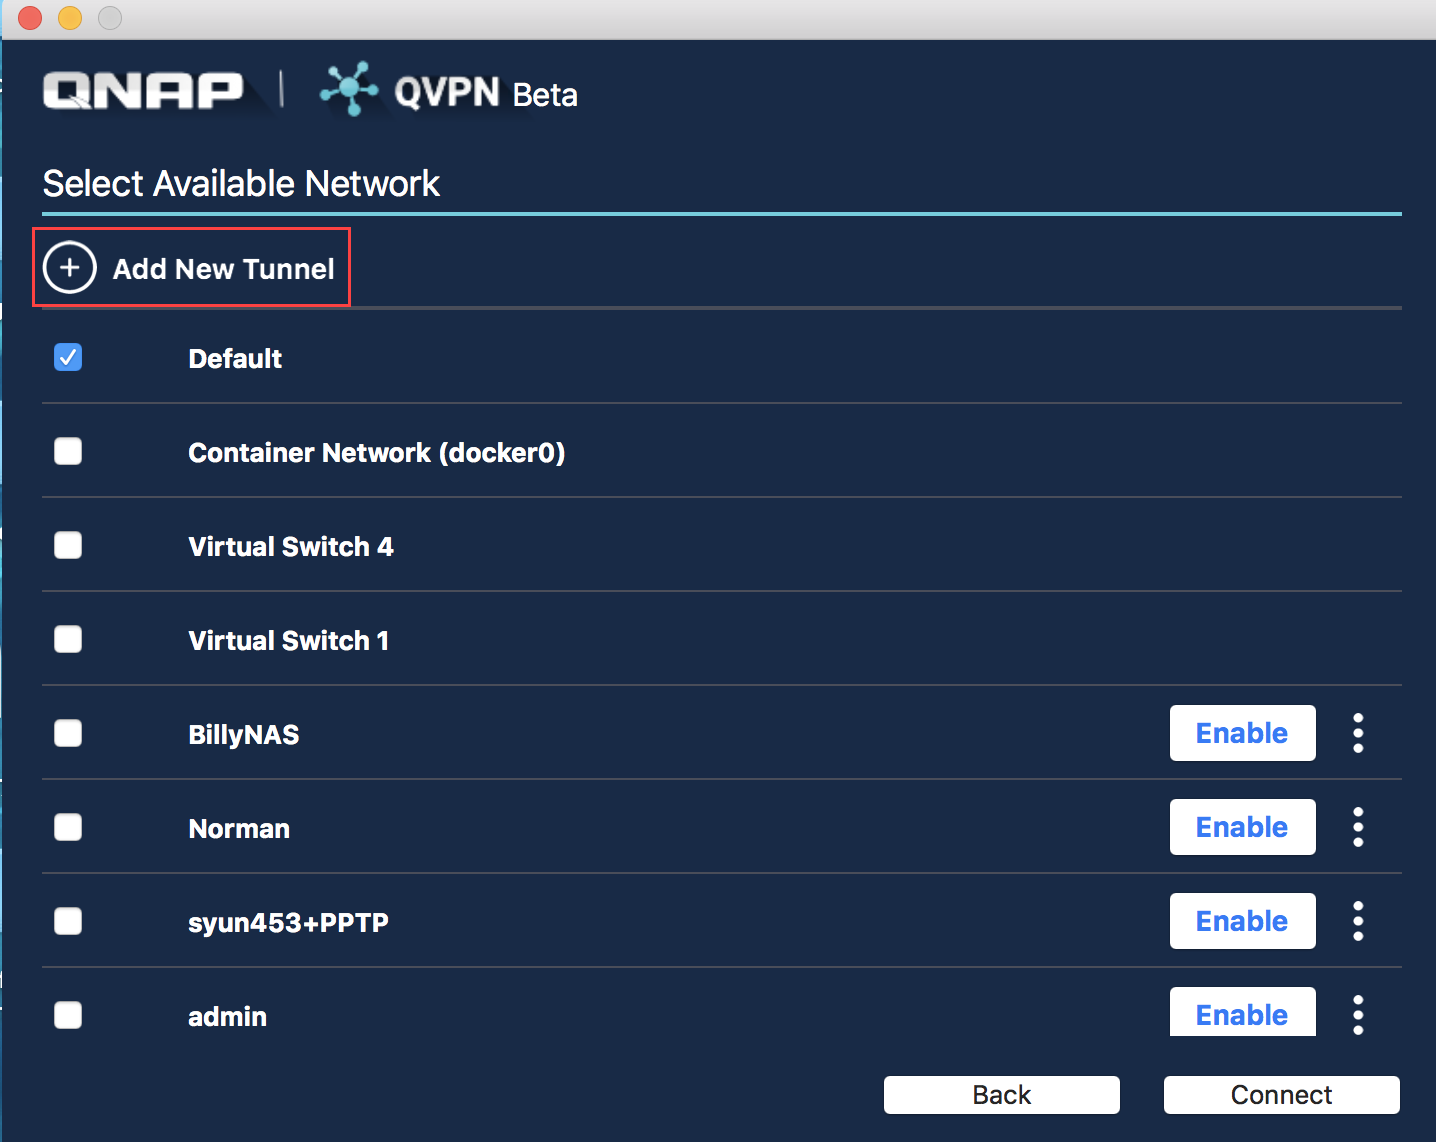
    2. Optional:  Click Add New Tunnel.
    3. Select a QNAP network device or other VPN service.
    4. Click Next.
    5. Configure the tunnel information.
    6. Click Save.
    7. Select a tunnel.
    8. Enable the tunnel.
    9. Click Connect.
    10. Specify the username and password.
    11. Click Connect.

QVPN Device Client connects the device to the enabled VPN tunnel.

Connecting to PPTP on Windows 10

  1. Go to Start > Settings > Network and Internet > VPN.
  2. Click Add a VPN Connection.
  3. Create a VPN profile.
     

    Field

    User Action

    VPN Provider

    Select Windows(build-in).

    Connection name

    Enter a name for the VPN profile.

    Server name or address

    Enter the VPN server IP address,

    VPN type

    Select Point to Point Tunneling Protocol (PPTP).

    Type of sign-in info

    Select User name and password.

    Username

    Enter the QTS account username.

    Password

    Enter the QTS account password.

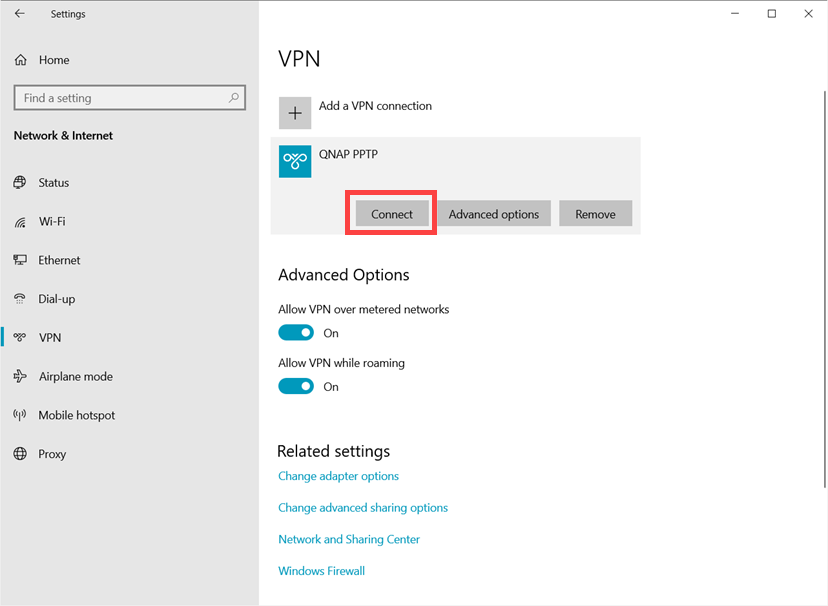
  4. Select the created VPN profile.
  5. Click Connect.

A PPTP VPN connection is established between the VPN client and QVPN Service.

Connecting to L2TP/IPSec on Windows 10

  1. Go to Start > Network and Internet > VPN.
  2. Click Add a VPN Connection.
  3. Create a VPN profile.
     

    Field

    User Action

    VPN Provider

    Select Windows(build-in).

    Connection name

    Enter a name for the VPN profile.

    Server name or address

    Enter the VPN server IP address.

    VPN type

    Select L2TP/IPsec with pre-share key.

    Pre-share key

    Enter the VPN pre-shared key.

    Type of sign-in info

    Select User name and password.

    Username

    Enter the QTS account username.

    Password

    Enter the QTS account password.

  4. Select the created VPN profile.
  5. Click Connect.

An L2TP VPN connection is established between the VPN client and QVPN Service.

Connecting to L2TP/IPSec on Windows 10 - Advanced

This process is meant for users unable to connect to the VPN server after following the steps in Connecting to L2TP/IPSec on Windows 10.

  1. Login to the PC with an administrator account.
  2. Open the Registry Editor.
    1. Right-click Start and select Run or press Windows logo key + R.
    2. Enter regedit.
    3. Click OK.
  3. Navigate to HKEY_LOCAL_MACHINE\ SYSTEM\CurrentControlSet\Services\PolicyAgent.
  4. Create a new value.
    1. Go to Edit > New > DWORD (32-bit) Value.
    2. Right-click the new value, then select Modify.
    3. Set Value name to AssumeUDPEncapsulationContextOnSendRule.
    4. Set Value data  to 2.
  5. Restart the PC.

Connecting to OpenVPN on Windows 10

Install OpenVPN from the OpenVPN website.

  1. Download the OpenVPN configuration file to your device.
    Tip:

    For more information, see Downloading an OpenVPN Configuration File.

  2. Move the OpenVPN configuration file to C:\Program Files\OpenVPN\config.
  3. Open OpenVPN with an administrator account.
  4. Enter your QTS account credentials to connect to the network device.

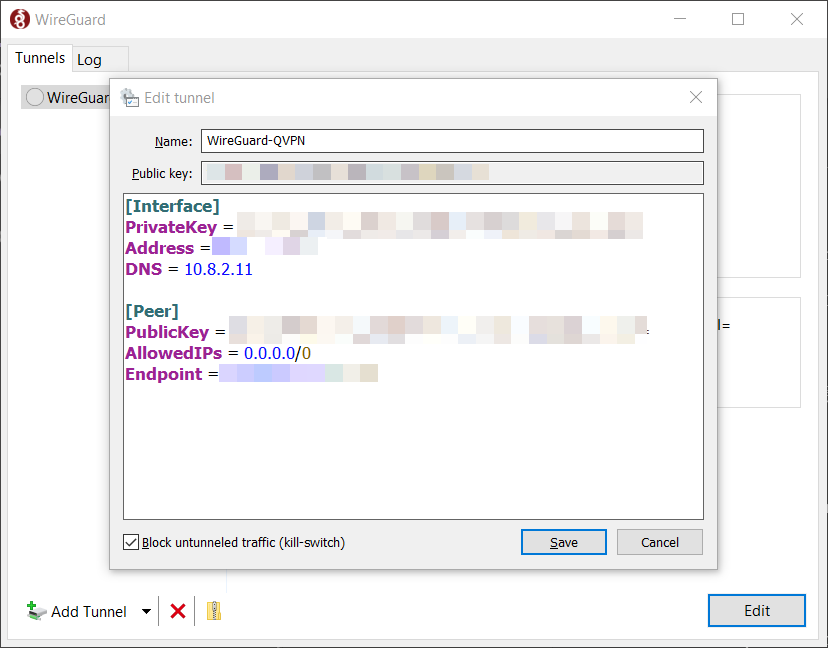
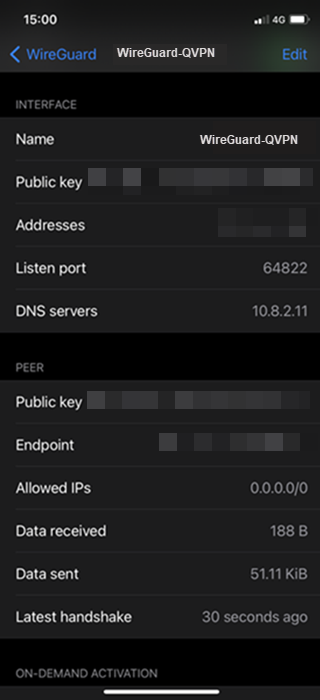
Connecting to WireGuard on Windows 10

Download and install WireGuard from the WireGuard website.

  1. Open WireGuard.
  2. Click Add Empty Tunnel.

    The Create new tunnel window appears.

  3. Configure the tunnel settings.
     

    Setting

    User Action

    Name

    Specify a name for the tunnel.

    Public key

    Copy the public key to the clipboard.

    Important:

    Ensure that you paste the copied public key in the QVPN Service WireGuard VPN server peer settings page.

    Interface

    Private key

    The private key is automatically generated when creating a new tunnel.

    Address

    Enter a IP subnet specified in the WireGuard VPN server page.

    DNS Server

    Specify a dedicated DNS server IP address that the WireGuard VPN client can access through the VPN tunnel.

    Peer


    Public key

    Copy and paste the public key from the WireGuard VPN server page.

    Note:

    The base64-encoded public key generated in the QVPN Service WireGuard VPN server page is required to authenticate both server and client.

    Allowed IPs

    Specify a list of addresses that are routed to the peer. Enter at least one IP subnet containing the internal IP addresses of the WireGuard connection. To allow packets from any IP subnet, enter 0.0.0.0/0.

    Endpoint

    Specify the IP address of the WireGuard server using the IP address:listen port format.

    Example: 192.168.10.1:51820.

  4. Optional:  Enable Block untunneled traffic (kill-switch).

    Enable to ensure that your IP address is not leaked, and block traffic that is not part of the VPN tunnel.

  5. Click Save.

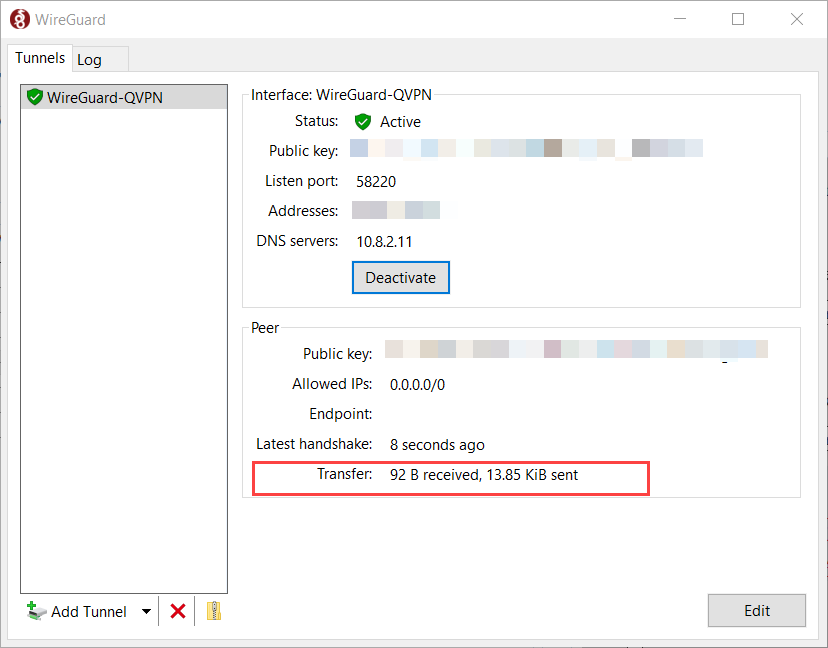
    The WireGuard application adds the tunnel profile.

  6. Click Activate.

    The WireGuard application establishes a VPN tunnel with the VPN server.
Configuring the QuWAN QBelt VPN Client Settings on Windows 10

Ensure that the VPN user receives the email from QuWAN Orchestrator containing the organization ID, username, and password that is required to configure the QVPN Device Client QuWAN QBelt VPN settings.

  1. Open QVPN Service.
  2. Select QuWAN VPN Server.

    The Connect to a QuWAN VPN Server window appears.

  3. Specify the 24-character organization ID.
  4. Specify the username and password.
  5. Click Next.

    A confirmation message appears.

  6. Click OK.

    The password page appears.

  7. Specify the current password.
  8. Specify a new password.
    Tip:

    Password requirements:

    • Length: 8–64 characters

    • Valid characters: A–Z,  a–z, 0–9

    • Not allowed: Any except for space ( )

  9. Confirm the password.
  10. Click Next.

    The profile settings page appears.

  11. Specify a VPN profile name.
  12. Select a method to connect to the hub (VPN server).
    • Automatically select: Select to allow the application to automatically select any available VPN server.

    • Manually select: Select to manually choose any available VPN server and its available WAN port.

  13. Optional:  Select Connect Immediately After Save.
  14. Click Save.

    QVPN Service saves the VPN profile.

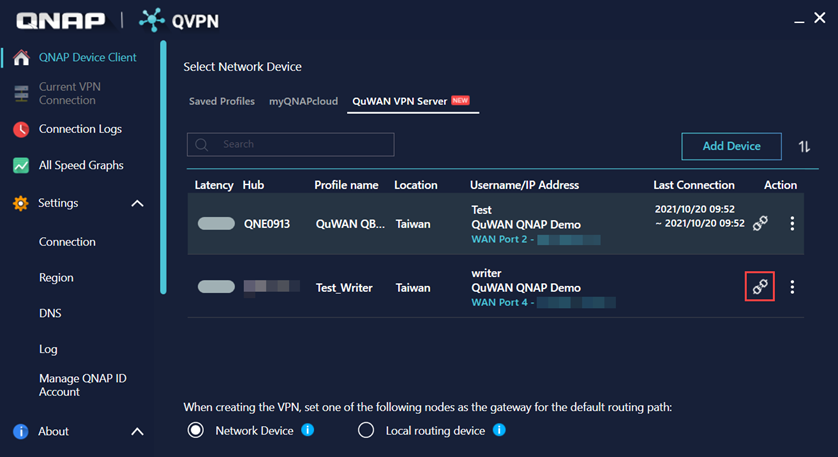
  15. Go to the QuWAN QBelt VPN page.
  16. Identify the saved VPN profile.
  17. Click the connect icon.

QVPN Service establishes a VPN tunnel connection with the QuWAN VPN server in QuWAN Orchestrator.


macOS

Connecting to QBelt on macOS 10.13

Install QVPN Device Client from the QNAP website.

  1. Open QVPN Device Client.
  2. Select an option.
     

    Option

    User Action

    Add Manually

    Manually configure the VPN connection.

    Discover

    Search for a network device connected to the same network segment.

    1. Select a network device from the list.

    2. Click Next.

    Import from QNAP ID

    Search for a network device connected to your QNAP ID.

    1. Specify the QNAP ID and password.

    2. Click Sign in.

    3. Select the network devices.

    4. Click Import.

    5. Identify a device to configure.

    6. Click .

    7. Click Edit Network Device.

    QuWAN VPN Server

    Connect to a hub configured as a VPN server on QuWAN Orchestrator

    For details, see QuWAN Orchestrator VPN Server.

  3. Configure the VPN profile.
     

    Field

    User Action

    Device Type

    Select the type of device.

    Profile Name

    Enter a name for the VPN profile.

    Host/IP or myQNAPcloud Name

    Enter the IP address of the VPN server or myQNAPcloud internet address.

    VPN Type

    Select the VPN protocol.

    Pre-shared key

    Enter the VPN pre-shared key.

    Important:

    This field is only visible if the VPN profile cannot be automatically configured.

    VPN port

    Enter the QBelt VPN server port number.

    Important:

    This field is only visible if the VPN profile cannot be automatically configured.

    Username

    Specify a QVPN client username.

    Password

    Specify a QVPN client password.

  4. Configure the optional settings.
     

    Setting

    User Action

    Remember Me

    Enable to stay logged in even after closing the application.

    Secure Login (SSL)

    Enable to increase the login security.

    Connect Immediately After Save

    Enable to immediately connect to the QVPN server after saving the network device information.

    Advanced Options

    Detect port automatically

    Enable to allow the application to automatically detect the VPN service port.

    LAN port

    Specify the LAN port number.

    Internet port

    Specify the internet port number.

  5. Click Save
  6. Select the created profile.
  7. Click Connect.

  8. Optional:  Configure tier 2 connection.
    1. Click Add Network.

    2. Optional:  Click Add New Tunnel.
    3. Select a QNAP network device or other VPN service.
    4. Configure the tunnel information.
    5. Click Save.
    6. Select a tunnel. 
    7. Enable the tunnel.
    8. Click Connect.
    9. Specify the username and password.
    10. Click Connect.

QVPN Device Client connects the device to the enabled VPN tunnel.

Connecting to L2TP/IPSec on macOS 10.13

  1. Go to System Preferences > Network.
  2. Create a VPN profile.
    1. Click +.
    2. Select VPN for the interface.
    3. Select L2TP for the VPN Type.
    4. Enter a profile name.
    5. Click Create.

  3. Configure the VPN profile.
    1. Enter the L2TP/IPSec server IP Address or a Qnap cloud username for Server Address.
    2. Enter the QTS account name for Account Name

  4. Enter the authentication information.
    1. Click Authentication Settings.
    2. Enter the QTS account password.
    3. Enter the L2TP/IPSec pre-shared key for Shared Secret.
    4. Click OK.
  5. Click Connect.

Connecting to OpenVPN on macOS 10.13

Install Tunnelblick from the Tunnelblick website.

  1. Download the OpenVPN configuration file to your device.
    Tip:

    For more information, see Downloading an OpenVPN Configuration File.

  2. Open Tunnelblick.
  3. Double-click the OpenVPN configuration file.
    The configuration file will import automatically.
  4. Click Connect.
  5. Enter your QTS account credentials to connect to the NAS.

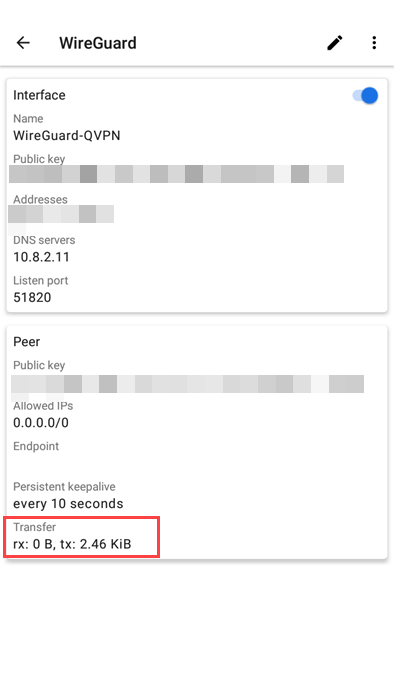
Connecting to WireGuard on macOS 10.13

Download and install WireGuard from the WireGuard website.

  1. Open WireGuard.
  2. Click + in the bottom left.
  3. Click Add Empty Tunnel.

    The tunnel creation window appears.

  4. Configure the tunnel settings.
     

    Setting

    User Action

    Name

    Specify a name for the tunnel.

    Public key

    Copy the public key to the clipboard.

    Important:

    Ensure that you specify the copied public key in the QVPN Service WireGuard peer settings page.

    On-Demand

    Specify the network interface for the WireGuard connection.

    Interface

    Private key

    The private key is automatically generated when creating a new tunnel.

    Address

    Enter a IP subnet specified in the WireGuard VPN server page.

    DNS server

    Specify a dedicated DNS server IP address that the WireGuard VPN server can access through the VPN tunnel.

    Peer


    Public key

    Copy and paste the public key from the WireGuard VPN server page.

    Note:

    The base64-encoded public key generated in the QVPN Service WireGuard VPN server page is required to authenticate both server and client.

    Allowed IPs

    Specify a list of addresses that are routed to the peer. Enter at least one IP subnet containing the internal IP addresses of the WireGuard connection. To allow packets from any IP subnet, enter 0.0.0.0/0.

    Endpoint

    Specify the IP address of the WireGuard server using the IP address:listen port format.

    Example: 192.168.10.1:51820.

    Persistent keepalive

    Specify an optional interval in seconds to send keepalive packets if the peer is behind a firewall.

  5. Optional:  Click Exclude private IPs to exclude private IP addresses.
  6. Click Save.

    The WireGuard application adds the tunnel profile.

  7. Click Activate.

    The WireGuard application establishes a VPN tunnel with the VPN server.
Configuring the QuWAN QBelt VPN Client Settings on macOS 10.13

Before configuring VPN client settings, ensure the following.

  • The QuWAN hubs configured as VPN servers are enabled in the QuWAN QBelt VPN Server page in QuWAN Orchestrator.

  • VPN users are added in the Privilege Settings page in QuWAN Orchestrator.

  • VPN user receives the email from QuWAN Orchestrator containing the organization ID, username, and password that is required to configure the QVPN Device Client QuWAN QBelt VPN settings.

  1. Open QVPN Service.
  2. Select QuWAN VPN Server.
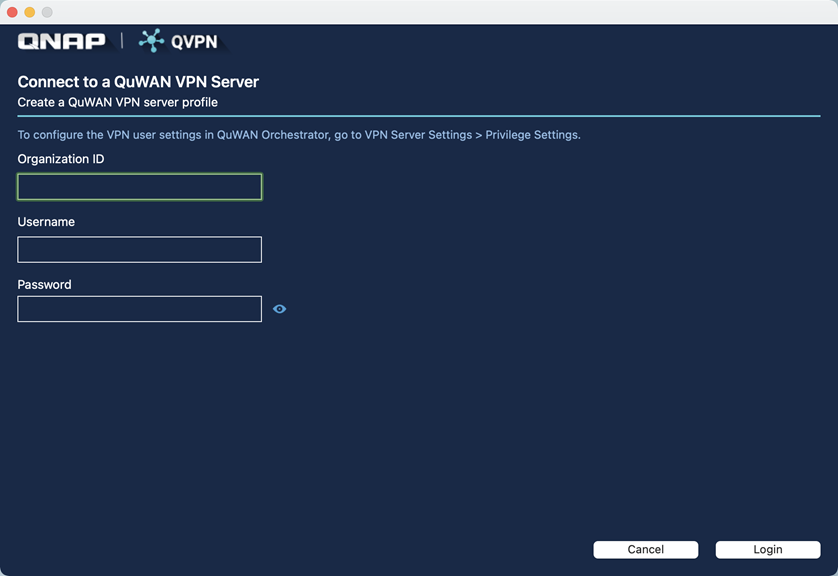
  3. Click Connect to a QuWAN VPN Server.

    The Connect to a QuWAN VPN Server window appears.

  4. Specify the 24-character organization ID.
  5. Specify the username and password.
  6. Click Login.

    A confirmation message appears.

  7. Click OK.

    The password page appears.

  8. Specify the current password.
  9. Specify a new password.
    Tip:

    Password requirements:

    • Length: 8–64 characters

    • Valid characters: A–Z,  a–z, 0–9

    • Not allowed: Any except for space ( )

  10. Confirm the password.
  11. Click Save.

    The profile settings page appears.

  12. Specify a VPN profile name.
  13. Select a method to connect to the hub (VPN server).
    • Automatically select: Select to allow the application to automatically select any available VPN server.

    • Manually select: Select to manually choose any available VPN server and its available WAN port.

  14. Optional: Select Connect Immediately After Save.
  15. Click Save.

    QVPN Service saves the VPN profile.

  16. Go to the QuWAN QBelt VPN page.
  17. Identify the saved VPN profile.
  18. Click the connect icon.

QVPN Service establishes a VPN tunnel connection with the QuWAN VPN server in QuWAN Orchestrator.


iOS

Connecting to QBelt on iOS

Install QVPN Device Client from the QNAP website.

  1. Open QVPN Device Client.
  2. Tap +.
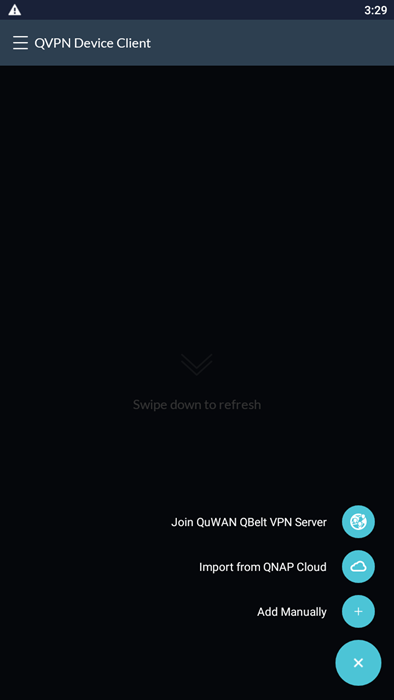
  3. Select an option.
     

    Option

    User Action

    Import from QNAP Cloud

    Search for a network device connected to your QNAP ID.

    1. Specify the QNAP ID and password.

    2. Tap Sign in.

    3. Select the network devices.

    4. Tap Import.

    5. Identify a device to configure.

    6. Tap .

    7. Tap Edit Device.

    Add Manually

    Manually configure VPN connection.

    Join QuWAN VPN Server

    Connect to a hub configured as a VPN server on QuWAN Orchestrator

    For details, see QuWAN Orchestrator VPN Server.

  4. Configure the VPN profile.
     

    Setting

    User Action

    Profile Name

    Enter a name for the VPN profile.

    Device Type

    Specify the type of QNAP device.

    Host/IP or myQNAPcloud Name

    Enter the IP address of the VPN server or myQNAPcloud internet address.

    Username

    Specify a QVPN client username.

    Password

    Specify a QVPN client password.

  5. Configure the optional settings.
     

    Setting

    User Action

    Remember Me

    Enable to stay logged in even after closing the application.

    Secure Login (SSL)

    Enable to increase the login security.

    Connect Immediately After Save

    Enable to immediately connect to the QVPN server after saving the network device information.

    Advanced Options

    Detect port automatically

    Enable to allow the application to automatically detect the VPN service port.

    LAN port

    Specify the LAN port number.

    Internet port

    Specify the internet port number.

  6. Tap Save
  7. Select the created profile.
  8. Tap Connect.

  9. Optional:  Configure Tier 2 connection.
    1. Tap Add Network.

    2. Optional:  Tap Add New Tunnel.
    3. Select a QNAP network device or other VPN service.
    4. Configure the tunnel information.
    5. Tap Save.
    6. Select a tunnel.
    7. Enable the tunnel.

QVPN Device Client connects the device to the enabled VPN tunnel.

Connecting to L2TP/IPSec on iOS

  1. Go to Settings > General > VPN.
  2. Tap Add VPN Configuration.
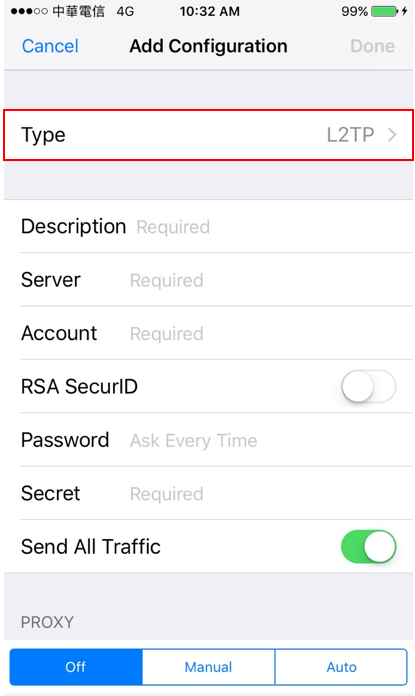
  3. Select L2TP for the Type.
  4. Configure the VPN profile.
  5. Tap Done.
  6. Go to Settings > General > VPN.
  7. Enable the created VPN Profile.

Connecting to OpenVPN on iOS

Install OpenVPN Connect from the Apple App store.

  1. Configure iOS settings.
    1. Go to Settings > OpenVPN > Advanced Settings
    2. Enable Force AES-CBC cipher suites.
  2. Transfer the OpenVPN configuration file to your device.
    Tip:

    For more information, see Downloading an OpenVPN Configuration File.

  3. Open OpenVPN Connect.
  4. Import the OpenVPN configuration file.
    1. Select OVPN Profile.
    2. Locate the Configuration file
    3. Tap Import
  5. Enter your QTS account credentials to connect to the NAS.

Connecting to WireGuard on iOS

Download and install WireGuard from the WireGuard website.

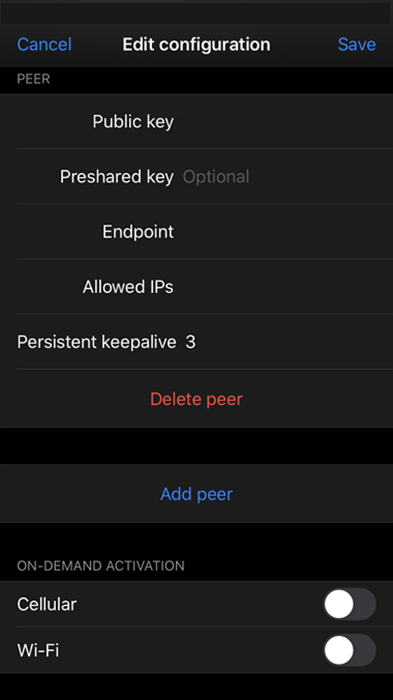
  1. Open WireGuard.
  2. Click + in the upper right.
  3. Click Create from scratch.

    The Create WireGuard Tunnel page appears.

  4. Configure the tunnel settings.
     

    Setting

    User Action

    Name

    Specify a name for the tunnel.

    Private key

    Click Generate Keypairs to automatically populate a unique 32-byte private and public key.

    Public key

    Copy the public key to the clipboard.

    Important:

    Ensure that you specify the copied public key in the QVPN Service WireGuard peer settings page.

    Addresses

    Enter a IP subnet specified in the WireGuard VPN server page.

    Listen port

    Specify an optional UDP port number between 1 and 65535.

    Tip:

    To allow the application to select the listen port, leave the field blank.

    MTU

    Specify an optional MTU value.

    Note:

    The recommended value is 1420.

    Tip:

    To allow the application to select the MTU value, leave the field blank.

    DNS servers

    Specify a dedicated DNS server IP address that the WireGuard VPN client can access through the VPN tunnel.

  5. Configure the peer settings.
     

    Setting

    User Action

    Public key

    Copy and paste the public key from the WireGuard VPN server page.

    Note:

    The base64-encoded public key generated in the QVPN Service WireGuard VPN server page is required to authenticate both server and client.

    Pre-shared key

    Specify an optional key only if the pre-shared key setting has been configured on the VPN server device.

    Important:

    Ensure that the pre-shared key is specified in both the VPN server and client configuration page to connect to the VPN tunnel.

    Endpoint

    Specify the IP address of the WireGuard server using the IP address:listen port format.

    Example: 192.168.10.1:51820.

    Allowed IPs

    Specify the list of addresses that are routed to the peer.

    Note:
    • Enter at least one IP subnet containing the internal IP addresses of the WireGuard connection.

    • To allow packets from any IP subnet, enter 0.0.0.0/0.

    Tip:

    To exclude private IP addresses, select Exclude private IPs.

    Persistent keepalive

    Specify an optional interval in seconds to send keepalive packets if the peer is behind a firewall.

  6. Click Save.

    WireGuard creates and saves the VPN tunnel settings.

  7. Beside Active, click .

The WireGuard app establishes a VPN tunnel with the VPN server.

Configuring the QuWAN QBelt VPN Client Settings on iOS

Before configuring VPN client settings, ensure the following.

  • The QuWAN hubs configured as VPN servers are enabled in the QuWAN QBelt VPN Server page in QuWAN Orchestrator.

  • VPN users are added in the Privilege Settings page in QuWAN Orchestrator.

  • VPN user receives the email from QuWAN Orchestrator containing the organization ID, username, and password that is required to configure the QVPN Device Client QuWAN QBelt VPN settings.

  1. Open QVPN Service.
  2. Select QuWAN VPN Server.
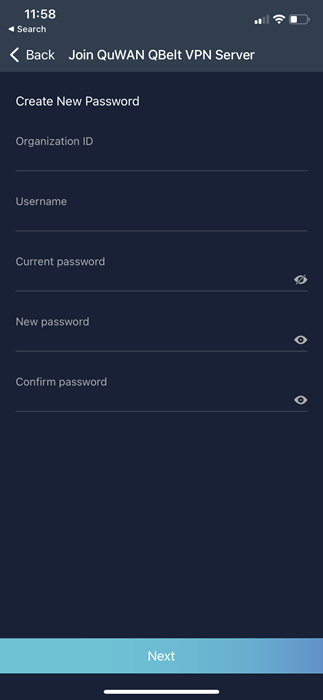
  3. Click Join QuWAN QBelt VPN Server.

    The Join QuWAN VPN Server window appears.

  4. Specify the 24-character organization ID.
  5. Specify the username and password.
  6. Click Next.

    A confirmation message appears.

  7. Click OK.

    The password page appears.

  8. Specify the current password.
  9. Specify a new password.
    Tip:

    Password requirements:

    • Length: 8–64 characters

    • Valid characters: A–Z,  a–z, 0–9

    • Not allowed: Any except for space ( )

  10. Confirm the password.
  11. Click Next.

    The profile settings page appears.

  12. Specify a VPN profile name.
  13. Select a method to connect to the hub (VPN server).
    • Auto: Select to allow the application to automatically select any available VPN server.

    • Manually select: Select to manually choose any available VPN server and its available WAN port.

  14. Optional: Select Connect Immediately After Save.
  15. Click Save.

    QVPN Service saves the VPN profile.

  16. Go to the QuWAN QBelt VPN page.
  17. Identify the saved VPN profile.
  18. Click .
  19. Click Connect.

QVPN Service establishes a VPN tunnel connection with the QuWAN VPN server in QuWAN Orchestrator.


Android

Connecting to QBelt on Android 7.0

Install QVPN Device Client from the QNAP website.

  1. Open QVPN Device Client.
  2. Tap +.
  3. Select an option.
     

    Option

    User Action

    Import from QNAP Cloud

    Search for a network device connected to your QNAP ID.

    1. Specify the QNAP ID and password.

    2. Tap Sign in.

    3. Select the network devices.

    4. Tap Import.

    5. Identify a device to configure.

    6. Tap .

    7. Tap Edit Device.

    Add Manually

    Manually configure VPN connection.

    Join QuWAN VPN Server

    Connect to a hub configured as a VPN server on QuWAN Orchestrator

    For details, see QuWAN Orchestrator VPN Server.

  4. Configure the VPN profile.
     

    Setting

    User Action

    Profile Name

    Enter a name for the VPN profile.

    Device Type

    Specify the type of QNAP device.

    Host/IP or myQNAPcloud Name

    Enter the IP address of the VPN server or myQNAPcloud internet address.

    Username

    Specify a QVPN client username.

    Password

    Specify a QVPN client password.

  5. Configure the optional settings.
     

    Setting

    User Action

    Remember Me

    Enable to stay logged in even after closing the application.

    Secure Login (SSL)

    Enable to increase the login security.

    Connect Immediately After Save

    Enable to immediately connect to the QVPN server after saving the network device information.

    Advanced Options

    Detect port automatically

    Enable to allow the application to automatically detect the VPN service port.

    LAN port

    Specify the LAN port number.

    Internet port

    Specify the internet port number.

  6. Tap Save
  7. Select the created profile.
  8. Tap Connect.
  9. Optional:  Configure Tier 2 connection.
    1. Tap Add Network.
    2. Optional:  Tap Add New Tunnel.
    3. Select a QNAP network device or other VPN service.
    4. Configure the tunnel information.
    5. Tap Save.
    6. Select a tunnel.
    7. Enable the tunnel.
    8. Tap Connect.

QVPN Device Client connects the device to the enabled VPN tunnel.

Connecting to PPTP on Android 7.0

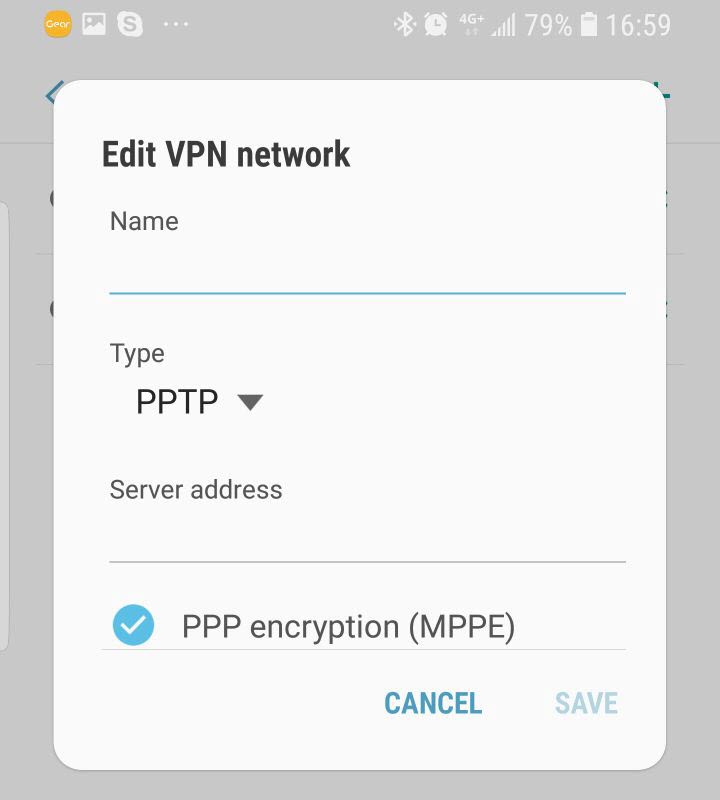
  1. Go to Settings > Connections > More connection settings.
  2. Tap +.
  3. Select PPTP.
  4. Enter configuration information.
  5. Tap Save.
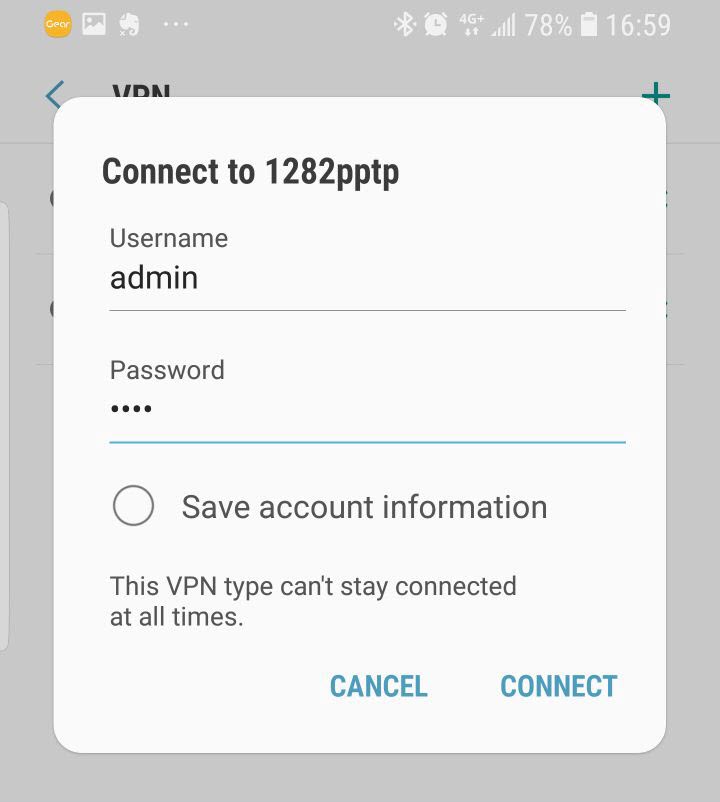
  6. Tap the created VPN profile.

    The Connect to ... window opens.

  7. Enter your QTS account credentials.
  8. Tap Connect.

Connecting to L2TP/IPSec on Android 7.0

  1. Go to Settings > Connections > More connection settings.
  2. Tap +.
  3. Select L2TP/IPSec PSK for the Type.
  4. Configure the VPN profile.
  5. Tap Save.
  6. Tap the created VPN profile.

    The Connect to ... window opens.

  7. Enter the QTS account credentials.
  8. Tap Connect.

Connecting to OpenVPN on Android 7.0

Install OpenVPN Connect from the Google Play store.

  1. Download the OpenVPN configuration file to your device.
    Tip:

    For more information, see Downloading an OpenVPN Configuration File.

  2. Open OpenVPN Connect.
  3. Import the OpenVPN configuration file.
    1. Select OVPN Profile.
    2. Locate the Configuration file
    3. Tap Import
  4. Enter your QTS account credentials to connect to the NAS.

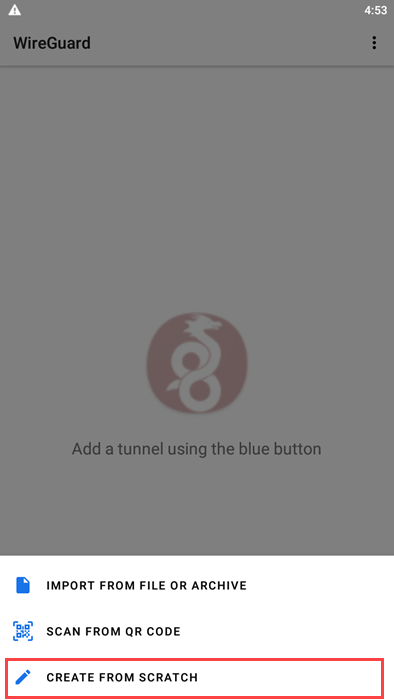
Connecting to WireGuard on Android 7.0

Download and install WireGuard from the WireGuard website.

  1. Open WireGuard.
  2. Click +.
  3. Click CREATE FROM SCRATCH.

    The Create WireGuard Tunnel page appears.

  4. Configure the tunnel settings.
     

    Setting

    User Action

    Name

    Specify a name for the tunnel.

    Private key

    Click  to generate the private key for the VPN connection.

    Public key

    Copy the public key to the clipboard.

    Important:

    Ensure that you specify the copied public key in the QVPN Service WireGuard peer settings page.

    Addresses

    Enter a IP subnet specified in the WireGuard VPN server page.

    Listen port

    Specify an optional UDP port number between 1 and 65535.

    Tip:

    To allow the application to select the listen port, leave the field blank.

    DNS servers

    Specify a dedicated DNS server IP address that the WireGuard VPN client can access through the VPN tunnel.

    MTU

    Specify an optional MTU value.

    Note:

    The recommended value is 1420.

    Tip:

    To allow the application to select the MTU value, leave the field blank.

  5. Optional:  Click ALL APPLICATIONS.

    The applications page appears.

  6. Optional:  Select the applications to exclude from the VPN tunnel connection.
  7. Click ADD PEER.
  8. Configure the peer settings.
     

    Setting

    User Action

    Public key

    Copy and paste the public key from the WireGuard VPN server page.

    Note:

    The base64-encoded public key generated in the QVPN Service WireGuard VPN server page is required to authenticate both server and client.

    Pre-shared key

    Specify an optional key only if the pre-shared key setting has been configured on the VPN server device.

    Important:

    Ensure that the pre-shared key is specified in both the VPN server and client configuration page to connect to the VPN tunnel.

    Persistent keepalive

    Specify an optional interval in seconds to send keepalive packets if the peer is behind a firewall.

    Endpoint

    Specify the IP address of the WireGuard server using the IP address:listen port format.

    Example: 192.168.10.1:51820.

    Allowed IPs

    Specify the list of addresses that are routed to the peer.

    Note:
    • Enter at least one IP subnet containing the internal IP addresses of the WireGuard connection.

    • To allow packets from any IP subnet, enter 0.0.0.0/0.

    Tip:

    To exclude private IP addresses, select Exclude private IPs.

  9. Click .

    WireGuard creates and saves the VPN tunnel settings.

  10. Click .

    The Connection request window appears.

  11. Click OK.

The WireGuard app establishes a VPN tunnel with the VPN server.

Configuring the QuWAN QBelt VPN Client Settings on Android 7.0

Before configuring VPN client settings, ensure the following.

  • The QuWAN hubs configured as VPN servers are enabled in the QuWAN QBelt VPN Server page in QuWAN Orchestrator.

  • VPN users are added in the Privilege Settings page in QuWAN Orchestrator.

  • VPN user receives the email from QuWAN Orchestrator containing the organization ID, username, and password that is required to configure the QVPN Device Client QuWAN QBelt VPN settings.

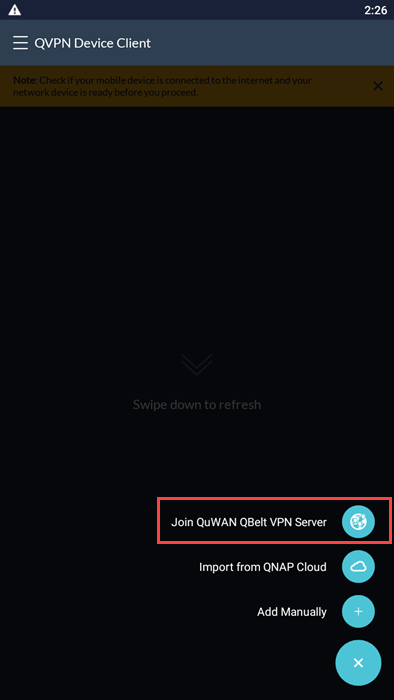
  1. Open QVPN Service.
  2. Select QuWAN VPN Server.

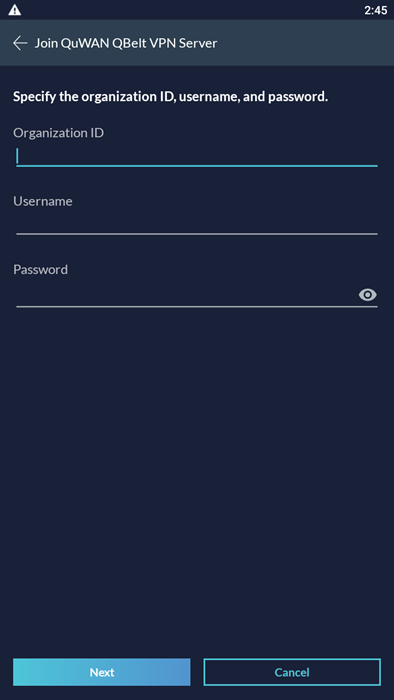
    The Join QuWAN VPN Server window appears.

  3. Specify the 24-character organization ID.
  4. Specify the username and password.
  5. Click Next.

    A confirmation message appears.

  6. Click OK.

    The password page appears.

  7. Specify the current password.
  8. Specify a new password.
    Tip:

    Password requirements:

    • Length: 8–64 characters

    • Valid characters: A–Z,  a–z, 0–9

    • Not allowed: Any except for space ( )

  9. Confirm the password.
  10. Click Next.

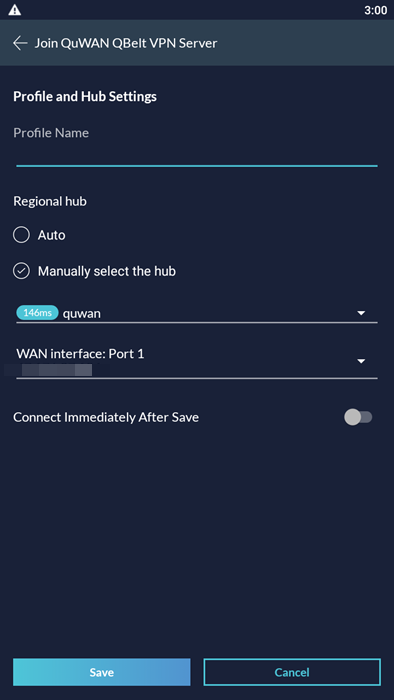
    The profile settings page appears.

  11. Specify a VPN profile name.
  12. Select a method to connect to the hub (VPN server).
    • Auto: Select to allow the application to automatically select any available VPN server.

    • Manually select: Select to manually choose any available VPN server and its available WAN interface.

  13. Optional:  Select Connect Immediately After Save.
  14. Click Save.

    QVPN Service saves the VPN profile.

  15. Go to the QuWAN QBelt VPN page.
  16. Identify the saved VPN profile.
  17. Click .
  18. Click Connect.

QVPN Service establishes a VPN tunnel connection with the QuWAN VPN server in QuWAN Orchestrator.


Was this article helpful?

7% of people think it helps.
Thank you for your feedback.

Please tell us how this article can be improved:

If you want to provide additional feedback, please include it below.

Choose specification

      Show more Less

      Choose Your Country or Region

      back to top