How to set up RADIUS authentication using a QNAP NAS and a router
Applicable Products
- All QNAP NAS models
- A router
- RADIUS-compatible user devices, including:
- Windows devices
- macOS devices
- iOS devices
- Android devices
Details
The RADIUS (Remote Authentication Dial-In User Service) server on a QNAP NAS enables centralized authentication and authorization for devices connecting to your network. It manages user credentials and access policies, ensuring that only approved users can join the network. The NAS supports authentication methods limited to PAP, EAP-TLS/PAP, and EAP-TTLS/PAP for system user accounts. To use this feature, the wireless router must support WPA-Enterprise or WPA2-Enterprise along with 802.1X authentication.
QNAP RADIUS architecture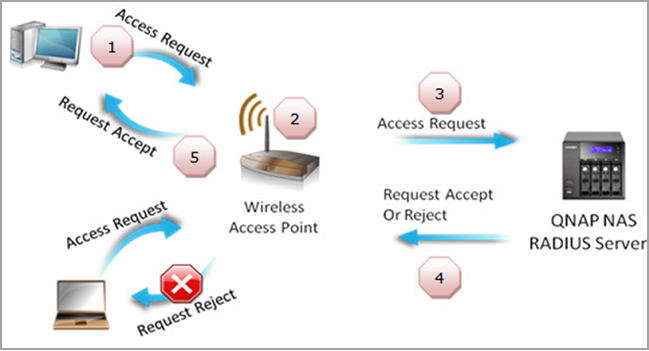
- The user attempts to connect to the wireless network and enters their login credentials.
- The wireless router receives the request and forwards the credentials to the QNAP NAS acting as the RADIUS server.
- The NAS verifies the credentials against its authentication database and determines whether the user is authorized.
- The NAS sends the authentication result back to the wireless router.
- The wireless router either allows or denies the user’s connection based on the response from the NAS.
Procedure
Configure RADIUS server, client, and user settings on the QNAP NAS
- Configure the RADIUS server settings.
- Log in to the NAS as an administrator.
- Go to Control Panel > Applications > RADIUS Server > Server Settings.
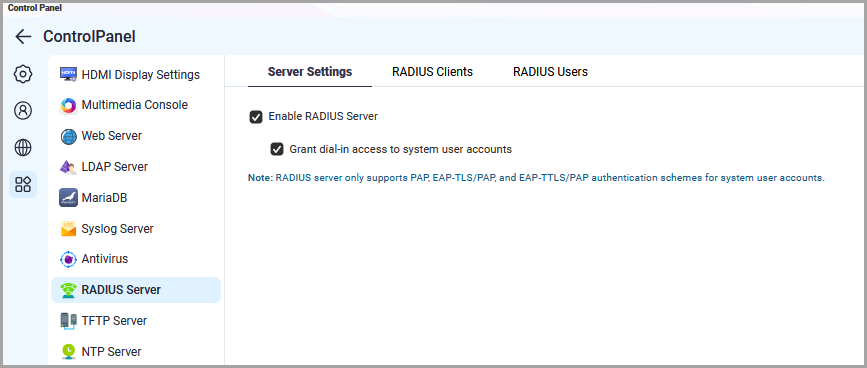
- Select Enable RADIUS Server.
- Optional: Enable Grant dial-in access to system user accounts.NoteEnabling this option allows you to sign in to the network on your device using your local NAS username and password through the RADIUS server.
- Click Apply.
- Configure a RADIUS client.
- Go to Control Panel > Applications > RADIUS Server > RADIUS Clients.
- Click Create a Client.
The Create a Client window appears.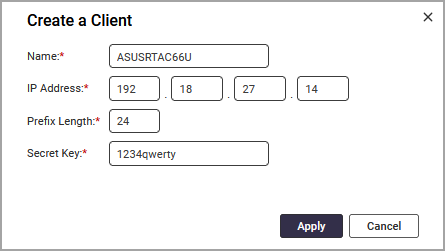
- Specify the following information:
- The name used to identify the client device.
- The IP address assigned to the client device.
- The prefix length, which determines the allocation range and number of available IP addresses.
Prefix Length Addresses Subnet Mask /30 4 255.255.255.252 /29 8 255.255.255.248 /28 16 255.255.255.240 /27 32 255.255.255.224 /26 64 255.255.255.192 /25 128 255.255.255.128 /24 256 255.255.255.0 Note- A larger CIDR prefix means fewer host addresses because more bits are reserved for the network.
- Each step upward in the prefix cuts the number of available addresses in half.
- The subnet mask increases in fixed increments as host bits are removed.
- A /24 block has 256 addresses; /25 reduces this to 128, and /26 reduces it further to 64.
- To learn more about CIDR, see RFC 4632.
- The secret key the NAS uses to authenticate requests from the client device.
- Click Apply.
- Create a RADIUS user.
- Go to Control Panel > Applications > RADIUS Server > RADIUS Users.
- Click Create a User.
The Create a RADIUS User window appears.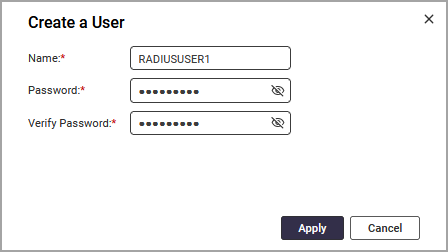
- Specify a username.
- Specify the user password.
- Re-enter the user password.
- Click Apply.
Set up a RADIUS client using a router
After configuring the RADIUS server, you must set up a RADIUS client on the router so that the router can communicate with the server and forward authentication requests. The client configuration defines where the router sends user credentials, how it identifies itself to the server, and which shared key is used to secure the exchange.
- Enter your router LAN IP address or
http://www.asusrouter.com. - Enter your username and password.
- Go to Advanced > Wireless > General.
- Select WPA2-Enterprise as the authentication method.
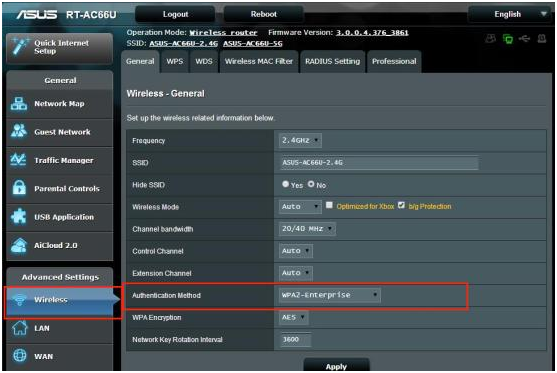
- Click Apply.
- Go to Advanced > Wireless > RADIUS Setting.
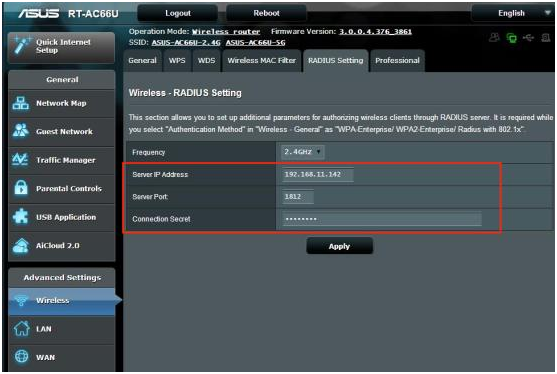
- Enter the QNAP NAS IP address as the server IP address.
- Specify the port number as
1812. - Enter the same shared secret on the router to secure communication with the RADIUS server.
- Click Apply.
After configuring the RADIUS client on the router and setting the NAS as the RADIUS server, the NAS will authenticate your access attempts when you connect to the Wi-Fi network.
Connecting to the Wi-Fi network using RADIUS authentication
Once the RADIUS server and client settings are complete, you can connect to the secured Wi-Fi network from any supported device. The sections below describe how to join the network using the authentication method enforced by your NAS.
Connecting to the Wi-Fi network using a Windows device
- Click the Windows Start menu.
- Go Settings > Network & Internet.
- Select Dial-up.
- Click Set up a new connection
The Set up a Connection or Network window appears. - Select Manually connect to a wireless network.
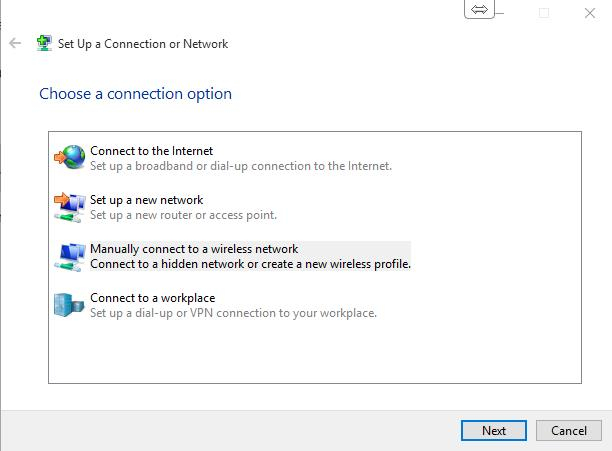
- Click Next.
- Configure the following details:
Network Name: Enter the name of the router on which you configured the RADIUS client (for example, ASUS-AC66U-2.4G).
Security type: Select WPA2-Enterprise.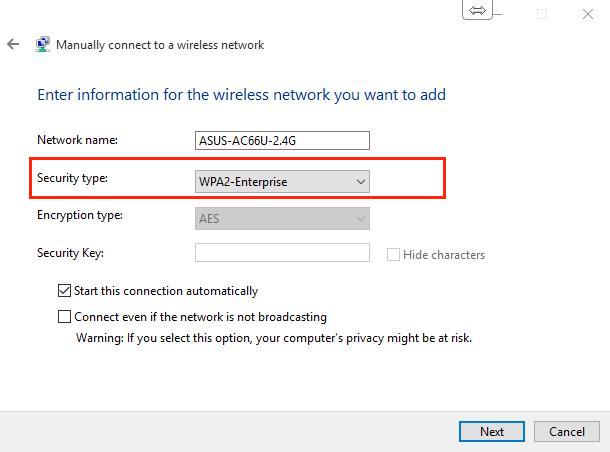
- Click Next.
- Click Change connection settings.
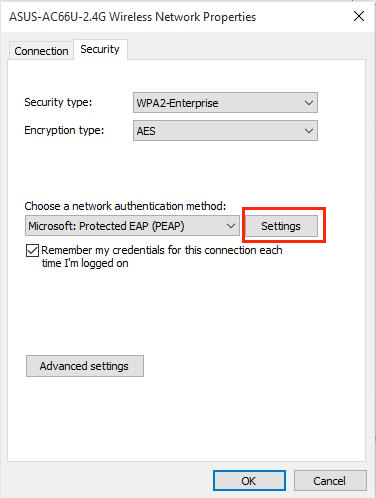
The Wireless Network Properties window appears. - Click Security.
- Select Microsoft: Protected EAP (PEAP) as the authentication method.
- Click Settings.
 The Protect EAP Properties window appears.
 - Disable Verify the server’s identity by validating the certificate.
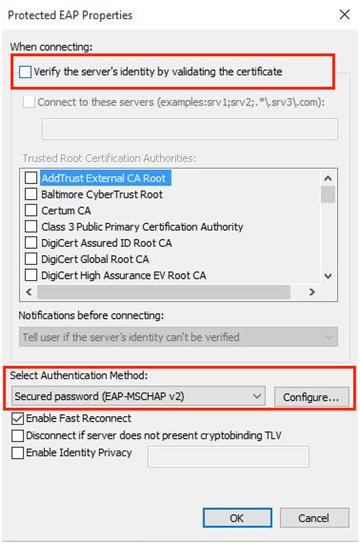
- Select Secured password (EAP-MSCHAP v2) as the authentication method.
- Click Configure.
The EAP MSCHAPv2 Properties window appears. - Disable Automatically use my Windows logon name and password (and domain if any).
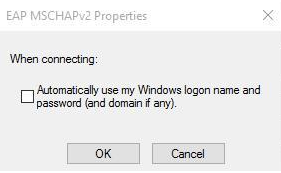
- Click OK.
The EAP MSCHAPv2 Properties window closes. - Click OK on the Protect EAP Properties page.
- Click OK on the Wireless Network Properties page.
- Go to Settings > Settings > Network & Internet > Wi-Fi.
- Select the router on which you configured the RADIUS client.
- Enter the RADIUS username and password configured.
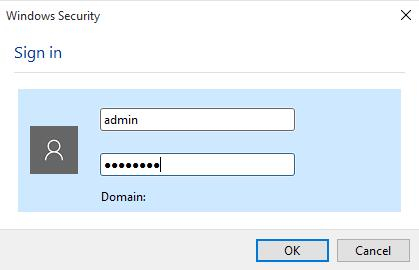 If Grant dial-in access to system user accounts is enabled, you may also use the credentials of a local NAS user.
 - Your device connects to the Wi-Fi network using RADIUS authentication.
Connecting to the Wi-Fi network using a macOS device
- Open the Wi-Fi menu from the menu bar.
- Click Join Other Network... to manually join a network.
- Enter the network details:
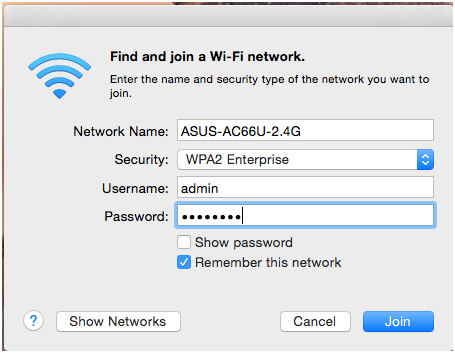
- Network Name: Enter the name of the router on which you configured the RADIUS client (for example, ASUS-AC66U-2.4G).
- Security: Choose WPA2/WPA3 Enterprise or WPA2 Enterprise, depending on your macOS version.
- Username: Enter the RADIUS user username.
- Password: Enter the RADIUS user password.
If Grant dial-in access to system user accounts is enabled, you may also use the credentials of a local NAS user.
- Click OK to join the network.
- Your device connects to the Wi-Fi network using RADIUS authentication.
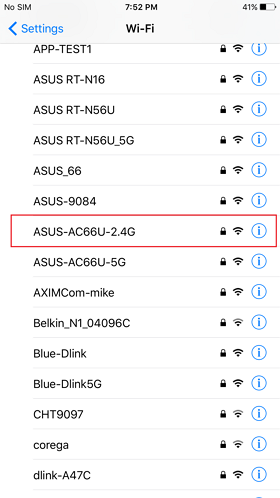
Connecting to the Wi-Fi network using an iOS device
- Open Settings.
- Tap Wi-Fi.
- Tap the Wi-Fi toggle if it is disabled.
iOS enables Wi-Fi on the device. - Select the router on which you configured the RADIUS client.
- Enter the RADIUS user’s username and password as configured in the QNAP NAS settings.
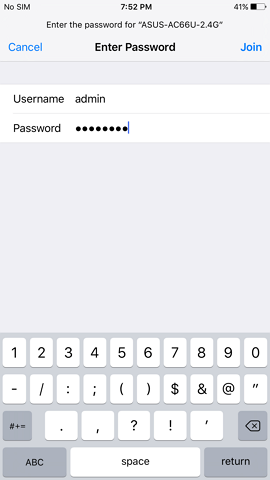 If Grant dial-in access to system user accounts is enabled, you can also sign in using the credentials of a local NAS user.
 - Tap Join.
The certificate page appears. - Tap Trust.
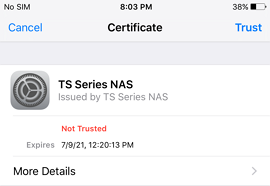 You can now connect to the Wi-Fi network after successfully logging in.
Connecting to the Wi-Fi network using an Android device
- Enable Wi-Fi on your Android device.
- Select the router on which you configured the RADIUS client.
- Enter the RADIUS user username.
- Enter the RADIUS user password.
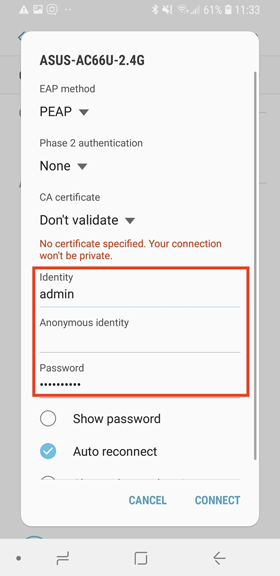 If Grant dial-in access to system user accounts is enabled, you may also sign in using the credentials of a local NAS user.
 - Tap Connect.
Your device connects to the Wi-Fi network using RADIUS authentication.


