Connecting to Wasabi Cloud with QNAP Applications


Last modified date: 2020-02-24

Wasabi is a secure, reliable, highly-scalable, and affordable object storage service. Wasabi Hot Cloud Storage eliminates confusing storage tiers and satisfies nearly all storage performance requirements. You can either store cold backup data or hot daily data on Wasabi cloud storage.

There are several ways to connect to Wasabi Cloud using QNAP applications.

Connecting to Wasabi Cloud with HBS 3

You will need your Wasabi Cloud access key and secret key from the Wasabi web console.

  1. On QTS, open HBS 3.
    The HBS 3 application opens.
  2. Go to Storage Spaces and then click Create.
  3. Locate and select Wasabi from the list.
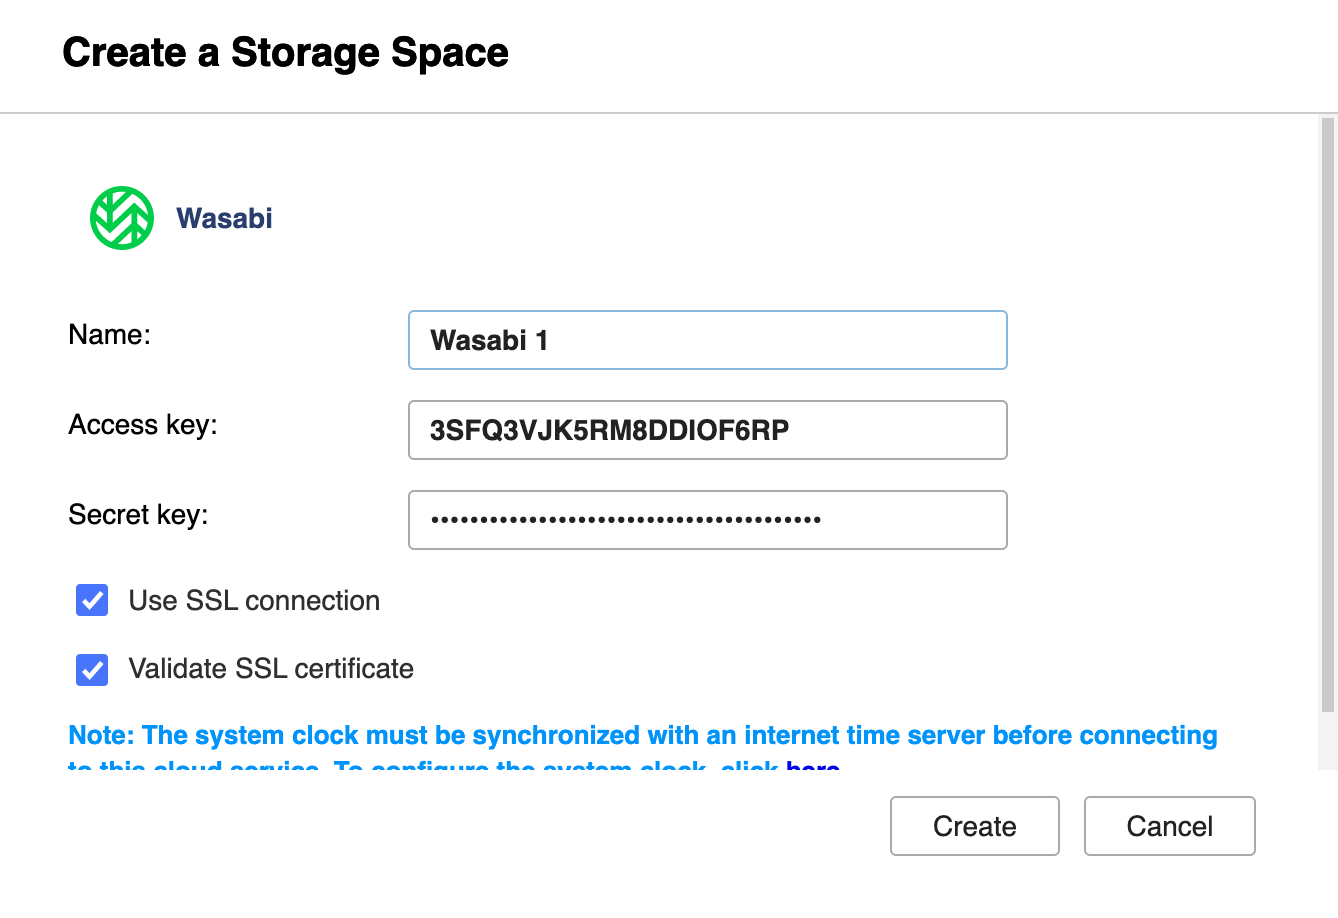
    The Create a Storage Space window opens.
  4. Complete the following information.
    Field Action
    Name Specify a name for the storage space.
    Access key Enter your Wasabi Cloud access key.
    Secret key Enter your Wasabi Cloud secret key.
  5. Optional: Enable the following settings for a secure connection.
    • Use SSL connection
    • Validate SSL certificate
  6. Click Create.
    HBS 3 creates a new Wasabi Cloud storage space. For more details on creating a backup or restoring files, see https://www.qnap.com/go/how-to/tutorial/con_show.php?cid=200.

Connecting to Wasabi Cloud with HybridMount

You will need your Wasabi Cloud access key and secret key from the Wasabi web console.

  1. On QTS, open HybridMount.
    The HybridMount application opens.
  2. Click Create Remote Mount.
  3. Click Create File Cloud Gateway.
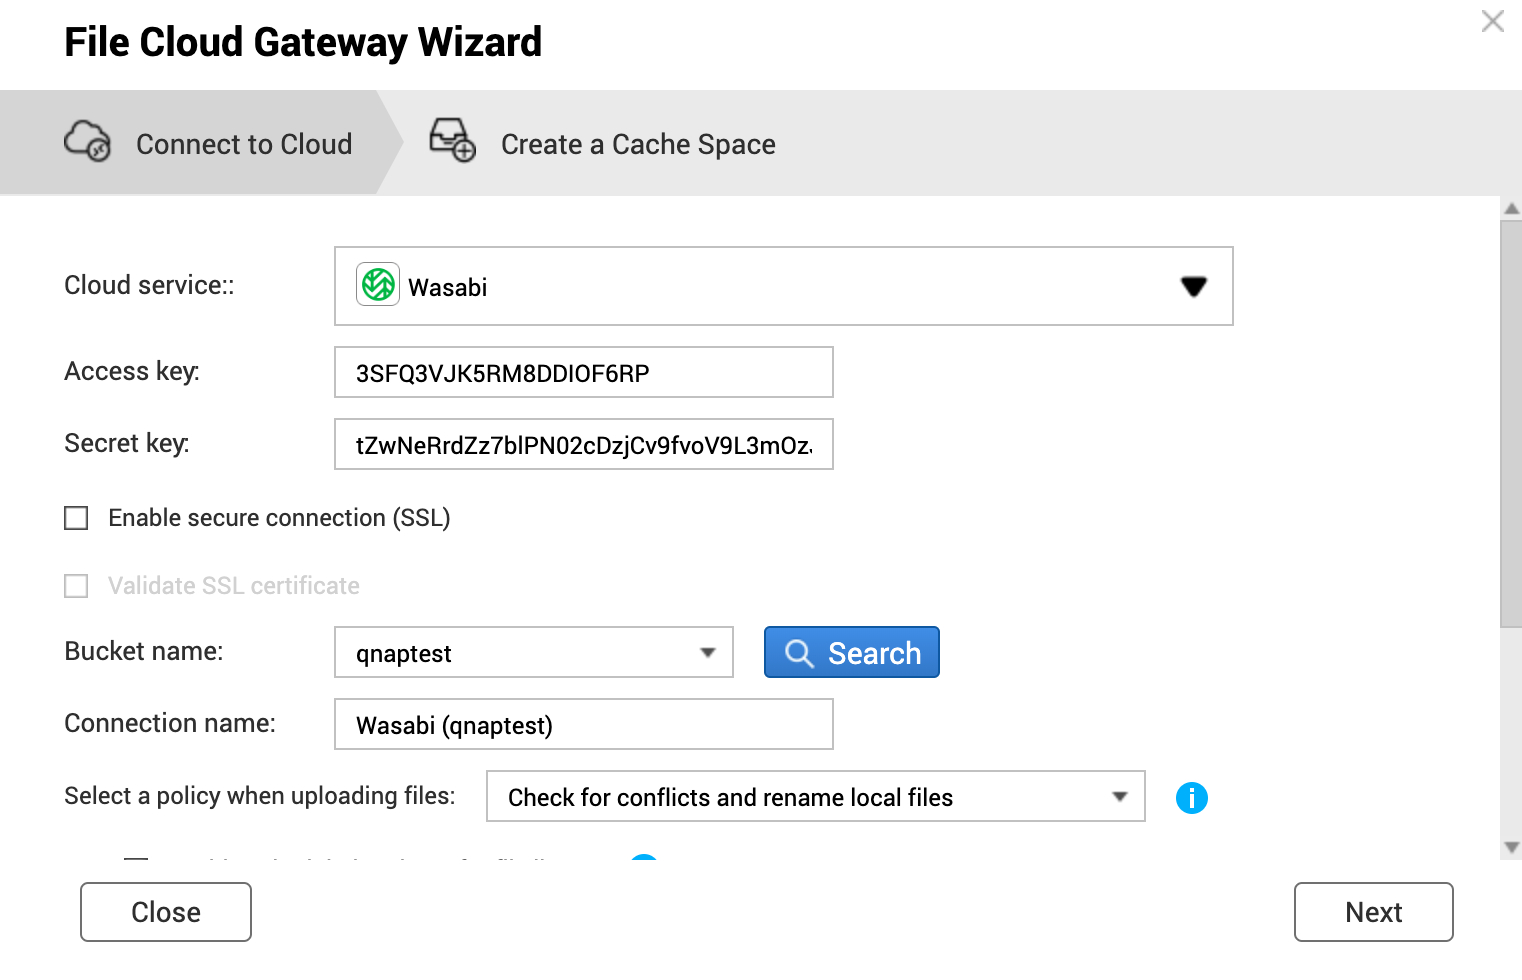
  4. Type "Wasabi" to search or click the Cloud service drop-down list and then select Wasabi.
  5. Complete the following information.
    Field Action
    Access key Enter your Wasabi Cloud access key.
    Secret key Enter your Wasabi Cloud secret key.
    Enable secure connection (SSL) Optional: Enable the setting for a secure connection.
    Note: You can select Validate SSL certificate after enabling this setting.
    Bucket name Click Search and then select the bucket that you want to use.
    Connection name Specify a connection name or keep the default value.
    Select a policy when uploading files Select one of the following upload policies.
    • Check for conflicts and rename local files: Before uploading files, HybridMount checks if any of the files on the cloud were modified by other users. This prevents HybridMount from overwriting important modifications. This may affect update speed.
    • Update files without checking: Checking for file conflicts may not be necessary if no other user accesses this cloud storage. Selecting this option maximizes update efficiency.
    Enable scheduled updates for file lists Optional: Enable this setting to specify the update schedule. If scheduled updates are disabled when the file list is created, HybridMount will only update the list once. You will need to manually update the list from the Mount Management screen.
  6. Click Next.
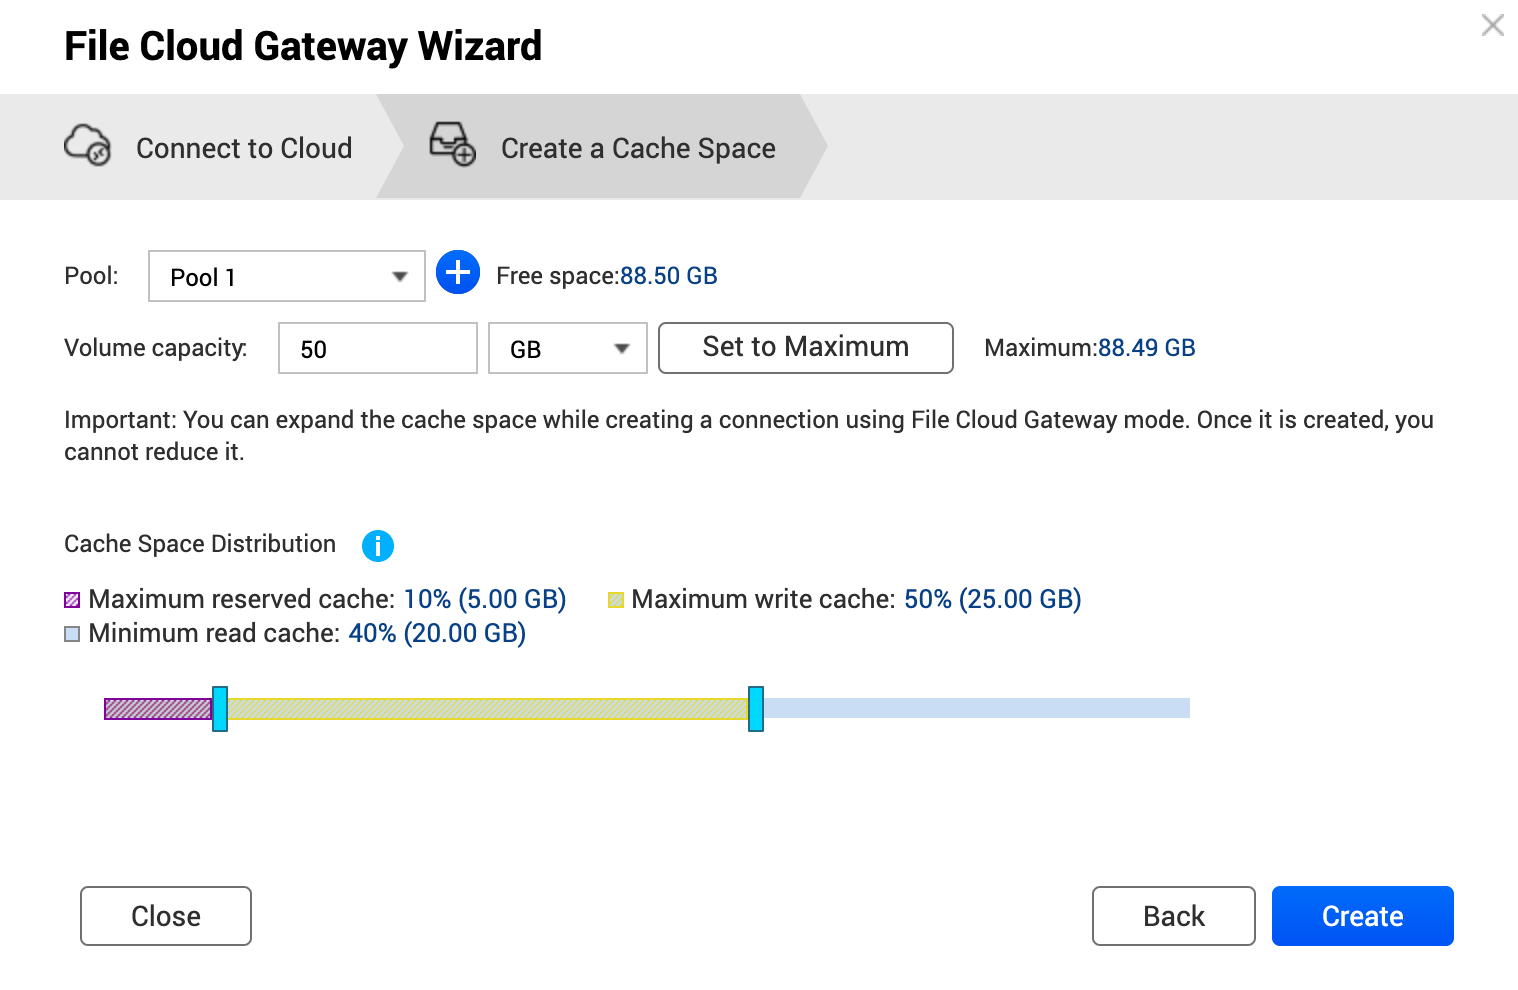
  7. Create a cache space.
    1. Select the pool.
    2. Specify the volume capacity.
    3. Click Create.
    Tip: You can create a volume in any storage pool and distribute the cache space to reserved cache, write cache, and read cache.

HybridMount creates the file cloud gateway. You can then manage your data on Wasabi Cloud from QTS File Station or using your computer after mounting the NAS as a network drive.

Connecting to Wasabi Cloud with VJBOD Cloud

You will need your Wasabi Cloud access key and secret key from the Wasabi web console.

  1. On QTS, open VJBOD Cloud.
    The VJBOD Cloud application opens.
  2. Click Create VJBOD Cloud Volume/LUN.
  3. Click one of the following.
    • Cloud Volume: Cloud volumes can be accessed using file transfer protocols such as NFS, SMB, AFP, FTP, and WebDAV.
    • Cloud LUN: Cloud LUNs can be accessed using the block-based data transfer protocols iSCSI.
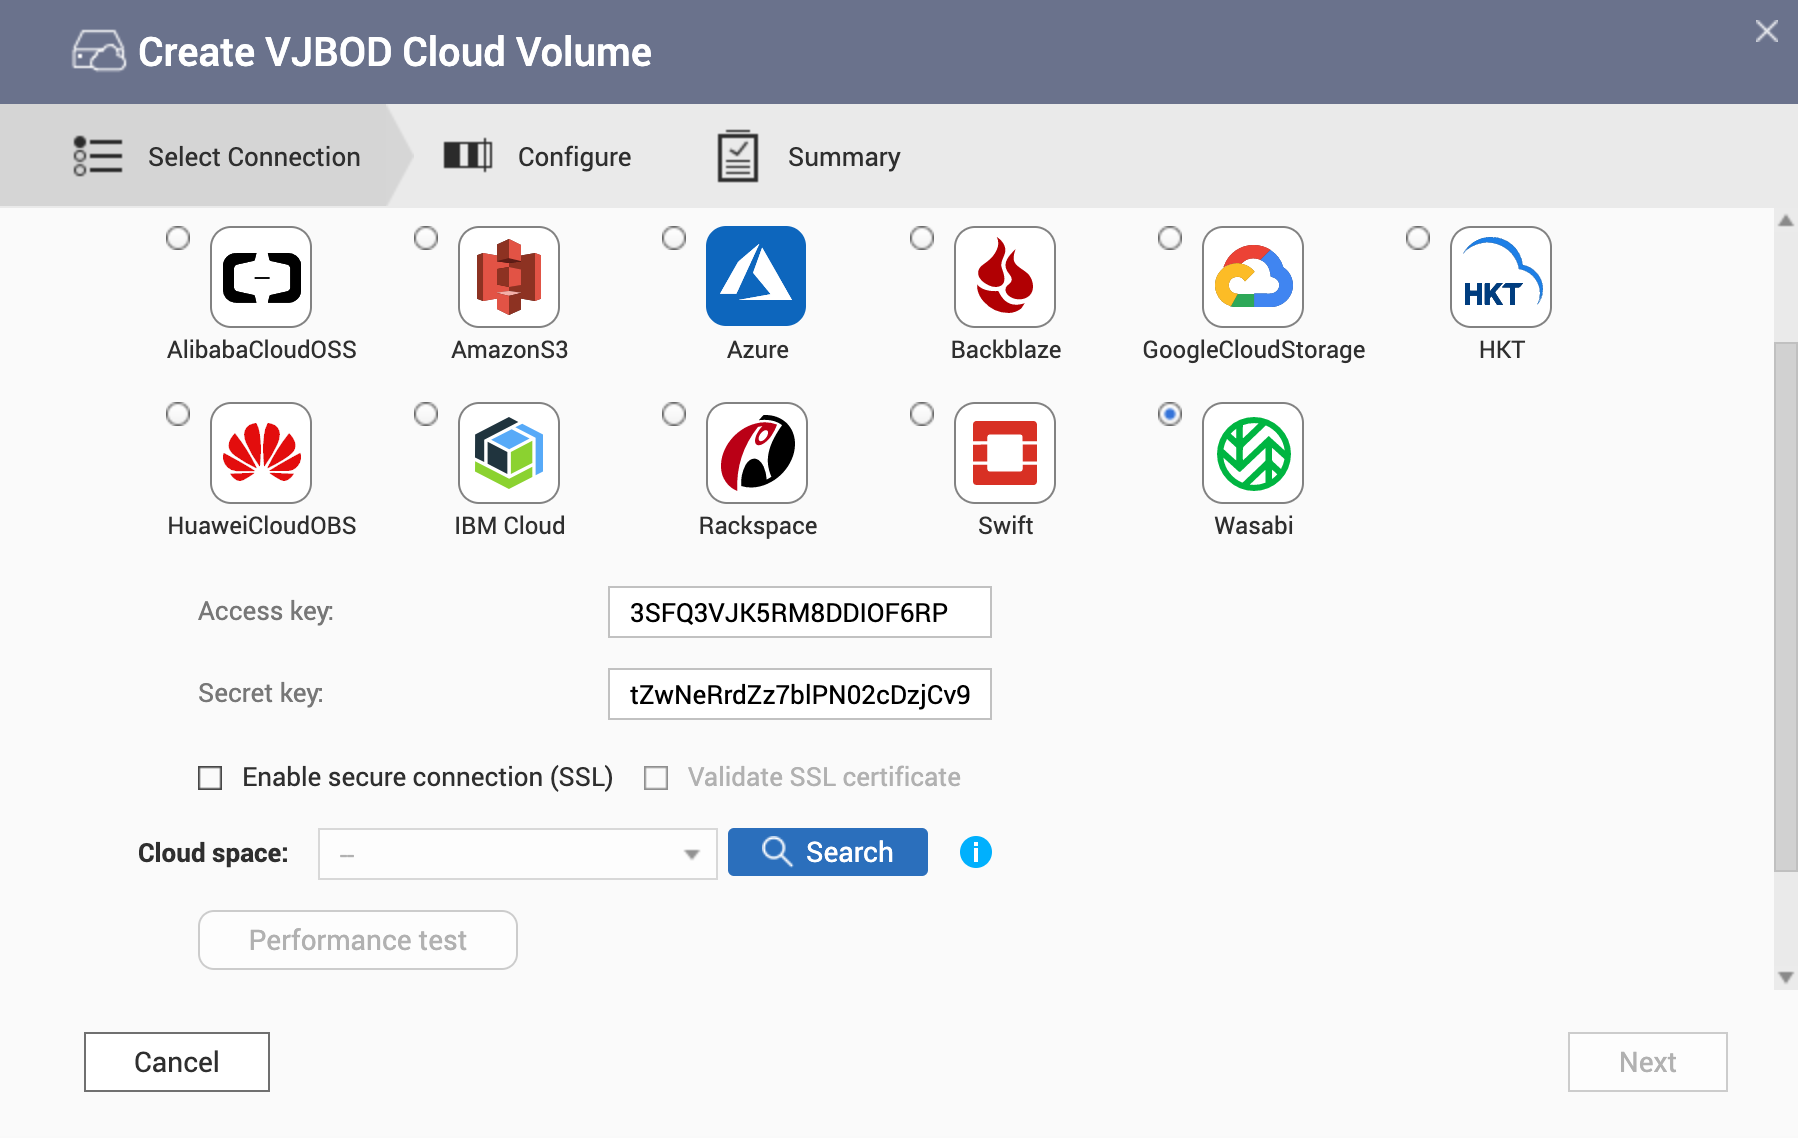
    The Create VJBOD Cloud Volume or Create VJBOD Cloud LUN window opens.
  4. Select Wasabi and then complete the following information.
    Field Action
    Access key Enter your Wasabi Cloud access key.
    Secret key Enter your Wasabi Cloud secret key.
    Cloud space Select the space from the list or click Search.
  5. Optional: Click Performance test.
  6. Click Next.
  7. Configure the following settings and then click Next.
    Field Action
    Select source Choose to either create a new volume or attach an existing cloud volume.
    Note: Only stored mode volumes are supported. You can have a maximum number of 16 VJBOD Cloud volumes and LUNs on the NAS.
    Volume alias Specify a name for the volume.
    Volume capacity Specify the storage size that will be used for the cloud volume or LUN.
    Alert threshold Optional: Select and then specify the percentage. VJBOD will display notifications when the space consumption reaches the specified value.
    Encryption Select to encrypt the volume using a key.
    Create a shared folder on the volume Select to create a shared folder.
    Note: Only users with administrator access will be able to read/write on the shared folder.
    Location Select the storage location.
    Stored space capacity Specify the size of the NAS storage space that will be used to store the VJBOD Cloud volume or LUN locally.
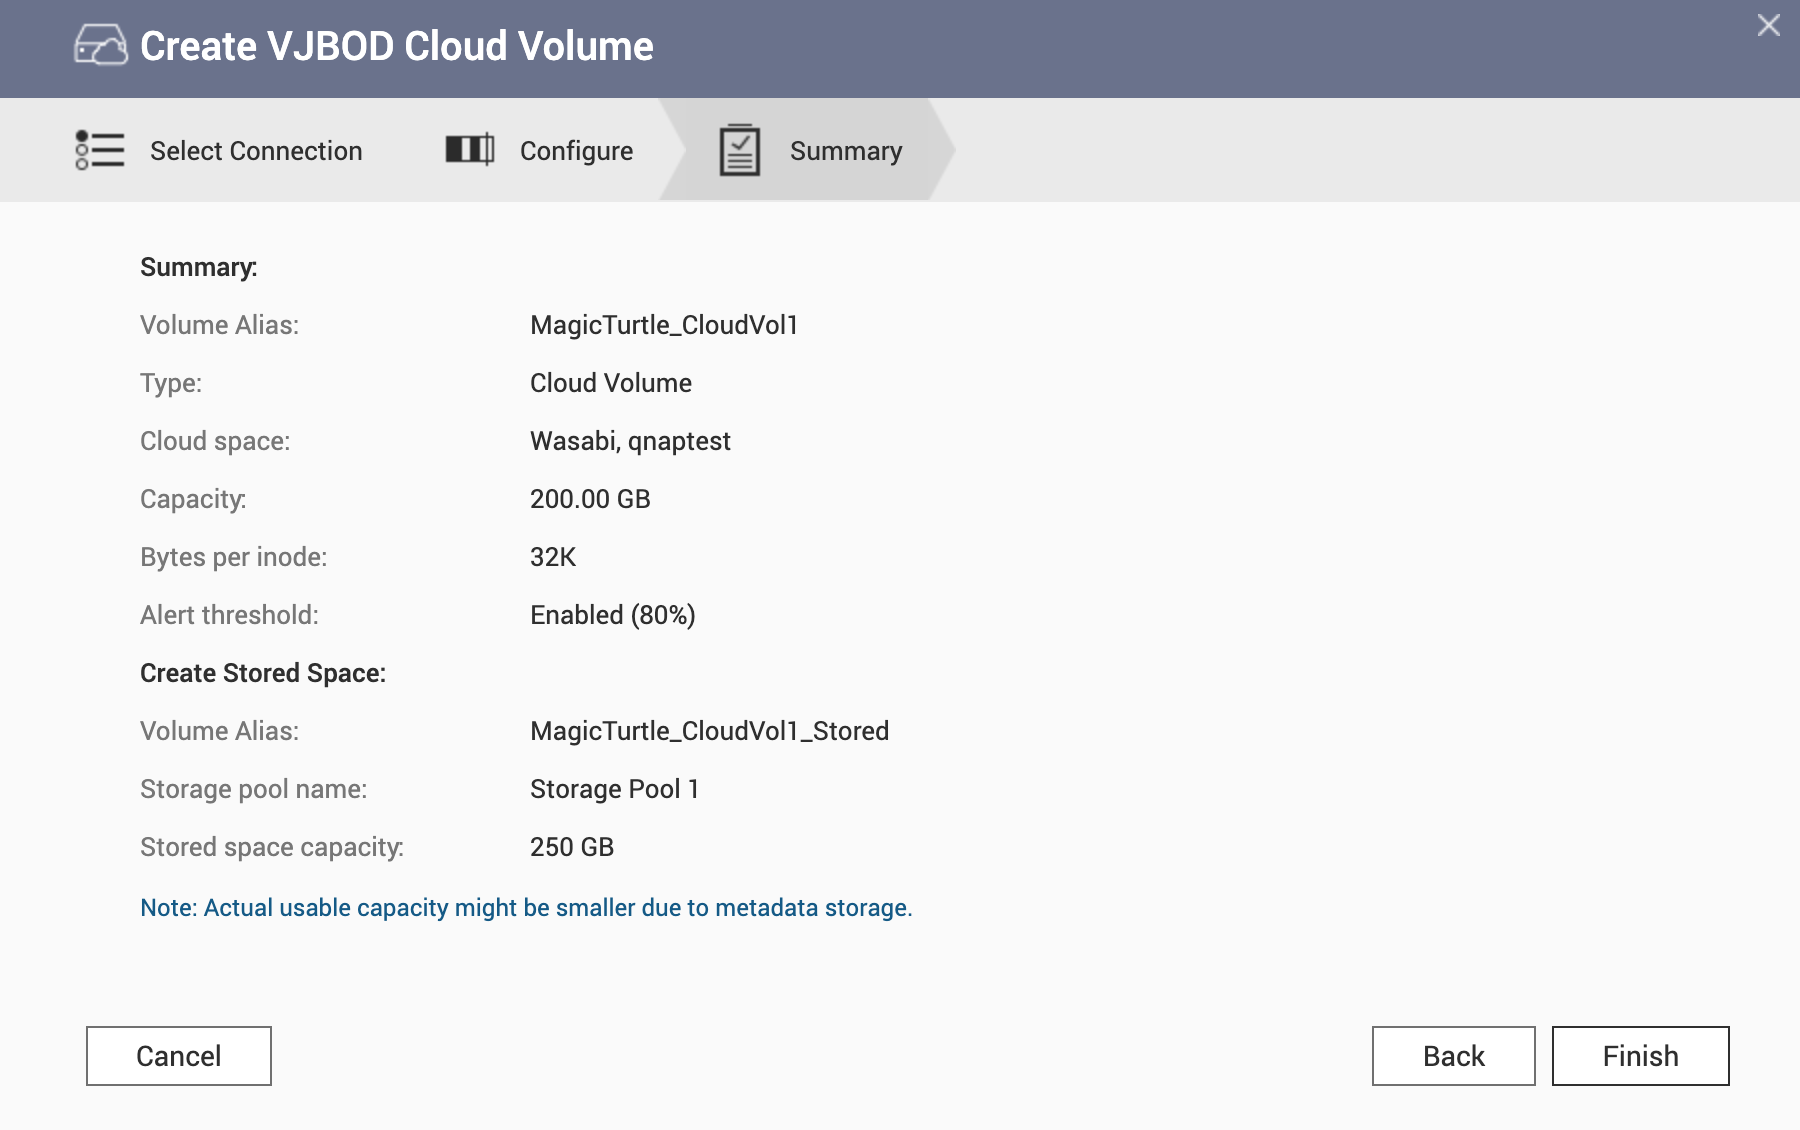
  8. Review the configuration summary and then click Finish.
    VJBOD creates the cloud volume or LUN. You can then access your data on Wasabi Cloud as you would on a local volume.
    Note: For details on mapping the ISCSI target after creating the cloud LUN, see https://www.qnap.com/go/how-to/tutorial/con_show.php?cid=29.

Was this article helpful?

61% of people think it helps.
Thank you for your feedback.

Please tell us how this article can be improved:

If you want to provide additional feedback, please include it below.

Choose specification

      Show more Less

      Choose Your Country or Region

      open menu
      back to top