After restoring or cloning an application consistent snapshot, why does my disk appear offline or as read-only?
The following guide is only required when an iSCSI LUN volume restored from a snapshot with VSS Hardware Provider (Application Consistent) enabled in QNAP Snapshot Agent appears offline or is read-only. The volume appears offline or is read-only because the Microsoft VSS engine has set the following attributes to your restored or cloned volume:
- Read only
- Hidden
- No default drive assigned
- Shadow Copy enabled
This situation only occurs under certain circumstances, and is defined by the Microsoft VSS engine. This is not a bug and is consistent with its intended behavior. Regular snapshots can be reverted without the following procedure. Application Consistent snapshots (VSS Hardware Provider enabled) can be reverted with QNAP Snapshot Agent on the original sever without using this procedure. Refer to https://msdn.microsoft.com/en-us/library/windows/desktop/aa384623(v=vs.85).aspx for more detail.
Restoring Volume Attributes
When using another server after restoring or cloning a snapshot, use the following steps to set the disks and volumes online and assign a drive letter to the volume.
Launch Disk Management to check for offline disks.

If there are disks that appear offline, follow the steps below:
- Run command prompt as administrator.
- Launch DISKPART by typing “diskpart” in Command Prompt.
- List the disks on your system by typing “list disk” in DISKPART.
|
Microsoft DiskPart version 6.3.9600 Copyright (C) 1999-2013 Microsoft Corporation. DISKPART> list disk
DISKPART> |
- Select the offline disk by typing “select disk #” in DISKPART . (# represents the offline disk number. Use “select disk 1” in our example)
- Bring the disk online by typing “online disk” in DISKPART.
|
DISKPART> select disk 1 |
- List the volumes on the disk by typing “list volume” in DISKPART.
|
DISKPART> list volume
DISKPART> |
- Select the hidden volume by typing “select volume #” in DISKPART. (# represents the hidden volume number. Use “select volume 3” in our example)
| DISKPART> select volume 3 Volume 3 is the selected volume. |
- Display the volume’s attributes by typing “detail volume” in DISKPART to confirm the following steps applies.
Step Result: The volume’s “Read-only”, “Hidden”, “No Default Drive Letter”, and “Shadow Copy” attributes are set to “Yes”.
| DISKPART> DISKPART> detail volume
Read-only : Yes Volume Capacity : 776 GB DISKPART> |
- Change the volume’s attributes by:
- Type “att vol clear shadowcopy” in DISKPART.
- Type “att vol clear nodefaultdriveletter” in DISKPART.
- Type “att vol clear hidden” in DISKPART.
- Type “att vol clear readonly” in DISKPART.
|
DISKPART> att vol clear shadowcopy Volume attributes cleared successfully. DISKPART> att vol clear nodefaultdriveletter Volume attributes cleared successfully. DISKPART> DISKPART> att vol clear hidden Volume attributes cleared successfully. DISKPART> att vol clear readonly Volume attributes cleared successfully. |
- Confirm the volume’s attributes have been updated by typing “detail volume” in DISKPART.
Step Result: Step Result: The volume’s “Read-only”, “Hidden”, “No Default Drive Letter”, and “Shadow Copy” attributes are set to “No”.
|
DISKPART> detail volume
Read-only : No Volume Capacity : 99 GB |
- Repeat step 7 to 10 if there are other hidden volumes.
- Repeat steps 3 to 11 if there are other offline disks.
- Assign drive letters to the volumes that were previously hidden.
- Launch Disk Management with administrator privileges.
- Right click on the volume.
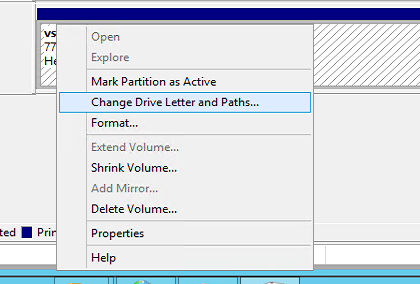
- Select “Change Drive Letter and Paths”.
- Follow the wizard to assign a letter to the volume.

- Repeat step 13 for all volumes that were hidden.
References
The Shadow Copy Creation Process
https://msdn.microsoft.com/en-us/library/windows/desktop/aa384623(v=vs.85).aspx
DiskPart Command-Line Options
https://technet.microsoft.com/en-us/library/cc766465(v=ws.10).aspx
QNAP Snapshot Agent Application Notes
https://www.qnap.com/en/tutorial/con_show.php?op=showone&cid=185


