How to obtain authentication for adding a new Microsoft 365 Domain in Boxafe_v1.4
Generating Application (Client) ID, Directory (Tenant) ID and Client secret for adding a new Microsoft 365 domain to Boaxafe
Step 1. Log into the Azure admin portal (https://portal.azure.com) using Global admin credentials for your Microsoft 365 domain.

Figure 1. Microsoft Sign In page
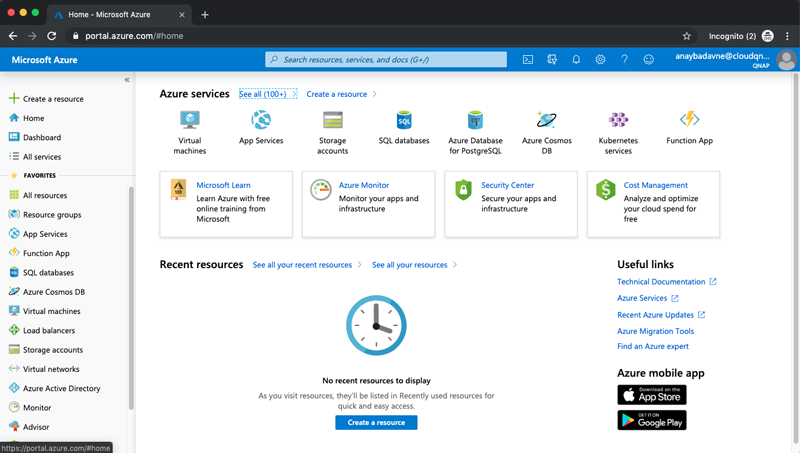
After logging in, you will be redirected to the Azure portal homepage:

Figure 2. Azure portal homepage
Step 2: On the side panel menu, click on Azure Active Directory.

Figure 3. Azure portal homepage side panel
Note that the user role should be “global administrator.”
Step 3: Click on App registrations

Figure 4. Azure Active Directory homepage
Step 4: On the App registration page, click on [+New Registration].

Figure 5. App registrations page
Step 5: On the register an application page, enter a display name for the new application, select a supported account type (Single tenant is selected by default), and click on “Register.”

Figure 6. Registering a new application
Step 6: Once you click register, the Application (client) ID and Directory (tenant) ID will appear on the Overview page of your registered application as shown in figure 7 below:

Figure 7. Registered application Overview page
Copy and save both the Application (client) ID and Directory (tenant) ID, as they would be required when adding a domain to Boxafe.
Step 7: To obtain a secret key, Select “Certificates & secrets” from the side panel menu of your newly created application as shown in figure 8 below:

Figure 8. Select “Certificates & secrets” from side panel menu
Step 8: On the Certificates & secrets page, click on “+New client secret” button:

Figure 9. Certificates & secrets page for registered application
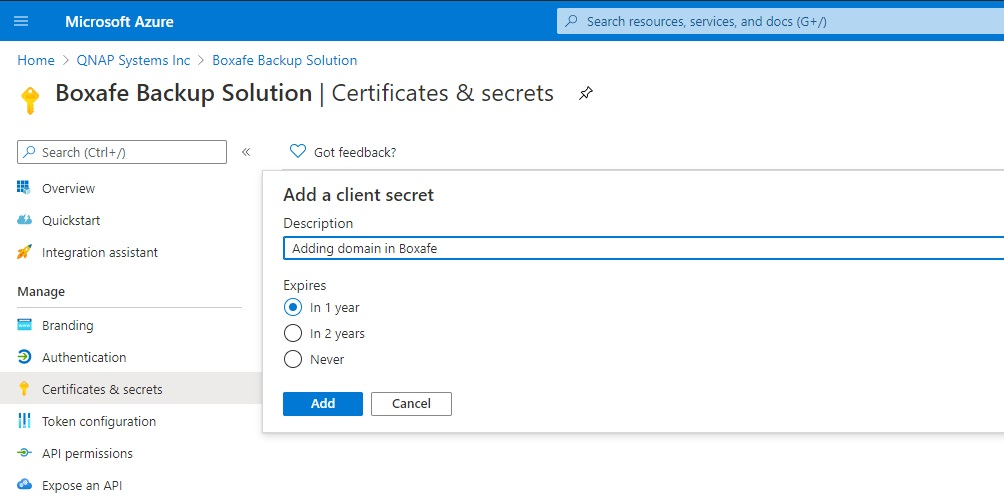
Step 9: On the new client secret page, write an optional description and select the expiration period from the given options, then click the “Add” button.

Figure 10. Add New client secret
Step 10: After you click the “Add” button, a new client secret will be generated.

Figure 11. Newly generated client secret
- Copy and save the client secret that appears on the screen. This secret would be required when adding a domain to Boxafe.
- Important: Copy this secret immediately after it appears as it would be hidden forever after some time.
- If you already registered an app, go to the app registration overview page and click on the registered app. Then follow from Step 5.
For more information, see: https://docs.microsoft.com/en-us/graph/auth-v2-service
Adding API permissions for adding a new Microsoft 365 domain to Boaxafe
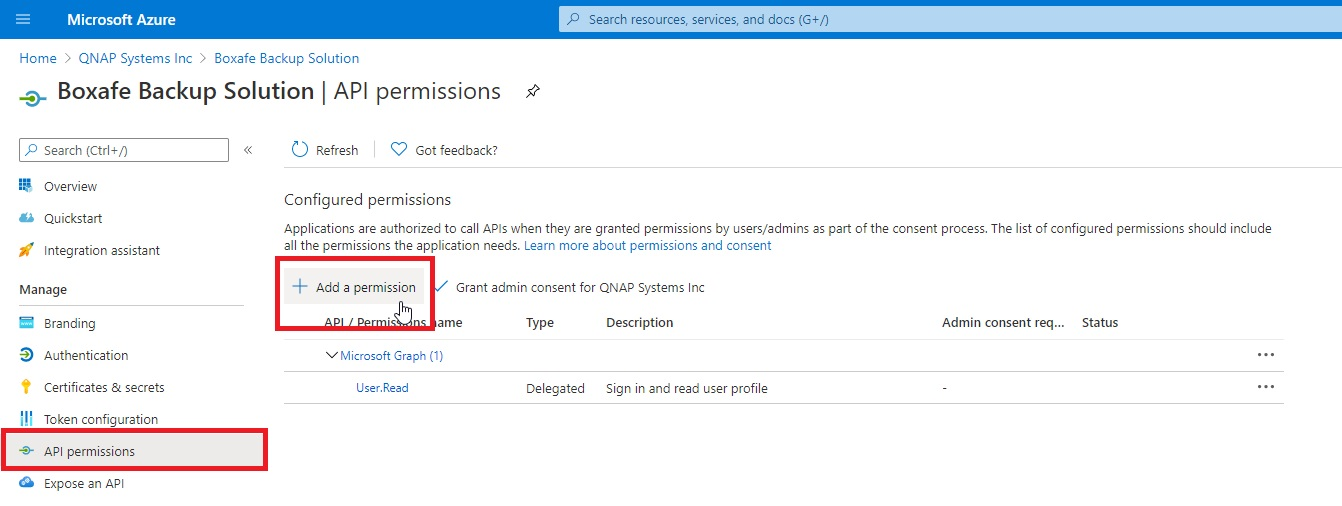
Step 11: Go to Azure Active Directory → App Registration → “Registered application page”, and select API permissions from the side panel as shown in figure 10.
Step 12: Click on [+Add a permission] button

Figure 12. API permissions page & Add a permission button
Step 13: After clicking on [+Add a permission] button, a panel on the right side will appear

Figure 13: Request API permissions panel
Step 14: To enable API permissions, follow the following steps:
Step 14.1 On the Request API permissions panel as shown in figure 13, “Microsoft Graph,” “OneNote,” and “SharePoint” APIs are listed under the section Commonly used Microsoft APIs.

Figure 14. Commonly used Microsoft APIs.
Scroll down to select “Azure Active Directory Graph” from the supported legacy APIs section.

Figure 15. Supported legacy APIs.
Step 14.2 Go to “APIs my organization users” and search for "Office 365 Exchange Online"

Figure 16. Office 365 Exchange Online API
Step 14.3 For each selected API, select the type of permissions (refer to “TYPE” column in Table 1 below)

Figure 17. Selecting a permission type.
Step 14.4 After selecting a permissions type, the list of available APIs will appear. Select the checkbox of the required APIs (refer to the “API / PERMISSIONS NAME” column in Table 1 below) and click the “Add permissions” button as shown in Figure 18 below.

Figure 18: Select APIs and Add permissions
Select and add the following permissions to a Boxafe domain to perform backup and restore tasks.
| API / PERMISSIONS NAME | TYPE | DESCRIPTION | ADMIN CONSENT REQUIRED |
|---|---|---|---|
| Azure Active Directory Graph (1) | |||
| User.Read | Delegated | Sign in and read user profile | - |
| Office 365 Exchange Online (7) | |||
| EWS.AccessAsUser.All | Delegated | Access mailboxes as the signed-in user via Exchange Web Services | - |
| full_access_as_app | Application | Use Exchange Web Services with full access to all mailboxes | Yes |
| Calendars.ReadWrite.All | Application | Read and write calendars in all mailboxes | Yes |
| Contacts.ReadWrite | Application | Read and write contacts in all mailboxes | Yes |
| MailboxSettings.ReadWrite | Application | Read and write all user mailbox settings | Yes |
| Mail.ReadWrite | Application | Read and write mail in all mailboxes | Yes |
| Tasks.ReadWrite | Application | Read and write tasks in all mailboxes | Yes |
| Microsoft Graph (14) | |||
| openid | Delegated | Sign users in | - |
| Group.ReadWrite.All | Delegated | Read and write all groups | Yes |
| User.Read | Delegated | Sign in and read user profile | - |
| User.ReadWrite.All | Delegated | Read and write all users' full profiles | Yes |
| Calendars.ReadWrite | Application | Read and write calendars in all mailboxes | Yes |
| Contacts.ReadWrite | Application | Read and write contacts in all mailboxes | Yes |
| Directory.ReadWrite.All | Application | Read and write directory data | Yes |
| Files.ReadWrite.All | Application | Read and write files in all site collections | Yes |
| Group.ReadWrite.All | Application | Read and write all groups | Yes |
| MailboxSettings.ReadWrite | Application | Read and write all user mailbox settings | Yes |
| Mail.ReadWrite | Application | Read and write mail in all mailboxes | Yes |
| Notes.ReadWrite.All | Application | Read and write all OneNote notebooks | Yes |
| Sites.FullControl.All | Application | Have full control of all site collections | Yes |
| User.ReadWrite.All | Application | Read and write all users' full profiles | Yes |
| OneNote (1) | |||
| Notes.ReadWrite.All | Application | View and modify notes for all users | Yes |
| SharePoint (3) | |||
| Sites.FullControl.All | Application | Have full control of all site collections | Yes |
| TermStore.ReadWrite.All | Application | Read and write managed metadata | Yes |
| User.ReadWrite.All | Application | Read and write user profiles | Yes |
Table 1. List of required API permission
Step 14.5. Repeat Step 14.1, Step 14.2 and Step 14.3 for each API or permission names listed in Table 1. After adding all the permissions, the API permissions page will appear similar to the figure below:

Figure 19: Added API permissions
Step 15: Once all the permissions are added, click the “Grant admin consent for …” button and the status column for each added permission will be updated with a green checkmark.
Repeat Step 15 when a permission is added or after all permissions are added.
Step 16: Once the permissions are added, enter the saved values of Application (client) ID, Directory (tenant) ID, and Client Secret from Step 6 and Step 10 into Boxafe’s “Add new Domain” pop up window to perform further backup and restore actions.
Congratulations! You have successfully added an Microsoft 365 domain to Boxafe. If you face any problems or issues, contact the QNAP Helpdesk.
Granting Microsoft 365 Tenant Administrative Permissions for SharePoint Sites
*This step is not certainly necessary for adding Microsoft 365 domain in Boxafe, Only the case that if you want to enable backup SharePoint Sites data to Boxafe then you need to complete the following steps.
Step1: Add the tenant name in the following link and open in the browser “https://[tenant]-admin.sharepoint.com/_layouts/15/appinv.aspx”
Note: The [tenant] name is the subdomain of your SharePoint Site. (e.g, cloudqnap.sharepoint.com is the URL of your SharePoint and the cloudqnap is the tenant name. Once you copy the tenant name and attach to URL then it will be shown as below (Figure 1):

Figure 1. Copy Application ID
Step2: Log into the Azure admin portal.
Step3: Go to Overview.
Step4: Copy the Client (Application) ID (Figure 2) and paste it in "App Id". Click Lookup then it will populate your app title (Figure 3).

Figure 2. Copy Client (Application) ID.

Figure 3. Generate Title
Step3: Enter the following information in the related fields:
| App Domain: | localhost |
|---|---|
| Redirect URL: | https://localhost |
| Permission Request XML: | <AppPermissionRequests AllowAppOnlyPolicy="true"> |

Figure 4. Fill up the information
Step4: Click the "Trust It" button.

Once completed the above steps then you can go to Boxafe start to add your SharePoint Site and continue to backup the SharePoint site data.


